Theory and practice of standardization of Docker services
Information on the topic of microservice application architecture, which has already managed to fill its edge, is quite enough today to decide whether it suits your product or not. And it is not a secret at all that companies that have decided to choose this path have to face many engineering and cultural challenges. One of the sources of problems is the overhead that is multiplying everywhere, and this equally applies to the routine associated with production processes.

As you might guess, Anti-plagiarism is just such a company, where the understanding gradually came that we were on the way with microservices. But before we start eating a cactus, we decided to clean and cook it. And since all the only true and correct solutions for each are unique, instead of universal DevOps slides with beautiful arrows, we decided to just share our own experience and tell how we have already covered a considerable part of our special path to, I hope, success.
If you are making a truly unique product, far and wide consisting of know-how, there is almost no chance of dodging this particular path, because it is formed of many private ones: starting from the culture and historical data that has developed in the company, ending with its own specificity and the technological stack used .
One of the tasks for any company and team is to find the optimal balance between freedoms and rules, and microservices take this problem to a new level. This may seem to contradict the very idea of microservices, which implies wide freedom in the choice of technologies, but if you do not focus directly on architectural and technological issues, but look at the problems of production as a whole, then the risk of being somewhere in the plot of “Garden of Earthly Delights” is quite palpable .
However, in the book "Creating Microservices" Sam Newman offers a solution to this problem, where literally from the first pages he speaks of the need to limit the creativity of teams within the framework of technical agreements. So one of the keys to success, especially in the context of a limited free-hand resource, is the standardization of everything that can only be negotiated and that no one really would like to do all the time. By working out agreements, we create clear rules of the game for all participants in the production and operation of system components. And knowing the rules of the game, you must agree that playing it should be easier and more enjoyable. However, following these rules themselves can become a routine and cause discomfort to the participants, which directly leads to all kinds of deviations from them and, as a consequence, the failure of the whole idea. And the most obvious way out is to put all the agreements in the code, because not a single regulation can do what automation and convenient tools can use, the use of which is intuitive and natural.
Moving in this direction, we were able to automate more and more, and the stronger our process became like an end-to-end conveyor for the production of libraries and micro (or not so) services.
- Development in the company in 90% of cases is done in C #;
- There was no need to start from scratch, part of the accepted standards, approaches and technologies - this is the result of accumulated experience or simply a historical legacy;
- Repositories with .NET projects, unlike teams, dozens (and there will be more);
- We like to use a very simple CI pipeline, avoiding vendor lock-in as much as possible;
- For an ordinary .NET developer, the words “container”, “docker” and “Linux” can still cause bouts of slight existential horror, but I don’t want to break anyone through the knee.
A bit of background
In the spring of 2017, Microsoft introduced the world with .NET Core 2.0 previews, and this year C # astrologers were quick to declare Linux Year, so ...

For a while we, not trusting magic, collected and tested everything on both Windows and Linux, published artifacts with some SSH scripts, tried to configure old CI / CD pipelines in the Swiss knife mode. But after some time they realized that we were doing something wrong. In addition, references to microservices and containers sounded more and more often around. So we also decided to ride the hype wave and explore these directions.
Already at the stage of reflection on our possible microservice future, a number of questions arose, ignoring which, we risked in this very future new problems that we ourselves would have created in return for resolving them.
First, when looking at the operation side of a theoretical microservice world without rules, we were scared by the prospect of chaos with all the ensuing consequences, including not only the unpredictable quality of the result, but also conflicts between teams or developers and engineers. And trying to give some recommendations, not being able to ensure compliance with them, immediately looked like an empty undertaking.
Secondly, no one really knew how to make containers and write dockerfiles correctly, which, nevertheless, have already begun to lively in our repositories. In addition, many “read somewhere” that everything is not so simple there. So, someone had to dive deeper and figure it out, then returning with the best container assembly practices. But the prospect of taking on the role of a full-time docker packer, left alone with stacks of docker files, for some reason did not inspire anyone in the company. In addition, as it turned out, diving once is clearly not enough, and even looking good and right at first glance, it may turn out to be wrong or just not very good.
And thirdly, I wanted to be sure that the resulting images with services would not only be correct from the point of view of container practices, but would also be predictable in their behavior and would have all the necessary properties and attributes to simplify the control of launched containers. In other words, I wanted to get images with applications that are equally configured and write logs, provide a single interface for obtaining metrics, have one consistent set of labels, and the like. It was also important that the assembly on the developer's computer yields the same result as the assembly in any CI system, including passing tests and generating artifacts.
Thus, an understanding was born that some process would be required to manage and centralize new knowledge, practices and standards, and the path from the first commit to a docker image completely ready for the product infrastructure should be unified and as automated as possible, not going beyond the terms beginning with the word continuous.
CLI vs. GUI
The starting point for a new component, be it a service or a library, is to create a repository. This stage can be divided into two parts: creating and configuring the repository on the hosting of the version control system (we have Bitbucket) and initializing it with creating the file structure. Fortunately, a number of requirements already existed for both. Therefore, formalizing them in code was a logical task.
So, what should be our repository:
- Located in one of the projects, on which the name, access rights, policies for accepting pull requests, etc .;
- Contain required files and directories, such as:
- a file with the configuration and information about the
SolutionInfo.props
repository (more on that below); - project source codes in the
src
directory; -
.gitignore
,README.md
, etc .;
- a file with the configuration and information about the
- Contain the necessary Git submodules;
- The project must be derived from one of the templates.
Since the Bitbucket REST API gives full control over the configuration of repositories, a special utility was created for interacting with it - the repository generator. In the “question-answer” mode, she receives from the user all the necessary data and creates a repository that fully meets all our requirements, namely:
- Defines a project in Bitbucket to choose;
- Validates the name in accordance with our agreement;
- Makes all the necessary settings that cannot be inherited from the project;
- Updates the list of custom templates (we use dotnet templating ) for the project and suggests choosing from it;
- Fills the minimum necessary information about the repository in the configuration file and in
*.md
documents; - It connects submodules with CI / CD configuration of the pipeline (in our case, Bamboo Specs ) and assembly scripts.
In other words, the developer, starting a new project, launches the utility, fills in several fields, selects the type of project and receives, for example, a completely ready “Hello world!” Service that is already connected to the CI system, from where the service can even be published, if done a commit that changes the version to nonzero.
The first step has been taken. No manual labor and errors, searching for documentation, registrations and SMS. Now let's move on to what was generated there.
Structure
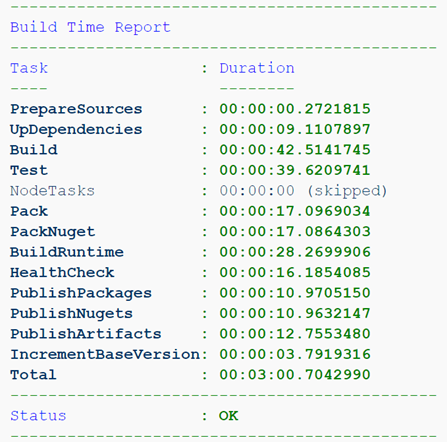
Standardization of the repository structure has taken root with us for a long time and was needed to simplify the assembly, integration with the CI system and the development environment. Initially, we started from the idea that the pipeline in CI should be as simple and, as you might guess, standard, which would ensure portability and reproducibility of the assembly. That is, the same result could be easily obtained both in any CI system and at the developer's workplace. Therefore, everything that does not apply to the features of a specific continuous integration environment is submitted to a special Git submodule and is a self-sufficient build system. More precisely, the assembly standardization system. The pipeline itself, to a minimum approximation, should only run the build.sh
script, pick up a report on the tests and initiate a deployment, if necessary. For clarity, let's see what happens if you generate the SampleService repository in a project with the speaking name Sandbox .
. ├── [bamboo-specs] ├── [devops.build] │ ├── build.sh │ └── ... ├── [docs] ├── [.scripts] ├── [src] │ ├── [CodeAnalysis] │ ├── [Sandbox.SampleService] │ ├── [Sandbox.SampleService.Bootstrap] │ ├── [Sandbox.SampleService.Client] │ ├── [Sandbox.SampleService.Tests] │ ├── Directory.Build.props │ ├── NLog.config │ ├── NuGet.Config │ └── Sandbox.SampleService.sln ├── .gitattributes ├── .gitignore ├── .gitmodules ├── CHANGELOG.md ├── README.md └── SolutionInfo.props
The first two directories are Git submodules. bamboo-specs
is “Pipeline as Code” for the Atlassian Bamboo CI system (there could have been some Jenkinsfile in its place), devops.build
is our build system, which I will discuss in more detail below. The .scripts
directory also .scripts
. The .NET project itself is located in src
: NuGet.Config
contains the configuration of the private NuGet repository, NLog.config
dev-time configuration of NLog . As you might guess, using NLog in a company is also one of the standards. Of the interesting stuff here is the almost magic Directory.Build.props
file. For some reason, few people know about such a possibility in .NET projects, such as customization of the assembly . In short, files with the names Directory.Build.props
and Directory.Build.targets
automatically imported into your projects and allow you to configure common properties for all projects in one place. For example, this is how we connect the StyleCop.Analyzers analyzer and its configuration from the CodeAnalysis
directory to all code-style projects, set versioning rules and some common attributes for libraries and packages ( Company , Copyright , etc.), and also connect via the <Import>
file SolutionInfo.props
, which is exactly the same repository configuration file, which was discussed above. It already contains the current version, information about the authors, the URL of the repository and its description, as well as several properties that affect the behavior of the assembly system and the resulting artifacts.
<?xml version="1.0"?> <Project xmlns:xsi="http://www.w3.org/2001/XMLSchema-instance" xsi:noNamespaceSchemaLocation="devops.build/SolutionInfo.xsd"> <PropertyGroup> <!-- Product name --> <Product>Sandbox.SampleService</Product> <!-- Product version. Version 0.0.0 wouldn't be published! --> <BaseVersion>0.0.0</BaseVersion> <!-- Project name which contains Main() --> <EntryProject>Sandbox.SampleService.Bootstrap</EntryProject> <!-- Exposed port --> <ExposedPort>4000/tcp</ExposedPort> <!-- DOTNET_SYSTEM_GLOBALIZATION_INVARIANT value. See https://github.com/dotnet/corefx/blob/master/Documentation/architecture/globalization-invariant-mode.md --> <GlobalizationInvariant>false</GlobalizationInvariant> <!-- Project URL --> <RepositoryUrl>https://bitbucket.contoso.com/projects/SND/repos/sandbox.sampleservice/</RepositoryUrl> <!-- Documentation URL --> <DocumentationUrl>https://bitbucket.contoso.com/projects/SND/repos/sandbox.sampleservice/browse/README.md</DocumentationUrl> <!-- Your name here --> <Authors>User Name <username@contoso.com></Authors> <!-- Project description --> <Description>The sample service for demo purposes.</Description> <!-- Bamboo plan key (required for Bamboo Specs --> <BambooBlanKey>SMPL</BambooBlanKey> </PropertyGroup> </Project>
<Project> <Import Condition="Exists('..\SolutionInfo.props')" Project="..\SolutionInfo.props" /> <ItemGroup> <None Include="$(MSBuildThisFileDirectory)/CodeAnalysis/stylecop.json" Link="stylecop.json" CopyToOutputDirectory="Never"/> <PackageReference Include="StyleCop.Analyzers" Version="1.*" PrivateAssets="all" /> </ItemGroup> <PropertyGroup> <CodeAnalysisRuleSet>$(MSBuildThisFileDirectory)/CodeAnalysis/stylecop.ruleset</CodeAnalysisRuleSet> <!-- Enable XML docs generating--> <GenerateDocumentationFile>true</GenerateDocumentationFile> <!-- Enable C# 7.x features --> <LangVersion>latest</LangVersion> <!-- default base version --> <BaseVersion Condition="'$(BaseVersion)' == ''">0.0.0</BaseVersion> <!-- default build number and format --> <BuildNumber Condition="'$(BuildNumber)' == ''">0</BuildNumber> <BuildNumber>$([System.String]::Format('{0:0000}',$(BuildNumber)))</BuildNumber> <!-- default version suffix --> <VersionSuffix Condition="'$(VersionSuffix)' == ''">local</VersionSuffix> <!-- empty version suffix instead of 'prod' --> <VersionSuffix Condition="'$(VersionSuffix)' == 'prod'"></VersionSuffix> <!-- format version prefix --> <VersionPrefix>$(BaseVersion).$(BuildNumber)</VersionPrefix> <!-- disable IsPackable by default --> <IsPackable>false</IsPackable> <PackageProjectUrl>$(RepositoryUrl)</PackageProjectUrl> <Company>Contoso</Company> <Copyright>Copyright $([System.DateTime]::Now.Date.Year) Contoso Ltd</Copyright> </PropertyGroup> </Project>
Assembly
It’s worth mentioning right away that both myself and my colleagues already had quite successful experience in using different build systems . And instead of weighting an existing tool with completely uncharacteristic functionality, it was decided to make another, specialized for our new process, and leave the old one alone to carry out its tasks as part of legacy projects. The fix idea was the desire to get a tool that will turn the code into a docker image that meets all our requirements, using a single standard process, while eliminating the need for developers to dive into the intricacies of the assembly, but preserving the possibility of some customization.
The selection of a suitable framework has begun. Based on the requirements of reproducibility of the result both on build machines with Linux and on Windows machines of any developer, the real cross-platform and a minimum of predefined dependencies became a key condition. At different times, I managed to get to know some of the assembly frameworks for .NET developers quite well: from MSBuild and its monstrous XML configurations, which were later translated into Psake (Powershell), to exotic FAKE (F #). But this time I wanted something fresh and light. Moreover, it was already decided that the assembly and testing should be carried out entirely in an isolated container environment, so I did not plan to run inside anything other than the Docker CLI and Git commands, that is, most of the process should have been described in the Dockerfile.
At that time, both FAKE 5 and Cake for .NET Core were still not ready, so with a cross-platform, these projects were so-so. But my dearly beloved PowerShell 6 Core has already been released, and I used it to the full. Therefore, I decided to turn to Psake again, and while I turned, I stumbled upon an interesting Invoke-Build project, which is a rethinking of Psake and, as the author himself points out, is the same, only better and easier. And there is. I will not dwell on it in detail in the framework of this article, I will only note that compactness bribes me in it if all the basic functions for this class of products are available:
- The sequence of actions is described by a set of interrelated tasks (tasks), which can be controlled using their interdependencies and additional conditions.
- There are several handy helpers, for example, exec {} for correctly processing console application exit codes.
- Any exception or stop using Ctrl + C will be correctly processed in a special built-in Exit-Build block. For example, there you can delete all temporary files, a test environment or draw a report that is pleasing to the eye.
Generic Dockerfile
The Dockerfile itself and the assembly using docker build
provide fairly weak parameterization capabilities, and the flexibility of these tools is hardly a little higher than that of a shovel handle. In addition, there are a large number of ways to make the “wrong” image, too big, too unsafe, too unintuitive or simply unpredictable. Fortunately, Microsoft's documentation already offers several examples of Dockerfile , which allow you to quickly understand the basic concepts and make your first Dockerfile, gradually improving it later. He already uses a multi-stage pattern and builds a special “ Test Runner ” image to run tests.
Multi-stage pattern and arguments
The first step is to break up the assembly stages into smaller ones and add new ones. So, it is worth highlighting the launch of dotnet build
as a separate stage, because for projects containing only libraries, it makes no sense to run dotnet publish
. Now, at our discretion, we can only run the required assembly stages using
dotnet build --target <name>
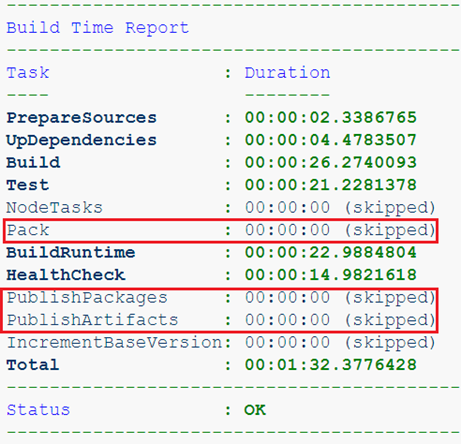
For example, here we are collecting a project containing only libraries. The artifacts here are only NuGet packages, which means it makes no sense to collect a runtime image.
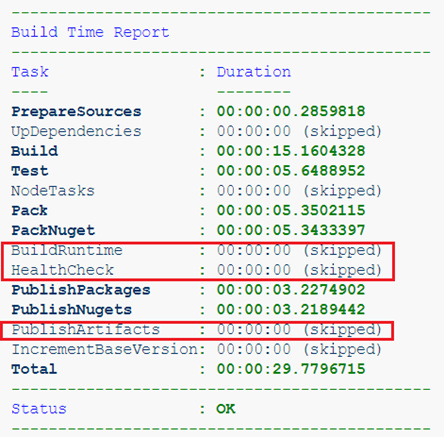
Or we are already building a service, but from the feature branch. We don’t need artifacts of such an assembly at all, only passing tests and healthcheck is important.
The next thing to do is parameterize the use of basic images. For some time now, in the Dockerfile, the ARG
directive can be placed outside the assembly stages, and the transferred values can be used in the name of the base image.
ARG DOTNETCORE_VERSION=2.2 ARG ALPINE_VERSION= ARG BUILD_BASE=mcr.microsoft.com/dotnet/core/sdk:${DOTNETCORE_VERSION}-alpine${ALPINE_VERSION} ARG RUNTIME_BASE=mcr.microsoft.com/dotnet/core/runtime:${DOTNETCORE_VERSION}-alpine${ALPINE_VERSION} FROM ${BUILD_BASE} AS restore ... FROM ${RUNTIME_BASE} AS runtime ...
So we got new and at first glance, and not obvious opportunities. Firstly, if we want to build an image with an ASP.NET Core application, then the runtime image will need a different one: mcr.microsoft.com/dotnet/core/aspnet
. The parameter with a non-standard basic image must be saved in the configuration of the SolutionInfo.props
repository and passed it as an argument during assembly. We also made it easier for the developer to use other versions of .NET Core images: previews, for example, or even custom ones (you never know!).
Secondly, the ability to “expand” the Dockerfile is even more interesting, having made part of the operations in another assembly, the result of which will be taken as a basis when preparing the runtime image. For example, some of our services use JavaScript and Vue.js, the code of which we will prepare in a separate image, simply adding such an “expanding” Dockerfile to the repository:
ARG DOTNETCORE_VERSION=2.2 ARG ALPINE_VERSION= ARG RUNTIME_BASE=mcr.microsoft.com/dotnet/core/aspnet:${DOTNETCORE_VERSION}-alpine${ALPINE_VERSION} FROM node:alpine AS install WORKDIR /build COPY package.json . RUN npm install FROM install AS src COPY [".babelrc", ".eslintrc.js", ".stylelintrc", "./"] COPY ClientApp ./ClientApp FROM src AS publish RUN npm run build-prod FROM ${RUNTIME_BASE} AS appbase COPY --from=publish /build/wwwroot/ /app/wwwroot/
Let's collect this image with the tag, which we will pass to the stage of assembling the runtime-image of the ASP.NET service as an argument to RUNTIME_BASE. So you can expand the assembly as much as you like, including, you can parameterize what you cannot just do in docker build
. Want to parameterize the addition of Volume? Easily:
ARG DOTNETCORE_VERSION=2.2 ARG ALPINE_VERSION= ARG RUNTIME_BASE=mcr.microsoft.com/dotnet/core/aspnet:${DOTNETCORE_VERSION}-alpine${ALPINE_VERSION} FROM ${RUNTIME_BASE} AS runtime ARG VOLUME VOLUME ${VOLUME}
We start the assembly of this Dockerfile as many times as we want to add VOLUME directives. We use the resulting image as the base for the service.
Running tests
Instead of running tests directly in the assembly stages, it is more correct and more convenient to do this in a special “Test Runner” container. Briefly conveying the essence of this approach, I note that it allows you to:
- Perform all scheduled launches, even if one of them crashes;
- Mount the host file system directory in the container to receive a test report, which is vital when building in the CI system;
- Run testing in a temporary environment by passing the name of its network to the
docker run --network <test_network_name>
.
The last paragraph means that we can now run not only unit tests, but also integration tests. We describe the environment, for example, in docker-compose.yaml
, and run it for the entire build. Now you can check the interaction with the database or our other service, and save the logs from them in case you need them for analysis.
We always check the resulting runtime image for passing the healthcheck, which is also a kind of test. A temporary test environment may come in handy here if the service being tested has dependencies on its environment.
I also note that the approach with the runner containers assembled at the stage with dotnet build
will serve then as well for launching dotnet publish
, dotnet pack
and dotnet nuget push
. This will allow us to save assembly artifacts locally.
Healthcheck and OS Dependencies
Pretty quickly it became clear that our standardized services would still be unique in their own way. They may have different requirements for preinstalled packages of the operating system inside the image and different ways of checking healthcheck. And if curl is suitable for checking the status of a Web application, then for a gRPC backend or, moreover, a headless service, it will be useless, and it will also be an extra package in the container.
To give developers the opportunity to customize the image and expand its configuration, we use the agreement on several special scripts that can be overridden in the repository:
.scripts ├── healthcheck.sh ├── run.sh └── runtime-deps.sh
The healthcheck.sh
script contains the commands necessary to check the status:
For the web using curl:
#!/bin/ash set –e curl -sIf -o /dev/null -w "%{http_code}\n" 127.0.0.1/health || exit 1
Other services using our own cli utility:
#!/bin/ash set –e healthcheck || exit 1
Using runtime-deps.sh
, dependencies are established and, if required, any other actions on the base OS are performed that are necessary for the normal functioning of the application inside the container. Typical examples:
For a web application:
#!/bin/ash apk add --no-cache curl icu-libs
For gRPC service:
#!/bin/ash apk add --no-cache libc6-compat
Thus, the way to manage dependencies and check state is standardized, but there is room for some flexibility. As for run.sh
, then it is further.
Entrypoint script
I am sure that everyone who at least once wrote their Dockerfile wondered which directive to use - CMD
or ENTRYPOINT
. Moreover, these teams also have two syntax options that most dramatically affect the result. I will not explain the difference in detail, repeating after those who have already clarified everything . I just recommend remembering that in 99% of situations it is correct to use ENTRYPOINT and the exec syntax:
ENTRYPOINT ["/ path / to / executable"]
Otherwise, the launched application will not be able to correctly process OS commands, such as SIGTERM, etc., and you can also get into trouble in the form of zombie processes and everything related to the PID 1 problem . But what if you want to start the container without launching the application? Yes, you can override the entry point:
docker run --rm -it --entrypoint ash <image_name> <params>
It doesn't look too comfortable and intuitive, right? But there is good news: you can do better! Namely, use an entrypoint script . Such a script allows you to make arbitrarily complex ( example ) initialization, processing of parameters and anything you want.
In our case, by default, the most simple, but at the same time functional scenario is used:
#!/bin/sh set -e if [ ! -z "$1" ] && $(command -v $1 >/dev/null 2>&1) then exec $@ else exec /usr/bin/dotnet /app/${ENTRY_PROJECT}.dll $@ fi
It allows you to control the launch of the container very intuitively:
docker run <image> env
- just executes env in the image, showing environment variables.
docker run <image> -param1 value1
- start the service with the specified arguments.
Separately, you need to pay attention to the exec
command: its presence before calling the executable application will ensure that it works with the coveted PID 1 in your container.
What else
Of course, over more than a year and a half of use, the assembly system has accumulated a lot of different functionalities. In addition to managing the launch conditions of various stages, working with the storage of artifacts, versioning and other features, our “standard” of the container also developed. It was filled with important attributes that make it more predictable and administratively convenient:
- All the necessary image labels are installed: versions, revision numbers, links to documentation, author and others.
- In the runtime container, the NLog configuration is redefined so that after publication all logs are immediately presented in a structured form using json, the version of which is versioned.
- Static analysis rules and any other standards are automatically maintained up to date.
Such a tool, of course, can always be improved and developed. It all depends on needs and imagination. For example, in addition to everything, it was possible to package additional cli utilities into an image. A developer can easily put them into an image by specifying in the configuration file only the required utility name and the name of the .NET project from which it should be assembled (for example, our healthcheck
).
Conclusion
Described here is only part of an integrated approach to standardization. The services themselves, which are created from our templates, remained behind the scenes, and therefore they are fairly unified by many criteria, such as a single approach to configuration, common methods for accessing metrics, code generation, and so on. . , .
, Linux , - . , , . , , , Code Style, , .
, ! , « », , . , Docker .
All Articles