Return Thread.Abort () to .NET Core. Supplying the application with its version of CoreCLR and CoreFX
When migrating from the .NET Framework to the .NET Core , some unpleasant moments may come up. For example, if your application uses domains, you will have to rewrite the logic. A similar situation with Thread.Abort () : Microsoft is so disliked by this practice (and rightly so) that they first declared this method deprecated , and then completely cut it out of the framework and now it is treacherously throwing a PlatformNotSupportedException .
But what if your application uses Thread.Abort () , and you really want to translate it to .NET Core without rewriting anything? Well, we know very well that the platform even supports this functionality, so I can please you: there is a way out, you just need to assemble your own version of the CLR .
Disclaimer: This is a purely practical article with a minimum of theory, designed only to demonstrate new options for interaction between the developer and the .NET environment. Never do this in production. But if you really want to ...

This was made possible thanks to two things: Microsoft’s desire for cross-platform .NET Core and the work done by developers to transfer the framework source to open access. Let's take advantage of this.
Theoretical minimum:
Before moving on to our main goal - returning Thread.Abort ( ) - let's change something fundamental in CoreFX to warm up to test the functionality of all tools. For example, in the footsteps of my previous article about dynamic , we completely prohibit its use in the application. What for? Because we can.
First of all, we will install everything necessary for assembly:
.NET desktop development
Desktop development with C ++
.NET Core cross-platform development
Clone corefx :
Now disable dynamic . We’ll open for this (hereinafter I will indicate the paths relative to the root of the repository)
And at the end of the CallSite <T> .Create function, insert the plain code:
We return to corefx and execute build.cmd . After the assembly is complete, create a new .NET Core project in Visual Studio with the following contents:
We compile our project. Now let's go to
and we find there a package that looks something like this: Microsoft.Private.CoreFx.NETCoreApp. 5.0.0-dev.19465.1 .nupkg . Open the .csproj of our project and insert the following lines there:
The version should be the same as in the name of the assembled package. In my case, 5.0.0-dev.19465.1 .

Go to the nuget settings for our project and add two new paths there:
And uncheck all the others.
Go to the project folder and execute
Done! It remains only to run:
Works! Libraries are not taken from the GAC , dynamic does not work.
Now let's move on to the second part, returning Thread.Abort () . An unpleasant surprise awaits us here: Thread implementation lies in CoreCLR , which is not part of CoreFX and is pre-installed on the machine separately. First, create a demo project:
Deflate coreclr . Find the file
And replace Abort () with
Now we need to return the attributes and c ++ implementation. I collected it in pieces from various open repositories of the .NET Framework and, for convenience, designed all the changes in the form of a pull request .
Note: during assembly there were problems with resources in the “new” attributes, which I
"Fixed" with plugs. Keep this in mind if you want to use this code anywhere other than home experimentation.
After integrating these changes into the code, run build.cmd from coreclr . The assembly in the later stages may begin to sprinkle with errors, but it's not scary, the main thing for us is that CoreCLR can assemble. It will lie in:
We carry out
Files from Windows_NT.x64.Debug are dropped into the folder with the published application.
Once the libraries are assembled, go to
and clone the 3.0.0 folder. We will call it, for example, 5.0.1. We copy everything that lies in Windows_NT.x64.Debug , except the folders. Now our version of CoreCLR will be available through runtimeconfig.
Putting our project together. Add to .csproj :
We repeat the manipulations with nuget from the previous part of the article. Publish
In runtimeconfig.json, enter the following configuration:
Launch!
The magic happened. Now in our .NET Core applications Thread.Abort () is running again. But, of course, only on Windows .
But what if your application uses Thread.Abort () , and you really want to translate it to .NET Core without rewriting anything? Well, we know very well that the platform even supports this functionality, so I can please you: there is a way out, you just need to assemble your own version of the CLR .
Disclaimer: This is a purely practical article with a minimum of theory, designed only to demonstrate new options for interaction between the developer and the .NET environment. Never do this in production. But if you really want to ...
This was made possible thanks to two things: Microsoft’s desire for cross-platform .NET Core and the work done by developers to transfer the framework source to open access. Let's take advantage of this.
Theoretical minimum:
- dotnet publish allows us to publish standalone application: the framework will be delivered with it, and not searched somewhere in the GAC
- The version of CoreCLR on which the application will run, under certain conditions, can be set using runtimeconfig.json
- We can build our own CoreFX : github.com/dotnet/corefx
- We can build our own CoreCLR : github.com/dotnet/coreclr
Customize CoreFX
Before moving on to our main goal - returning Thread.Abort ( ) - let's change something fundamental in CoreFX to warm up to test the functionality of all tools. For example, in the footsteps of my previous article about dynamic , we completely prohibit its use in the application. What for? Because we can.
Prerequisites
First of all, we will install everything necessary for assembly:
- CMake
- Visual Studio 2019 Preview
- Latest .NET Core SDK (.NET Core 3.0 Preview)
Visual Studio 2019 - Workloads
.NET desktop development
- All Required Components
- .NET Framework 4.7.2 Development Tools
Desktop development with C ++
- All Required Components
- VC ++ 2019 v142 Toolset (x86, x64)
- Windows 8.1 SDK and UCRT SDK
- VC ++ 2017 v141 Toolset (x86, x64)
.NET Core cross-platform development
- All Required Components
Visual Studio 2019 - Individual components
- C # and Visual Basic Roslyn Compilers
- Static Analysis Tools
- .NET Portable Library Targeting Pack
- Windows 10 SDK or Windows 8.1 SDK
- Visual Studio C ++ Core Features
- VC ++ 2019 v142 Toolset (x86, x64)
- VC ++ 2017 v141 Toolset (x86, x64)
- Msbuild
- .NET Framework 4.7.2 Targeting Pack
- Windows Universal CRT SDK
Clone corefx :
git clone https://github.com/dotnet/corefx.git
Now disable dynamic . We’ll open for this (hereinafter I will indicate the paths relative to the root of the repository)
corefx\src\System.Linq.Expressions\src\System\Runtime\CompilerServices\CallSite.cs
And at the end of the CallSite <T> .Create function, insert the plain code:
throw new PlatformNotSupportedException("No way");
We return to corefx and execute build.cmd . After the assembly is complete, create a new .NET Core project in Visual Studio with the following contents:
public int Test { get; set; } public static void Main(string[] args) { try { dynamic a = new Program(); a.Test = 120; } catch (Exception e) { Console.WriteLine(e); } //, foreach (var asm in AppDomain.CurrentDomain.GetAssemblies()) { Console.WriteLine(asm.Location); } }
We compile our project. Now let's go to
corefx\artifacts\packages\Debug\NonShipping
and we find there a package that looks something like this: Microsoft.Private.CoreFx.NETCoreApp. 5.0.0-dev.19465.1 .nupkg . Open the .csproj of our project and insert the following lines there:
<PropertyGroup> <PackageConflictPreferredPackages>Microsoft.Private.CoreFx.NETCoreApp;runtime.$(RuntimeIdentifiers).Microsoft.Private.CoreFx.NETCoreApp;$(PackageConflictPreferredPackages)</PackageConflictPreferredPackages> </PropertyGroup> <ItemGroup> <PackageReference Include="Microsoft.Private.CoreFx.NETCoreApp" Version="5.0.0-dev.19465.1" /> </ItemGroup>
The version should be the same as in the name of the assembled package. In my case, 5.0.0-dev.19465.1 .
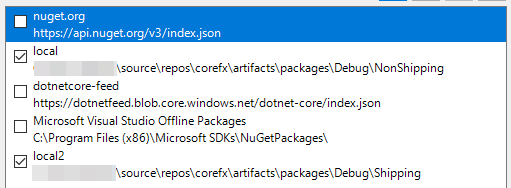
Go to the nuget settings for our project and add two new paths there:
corefx\artifacts\packages\Debug\NonShipping corefx\artifacts\packages\Debug\Shipping
And uncheck all the others.
Go to the project folder and execute
dotnet publish --runtime win-x64 --self-contained
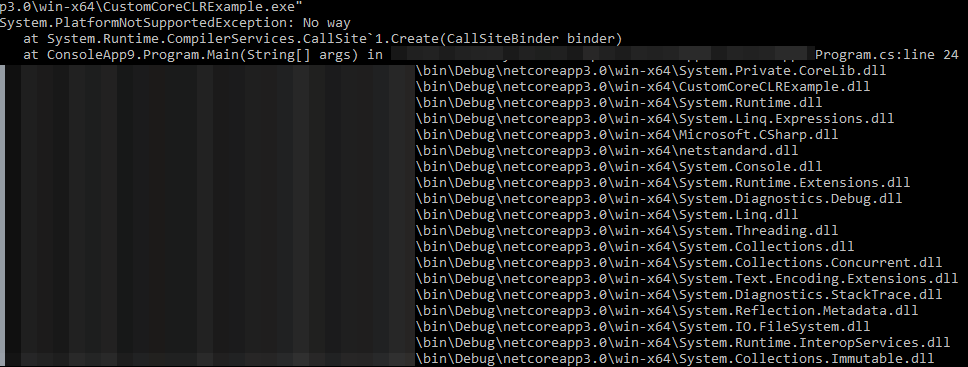
Done! It remains only to run:
Works! Libraries are not taken from the GAC , dynamic does not work.
Make CoreCLR Great Again
Now let's move on to the second part, returning Thread.Abort () . An unpleasant surprise awaits us here: Thread implementation lies in CoreCLR , which is not part of CoreFX and is pre-installed on the machine separately. First, create a demo project:
var runtimeInformation = RuntimeInformation.FrameworkDescription; Console.WriteLine(runtimeInformation); var thr = new Thread(() => { try { while (true) { Console.WriteLine("."); Thread.Sleep(500); } } catch (ThreadAbortException) { Console.WriteLine("Thread aborted!"); } }); foreach (var asm in AppDomain.CurrentDomain.GetAssemblies()) { Console.WriteLine(asm.Location); } thr.Start(); Thread.Sleep(2000); thr.Abort();
Deflate coreclr . Find the file
coreclr\src\System.Private.CoreLib\shared\System\Threading\Thread.cs
And replace Abort () with
[SecuritySafeCritical] [SecurityPermissionAttribute(SecurityAction.Demand, ControlThread = true)] public void Abort() { AbortInternal(); } [System.Security.SecurityCritical] // auto-generated [ResourceExposure(ResourceScope.None)] [MethodImplAttribute(MethodImplOptions.InternalCall)] private extern void AbortInternal();
Now we need to return the attributes and c ++ implementation. I collected it in pieces from various open repositories of the .NET Framework and, for convenience, designed all the changes in the form of a pull request .
Note: during assembly there were problems with resources in the “new” attributes, which I
"Fixed" with plugs. Keep this in mind if you want to use this code anywhere other than home experimentation.
After integrating these changes into the code, run build.cmd from coreclr . The assembly in the later stages may begin to sprinkle with errors, but it's not scary, the main thing for us is that CoreCLR can assemble. It will lie in:
coreclr\bin\Product\Windows_NT.x64.Debug
Easy way
We carry out
dotnet publish --runtime win-x64 --self-contained
Files from Windows_NT.x64.Debug are dropped into the folder with the published application.
Hard way
Once the libraries are assembled, go to
C:\Program Files\dotnet\shared\Microsoft.NETCore.App
and clone the 3.0.0 folder. We will call it, for example, 5.0.1. We copy everything that lies in Windows_NT.x64.Debug , except the folders. Now our version of CoreCLR will be available through runtimeconfig.
Putting our project together. Add to .csproj :
<PropertyGroup> <DisableImplicitFrameworkReferences>true</DisableImplicitFrameworkReferences> <PackageConflictPreferredPackages>Microsoft.Private.CoreFx.NETCoreApp;runtime.$(RuntimeIdentifiers).Microsoft.Private.CoreFx.NETCoreApp;$(PackageConflictPreferredPackages)</PackageConflictPreferredPackages> </PropertyGroup> <ItemGroup> <PackageReference Include="Microsoft.Private.CoreFx.NETCoreApp" Version="5.0.0-dev.19465.1" /> </ItemGroup>
We repeat the manipulations with nuget from the previous part of the article. Publish
dotnet publish --runtime win-x64 --self-contained
In runtimeconfig.json, enter the following configuration:
{ "runtimeOptions": { "tfm": "netcoreapp3.0", "framework": { "name": "Microsoft.NETCore.App", "version": "5.0.1" } } }
Result
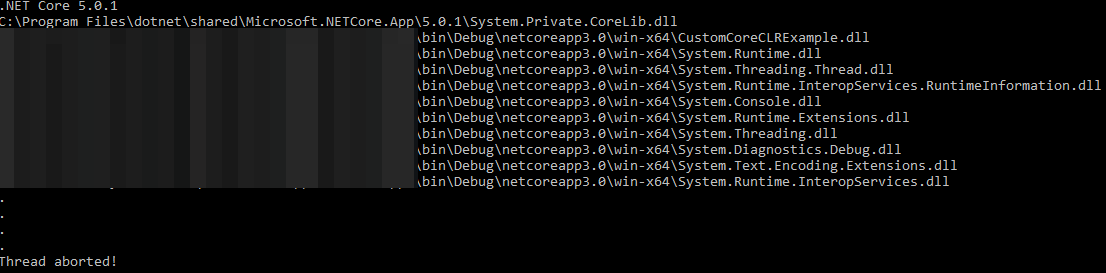
Launch!
The magic happened. Now in our .NET Core applications Thread.Abort () is running again. But, of course, only on Windows .
All Articles