Creating Tower Defense in Unity: Scenarios and Waves of Enemies
[ The first , second , third and fourth parts of the tutorial]
This is the fifth part of a series of tutorials on creating a simple tower defense game. In it, we will learn how to create gameplay scenarios that generate waves of various enemies.
The tutorial was created in Unity 2018.4.6f1.
It is getting pretty comfortable.
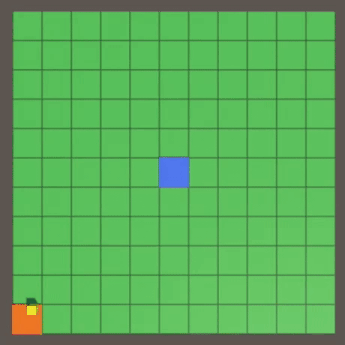
It’s not very interesting to create the same blue cube every time. The first step to supporting more interesting gameplay scenarios is to support several types of enemies.
There are many ways to make enemies unique, but we will not complicate: we classify them as small, medium and large. To tag them, create an
enumeration.
Change
so that it supports all three types of enemies instead of one. For all three enemies, the same configuration fields are needed, so we add the
nested class containing all of them, and then add three configuration fields of this type to the factory. Since this class is used only for configuration and we will not use it anywhere else, you can simply make its fields public so that the factory can access them.
itself
not required to be public.
Let's also make health customizable for each enemy, because it’s logical that large enemies have more than small ones.
Add a type parameter to
so that you can get a specific type of enemy, and the default type will be medium. We will use the type to get the correct configuration, for which a separate method will be useful, and then create and initialize the enemy as before, only with the added health argument.
Add the required parameter health to
and use it to set health instead of determining it by the size of the enemy.
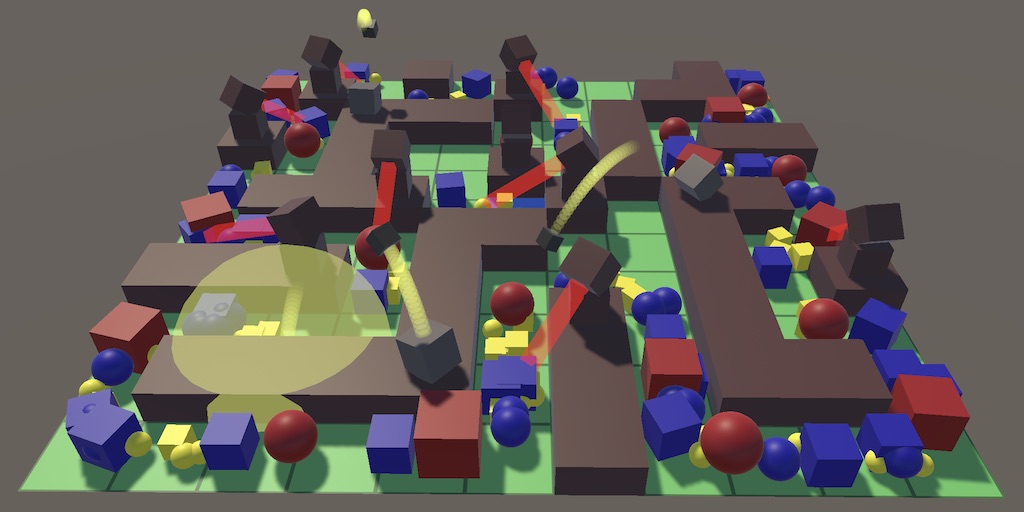
You can choose what the design of the three enemies will be, but in the tutorial I will strive for maximum simplicity. I duplicated the original prefab of the enemy and used it for all three sizes, changing only the material: yellow for small, blue for medium and red for large. I did not change the scale of the prefab cube, but used the factory scale configuration to set the dimensions. Also, depending on the size, I increased their health and reduced speed.

Factory for enemies cubes of three sizes.
The fastest way is to make all three types appear in the game by changing
so that he gets a random type of enemy instead of the middle one.
Enemies of different types.
Now the enemy factory sets up many of the three enemies. The existing factory creates cubes of three sizes, but nothing prevents us from making another factory that creates something else, for example, spheres of three sizes. We can change the created enemies by appointing another factory in the game, thus switching to a different topic.

Spherical enemies.
The second step in creating gameplay scenarios will be the rejection of spawning enemies with a constant frequency. Enemies must be created in successive waves until the script ends or the player loses.
One wave of enemies consists of a group of enemies created one after another until the wave is completed. A wave can contain different types of enemies, and the delay between their creation can vary. In order not to complicate the implementation, we will start with a simple spawning sequence that creates the same type of enemies with a constant frequency. Then the wave will be just a list of such sequences.
To configure each sequence, create an
class. Since it is quite complex, put it in a separate file. The sequence must know which factory to use, what type of enemy to create, their number and frequency. To simplify the configuration, we will make the last parameter a pause that determines how much time should pass before creating the next enemy. Note that this approach allows you to use several enemy factories in the wave.
A wave is a simple array of enemy creation sequences. Create an EnemyWave
type for it that starts with one standard sequence.
Now we can create waves of enemies. For example, I created a wave that generates a group of cubic enemies, starting with ten small ones, with a frequency of two per second. They are followed by five averages, created once per second, and, finally, one large enemy with a pause of five seconds.
A wave of increasing cubes.
The gameplay scenario is created from a sequence of waves. Let's create a GameScenario
type with one array of waves for this, and then use it to make a script.
For example, I created a scenario with two waves of small-medium-large enemies (MSC), first with cubes, then with spheres.

Scenario with two waves of MSC.
Asset types are used to create scripts, but since these are assets, they must contain data that does not change during the game. However, to advance the scenario, we somehow need to track their status. One way is to duplicate the asset used in the game so that the duplicate tracks its condition. But we don’t need to duplicate the whole asset, just state and links to the asset are enough. So let's create a separate
class, first for
. Since it applies only to a sequence, we make it nested. It is valid only when it has a reference to a sequence, so we will give it a constructor method with a sequence parameter.

A nested type of state that refers to its sequence.
When we want to start moving forward in sequence, we need a new instance of the state for this. Add sequences to the
method, which constructs and returns state. Thanks to this, everyone who calls
will be responsible for matching the state, and the sequence itself will remain stateless. It will even be possible to advance in parallel several times along the same sequence.
In order for the state to survive after hot reboots, you need to make it serializable.
The disadvantage of this approach is that every time we run the sequence, we need to create a new state object. We can avoid memory allocation by making it a structure instead of a class. This is normal as long as the condition remains small. Just keep in mind that state is a value type. When it is transferred, it is copied, so track it in one place.
The state of the sequence consists of only two aspects: the number of enemies generated and the progress of the pause time. We add the
method, which increases the value of the pause per time delta, and then resets it when the configured value is reached, similar to what happens with the generation time in
. We will increment the count of enemies every time this happens. In addition, the pause value must begin with the maximum value so that the sequence creates enemies without a pause at the beginning.

The state contains only the necessary data.
Progress must continue until the desired number of enemies is created and the pause ends. At this point,
should report completion, but most likely we will jump a little over the value. Therefore, at this moment we must return the extra time in order to use it in advancement in the following sequence. For this to work, you need to turn the time delta into a parameter. We also need to indicate that we have not finished yet, and this can be realized by returning a negative value.
In order for sequences to spawn enemies, we need to transform
into another public static method.
Since the
itself will no longer generate enemies, we can remove the enemy factory, creation speed, the creation promotion process and the enemy creation code from
.
We will call
in
after increasing the count of enemies.
Let us take the same approach to progressing along a sequence as when promoting along a whole wave. Let's give
its own
method, which returns a new instance of the nested
structure. In this case, the state contains the wave index and the state of the active sequence, which we initialize with the beginning of the first sequence.

A wave state containing the state of a sequence.
We also add the
method
, which uses the same approach as before, with minor changes. We start by moving along the active sequence and replace the time delta with the result of this call. While there is time left, we move to the next sequence, if it is accessed, and perform progress on it. If there are no sequences left, then return the remaining time; otherwise return a negative value.
Add
the same processing. In this case, the state contains the wave index and the state of the active wave.
Since we are at the top level, the
method does not require a parameter and you can use
directly. We do not need to return the remaining time, but we need to show whether the script is completed. We will return
after the completion of the last wave and
to show that the script is still active.
To play a
script, you need a script configuration field and tracking its status. We will just run the script in Awake and run
on it until the status of the rest of the game is updated.
Now the configured script will be launched at the start of the game. Promotion on it will be carried out until completion, and after that nothing happens.
Two waves accelerated 10 times.
We can reproduce one scenario, but after its completion new enemies will not appear. For the game to continue, we need to make it possible to start a new scenario, either manually, or because the player lost / won. You can also implement a choice of several scenarios, but in this tutorial we will not consider it.
Ideally, we need the opportunity to start a new game at any given time. To do this, you need to reset the current state of the entire game, that is, we will have to reset many objects. First, add a
method to the
that utilizes all of its behavior.
This suggests that all behaviors can be disposed of, but so far this is not the case. To make this work, add
abstract
method to
.
The
method of the
class must explicitly override it.
does not yet have a
method, so add it. All he has to do is force the factory to return it. Then we call
wherever we directly access the factory.
also needs to be reset, so let's give it the
method, which empties all the tiles, resets all creation points and updates the content, and then sets the standard start and end points. Then, instead of repeating the code, we can call
at the end of
.
Now we can add the
method to the
, dumping enemies, other objects and the field, and then starting a new script.
We will call this method in
if you press B before moving on to the script.
The goal of the game is to defeat all enemies before a certain number of them reach the final point. The number of enemies needed to trigger the defeat condition depends on the player’s initial health, for which we will add a configuration field to the
. Since we count enemies, we will use integer, not float.

Initially, a player has 10 health.
In case of Awake or the beginning of a new game, we assign the initial value to the current health of the player.
Add the public static
method
that enemies can tell
that they have reached the endpoint. When this happens, reduce the player’s health.
Call this method in
at the appropriate time.
Now we can check the condition of defeat in
. If the player’s health is equal to or less than zero, then the defeat condition is triggered. We simply print this information in the log and immediately start a new game before moving along the script. But we will do this only with a positive initial health. This allows us to use 0 as initial health, making it impossible to lose. So it will be convenient for us to test the scripts.
An alternative to defeat is victory, which is achieved at the end of the scenario, if the player is still alive. That is, when the result of
is
, display a victory message in the log, start a new game, and immediately move on it.
However, the victory will come after the end of the last pause, even if there are still enemies on the field. We need to postpone the victory until all enemies disappear, which can be realized by checking whether the collection of enemies is empty. We assume that it has the
property.
Add the desired property to the
.
Let's also implement the time management feature, this will help in testing and is often a gameplay function. To get started, let
check for a spacebar, and use this event to enable / disable pauses in the game. This can be done by switching
values between zero and one. This will not change the game logic, but will make all objects freeze in place. Or you can use a very small value instead of 0, for example 0.01, to create extremely slow motion.
Secondly, we’ll add
the speed of the game to the slider so that you can speed up time.

Game speed.
If the pause is not turned on and the pause value is not assigned to the time scale, we make it equal to the speed of the game. Also, when removing a pause, we use the speed of the game instead of unity.
In some scenarios, it may be necessary to go through all the waves several times. It is possible to implement support for such a function by making it possible to repeat the scenarios by looping through all the waves several times. You can further improve this function, for example, by enabling the repetition of only the last wave, but in this tutorial we will just repeat the whole scenario.
Add to the
configuration slider to set the number of cycles, by default, assign it a value of 1. At minimum, make zero, and the script will repeat endlessly. So we will create a survival scenario that cannot be defeated, and the point is to check how much the player can hold out.

Two-cycle scenario.
Now it
should track the cycle number.
In
we will execute the increment of the cycle after completion, and return
only if a sufficient number of cycles have passed. Otherwise, we reset the wave index to zero and continue to move.
If the player managed to defeat the cycle once, then he will be able to defeat him again without any problems. To keep the scenario complex, we need to increase complexity. The easiest way to do this is, reducing in subsequent cycles all the pauses between the creation of enemies. Then the enemies will appear faster and will inevitably defeat the player in the survival scenario.
Add a
configuration slider to control acceleration per cycle. This value is added to the time scale after each cycle only to reduce pauses. For example, with an acceleration of 0.5, the first cycle has a pause speed of × 1, the second cycle has a speed of × 1.5, the third × 2, the fourth × 2.5, and so on.
Now you need to add the time scale and to
. It is always initially equal to 1 and increases by a given value of acceleration after each cycle. Use it to scale
before moving along the wave.
Three cycles with increasing speed of creating enemies; accelerated ten times.
Would you like to receive information about the release of new tutorials? Follow my page on Patreon !
Repository
PDF article
- Support for enemies of small, medium and large sizes.
- Create game scenarios with multiple waves of enemies.
- Separation of asset configuration and gameplay state.
- Start, pause, win, defeat and speed up the game.
- Create endlessly repeating scenarios.
This is the fifth part of a series of tutorials on creating a simple tower defense game. In it, we will learn how to create gameplay scenarios that generate waves of various enemies.
The tutorial was created in Unity 2018.4.6f1.
It is getting pretty comfortable.
More enemies
It’s not very interesting to create the same blue cube every time. The first step to supporting more interesting gameplay scenarios is to support several types of enemies.
Enemy Configurations
There are many ways to make enemies unique, but we will not complicate: we classify them as small, medium and large. To tag them, create an
EnemyType
enumeration.
public enum EnemyType { Small, Medium, Large }
Change
EnemyFactory
so that it supports all three types of enemies instead of one. For all three enemies, the same configuration fields are needed, so we add the
EnemyConfig
nested class containing all of them, and then add three configuration fields of this type to the factory. Since this class is used only for configuration and we will not use it anywhere else, you can simply make its fields public so that the factory can access them.
EnemyConfig
itself
EnemyConfig
not required to be public.
public class EnemyFactory : GameObjectFactory { [System.Serializable] class EnemyConfig { public Enemy prefab = default; [FloatRangeSlider(0.5f, 2f)] public FloatRange scale = new FloatRange(1f); [FloatRangeSlider(0.2f, 5f)] public FloatRange speed = new FloatRange(1f); [FloatRangeSlider(-0.4f, 0.4f)] public FloatRange pathOffset = new FloatRange(0f); } [SerializeField] EnemyConfig small = default, medium = default, large = default; … }
Let's also make health customizable for each enemy, because it’s logical that large enemies have more than small ones.
[FloatRangeSlider(10f, 1000f)] public FloatRange health = new FloatRange(100f);
Add a type parameter to
Get
so that you can get a specific type of enemy, and the default type will be medium. We will use the type to get the correct configuration, for which a separate method will be useful, and then create and initialize the enemy as before, only with the added health argument.
EnemyConfig GetConfig (EnemyType type) { switch (type) { case EnemyType.Small: return small; case EnemyType.Medium: return medium; case EnemyType.Large: return large; } Debug.Assert(false, "Unsupported enemy type!"); return null; } public Enemy Get (EnemyType type = EnemyType.Medium) { EnemyConfig config = GetConfig(type); Enemy instance = CreateGameObjectInstance(config.prefab); instance.OriginFactory = this; instance.Initialize( config.scale.RandomValueInRange, config.speed.RandomValueInRange, config.pathOffset.RandomValueInRange, config.health.RandomValueInRange ); return instance; }
Add the required parameter health to
Enemy.Initialize
and use it to set health instead of determining it by the size of the enemy.
public void Initialize ( float scale, float speed, float pathOffset, float health ) { … Health = health; }
We create the design of different enemies
You can choose what the design of the three enemies will be, but in the tutorial I will strive for maximum simplicity. I duplicated the original prefab of the enemy and used it for all three sizes, changing only the material: yellow for small, blue for medium and red for large. I did not change the scale of the prefab cube, but used the factory scale configuration to set the dimensions. Also, depending on the size, I increased their health and reduced speed.
Factory for enemies cubes of three sizes.
The fastest way is to make all three types appear in the game by changing
Game.SpawnEnemy
so that he gets a random type of enemy instead of the middle one.
void SpawnEnemy () { GameTile spawnPoint = board.GetSpawnPoint(Random.Range(0, board.SpawnPointCount)); Enemy enemy = enemyFactory.Get((EnemyType)(Random.Range(0, 3))); enemy.SpawnOn(spawnPoint); enemies.Add(enemy); }
Enemies of different types.
Several factories
Now the enemy factory sets up many of the three enemies. The existing factory creates cubes of three sizes, but nothing prevents us from making another factory that creates something else, for example, spheres of three sizes. We can change the created enemies by appointing another factory in the game, thus switching to a different topic.
Spherical enemies.
Waves of enemies
The second step in creating gameplay scenarios will be the rejection of spawning enemies with a constant frequency. Enemies must be created in successive waves until the script ends or the player loses.
Creation sequences
One wave of enemies consists of a group of enemies created one after another until the wave is completed. A wave can contain different types of enemies, and the delay between their creation can vary. In order not to complicate the implementation, we will start with a simple spawning sequence that creates the same type of enemies with a constant frequency. Then the wave will be just a list of such sequences.
To configure each sequence, create an
EnemySpawnSequence
class. Since it is quite complex, put it in a separate file. The sequence must know which factory to use, what type of enemy to create, their number and frequency. To simplify the configuration, we will make the last parameter a pause that determines how much time should pass before creating the next enemy. Note that this approach allows you to use several enemy factories in the wave.
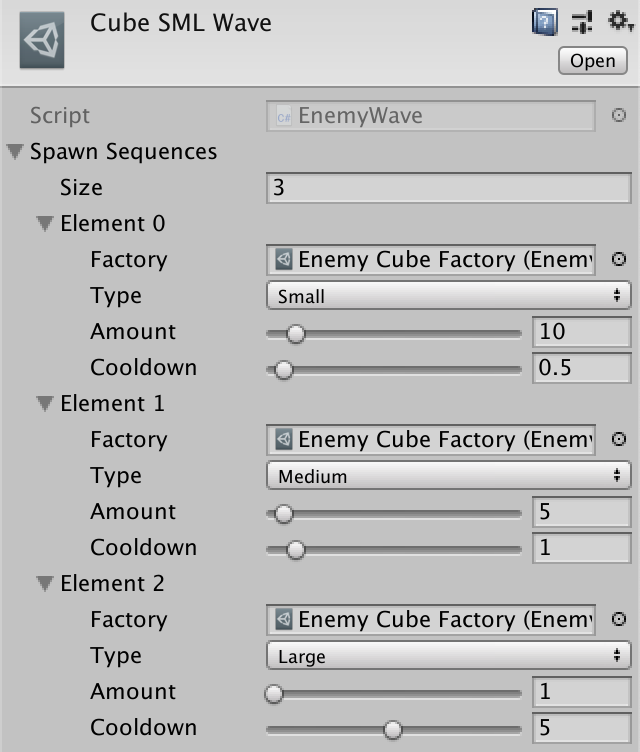
using UnityEngine; [System.Serializable] public class EnemySpawnSequence { [SerializeField] EnemyFactory factory = default; [SerializeField] EnemyType type = EnemyType.Medium; [SerializeField, Range(1, 100)] int amount = 1; [SerializeField, Range(0.1f, 10f)] float cooldown = 1f; }
The waves
A wave is a simple array of enemy creation sequences. Create an EnemyWave
EnemyWave
type for it that starts with one standard sequence.
using UnityEngine; [CreateAssetMenu] public class EnemyWave : ScriptableObject { [SerializeField] EnemySpawnSequence[] spawnSequences = { new EnemySpawnSequence() }; }
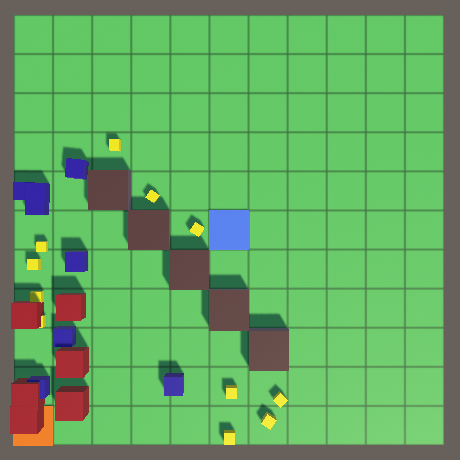
Now we can create waves of enemies. For example, I created a wave that generates a group of cubic enemies, starting with ten small ones, with a frequency of two per second. They are followed by five averages, created once per second, and, finally, one large enemy with a pause of five seconds.
A wave of increasing cubes.
Can I add a delay between sequences?
You can implement it indirectly. For example, insert a four-second delay between small and medium cubes, reduce the number of small cubes by one, and insert a sequence of one small cube that has a pause of four seconds.

Four-second delay between small and medium cubes.
Four-second delay between small and medium cubes.
Scenarios
The gameplay scenario is created from a sequence of waves. Let's create a GameScenario
GameScenario
type with one array of waves for this, and then use it to make a script.
using UnityEngine; [CreateAssetMenu] public class GameScenario : ScriptableObject { [SerializeField] EnemyWave[] waves = {}; }
For example, I created a scenario with two waves of small-medium-large enemies (MSC), first with cubes, then with spheres.
Scenario with two waves of MSC.
Sequence movement
Asset types are used to create scripts, but since these are assets, they must contain data that does not change during the game. However, to advance the scenario, we somehow need to track their status. One way is to duplicate the asset used in the game so that the duplicate tracks its condition. But we don’t need to duplicate the whole asset, just state and links to the asset are enough. So let's create a separate
State
class, first for
EnemySpawnSequence
. Since it applies only to a sequence, we make it nested. It is valid only when it has a reference to a sequence, so we will give it a constructor method with a sequence parameter.
A nested type of state that refers to its sequence.
public class EnemySpawnSequence { … public class State { EnemySpawnSequence sequence; public State (EnemySpawnSequence sequence) { this.sequence = sequence; } } }
When we want to start moving forward in sequence, we need a new instance of the state for this. Add sequences to the
Begin
method, which constructs and returns state. Thanks to this, everyone who calls
Begin
will be responsible for matching the state, and the sequence itself will remain stateless. It will even be possible to advance in parallel several times along the same sequence.
public class EnemySpawnSequence { … public State Begin () => new State(this); public class State { … } }
In order for the state to survive after hot reboots, you need to make it serializable.
[System.Serializable] public class State { … }
The disadvantage of this approach is that every time we run the sequence, we need to create a new state object. We can avoid memory allocation by making it a structure instead of a class. This is normal as long as the condition remains small. Just keep in mind that state is a value type. When it is transferred, it is copied, so track it in one place.
[System.Serializable] public struct State { … }
The state of the sequence consists of only two aspects: the number of enemies generated and the progress of the pause time. We add the
Progress
method, which increases the value of the pause per time delta, and then resets it when the configured value is reached, similar to what happens with the generation time in
Game.Update
. We will increment the count of enemies every time this happens. In addition, the pause value must begin with the maximum value so that the sequence creates enemies without a pause at the beginning.
int count; float cooldown; public State (EnemySpawnSequence sequence) { this.sequence = sequence; count = 0; cooldown = sequence.cooldown; } public void Progress () { cooldown += Time.deltaTime; while (cooldown >= sequence.cooldown) { cooldown -= sequence.cooldown; count += 1; } }
The state contains only the necessary data.
Can I access EnemySpawnSequence.cooldown from State?
Yes, because
is set in the same scope. Therefore, nested types know about the private members of the types containing them.
State
is set in the same scope. Therefore, nested types know about the private members of the types containing them.
Progress must continue until the desired number of enemies is created and the pause ends. At this point,
Progress
should report completion, but most likely we will jump a little over the value. Therefore, at this moment we must return the extra time in order to use it in advancement in the following sequence. For this to work, you need to turn the time delta into a parameter. We also need to indicate that we have not finished yet, and this can be realized by returning a negative value.
public float Progress (float deltaTime) { cooldown += deltaTime; while (cooldown >= sequence.cooldown) { cooldown -= sequence.cooldown; if (count >= sequence.amount) { return cooldown; } count += 1; } return -1f; }
Create enemies anywhere
In order for sequences to spawn enemies, we need to transform
Game.SpawnEnemy
into another public static method.
public static void SpawnEnemy (EnemyFactory factory, EnemyType type) { GameTile spawnPoint = instance.board.GetSpawnPoint( Random.Range(0, instance.board.SpawnPointCount) ); Enemy enemy = factory.Get(type); enemy.SpawnOn(spawnPoint); instance.enemies.Add(enemy); }
Since the
Game
itself will no longer generate enemies, we can remove the enemy factory, creation speed, the creation promotion process and the enemy creation code from
Update
.
void Update () { }
We will call
Game.SpawnEnemy
in
EnemySpawnSequence.State.Progress
after increasing the count of enemies.
public float Progress (float deltaTime) { cooldown += deltaTime; while (cooldown >= sequence.cooldown) { … count += 1; Game.SpawnEnemy(sequence.factory, sequence.type); } return -1f; }
Wave advancement
Let us take the same approach to progressing along a sequence as when promoting along a whole wave. Let's give
EnemyWave
its own
Begin
method, which returns a new instance of the nested
State
structure. In this case, the state contains the wave index and the state of the active sequence, which we initialize with the beginning of the first sequence.
A wave state containing the state of a sequence.
public class EnemyWave : ScriptableObject { [SerializeField] EnemySpawnSequence[] spawnSequences = { new EnemySpawnSequence() }; public State Begin() => new State(this); [System.Serializable] public struct State { EnemyWave wave; int index; EnemySpawnSequence.State sequence; public State (EnemyWave wave) { this.wave = wave; index = 0; Debug.Assert(wave.spawnSequences.Length > 0, "Empty wave!"); sequence = wave.spawnSequences[0].Begin(); } } }
We also add the
EnemyWave.State
method
Progress
, which uses the same approach as before, with minor changes. We start by moving along the active sequence and replace the time delta with the result of this call. While there is time left, we move to the next sequence, if it is accessed, and perform progress on it. If there are no sequences left, then return the remaining time; otherwise return a negative value.
public float Progress (float deltaTime) { deltaTime = sequence.Progress(deltaTime); while (deltaTime >= 0f) { if (++index >= wave.spawnSequences.Length) { return deltaTime; } sequence = wave.spawnSequences[index].Begin(); deltaTime = sequence.Progress(deltaTime); } return -1f; }
Script promotion
Add
GameScenario
the same processing. In this case, the state contains the wave index and the state of the active wave.
public class GameScenario : ScriptableObject { [SerializeField] EnemyWave[] waves = {}; public State Begin () => new State(this); [System.Serializable] public struct State { GameScenario scenario; int index; EnemyWave.State wave; public State (GameScenario scenario) { this.scenario = scenario; index = 0; Debug.Assert(scenario.waves.Length > 0, "Empty scenario!"); wave = scenario.waves[0].Begin(); } } }
Since we are at the top level, the
Progress
method does not require a parameter and you can use
Time.deltaTime
directly. We do not need to return the remaining time, but we need to show whether the script is completed. We will return
false
after the completion of the last wave and
true
to show that the script is still active.
public bool Progress () { float deltaTime = wave.Progress(Time.deltaTime); while (deltaTime >= 0f) { if (++index >= scenario.waves.Length) { return false; } wave = scenario.waves[index].Begin(); deltaTime = wave.Progress(deltaTime); } return true; }
Script run
To play a
Game
script, you need a script configuration field and tracking its status. We will just run the script in Awake and run
Update
on it until the status of the rest of the game is updated.
[SerializeField] GameScenario scenario = default; GameScenario.State activeScenario; … void Awake () { board.Initialize(boardSize, tileContentFactory); board.ShowGrid = true; activeScenario = scenario.Begin(); } … void Update () { … activeScenario.Progress(); enemies.GameUpdate(); Physics.SyncTransforms(); board.GameUpdate(); nonEnemies.GameUpdate(); }
Now the configured script will be launched at the start of the game. Promotion on it will be carried out until completion, and after that nothing happens.
Two waves accelerated 10 times.
Start and end games
We can reproduce one scenario, but after its completion new enemies will not appear. For the game to continue, we need to make it possible to start a new scenario, either manually, or because the player lost / won. You can also implement a choice of several scenarios, but in this tutorial we will not consider it.
The beginning of a new game
Ideally, we need the opportunity to start a new game at any given time. To do this, you need to reset the current state of the entire game, that is, we will have to reset many objects. First, add a
Clear
method to the
GameBehaviorCollection
that utilizes all of its behavior.
public void Clear () { for (int i = 0; i < behaviors.Count; i++) { behaviors[i].Recycle(); } behaviors.Clear(); }
This suggests that all behaviors can be disposed of, but so far this is not the case. To make this work, add
GameBehavior
abstract
Recycle
method to
GameBehavior
.
public abstract void Recycle ();
The
Recycle
method of the
WarEntity
class must explicitly override it.
public override void Recycle () { originFactory.Reclaim(this); }
Enemy
does not yet have a
Recycle
method, so add it. All he has to do is force the factory to return it. Then we call
Recycle
wherever we directly access the factory.
public override bool GameUpdate () { if (Health <= 0f) { Recycle(); return false; } progress += Time.deltaTime * progressFactor; while (progress >= 1f) { if (tileTo == null) { Recycle(); return false; } … } … } public override void Recycle () { OriginFactory.Reclaim(this); }
GameBoard
also needs to be reset, so let's give it the
Clear
method, which empties all the tiles, resets all creation points and updates the content, and then sets the standard start and end points. Then, instead of repeating the code, we can call
Clear
at the end of
Initialize
.
public void Initialize ( Vector2Int size, GameTileContentFactory contentFactory ) { … for (int i = 0, y = 0; y < size.y; y++) { for (int x = 0; x < size.x; x++, i++) { … } } Clear(); } public void Clear () { foreach (GameTile tile in tiles) { tile.Content = contentFactory.Get(GameTileContentType.Empty); } spawnPoints.Clear(); updatingContent.Clear(); ToggleDestination(tiles[tiles.Length / 2]); ToggleSpawnPoint(tiles[0]); }
Now we can add the
BeginNewGame
method to the
Game
, dumping enemies, other objects and the field, and then starting a new script.
void BeginNewGame () { enemies.Clear(); nonEnemies.Clear(); board.Clear(); activeScenario = scenario.Begin(); }
We will call this method in
Update
if you press B before moving on to the script.
void Update () { … if (Input.GetKeyDown(KeyCode.B)) { BeginNewGame(); } activeScenario.Progress(); … }
Losing
The goal of the game is to defeat all enemies before a certain number of them reach the final point. The number of enemies needed to trigger the defeat condition depends on the player’s initial health, for which we will add a configuration field to the
Game
. Since we count enemies, we will use integer, not float.
[SerializeField, Range(0, 100)] int startingPlayerHealth = 10;
Initially, a player has 10 health.
In case of Awake or the beginning of a new game, we assign the initial value to the current health of the player.
int playerHealth; … void Awake () { playerHealth = startingPlayerHealth; … } void BeginNewGame () { playerHealth = startingPlayerHealth; … }
Add the public static
EnemyReachedDestination
method
EnemyReachedDestination
that enemies can tell
Game
that they have reached the endpoint. When this happens, reduce the player’s health.
public static void EnemyReachedDestination () { instance.playerHealth -= 1; }
Call this method in
Enemy.GameUpdate
at the appropriate time.
if (tileTo == null) { Game.EnemyReachedDestination(); Recycle(); return false; }
Now we can check the condition of defeat in
Game.Update
. If the player’s health is equal to or less than zero, then the defeat condition is triggered. We simply print this information in the log and immediately start a new game before moving along the script. But we will do this only with a positive initial health. This allows us to use 0 as initial health, making it impossible to lose. So it will be convenient for us to test the scripts.
if (playerHealth <= 0 && startingPlayerHealth > 0) { Debug.Log("Defeat!"); BeginNewGame(); } activeScenario.Progress();
Victory
An alternative to defeat is victory, which is achieved at the end of the scenario, if the player is still alive. That is, when the result of
GameScenario.Progess
is
false
, display a victory message in the log, start a new game, and immediately move on it.
if (playerHealth <= 0) { Debug.Log("Defeat!"); BeginNewGame(); } if (!activeScenario.Progress()) { Debug.Log("Victory!"); BeginNewGame(); activeScenario.Progress(); }
However, the victory will come after the end of the last pause, even if there are still enemies on the field. We need to postpone the victory until all enemies disappear, which can be realized by checking whether the collection of enemies is empty. We assume that it has the
IsEmpty
property.
if (!activeScenario.Progress() && enemies.IsEmpty) { Debug.Log("Victory!"); BeginNewGame(); activeScenario.Progress(); }
Add the desired property to the
GameBehaviorCollection
.
public bool IsEmpty => behaviors.Count == 0;
Time control
Let's also implement the time management feature, this will help in testing and is often a gameplay function. To get started, let
Game.Update
check for a spacebar, and use this event to enable / disable pauses in the game. This can be done by switching
Time.timeScale
values between zero and one. This will not change the game logic, but will make all objects freeze in place. Or you can use a very small value instead of 0, for example 0.01, to create extremely slow motion.
const float pausedTimeScale = 0f; … void Update () { … if (Input.GetKeyDown(KeyCode.Space)) { Time.timeScale = Time.timeScale > pausedTimeScale ? pausedTimeScale : 1f; } if (Input.GetKeyDown(KeyCode.B)) { BeginNewGame(); } … }
Secondly, we’ll add
Game
the speed of the game to the slider so that you can speed up time.
[SerializeField, Range(1f, 10f)] float playSpeed = 1f;
Game speed.
If the pause is not turned on and the pause value is not assigned to the time scale, we make it equal to the speed of the game. Also, when removing a pause, we use the speed of the game instead of unity.
if (Input.GetKeyDown(KeyCode.Space)) { Time.timeScale = Time.timeScale > pausedTimeScale ? pausedTimeScale : playSpeed; } else if (Time.timeScale > pausedTimeScale) { Time.timeScale = playSpeed; }
Loop scenarios
In some scenarios, it may be necessary to go through all the waves several times. It is possible to implement support for such a function by making it possible to repeat the scenarios by looping through all the waves several times. You can further improve this function, for example, by enabling the repetition of only the last wave, but in this tutorial we will just repeat the whole scenario.
Cyclical advancement on the waves
Add to the
GameScenario
configuration slider to set the number of cycles, by default, assign it a value of 1. At minimum, make zero, and the script will repeat endlessly. So we will create a survival scenario that cannot be defeated, and the point is to check how much the player can hold out.
[SerializeField, Range(0, 10)] int cycles = 1;
Two-cycle scenario.
Now it
GameScenario.State
should track the cycle number.
int cycle, index; EnemyWave.State wave; public State (GameScenario scenario) { this.scenario = scenario; cycle = 0; index = 0; wave = scenario.waves[0].Begin(); }
In
Progress
we will execute the increment of the cycle after completion, and return
false
only if a sufficient number of cycles have passed. Otherwise, we reset the wave index to zero and continue to move.
public bool Progress () { float deltaTime = wave.Progress(Time.deltaTime); while (deltaTime >= 0f) { if (++index >= scenario.waves.Length) { if (++cycle >= scenario.cycles && scenario.cycles > 0) { return false; } index = 0; } wave = scenario.waves[index].Begin(); deltaTime = wave.Progress(deltaTime); } return true; }
Acceleration
If the player managed to defeat the cycle once, then he will be able to defeat him again without any problems. To keep the scenario complex, we need to increase complexity. The easiest way to do this is, reducing in subsequent cycles all the pauses between the creation of enemies. Then the enemies will appear faster and will inevitably defeat the player in the survival scenario.
Add a
GameScenario
configuration slider to control acceleration per cycle. This value is added to the time scale after each cycle only to reduce pauses. For example, with an acceleration of 0.5, the first cycle has a pause speed of × 1, the second cycle has a speed of × 1.5, the third × 2, the fourth × 2.5, and so on.
[SerializeField, Range(0f, 1f)] float cycleSpeedUp = 0.5f;
Now you need to add the time scale and to
GameScenario.State
. It is always initially equal to 1 and increases by a given value of acceleration after each cycle. Use it to scale
Time.deltaTime
before moving along the wave.
float timeScale; EnemyWave.State wave; public State (GameScenario scenario) { this.scenario = scenario; cycle = 0; index = 0; timeScale = 1f; wave = scenario.waves[0].Begin(); } public bool Progress () { float deltaTime = wave.Progress(timeScale * Time.deltaTime); while (deltaTime >= 0f) { if (++index >= scenario.waves.Length) { if (++cycle >= scenario.cycles && scenario.cycles > 0) { return false; } index = 0; timeScale += scenario.cycleSpeedUp; } wave = scenario.waves[index].Begin(); deltaTime = wave.Progress(deltaTime); } return true; }
Three cycles with increasing speed of creating enemies; accelerated ten times.
Would you like to receive information about the release of new tutorials? Follow my page on Patreon !
Repository
PDF article
All Articles