OAuth Authorization and InterSystems IRIS - Taming Trust Protocols
How to allow computers to trust each other in your absence, while maintaining security and privacy?

- Dry Martini. In a big glass.
- Oui, monsieur. [Yes, Monsieur (Fr.)]
“Just a second, not all.” Three fingers of Gordon, one of vodka, half finger of Kina Lyklet. Beat well in a shaker, and then put a large slice of lemon. Do you remember?
Jan Fleming, Casino Royale, 1953
Universal and, it seems, today in the 21st century, everyone’s favorite bundle of open access delegation and authentication protocols is called OAuth + OIDC. Better for mass use so far nothing has been invented. They are especially popular with front-end vendors because they walk on top of HTTP (S) protocols and use the JWT ( JSON Web Token ) container. OpenID Connect uses OAuth for its work or, in other words, OIDC is a wrapper for OAuth.
OpenID - an open standard for authentication and the creation of digital identification systems is not new to developers. This year, he turns 14 years old. In the current third version, the full name is OpenID Connect or shorter than OIDC. It is popular both in the web and mobile development, and in corporate systems.
His partner, the OAuth Open Access Delegation Standard, is turning 12 years old. And 9 years since the corresponding RFC 5849 standard appeared. We will rely on the modern version of the OAuth 2.0 protocol and the current RFC 6749 . Remember that OAuth 2.0 is not compatible with its predecessor OAuth 1.0.
And, attention, OAuth can not say anything about a specific user ! Neither who he is, nor where he is now, nor even whether he works at the computer now or not. But then it makes it possible to interact with systems without user intervention, using access tokens already issued. This is an important point.
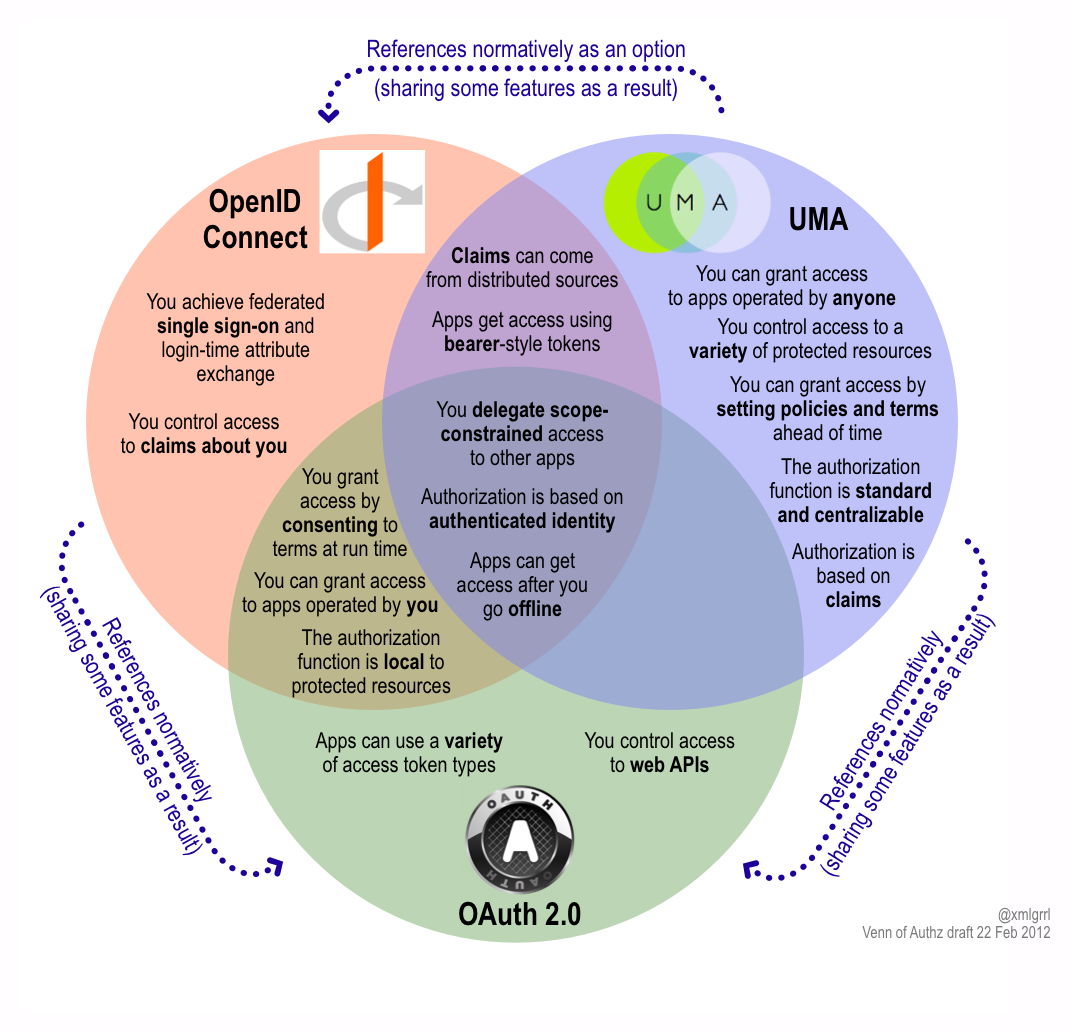
A New Venn Of Access Control For The API Economy
Most importantly, do not store personal data in the same place as the rest of the system. Separate physically authentication and authorization. Better yet, give all the identification personally to the person and never keep it with you. Trust the device owner.
So, we decided that it was not comme il faut to store the personal data of our dear users neither in our application, nor in a single storage together with a working database. That is, they chose a reliable trustee who will provide this service to us. And so, when His Majesty the User appears, then we provide the following dialogue.
Characters:
The action takes place in a browser on the user's computer. All characters have long been familiar with each other. The user has a personal account on the Identity Service. The Client Application has a signed valid contract with the Identification Service and mutual interfaces. The Resource Server trusts the Identity Service in the issue of issuing access keys to any sufferer whom he can identify.
User (P): (by launching a web-based client application) Dear Client-application, I need “this resource”.
Client application (K): Dear user, first present the key to "this resource". Without a key, access to "this resource" is closed.
P: I do not have such a key.
K: Then I’ll temporarily switch you to an identification service with which we have an agreement to issue keys to the Resource Server. (redirects P. to the identification service)
Identification service (I): Dear user, please tell me who you are and what keys you require?
P: I, Ytsuken User User, the password is such and such, I want to get access to "this resource".
And: Thank you, comrade Jtsuken. Authentication was successful and your identification is verified. Here is the key to “this resource” (P. redirects back to K.)
P: Client, I brought you the key to the “resource” I need.
K: Thank you user. The key is correct. Here is the "resource" you requested.
Curtain. The opening symphony of Richard Strauss from the film “Space Odyssey of 2001” plays
Now let's get down to business. We have three tasks on the agenda: to appoint the characters, prepare the stage and play the play. And everything is decided at once on the InterSystems IRIS platform. But this is not necessary, you can assemble a design from different platforms at your discretion. For example, in this combination: OAuth Keycloak server + OAuth client and OAuth resource on IRIS. In other words:
We go into the IRIS management portal and select the section:
System Administration >> Security >> OAuth 2.0 >> Server
Next, in each paragraph, there will be a name for the settings line and, through the colon, an example or explanation, if necessary.
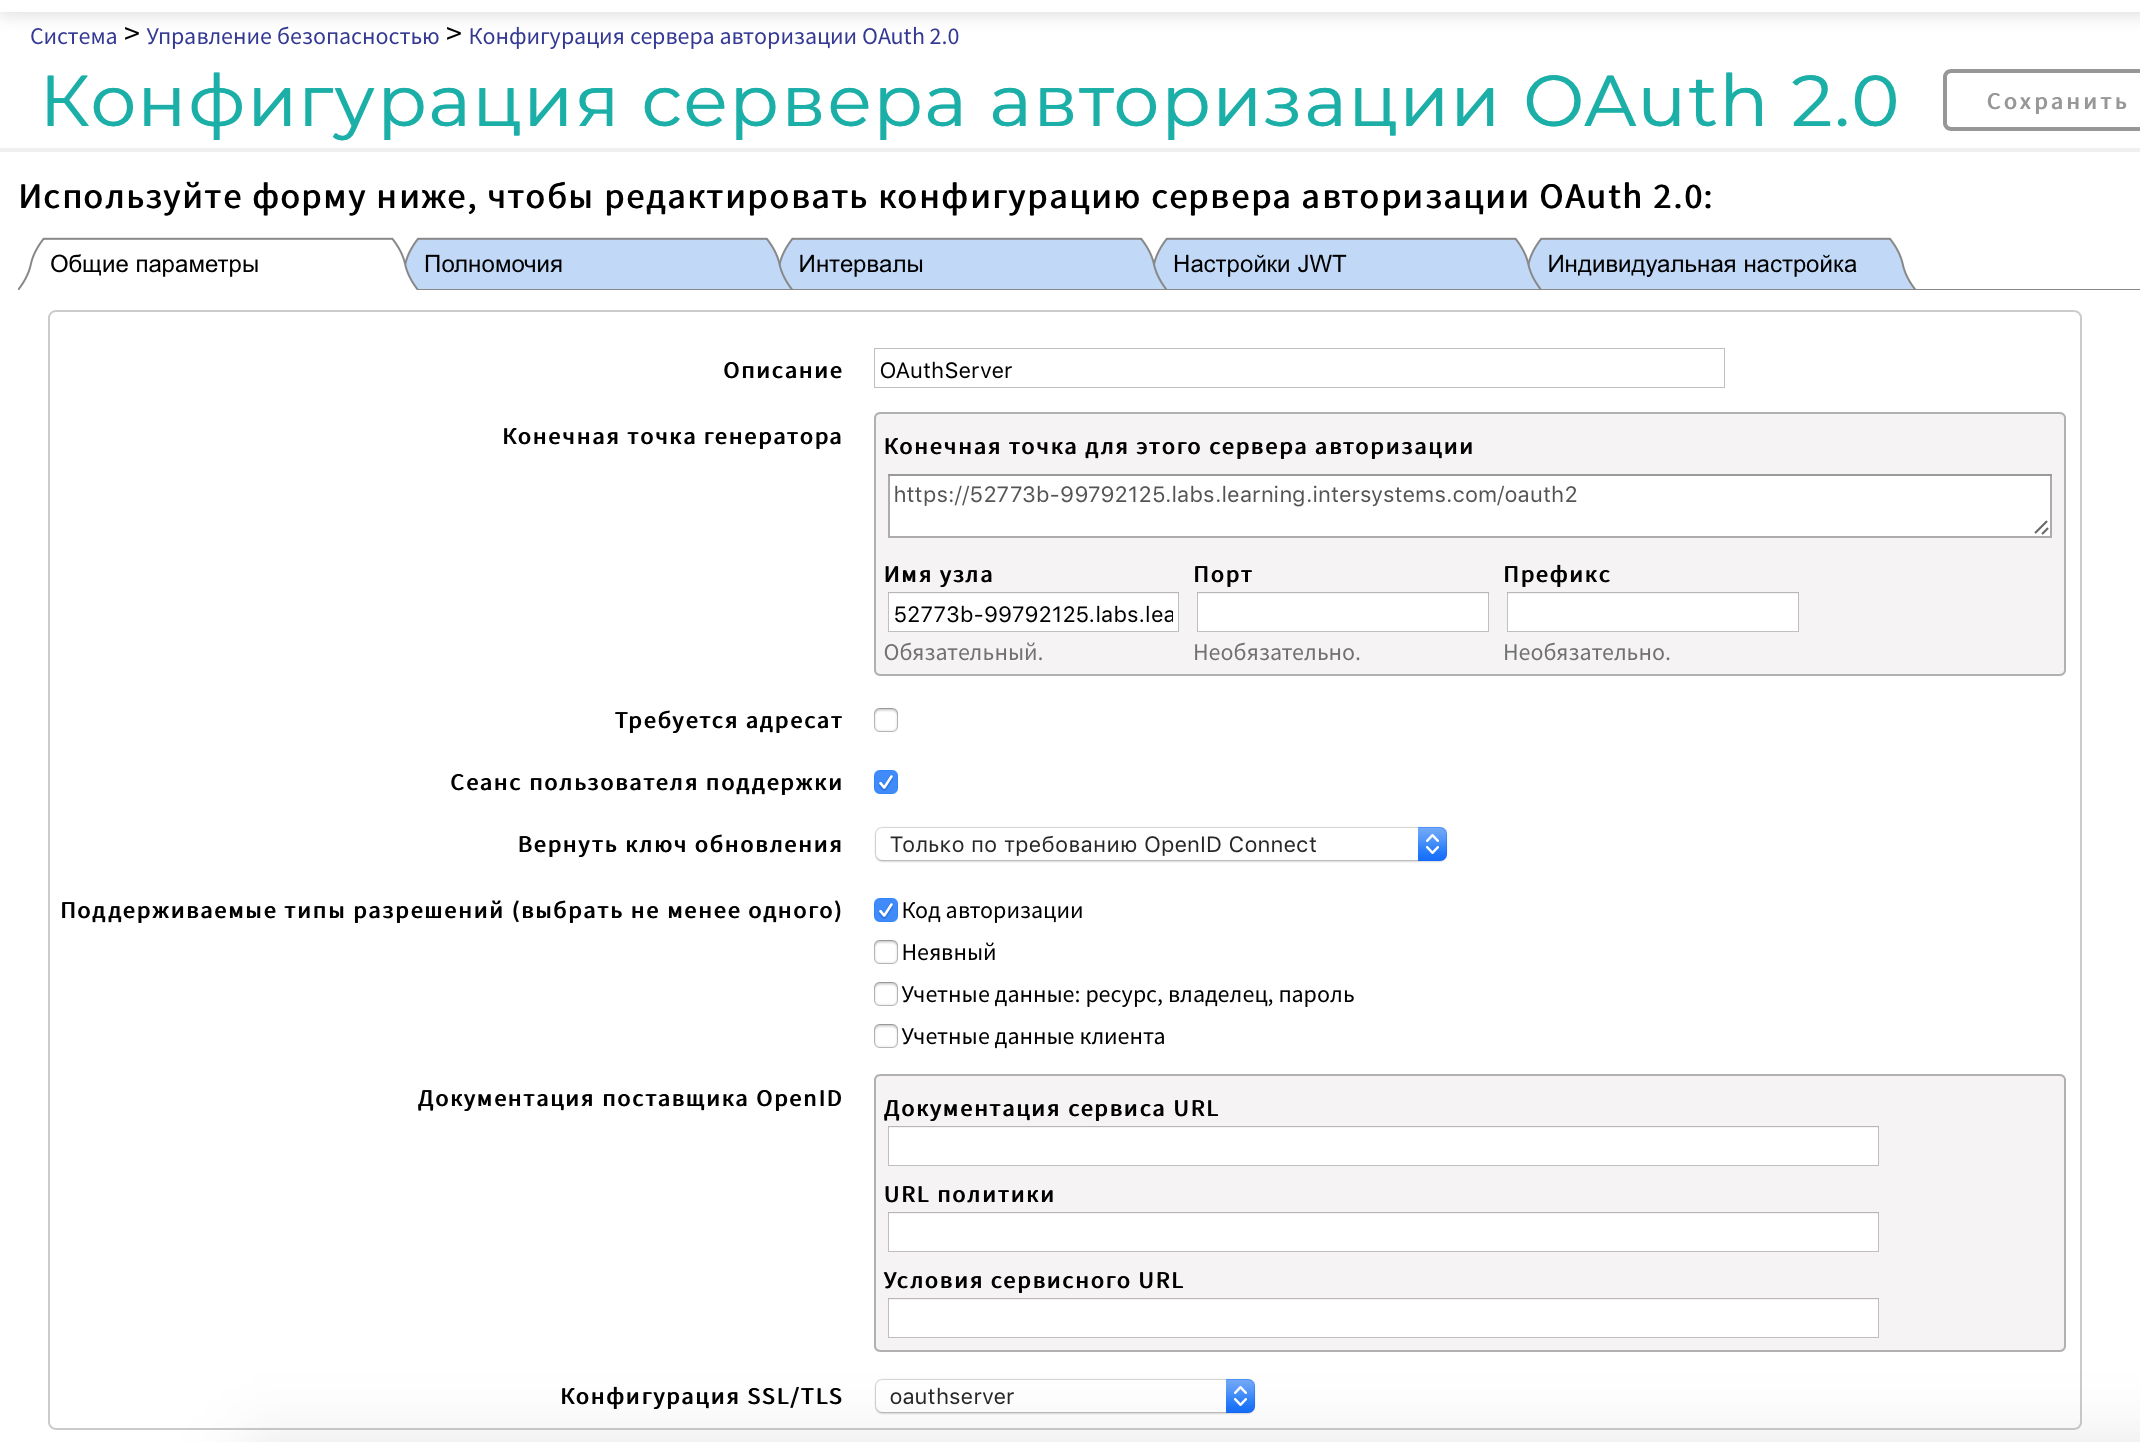
General Settings Tab:
Description: optional, for example, so "Authorization server"
The generator endpoint (hereinafter referred to as CTG) is the host name: DNS name of your server
Supported permission types (select at least one):
Authorization code
Implicit
Credentials: resource, owner, password
Customer credentials
SSL / TLS Configuration: oauthserver
Permissions tab:
add supported volumes: e.g. scope1 and scope2
Intervals tab:
Access Key Interval: 3600
Authorization Code Interval: 60
Update Key Interval: 86400
Session Abandonment Interval: 86400
Client Key Validity Period: 0
JWT Settings Tab:
Input Algorithm: RS512
Key Management Algorithm: RSA-OAEP
Content Encryption Algorithm: A256CBC-HS512
Customizing tab:
Identify class:% OAuth2.Server.Authenticate
Check user class:% OAuth2.Server.Validate
Session Service Class: OAuth2.Server.Session
Generate key class:% OAuth2.Server.JWT
Customization Namespace:% SYS
Customization roles (select at least one):% DB_IRISSYS and% Manager
Save.
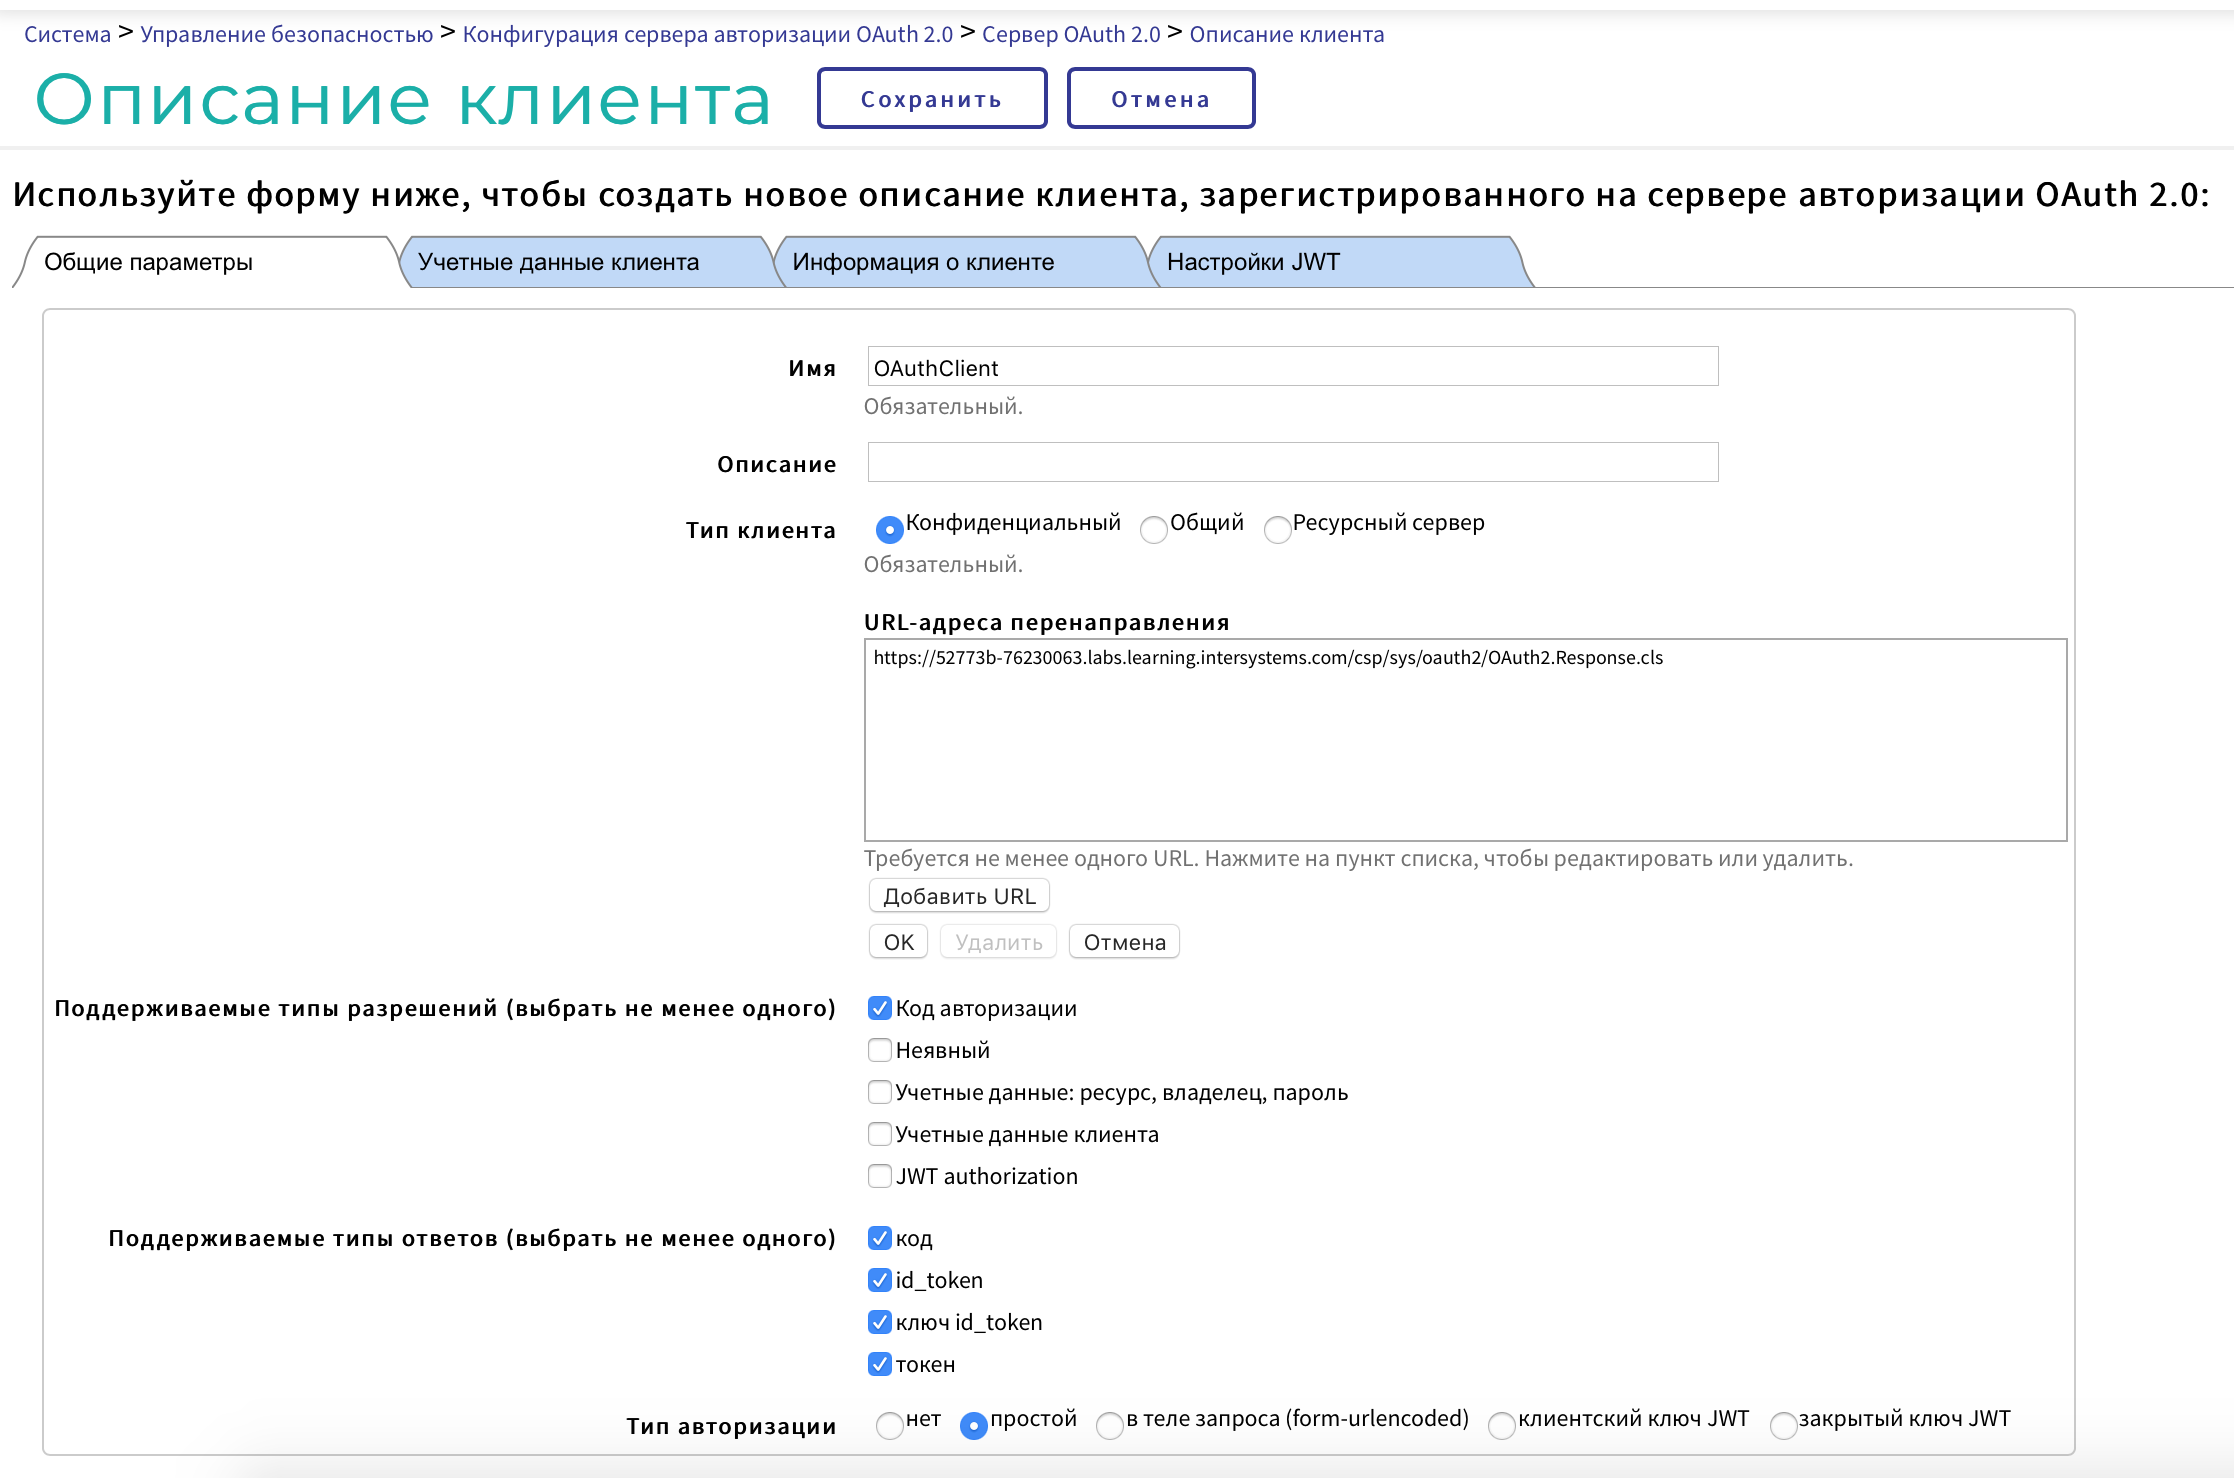
Customer Description button >> Create Customer Description button:
General Settings Tab:
Name: CLIENT
Description: arbitrary
Client Type: Confidential
Redirect URLs: The return point address in our application after authentication
Supported Permission Types
Authorization Code: yes
Implicit
Credentials: resource, owner, password
Customer credentials
JWT authorization
Supported Answer Types
the code
id_token
id_token key
token
Authorization Type: Simple
Client Credentials Tab: Automatically Filled
Client Information Tab:
Launch URL:
Login screen
Customer name
Logo url
Client Home Page URL
Policy url
Service URL Terms
System Administration >> Security >> OAuth 2.0 >> Client

Create a server description:
Generator endpoint: take from the general server parameters, see above
SSL / TLS configuration: select from the list of pre-configured
The contents of the remaining fields will be downloaded automatically from the server, but you can also configure them manually:
Authorization server
Authorization Endpoint: CTG + / authorize
Key Endpoint: CTG + / token
User Information Endpoint: CTG + / userinfo
Key self-diagnosis endpoint: CTG + / revocation
Key revocation endpoint: CTG + / introspection
JSON Web Token Settings (JWT)
Other source besides dynamic registration: select JWKS from URL
URL: CTG + / jwks
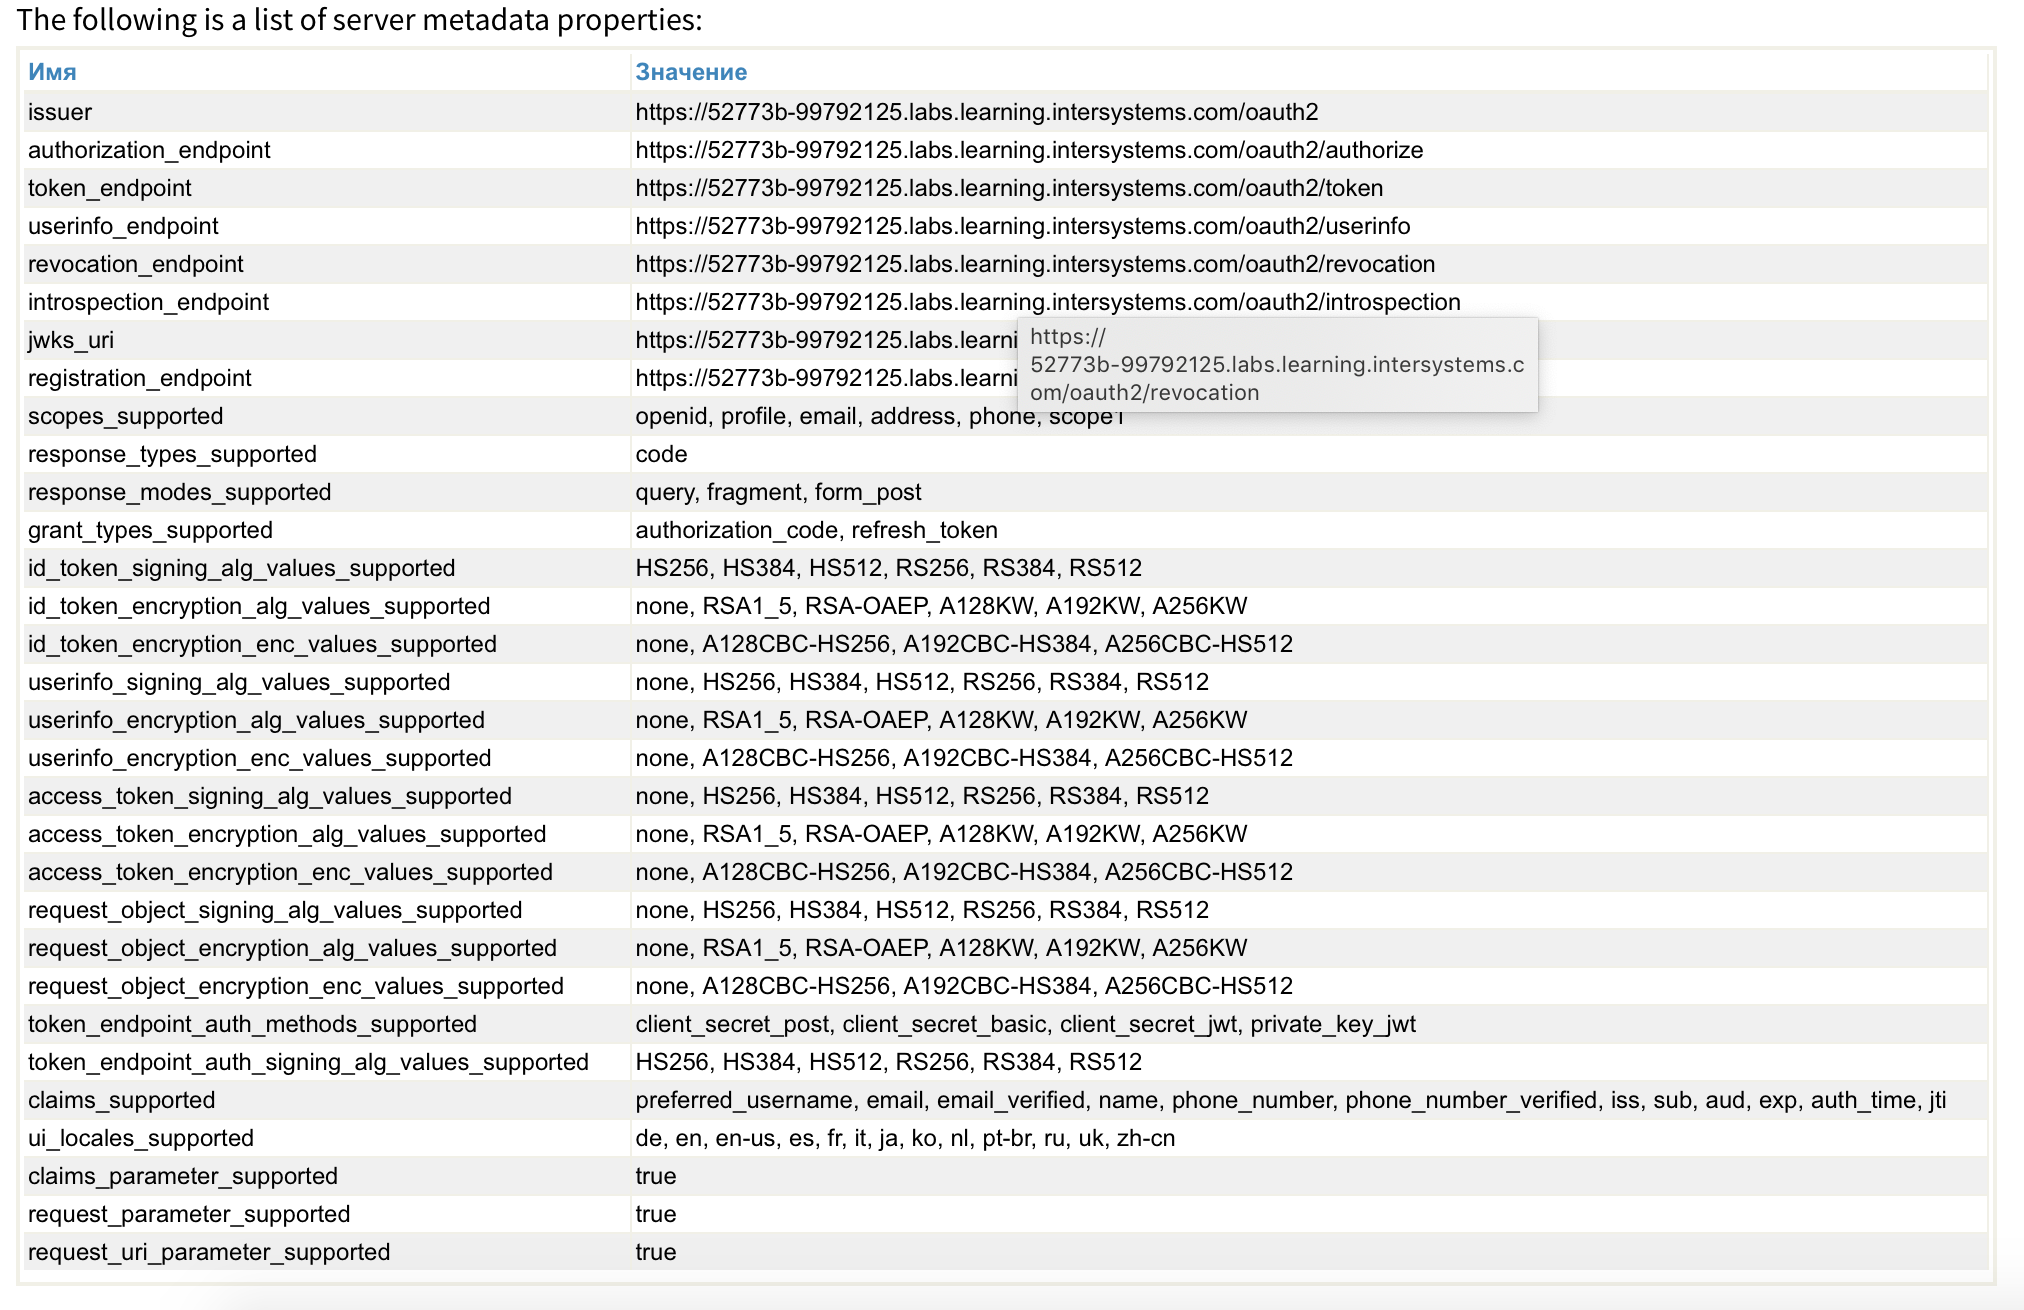
From this list, for example, it can be seen (scopes_supported and claims_supported) that the server can provide the OAuth client with different information about the user. And it is worth paying attention that when implementing your application, you would need to ask the user what data he is ready to share. Further, in our example, we will only be asked for permission by scope1.
Save.
If there is an error indicating SSL, then go to the settings:
System Administration >> Security >> SSL / TSL Configuration
System Administration >> Security >> OAuth 2.0 >> Client >> Client Configuration >> Create Client Configuration

General tab:
Application Name: demo client
Client Name: demo client
Description: optional
Enabled: Yes
Client Type: Confidential
SSL / TCL configuration: oauthclient
Client redirect URL: DNS name of your server
Required Permission Types
Authorization Code: yes
Implicit
Credentials: resource, owner, password
Customer credentials
JWT authorization
Authorization Type: Simple
Client Information Tab:
Login screen
Logo url
Client Home Page URL
Policy url
Service URL Terms
Default volume: we take from the ones specified earlier on the server, for example, scope1
Contact email addresses (separated by a comma)
Maximum default age (in seconds)
JWT Settings Tab:
JSON Web Token Settings (JWT)
Creating JWT Settings from X509 Credentials
IDToken Algorithms
Signing: RS256
Encryption: A256CBC
Key: RSA-OAEP
Userinfo Algorithms
Access Token Algorithms
Query Algorithms
Client Credentials Tab:
Id client: from the one issued when registering the client on the server (see above)
Customer ID issued
Client's secret: from the one issued when registering the client on the server (see above)
The client secret expires
Customer Registration URI
Save.
Let's create a minimalistic web application with OAuth authorization and REST.
In the absence of authorization, we are preparing a link to a user identification request and obtaining permission from him to work with our application. Here we need to specify not only the application name and requested volume (scope) registered on the OAuth server and in the OAuth client, but also a back link to which point the web application should return the user.
We use the built-in IRIS authentication service and, accordingly, we register users on the OAuth IRIS server. For example, it’s enough to set the user only a username and password, you won’t need to make other settings in the account.
When transferring the user using the received link, the server will carry out the user identification procedure and request permission from him to operate with credentials in a web application, and also save the result in his OAuth2.Server.Session global in the% SYS area:
3. Demonstrate the data of an authorized user. Upon successful completion of the procedures, we have, for example, an access token. Let's get it:
If necessary, enable extended debugging mode on the OAuth server and OAuth client. Messages are written to the ISCLOG global in the% SYS area. Type in the terminal of your IRIS (or install and use the web terminal ):
See the IRIS documentation Using OAuth 2.0 and OpenID Connect for more information .
Findings:
- Dry Martini. In a big glass.
- Oui, monsieur. [Yes, Monsieur (Fr.)]
“Just a second, not all.” Three fingers of Gordon, one of vodka, half finger of Kina Lyklet. Beat well in a shaker, and then put a large slice of lemon. Do you remember?
Jan Fleming, Casino Royale, 1953
Part 1. OAuth 2.0 and OpenID Connect Stories
Universal and, it seems, today in the 21st century, everyone’s favorite bundle of open access delegation and authentication protocols is called OAuth + OIDC. Better for mass use so far nothing has been invented. They are especially popular with front-end vendors because they walk on top of HTTP (S) protocols and use the JWT ( JSON Web Token ) container. OpenID Connect uses OAuth for its work or, in other words, OIDC is a wrapper for OAuth.
OpenID - an open standard for authentication and the creation of digital identification systems is not new to developers. This year, he turns 14 years old. In the current third version, the full name is OpenID Connect or shorter than OIDC. It is popular both in the web and mobile development, and in corporate systems.
His partner, the OAuth Open Access Delegation Standard, is turning 12 years old. And 9 years since the corresponding RFC 5849 standard appeared. We will rely on the modern version of the OAuth 2.0 protocol and the current RFC 6749 . Remember that OAuth 2.0 is not compatible with its predecessor OAuth 1.0.
OAuth is an open protocol (scheme, transport) for delegating access, which allows providing a third party with limited access to the user's protected resources without the need to transfer to her (a third party) the login and password of RFC 6749Strictly speaking, OAuth is not a protocol, but a set of rules (scheme) for separating and transferring user identification operations to a separate trusted server when implementing the architecture of access control delimitation in software systems.
oauth.net is the leading OAuth website hosted by Aaron Parecki
oauth.com - OAuth Tutorial and Test Environment
Open ID Connect (OIDC) is an open standard for decentralized identification systems that allows the user to create a single account for identification on a variety of unrelated Internet resources using third-party services, uses OAuth messages and a JWT container for secure communication.
And, attention, OAuth can not say anything about a specific user ! Neither who he is, nor where he is now, nor even whether he works at the computer now or not. But then it makes it possible to interact with systems without user intervention, using access tokens already issued. This is an important point.
It can be useful:
- OAuth combines perfectly with the use of the XACML attribute access description language
- OAuth also relies on User-Managed Access ( UMA )
The joint use of OAuth + OIDC + UMA allows implementing systems of secure identification and access control (Identity and Access Management - IdM, IAM) in different subject areas, for example:
- using the HEART (Health Relationship Trust) patient’s personal data profile in medicine
- in CIAM (Consumer Identity and Access Management) customer identification platforms for manufacturing and trading companies
- personalization of digital certificates of smart devices in IoT (Internet of Things) systems
A New Venn Of Access Control For The API Economy
Most importantly, do not store personal data in the same place as the rest of the system. Separate physically authentication and authorization. Better yet, give all the identification personally to the person and never keep it with you. Trust the device owner.
Apple said what personal data Russians store in Russia. This is the name, address, email, phone number. But Messages, photos, etc. people themselves trust the iCloud cloud (which is not in Russia).
Part 2. Short play “Trust and Authentication”
So, we decided that it was not comme il faut to store the personal data of our dear users neither in our application, nor in a single storage together with a working database. That is, they chose a reliable trustee who will provide this service to us. And so, when His Majesty the User appears, then we provide the following dialogue.
Characters:
- User
- Client Application
- Identity Service
- Resource Server
The action takes place in a browser on the user's computer. All characters have long been familiar with each other. The user has a personal account on the Identity Service. The Client Application has a signed valid contract with the Identification Service and mutual interfaces. The Resource Server trusts the Identity Service in the issue of issuing access keys to any sufferer whom he can identify.
User (P): (by launching a web-based client application) Dear Client-application, I need “this resource”.
Client application (K): Dear user, first present the key to "this resource". Without a key, access to "this resource" is closed.
P: I do not have such a key.
K: Then I’ll temporarily switch you to an identification service with which we have an agreement to issue keys to the Resource Server. (redirects P. to the identification service)
Identification service (I): Dear user, please tell me who you are and what keys you require?
P: I, Ytsuken User User, the password is such and such, I want to get access to "this resource".
And: Thank you, comrade Jtsuken. Authentication was successful and your identification is verified. Here is the key to “this resource” (P. redirects back to K.)
P: Client, I brought you the key to the “resource” I need.
K: Thank you user. The key is correct. Here is the "resource" you requested.
Curtain. The opening symphony of Richard Strauss from the film “Space Odyssey of 2001” plays
Part 3. Real authorization service
Now let's get down to business. We have three tasks on the agenda: to appoint the characters, prepare the stage and play the play. And everything is decided at once on the InterSystems IRIS platform. But this is not necessary, you can assemble a design from different platforms at your discretion. For example, in this combination: OAuth Keycloak server + OAuth client and OAuth resource on IRIS. In other words:
- Configure and start the OAuth server with registering our demo client on it.
- Set up a demo OAuth client by connecting it to the OAuth server and web resources.
- Develop client applications that can use OAuth. You can use Java, Python, C #, NodeJS. The following is sample application code in ObjectScript.
The website of the developer community has a detailed instruction by Daniel Kutak in three parts with examples of using OAuth in IRIS for different applications based on CSP ( part 1 , part 2 , part 3 ).There are a lot of settings in OAuth. Therefore, write yourself checklists - this is the most correct application for them. Examples and blanks below.
Where to get ready-made InterSystems IRIS for a sample? There are at least two options available to everyone:
Get a ready-made pre-configured cloud IRIS server on the InterSystems Learning Services training platform in the InterSystems Learning Labs section.
Install a ready-made docker container . Read more in the article - a step-by-step instruction for beginners of Launching IRIS Using Docker developers or, who prefer a video, a screencast instruction of Developing Solutions with InterSystems IRIS Using Docker and VSCode
1-1 Configuring the OAuth Server
We go into the IRIS management portal and select the section:
System Administration >> Security >> OAuth 2.0 >> Server
Next, in each paragraph, there will be a name for the settings line and, through the colon, an example or explanation, if necessary.
General Settings Tab:
Description: optional, for example, so "Authorization server"
The generator endpoint (hereinafter referred to as CTG) is the host name: DNS name of your server
Supported permission types (select at least one):
Authorization code
Implicit
Credentials: resource, owner, password
Customer credentials
SSL / TLS Configuration: oauthserver
Permissions tab:
add supported volumes: e.g. scope1 and scope2
Intervals tab:
Access Key Interval: 3600
Authorization Code Interval: 60
Update Key Interval: 86400
Session Abandonment Interval: 86400
Client Key Validity Period: 0
JWT Settings Tab:
Input Algorithm: RS512
Key Management Algorithm: RSA-OAEP
Content Encryption Algorithm: A256CBC-HS512
Customizing tab:
Identify class:% OAuth2.Server.Authenticate
Check user class:% OAuth2.Server.Validate
Session Service Class: OAuth2.Server.Session
Generate key class:% OAuth2.Server.JWT
Customization Namespace:% SYS
Customization roles (select at least one):% DB_IRISSYS and% Manager
Save.
1-2 Register the client on the OAuth server
Customer Description button >> Create Customer Description button:
General Settings Tab:
Name: CLIENT
Description: arbitrary
Client Type: Confidential
Redirect URLs: The return point address in our application after authentication
Supported Permission Types
Authorization Code: yes
Implicit
Credentials: resource, owner, password
Customer credentials
JWT authorization
Supported Answer Types
the code
id_token
id_token key
token
Authorization Type: Simple
Client Credentials Tab: Automatically Filled
Client Information Tab:
Launch URL:
Login screen
Customer name
Logo url
Client Home Page URL
Policy url
Service URL Terms
2-1 Configuring the binding on the OAuth server client
System Administration >> Security >> OAuth 2.0 >> Client
Create a server description:
Generator endpoint: take from the general server parameters, see above
SSL / TLS configuration: select from the list of pre-configured
The contents of the remaining fields will be downloaded automatically from the server, but you can also configure them manually:
Authorization server
Authorization Endpoint: CTG + / authorize
Key Endpoint: CTG + / token
User Information Endpoint: CTG + / userinfo
Key self-diagnosis endpoint: CTG + / revocation
Key revocation endpoint: CTG + / introspection
JSON Web Token Settings (JWT)
Other source besides dynamic registration: select JWKS from URL
URL: CTG + / jwks
From this list, for example, it can be seen (scopes_supported and claims_supported) that the server can provide the OAuth client with different information about the user. And it is worth paying attention that when implementing your application, you would need to ask the user what data he is ready to share. Further, in our example, we will only be asked for permission by scope1.
Save.
If there is an error indicating SSL, then go to the settings:
System Administration >> Security >> SSL / TSL Configuration
2-2 Configuring the OAuth Client
System Administration >> Security >> OAuth 2.0 >> Client >> Client Configuration >> Create Client Configuration
General tab:
Application Name: demo client
Client Name: demo client
Description: optional
Enabled: Yes
Client Type: Confidential
SSL / TCL configuration: oauthclient
Client redirect URL: DNS name of your server
Required Permission Types
Authorization Code: yes
Implicit
Credentials: resource, owner, password
Customer credentials
JWT authorization
Authorization Type: Simple
Client Information Tab:
Login screen
Logo url
Client Home Page URL
Policy url
Service URL Terms
Default volume: we take from the ones specified earlier on the server, for example, scope1
Contact email addresses (separated by a comma)
Maximum default age (in seconds)
JWT Settings Tab:
JSON Web Token Settings (JWT)
Creating JWT Settings from X509 Credentials
IDToken Algorithms
Signing: RS256
Encryption: A256CBC
Key: RSA-OAEP
Userinfo Algorithms
Access Token Algorithms
Query Algorithms
Client Credentials Tab:
Id client: from the one issued when registering the client on the server (see above)
Customer ID issued
Client's secret: from the one issued when registering the client on the server (see above)
The client secret expires
Customer Registration URI
Save.
Part 4. Code
Let's create a minimalistic web application with OAuth authorization and REST.
OAuth relies on the fact that the communication channels between the interaction participants (server, clients, web application, user browser, resource server) are somehow protected. Most often, this role is played by SSL / TLS. But OAuth will also work on insecure channels. For example, the Keycloak server, by default, uses the HTTP protocol and goes without protection. This simplifies development and debugging during development. With the real use of OAuth services, channel protection must be strictly enabled - this is recorded in the Keycloak documentation. InterSystems IRIS developers take a stricter approach for OAuth - SSL / TSL is required. The only simplification is that you can use self-signed certificates or use the PKI service built into IRIS (System Administration >> Security >> Public Key System).User authorization is checked with the explicit indication of two parameters - the name of your application and the volume supported by the OAuth server and in the OAuth client (scope - I wonder how to correctly name it in Russian?):
Parameter OAUTH2APPNAME = "OAuthClient"; set isAuthorized = ##class(%SYS.OAuth2.AccessToken).IsAuthorized( ..#OAUTH2APPNAME, .sessionId, "scope1", .accessToken, .idtoken, .responseProperties, .error)
In the absence of authorization, we are preparing a link to a user identification request and obtaining permission from him to work with our application. Here we need to specify not only the application name and requested volume (scope) registered on the OAuth server and in the OAuth client, but also a back link to which point the web application should return the user.
Parameter OAUTH2CLIENTREDIRECTURI = "https://52773b-76230063.labs.learning.intersystems.com/oauthclient/" set url = ##class(%SYS.OAuth2.Authorization).GetAuthorizationCodeEndpoint( ..#OAUTH2APPNAME, "scope1", ..#OAUTH2CLIENTREDIRECTURI, .properties, .isAuthorized, .sc)
We use the built-in IRIS authentication service and, accordingly, we register users on the OAuth IRIS server. For example, it’s enough to set the user only a username and password, you won’t need to make other settings in the account.
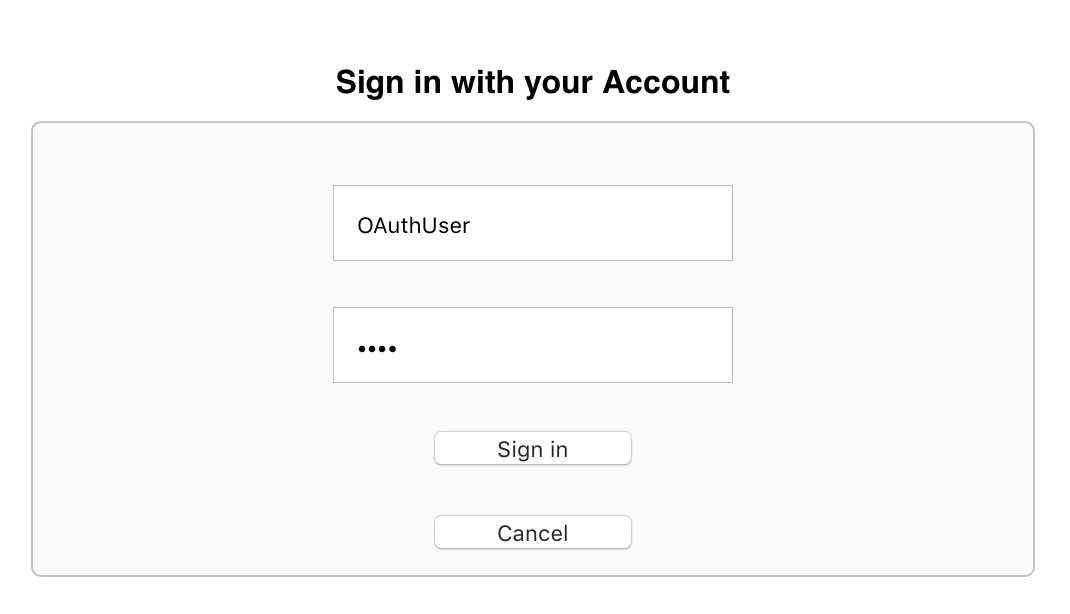
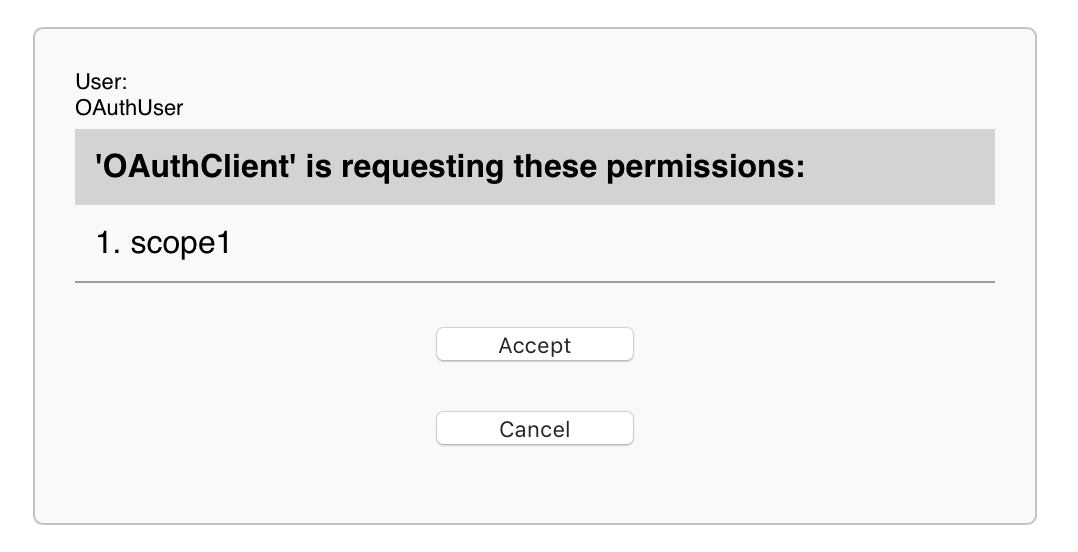
When transferring the user using the received link, the server will carry out the user identification procedure and request permission from him to operate with credentials in a web application, and also save the result in his OAuth2.Server.Session global in the% SYS area:
3. Demonstrate the data of an authorized user. Upon successful completion of the procedures, we have, for example, an access token. Let's get it:
set valid = ##class(%SYS.OAuth2.Validation).ValidateJWT( .#OAUTH2APPNAME, accessToken, "scope1", .aud, .JWTJsonObject, .securityParameters, .sc )
Full working code of an example of working with OAuth:
Class OAuthClient.REST Extends %CSP.REST { Parameter OAUTH2APPNAME = "OAuthClient"; Parameter OAUTH2CLIENTREDIRECTURI = "https://52773b-76230063.labs.learning.intersystems.com/oauthclient/"; // to keep sessionId Parameter UseSession As Integer = 1; XData UrlMap [ XMLNamespace = "http://www.intersystems.com/urlmap" ] { <Routes> <Route Method="GET" Url = "/" Call = "Do" /> </Routes> } ClassMethod Do() As %Status { // Check for accessToken set isAuthorized = ##class(%SYS.OAuth2.AccessToken).IsAuthorized( ..#OAUTH2APPNAME, .sessionId, "scope1", .accessToken, .idtoken, .responseProperties, .error) // to show accessToken if isAuthorized { set valid = ##class(%SYS.OAuth2.Validation).ValidateJWT( ..#OAUTH2APPNAME, accessToken, "scope1", .aud, .JWTJsonObject, .securityParameters, .sc ) &html< Hello!<br> > w "You access token = ", JWTJsonObject.%ToJSON() &html< </html> > quit $$$OK } // perform the process of user and client identification and get accessToken set url = ##class(%SYS.OAuth2.Authorization).GetAuthorizationCodeEndpoint( ..#OAUTH2APPNAME, "scope1", ..#OAUTH2CLIENTREDIRECTURI, .properties, .isAuthorized, .sc) if $$$ISERR(sc) { w "error handling here" quit $$$OK } // url magic correction: change slashes in the query parameter to its code set urlBase = $PIECE(url, "?") set urlQuery = $PIECE(url, "?", 2) set urlQuery = $REPLACE(urlQuery, "/", "%2F") set url = urlBase _ "?" _ urlQuery &html< <html> <h1> IRIS OAuth2</h1> <a href = "#(url)#"> <b>IRIS</b></a> </html> > quit $$$OK } }
If necessary, enable extended debugging mode on the OAuth server and OAuth client. Messages are written to the ISCLOG global in the% SYS area. Type in the terminal of your IRIS (or install and use the web terminal ):
set ^%ISCLOG = 5 set ^%ISCLOG("Category", "OAuth2") = 5 set ^%ISCLOG("Category", "OAuth2Server") = 5
See the IRIS documentation Using OAuth 2.0 and OpenID Connect for more information .
Findings:
- OAuth helps physically and geographically separate services with user credentials and “working” databases. And, thereby, strengthen the protection of identification data and, if necessary, comply with the requirements of laws on the protection of personal data of different countries.
- Using OAuth, the user can be provided with the ability to safely work simultaneously from multiple devices and minimally “shine” his personal data to various services and applications. It is also not to take “redundant” information about users on their services, that is, to conduct depersonalized data processing in their services.
- When using InterSystems IRIS, you have a complete set of ready-made tools for testing and deploying OAuth and OIDC services both stand-alone and in cooperation with third-party software products.
What industries most commonly use the InterSystems IRIS platform?As you can see above, all OAuth features are easily accessible and fully ready to use. If necessary, you can replace the handler classes and user interfaces with your own. OAuth server and client settings can be made from configuration files, instead of using the management portal.
For healthcare automation, in the financial sector, for e-government projects, in logistics, retail and many other industries.
If you are interested in healthcare automation tasks, then pay attention to the FHIR standard. InterSystems IRIS for Health (a special version of the InterSystems IRIS platform) has support for the FHIR standard for integration and application development
All Articles