Comparison of comparators for synchronizing schemas and database data of MS SQL Server
Description of the overall need for change synchronization
When working with databases, you often have to solve the problem of synchronizing changes.
If the company uses only one industrial environment, then in addition to it, at least one additional additional environment is required to test the changes made. In this case, it becomes necessary to transfer changes from the test environment to the industrial one.
As the company grows, the number of required servers and virtual environments can increase, and the number of instances of database management systems can also grow, then there is a need for more complex synchronization.
As a rule, databases are developed in a dedicated environment. Then the changes are transferred to the testing environment for various checks (unit tests, autotests, load tests, etc.). And only after all stages of development and inspections carry out the transfer of changes to the industrial environment.
With a sufficiently large infrastructure, it becomes necessary to transfer changes to several industrial environments at once. In addition, database development can be divided into different environments by functionality, and then it is necessary to periodically transfer changes between these environments.
There are cases when changes were applied outside the development environment and they need to be transferred to it. But such situations must be minimized so that there is no threat to the correct operation of the system.
In general, the sequence of transfer of changes can be represented as follows:
- Between development environments.
- From development environments to testing environments.
- Between test environments. If you make changes that came not from the development environment to any of the testing environments, such changes are also transferred to the development environment. As a rule, all changes should come from the development environment to the testing environment, but not vice versa.
- From the testing environment to pre-industrial environments, where changes are collected for each specific industrial environment, the latest integration tests are carried out, as well as tests to roll back changes in case of pre-specified staged failures.
- From the pre-industrial environment to the industrial environment with the ability to quickly roll back the changes made.
There are various tools for synchronizing changes between environments, for example:
- Visual Studio Comparer
- SQL Server Integration Services
- dbForge Comparer by Devart
- Quest Software ApexSQL
- RedGate Solutions
Typically, solutions written in .NET (for example, written in C #) work with MS SQL Server.
This article will examine an example of transferring changes to an MS SQL Server database from one server to another using tools from Devart, Quest Software, and RedGate. In the end, a comparison of these tools will be made.
In this article, for examples, we will consider the SRV database, which is designed to serve the MS SQL Server DBMS. You can download its sources here .
This SRV database is freely distributed for any purpose.
Devart Solutions
Devart's MS SQL Server database synchronization solutions are called DbForge Data Comparer , DbForge Schema Comparer and dbForge Compare Bundle for SQL Server . The first two are integrated into DbForge Studio for MS SQL Server , and the third directly into SSMS .
Detailed Devart Solution Review
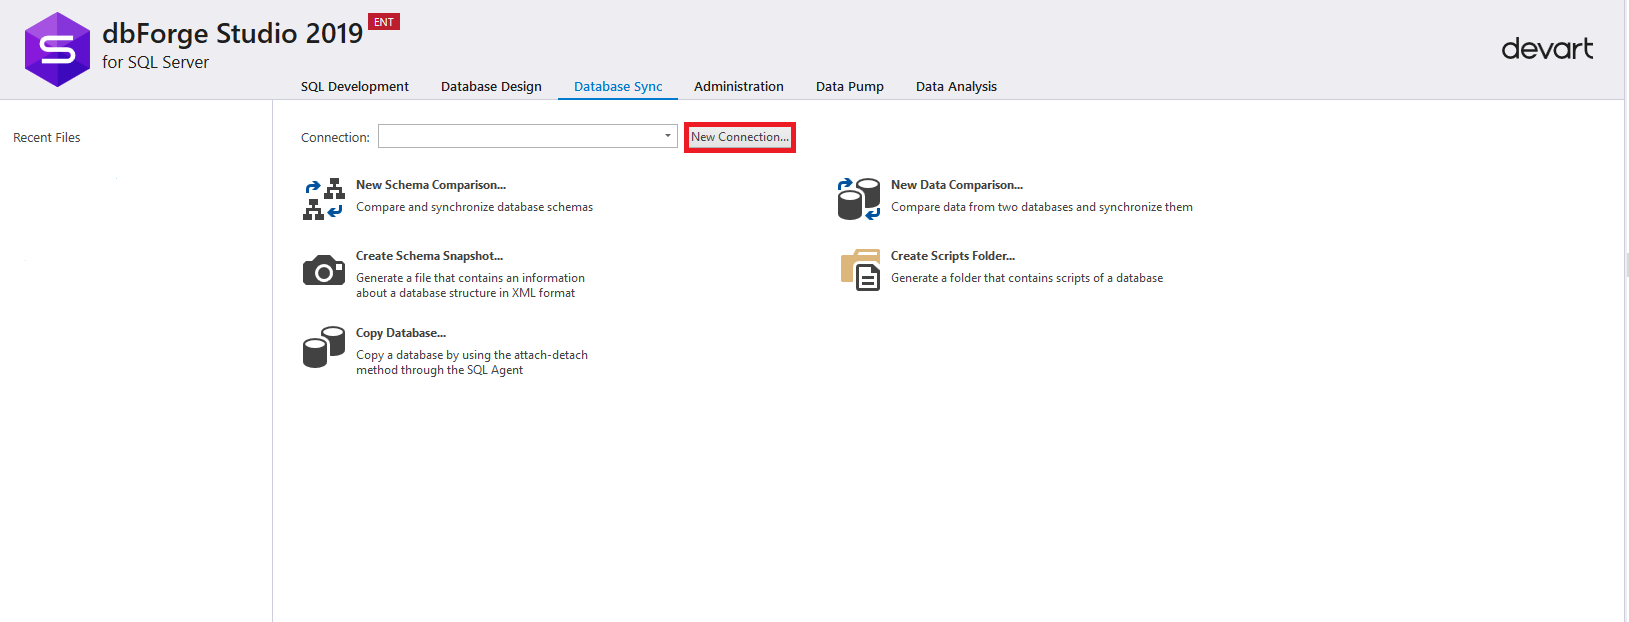
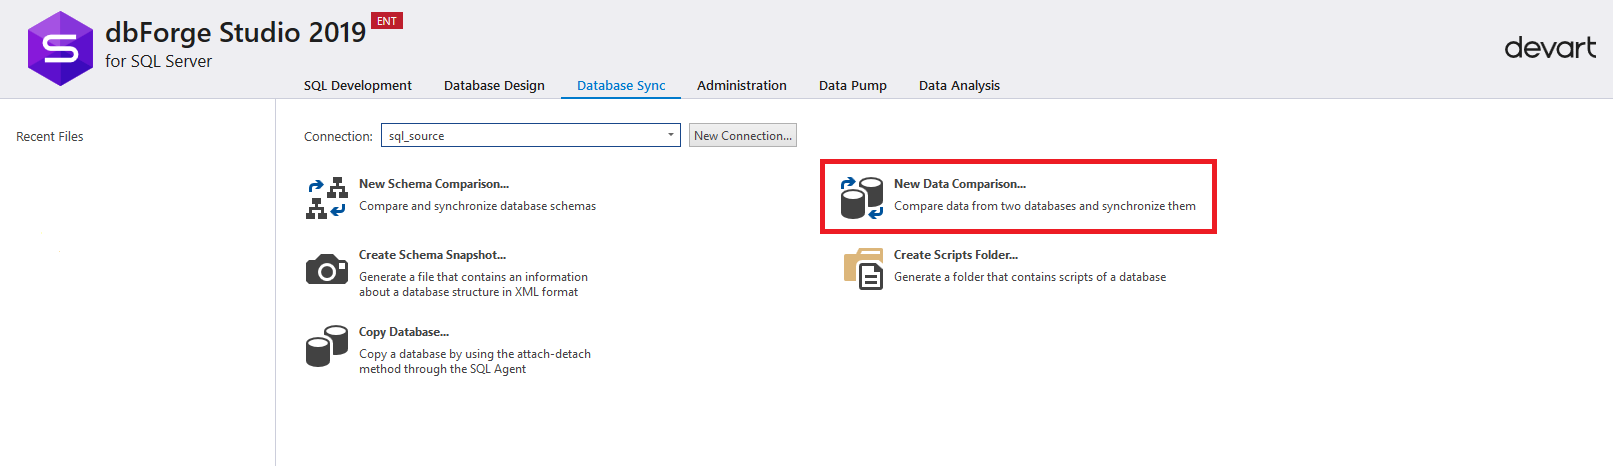
After opening the studio, go to the “Database Sync” tab and create a new connection by clicking on the “New Connection” button:
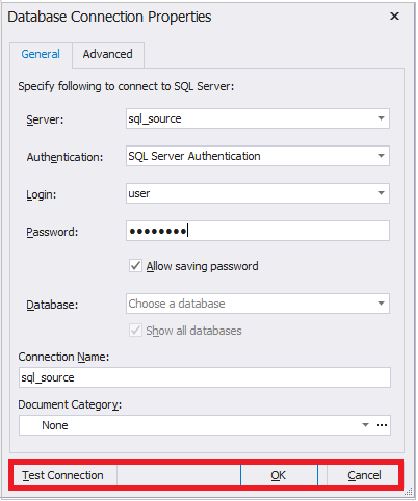
In the connection settings window that opens, you must enter the necessary data to connect to the MS SQL Server instance (source server). Please note that in addition to MS SQL Server, Windows, Active Directory authentication, authentication through MFA has appeared. After filling in all the necessary fields, click on the “Test Connection” button to test the connection:
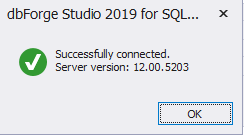
After the connection is established, the following dialog box appears:
Next, click on the “OK” button in the dialog box and the same button in the connection settings window.
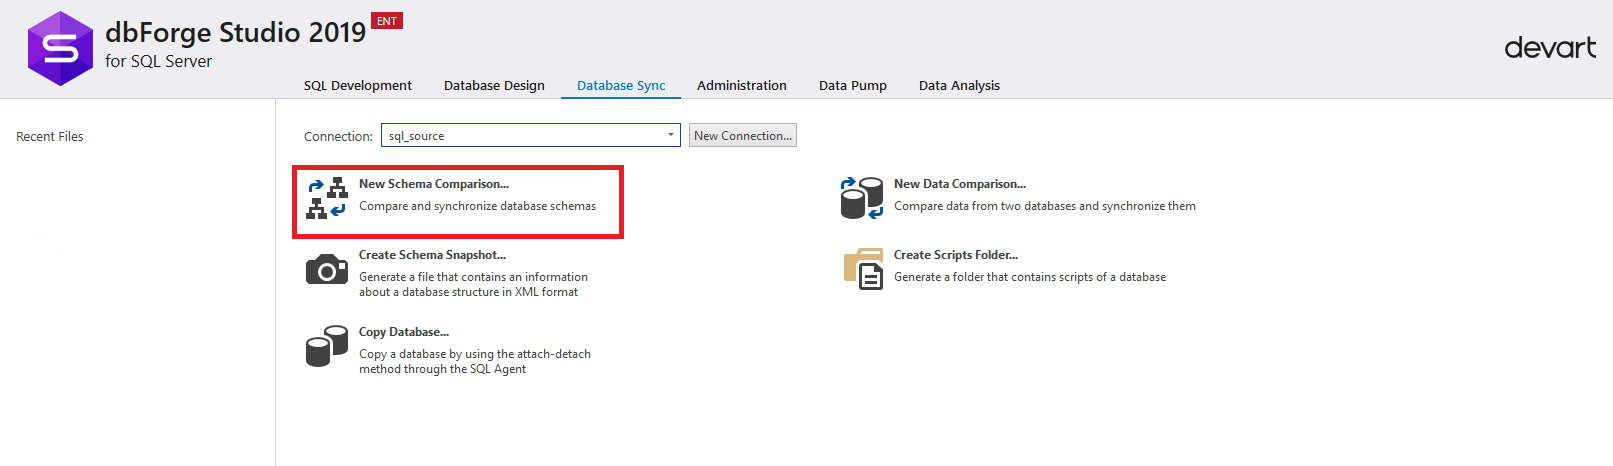
Now a new connection has appeared:

Similarly, you need to connect all the necessary instances of MS SQL Server (in this example, you need to create a connection for the destination server).
After that, click on “New Schema Comparison” to configure the process of comparing database schemas on the source server and the database on the destination server:
A settings window for comparing circuits will appear.
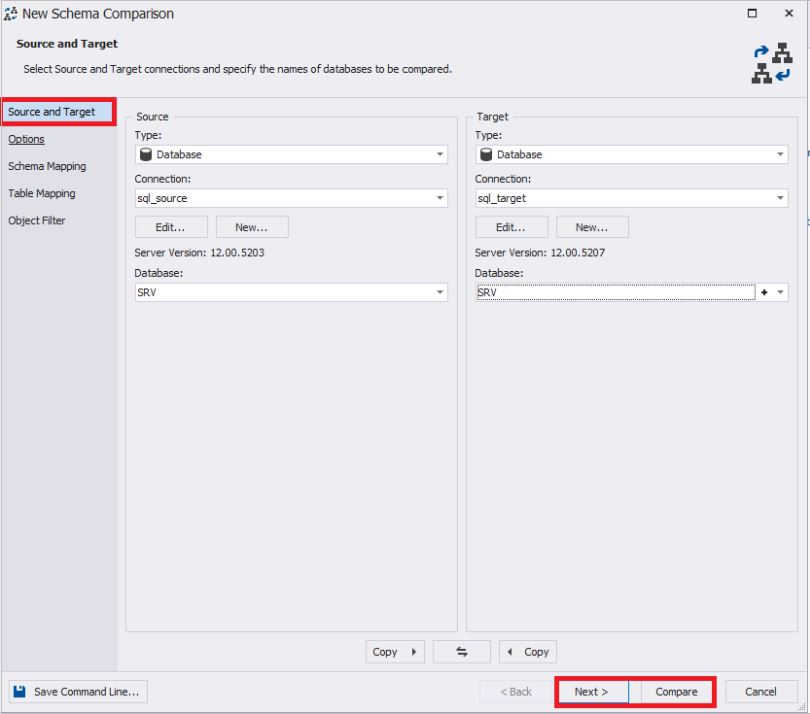
On the "Source and Target" tab on the left in the Source panel, you must select:
On the right in the Target panel you need to select:
Please note that in the type you can select not only the database, but also the script directory, snapshot, version control and backup. In our case, we select in the "database" type.
After selecting all the settings, you must click on the “Next” button to continue setting up synchronization of database schemas.
If two initially identical databases are compared, then you can immediately start comparing the schemas by clicking on the “Compare” button.
If necessary, you can go to any settings tab by clicking on the corresponding item in the left window.
At any stage, you can save the settings as a bat-file by clicking on the “Save Command Line” button in the lower left of the window.
In most cases, when rolling changes between initially identical databases, just click on the “Compare” button. But for functional research it is necessary to click “Next”:
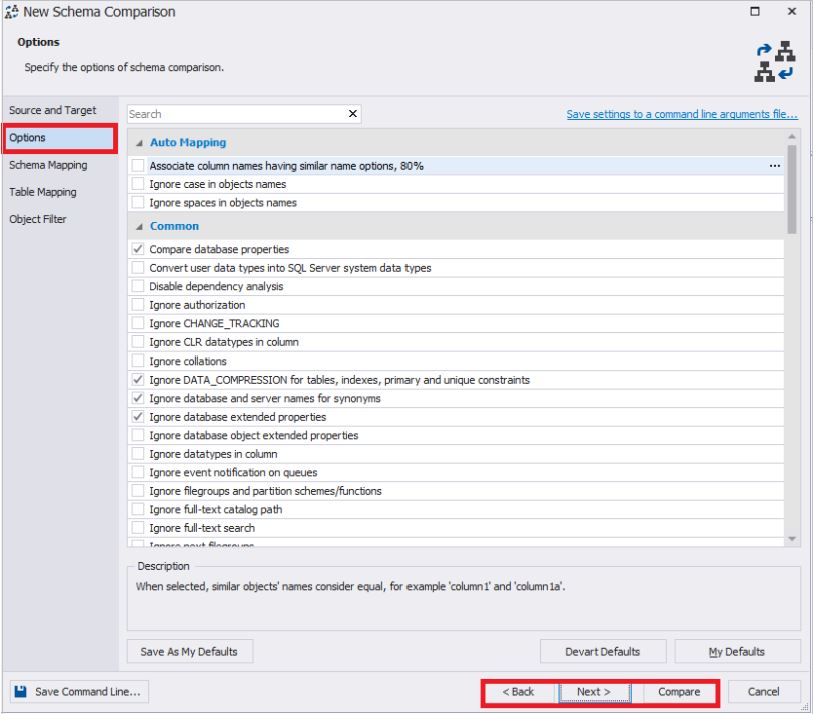
In the Options tab, you can set various settings or leave them by default:
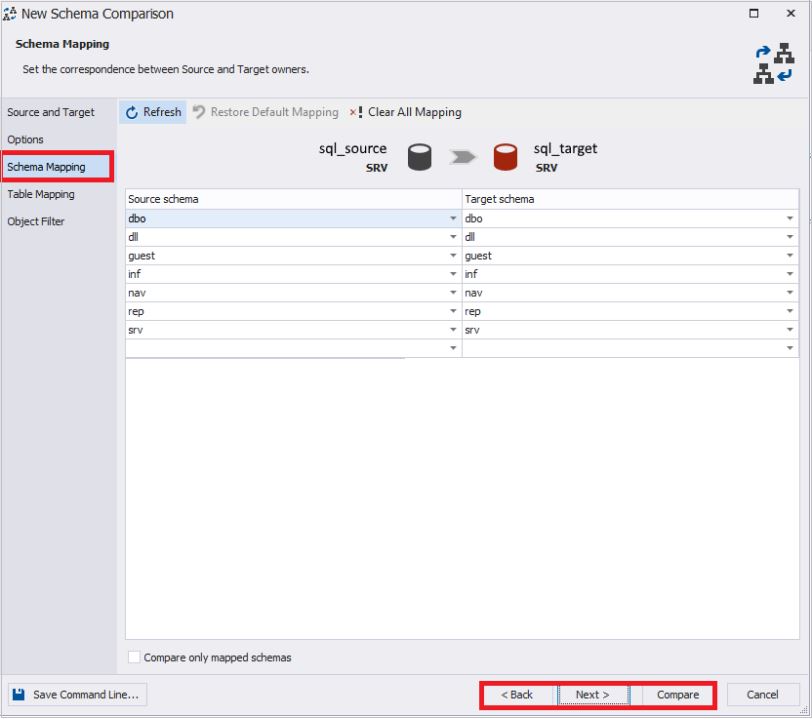
In the “Schema Mapping” tab, you can configure the mapping of schemes by name:
In the “Table Mapping” tab, you can configure the mapping of tables and columns:

In the “Object Filter” tab, you can specify objects for comparison.
After that, if necessary, you can return to the previous steps.
At the end, you must click on the “Compare” button to start the process of comparing the schemes of the specified databases:

The database schema comparison settings window will disappear, and a window will appear with an indicator of the comparison process:

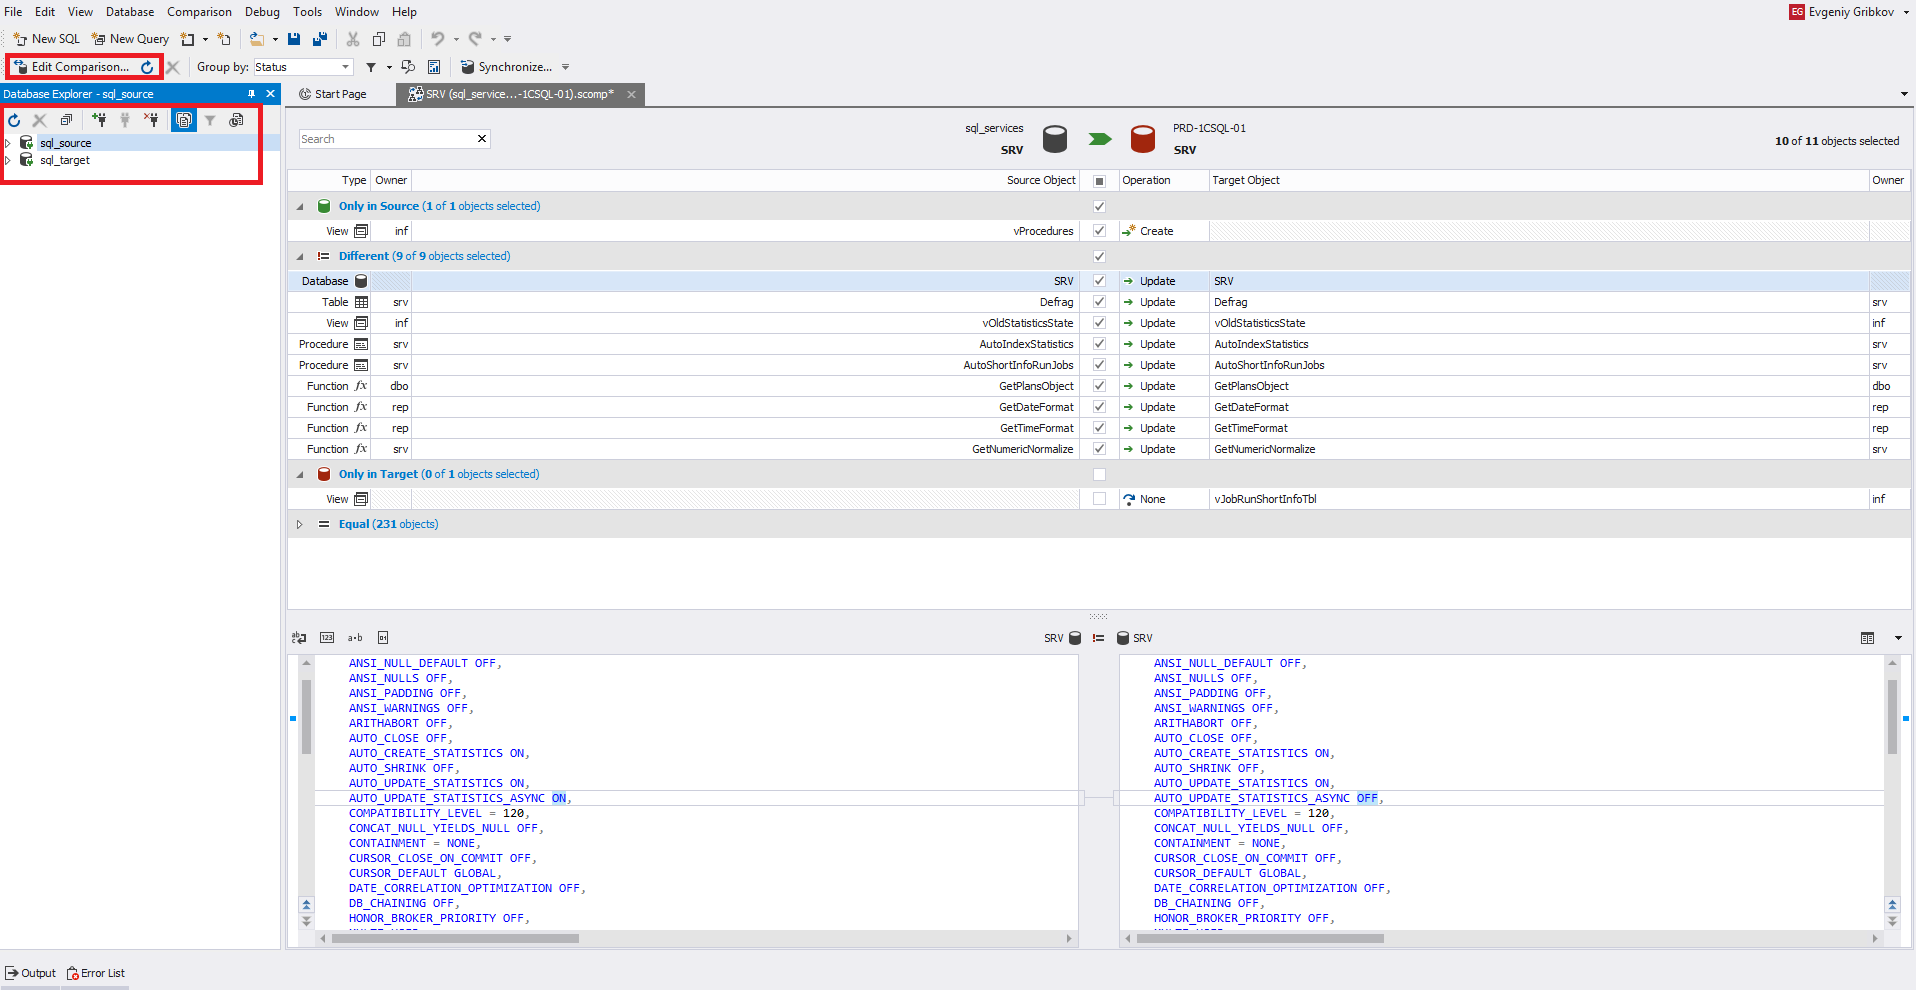
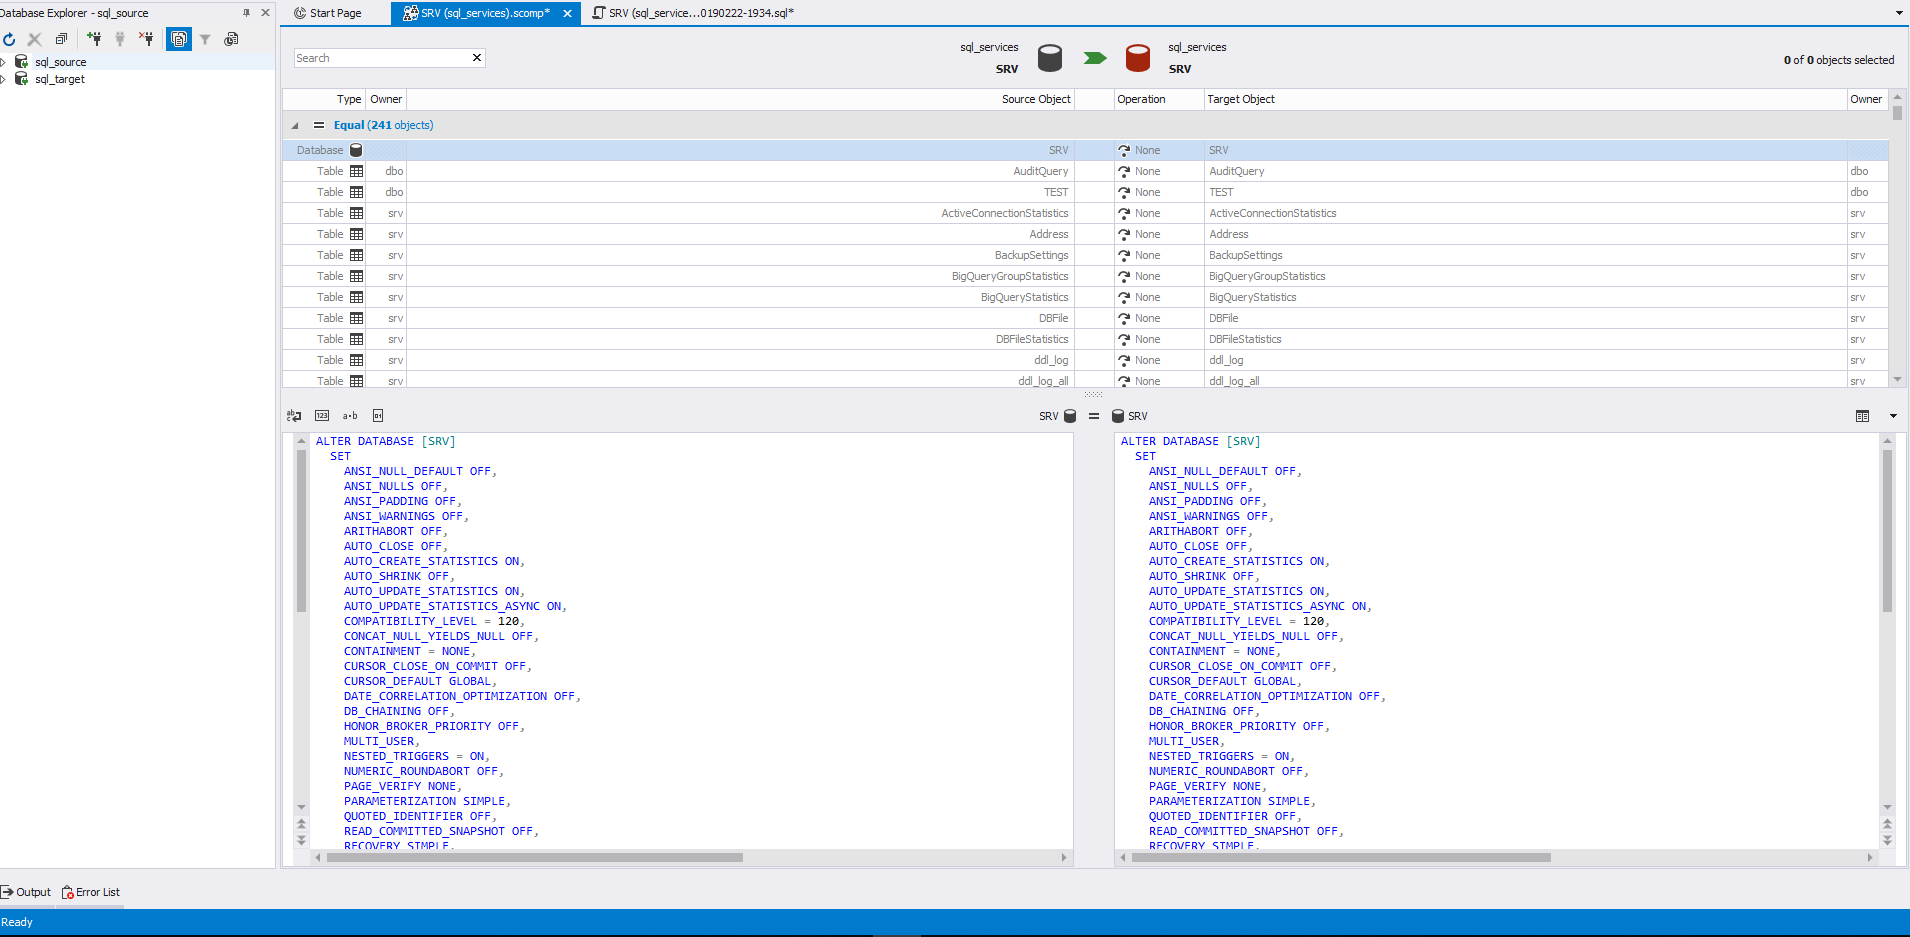
At the end of the process, pay attention to the window. You can change the comparison settings by clicking on the “Edit Comparison” button in the upper left corner of the window. To the right of this button is a circle with an arrow - this is the update button, which starts the process of comparing schemes again. Also located below are all previously registered servers:
Through the main menu in File, you can save the settings for comparing circuits as a file with the scomp extension.
Now let's pay attention to the central part of the window. Here you need to select the necessary objects for synchronization with checkmarks. On the left are the source objects, and on the right, the receiver. Below in the same way is the code for defining objects. Objects for comparison are divided into 4 sections with a count of the number of these objects in each section.
Here, a table is selected for viewing the definition code, which is both in the source and in the receiver. Therefore, this object is located in the "Different" section:

When you select this object, its definition code on the left will be moved to the right when synchronizing database schemes for the receiver.
Here, to view the definition code, a view is selected that is only in the source. Therefore, this object is located in the “Only in source” section and there is no definition code for it on the right:
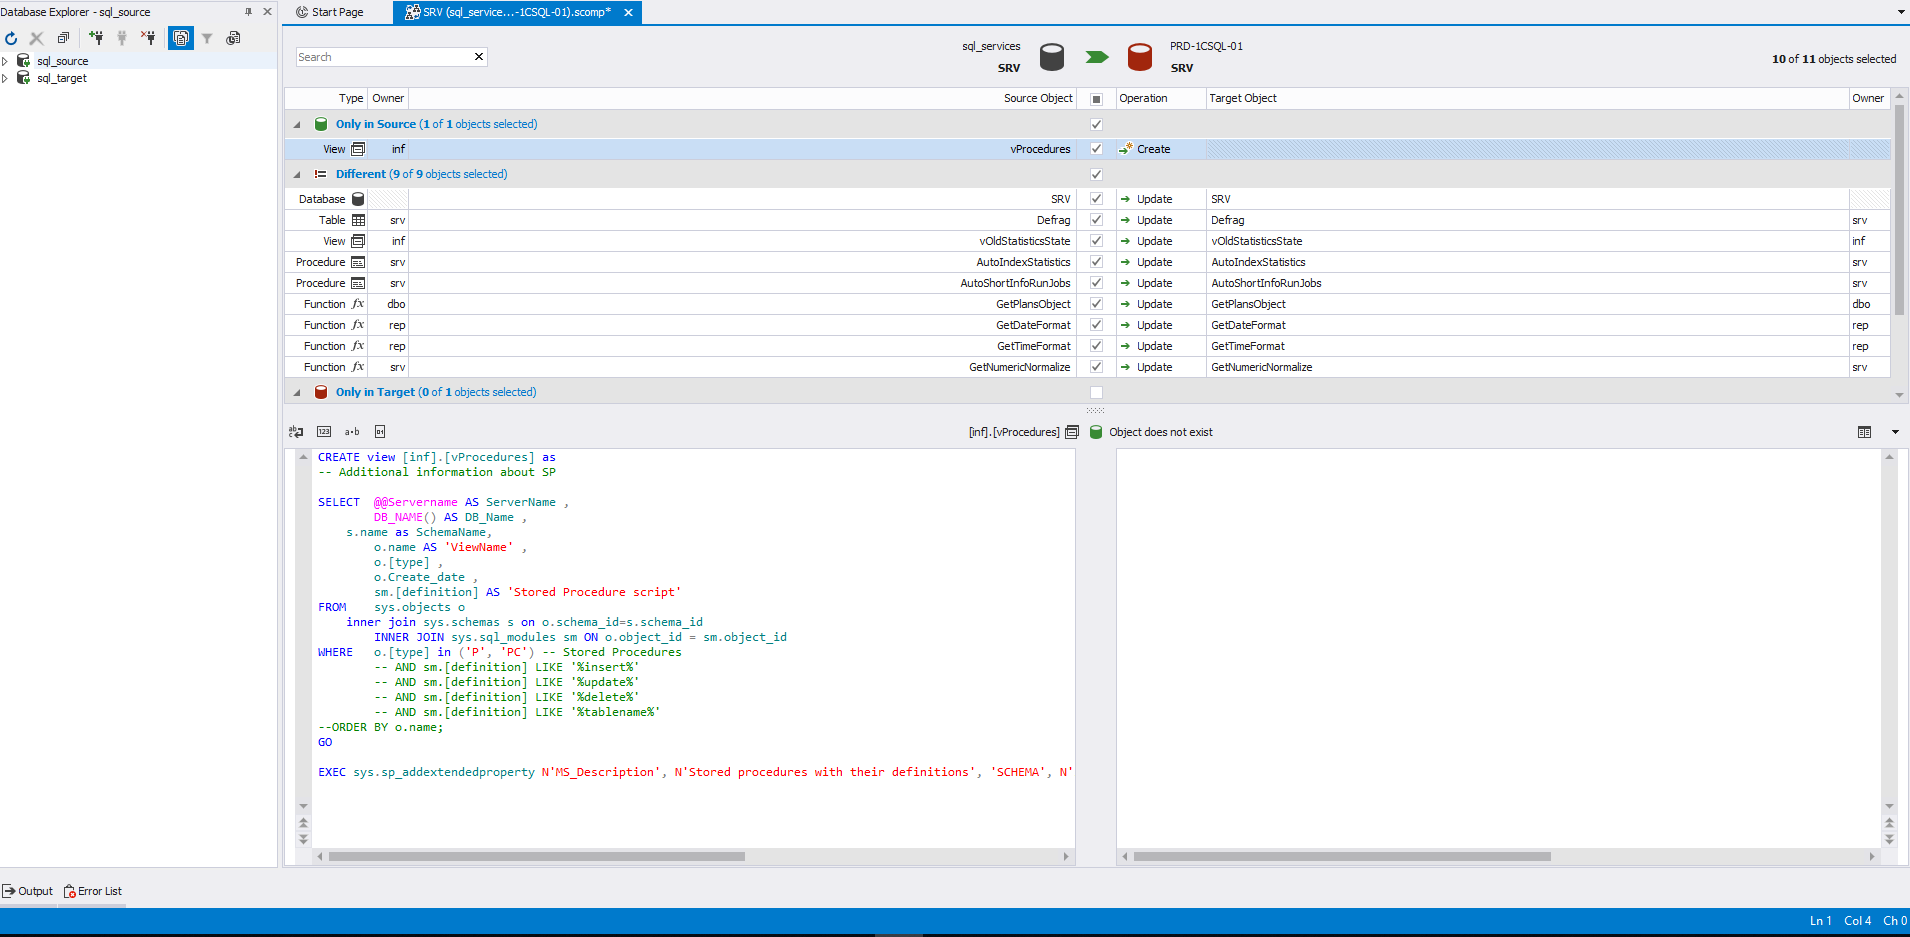
When choosing such an object, its creation code will be generated for the receiver.
Here, to view the definition code, a view is selected that is only in the receiver. Therefore, this object is located in the “Only in target” section and there is no definition code for it on the left:
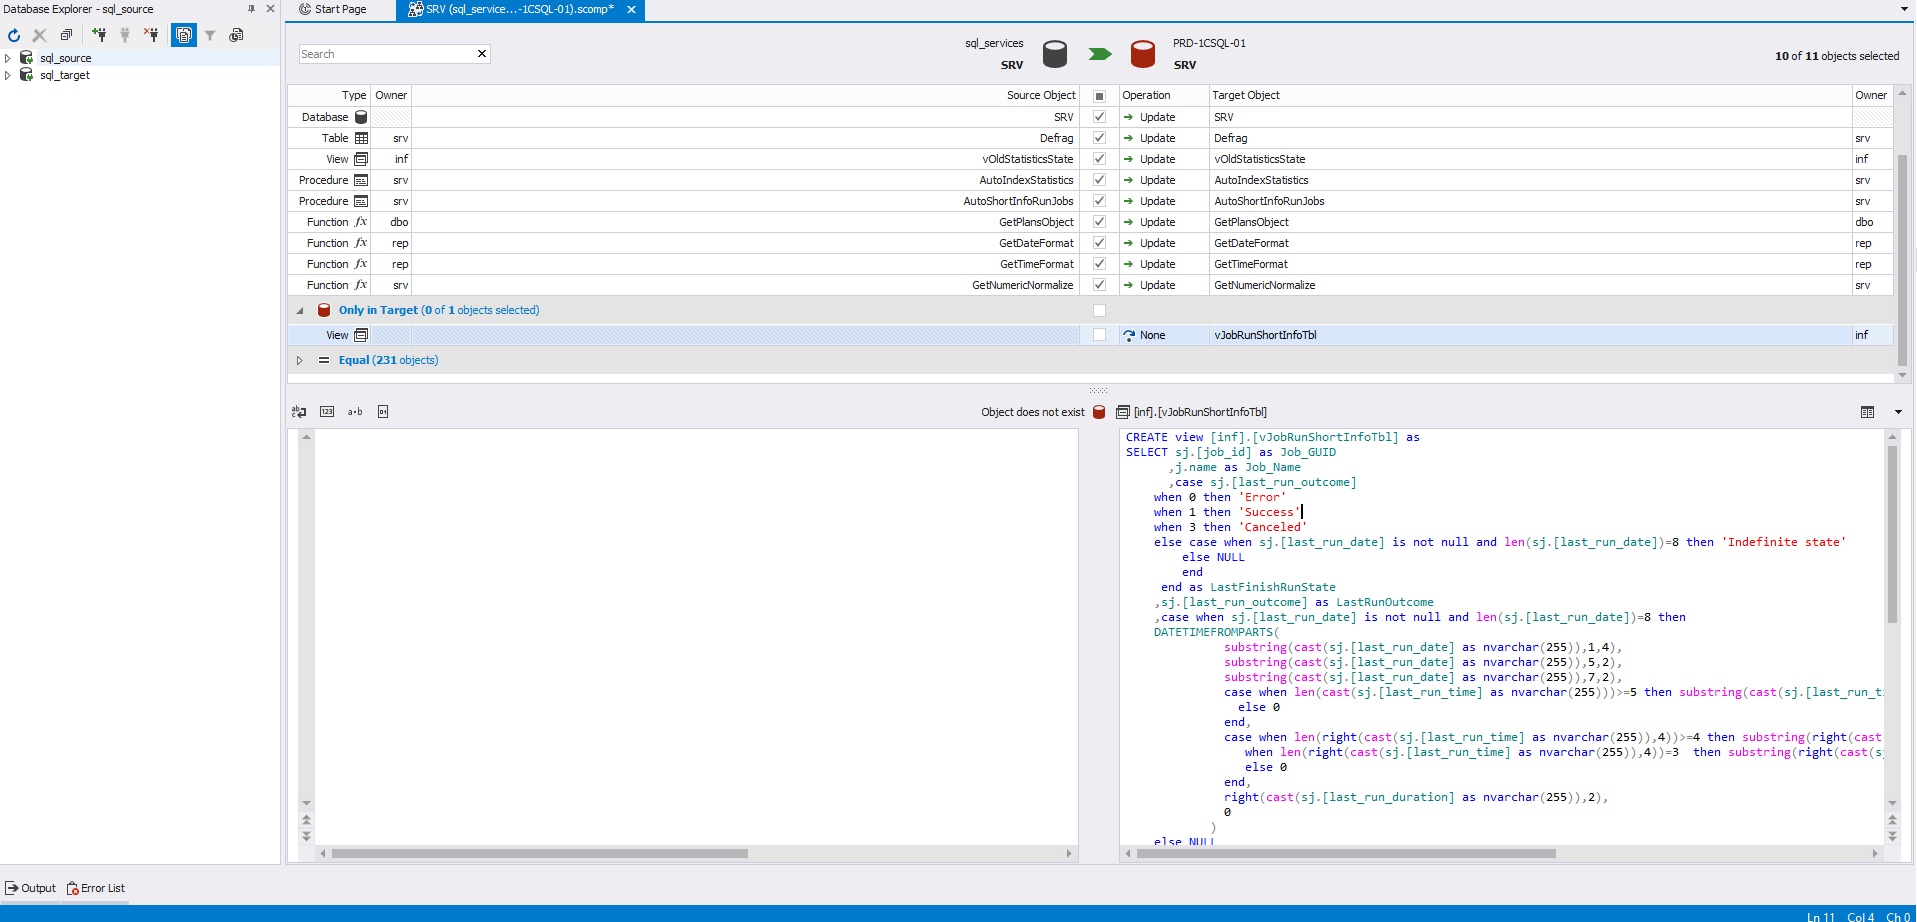
When choosing such an object, its deletion code will be generated for the receiver.
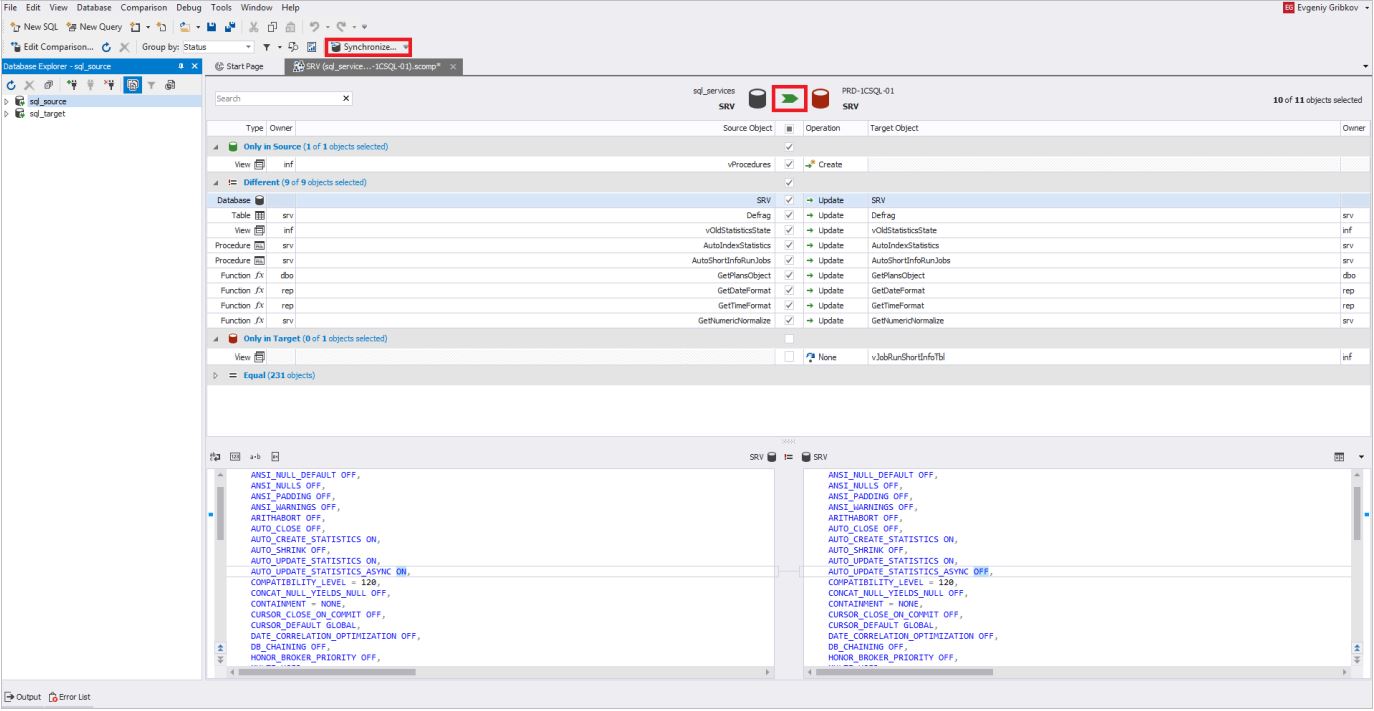
Next, to start the process of synchronizing database schemas, click on one of the buttons highlighted in red in the picture:
In the “Output” tab, you must specify how the synchronization process will occur. Usually the script generation is selected in the studio or in a file. In our case, we will choose the first option. It is recommended that you carefully go through the sequence of all the tabs for setting up the synchronization process:
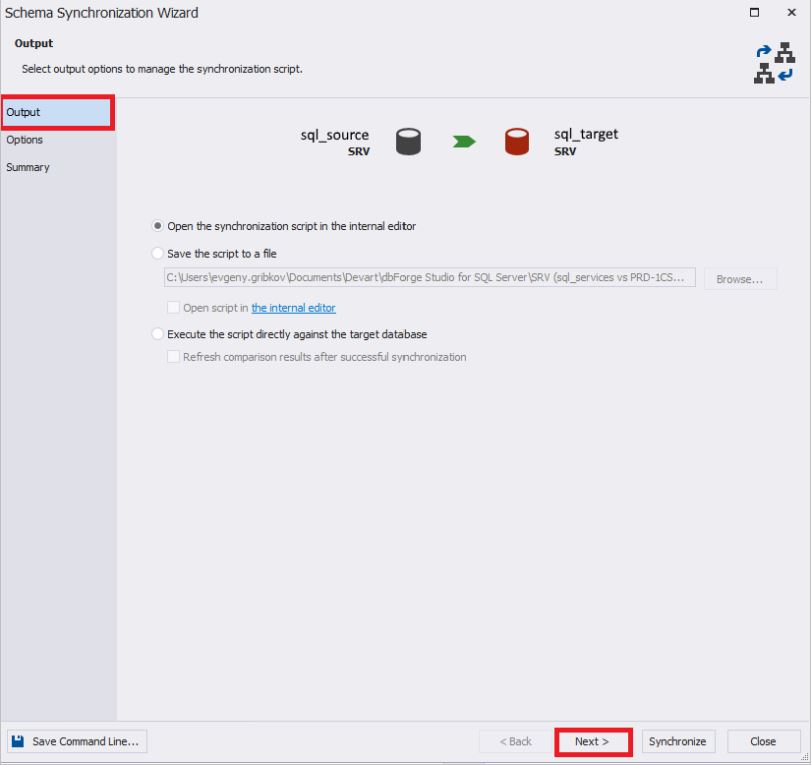
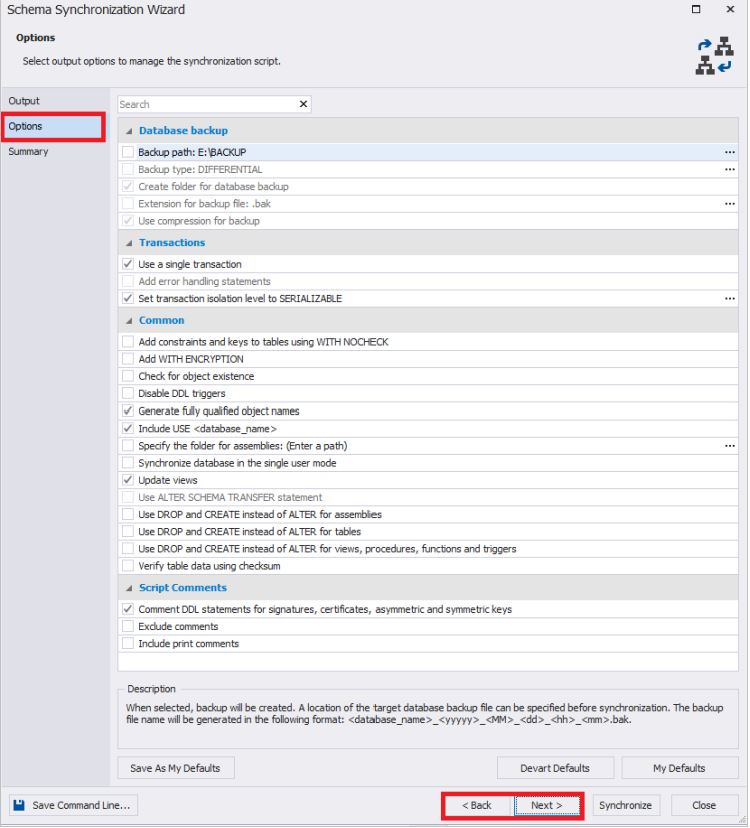
In the “Options” tab, you can set various settings for synchronizing database schemas.
Usually, all settings from the Database backup group are removed.
By default, in the settings group “Transactions”, “Use a single transaction” and “Set transaction isolation level to SERIALIZABLE” are set, which prevents situations in which only parts of the changes can be applied - i.e. changes will be applied in full or not at all:
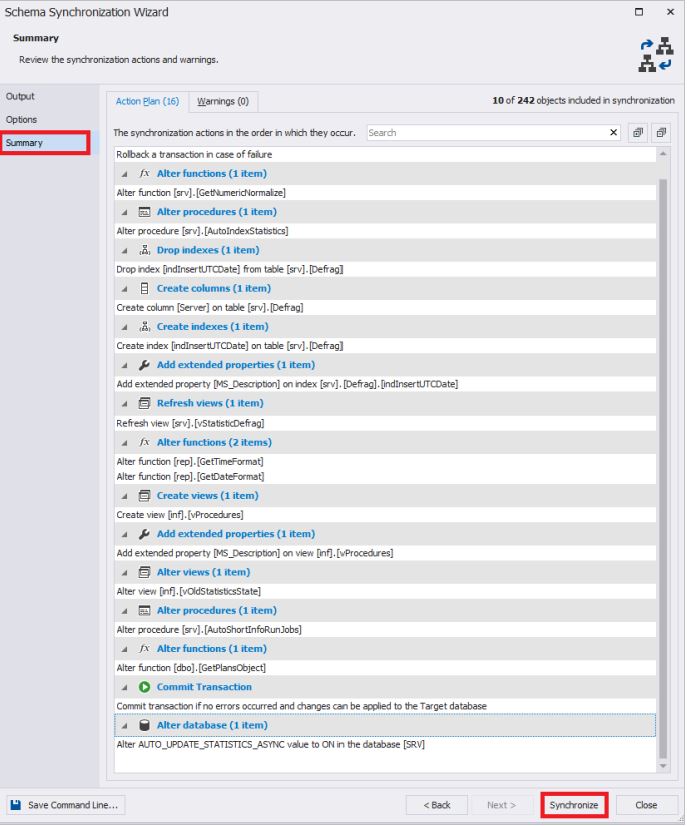
The Summary tab displays the results of the selection of synchronization settings. If necessary, you can return to the previous paragraphs.
Please note that the settings for synchronizing database schemas can also be saved to a bat file by clicking on the “Save Command Line” button in the lower left of the window.
At the end, you need to click on the “Synchronize” button to start the process of generating a script for synchronizing database schemas:
Upon completion, a script will be generated in a new window:
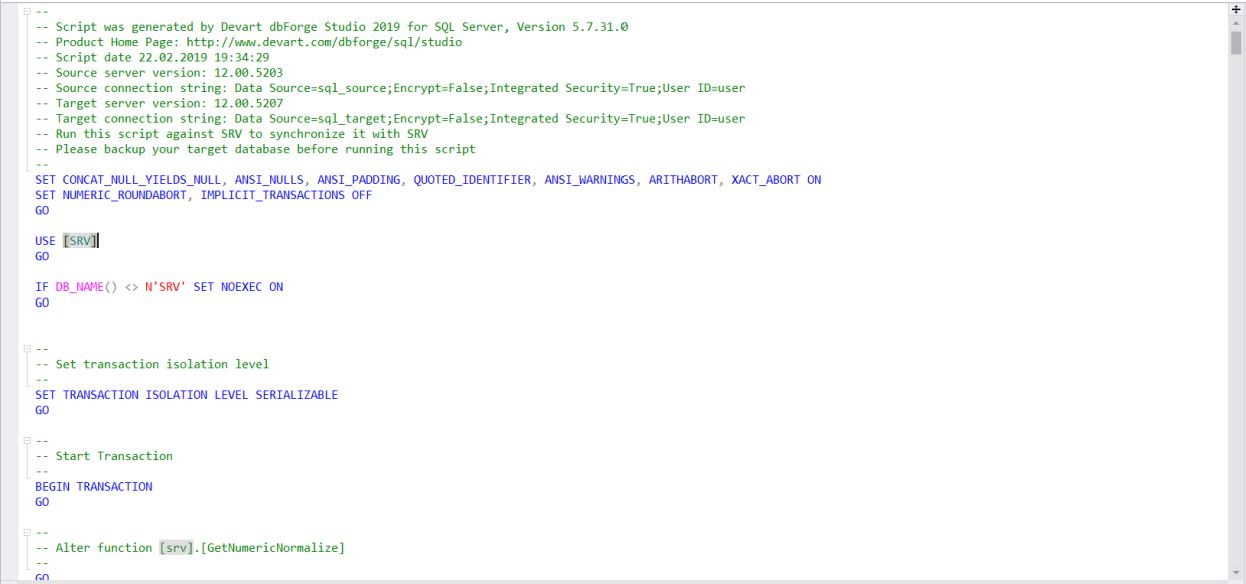
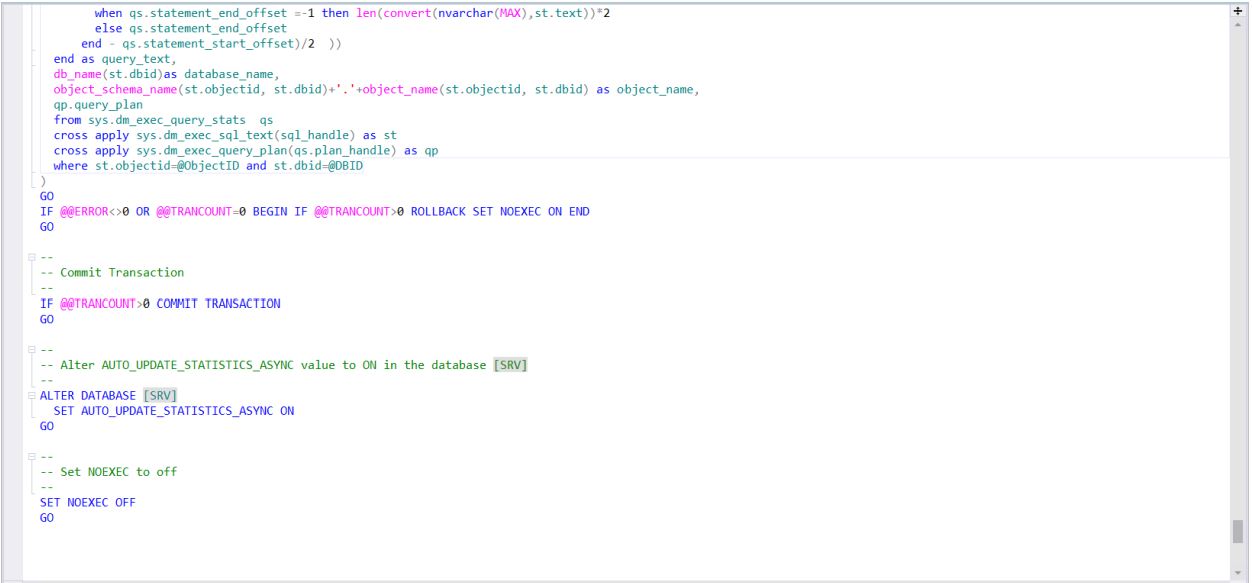
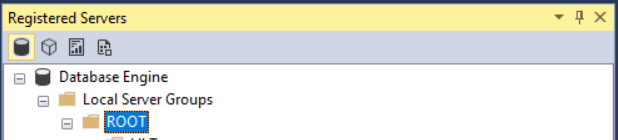
This script is the code for transferring database schema changes from source to receiver. It can be used on the destination server or saved to a file for later use on the destination server. As a rule, in any case, this script is saved in order to apply it on several servers for the same database after all the checks. This can be done using groups of registered servers in SSMS by sending the resulting script immediately to the entire desired group of servers:
After synchronization, previously selected objects should disappear from the circuit comparison window:
It is assumed that the necessary connections have been created as described above in “Database Schema Synchronization”.
After that, you need to click "New Data Comparison" to configure the process of comparing the database data on the source server and the database on the destination server:
A settings window for comparing data will appear.
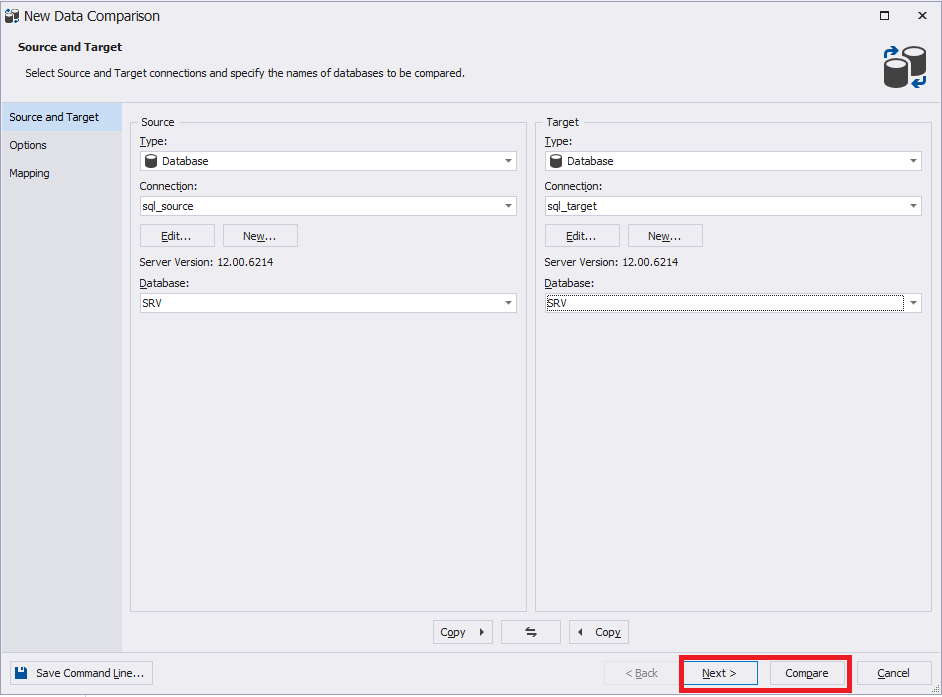
On the "Source and Target" tab on the left in the Source panel, you must select:
On the right in the Target panel you need to select:
Note that in the type you can select not only the database, but also the script directory and backup. In our case, we select in the "database" type.
After selecting all the settings, click “Next” to continue setting up the synchronization of database data.
Unlike circuit comparison, when comparing data, it is recommended that you go through all the configuration steps in sequence.
If necessary, you can go to any settings tab by clicking on the corresponding window element on the left.
At any stage, you can save the settings as a bat file by clicking the “Save Command Line” in the lower left of the window.
After setting the “Source and Target” tab, click “Next”:
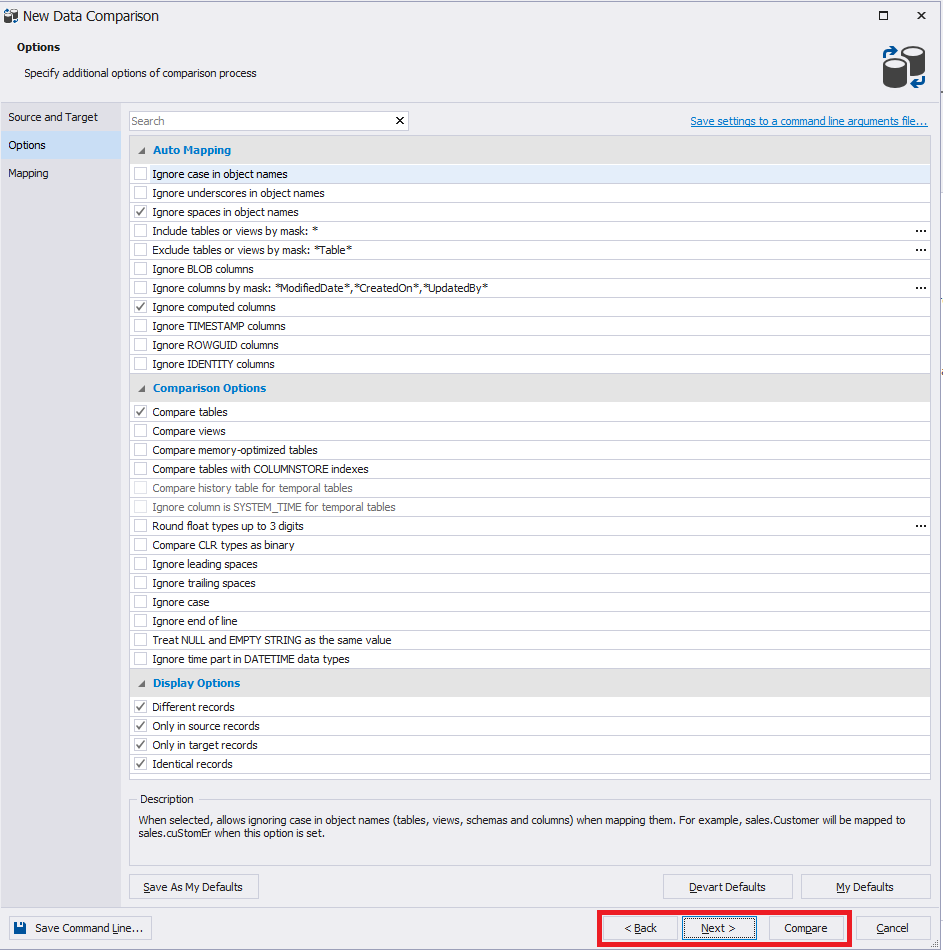
In the Options tab, you can set various settings or leave them by default:
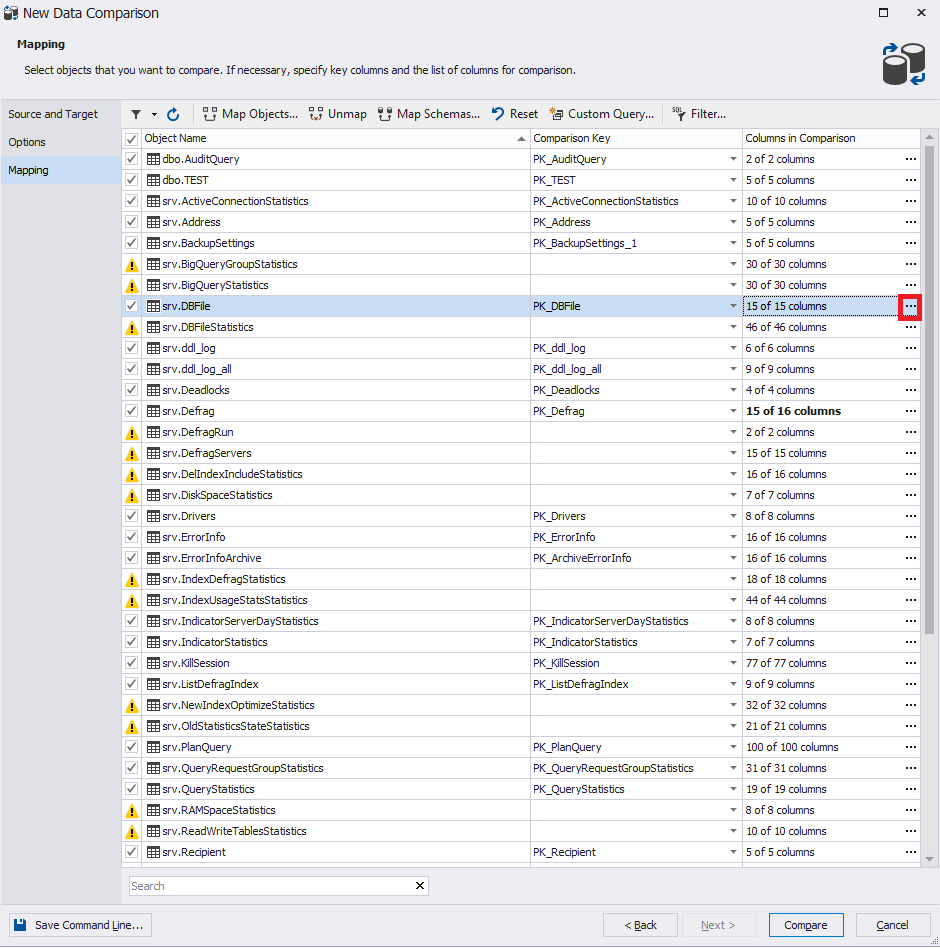
The “Mapping” tab provides a list of tables for data synchronization. Exclamation marks indicate those tables in which there is no primary key. For such tables, matching must be done manually. To do this, select the desired row (table) and on the right click on the ellipsis:
The matching window will appear:

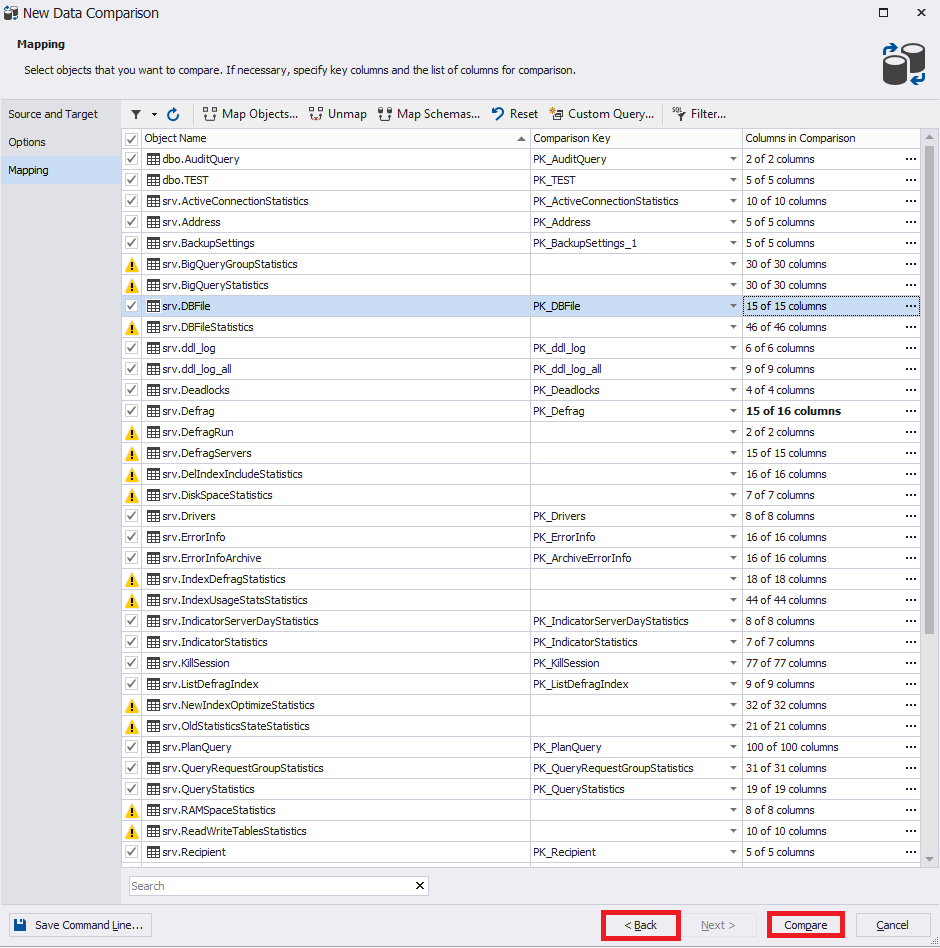
After that, if necessary, you can return to the previous steps.
At the end, click “Compare” to start the process of comparing the data of the specified databases:
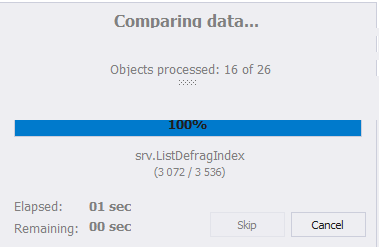
The settings window for comparing database data will disappear and a window will appear with an indicator of the progress of the comparison:
At the end of the process, pay attention to the window. You can change the comparison settings by clicking “Edit Comparison” in the upper left corner of the window. To the right of this button is a circle with an arrow - this is an update button that starts the data comparison process again. Also located below are all previously registered servers:

Through the main menu in File, you can save the settings for comparing circuits as a file with the dcomp extension.
Now let's pay attention to the central part of the window. Here you need to select the necessary objects for synchronization with checkmarks. On the left are the source objects, and on the right - the receiver:

The following information is displayed below:
At the bottom left, if necessary, you can select not all the lines for changes, but the ones you need. By default, all rows are selected:
You can also switch between added, changed, and deleted rows using the tabs above the data table itself:
To control the visibility of the desired columns (fields) there is the necessary functionality:
By default, all columns are selected.
Next, to start the database data synchronization process itself, you need to click on one of the buttons highlighted in red in the picture:

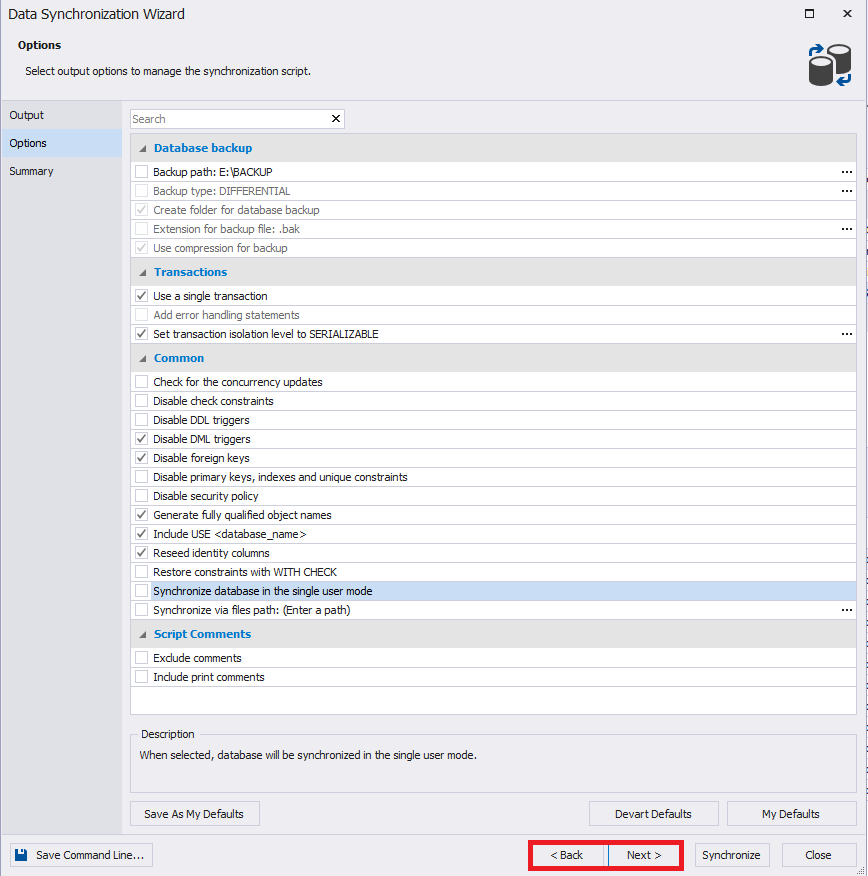
In the “Output” tab, you must specify how the synchronization process will occur. Usually the script generation is selected in the studio or in a file. In our case, we will choose the first option. It is recommended that you carefully go through the sequence of all the tabs for setting up the synchronization process:
In the Options tab, you can set various settings for synchronization.
Usually, all settings from the Database backup group are removed.
By default, in the settings group “Transactions”, “Use a single transaction” and “Set transaction isolation level to SERIALIZABLE” are set, which prevents situations in which only parts of the changes can be applied - i.e. changes will be applied in full or not at all:
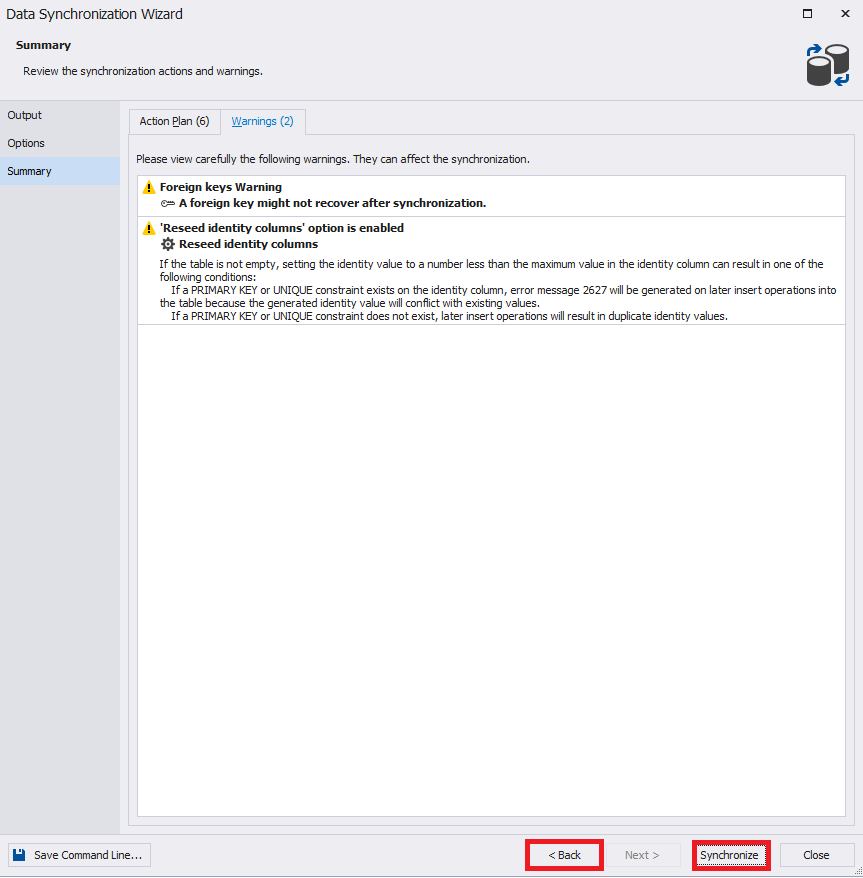
The Summary tab displays the results of the selection of synchronization settings. If necessary, you can return to the previous paragraphs.
Please note that the settings for synchronizing database schemas can also be saved in a bat file by clicking the "Save Command Line" in the lower left of the window.
At the end, you need to click "Synchronize" to start the process of generating a synchronization script:
Upon completion, a script will be generated in a new window:
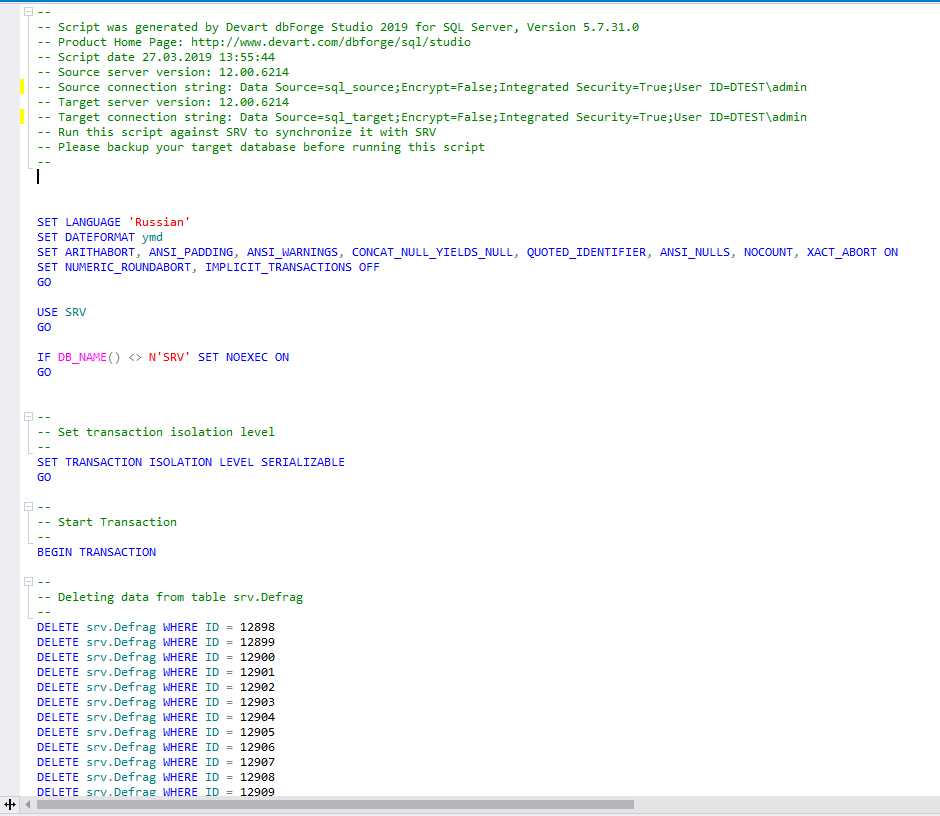
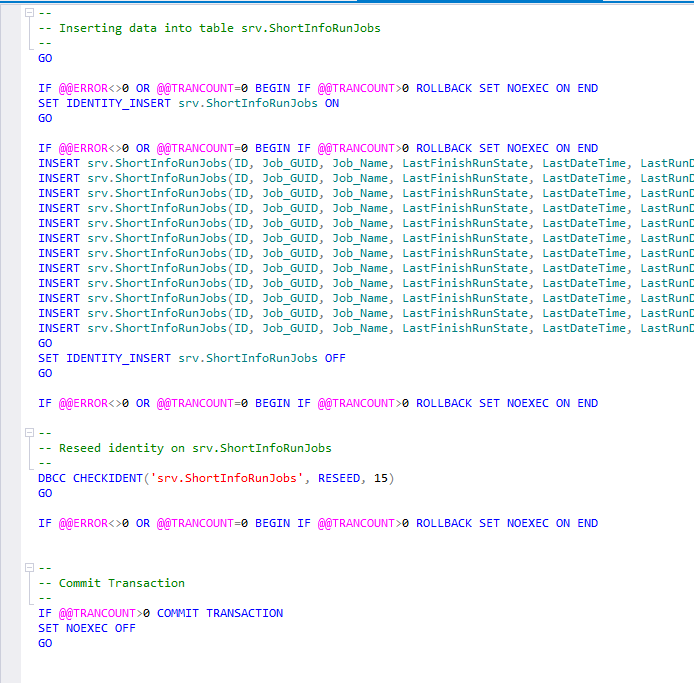
This script is the code for transferring data changes from the source to the receiver. It can be applied on the server-receiver or saved to a file for later use on the server-receiver.
After synchronization, previously selected objects should disappear from the data comparison window.
In addition to dbForge Studio for SQL Server itself, you can use the dbForge Compare Bungle for SQL Server tool from Devart, which is built into SQL Server Management Studio (SSMS), to compare data and database schemas. Consider an example of using this tool in SSMS:
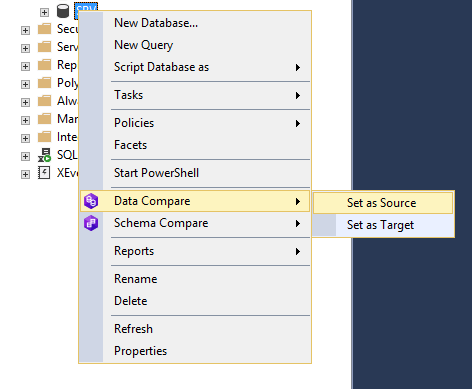
Here you need to right-click on the desired database and select the desired action: data comparison or circuit comparison. After that, install the selected database as a source or as a receiver. Similarly, select the second database as a receiver or as a source.
After setting the source and receiver, to start the configuration of data synchronization or database schema, click on the green arrow in the middle of the screen:
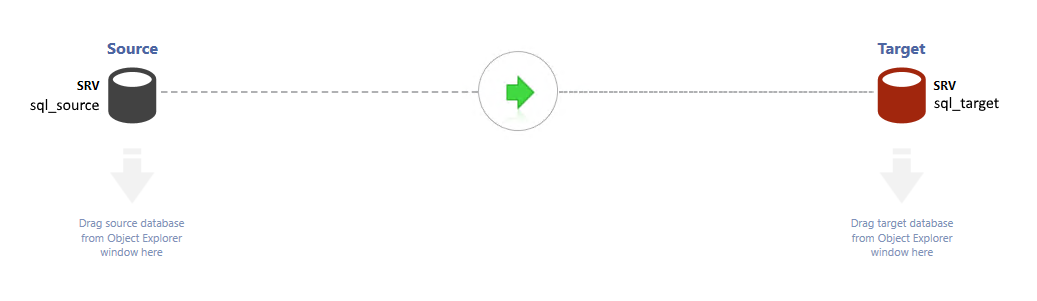
After that, the familiar window for setting data synchronization or database schemas will appear, depending on what was previously selected.
Database Schema Synchronization
After opening the studio, go to the “Database Sync” tab and create a new connection by clicking on the “New Connection” button:
In the connection settings window that opens, you must enter the necessary data to connect to the MS SQL Server instance (source server). Please note that in addition to MS SQL Server, Windows, Active Directory authentication, authentication through MFA has appeared. After filling in all the necessary fields, click on the “Test Connection” button to test the connection:
After the connection is established, the following dialog box appears:
Next, click on the “OK” button in the dialog box and the same button in the connection settings window.
Now a new connection has appeared:
Similarly, you need to connect all the necessary instances of MS SQL Server (in this example, you need to create a connection for the destination server).
After that, click on “New Schema Comparison” to configure the process of comparing database schemas on the source server and the database on the destination server:
A settings window for comparing circuits will appear.
On the "Source and Target" tab on the left in the Source panel, you must select:
- type of
- connection
- source database
On the right in the Target panel you need to select:
- type of
- connection
- receiver database
Please note that in the type you can select not only the database, but also the script directory, snapshot, version control and backup. In our case, we select in the "database" type.
After selecting all the settings, you must click on the “Next” button to continue setting up synchronization of database schemas.
If two initially identical databases are compared, then you can immediately start comparing the schemas by clicking on the “Compare” button.
If necessary, you can go to any settings tab by clicking on the corresponding item in the left window.
At any stage, you can save the settings as a bat-file by clicking on the “Save Command Line” button in the lower left of the window.
In most cases, when rolling changes between initially identical databases, just click on the “Compare” button. But for functional research it is necessary to click “Next”:
In the Options tab, you can set various settings or leave them by default:
In the “Schema Mapping” tab, you can configure the mapping of schemes by name:
In the “Table Mapping” tab, you can configure the mapping of tables and columns:
In the “Object Filter” tab, you can specify objects for comparison.
After that, if necessary, you can return to the previous steps.
At the end, you must click on the “Compare” button to start the process of comparing the schemes of the specified databases:
The database schema comparison settings window will disappear, and a window will appear with an indicator of the comparison process:
At the end of the process, pay attention to the window. You can change the comparison settings by clicking on the “Edit Comparison” button in the upper left corner of the window. To the right of this button is a circle with an arrow - this is the update button, which starts the process of comparing schemes again. Also located below are all previously registered servers:
Through the main menu in File, you can save the settings for comparing circuits as a file with the scomp extension.
Now let's pay attention to the central part of the window. Here you need to select the necessary objects for synchronization with checkmarks. On the left are the source objects, and on the right, the receiver. Below in the same way is the code for defining objects. Objects for comparison are divided into 4 sections with a count of the number of these objects in each section.
Here, a table is selected for viewing the definition code, which is both in the source and in the receiver. Therefore, this object is located in the "Different" section:
When you select this object, its definition code on the left will be moved to the right when synchronizing database schemes for the receiver.
Here, to view the definition code, a view is selected that is only in the source. Therefore, this object is located in the “Only in source” section and there is no definition code for it on the right:
When choosing such an object, its creation code will be generated for the receiver.
Here, to view the definition code, a view is selected that is only in the receiver. Therefore, this object is located in the “Only in target” section and there is no definition code for it on the left:
When choosing such an object, its deletion code will be generated for the receiver.
Next, to start the process of synchronizing database schemas, click on one of the buttons highlighted in red in the picture:
In the “Output” tab, you must specify how the synchronization process will occur. Usually the script generation is selected in the studio or in a file. In our case, we will choose the first option. It is recommended that you carefully go through the sequence of all the tabs for setting up the synchronization process:
In the “Options” tab, you can set various settings for synchronizing database schemas.
Usually, all settings from the Database backup group are removed.
By default, in the settings group “Transactions”, “Use a single transaction” and “Set transaction isolation level to SERIALIZABLE” are set, which prevents situations in which only parts of the changes can be applied - i.e. changes will be applied in full or not at all:
The Summary tab displays the results of the selection of synchronization settings. If necessary, you can return to the previous paragraphs.
Please note that the settings for synchronizing database schemas can also be saved to a bat file by clicking on the “Save Command Line” button in the lower left of the window.
At the end, you need to click on the “Synchronize” button to start the process of generating a script for synchronizing database schemas:
Upon completion, a script will be generated in a new window:
This script is the code for transferring database schema changes from source to receiver. It can be used on the destination server or saved to a file for later use on the destination server. As a rule, in any case, this script is saved in order to apply it on several servers for the same database after all the checks. This can be done using groups of registered servers in SSMS by sending the resulting script immediately to the entire desired group of servers:
After synchronization, previously selected objects should disappear from the circuit comparison window:
Database Data Sync
It is assumed that the necessary connections have been created as described above in “Database Schema Synchronization”.
After that, you need to click "New Data Comparison" to configure the process of comparing the database data on the source server and the database on the destination server:
A settings window for comparing data will appear.
On the "Source and Target" tab on the left in the Source panel, you must select:
- type of
- connection
- source database
On the right in the Target panel you need to select:
- type of
- connection
- receiver database
Note that in the type you can select not only the database, but also the script directory and backup. In our case, we select in the "database" type.
After selecting all the settings, click “Next” to continue setting up the synchronization of database data.
Unlike circuit comparison, when comparing data, it is recommended that you go through all the configuration steps in sequence.
If necessary, you can go to any settings tab by clicking on the corresponding window element on the left.
At any stage, you can save the settings as a bat file by clicking the “Save Command Line” in the lower left of the window.
After setting the “Source and Target” tab, click “Next”:
In the Options tab, you can set various settings or leave them by default:
The “Mapping” tab provides a list of tables for data synchronization. Exclamation marks indicate those tables in which there is no primary key. For such tables, matching must be done manually. To do this, select the desired row (table) and on the right click on the ellipsis:
The matching window will appear:
After that, if necessary, you can return to the previous steps.
At the end, click “Compare” to start the process of comparing the data of the specified databases:
The settings window for comparing database data will disappear and a window will appear with an indicator of the progress of the comparison:
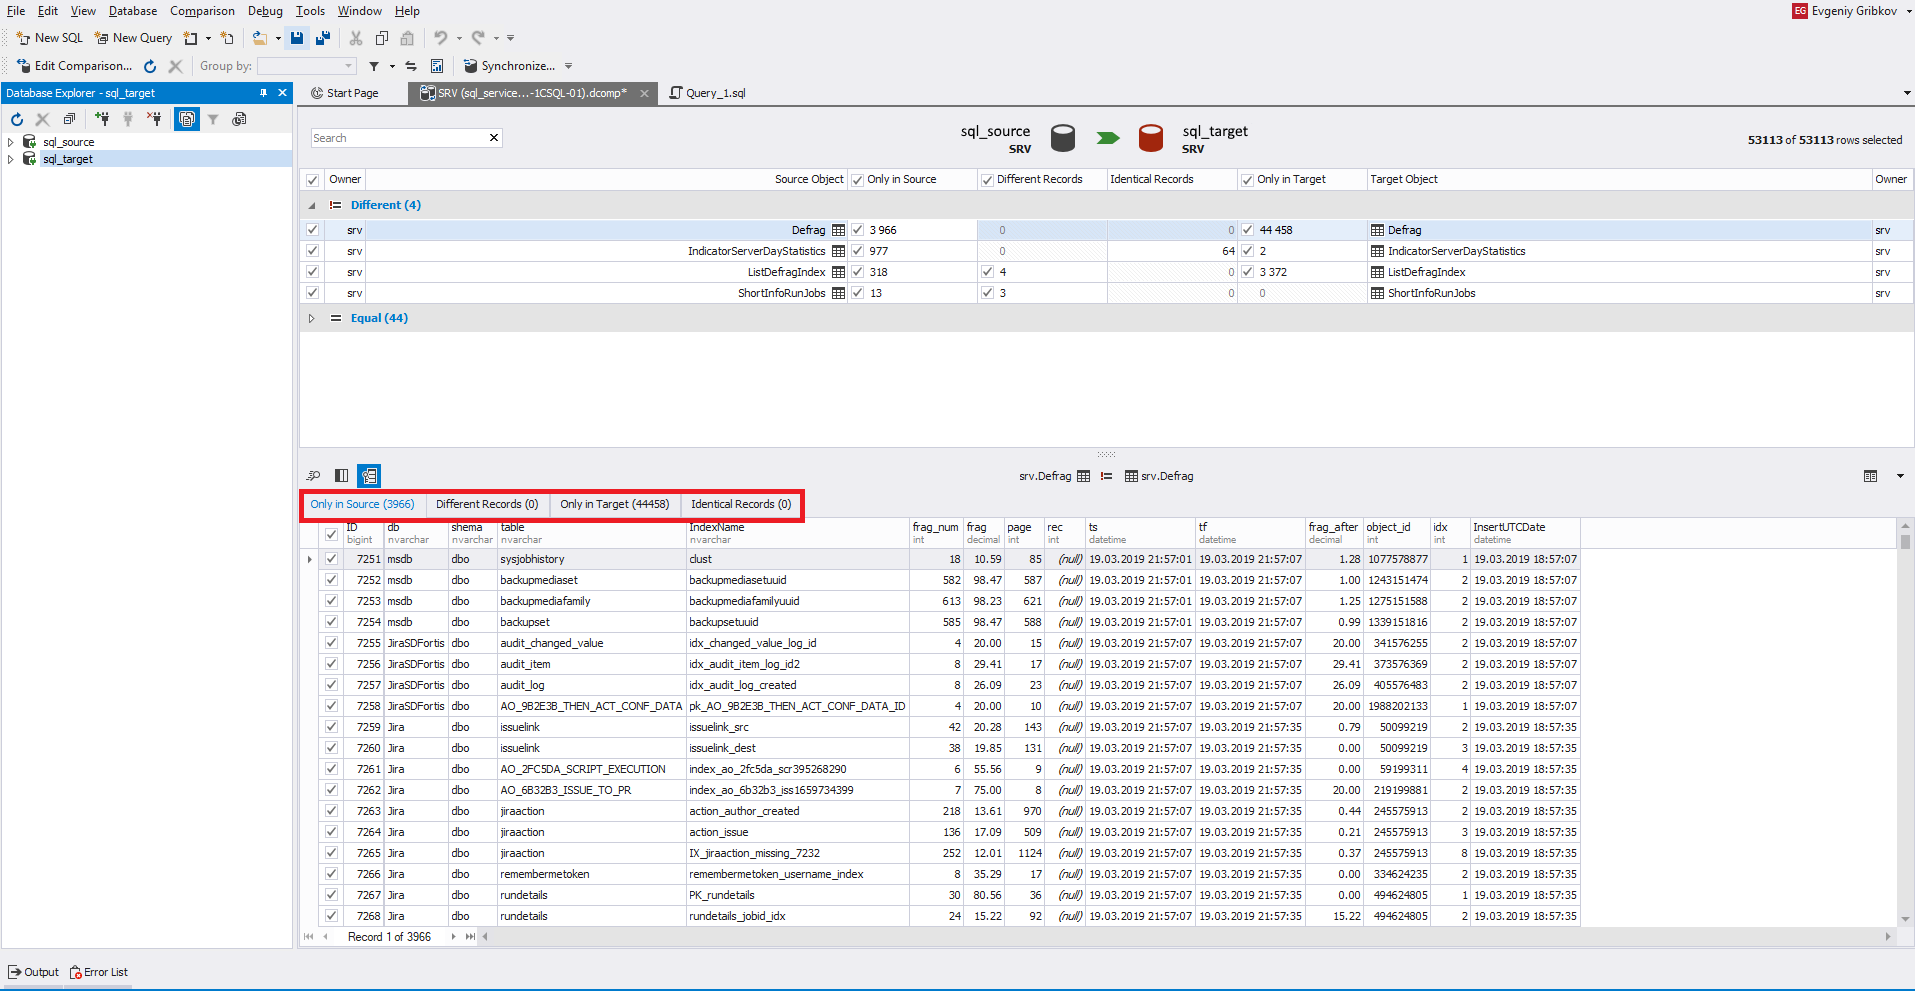
At the end of the process, pay attention to the window. You can change the comparison settings by clicking “Edit Comparison” in the upper left corner of the window. To the right of this button is a circle with an arrow - this is an update button that starts the data comparison process again. Also located below are all previously registered servers:
Through the main menu in File, you can save the settings for comparing circuits as a file with the dcomp extension.
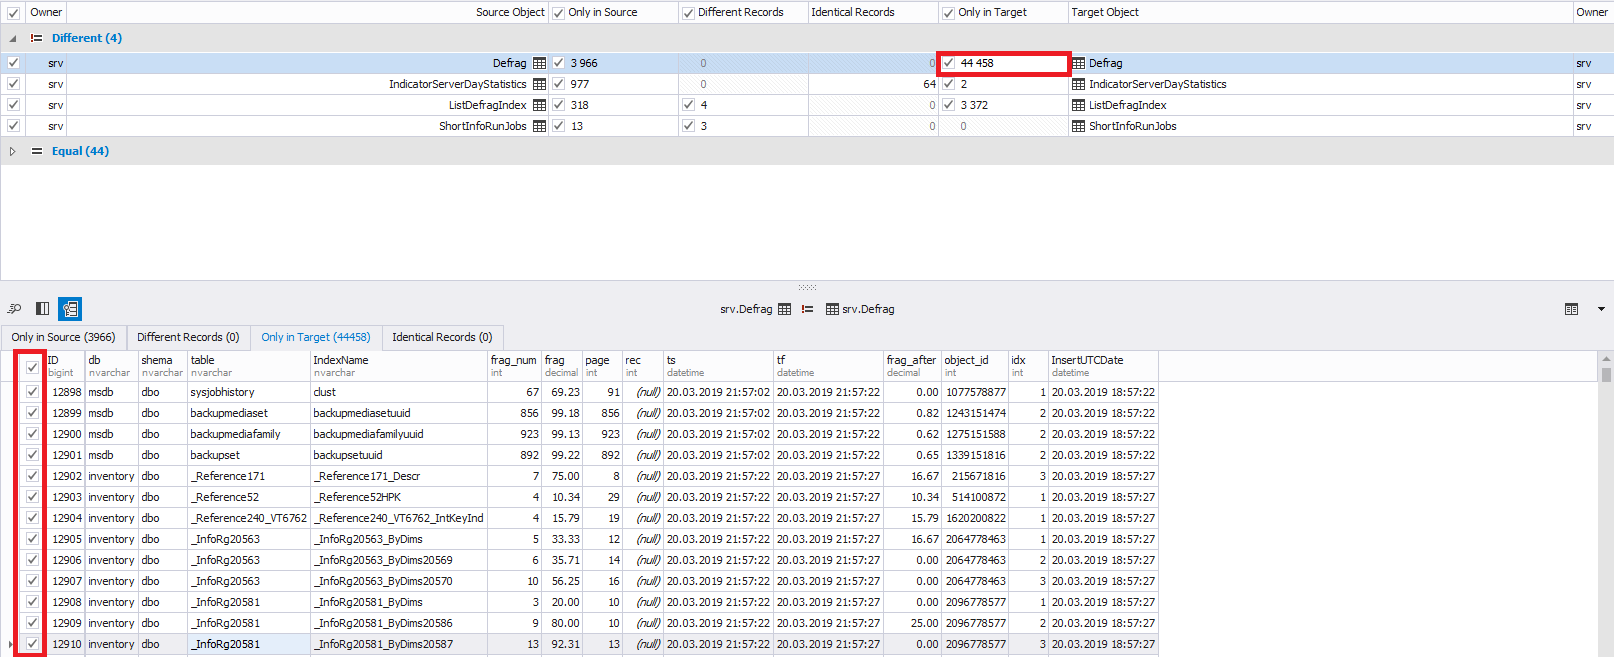
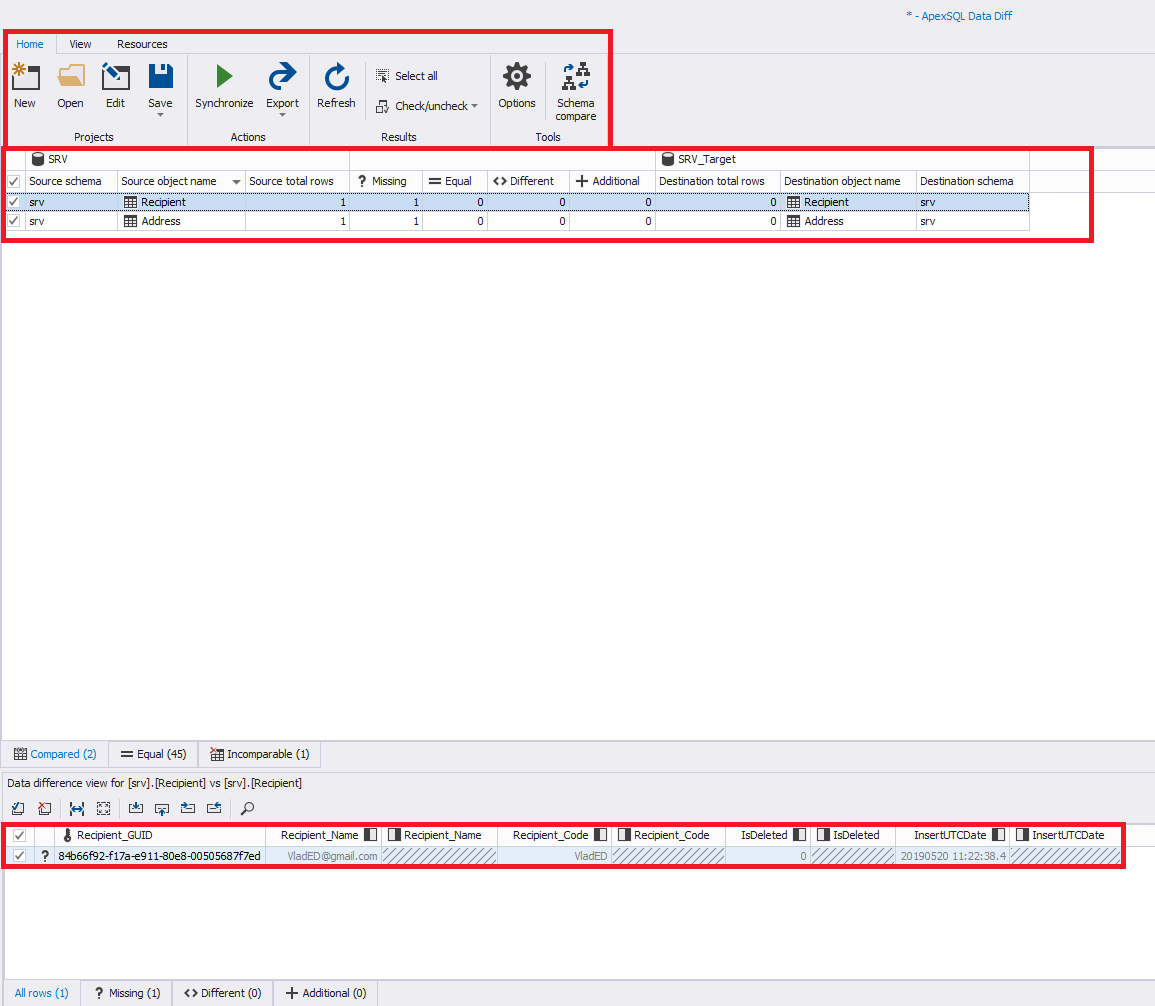
Now let's pay attention to the central part of the window. Here you need to select the necessary objects for synchronization with checkmarks. On the left are the source objects, and on the right - the receiver:
The following information is displayed below:
- for inserted rows - data of inserted rows:
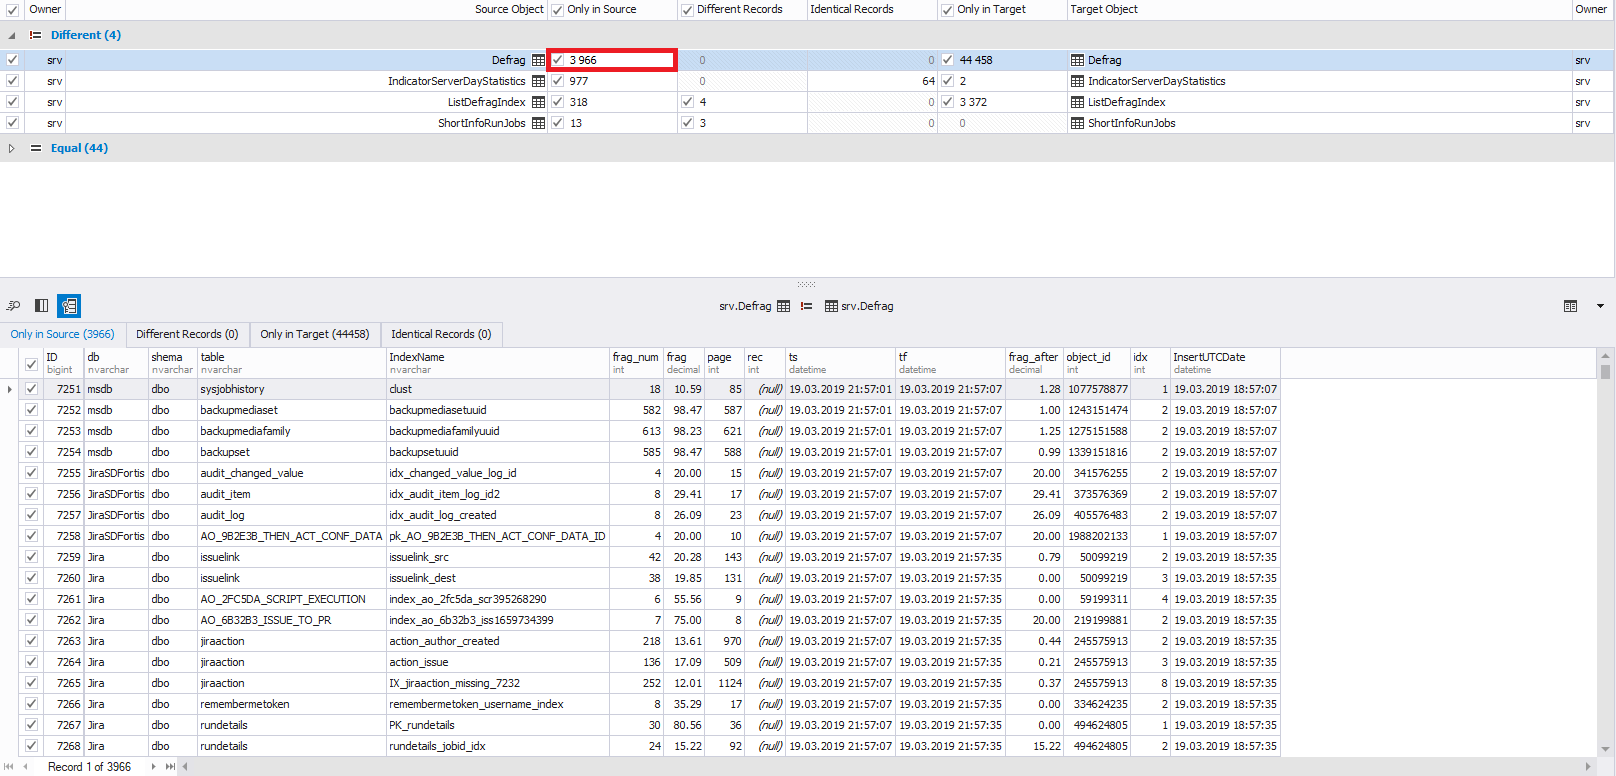
- for mutable strings - string comparison:

- for deleted rows - data of deleted rows:
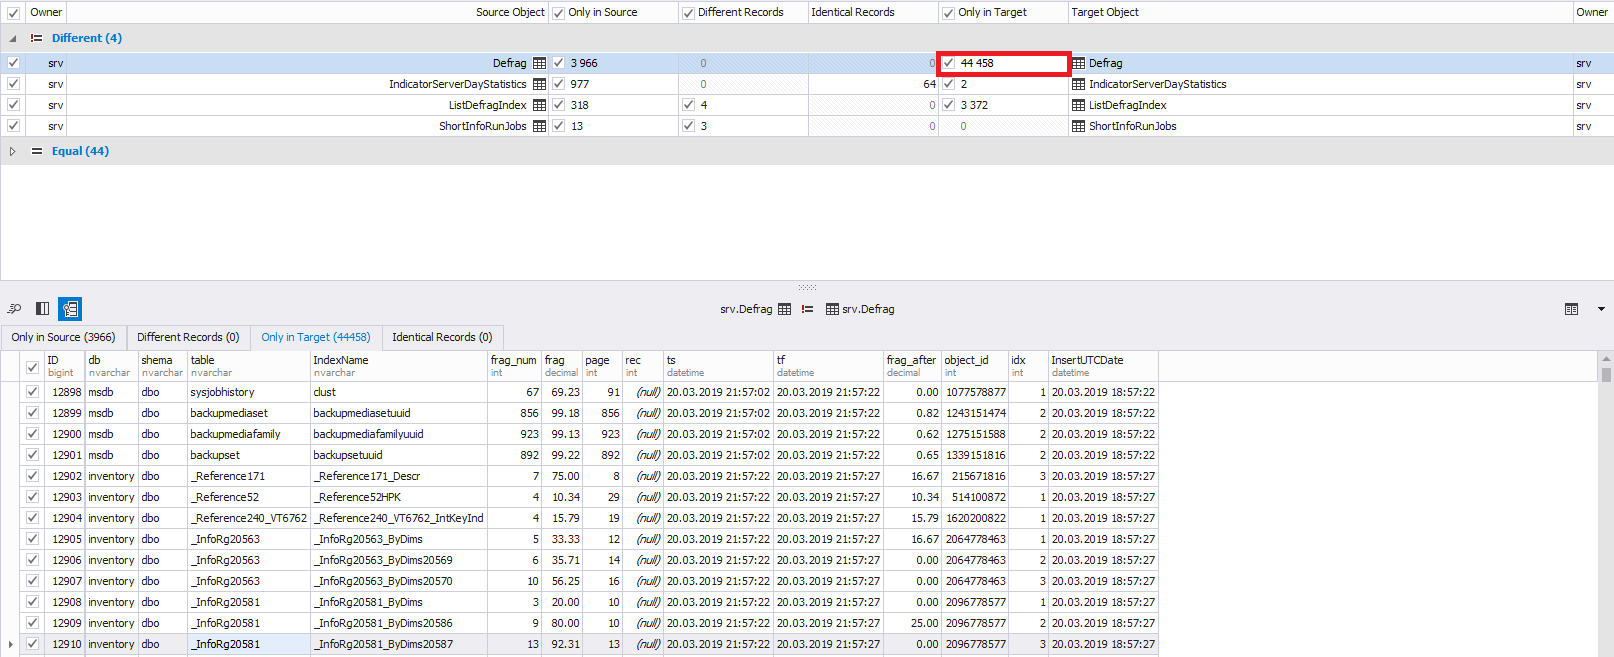
At the bottom left, if necessary, you can select not all the lines for changes, but the ones you need. By default, all rows are selected:
You can also switch between added, changed, and deleted rows using the tabs above the data table itself:
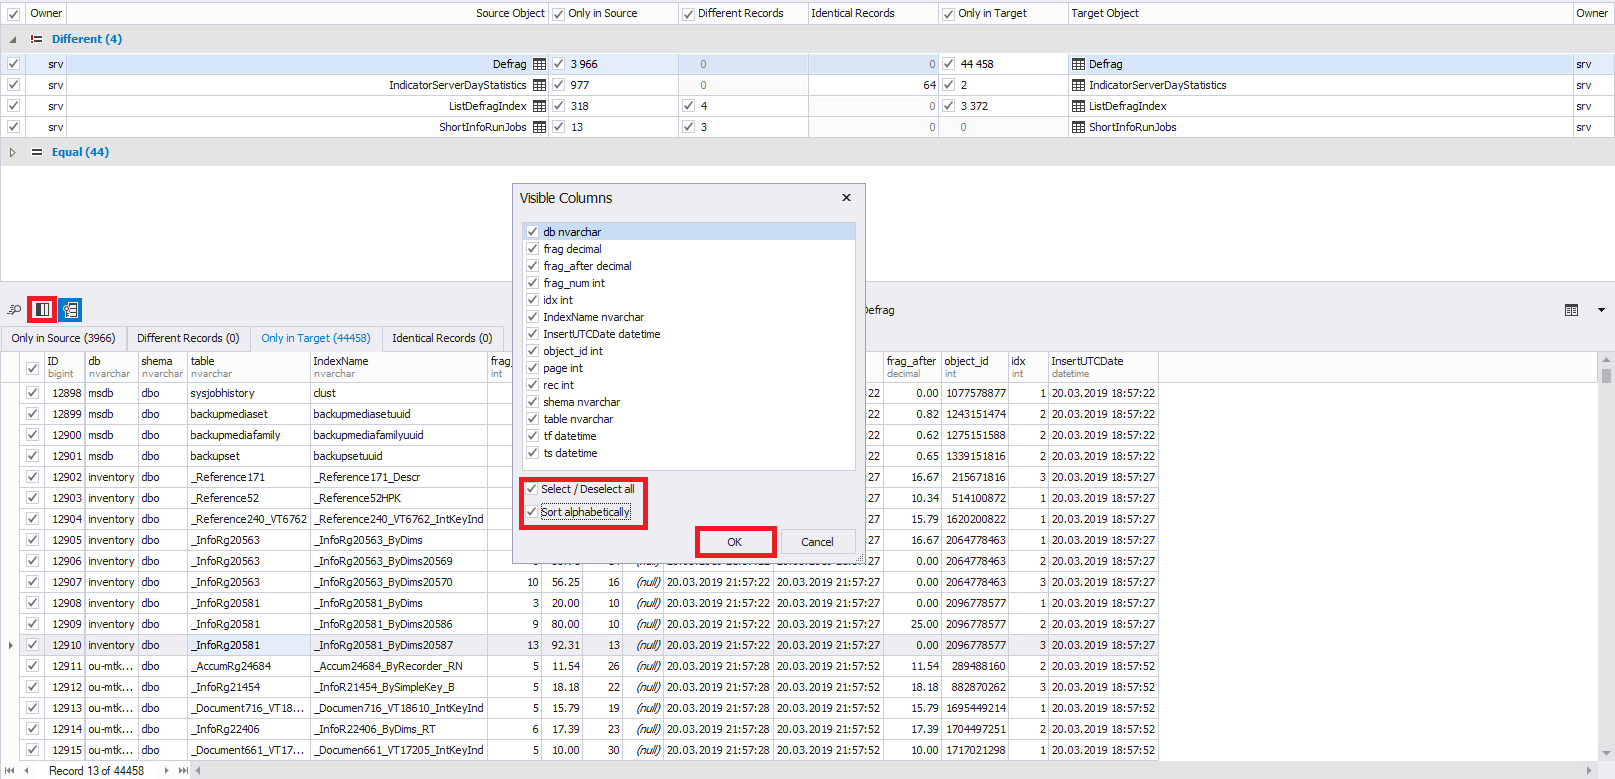
To control the visibility of the desired columns (fields) there is the necessary functionality:
By default, all columns are selected.
Next, to start the database data synchronization process itself, you need to click on one of the buttons highlighted in red in the picture:
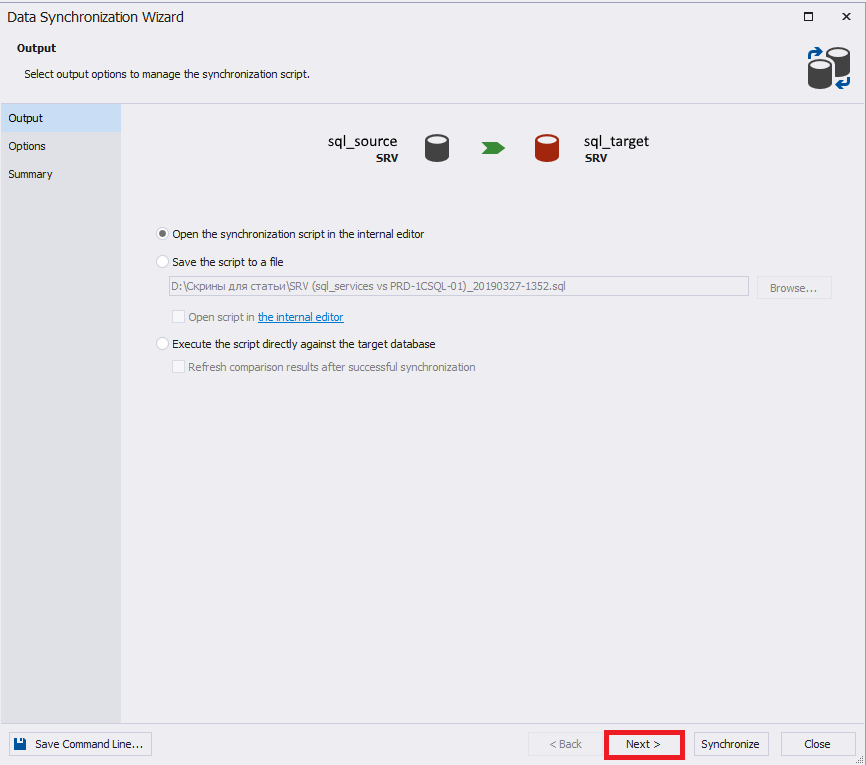
In the “Output” tab, you must specify how the synchronization process will occur. Usually the script generation is selected in the studio or in a file. In our case, we will choose the first option. It is recommended that you carefully go through the sequence of all the tabs for setting up the synchronization process:
In the Options tab, you can set various settings for synchronization.
Usually, all settings from the Database backup group are removed.
By default, in the settings group “Transactions”, “Use a single transaction” and “Set transaction isolation level to SERIALIZABLE” are set, which prevents situations in which only parts of the changes can be applied - i.e. changes will be applied in full or not at all:
The Summary tab displays the results of the selection of synchronization settings. If necessary, you can return to the previous paragraphs.
Please note that the settings for synchronizing database schemas can also be saved in a bat file by clicking the "Save Command Line" in the lower left of the window.
At the end, you need to click "Synchronize" to start the process of generating a synchronization script:
Upon completion, a script will be generated in a new window:
This script is the code for transferring data changes from the source to the receiver. It can be applied on the server-receiver or saved to a file for later use on the server-receiver.
After synchronization, previously selected objects should disappear from the data comparison window.
DbForge Compare Bundle for SQL Server at a Glance
In addition to dbForge Studio for SQL Server itself, you can use the dbForge Compare Bungle for SQL Server tool from Devart, which is built into SQL Server Management Studio (SSMS), to compare data and database schemas. Consider an example of using this tool in SSMS:
Here you need to right-click on the desired database and select the desired action: data comparison or circuit comparison. After that, install the selected database as a source or as a receiver. Similarly, select the second database as a receiver or as a source.
After setting the source and receiver, to start the configuration of data synchronization or database schema, click on the green arrow in the middle of the screen:
After that, the familiar window for setting data synchronization or database schemas will appear, depending on what was previously selected.
Quest Software Solutions
Quest Software's ApexSQL Diff and ApexData Diff tools are integrated into SSMS .
Also, these tools can work independently and without SSMS .
In-depth Quest Software Solutions
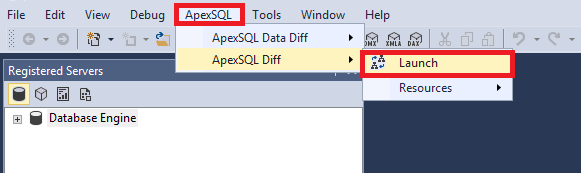
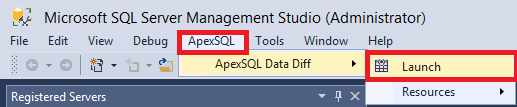
In the main menu, to start the tool, just select ApexSQL \ ApexSQL Diff \ Launch:
In the window that appears, click on the “New” button below:

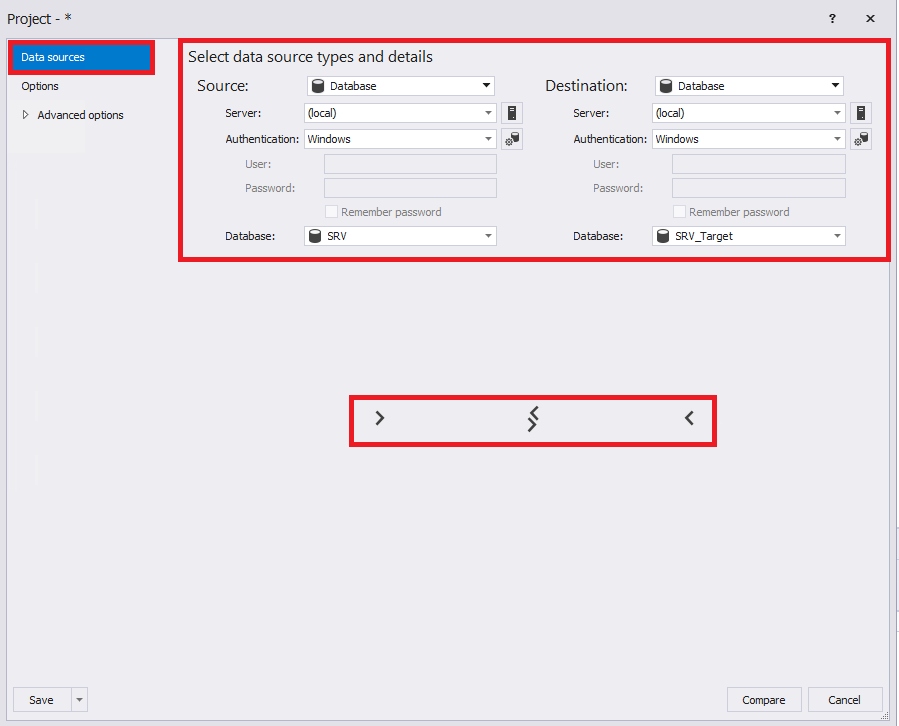
The database schema comparison options window opens. Now you need to fill in the required fields on the “Data sources” tab:
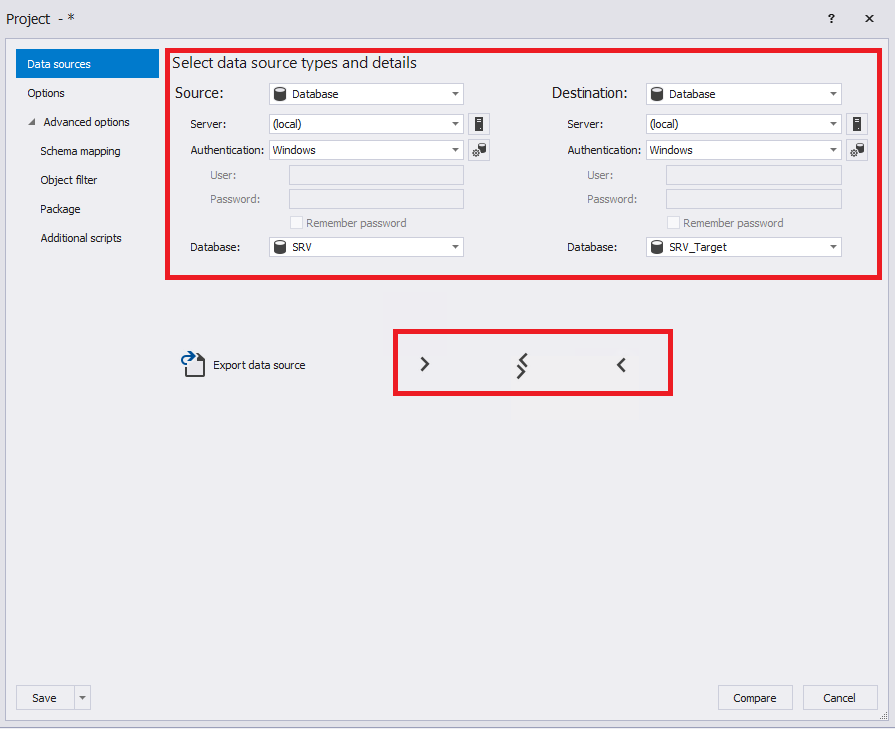
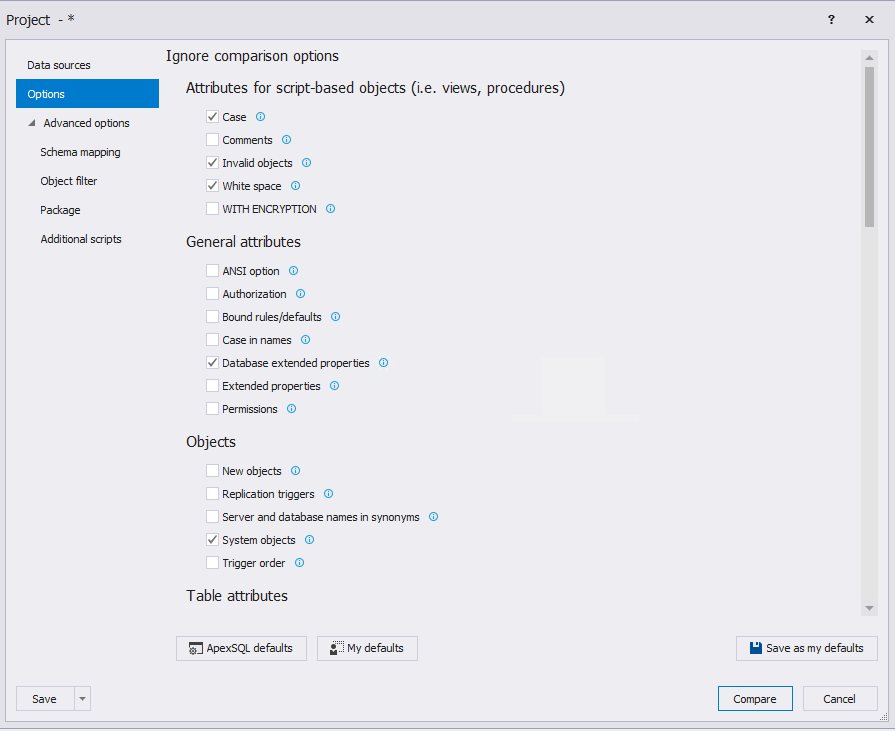
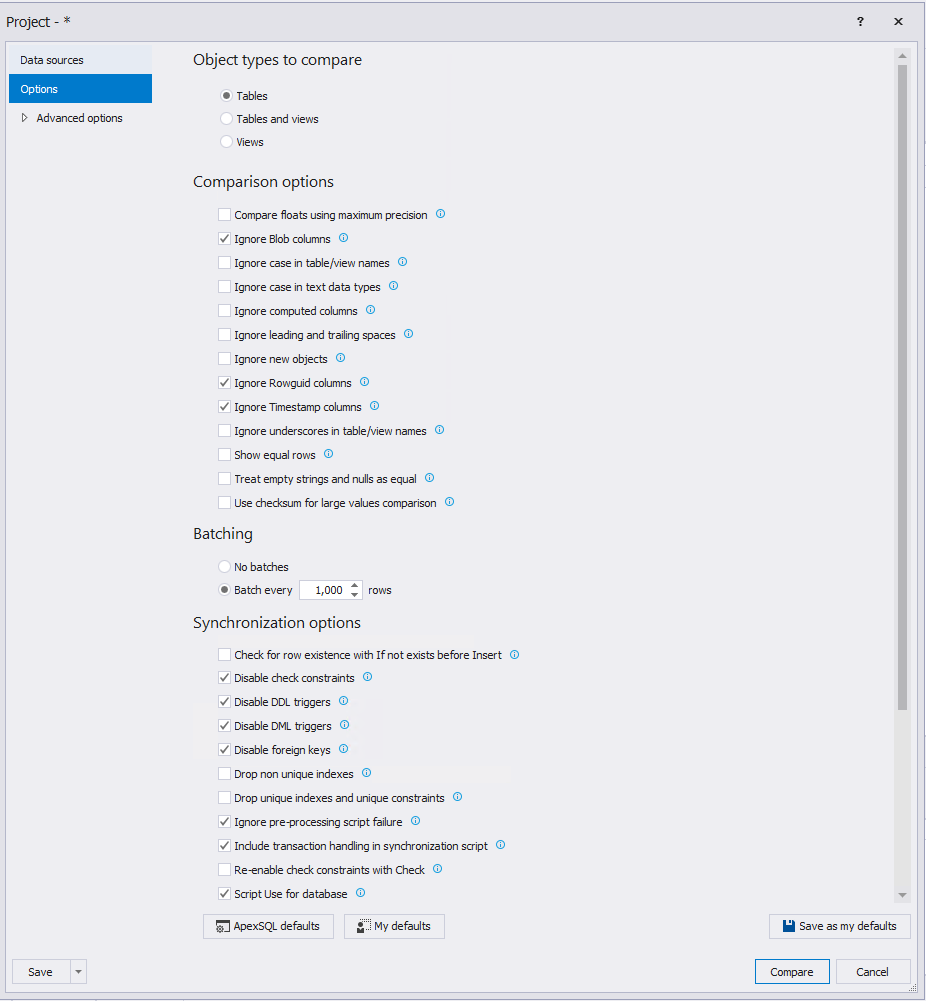
Pay attention to the arrows below. They allow you to swap settings from left to right and from right to left, as well as copy settings from left to right and from right to left. Next, click on the “Options” tab and select the necessary settings for comparing database schemas (you can not change anything):
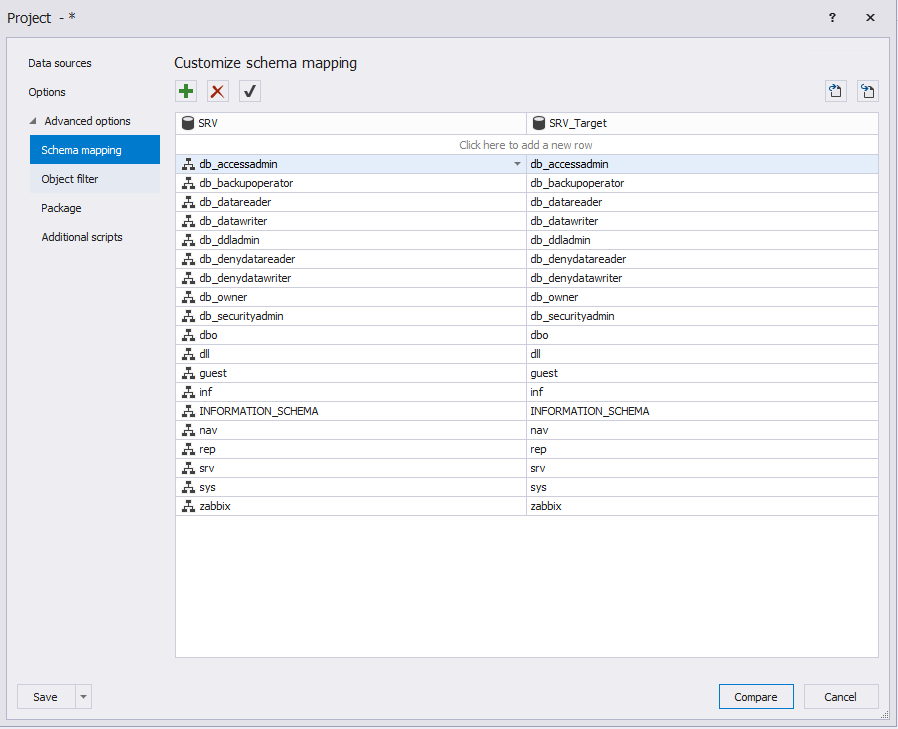
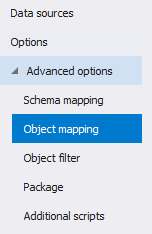
Now you need to go to the “Advanced options” tab and see the advanced settings, which can be changed if necessary. The “Schema mapping” tab contains a map comparison for comparison:
There are also a number of other advanced settings:
At the end, you need to click on the “Compare” button to start the process of comparing database schemas. At the end, a window appears where the source database schema objects will be located on the left, and the receiver database objects on the right:
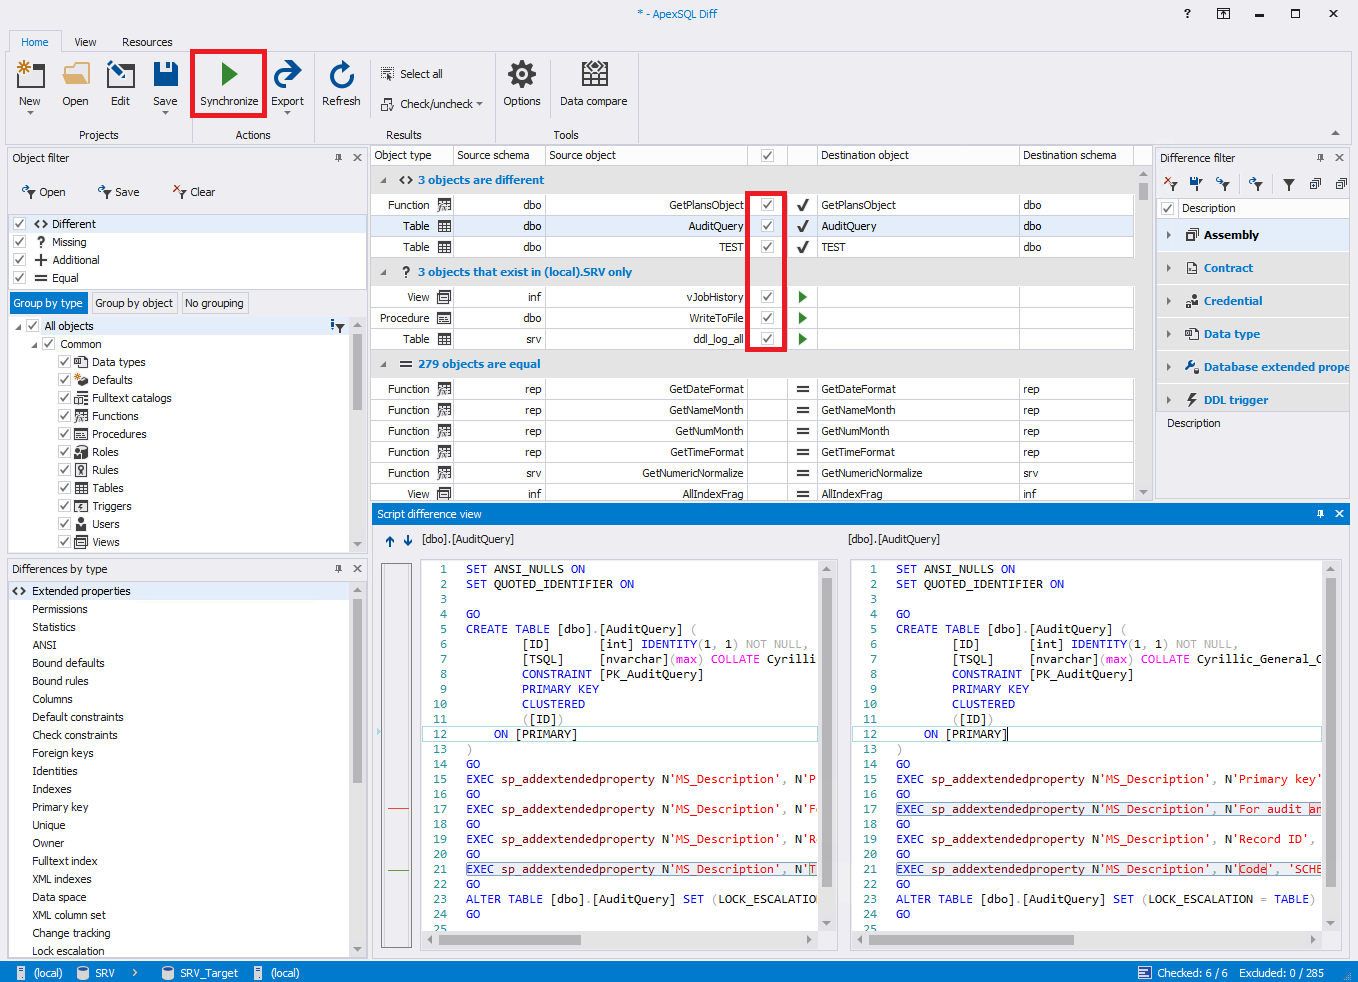
At the bottom of the window is the definition code for the selected object, and the differences in the definition codes of the same object in different databases are highlighted.
Here you need to select the necessary objects for synchronizing database schemas.
After that, you need to click on the button with the image of the green arrow "Synchronize".
The settings window for the database synchronization itself will open.
On the tab "Synchronization direction" sets the direction of synchronization.
Next, click on the “Next” button:

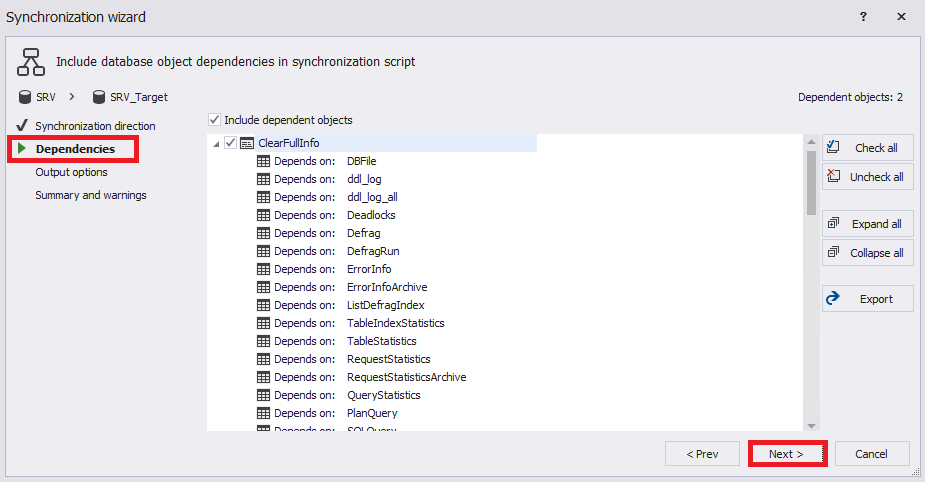
Dependencies tab shows dependencies:
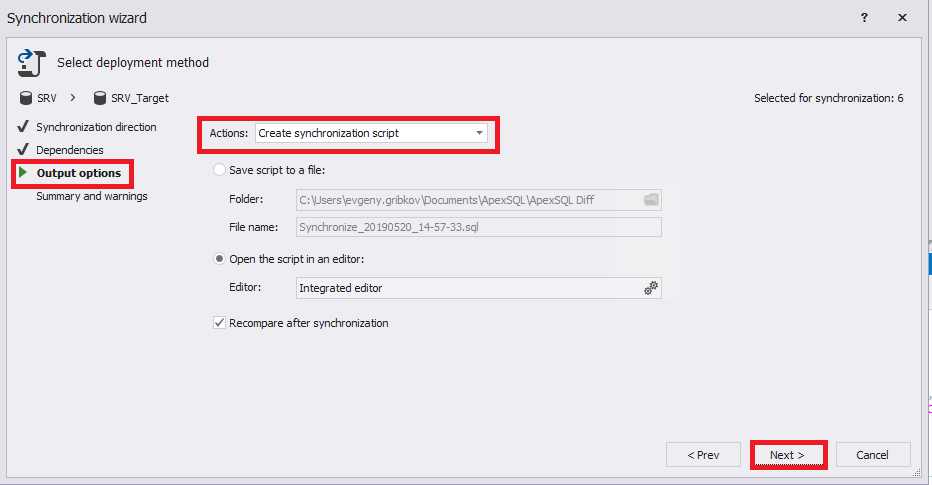
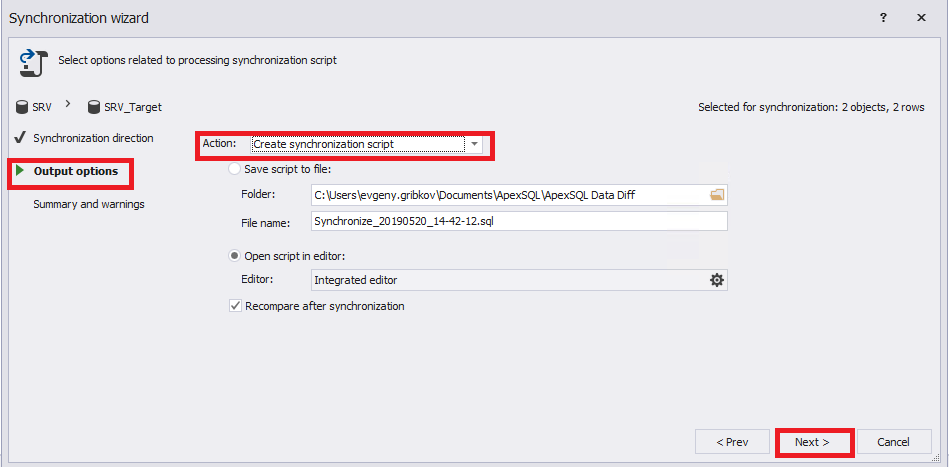
On the tab “Output options” indicate that you need to generate a synchronization script:
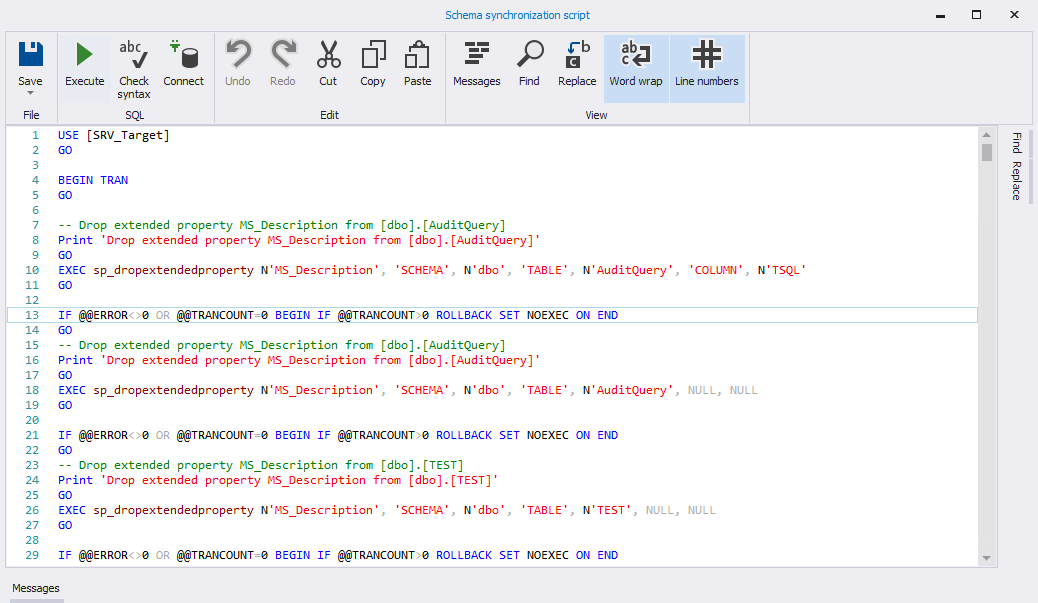
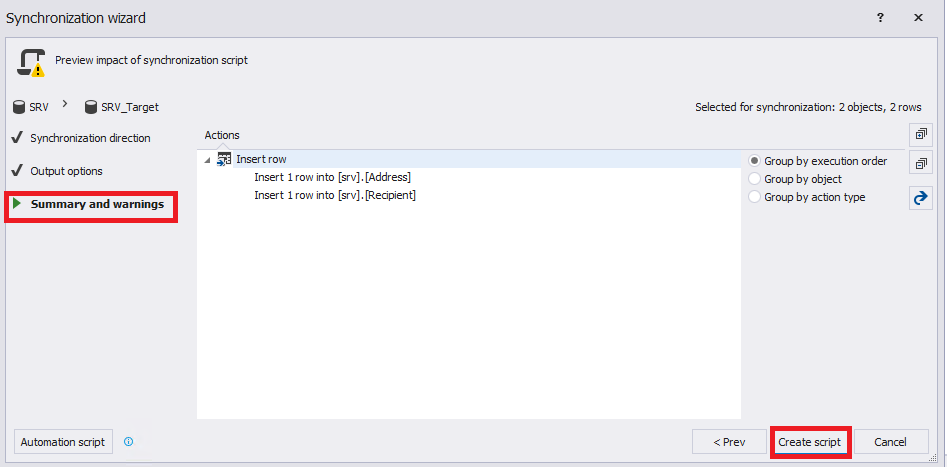
The Summary and warnings tab displays summary information about the selected synchronization settings. To start creating a synchronization script, click on the "Create script" button:

At the end, the script will be displayed:
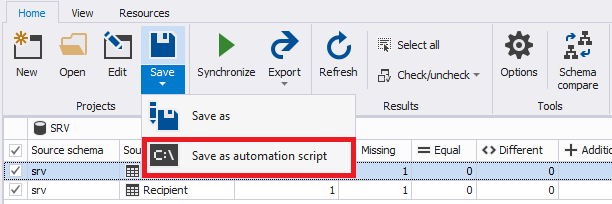
Now let’s take a closer look at the top panel of the database schema synchronization project:

The “View” tab contains various settings for displaying window components.
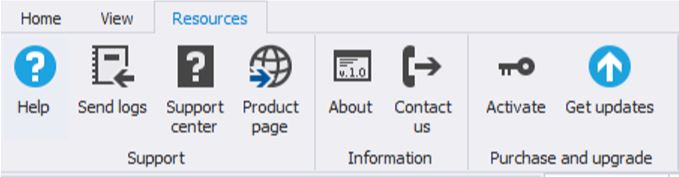
«Resources» , . «Home». SSIS-:

:

:

ApexSQL\ApexSQL Data Diff\Launch:
“New”:

. «Data sources»:
. , .
«Options» ( ):
«Advanced options» , . , . «Object mapping»:
, .
«Compare» :

:
, , . , , — .
, . «Synchronize».
.
«Synchronization direction» .
, «Next»:

«Output options» , :
«Summary and warnings» . «Create script»:
:

, :

«View» .

«Resources» , .
«Home».
:
:

Database Schema Synchronization
In the main menu, to start the tool, just select ApexSQL \ ApexSQL Diff \ Launch:
In the window that appears, click on the “New” button below:
The database schema comparison options window opens. Now you need to fill in the required fields on the “Data sources” tab:
Pay attention to the arrows below. They allow you to swap settings from left to right and from right to left, as well as copy settings from left to right and from right to left. Next, click on the “Options” tab and select the necessary settings for comparing database schemas (you can not change anything):
Now you need to go to the “Advanced options” tab and see the advanced settings, which can be changed if necessary. The “Schema mapping” tab contains a map comparison for comparison:
There are also a number of other advanced settings:
- advanced settings of the Object Filter tab:
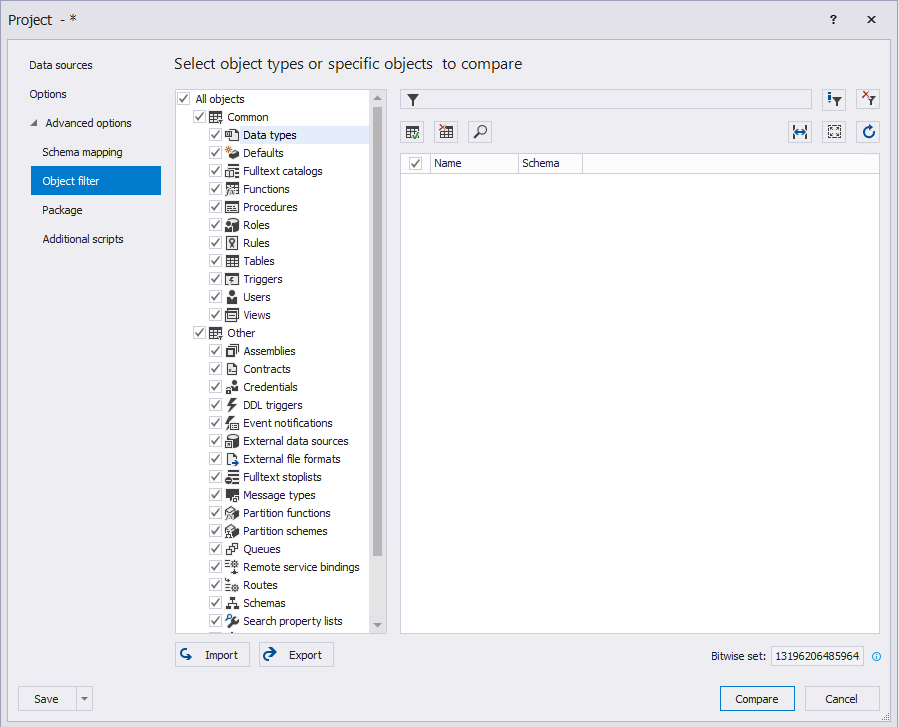
- advanced settings of the Package tab:

- advanced settings of the Additional scripts tab:

At the end, you need to click on the “Compare” button to start the process of comparing database schemas. At the end, a window appears where the source database schema objects will be located on the left, and the receiver database objects on the right:
At the bottom of the window is the definition code for the selected object, and the differences in the definition codes of the same object in different databases are highlighted.
Here you need to select the necessary objects for synchronizing database schemas.
After that, you need to click on the button with the image of the green arrow "Synchronize".
The settings window for the database synchronization itself will open.
On the tab "Synchronization direction" sets the direction of synchronization.
Next, click on the “Next” button:
Dependencies tab shows dependencies:
On the tab “Output options” indicate that you need to generate a synchronization script:
The Summary and warnings tab displays summary information about the selected synchronization settings. To start creating a synchronization script, click on the "Create script" button:
At the end, the script will be displayed:
Now let’s take a closer look at the top panel of the database schema synchronization project:
The “View” tab contains various settings for displaying window components.
«Resources» , . «Home». SSIS-:
:
:
ApexSQL\ApexSQL Data Diff\Launch:
“New”:
. «Data sources»:
. , .
«Options» ( ):
«Advanced options» , . , . «Object mapping»:
, .
«Compare» :
:
, , . , , — .
, . «Synchronize».
.
«Synchronization direction» .
, «Next»:
«Output options» , :
«Summary and warnings» . «Create script»:
:
, :
«View» .
«Resources» , .
«Home».
:
:
RedGate Solutions
Now let's look at the SQL Compare and SQL Data Compare tools from RedGate .
RedGate Solution Overview
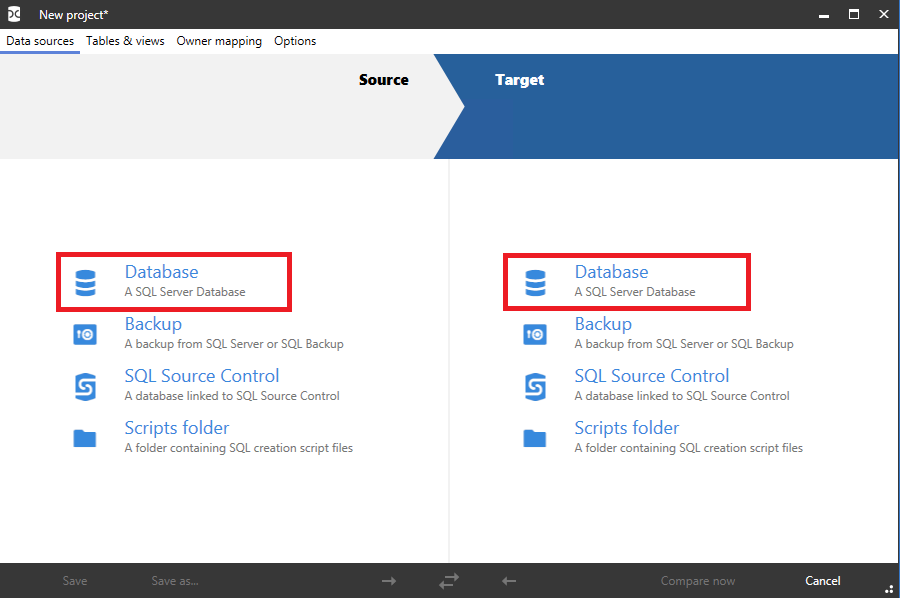
SQL Compare RedGate . «Data sources» :
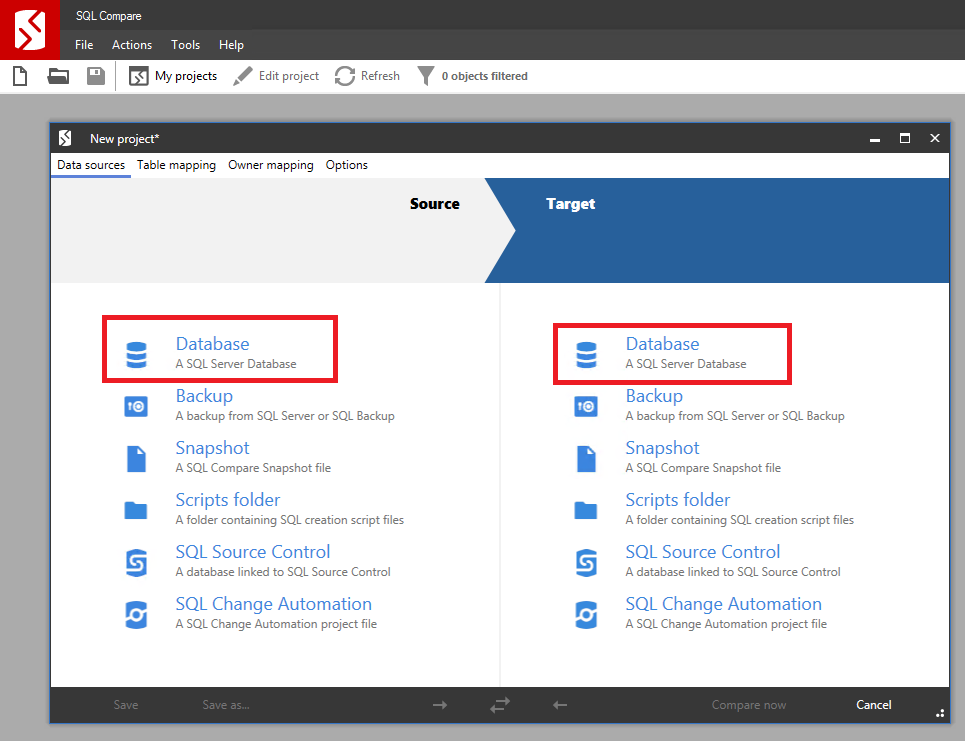
, , , , -. :

«Table mapping» :

«Full» , , :

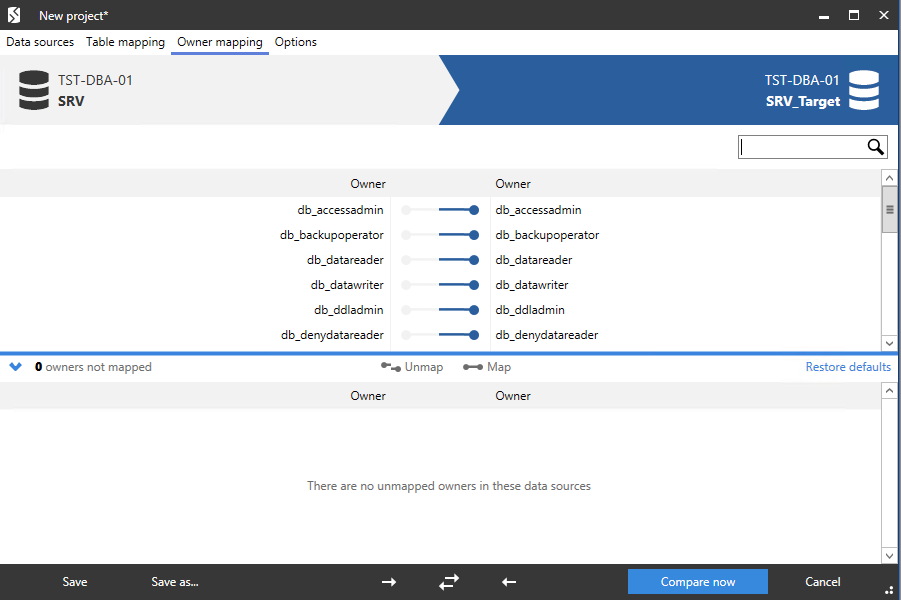
«Owner mapping» :
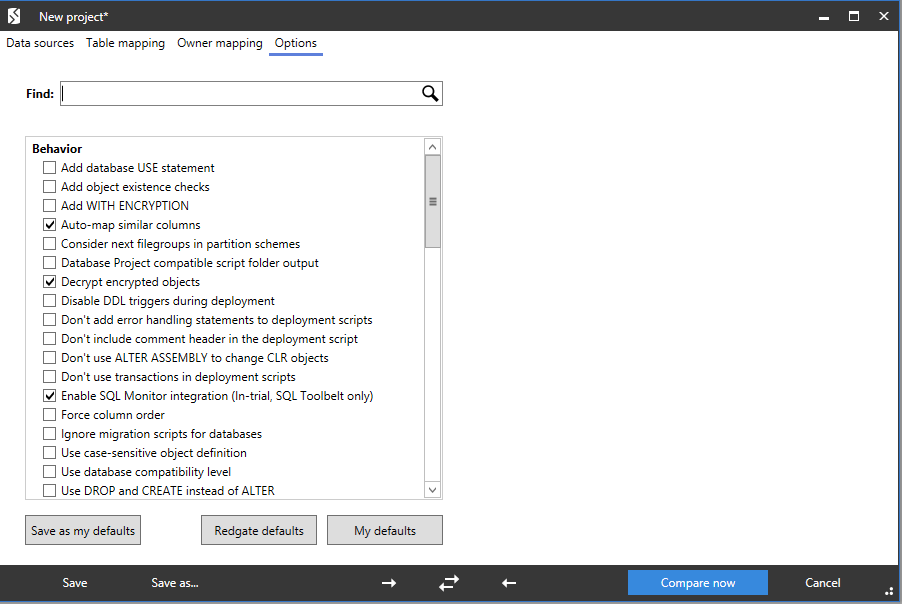
«Options» :
«Compare now» . «OK»:

, ( ApexSQL Diff) , :
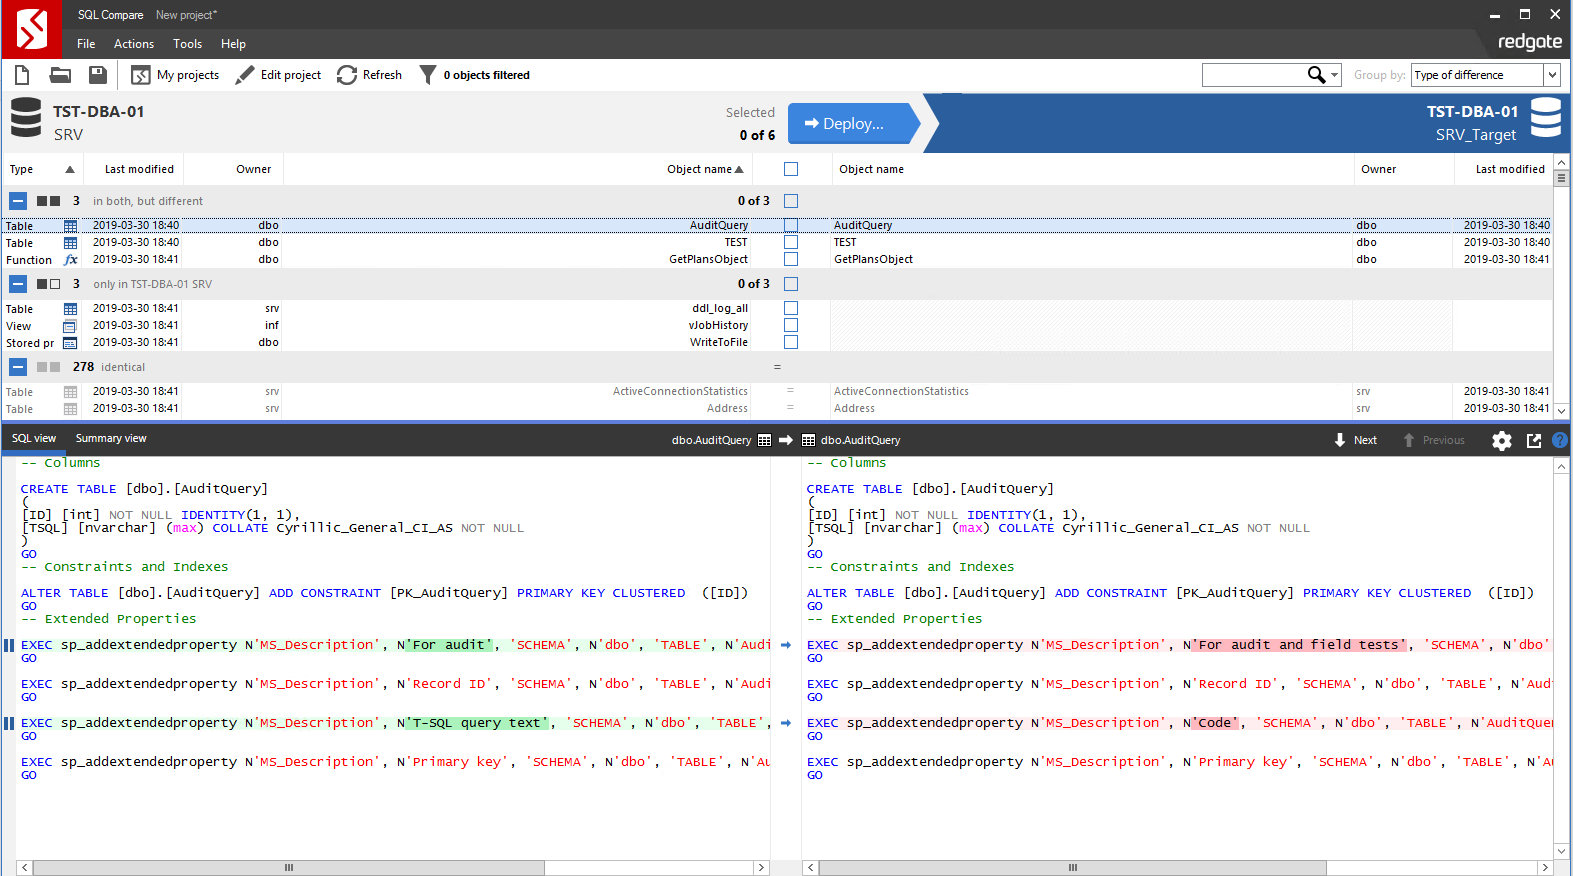
, «Deploy»:
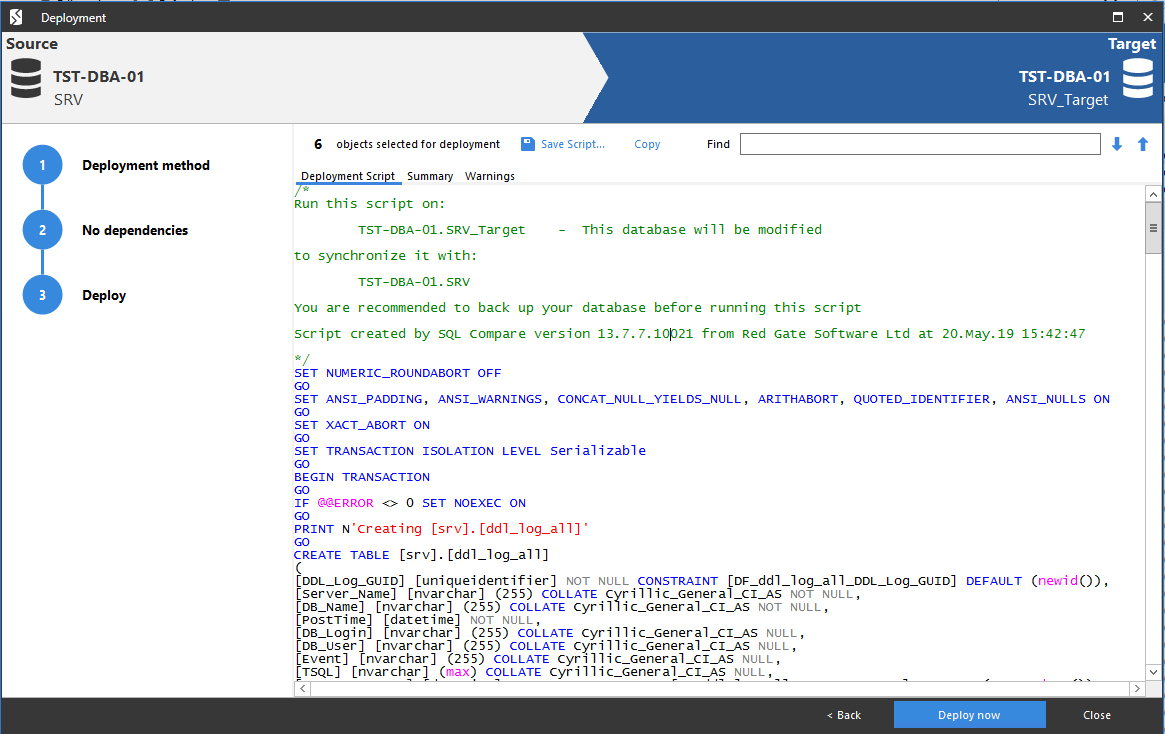
:

.
«Deployment method» .
«Next»:

, :
SQL Data Compare RedGate . «Data sources» :
, , , , -.
:

«Table & views» :
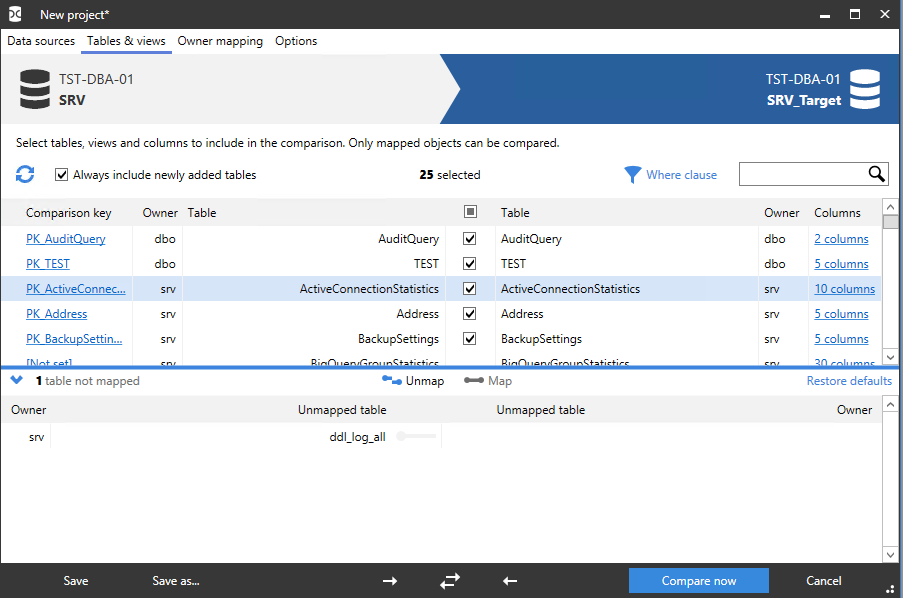
«columns» , , :

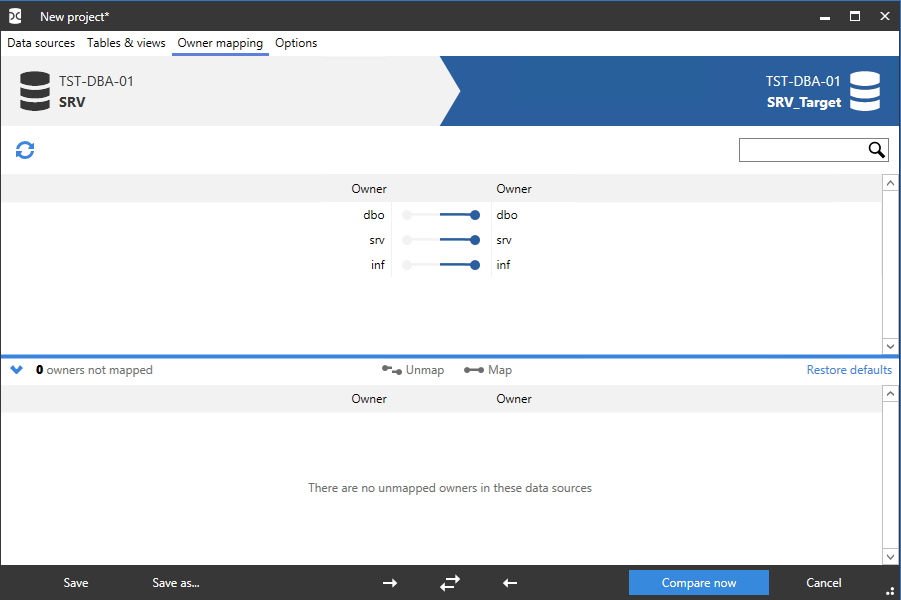
«Owner mapping» :
«Options» :

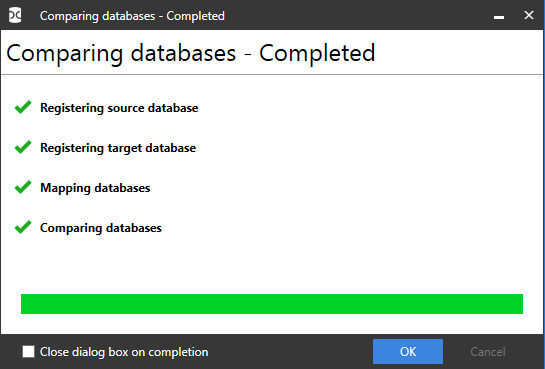
«Compare now» . «OK»:
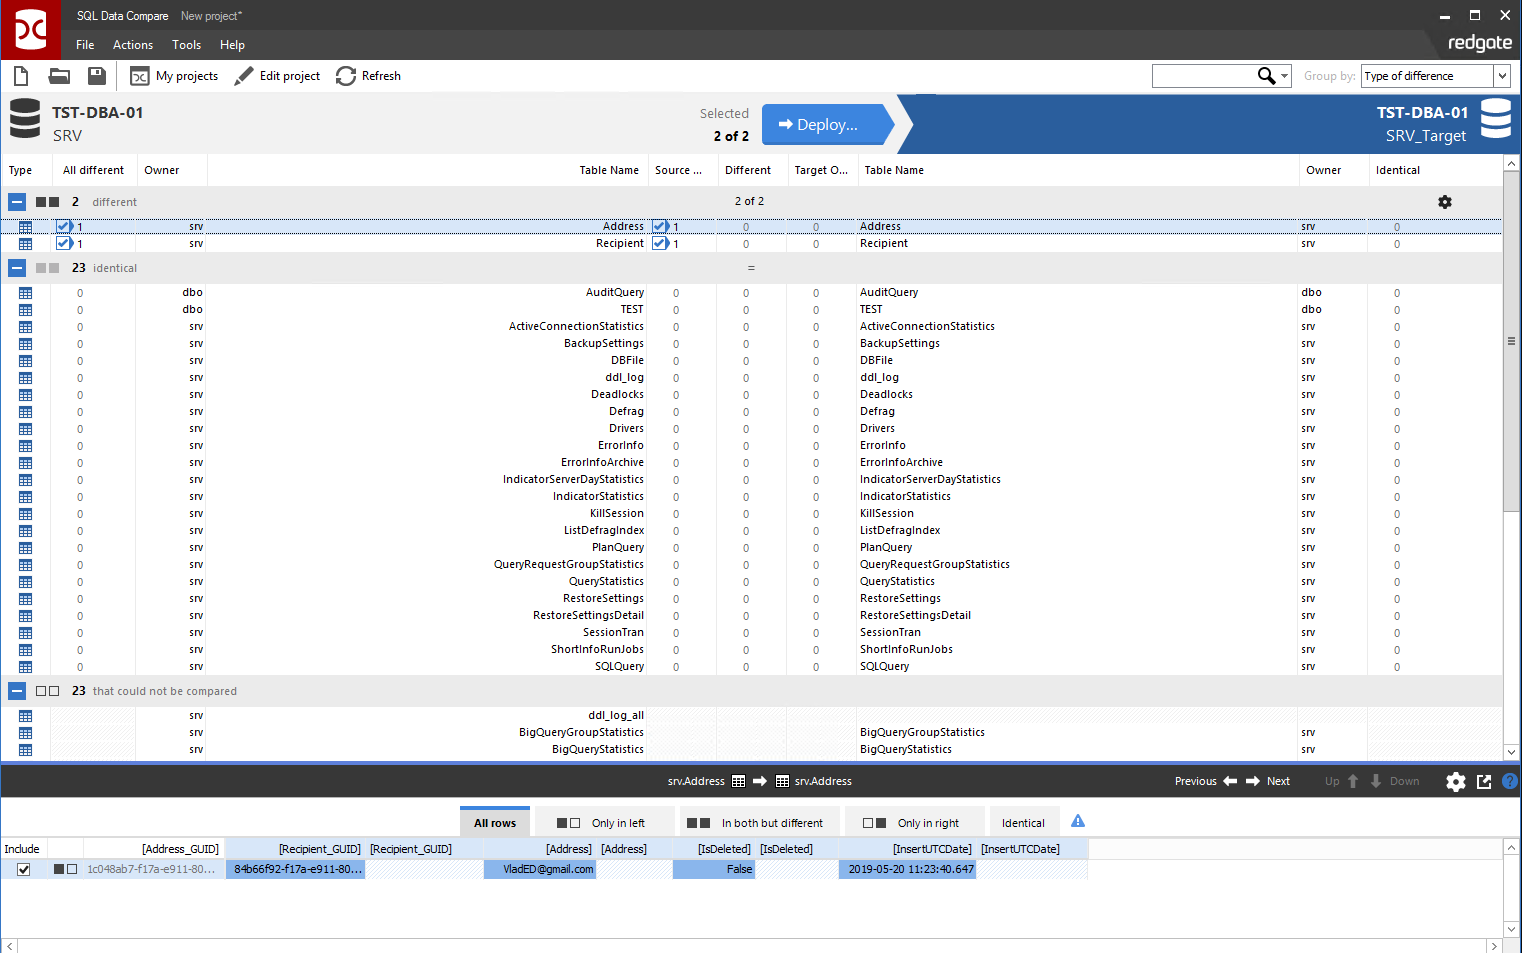
, ( ApexSQL Data Diff) , :
, «Deploy»:
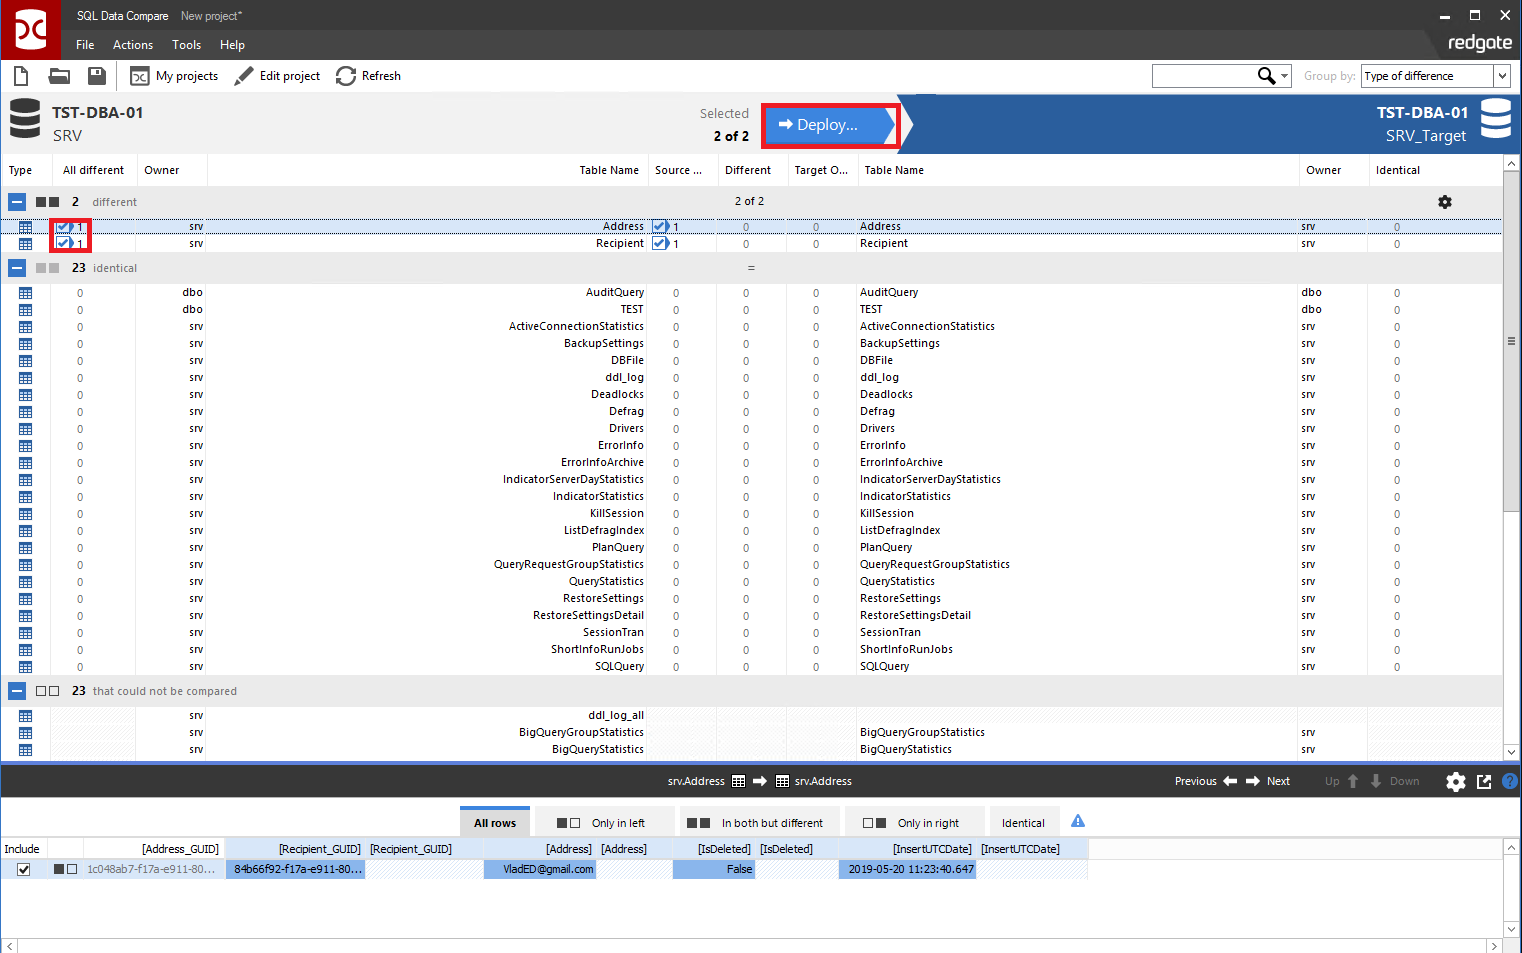
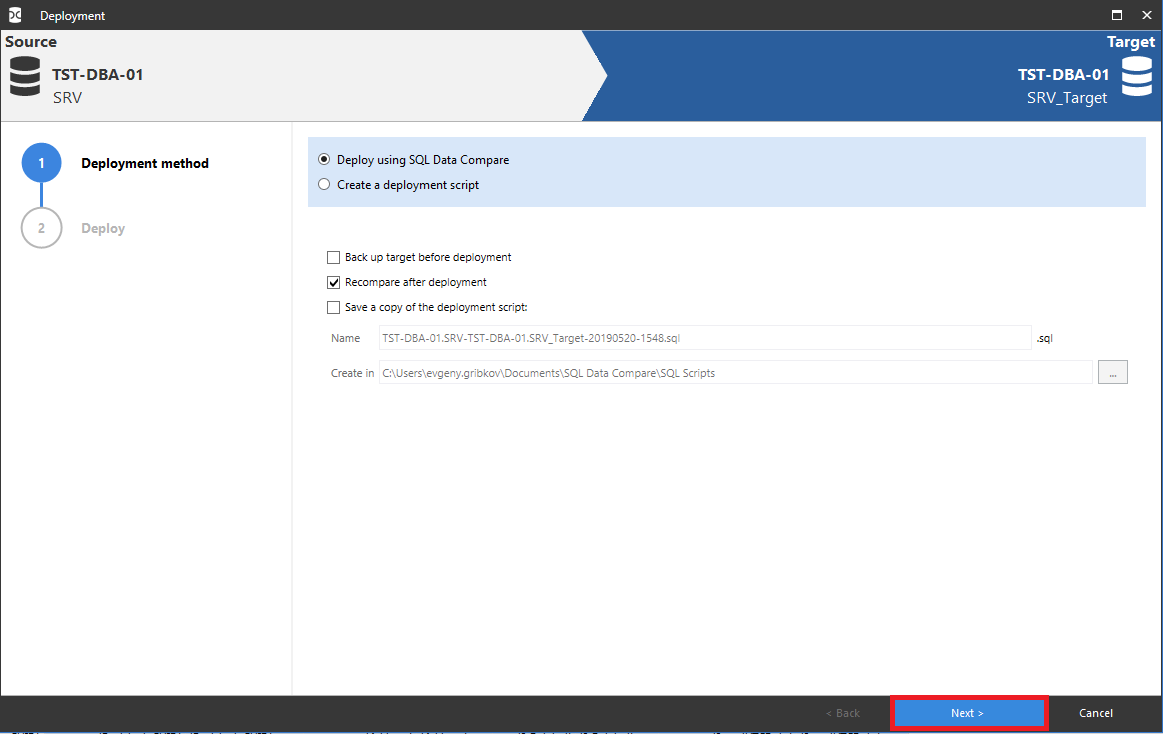
.
«Deployment method» .
«Next»:
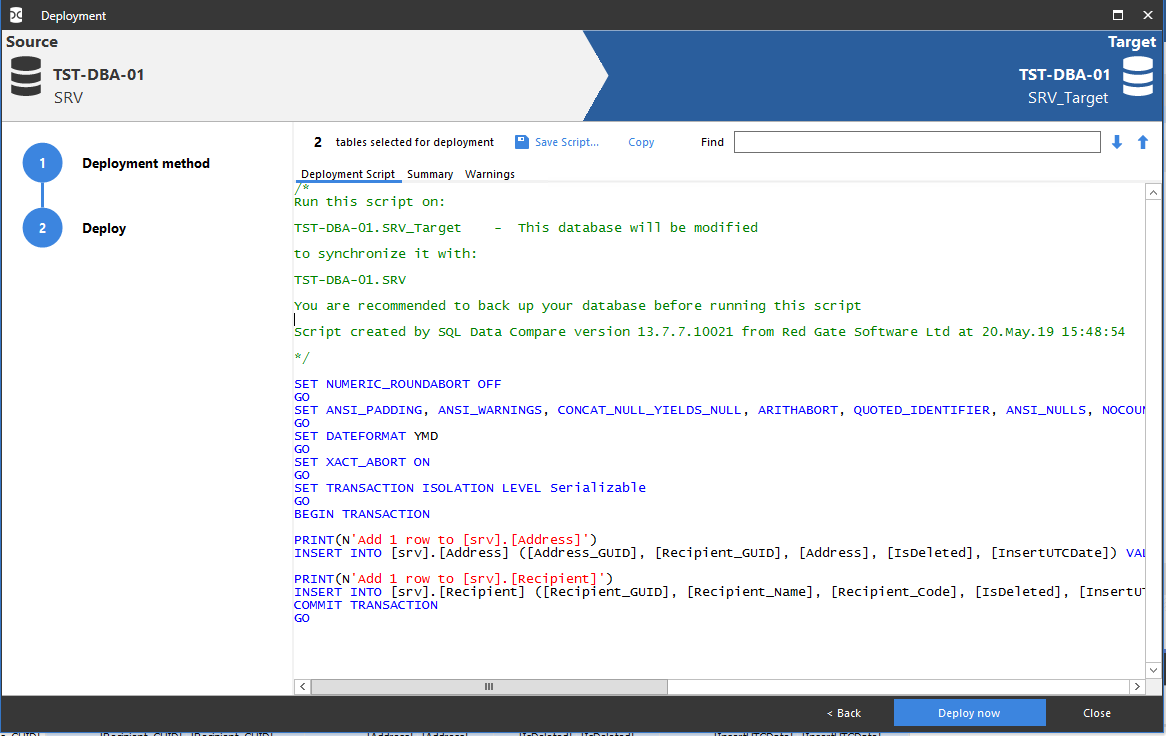
, :
SQL Compare RedGate . «Data sources» :
, , , , -. :
«Table mapping» :
«Full» , , :
«Owner mapping» :
«Options» :
«Compare now» . «OK»:
, ( ApexSQL Diff) , :
, «Deploy»:
:
.
«Deployment method» .
«Next»:
, :
SQL Data Compare RedGate . «Data sources» :
, , , , -.
:
«Table & views» :
«columns» , , :
«Owner mapping» :
«Options» :
«Compare now» . «OK»:
, ( ApexSQL Data Diff) , :
, «Deploy»:
.
«Deployment method» .
«Next»:
, :
Comparison of price and functionality
| Product | 1 license | | |
|---|---|---|---|
| ApexSQL diff | 599 $ | 359 $ | |
| | 599 $ | 359 $ | |
| SQL Compare | 785 $ | 785 $ | |
| SQL Data Compare | 785 $ | 785 $ | |
| | 300 $ | 300 $ | |
| | 300 $ | 300 $ | |
It is also worth noting the following functionality of the tools discussed above:
- :
- . bat-
The official site of ApexSQL Diff tool provides a comparison of this program with the SQL Compare tool.
Similarly, for the ApexSQL Data Diff tool , a comparison with the SQL Data Compare tool is provided.
From the above comparisons it is easy to see that there is something in ApexSQL, which is not in Compare, and something on the contrary is in Compare, but not in ApexSQL. But all the considered utilities have the necessary set of basic functionality for comparing both the schemas and the database data itself.
In terms of functionality and price, taking into account discounts and the material discussed above, ApexSQL Diff and ApexSQL Data Diff products are the best choice.
Conclusion
Popular utilities for synchronizing database schemas and data were considered:
- dbForge Schema Compare for SQL Server by Devart
- dbForge Data Compare for SQL Server Devart
- ApexSQL Diff Quest Software
- ApexSQL Data Diff Quest Software
- SQL Compare RedGate
- SQL Data Compare RedGate
A brief comparison was also made on the price and functionality of these products.
The result of the review was the conclusion that the best choice in price and functionality are ApexSQL Diff and ApexSQL Data Diff from Quest Software. However, the main necessary functionality is sufficiently available in Devart products: dbForge Schema Compare for SQL Server and dbForge Data Compare for SQL Server. These products can be bought much cheaper than their counterparts ApexSQL Diff and ApexSQL Data Diff from Quest Software.
There are similar solutions for Oracle DBMS.
And which comparators help you and for which DBMSs for comparing schemas and database data?
After discussions
Also, colleagues in the comments and in correspondence recommended the following interesting comparators:
- for comparing schemas and database data of different DBMS
- To migrate from MS SQL Server to PostgreSQL:
- for comparing database schemas and database data for MS SQL Server
- for switching from one DBMS to another DBMS and for comparing schemas and database data of different DBMS
- for transferring a Jira database from MS SQL Server DBMS to PostgreSQL DBMS
Sources
All Articles