Spring Cache: from connecting caching in 1 minute to flexible configuration of the cache manager
I used to be afraid of caching. I really didn’t want to climb and find out what it was, I immediately imagined some engine compartment luto-enterprise things that only the winner of the mathematics olympiad could figure out. It turned out that this is not so. Caching turned out to be very simple, understandable and incredibly easy to implement in any project.
In this post, I will try to explain about caching as simple as I now understand. You will learn how to implement caching in 1 minute, how to cache by key, set the cache lifetime, and many other things that you need to know if you were instructed to cache something in your working project, and you don’t want to muddle face.
Why do I say "entrusted"? Because caching, as a rule, it makes sense to apply in large, highly loaded projects, with tens of thousands of requests per minute. In such projects, in order not to overload the database, they usually cache repository calls. Especially if it is known that the data from some master system is updated at a certain frequency. We ourselves do not write such projects, we work on them. If the project is small and does not threaten overloads, then, of course, it is better not to cache anything - always fresh data is always better than periodically updated ones.
Usually, in the training posts, the speaker first crawls under the hood, starts digging into the guts of the technology, which bothers the reader a lot, and only then, when he leafed through a good half of the article and did not understand anything, it tells how it works. Everything will be different with us. First, we make it work, and preferably, with the least effort, and only then, if you're interested, you can look under the cache hood, look inside the bin itself and fine-tune caching. But even if you do not (and this starts with point 6), your caching will work like that.
We will create a project in which we will analyze all the aspects of caching that I promised. At the end, as usual, there will be a link to the project itself.
We will create a very simple project in which we can take the entity from the database. I added Lombok, Spring Cache, Spring Data JPA, and H2 to the project. Although, only Spring Cache can be dispensed with.
We will have only one entity, let's call it User.
Add repository and service:
When we enter the get () service method, we write about it in the log.
Connect to the Spring Cache project.
The project is ready.
What does Spring Cache do? Spring Cache simply caches the return result for specific input parameters. Let's check it out. We will put the @Cacheable annotation over the get () service method to cache the returned data. We give this annotation the name “users” (we will further analyze why this is done separately).
In order to check how this works, we will write a simple test.
What does our test do? He creates two users and then pulls them out of the database 2 times. As we recall, we put the @Cacheable annotation, which will cache the returned values. After receiving the object from the get () method, we output the object to the log. Also, we log information about each visit by the application to the get () method.
Run the test. This is what we get in the console.
As we see, the first two times we really went to the get () method and actually got the user from the database. In all other cases, there was no real call to the method, the application took cached data by key (in this case, this is id).
There are situations when several parameters come to the cached method. In this case, it may be necessary to determine the parameter by which caching will occur. We add an example to a method that will save an entity assembled by parameters into the database, but if an entity with the same name already exists, we will not save it. To do this, we will define the name parameter as the key for caching. It will look like this:
Let's write the corresponding test:
We will try to create three users, for two of which the name will be the same
and for two of which email will match
In the creation method, we log every fact that the method is called, and also, we will log all the entities that this method returned to us. The result will be like this:
We see that, in fact, the application called the method 3 times, and went into it only two times. Once, a key matched a method, and it simply returned a cached value.
There are situations when we want to cache the return value for some entity, but at the same time, we need to update the cache. For such needs, there is the @CachePut annotation. It passes the application into the method, while updating the cache for the return value, even if it is already cached.
Add a couple of methods in which we will save the user. We will mark one of them with the usual @Cacheable annotation, the second with @CachePut.
The first method will simply return the cached values, the second will force the cache to be updated. Caching will be performed using the key # user.name. We will write the corresponding test.
According to the logic that has already been described, the first time a user with the name “Vasya” is saved through the createOrReturnCached () method, we will then receive a cached entity, and the application will not go into the method itself. If we call the createAndRefreshCache () method, the cached entity for the key named “Vasya” will be overwritten in the cache. Let's run the test and see what will be displayed in the console.
We see that user1 has successfully written to the database and cache. When we try to record the user with the same name again, we get the cached result of the first call (user2, for which the id is the same as user1, which tells us that the user was not written, and this is just a cache). Next, we write the third user through the second method, which, even with the cached result, still called the method and wrote a new result to the cache. This is user3. As we can see, he already has a new id. After which, we call the first method, which takes the new cache added by user3.
Sometimes there is a need to hard update some data in the cache. For example, an entity has already been deleted from the database, but it is still accessible from the cache. To maintain data consistency, we need to at least not store deleted data in the cache.
Add a couple more methods to the service.
The first will simply delete the user, the second will also delete it, but we will mark it with the annotation @CacheEvict. Add a test that will create two users, after which one will be deleted through a simple method, and the second through an annotated method. After that, we will get these users through the get () method.
It is logical that since our user is already cached, the removal will not prevent us from getting it, as it is cached. Let's see the logs.
We see that the application safely went both times to the get () method and Spring cached these entities. Next, we deleted them through different methods. We deleted the first one in the usual way, and the cached value remained, so when we tried to get the user under id 1, we succeeded. When we tried to get user 2, the method returned an EntityNotFoundException - there was no such user in the cache.
Sometimes one method requires several caching settings. For this purpose, the @Caching annotation is used. It may look something like this:
This is the only way to group annotations. If you try to pile up something like
then IDEA will tell you this is not the case.
Finally, we figured out the cache, and it ceased to be something incomprehensible and scary for us. Now let's look under the hood and see how we can configure caching in general.
For such tasks, there is a CacheManager. It exists wherever Spring Cache is. When we added the @EnableCache annotation, such a cache manager will be automatically created by Spring. We can verify this if we auto-wrap the ApplicationContext and open it at the breakpoint. Among other bins, there will be a cacheManager bean.
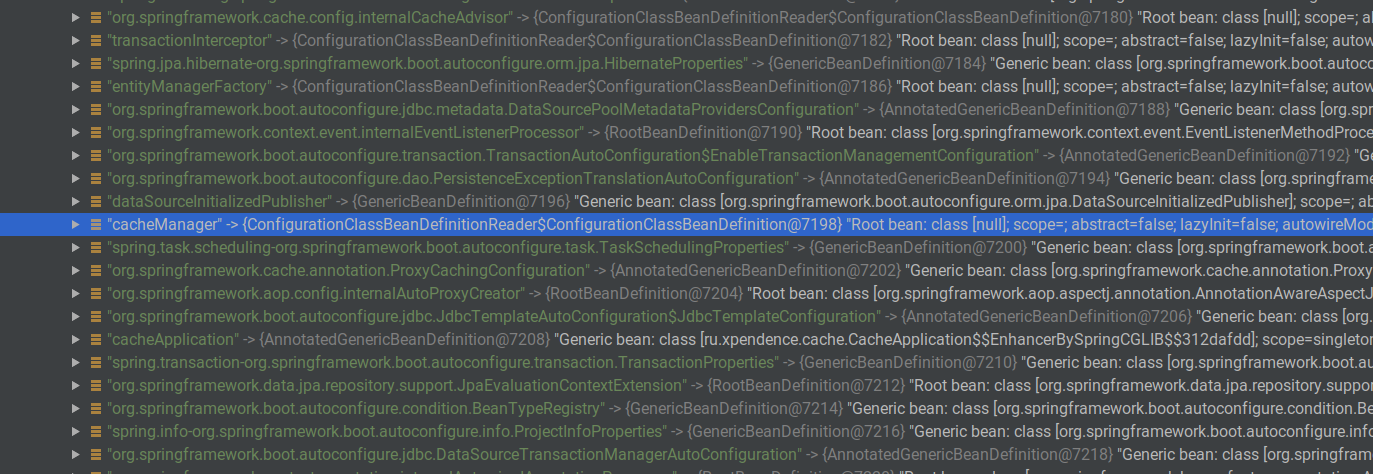
I stopped the application at the stage when two users were already created and put in the cache. If we call the bean we need through Evaluate Expression, we will see that there really is such a bean, it has a ConcurentMapCache with the "users" key and the value ConcurrentHashMap, which already contains cached users.

We, in turn, can create our cache manager, with Habr and programmers, and then fine-tune it to our taste.
It remains only to choose which cache manager we will use, because there are plenty of them. I will not list all the cache managers, it will be enough to know that there are such:
As part of my humble post, I will not describe the cache managers from the last three. Instead, we’ll take a look at several aspects of setting up a cache manager using the ConcurrentMapCacheManager as an example.
So, let's recreate our cache manager.
Our cache manager is ready.
To do this, we need a fairly popular Google Guava library. I took the last one.
When creating the cache manager, we redefine the createConcurrentMapCache method, in which we will call CacheBuilder from Guava. In the process, we will be asked to configure the cache manager by initializing the following methods:
and others.
We define in the manager the lifetime of the record. In order not to wait long, set 1 second.
We write a test corresponding to such a case.
We save several values to the database, and if the data is cached, we do not save anything. First, we save two values, then we wait 1 second until the cache goes dead, after which we save another value.
Logs show that first we created a user, then we tried another one, but since the data was cached, we got it from the cache (in both cases, when saving and when getting from the database). Then the cache went bad, as a record tells us about the actual saving and actual receipt of the user.
Sooner or later, the developer is faced with the need to implement caching in the project. I hope this article helps you understand the subject and look at caching issues more boldly.
Github of the project here: https://github.com/promoscow/cache
In this post, I will try to explain about caching as simple as I now understand. You will learn how to implement caching in 1 minute, how to cache by key, set the cache lifetime, and many other things that you need to know if you were instructed to cache something in your working project, and you don’t want to muddle face.
Why do I say "entrusted"? Because caching, as a rule, it makes sense to apply in large, highly loaded projects, with tens of thousands of requests per minute. In such projects, in order not to overload the database, they usually cache repository calls. Especially if it is known that the data from some master system is updated at a certain frequency. We ourselves do not write such projects, we work on them. If the project is small and does not threaten overloads, then, of course, it is better not to cache anything - always fresh data is always better than periodically updated ones.
Usually, in the training posts, the speaker first crawls under the hood, starts digging into the guts of the technology, which bothers the reader a lot, and only then, when he leafed through a good half of the article and did not understand anything, it tells how it works. Everything will be different with us. First, we make it work, and preferably, with the least effort, and only then, if you're interested, you can look under the cache hood, look inside the bin itself and fine-tune caching. But even if you do not (and this starts with point 6), your caching will work like that.
We will create a project in which we will analyze all the aspects of caching that I promised. At the end, as usual, there will be a link to the project itself.
0. Creating a project
We will create a very simple project in which we can take the entity from the database. I added Lombok, Spring Cache, Spring Data JPA, and H2 to the project. Although, only Spring Cache can be dispensed with.
plugins { id 'org.springframework.boot' version '2.1.7.RELEASE' id 'io.spring.dependency-management' version '1.0.8.RELEASE' id 'java' } group = 'ru.xpendence' version = '0.0.1-SNAPSHOT' sourceCompatibility = '1.8' configurations { compileOnly { extendsFrom annotationProcessor } } repositories { mavenCentral() } dependencies { implementation 'org.springframework.boot:spring-boot-starter-cache' implementation 'org.springframework.boot:spring-boot-starter-data-jpa' compileOnly 'org.projectlombok:lombok' runtimeOnly 'com.h2database:h2' annotationProcessor 'org.projectlombok:lombok' testImplementation 'org.springframework.boot:spring-boot-starter-test' }
We will have only one entity, let's call it User.
@Entity @Table(name = "users") @Data @NoArgsConstructor @ToString public class User implements Serializable { @Id @GeneratedValue(strategy = GenerationType.IDENTITY) private Long id; @Column(name = "name") private String name; @Column(name = "email") private String email; public User(String name, String email) { this.name = name; this.email = email; } }
Add repository and service:
public interface UserRepository extends JpaRepository<User, Long> { } @Slf4j @Service public class UserServiceImpl implements UserService { private final UserRepository repository; public UserServiceImpl(UserRepository repository) { this.repository = repository; } @Override public User create(User user) { return repository.save(user); } @Override public User get(Long id) { log.info("getting user by id: {}", id); return repository.findById(id) .orElseThrow(() -> new EntityNotFoundException("User not found by id " + id)); } }
When we enter the get () service method, we write about it in the log.
Connect to the Spring Cache project.
@SpringBootApplication @EnableCaching // Spring Cache public class CacheApplication { public static void main(String[] args) { SpringApplication.run(CacheApplication.class, args); } }
The project is ready.
1. Caching the return result
What does Spring Cache do? Spring Cache simply caches the return result for specific input parameters. Let's check it out. We will put the @Cacheable annotation over the get () service method to cache the returned data. We give this annotation the name “users” (we will further analyze why this is done separately).
@Override @Cacheable("users") public User get(Long id) { log.info("getting user by id: {}", id); return repository.findById(id) .orElseThrow(() -> new EntityNotFoundException("User not found by id " + id)); }
In order to check how this works, we will write a simple test.
@RunWith(SpringRunner.class) @SpringBootTest public abstract class AbstractTest { }
@Slf4j public class UserServiceTest extends AbstractTest { @Autowired private UserService service; @Test public void get() { User user1 = service.create(new User("Vasya", "vasya@mail.ru")); User user2 = service.create(new User("Kolya", "kolya@mail.ru")); getAndPrint(user1.getId()); getAndPrint(user2.getId()); getAndPrint(user1.getId()); getAndPrint(user2.getId()); } private void getAndPrint(Long id) { log.info("user found: {}", service.get(id)); } }
A small digression, why I usually write AbstractTest and inherit all tests from it.
If the class has its own @SpringBootTest annotation, the context is re-raised for such a class every time. Since the context can take 5 seconds, or maybe 40 seconds, this in any case greatly inhibits the testing process. At the same time, there is usually no difference in context, and when you run each group of tests within the same class, there is no need to restart the context. If we put only one annotation, say, over an abstract class, as in our case, this allows us to raise the context only once.
Therefore, I prefer to reduce the number of contexts raised during testing / assembly, if possible.
Therefore, I prefer to reduce the number of contexts raised during testing / assembly, if possible.
What does our test do? He creates two users and then pulls them out of the database 2 times. As we recall, we put the @Cacheable annotation, which will cache the returned values. After receiving the object from the get () method, we output the object to the log. Also, we log information about each visit by the application to the get () method.
Run the test. This is what we get in the console.
getting user by id: 1 user found: User(id=1, name=Vasya, email=vasya@mail.ru) getting user by id: 2 user found: User(id=2, name=Kolya, email=kolya@mail.ru) user found: User(id=1, name=Vasya, email=vasya@mail.ru) user found: User(id=2, name=Kolya, email=kolya@mail.ru)
As we see, the first two times we really went to the get () method and actually got the user from the database. In all other cases, there was no real call to the method, the application took cached data by key (in this case, this is id).
2. Declaring a key for caching
There are situations when several parameters come to the cached method. In this case, it may be necessary to determine the parameter by which caching will occur. We add an example to a method that will save an entity assembled by parameters into the database, but if an entity with the same name already exists, we will not save it. To do this, we will define the name parameter as the key for caching. It will look like this:
@Override @Cacheable(value = "users", key = "#name") public User create(String name, String email) { log.info("creating user with parameters: {}, {}", name, email); return repository.save(new User(name, email)); }
Let's write the corresponding test:
@Test public void create() { createAndPrint("Ivan", "ivan@mail.ru"); createAndPrint("Ivan", "ivan1122@mail.ru"); createAndPrint("Sergey", "ivan@mail.ru"); log.info("all entries are below:"); service.getAll().forEach(u -> log.info("{}", u.toString())); } private void createAndPrint(String name, String email) { log.info("created user: {}", service.create(name, email)); }
We will try to create three users, for two of which the name will be the same
createAndPrint("Ivan", "ivan@mail.ru"); createAndPrint("Ivan", "ivan1122@mail.ru");
and for two of which email will match
createAndPrint("Ivan", "ivan@mail.ru"); createAndPrint("Sergey", "ivan@mail.ru");
In the creation method, we log every fact that the method is called, and also, we will log all the entities that this method returned to us. The result will be like this:
creating user with parameters: Ivan, ivan@mail.ru created user: User(id=1, name=Ivan, email=ivan@mail.ru) created user: User(id=1, name=Ivan, email=ivan@mail.ru) creating user with parameters: Sergey, ivan@mail.ru created user: User(id=2, name=Sergey, email=ivan@mail.ru) all entries are below: User(id=1, name=Ivan, email=ivan@mail.ru) User(id=2, name=Sergey, email=ivan@mail.ru)
We see that, in fact, the application called the method 3 times, and went into it only two times. Once, a key matched a method, and it simply returned a cached value.
3. Forced caching. @CachePut
There are situations when we want to cache the return value for some entity, but at the same time, we need to update the cache. For such needs, there is the @CachePut annotation. It passes the application into the method, while updating the cache for the return value, even if it is already cached.
Add a couple of methods in which we will save the user. We will mark one of them with the usual @Cacheable annotation, the second with @CachePut.
@Override @Cacheable(value = "users", key = "#user.name") public User createOrReturnCached(User user) { log.info("creating user: {}", user); return repository.save(user); } @Override @CachePut(value = "users", key = "#user.name") public User createAndRefreshCache(User user) { log.info("creating user: {}", user); return repository.save(user); }
The first method will simply return the cached values, the second will force the cache to be updated. Caching will be performed using the key # user.name. We will write the corresponding test.
@Test public void createAndRefresh() { User user1 = service.createOrReturnCached(new User("Vasya", "vasya@mail.ru")); log.info("created user1: {}", user1); User user2 = service.createOrReturnCached(new User("Vasya", "misha@mail.ru")); log.info("created user2: {}", user2); User user3 = service.createAndRefreshCache(new User("Vasya", "kolya@mail.ru")); log.info("created user3: {}", user3); User user4 = service.createOrReturnCached(new User("Vasya", "petya@mail.ru")); log.info("created user4: {}", user4); }
According to the logic that has already been described, the first time a user with the name “Vasya” is saved through the createOrReturnCached () method, we will then receive a cached entity, and the application will not go into the method itself. If we call the createAndRefreshCache () method, the cached entity for the key named “Vasya” will be overwritten in the cache. Let's run the test and see what will be displayed in the console.
creating user: User(id=null, name=Vasya, email=vasya@mail.ru) created user1: User(id=1, name=Vasya, email=vasya@mail.ru) created user2: User(id=1, name=Vasya, email=vasya@mail.ru) creating user: User(id=null, name=Vasya, email=kolya@mail.ru) created user3: User(id=2, name=Vasya, email=kolya@mail.ru) created user4: User(id=2, name=Vasya, email=kolya@mail.ru)
We see that user1 has successfully written to the database and cache. When we try to record the user with the same name again, we get the cached result of the first call (user2, for which the id is the same as user1, which tells us that the user was not written, and this is just a cache). Next, we write the third user through the second method, which, even with the cached result, still called the method and wrote a new result to the cache. This is user3. As we can see, he already has a new id. After which, we call the first method, which takes the new cache added by user3.
4. Removal from the cache. @CacheEvict
Sometimes there is a need to hard update some data in the cache. For example, an entity has already been deleted from the database, but it is still accessible from the cache. To maintain data consistency, we need to at least not store deleted data in the cache.
Add a couple more methods to the service.
@Override public void delete(Long id) { log.info("deleting user by id: {}", id); repository.deleteById(id); } @Override @CacheEvict("users") public void deleteAndEvict(Long id) { log.info("deleting user by id: {}", id); repository.deleteById(id); }
The first will simply delete the user, the second will also delete it, but we will mark it with the annotation @CacheEvict. Add a test that will create two users, after which one will be deleted through a simple method, and the second through an annotated method. After that, we will get these users through the get () method.
@Test public void delete() { User user1 = service.create(new User("Vasya", "vasya@mail.ru")); log.info("{}", service.get(user1.getId())); User user2 = service.create(new User("Vasya", "vasya@mail.ru")); log.info("{}", service.get(user2.getId())); service.delete(user1.getId()); service.deleteAndEvict(user2.getId()); log.info("{}", service.get(user1.getId())); log.info("{}", service.get(user2.getId())); }
It is logical that since our user is already cached, the removal will not prevent us from getting it, as it is cached. Let's see the logs.
getting user by id: 1 User(id=1, name=Vasya, email=vasya@mail.ru) getting user by id: 2 User(id=2, name=Vasya, email=vasya@mail.ru) deleting user by id: 1 deleting user by id: 2 User(id=1, name=Vasya, email=vasya@mail.ru) getting user by id: 2 javax.persistence.EntityNotFoundException: User not found by id 2
We see that the application safely went both times to the get () method and Spring cached these entities. Next, we deleted them through different methods. We deleted the first one in the usual way, and the cached value remained, so when we tried to get the user under id 1, we succeeded. When we tried to get user 2, the method returned an EntityNotFoundException - there was no such user in the cache.
5. Grouping settings. @Caching
Sometimes one method requires several caching settings. For this purpose, the @Caching annotation is used. It may look something like this:
@Caching( cacheable = { @Cacheable("users"), @Cacheable("contacts") }, put = { @CachePut("tables"), @CachePut("chairs"), @CachePut(value = "meals", key = "#user.email") }, evict = { @CacheEvict(value = "services", key = "#user.name") } ) void cacheExample(User user) { }
This is the only way to group annotations. If you try to pile up something like
@CacheEvict("users") @CacheEvict("meals") @CacheEvict("contacts") @CacheEvict("tables") void cacheExample(User user) { }
then IDEA will tell you this is not the case.
6. Flexible configuration. Cachemanager
Finally, we figured out the cache, and it ceased to be something incomprehensible and scary for us. Now let's look under the hood and see how we can configure caching in general.
For such tasks, there is a CacheManager. It exists wherever Spring Cache is. When we added the @EnableCache annotation, such a cache manager will be automatically created by Spring. We can verify this if we auto-wrap the ApplicationContext and open it at the breakpoint. Among other bins, there will be a cacheManager bean.
I stopped the application at the stage when two users were already created and put in the cache. If we call the bean we need through Evaluate Expression, we will see that there really is such a bean, it has a ConcurentMapCache with the "users" key and the value ConcurrentHashMap, which already contains cached users.
We, in turn, can create our cache manager, with Habr and programmers, and then fine-tune it to our taste.
@Bean("habrCacheManager") public CacheManager cacheManager() { return null; }
It remains only to choose which cache manager we will use, because there are plenty of them. I will not list all the cache managers, it will be enough to know that there are such:
- SimpleCacheManager is the simplest cache manager, convenient for learning and testing.
- ConcurrentMapCacheManager - Lazily initializes returned instances for each request. It is also recommended for testing and learning how to work with the cache, as well as for some simple actions like ours. For serious work with the cache, the implementation below is recommended.
- JCacheCacheManager , EhCacheCacheManager , CaffeineCacheManager are serious partners-based cache managers that are flexibly customizable and perform tasks of a very wide range of actions.
As part of my humble post, I will not describe the cache managers from the last three. Instead, we’ll take a look at several aspects of setting up a cache manager using the ConcurrentMapCacheManager as an example.
So, let's recreate our cache manager.
@Bean("habrCacheManager") public CacheManager cacheManager() { return new ConcurrentMapCacheManager(); }
Our cache manager is ready.
7. Cache setup. Life time, maximum size and so on.
To do this, we need a fairly popular Google Guava library. I took the last one.
compile group: 'com.google.guava', name: 'guava', version: '28.1-jre'
When creating the cache manager, we redefine the createConcurrentMapCache method, in which we will call CacheBuilder from Guava. In the process, we will be asked to configure the cache manager by initializing the following methods:
- maximumSize - the maximum size of the values that the cache can contain. Using this parameter, you can find an attempt to find a compromise between the load on the database and the JVM RAM.
- refreshAfterWrite - time after writing the value to the cache, after which it will automatically be updated.
- expireAfterAccess - the lifetime of the value after the last call to it.
- expireAfterWrite - lifetime of the value after writing to the cache. This is the parameter we will define.
and others.
We define in the manager the lifetime of the record. In order not to wait long, set 1 second.
@Bean("habrCacheManager") public CacheManager cacheManager() { return new ConcurrentMapCacheManager() { @Override protected Cache createConcurrentMapCache(String name) { return new ConcurrentMapCache( name, CacheBuilder.newBuilder() .expireAfterWrite(1, TimeUnit.SECONDS) .build().asMap(), false); } }; }
We write a test corresponding to such a case.
@Test public void checkSettings() throws InterruptedException { User user1 = service.createOrReturnCached(new User("Vasya", "vasya@mail.ru")); log.info("{}", service.get(user1.getId())); User user2 = service.createOrReturnCached(new User("Vasya", "vasya@mail.ru")); log.info("{}", service.get(user2.getId())); Thread.sleep(1000L); User user3 = service.createOrReturnCached(new User("Vasya", "vasya@mail.ru")); log.info("{}", service.get(user3.getId())); }
We save several values to the database, and if the data is cached, we do not save anything. First, we save two values, then we wait 1 second until the cache goes dead, after which we save another value.
creating user: User(id=null, name=Vasya, email=vasya@mail.ru) getting user by id: 1 User(id=1, name=Vasya, email=vasya@mail.ru) User(id=1, name=Vasya, email=vasya@mail.ru) creating user: User(id=null, name=Vasya, email=vasya@mail.ru) getting user by id: 2 User(id=2, name=Vasya, email=vasya@mail.ru)
Logs show that first we created a user, then we tried another one, but since the data was cached, we got it from the cache (in both cases, when saving and when getting from the database). Then the cache went bad, as a record tells us about the actual saving and actual receipt of the user.
8. To summarize
Sooner or later, the developer is faced with the need to implement caching in the project. I hope this article helps you understand the subject and look at caching issues more boldly.
Github of the project here: https://github.com/promoscow/cache
All Articles