Training Cisco 200-125 CCNA v3.0. Day 26. DNS and DHCP
The DNS domain name distribution system and the DHCP dynamic host configuration protocol are very important for networks, especially for the Internet, as they allow you to configure access to the Internet, configure a browser, etc. In previous lessons, we already looked at configuring a DHCP server, so we won’t waste time and start the lesson.
Today we will look at three topics: the operation of DNS, the configuration of DNS and the problems that may occur when using this system, as well as the configuration and problems of DHCP. Before moving on, we need to consider a few things. They are not part of the CCNA course theme, but are needed to understand the basic concepts of how a new website is hosted. If you are interested in creating sites, you want to learn about HTML, CSS, PHP, Java-script, I want to say that I'm going to make a new series of video tutorials on how to create sites. However, given that I do this in my spare time from my main job, this series will not be released soon. In the meantime, I want to talk about some of the basics of site building, relating not so much to the development of sites as hosting and network support for web pages.

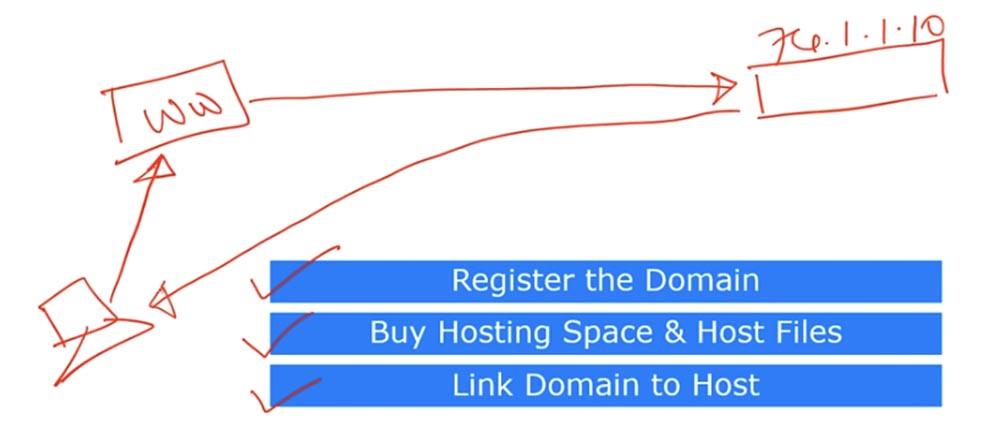
So, to install a site on the Internet, you first need to register a domain, that is, purchase the domain name of the site. To do this, you can contact the largest domain name registrar, like Go Daddy. You go to the registrar's website and check the availability of the website name you invented, for example, imran.com. This name may be available, as well as a name with the extension .org, .net, and so on. Choosing it, you will have to pay a certain amount, from $ 10 to a thousand dollars, depending on the popularity of the zone in which you buy the domain. After you have purchased a domain name, you should acquire a hosting space. A domain name is what makes your website recognizable on the Internet. The hosting space that you can buy from the same Go Daddy registrar is necessary for placing on the Internet the site you developed, that is, your web pages assembled as a whole. You buy this space to load your site there. The third thing you should do is bind the domain name to the hosted site.
If someone types imran.com in the search engine of their browser, you should tell the computer where exactly the site with the given name is located so that he can find the requested HTML files on the Internet and open the desired page in the browser.
Suppose on the left we have the domain name of the site www.imran.com , and on the right in the rectangle is the host 74.1.1.10 on which the files of this site are stored. Below I draw a computer whose browser accesses the site name www. imran.com. Since the computer does not know exactly where the files of this site are located, there must be a mechanism to help it find them. This mechanism helps the computer send a request for hosting, and hosting by this request sends files that are displayed in a browser on the computer screen.
Technically, you can instead of www.imran.com type in the browser IP address of the host 74.1.1.10, and everything will work just as well - you can get any files you need. However, remembering such a site address is very difficult, which is why domain names are created. Suppose that hosting has raised its prices tomorrow, and using host 74.1.1.10 to store files on my site has become very expensive. In this case, I find a cheaper hosting and upload my site there, while the domain name of the site does not change - I untie the domain from the old host and link it to the new host 58.1.1.10.
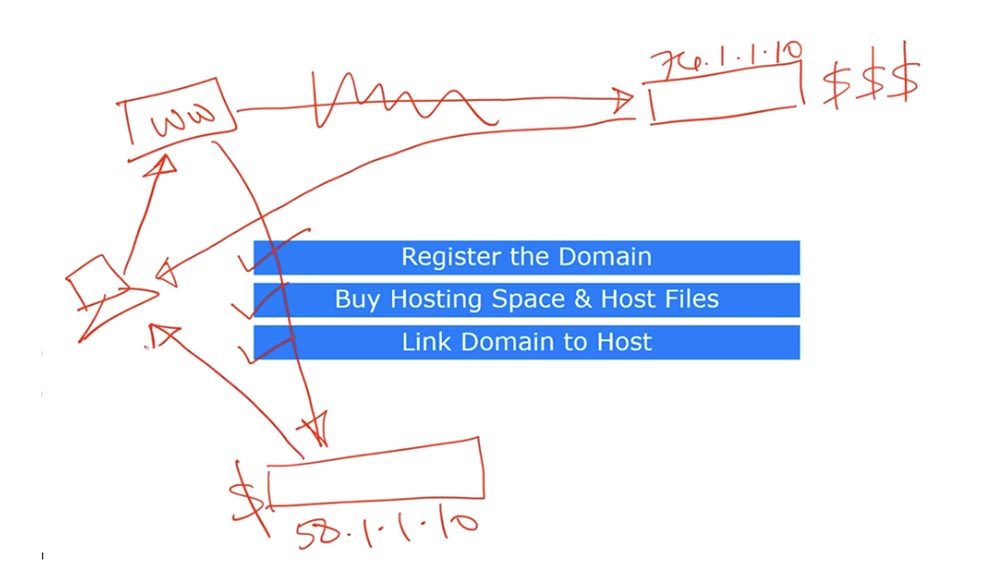
Now the computer can just as well receive HTML files from the new host if the domain name imran.com appears in the browser line. Thus, the user only needs to remember the domain name and not think about which host the site’s files are located on. This is the reason we use domain names and hosts. Let me remind you again - these concepts are not included in the theme of the CCNA course, and if you want to know more about hosting and sites, you will have to watch other series of video tutorials.
Let's move on to the DNS. This is a system that converts domain names to IP addresses. As I said, a domain name like www.imran.com is much easier to remember than a set of numbers of IP addresses. Therefore, we need a mechanism to translate the domain name into the IP address of the host on which the files of this site are stored. I’ll show you something now. Here is the command line where I type ping google.com.
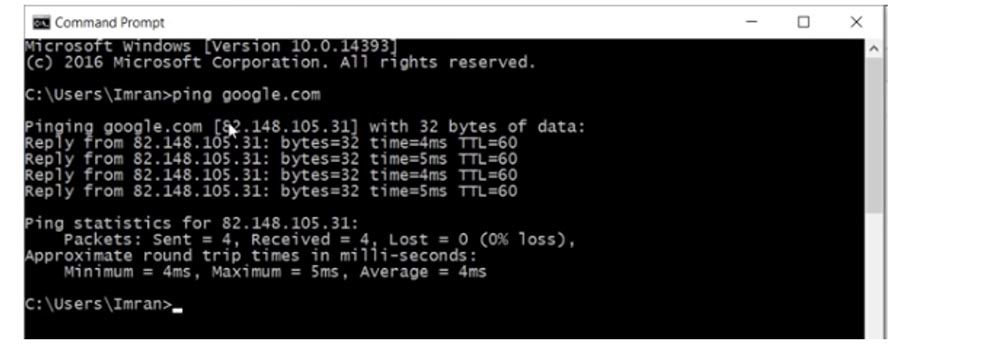
You see that next to the domain name, the system displays the host IP address. If I type this address in the browser bar and press enter, I will go to google.com. At the same time, the domain name of the site, and not its IP address, will be displayed in the address bar of the browser. Technically, the browser does not care what type of address to dial, but as I said, if you remember the IP address of the host of a resource, and its owner transfers the site to another hosting, you cannot find the resource you are looking for. Because if 10,000 people use my site, I won’t be able to tell everyone that the site has moved to a new host and its IP address has changed. So the best way would be to remember the domain name, because changing the host address will take place automatically and will not affect the site name.
There are two types of DNS servers: private, or internal, and public, or external. In the first case, we can have a network of 100 computers that need a local domain name. For example, to use the file server of a company located on a host with a certain IP address, you will not need to type and remember this address if you use the simple domain name fileserver. At the same time, the network administrator can change the IP address of the file server at any time, and this will not affect users on the local network.
Similarly, you can use a public DNS server, or a DNS resolver. If you type imran.com in the address bar of your browser, your computer does not know what the name is and where it can be found, therefore it contacts the DNS server. In the network settings of Windows, it is possible to specify the primary, preferred and secondary, alternative DNS server.

This process can happen automatically with ISP, your network provider. If you enter the domain name imran.com, your computer accesses the DNS server. If the preferred server, whose IP address you entered manually, is unavailable for some reason, the computer will turn to an alternative DNS server. This does not mean that if the primary server does not know anything about the imran.com domain name, it will forward the request to the secondary server. If the domain name you dialed does not exist on the network, that is, the primary server does not know anything about it, it will simply reject the wrong request. But if your preferred DNS server is simply unavailable for technical reasons, you will be redirected to an alternate server.
Now I will show how it works. I will draw your computer that is associated with a DNS resolver. Usually, as soon as you type imran.com, your computer, or rather, its browser, checks its own cache. If the computer previously had access to this site, its IP address was saved in the cache. If this is the first call to the site, the request goes to the resolver, who also checks his cache first. If there is no information there, the resolver refers to the root server. Dozens of root DNS servers are scattered around the world, and if you access the Internet from India, you contact the Indian root server, if you are from the United States, you will be taken to the American root server closest to you. These servers have anycast IP addresses.
Upon receiving your request, the root server replies: “I don’t know where the site imran.com is located, but I can tell where the sites with the .com extension are located,” that is, it provides access to the TLD server, or to the Top Level Domain because he knows the IP addresses of all sites with the .com extension. This response of the root server goes to the DNS resolver, after which it addresses its request to the TLD server.
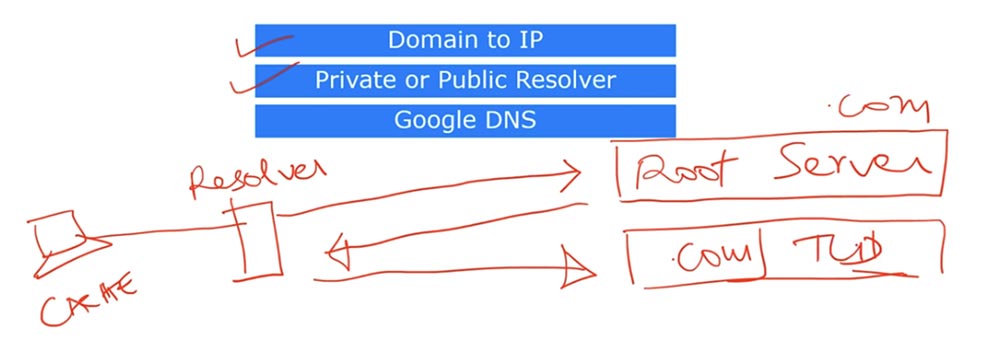
The top-level domain answers: “I do not know where imran.com is located, but I know where the authoritative name server Authoritative Nameserver for imran.com is located”, and sends its response to the resolver.
After that, the DNS resolver sends a request to the authoritarian server, and the server finally answers the resolver: "imran.com is located at 74.1.0.1."

After that, the resolver stores this IP address in its cache and reports it to the computer. Finally, the computer accesses server 74.1.0.1 directly, and it sends the desired HTML file to the browser. You might think that this is a rather lengthy process, but in reality, accessing all these servers and receiving answers takes less than a second.
There is a very popular public resolver that everyone uses - this is Google DNS, which has an IP address of 8.8.8.8. Google has many resolvers that store a huge number of addresses of various resources in their caches, so accessing Google and receiving a response is much faster. Now let's move on to DHCP.

If you remember, we already talked about this protocol in one of the first video tutorials. DHCP organizes the process of obtaining the device IP address and other parameters that are needed to work on the network using TCP / IP protocols. Cisco devices use a DHCP server whose settings are configured in the global configuration mode of the router. To do this, use the ip dhcp pool <name> command, with which a DHCP pool is configured on the router, then the network <network> <subnet mask> command indicating which subnet it is configured for. The network IP address is / 24 and the subnet mask is 255.255.255.0. A slash 24 indicates that there may be 254 possible addresses on the network that are assigned to this DHCP pool.
Next, you must specify the default router, which is the IP address of the default gateway, and specify the DNS server itself, indicating its IP address. For example, if you specify the address 8.8.8.8 as the DNS server, then DHCP will report this address to all clients in the pool.
Suppose your network 192.168.1.0 has a DHSP server, a file server, and a web server. Then these devices will have the last octet of the IP address, respectively .1, .2 and .3. Suppose you have a new client that is accessing a DHCP server to obtain an IP address. At the same time, the server should not assign it the addresses .2 and .3, because they are already occupied by other devices. In this case, we need a ban on those addresses that cannot be assigned to new devices included in the network.

I will give an example of how this ban can be implemented. In this case, a range of IP addresses is set that the DHCP server should not assign to clients. I will show you this process in Packet Tracer. You see the network topology in which the first router acts as a DHCP server.
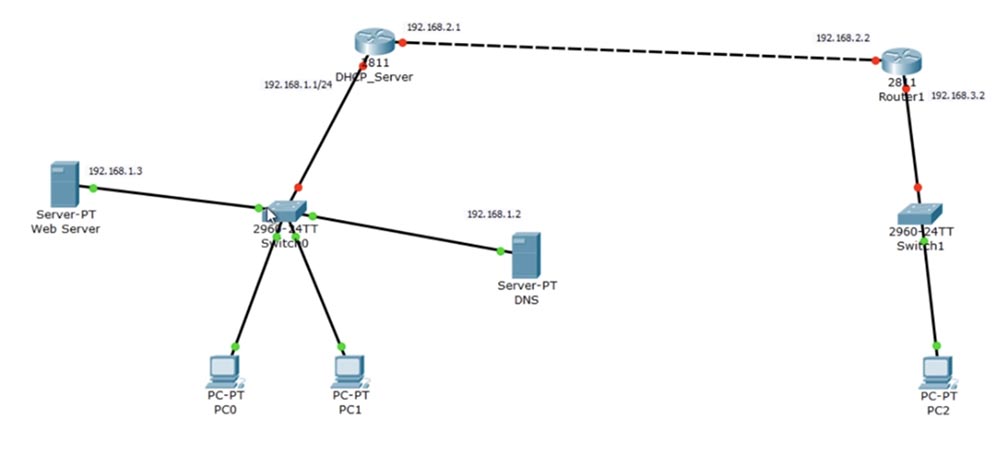
On the left side is the network 192.168.1.0, which includes two computers, a switch, a web server and a DNS server. Computers act as clients that automatically receive addresses from the DHCP pool. I will configure the DNS server so that every time clients access google.com or cisco.com, they will send a request to the web server, which will provide them with the requested information. This is the first thing to do.
Then I have to go to the DHCP server, to the right of which there are two more networks: the network 192.168.2.0, which connects it to Router1, and the network 192.168.3.0, in which the switch and PC2 are located. This computer must also be able to access the DHCP server. However, the DHCP request is broadcast, and as we know, the router does not accept the broadcast request and discards it. Therefore, we need to configure Router1 so that it serves as a relay of DHCP requests from PC2 to the DHCP server. Upon receiving such a request, the server must provide the third computer with an IP address, however this address should not belong to the address range of the network 192.168.1.0, since PC2 is located on the network 192.168.3.0. Therefore, PC2 must obtain an IP address from the network address range of 192.168.3.0.
Thus, we need a mechanism that allows us to create several pools for working with devices located on different subnets. To organize the work of a DHCP server with several subnets, you need to go into the settings of the router and assign IP addresses to its interfaces, which I designated in the diagram.
First, I enter the global settings mode and enter the hostname DHCP_server command, then assign the IP address to the f0 / 0 interface with the ip address 192.168.1.1 255.255.255.0 command and add the no shutdown command. Interface f0 / 1 is assigned the address 192.168.2.1.
Now create a pool of IP addresses. To do this, use the ip dhcp pool command, in which you need to specify the name of the pool, then switch to the sub-command mode of the created pool, specify the range of free IP addresses of the pool and the passive DHCP-relay server.
So, I create a pool called NET1 using the ip dhcp pool NET1 command, press Enter and go to the subcommands. The system gives a hint which parameters can be configured.

You can specify the default router default-router, the name of the DNS server dns-server, the exit command allows you to exit the DHCP pool settings, the network parameter allows you to specify the network number and mask, the no command cancels all changes and resets to default settings, and option allows you to specify Raw DHCP features.
To begin with, we indicate the default router, that is, we specify the IP address 192.168.1.1. This means that if PC0 or PC1 wants to get an IP address, it will have to go to the gateway that has that address. This parameter is entered with the default-router 192.168.1.1 command. Next, you need to specify for which network this pool is configured. To do this, use the network 192.168.1.0 255.255.255.0 command.
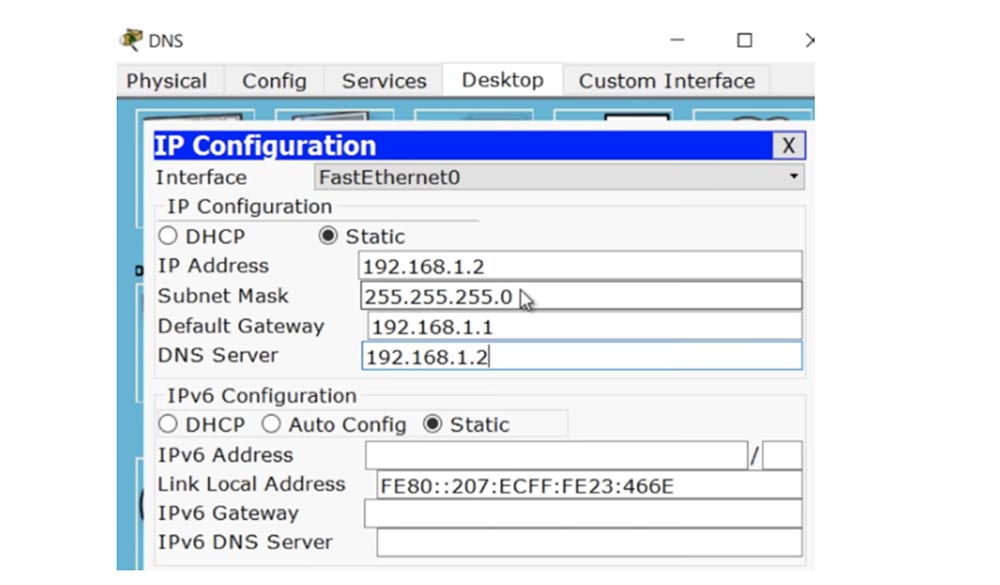
Now you need to specify the DNS server, which in our diagram has the IP address 192.168.1.2. To do this, I enter the dns-server 192.168.1.2 command without specifying a subnet mask.
After setting up the DHCP server, let's move on to setting up the DNS server. To do this, I click on the icon of this device and go to the IP configuration tab. In this case, the static IP address 192.168.1.2 is used, the default gateway address is 192.168.1.1, and the device indicates itself as a DNS server, that is, the IP address 192.168.1.2.
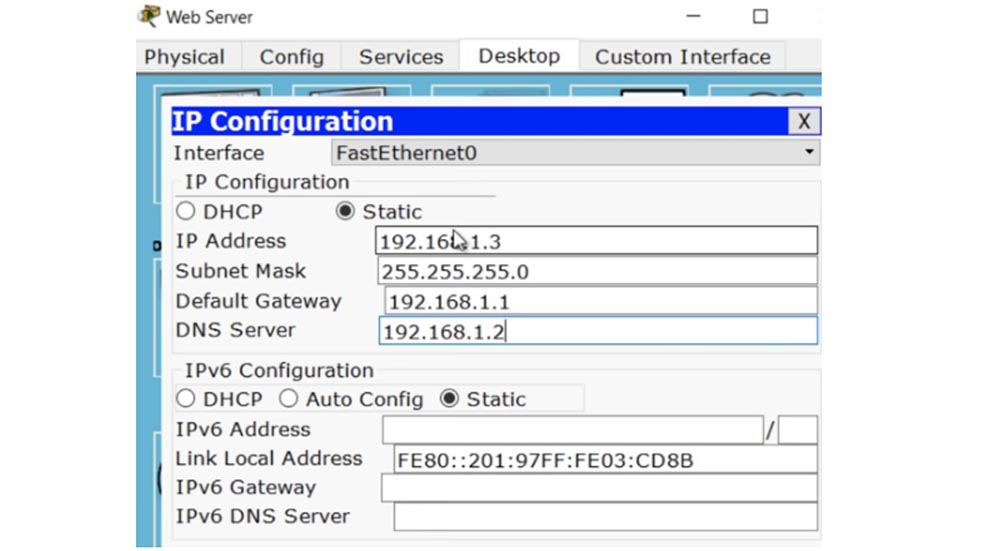
Now you can go to the web server settings. I also go into the IP settings and enter the necessary parameters.
I also need to do some additional configuration of the web server, but don’t worry, setting up such servers is not part of the CCNA course, I just have to do this to continue working with our network example. I just want to show that on the Services tab there is an HTML file that I put here in advance. After the web server receives a computer request, it will send it this file. I go back to the DNS server settings, open the Services tab and turn on the DNS service. Then I create a DNS service record: in the Name field I enter the name of the site the client is accessing - www.nwking.org , and in the next line Address I enter the IP address of the web server on which this site is stored - 192.168.1.3.

After that, I click on the Add button, and we get a record on how to get to the nwking.org resource. In this case, this entry simply converts the site name to IP address. There is a possibility to change it, but I will not dwell on this, since setting up a DNS server is not part of your CCNA course. I just showed how website hosting is configured.
Now I will go to PC0 and configure DHCP. To do this, I will send a request, and as you can see, DHCP will automatically respond to the computer immediately, filling in the lines with information. This way PC0 will get its IP address 192.168.1.4
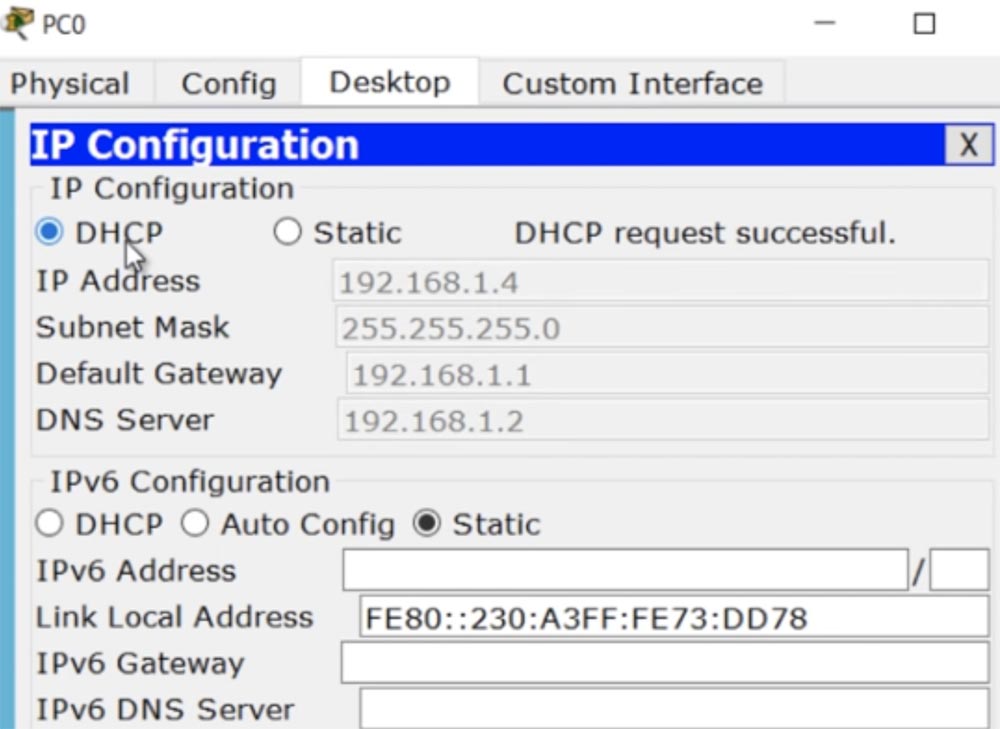
This address with the last octet .4 was automatically configured taking into account the fact that devices with addresses .1, .2 and .3 are already present in the network. However, if you manually assign an IP address to a device on this network, an IP conflict may occur because the DHCP server will not know that you have already assigned the computer, for example, address 192.168.1.3, and may automatically assign the same Address to another device.
To prevent this conflict, you must manually tell the server which IP addresses to exclude from the list of available ones. This is done with the ip dhcp excluded-address 192.168.1.1 192.168.1.10 command, that is, we set the range of invalid addresses from .1 to .10. Just in case, I reserved more addresses so that in the future it would be possible to place more file servers, new computers, etc. in this network. If you again send a request to assign an IP address to PC0, you can see that the DHCP server issued an address that is outside the range of unavailable IP addresses with a fourth octet .11.
Let's move on to PC1 and do the same. We see that the server assigned it the next available IP address 192.168.1.12, the default gateway is 192.168.1.1, and the DNS server is 192.168.1.2.
Now I’ll go to PC0’s computer settings and go to the Web Browser tab, then type in the address bar www.nwking.org and click the Go button. After that, the browser will show me the site page, or rather, the file that I placed as a site on a web server. The following happened: the computer sent a request to the DNS server, it said that if you are looking for this site, it is available on the device with the IP address 192.168.1.3, after which PC0 directly accessed the web server and received the necessary one from it information.

Now I will disconnect the DNS server by removing the cable that connects it to the switch. If I try to call this site again from PC0, it should open it again in the browser, because the data is stored in the cache. I enter the address www.nwking.org and click Go, but nothing happens.This is strange because information about accessing the site should have remained in the browser cache.
I will do the same with PC1, and as you can see, pressing the Go button does not produce any result. Let me reconnect the DNS server to the switch and run the PC0 browser again. Technically, if information about a site is stored in the browser’s cache, you don’t need a connection to the DNS server in order to access this site, because the computer will automatically access the web server directly.
, - , , Packet Tracer. DNS- PC0. – DNS-, PC0 . PC1 , www.nwking.org – DNS-, . , , , DNS- .
DHCP- , PC2, NET2. ip dhcp pool NET2 network 192.168.3.0 255.255.255.0. IP- DNS-, — 192.168.1.2 . 3.0, default router Router1 IP- 192.168.3.2.
, Router1 f0/0 f0/1 IP- 192.168.2.2 192.168.3.2.
, IP- PC2 DHCP, Router1. DHCP-, , APIPA, IP-, DHCP-.
APIPA IP- 169.254.133.157. , . , Router1, IP-, DHCP-, , DHCP-relay. , , DHCP-server RIP-.

Router1 , RIP.

f0/1, helper-address. helper-address DHCP- , 192.168.2.1.
DHCP- PC2 DHCP-. DHCP, , APIPA – DHCP- .
, Router1 ping 192.168.2.1. , - DHCP-, show ip int brief, . , ! , , , . .
DHCP- , f0/1: ip add 192.168.2.1 255.255.255.0. , . PC2 DHCP. What now? !
Router1. C , , ? . , .
DHCP- show ip route. , , . , .
PC2 DHCP – , IP- 192.168.3.6, DHCP-. - , .
, www.nwking.org , Nameserver , - 192.168.1.3. PC2 HTML-.
DHCP-relay, helper-address. , . DNS DHCP .
As I already said, we are approaching the end of the topic necessary for passing the first CCNA exam, we still have a few important video tutorials, in particular, ASL, NAT and PAT. I ask you not to worry about the incompatibility of the video tutorials of the old and new versions of CCNA - I will add new episodes in a timely manner and delete unnecessary ones, so that you will only study relevant topics.
Thank you for staying with us. Do you like our articles? Want to see more interesting materials? Support us by placing an order or recommending it to your friends, a 30% discount for Habr users on a unique analogue of entry-level servers that was invented by us for you: The whole truth about VPS (KVM) E5-2650 v4 (6 Cores) 10GB DDR4 240GB SSD 1Gbps from $ 20 or how to divide the server? (options are available with RAID1 and RAID10, up to 24 cores and up to 40GB DDR4).
Dell R730xd 2 times cheaper? Only we have 2 x Intel TetraDeca-Core Xeon 2x E5-2697v3 2.6GHz 14C 64GB DDR4 4x960GB SSD 1Gbps 100 TV from $ 199 in the Netherlands! Dell R420 - 2x E5-2430 2.2Ghz 6C 128GB DDR3 2x960GB SSD 1Gbps 100TB - from $ 99! Read about How to Build Infrastructure Bldg. class c using Dell R730xd E5-2650 v4 servers costing 9,000 euros for a penny?
Today we will look at three topics: the operation of DNS, the configuration of DNS and the problems that may occur when using this system, as well as the configuration and problems of DHCP. Before moving on, we need to consider a few things. They are not part of the CCNA course theme, but are needed to understand the basic concepts of how a new website is hosted. If you are interested in creating sites, you want to learn about HTML, CSS, PHP, Java-script, I want to say that I'm going to make a new series of video tutorials on how to create sites. However, given that I do this in my spare time from my main job, this series will not be released soon. In the meantime, I want to talk about some of the basics of site building, relating not so much to the development of sites as hosting and network support for web pages.
So, to install a site on the Internet, you first need to register a domain, that is, purchase the domain name of the site. To do this, you can contact the largest domain name registrar, like Go Daddy. You go to the registrar's website and check the availability of the website name you invented, for example, imran.com. This name may be available, as well as a name with the extension .org, .net, and so on. Choosing it, you will have to pay a certain amount, from $ 10 to a thousand dollars, depending on the popularity of the zone in which you buy the domain. After you have purchased a domain name, you should acquire a hosting space. A domain name is what makes your website recognizable on the Internet. The hosting space that you can buy from the same Go Daddy registrar is necessary for placing on the Internet the site you developed, that is, your web pages assembled as a whole. You buy this space to load your site there. The third thing you should do is bind the domain name to the hosted site.
If someone types imran.com in the search engine of their browser, you should tell the computer where exactly the site with the given name is located so that he can find the requested HTML files on the Internet and open the desired page in the browser.
Suppose on the left we have the domain name of the site www.imran.com , and on the right in the rectangle is the host 74.1.1.10 on which the files of this site are stored. Below I draw a computer whose browser accesses the site name www. imran.com. Since the computer does not know exactly where the files of this site are located, there must be a mechanism to help it find them. This mechanism helps the computer send a request for hosting, and hosting by this request sends files that are displayed in a browser on the computer screen.
Technically, you can instead of www.imran.com type in the browser IP address of the host 74.1.1.10, and everything will work just as well - you can get any files you need. However, remembering such a site address is very difficult, which is why domain names are created. Suppose that hosting has raised its prices tomorrow, and using host 74.1.1.10 to store files on my site has become very expensive. In this case, I find a cheaper hosting and upload my site there, while the domain name of the site does not change - I untie the domain from the old host and link it to the new host 58.1.1.10.
Now the computer can just as well receive HTML files from the new host if the domain name imran.com appears in the browser line. Thus, the user only needs to remember the domain name and not think about which host the site’s files are located on. This is the reason we use domain names and hosts. Let me remind you again - these concepts are not included in the theme of the CCNA course, and if you want to know more about hosting and sites, you will have to watch other series of video tutorials.
Let's move on to the DNS. This is a system that converts domain names to IP addresses. As I said, a domain name like www.imran.com is much easier to remember than a set of numbers of IP addresses. Therefore, we need a mechanism to translate the domain name into the IP address of the host on which the files of this site are stored. I’ll show you something now. Here is the command line where I type ping google.com.
You see that next to the domain name, the system displays the host IP address. If I type this address in the browser bar and press enter, I will go to google.com. At the same time, the domain name of the site, and not its IP address, will be displayed in the address bar of the browser. Technically, the browser does not care what type of address to dial, but as I said, if you remember the IP address of the host of a resource, and its owner transfers the site to another hosting, you cannot find the resource you are looking for. Because if 10,000 people use my site, I won’t be able to tell everyone that the site has moved to a new host and its IP address has changed. So the best way would be to remember the domain name, because changing the host address will take place automatically and will not affect the site name.
There are two types of DNS servers: private, or internal, and public, or external. In the first case, we can have a network of 100 computers that need a local domain name. For example, to use the file server of a company located on a host with a certain IP address, you will not need to type and remember this address if you use the simple domain name fileserver. At the same time, the network administrator can change the IP address of the file server at any time, and this will not affect users on the local network.
Similarly, you can use a public DNS server, or a DNS resolver. If you type imran.com in the address bar of your browser, your computer does not know what the name is and where it can be found, therefore it contacts the DNS server. In the network settings of Windows, it is possible to specify the primary, preferred and secondary, alternative DNS server.
This process can happen automatically with ISP, your network provider. If you enter the domain name imran.com, your computer accesses the DNS server. If the preferred server, whose IP address you entered manually, is unavailable for some reason, the computer will turn to an alternative DNS server. This does not mean that if the primary server does not know anything about the imran.com domain name, it will forward the request to the secondary server. If the domain name you dialed does not exist on the network, that is, the primary server does not know anything about it, it will simply reject the wrong request. But if your preferred DNS server is simply unavailable for technical reasons, you will be redirected to an alternate server.
Now I will show how it works. I will draw your computer that is associated with a DNS resolver. Usually, as soon as you type imran.com, your computer, or rather, its browser, checks its own cache. If the computer previously had access to this site, its IP address was saved in the cache. If this is the first call to the site, the request goes to the resolver, who also checks his cache first. If there is no information there, the resolver refers to the root server. Dozens of root DNS servers are scattered around the world, and if you access the Internet from India, you contact the Indian root server, if you are from the United States, you will be taken to the American root server closest to you. These servers have anycast IP addresses.
Upon receiving your request, the root server replies: “I don’t know where the site imran.com is located, but I can tell where the sites with the .com extension are located,” that is, it provides access to the TLD server, or to the Top Level Domain because he knows the IP addresses of all sites with the .com extension. This response of the root server goes to the DNS resolver, after which it addresses its request to the TLD server.
The top-level domain answers: “I do not know where imran.com is located, but I know where the authoritative name server Authoritative Nameserver for imran.com is located”, and sends its response to the resolver.
After that, the DNS resolver sends a request to the authoritarian server, and the server finally answers the resolver: "imran.com is located at 74.1.0.1."
After that, the resolver stores this IP address in its cache and reports it to the computer. Finally, the computer accesses server 74.1.0.1 directly, and it sends the desired HTML file to the browser. You might think that this is a rather lengthy process, but in reality, accessing all these servers and receiving answers takes less than a second.
There is a very popular public resolver that everyone uses - this is Google DNS, which has an IP address of 8.8.8.8. Google has many resolvers that store a huge number of addresses of various resources in their caches, so accessing Google and receiving a response is much faster. Now let's move on to DHCP.
If you remember, we already talked about this protocol in one of the first video tutorials. DHCP organizes the process of obtaining the device IP address and other parameters that are needed to work on the network using TCP / IP protocols. Cisco devices use a DHCP server whose settings are configured in the global configuration mode of the router. To do this, use the ip dhcp pool <name> command, with which a DHCP pool is configured on the router, then the network <network> <subnet mask> command indicating which subnet it is configured for. The network IP address is / 24 and the subnet mask is 255.255.255.0. A slash 24 indicates that there may be 254 possible addresses on the network that are assigned to this DHCP pool.
Next, you must specify the default router, which is the IP address of the default gateway, and specify the DNS server itself, indicating its IP address. For example, if you specify the address 8.8.8.8 as the DNS server, then DHCP will report this address to all clients in the pool.
Suppose your network 192.168.1.0 has a DHSP server, a file server, and a web server. Then these devices will have the last octet of the IP address, respectively .1, .2 and .3. Suppose you have a new client that is accessing a DHCP server to obtain an IP address. At the same time, the server should not assign it the addresses .2 and .3, because they are already occupied by other devices. In this case, we need a ban on those addresses that cannot be assigned to new devices included in the network.
I will give an example of how this ban can be implemented. In this case, a range of IP addresses is set that the DHCP server should not assign to clients. I will show you this process in Packet Tracer. You see the network topology in which the first router acts as a DHCP server.
On the left side is the network 192.168.1.0, which includes two computers, a switch, a web server and a DNS server. Computers act as clients that automatically receive addresses from the DHCP pool. I will configure the DNS server so that every time clients access google.com or cisco.com, they will send a request to the web server, which will provide them with the requested information. This is the first thing to do.
Then I have to go to the DHCP server, to the right of which there are two more networks: the network 192.168.2.0, which connects it to Router1, and the network 192.168.3.0, in which the switch and PC2 are located. This computer must also be able to access the DHCP server. However, the DHCP request is broadcast, and as we know, the router does not accept the broadcast request and discards it. Therefore, we need to configure Router1 so that it serves as a relay of DHCP requests from PC2 to the DHCP server. Upon receiving such a request, the server must provide the third computer with an IP address, however this address should not belong to the address range of the network 192.168.1.0, since PC2 is located on the network 192.168.3.0. Therefore, PC2 must obtain an IP address from the network address range of 192.168.3.0.
Thus, we need a mechanism that allows us to create several pools for working with devices located on different subnets. To organize the work of a DHCP server with several subnets, you need to go into the settings of the router and assign IP addresses to its interfaces, which I designated in the diagram.
First, I enter the global settings mode and enter the hostname DHCP_server command, then assign the IP address to the f0 / 0 interface with the ip address 192.168.1.1 255.255.255.0 command and add the no shutdown command. Interface f0 / 1 is assigned the address 192.168.2.1.
Now create a pool of IP addresses. To do this, use the ip dhcp pool command, in which you need to specify the name of the pool, then switch to the sub-command mode of the created pool, specify the range of free IP addresses of the pool and the passive DHCP-relay server.
So, I create a pool called NET1 using the ip dhcp pool NET1 command, press Enter and go to the subcommands. The system gives a hint which parameters can be configured.
You can specify the default router default-router, the name of the DNS server dns-server, the exit command allows you to exit the DHCP pool settings, the network parameter allows you to specify the network number and mask, the no command cancels all changes and resets to default settings, and option allows you to specify Raw DHCP features.
To begin with, we indicate the default router, that is, we specify the IP address 192.168.1.1. This means that if PC0 or PC1 wants to get an IP address, it will have to go to the gateway that has that address. This parameter is entered with the default-router 192.168.1.1 command. Next, you need to specify for which network this pool is configured. To do this, use the network 192.168.1.0 255.255.255.0 command.
Now you need to specify the DNS server, which in our diagram has the IP address 192.168.1.2. To do this, I enter the dns-server 192.168.1.2 command without specifying a subnet mask.
After setting up the DHCP server, let's move on to setting up the DNS server. To do this, I click on the icon of this device and go to the IP configuration tab. In this case, the static IP address 192.168.1.2 is used, the default gateway address is 192.168.1.1, and the device indicates itself as a DNS server, that is, the IP address 192.168.1.2.
Now you can go to the web server settings. I also go into the IP settings and enter the necessary parameters.
I also need to do some additional configuration of the web server, but don’t worry, setting up such servers is not part of the CCNA course, I just have to do this to continue working with our network example. I just want to show that on the Services tab there is an HTML file that I put here in advance. After the web server receives a computer request, it will send it this file. I go back to the DNS server settings, open the Services tab and turn on the DNS service. Then I create a DNS service record: in the Name field I enter the name of the site the client is accessing - www.nwking.org , and in the next line Address I enter the IP address of the web server on which this site is stored - 192.168.1.3.
After that, I click on the Add button, and we get a record on how to get to the nwking.org resource. In this case, this entry simply converts the site name to IP address. There is a possibility to change it, but I will not dwell on this, since setting up a DNS server is not part of your CCNA course. I just showed how website hosting is configured.
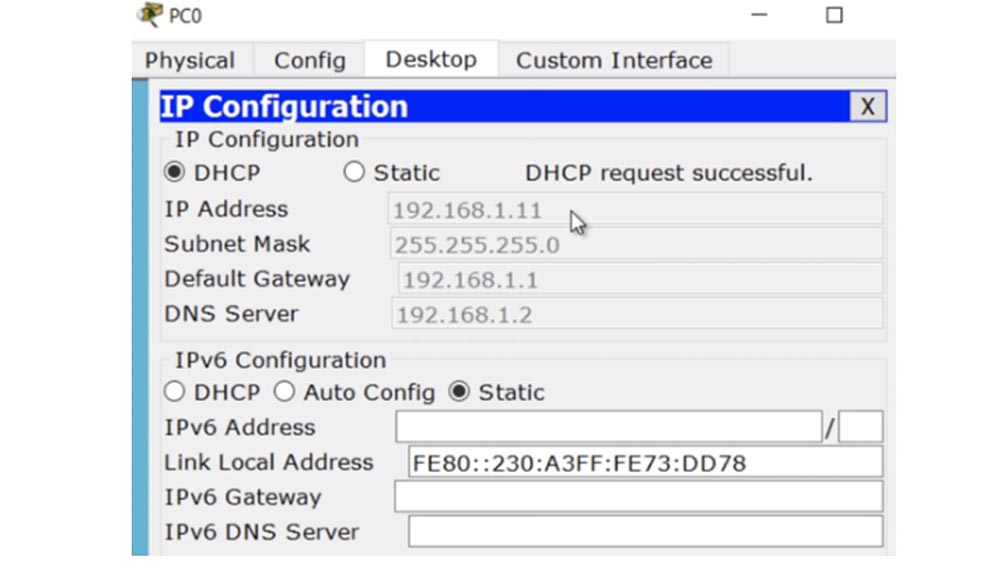
Now I will go to PC0 and configure DHCP. To do this, I will send a request, and as you can see, DHCP will automatically respond to the computer immediately, filling in the lines with information. This way PC0 will get its IP address 192.168.1.4
This address with the last octet .4 was automatically configured taking into account the fact that devices with addresses .1, .2 and .3 are already present in the network. However, if you manually assign an IP address to a device on this network, an IP conflict may occur because the DHCP server will not know that you have already assigned the computer, for example, address 192.168.1.3, and may automatically assign the same Address to another device.
To prevent this conflict, you must manually tell the server which IP addresses to exclude from the list of available ones. This is done with the ip dhcp excluded-address 192.168.1.1 192.168.1.10 command, that is, we set the range of invalid addresses from .1 to .10. Just in case, I reserved more addresses so that in the future it would be possible to place more file servers, new computers, etc. in this network. If you again send a request to assign an IP address to PC0, you can see that the DHCP server issued an address that is outside the range of unavailable IP addresses with a fourth octet .11.
Let's move on to PC1 and do the same. We see that the server assigned it the next available IP address 192.168.1.12, the default gateway is 192.168.1.1, and the DNS server is 192.168.1.2.
Now I’ll go to PC0’s computer settings and go to the Web Browser tab, then type in the address bar www.nwking.org and click the Go button. After that, the browser will show me the site page, or rather, the file that I placed as a site on a web server. The following happened: the computer sent a request to the DNS server, it said that if you are looking for this site, it is available on the device with the IP address 192.168.1.3, after which PC0 directly accessed the web server and received the necessary one from it information.
Now I will disconnect the DNS server by removing the cable that connects it to the switch. If I try to call this site again from PC0, it should open it again in the browser, because the data is stored in the cache. I enter the address www.nwking.org and click Go, but nothing happens.This is strange because information about accessing the site should have remained in the browser cache.
I will do the same with PC1, and as you can see, pressing the Go button does not produce any result. Let me reconnect the DNS server to the switch and run the PC0 browser again. Technically, if information about a site is stored in the browser’s cache, you don’t need a connection to the DNS server in order to access this site, because the computer will automatically access the web server directly.
, - , , Packet Tracer. DNS- PC0. – DNS-, PC0 . PC1 , www.nwking.org – DNS-, . , , , DNS- .
DHCP- , PC2, NET2. ip dhcp pool NET2 network 192.168.3.0 255.255.255.0. IP- DNS-, — 192.168.1.2 . 3.0, default router Router1 IP- 192.168.3.2.
, Router1 f0/0 f0/1 IP- 192.168.2.2 192.168.3.2.
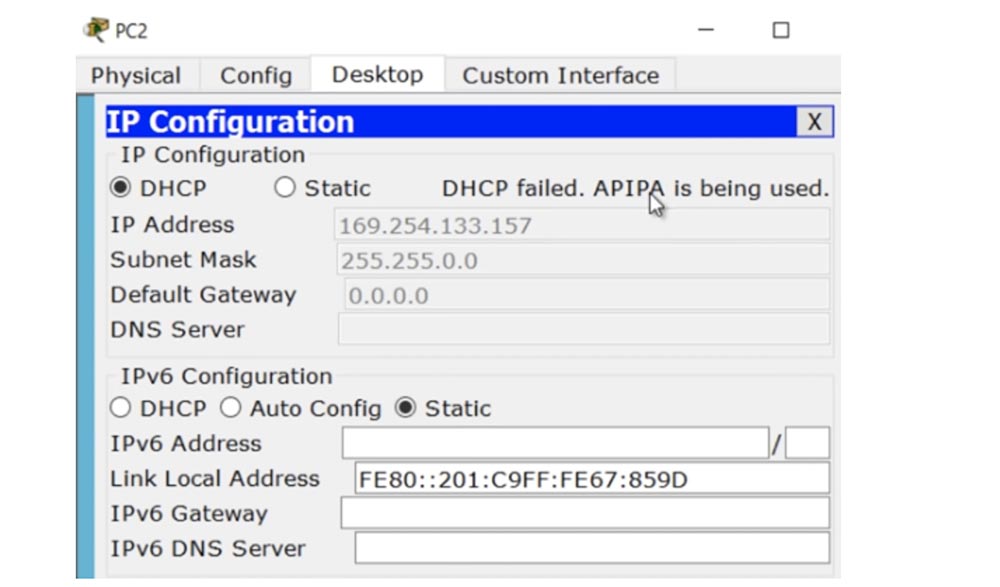
, IP- PC2 DHCP, Router1. DHCP-, , APIPA, IP-, DHCP-.
APIPA IP- 169.254.133.157. , . , Router1, IP-, DHCP-, , DHCP-relay. , , DHCP-server RIP-.
Router1 , RIP.
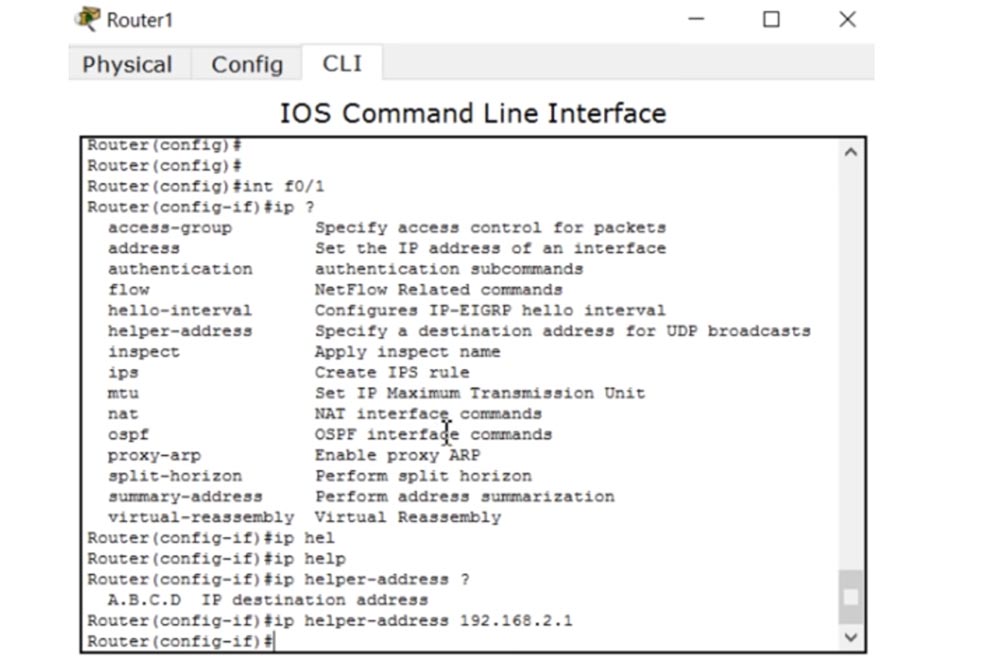
f0/1, helper-address. helper-address DHCP- , 192.168.2.1.
DHCP- PC2 DHCP-. DHCP, , APIPA – DHCP- .
, Router1 ping 192.168.2.1. , - DHCP-, show ip int brief, . , ! , , , . .
DHCP- , f0/1: ip add 192.168.2.1 255.255.255.0. , . PC2 DHCP. What now? !
Router1. C , , ? . , .
DHCP- show ip route. , , . , .
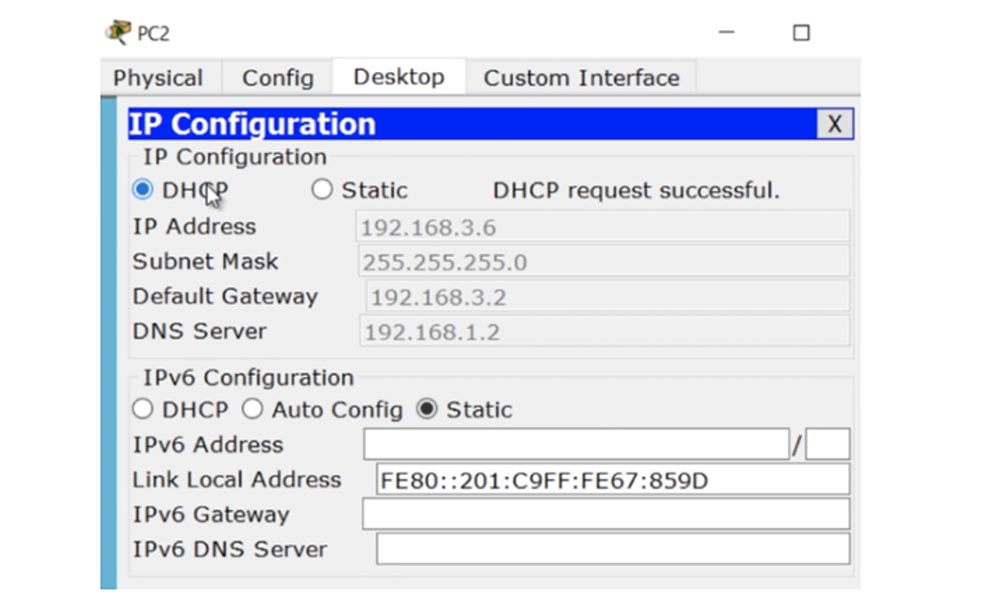
PC2 DHCP – , IP- 192.168.3.6, DHCP-. - , .
, www.nwking.org , Nameserver , - 192.168.1.3. PC2 HTML-.
DHCP-relay, helper-address. , . DNS DHCP .
As I already said, we are approaching the end of the topic necessary for passing the first CCNA exam, we still have a few important video tutorials, in particular, ASL, NAT and PAT. I ask you not to worry about the incompatibility of the video tutorials of the old and new versions of CCNA - I will add new episodes in a timely manner and delete unnecessary ones, so that you will only study relevant topics.
Thank you for staying with us. Do you like our articles? Want to see more interesting materials? Support us by placing an order or recommending it to your friends, a 30% discount for Habr users on a unique analogue of entry-level servers that was invented by us for you: The whole truth about VPS (KVM) E5-2650 v4 (6 Cores) 10GB DDR4 240GB SSD 1Gbps from $ 20 or how to divide the server? (options are available with RAID1 and RAID10, up to 24 cores and up to 40GB DDR4).
Dell R730xd 2 times cheaper? Only we have 2 x Intel TetraDeca-Core Xeon 2x E5-2697v3 2.6GHz 14C 64GB DDR4 4x960GB SSD 1Gbps 100 TV from $ 199 in the Netherlands! Dell R420 - 2x E5-2430 2.2Ghz 6C 128GB DDR3 2x960GB SSD 1Gbps 100TB - from $ 99! Read about How to Build Infrastructure Bldg. class c using Dell R730xd E5-2650 v4 servers costing 9,000 euros for a penny?
All Articles