Creating a Sticky Notes Application Using 8base, GraphQL, and React

View the demo version of the program here .
At all times, time management has been a huge struggle for me, planned tasks are forgotten, notes are lost, because they are distributed across several applications that save notes. The solution is not at all in the application for personalized notes, which I suggest you create, although it is likely that you will use it because of the time you put into it.
To create a note-taking application, we need a simple stack that practically does not require a development backend, and an application that can be easily deployed. Based on these requirements, we will choose the stack for the application. It looks like this:
-React - for front-end development. This is a popular library for creating user interfaces, it can be easily deployed on several platforms, such as Now and Netlify.
-8base GraphQL - database layer for our application. Here we will store and read requests in our application. With 8base, you do not need to create and maintain a backend for the application.
I have successfully created a simple application using these tools. In this article, we will look at the process of creating this application and setting up a backend running on the 8base platform.

If screenshots are not convenient for you, you can always look at a demo application . Notes are placed randomly on a web page and can be dragged to different places.
Following the instructions requires a basic understanding of React and Node.js. Before you start, please make sure that you have Node and npm / yarn installed .
We will also use GraphQL queries in the project, so some familiarity with this technology will be useful.
The 8base platform offers a wide range of features to help developers create applications faster and easier. With 8base, you can easily organize the backend of your application without writing code. Using the 8base platform, you can create your backend using a simple graphical interface that allows you to perform actions such as:
- Define your data schema: create tables / table relationships.
- Upload files.
- Define access rights and authorization roles.
- Manage various projects using workshops.
- Design queries using the API Explorer (based on GraphQL).
In this guide, we will see how to use 8base to quickly configure the server side and process data using the GraphQL API. Our front-end application will be built using React and will interact with the server using GraphQL.
To start using 8base, follow these steps:
1. Create an account on 8base. It's free.

2. After registration is complete, click the Data Builder button to go to the Data page, and click New Table to start configuring the backend.

3. After loading the new table, you will be taken to the scheme and you will be able to start defining the fields. Let's note a couple of things. On the left you will see System Tables and Your Tables .
Each new 8base workspace automatically comes with several built-in tables. These tables are used for things like Files, Settings, and Permissions, and they are all accessible through the 8base GraphQL API.
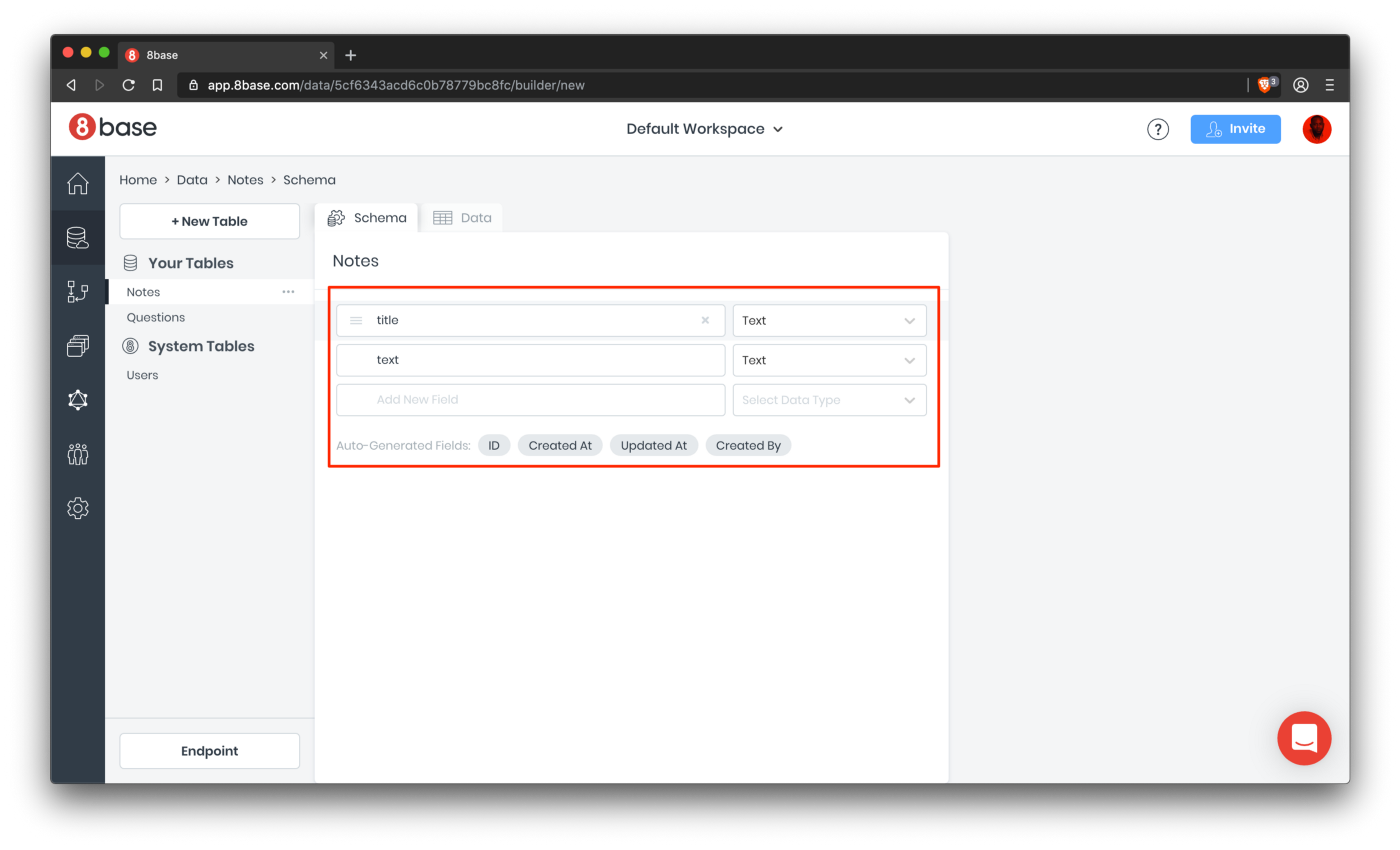
4. Go ahead and create the Notes table , which consists of the following fields:
title : field type Text . Here will be the title of the note.
text : type of the Text field. This field will contain the body of the note.
Our scheme is quite simple and is used to achieve the opportunities that we are trying to realize.
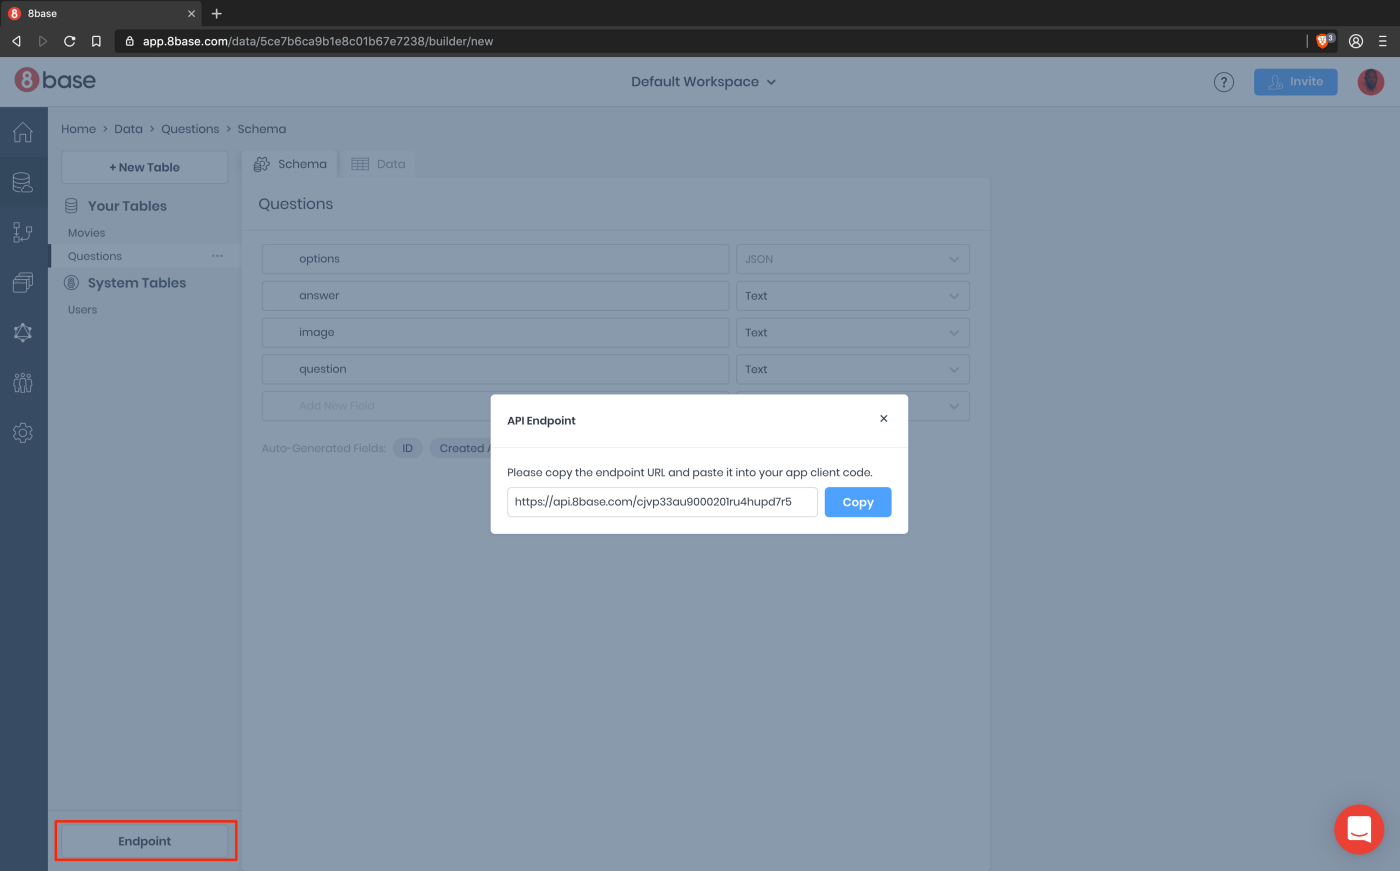
5. Then copy the endpoint API URL (available at the bottom left) - this is the main line of communication between the client and server parts of your application.
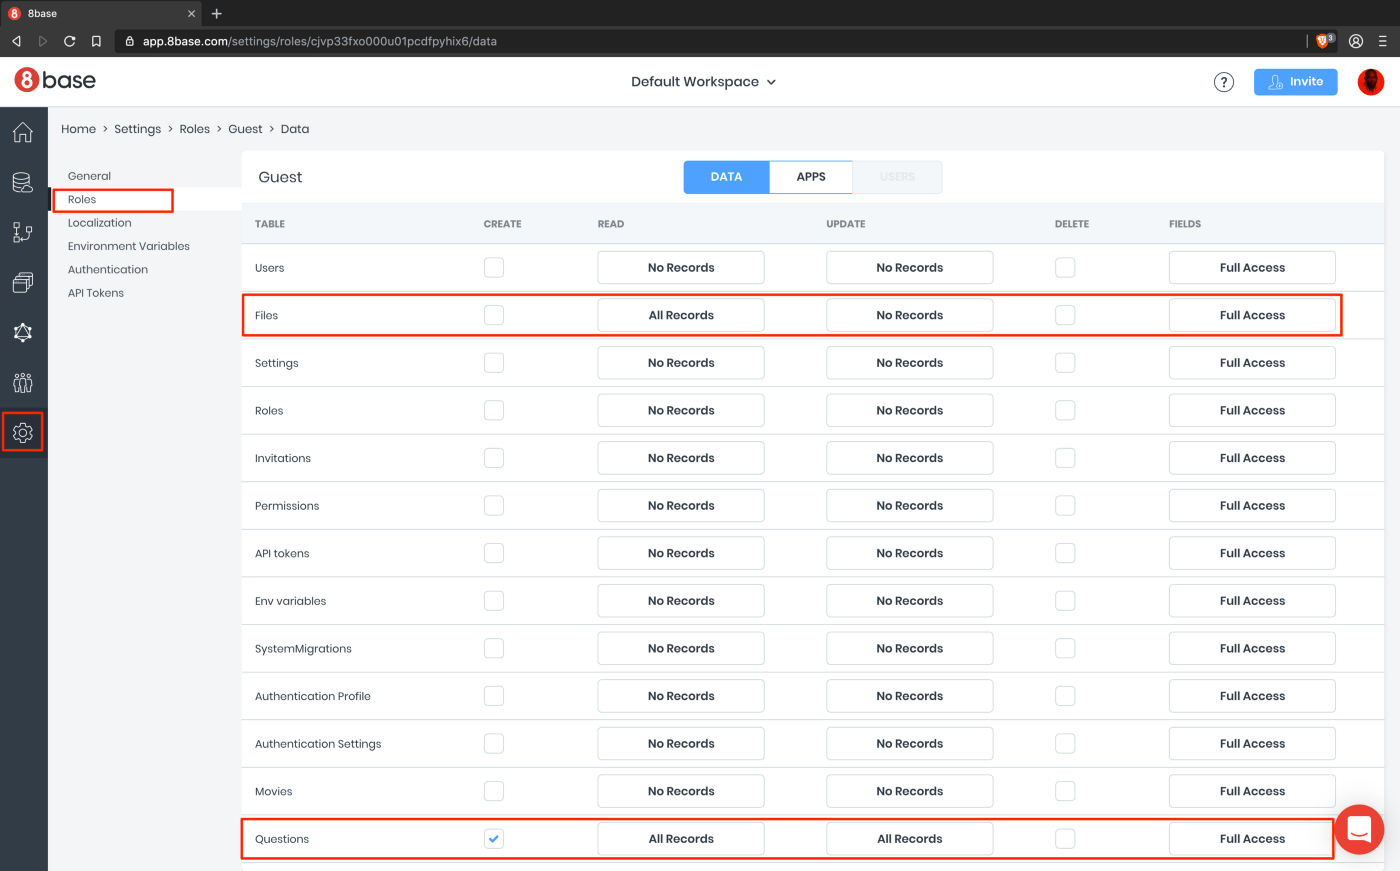
6. Finally, for the purposes of this guide, we will by default allow public access for Guests , so authentication is not required. To allow guest access to the new Notes table, go to Settings> Roles> Guest and select the appropriate check boxes in the Notes section. All unauthorized users who access your API endpoint are assigned the Guest role by default. Authorization is not covered in this guide. Here you can learn more about how to work with it.
Now that we have finished configuring the backend using 8base, we will begin work on the front-end side of the application.
Getting started
I created a starter project to easily configure and reduce overhead, so that the article basically describes how to get started with 8base and GraphQL. The skeleton of the application is already configured, including the styles and structure of the project. The following options are available in the starter branch:
- A component of the note form for creating a note.
- A component of a note that displays the details of a single note.
- A note list component that displays a list of available notes.
Run the following command to clone the repository:
git clone -b starter https://github.com/HackAfro/note-app.git
Open the folder and install the project dependencies by running the following command:
npm install
Start the React application server by running npm start in the terminal in the root folder of your project.
Connect to 8base backend using GraphQL
Now that our initial frontend is up and running, the next step is to configure the client to interact with the 8base backend using GraphQL. A useful library to help you connect is apollo-boost ; it provides a client for connecting to the GraphQL backend using a URI. URI is an endpoint provided by 8base. Let's update the index.js file to configure ApolloClient.
import React from "react"; import ReactDOM from "react-dom"; import { ApolloProvider } from "react-apollo"; import ApolloClient from "apollo-boost"; import * as serviceWorker from "./serviceWorker"; import "./index.css"; import App from "./App"; const client = new ApolloClient({ uri: "<YOUR_8BASE_ENDPOINT>" }); ReactDOM.render( <ApolloProvider client={client}> <App /> </ApolloProvider>, document.getElementById("root") ); serviceWorker.unregister();
ApolloClient takes an object with the uri property as an argument; at the same time, the client gives us access to receive, update and delete data using the provided uri . Be sure to replace the value of <YOUR_8BASE_ENDPOINT> with the actual endpoint.
Then we wrap the application in ApolloProvider, which accepts the prop client. ApolloProvider loads the 8base table schema, which gives you access to all the data model properties in your front-end code.
Receive and display notes
To get notes from the backend, we will write a GraphQL query to receive notes stored in 8base. Let's get started by updating the App.js file.
Add the following imports to where you find the TODO - 1 comment:
import gql from "graphql-tag"; import { graphql } from "react-apollo";
They will be useful for creating GraphQL queries and passing props to the App component for taking notes. Next, we need to add a request to receive notes from the server side. Update NOTE_LIST_QUERY to look like the snippet below:
const NOTE_LIST_QUERY = gql` query { notesList { items { id title text } } } `;
If you are not sure about your requests, you can always test them in the 8base API explorer . Let's check the above query.
If you run this query in your explorer, most likely an empty array will be returned to you because you did not create any notes. We can easily create notes using the 8base toolbar. Follow the data link in the sidebar and follow the instructions in the screenshots below:

We will get id , title and text from notesList elements. Next, we will prepare the App component for using notes received from the request. Finally, we will use the graphql HOC (Higher Order Component) to associate the query with the App component. The function accepts the query string and configuration parameters.
// TODO - 3
export default graphql(NOTE_LIST_QUERY, { props: (result) => { const { data } = result; const { loading, refetch } = data; let notes = []; if (data && data.notesList) notes = data.notesList.items; return { loading, notes, refetch, }; }, })(App);
Replace the existing export line under the TODO - 3 comment above.
The graphql function returns a “enhancer" function that will extend any component passed to it with GraphQL capabilities. This corresponds to the high-order component pattern that is also used by the connect function in response-redux.
Using the
graphql()
function, we can turn to the GraphQL endpoint. As the first parameter, it accepts the request (NOTE_LIST_QUERY), the second - config, the return value is HOC, which should be executed with the required component as an argument. In the fragment, we pass the value of the
data.noteList
property
data.noteList
new notes variable. By returning this value, we can access it inside the component as
props.notes
, and the download status as
props.loading
.
The refetch method will be very useful so that we can achieve something close to real-time updating. We will call the function after each mutation to ensure that the data in the application is always synchronized with the 8base backend.
If you switch to localhost: 3000, you will see the note just created. We need to be able to create notes without visiting the 8base toolbar, this means moving to the next level of GraphQL .... Mutations!
Create notes
After completing the settings for receiving notes from the backend, the next logical step is to add the ability to create notes. The initial files contain the form component, and we need to update the component to enable the mutation to save the created notes on the 8base backend.
In the previous section, we executed the request for receiving notes from the backend, in this section we will perform mutations to save new notes, the mutation is similar to the request, with the only difference being that the mutation is called up whenever there is a need to change the data. After creating tables in 8base, queries and mutations for this table are easily accessible in the Explorer API; therefore, we can always get there if we doubt how the mutation should be structured.
Let's see what the mutation looks like to create notes in the API Explorer. Go to the 8base toolbar and click on the API Explorer in the sidebar.
In the API Explorer, click on the mutation link, as shown above. This will show all available mutations. Look for what is responsible for creating notes:
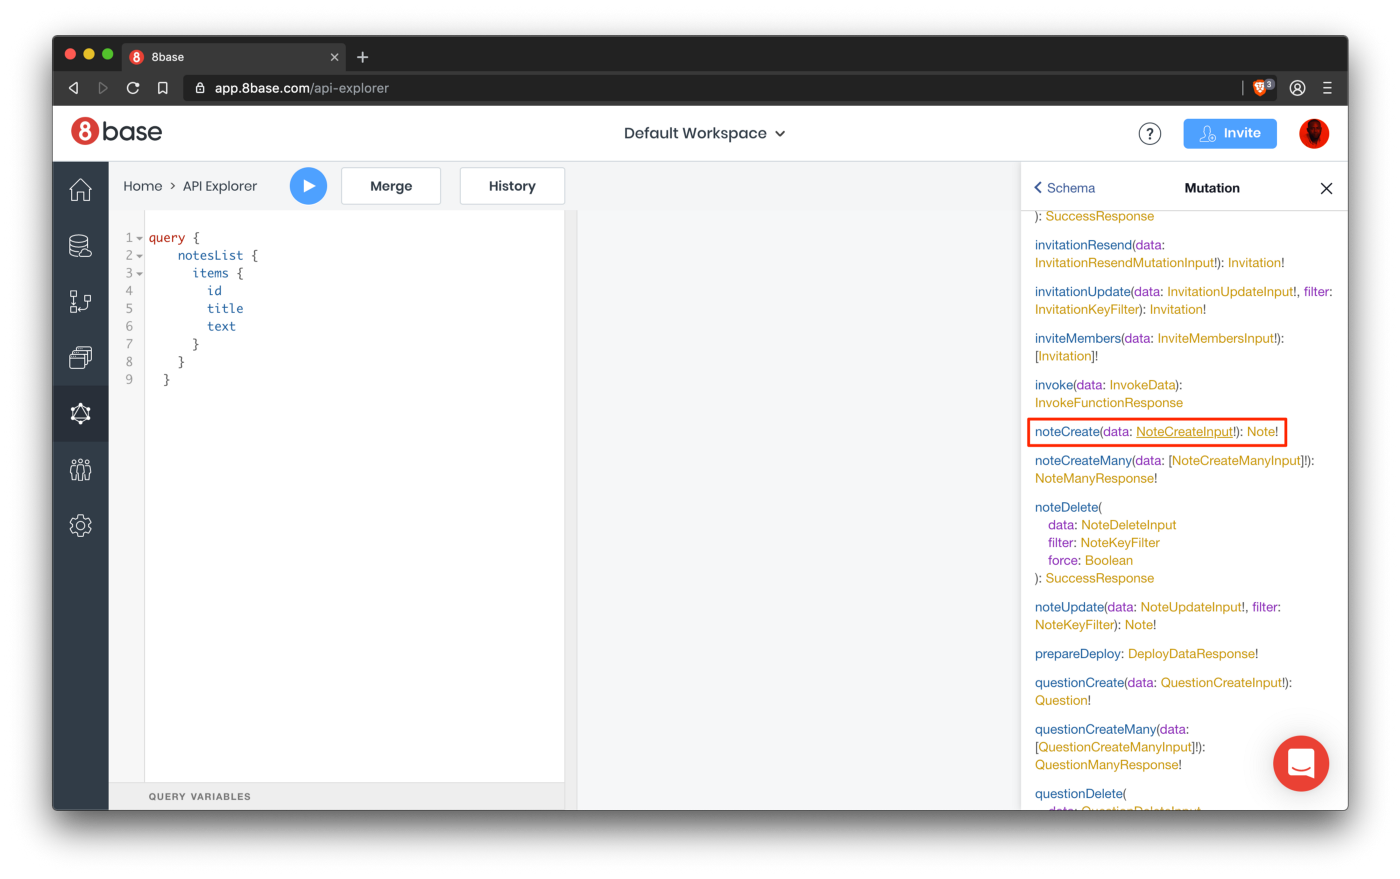
The screenshot shows that the mutation name is noteCreate , and it takes one argument of type NoteCreateInput . NoteCreateInput - Defines the type of request body required to create a note.
Now that we know what is required of us, let's get down to implementation. I took care of you and created a form for creating notes, so it remains to add a mutation to the component using the graphql function.
Open src / components / note-form / index.js , add the following imports where you have a TODO 1 comment .:
import gql from "graphql-tag"; import { graphql } from "react-apollo";
Next, we will declare the mutation, update the NOTE_MUTATION variable and assign it a new value, similar to the fragment below:
const NOTE_MUTATION = gql` mutation NoteCreate($data: NoteCreateInput!) { noteCreate(data: $data) { id } } `;
Next, we associate the mutation with the component using the graphql function. Replace the export line in the file with the snippet below:
export default graphql(NOTE_MUTATION, { name: "noteCreate" })(NoteForm);
Thus, the graphql function passes the named function noteCreate , which will be used to perform the create mutation. Let's use the noteCreate function to create a note when submitting a form.
Go to the TODO 4 comment and update the submit function to look like the snippet below:
// TODO - 4
const submit = async note => { const res = await noteCreate({ variables: { data: note } }); if (res.data.noteCreate.id) { setNote({ title: "", text: "" }); refetch() } };
In the above snippet, we used the noteCreate function to perform the create mutation in the notes table. The argument passed to the function is an object containing variables and a data body.
We wait until the request is completed, then check its success by finding id in the response body. Then we reset the state of note and refetch. I mentioned the refetch function earlier in this article, but let me update your memory. Refetch forces your component to repeat the query that you defined in the
graphql()
function.
Now everything is ready for testing. Go to localhost: 3000, fill out the form and enjoy the result.
Delete notes
What good is any note taking app if you can't delete all of your notes and pretend they never existed. Procedure for deleting a note:
- The user clicks on the delete button.
- A confirmation window appears - this reduces the number of malicious users, very useful.
- It remains to commit an act - delete the note.
The setting for deleting notes is in the src / note-card / delete-button.js file. Open the file and add the following imports at the top of the file. In particular, below where TODO 1 is located:
import gql from 'graphql-tag'; import { graphql } from 'react-apollo';
Then write the deletion mutation and assign it to the DELETE_MUTATION variable. This should look something like the following:
const DELETE_MUTATION = gql` mutation DeleteNote($data: NoteDeleteInput!) { noteDelete(data: $data) { success } } `;
Next, we associate the mutation with the component using the graphql function. Replace the export line in the file with the fragment below:
export default graphql(DELETE_MUTATION, { name: 'deleteNote', })(DeleteButton);
The graphql function then passes the named deleteNote function, which will be used to perform the delete mutation. Now we can update the click event handler and add the much-needed settings to delete the note.
Go to the onDeleteClick function in the component, place the following fragment inside the function:
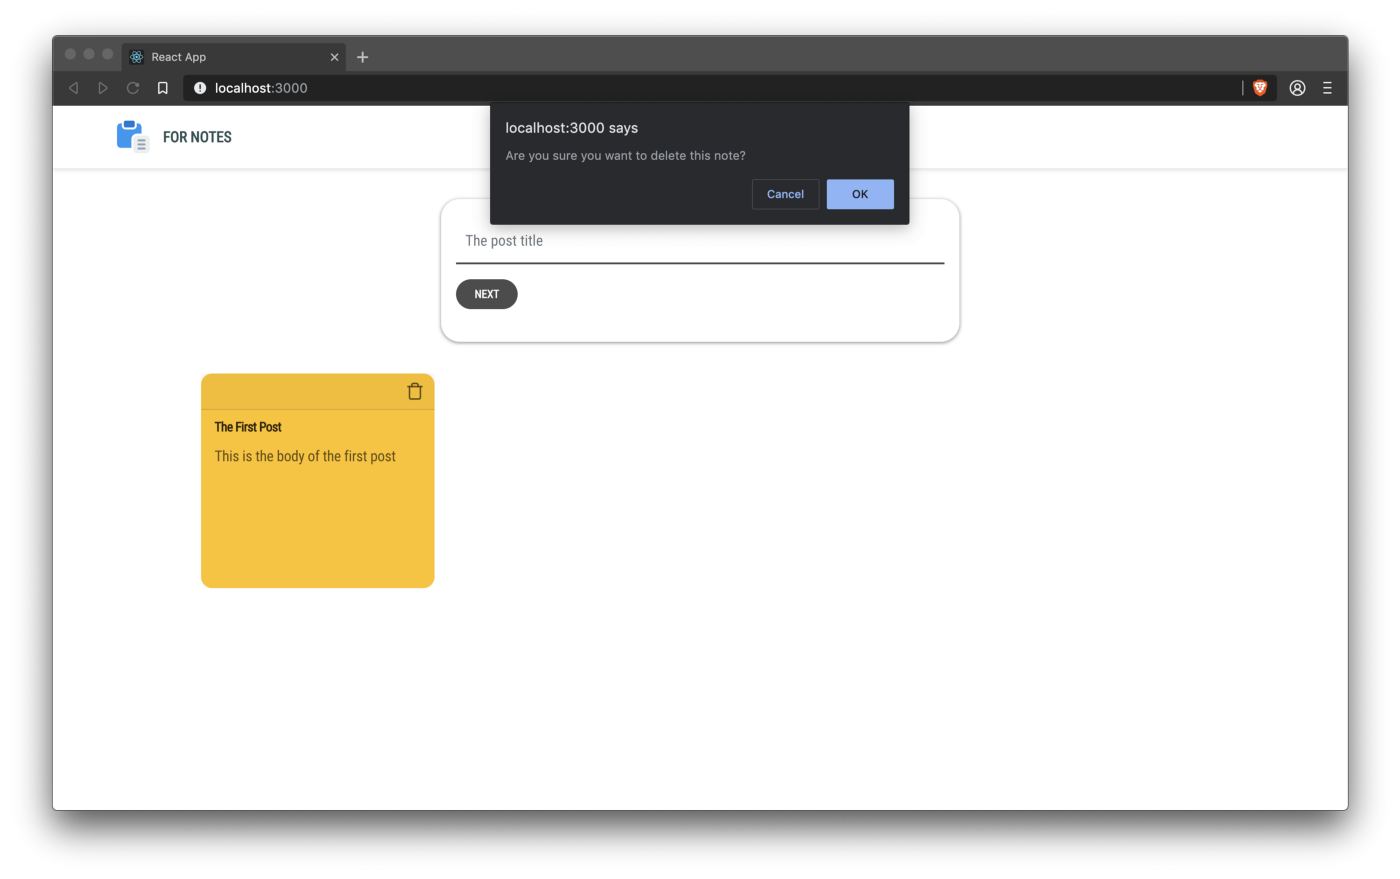
const onDeleteClick = async () => { const data = { id: noteId, }; const remove = window.confirm('Are you sure you want to delete this note?'); if (remove) { await deleteNote({ variables: { data } }); refetch(); } };
When you click the delete button, in the body of the data object, we assign the value of noteId to the id field, and then we show the user a confirmation message, clearly stating that we intend to delete this note permanently. If the user does as intended and decides to continue, we call the deleteNote function to mutate the delete. When this is completed, you need an application.
Here's how it should look. Go to localhost: 3000 and try to delete the note:
You can find a demo of this application here .
Conclusion
I am sure that you had a good time creating this application, we looked at how to write queries to receive data from the server side of 8base, as well as how to write creation and deletion mutations. 8base as a platform is relatively easy to navigate and offers an intuitive user interface. I spent the night figuring it out. You can fill in the missing hole by learning how to write update mutations and add the ability to edit notes. I am sure that users will be satisfied. You can also view their official documentation to get more information about the platform. You can find the source code of the application here .
All Articles