How to turn a smartphone into a full-fledged cash desk
Every day in stores we see different cash desks - all kinds of embedded solutions with mysterious buttons. Behind such cash desks are cashiers who shout “Galya, we have canceled.” This is inconvenient for both cashiers and customers.
The checkout interface becomes more user friendly over time, and Gali is already needed less, but the checkout is still a cumbersome and complex artifact.

My name is Vladimir Sarbeev, I am an Android developer in MySklad. And I’m sure that the cash register can be compact and convenient. Moreover, you can turn your smartphone into a cashier.
In MyStore, we have created the Kassa MyStore mobile application. This is a full box office inside the smartphone.
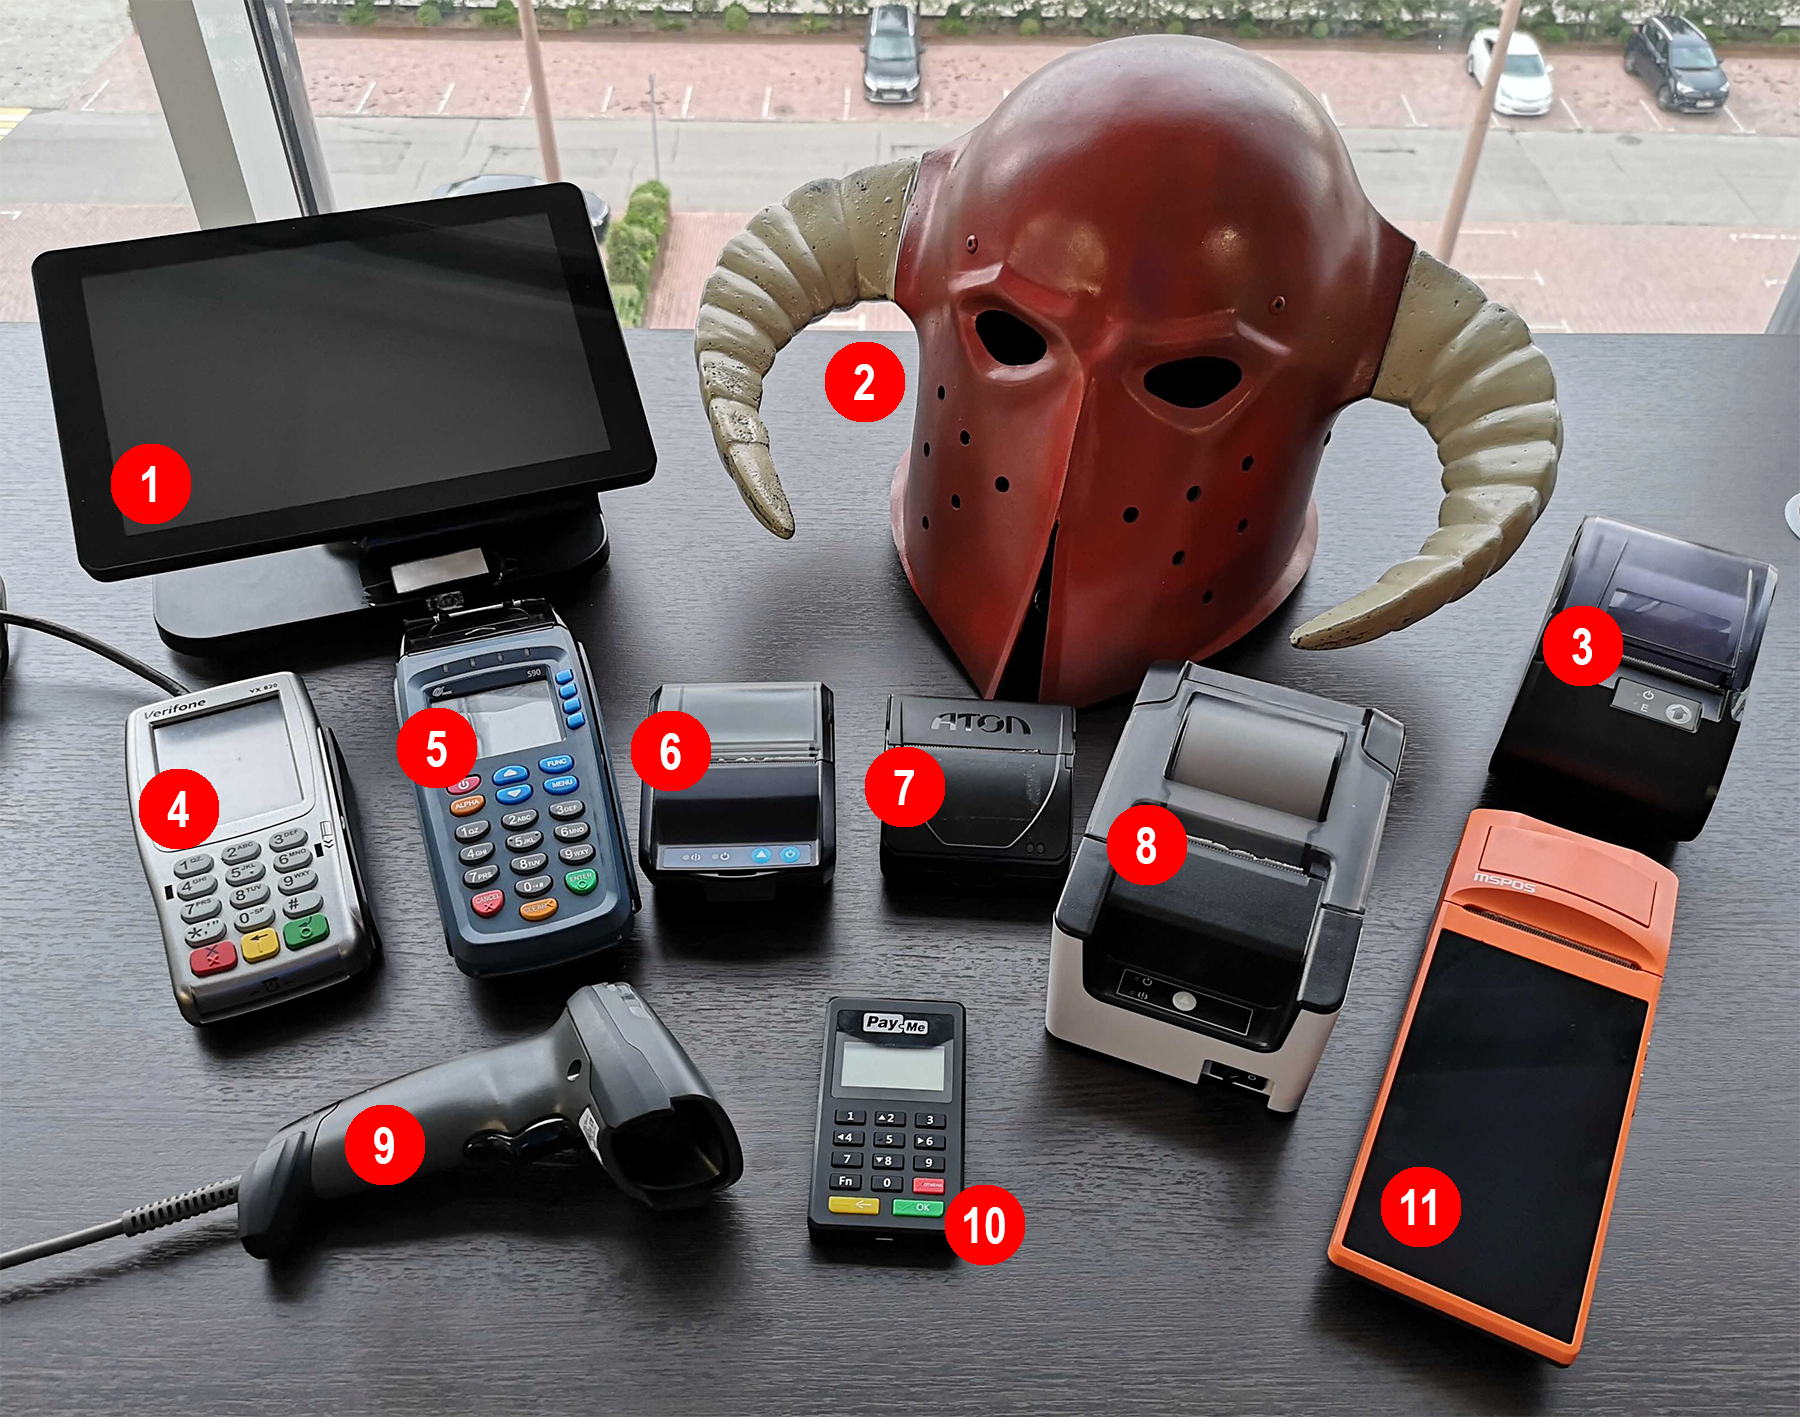
It works like this: after authorization, the cashier can open and close shifts, sell goods directly or by reservation, take cash into account. You can connect devices that are required to work to the Cashier. They are in the photo:

1 - box office Atol Sigma 10; 2 - the application is not supported, integration with employees
3 - ticket office Atol 11F; 4 - terminal Verifone VX820; 5 - PAX S90 terminal
6 - box office Shtrikh-Nano-F; 7 - ticket office Atol 15F; 8 - box office Bar-ON-LINE
9 - barcode scanner; 10 - PayMe terminal; 11 - cash desk MSPOS-K
The smartphone itself cannot print out cash receipts and accept payment by credit card, so cash desks and payment terminals are needed. A hardware scanner is required if the smartphone’s camera is not suitable for a full replacement of the barcode scanner.
All-seeing eye
Even before the release of Cash desk MySklad, we decided that the camera is a camera, but the user may have a hardware barcode scanner that he wants to use.
We can work with scanners in the form of an ordinary HID (human interface device). After reading the barcode, we get a sequence of characters from the scanner. This is perhaps the easiest integration. The simplest, if not two “buts.”
Firstly, being “out of the box” a scanner can transmit not at all what it should. Secondly, not all scanner models signal us that barcode reading is complete.
The first “but” is solved simply: if the scanner starts to transmit not what it should scan, you need to find the instructions for the scanner and configure it using the service barcodes. Typically, the instruction is complete on paper or in electronic form from the manufacturer. After describing the available settings, it contains barcodes that scan in the desired sequence. So you can configure the scanner as you need.
The second “but” is a more serious problem. The zoo of scanners is extensive, and not all devices show the end of a read line. There are two options for solving this problem. The first is to use the same service barcodes to set the setting that will transmit the line break character after reading. If you are unlucky with the model and the first option does not fit, you can set the scanner suffix. Using the service barcodes, add a character at the end of the read sequence by which you can catch the end of the input.
We connect cash desk
So, the application is there, the barcode scanner is connected, but we still cannot print the check. For this we need the box office itself. In MySklad we support KKT Atol and Shtrikh, also MSPOS, I will tell about it in another article.
When it came to integration with the cashier, the amount of iron code began to grow inexorably. We decided to put all the work with the connected equipment into a separate library. The cash register application itself has become a client pulling a library through gradle.
Depending on the model, you can connect via USB, Bluetooth or Wi-Fi. And also according to the UART protocol, which is a rigid coupling of the cash register and an Android device in one case. Also, different vendors radically differ in the implementation of connecting the client to the checkout. Java wrapper over native .so libraries, add-on over open source jPOS library and even fiscal core accessed via service with AIDL interface (Android interface definition language).
At the first attempts to integrate one device from one manufacturer, we were satisfied with the KKM Device interaction scheme:

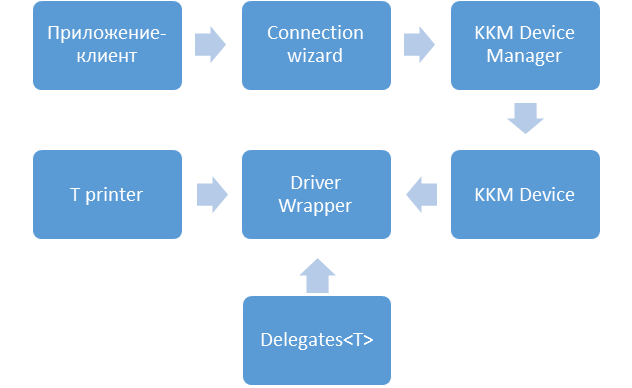
But taking into account the number of driver implementations, connection methods and functionality uniformity, we decided to rethink working with hardware. As a result, the previous scheme came to this form:

T is a specific low-level driver wrapper
Device Manager hides the implementation of the connection from the client. It is enough to create a connection wizard, which will require you to sequentially select the cashier's manufacturer, type of connection, and specify settings. In the case of a successful connection, it returns to us an object that implements the KKMDevice interface.
KKMDevice hides the details of working with a separate vendor driver. Wrappers of each specific manufacturer contain a link to the T driver and delegates that implement certain sets of functions. For example, FiscalDelegate, NonFiscalDelegate, DeviceInfoDelegate.
I will note a few general points of integration:
- Be sure to stay tuned for driver updates. In addition to bug fixes and increased speed, quality leaps often occur. Believe me, the transition from low-level HEX commands to a Java-like interface, and from it to json tasks greatly facilitates the work and makes the code more understandable.
- For the duration of the operations, block the UI with a progress bar. The sign says that the “Pay” button pressed several times in a row with a CCP connected is a harbinger of criticism in the task tracker.
- Make sure that any operations with CCP are performed strictly sequentially. A “successful” flow race can hang up the CCP, while a progress bar spinning at the same time is also an application.
- If you need to configure data transfer to the fiscal data operator, I advise you to select the maximum number of parameters from a predefined list. Because manually entering data with a military fiscal drive is a great way to shoot yourself in the foot, but on the user's side when using the application.
A fiscal drive is a device that collects and processes information about trading operations. It may cost more than the box office itself. If the drive is not configured correctly, process zeroing may be required. To do this, open the box office, immediately the warranty flies.
Acquiring
So, we have the cash desk interface, we can scan the goods by barcode and print the check. It remains to add the ability to pay by card.
Our application integrates support for PayMe and Inpas terminals. The former are connected via Bluetooth, while the latter can be connected via USB or via Wi-Fi.
The connection scheme for payment terminals is very similar to connecting a CCP, unless additional authorization is required.
But there are serious differences - in handling the abnormal behavior of the device. So in the CCP, any operation either successfully passed or not. If the operation failed, you can try again or cancel it. Everything else happens without intervention.
In the case of terminals, it is necessary to monitor possible interruptions of the payment process at any step. A bank card may not be considered or there will be insufficient funds on the card. You can not wait for a response from the bank or wait, but get a 5xx HTTP code in response. And at any stage, the connection may simply fall off.
Moreover, you will not be able to release an adequately working application with Inpas terminal support without certification. The certification includes checking the availability and correct operation of all user operations of the terminal and processing events such as disconnection from the network after the buyer has already attached a card to the terminal.
When testing the terminal, you need to consider which bank or payment system it is paired with. In some cases, even in development mode, money is refunded only through the account’s personal account, and not automatically.
You also need to remember that the bank also takes part in the payment process. For example, the absence of a slip-check may occur if there is no necessary setting in the personal account of the bank.
Conclusion
Connecting various devices to an Android application is a complicated but interesting process. We talked about him as a whole, to describe all the obstacles, of course, is unrealistic.
If you have any questions, I will be glad to answer them in the comments. If questions are typed into a separate article, write :)
All Articles