Generate one-time passwords for 2FA in JS using the Web Crypto API
Introduction
Two-factor authentication is everywhere today. Thanks to her, to steal an account, just a password is not enough. And although its presence does not guarantee that your account will not be removed in order to get around it, a more complex and multi-level attack will be required. As you know, the more complicated something in this world, the more likely it will not work.
I am sure everyone who reads this article has at least once used two-factor authentication (hereinafter referred to as 2FA, a painfully long phrase) in their life. Today I invite you to figure out how this technology works, which protects countless accounts daily.
But for starters, you can take a look at the demo of what we are going to do today.
The basics
The first thing worth mentioning about one-time passwords is that they are of two types: HOTP and TOTP . Namely, HMAC-based One Time Password and Time-based OTP . TOTP is just an add-on to HOTP, so let's talk about a simpler algorithm first.
HOTP is described in RFC4226 . It is small, only 35 pages, and contains everything you need: a formal description, an example of implementation and test data. Let's look at the basic concepts.
First of all, what is HMAC ? HMAC stands for Hash-based Message Authentication Code , or in Russian "message authentication code that uses hash functions." MAC is a mechanism for verifying the sender of a message. The MAC algorithm generates a MAC tag using a secret key known only to the sender and receiver. After receiving the message, you can generate the MAC tag yourself and compare the two tags. If they coincide - everything is in order, there was no interference in the communication process. As a bonus, in the same way, you can check whether the message was damaged during transmission. Of course, it will not work to distinguish interference from damage, but the fact of information corruption is enough.

What is a hash? A hash is the result of applying a hash function to a message. Hash functions take your data and make it a string of fixed length. A good example is the well-known MD5 function, which has been widely used to verify file integrity.
MAC itself is not a specific algorithm, but just a general term. HMAC, in turn, is already a concrete implementation. More specifically, HMAC- X , where X is one of the cryptographic hash functions. The HMAC takes two arguments: a secret key and a message, mixes them in a certain way, applies the selected hash function two times, and returns a MAC tag.
If you are currently thinking to yourself what all this has to do with one-time passwords - don’t worry, we’ve almost reached the main point.
According to the specification, HOTP is calculated based on two values:
- K is the secret key that the client and server know. It should be at least 128 bits long, and preferably 160, and created when you configure 2FA.
- C is the counter .
A counter is an 8-byte value synchronized between the client and server. It is updated as you generate new passwords. In the HOTP scheme, a client-side counter is incremented each time you generate a new password. On the server side, every time the password passes validation. Since you can generate a password, but not use it, the server allows the counter value to run a little ahead in the window. However, if you play too much with the password generator in the HOTP scheme, you will have to sync it again.
So. As you probably noticed, HMAC also takes two arguments. RFC4226 defines the HOTP generation function as follows:
HOTP(K,C) = Truncate(HMAC-SHA-1(K,C))
Quite expectedly, K is used as a secret key. The counter, in turn, is used as a message. After the HMAC function generates a MAC tag, the mysterious Truncate
function pulls out the one-time password that is already familiar to us, which you see in your generator application or on the token.
Let's start writing the code and deal with the rest as we go.
Implementation plan
To get one-time passwords, we need to follow these steps.

- Generate an HMAC-SHA1 hash from the K and C parameters. This will be a 20 byte string.
- Pull 4 bytes from this string in a specific way.
- Convert the pulled out value to a number and divide it by 10 ^ n, where n = the number of digits in the one-time password (usually n = 6). And finally, take the remainder of this division. This will be our password.
That doesn't sound too hard, right? Let's start with the hash generation.
Generate HMAC-SHA1
This is perhaps the easiest of the steps listed above. We will not try to recreate the algorithm on our own (we never need to try to implement something from cryptography on our own). Instead, we will use the Web Crypto API . The small problem is that this specification API is only available under Secure Context (HTTPS). For us, this is fraught with the fact that we cannot use it without setting up HTTPS on the development server. A bit of history and discussion on how this is the right decision can be found here .
Fortunately, in Firefox you can use Web Crypto in an insecure context, and you won’t have to reinvent the wheel or drag in third-party libraries. Therefore, for the purposes of developing a demo, I suggest using FF.
The Crypto API itself is defined in window.crypto.subtle
. If you are surprised by the name, I quote from the specification:
The API is calledSubtleCrypto
as a reflection of the fact that many of the algorithms have specific usage requirements. Only when these requirements are met do they retain their durability.
Let's go over the methods we need. Note: all the methods mentioned here are asynchronous and return Promise
.
First, we need the importKey
method, since we will use our private key, and not generate it in the browser. importKey
takes 5 arguments:
importKey( format, keyData, algorithm, extractable, usages );
In our case:
-
format
will be'raw'
, i.e. we will provide the key as anArrayBuffer
byte array. -
keyData
is the same ArrayBuffer. Very soon we’ll talk about how to generate it. -
algorithm
, according to the specification, will beHMAC-SHA1
. This argument must match the format of HmacImportParams . -
extractable
to false, because we have no plans to export the secret key - And finally, of all
usages
we only need a'sign'
.
Our secret key will be a long random string. In the real world, this may be a sequence of bytes, which may be unprintable, but for convenience in this article we will consider a string. To convert it to ArrayBuffer
we will use the TextEncoder
interface. With it, the key is prepared in two lines of code:
const encoder = new TextEncoder('utf-8'); const secretBytes = encoder.encode(secret);
Now let's put it all together:
const Crypto = window.crypto.subtle; const encoder = new TextEncoder('utf-8'); const secretBytes = encoder.encode(secret); const key = await Crypto.importKey( 'raw', secretBytes, { name: 'HMAC', hash: { name: 'SHA-1' } }, false, ['sign'] );
Fine! Cryptography was prepared. Now we will deal with the counter and finally sign the message.
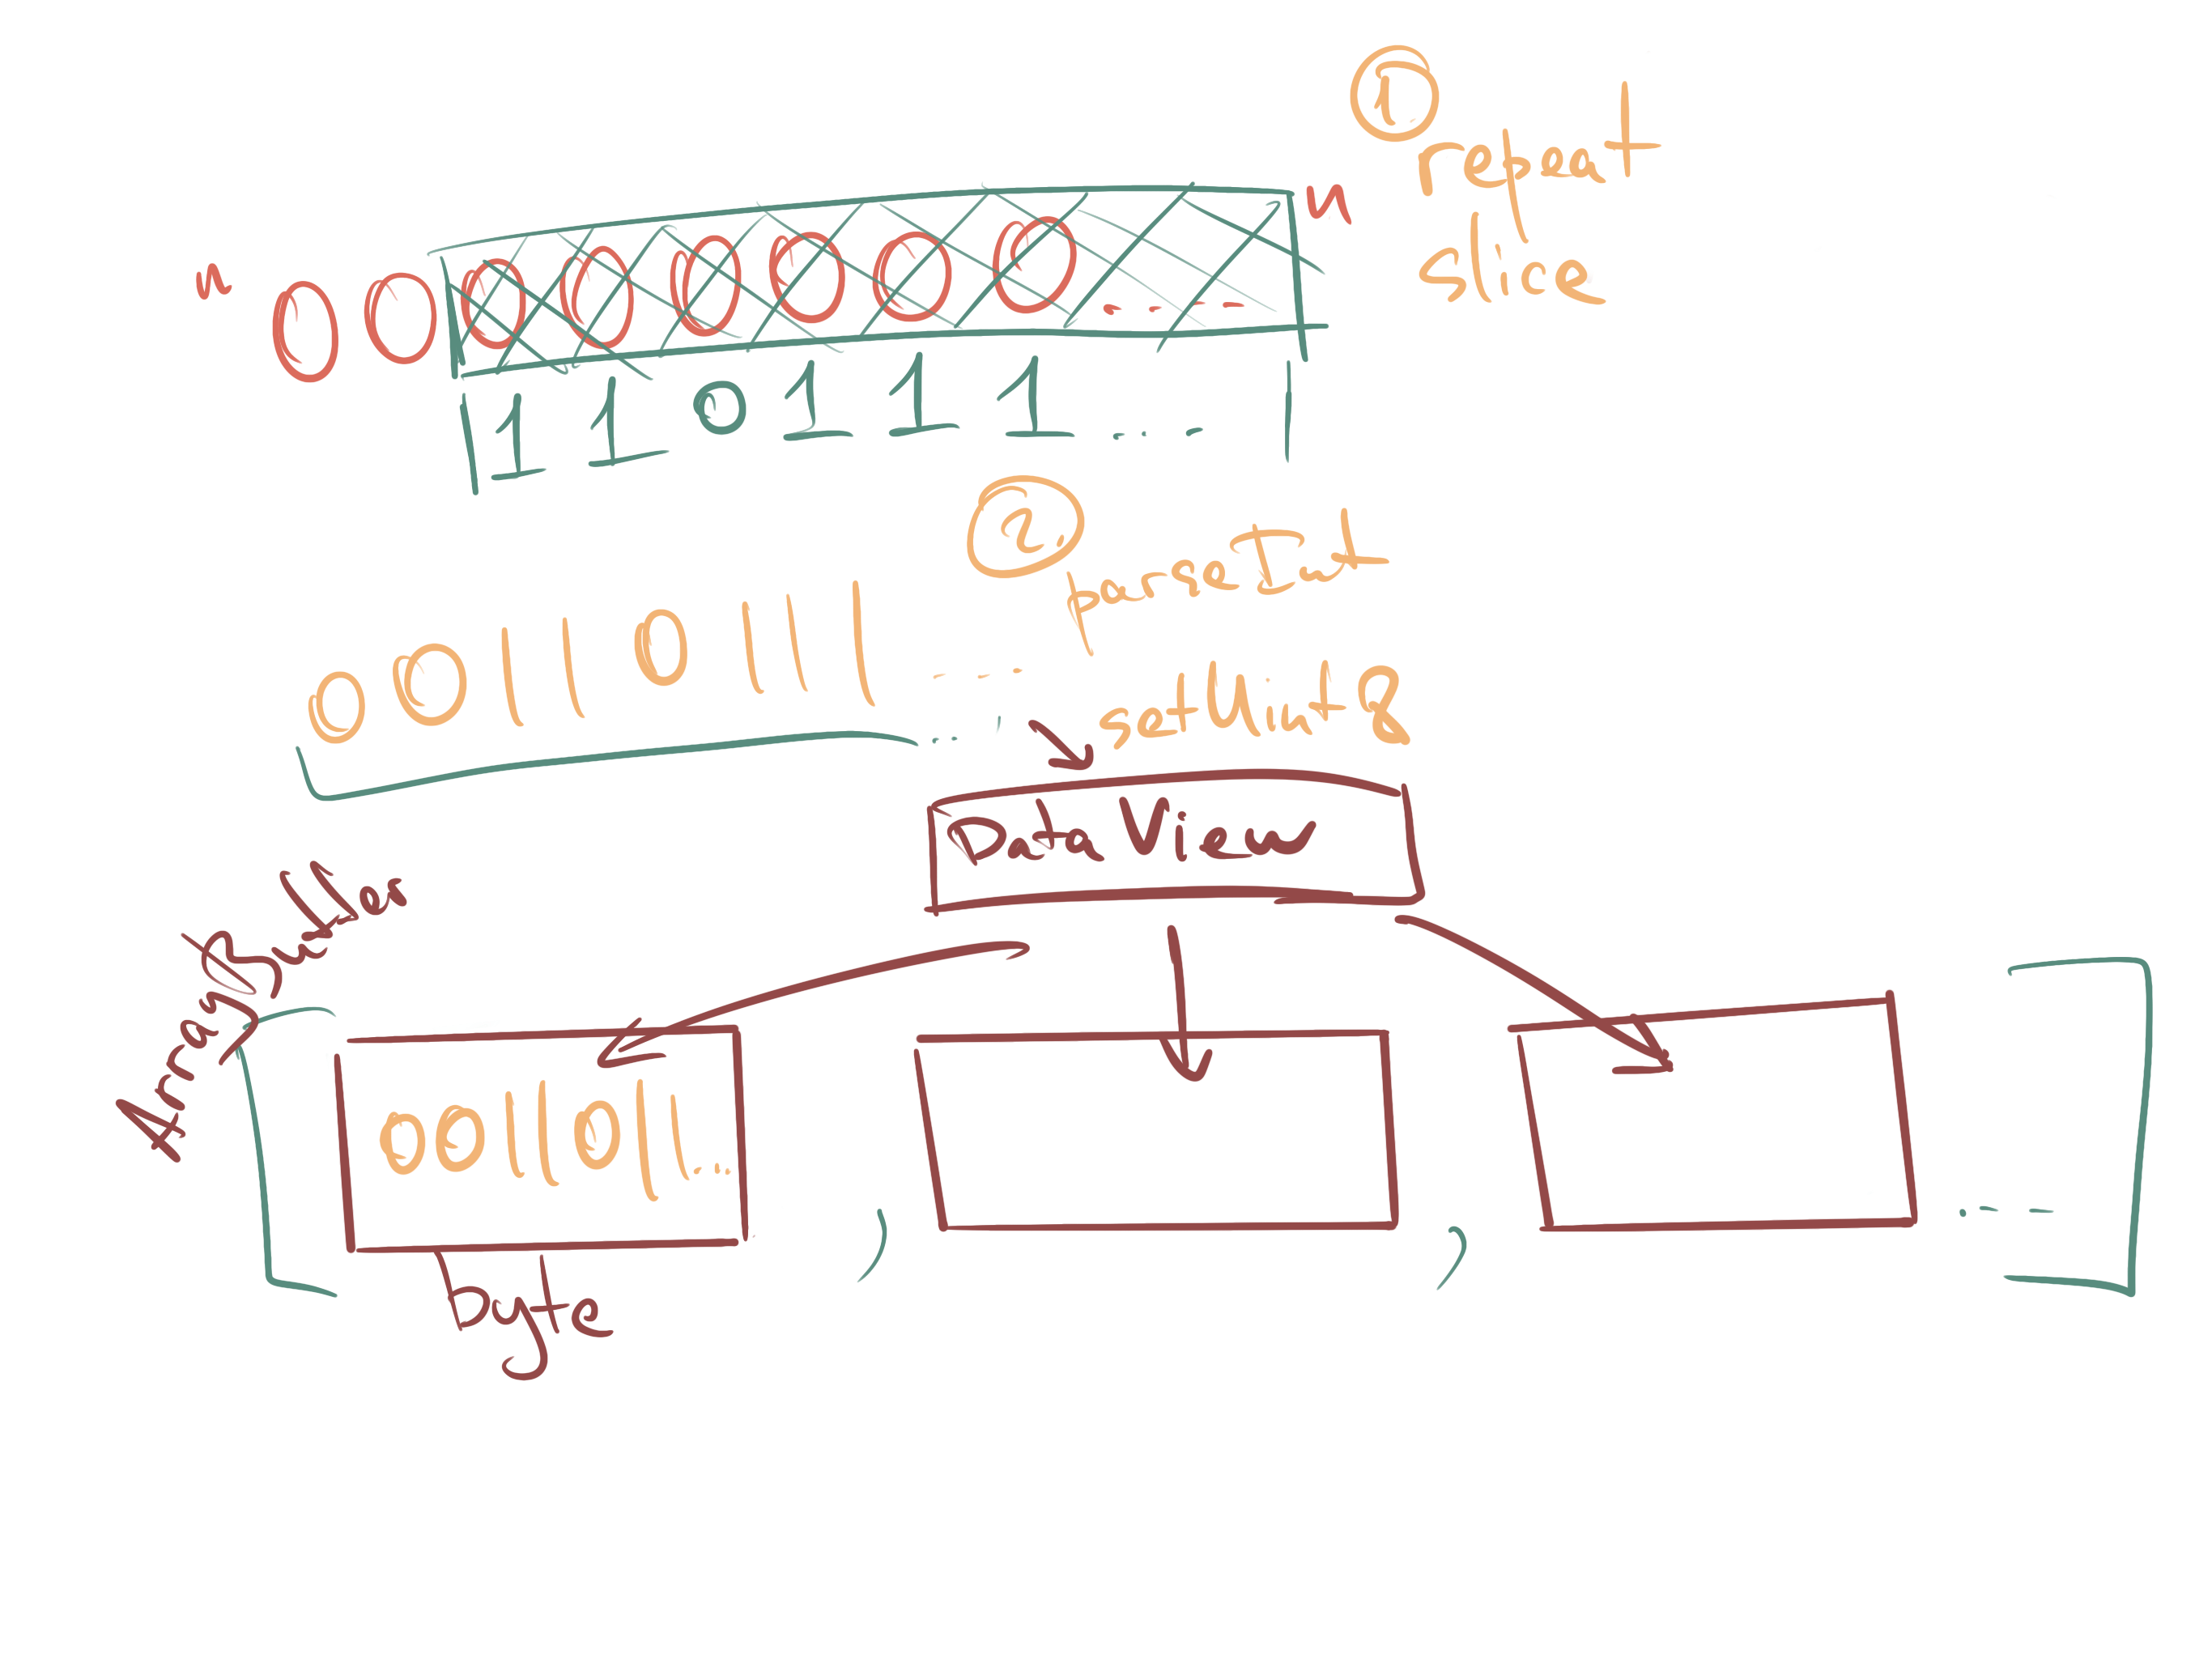
According to the specification, our counter should be 8 bytes long. We will work with it again, as with ArrayBuffer
. To translate it into this form, we will use the trick that is usually used in JS to save zeros in the upper digits of a number. After that, we put each byte in an ArrayBuffer
using a DataView
. Keep in mind that by specification for all binary data the format is big endian .
function padCounter(counter) { const buffer = new ArrayBuffer(8); const bView = new DataView(buffer); const byteString = '0'.repeat(64); // 8 bytes const bCounter = (byteString + counter.toString(2)).slice(-64); for (let byte = 0; byte < 64; byte += 8) { const byteValue = parseInt(bCounter.slice(byte, byte + 8), 2); bView.setUint8(byte / 8, byteValue); } return buffer; }
Finally, having prepared the key and the counter, you can generate a hash! To do this, we will use the sign
function of SubtleCrypto
.
const counterArray = padCounter(counter); const HS = await Crypto.sign('HMAC', key, counterArray);
And on this we have completed the first step. At the output, we get a slightly mysterious value called HS. And although this is not the best name for a variable, that is what it (and some of the following) is called in the specification. We’ll leave these names to make it easier to compare the code with it. What's next?
Step 2: Generate a 4-byte string (Dynamic Truncation)
Let Sbits = DT (HS) // DT, defined below,
// returns a 31-bit string
DT stands for Dynamic Truncation. And here is how it works:
function DT(HS) { // First we take the last byte of our generated HS and extract last 4 bits out of it. // This will be our _offset_, a number between 0 and 15. const offset = HS[19] & 0b1111; // Next we take 4 bytes out of the HS, starting at the offset const P = ((HS[offset] & 0x7f) << 24) | (HS[offset + 1] << 16) | (HS[offset + 2] << 8) | HS[offset + 3] // Finally, convert it into a binary string representation const pString = P.toString(2); return pString; }
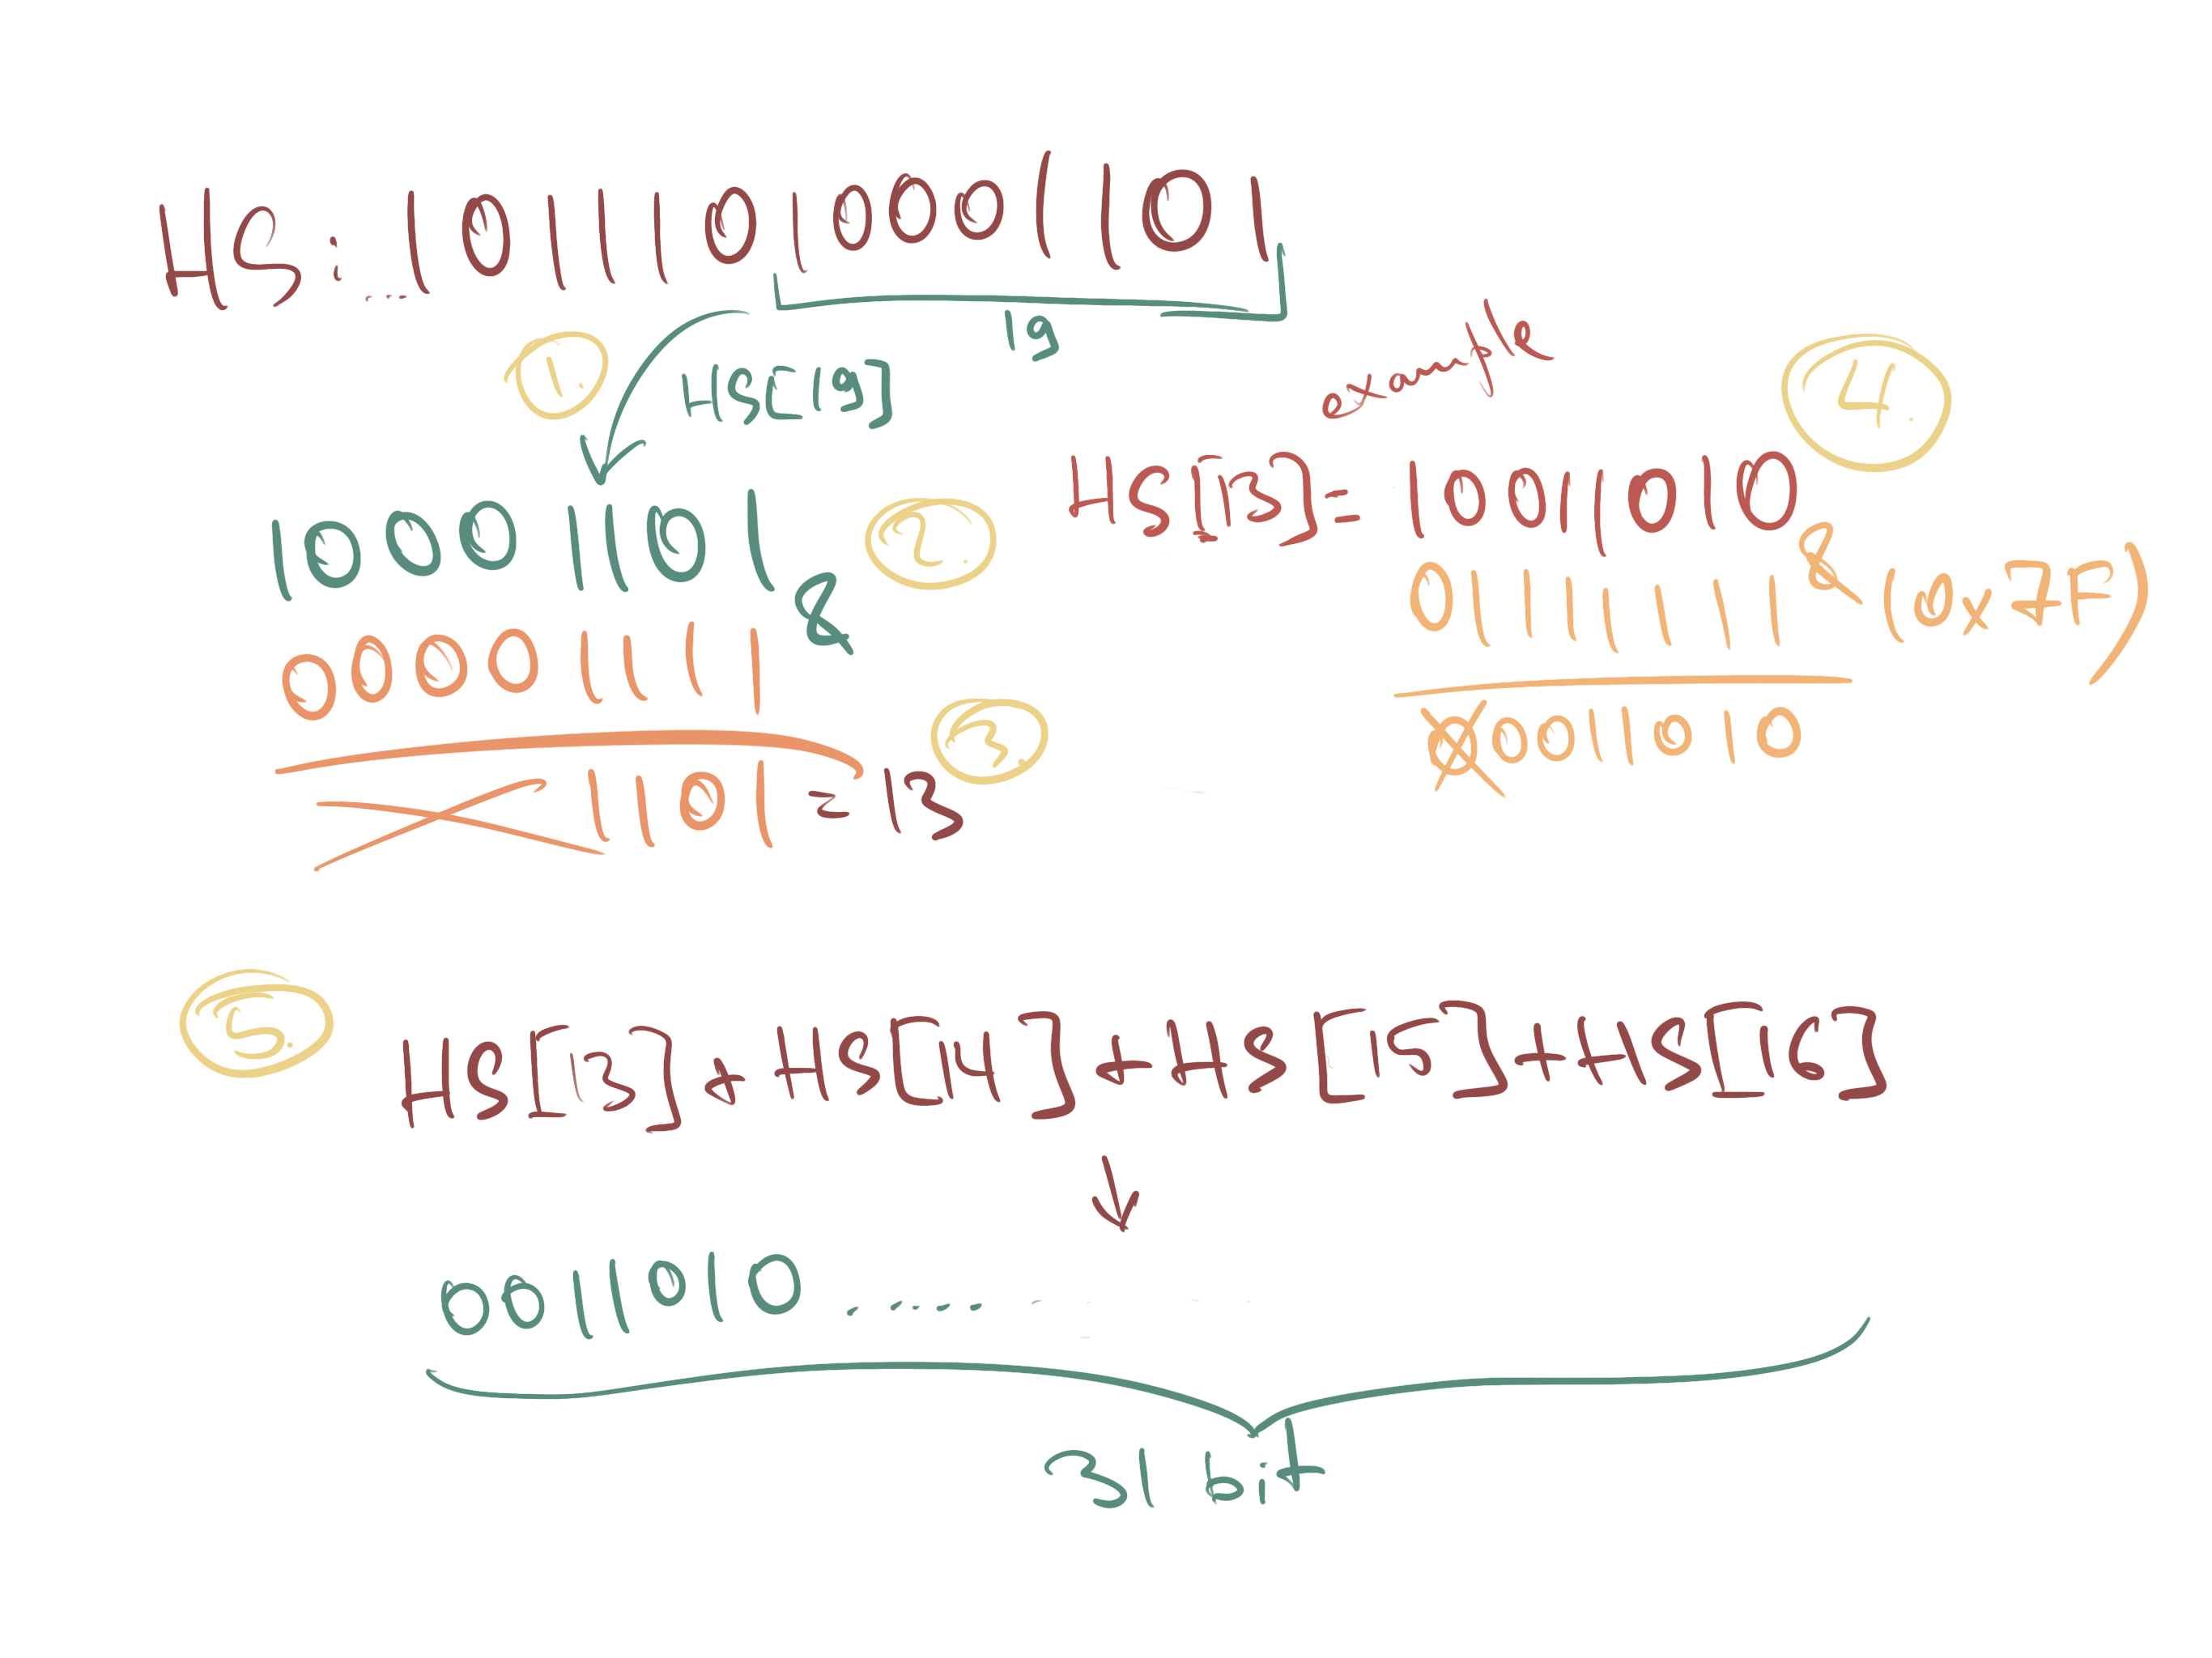
Notice how we applied bitwise AND to the first byte of HS. 0x7f
in the binary system is 0b01111111
, so essentially we just discard the first bit. In JS, this is where the meaning of this expression ends, but in other languages it will also provide for cutting off the sign bit to remove confusion between positive / negative numbers and present this number as unsigned.
Almost done! It remains only to convert the value obtained from DT into a number and forward to the third step.
function truncate(uKey) { const Sbits = DT(uKey); const Snum = parseInt(Sbits, 2); return Snum; }
The third step is also quite small. All that needs to be done is to divide the resulting number by 10 ** ( )
, and then take the remainder of this division. Thus, we cut off the last N digits from this number. According to the specification, our code should be able to pull out at least six-digit passwords and potentially 7 and 8-digit ones. Theoretically, since this is a 31-bit number, we could have pulled out 9 characters, but in reality, I personally have never seen more than 6 characters. And you?
The code for the final function, which combines all the previous ones, in this case will look something like this:
async function generateHOTP(secret, counter) { const key = await generateKey(secret, counter); const uKey = new Uint8Array(key); const Snum = truncate(uKey); // Make sure we keep leading zeroes const padded = ('000000' + (Snum % (10 ** 6))).slice(-6); return padded; }
Hooray! But now how to check that our code is correct?
Testing
In order to test the implementation, we will use examples from the RFC. Appendix D includes test values for the secret key "12345678901234567890"
and counter values from 0 to 9. Also there are counted HMAC hashes and intermediate results of the Truncate function. Pretty useful for debugging all the steps of the algorithm. Here is a small example of this table (only the counter and HOTP are left):
Count HOTP 0 755224 1 287082 2 359152 3 969429 ...
If you have not watched the demo , now is the time. You can drive in it the values from the RFC. And come back, because we are starting TOTP.
Totp
So we finally got to the more modern part of 2FA. When you open your one-time password generator and see a small timer counting how much more code will be valid, it is TOTP. What is the difference?
Time-based means that instead of a static value, the current time is used as a counter. Or, more precisely, the "interval" (time step). Or even the number of the current interval. To calculate it, we take Unix time (the number of milliseconds since midnight January 1, 1970 UTC) and divide by the window the password validity (usually 30 seconds). The server usually makes slight deviations due to imperfect clock synchronization. Usually 1 interval back and forth depending on configuration.
Obviously, this is much safer than the HOTP scheme. In a time-bound scheme, the valid code changes every 30 seconds, even if it has not been used. In the original algorithm, a valid password is determined by the current counter value on the server + tolerance window. If you do not authenticate, the password will not be changed indefinitely. You can read more about TOTP in RFC6238 .
Since the time-based scheme is an addition to the original algorithm, we do not need to make changes to the original implementation. We will use requestAnimationFrame
and will check for each frame whether we are still inside the time interval. If not, generate a new counter and calculate HOTP again. Omitting all the control code, the solution looks something like this:
let stepWindow = 30 * 1000; // 30 seconds in ms let lastTimeStep = 0; const updateTOTPCounter = () => { const timeSinceStep = Date.now() - lastTimeStep * stepWindow; const timeLeft = Math.ceil(stepWindow - timeSinceStep); if (timeLeft > 0) { return requestAnimationFrame(updateTOTPCounter); } timeStep = getTOTPCounter(); lastTimeStep = timeStep; <...update counter and regenerate...> requestAnimationFrame(updateTOTPCounter); }
Finishing Touches - QR Code Support
Usually, when we configure 2FA, we scan the initial parameters with a QR code. It contains all the necessary information: the selected scheme, secret key, account name, provider name, number of digits in the password.
In a previous article, I talked about how you can scan QR codes directly from the screen using the getDisplayMedia
API. Based on that material, I made a small library, which we will use now. The library is called stream-display , and in addition to it we use the wonderful jsQR package.
The QR-encoded link has the following format:
otpauth://TYPE/LABEL?PARAMETERS
For example:
otpauth://totp/label?secret=oyu55d4q5kllrwhy4euqh3ouw7hebnhm5qsflfcqggczoafxu75lsagt&algorithm=SHA1&digits=6&period=30
I will omit the code that sets up the process of starting screen capture and recognition, since all this can be found in the documentation. Instead, here's how to parse this link:
const setupFromQR = data => { const url = new URL(data); // drop the "//" and get TYPE and LABEL const [scheme, label] = url.pathname.slice(2).split('/'); const params = new URLSearchParams(url.search); const secret = params.get('secret'); let counter; if (scheme === 'hotp') { counter = params.get('counter'); } else { stepWindow = parseInt(params.get('period'), 10) * 1000; counter = getTOTPCounter(); } }
In the real world, the secret key will be a base- 32 (!) Encoded string, as some bytes may be unprintable. But for simplicity of demonstration, we omit this point. Unfortunately, I could not find information why base-32 or just such a format. Apparently, there is no official specification for this URL format, and the format itself was coined by Google. You can read a little about him here.
To generate test QR codes, I recommend using FreeOTP .
Conclusion
And that is all! Once again, don't forget to watch the demo . There is also a link to the repository with the code that is behind it all.
Today we have disassembled a fairly important technology that we use on a daily basis. I hope you learned something new for yourself. This article took a lot longer than I thought. However, it’s quite interesting to turn a paper specification into something working and so familiar.
See you soon!
All Articles