Black Box Testing
Lee Copeland's "A Practitioner's Guide to Software Test Design" was published in 2003.
Since then, it has firmly entrenched itself in the list of books that any tester must read. It is worth reading in the original. It reads very nicely: the language is not complicated, the style is easy. In the course of the book, the author slightly ironizes over himself, his students, readers and, in general, over the sphere of our activity.
The following is not a translation, but rather a detailed summary of the “Black Box Testing Techniques” section, which describes the application of test design techniques.
The book fell into my hands on the advice of a former colleague, for which special thanks to him.
To be most effective and efficient test case must be designed, not just slapped together.
Equivalence Class Testing
Boundary Value Testing
Decision table testing
Pairwise testing
State Transition Testing
Use Case Testing
Equivalence Class Testing
Equipment
- Define equivalence classes.
- Create test cases for each equivalence class.
An equivalence class is a dataset that runs the same modules and should produce the same results.
Any data within the class is equivalent, which means that if one test case in the equivalence box has discovered / not found a defect, then all other test cases inside this equivalence class will detect / not find the same defect.
An alternative approach is to use equivalence classes not for inputs, but for outputs. Divide output options into equivalence classes, determine which input values can trigger such outputs. The advantage is that every possible exit option is checked. The disadvantage is that within the output equivalence class, several input equivalence classes can be hidden.
If there are several variables:
- valid classes of several variables are combined into one test case;
- invalid classes are tested separately.
Let your designers and programmers know when they have helped you. They'll appreciate the thought and may do in again.
Boundary Value Testing
Equipment
- Define equivalence classes
- Define the boundaries of each equivalence class
- Create test cases for each boundary value, choosing one point directly on the border, above and below the border.
It should be remembered that a point above or below the boundary can be an instance of another equivalence class, in which case you do not need to duplicate the test.
Values are determined by type. If the border is 5, then points 4 and 6 are tested for the field where integers are entered, and points 4.99 and 5.01 are tested for the field where the amounts in rubles and copecks are entered.
If there are several variables:
- minimum values of valid boundaries are combined into one test case;
- maximum values of valid boundaries are combined in another test case;
- invalid boundaries are tested separately, as is the case with invalid classes.
Boundary value testing focuses on the boundaries because that is where so many defects hide.
Decision Table Testing
Equipment
- Define all conditions
- Make all possible combinations of conditions
- Remove unnecessary combinations. Those in which changing the values have no effect on the result (Don’t care - DC) are deleted
- Define Actions
- Create test cases for each combination
Decision table - represents the relationship of the composite conditions and the resulting actions.
If the condition is a range of values, then tests are additionally created to check the values above and below the boundary.
| 2 3 = 8 combinations
| Rule 1
| Rule 2
| Rule 3
| Rule 4
| Rule 5
| Rule 6
| Rule 7
| Rule 8
|
| Conditions
| ||||||||
| Valid stock code
| N
| N
| N
| N
| Y
| Y
| Y
| Y
|
| Allowable amount
| N
| N
| Y
| Y
| N
| N
| Y
| Y
|
| Enough money
| N
| Y
| N
| Y
| N
| Y
| N
| Y
|
| Actions
| ||||||||
| Buy
| N
| N
| N
| N
| N
| N
| N
| Y
|
By carefully looking at the table, you can see that in rules 1, 2, 3, 4, if the stock code is invalid, then checking the remaining conditions does not make sense. Rules 5 and 6 can be combined, because the condition for checking funds does not affect the result. Conditions that do not affect the result are marked as “DC”. The table is converted:
| 4 combinations
| Rule 1
| Rule 2
| Rule 3
| Rule 4
|
| Conditions
| ||||
| Valid stock code
| N
| Y
| Y
| Y
|
| Allowable amount
| DC
| N
| Y
| Y
|
| Enough money
| DC
| DC
| N
| Y
|
| Actions
| ||||
| Buy
| N
| N
| N
| Y
|
Because there is always a chance that the table may not be converted correctly or the code is written incorrectly better so that the original table is still at hand.
Famous Software Tester Mick Jagger gives excellent advice regarding this “You can't always get what you want, but if you try sometimes, you just might find, you get what you need.”
Pair testing
Equipment
- Define parameters
- Determine the number of values for each parameter (choices for variable)
- Build an array containing columns for each parameter and values in columns that contain all combinations of the values of these parameters with each other.
- Match the resulting orthogonal array for testing purposes.
- Build test cases.
It was experimentally determined that most defects are either single-mode defects or double-mode defects, i.e. manifested when a single parameter is combined with only one other parameter, while the value of the remaining parameters does not matter.
If the number of combinations of variable values is large, you should not try to test all possible combinations, it is better to focus on testing all pairs of variable values.
Two pairwise testing approaches: the orthogonal arrays method and the allpair algorithm.
An orthogonal array is a two-dimensional array that has a special property: if you select any two columns in the array, then all possible combinations of parameter values will be present in them, all pairs of columns have the same property.
All pairs - to create an array, an algorithm is used that generates pairs directly, without using additional balancing. If there are a large number of parameters that take a small number of values, then this method is better for pairing.
It is not necessary to make pairwise combinations manually, for this there are a lot of tools .
It should be borne in mind that restrictions may arise due to the fact that some combinations of parameters will never take place.
There is no underlying “software defect physics” that guarantees pairwise testing will be of benefit. There is only one way to know - try it.
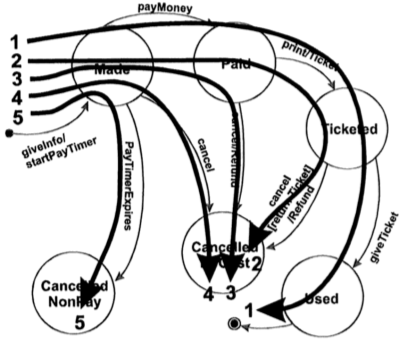
State transition diagram
Equipment
State - A condition in which the system expects one or more events. The state remembers what was received at the input and determines the response that should occur. This event can be brought into a new state and / or initiate a new action. The state usually reflects the value of some variable in the system. Depicted in the shape of a circle.
Transition - Represents the transition from the current state to a new one, as a result of some action. Depicted as an arrow.
Event - The event that caused the state to change. Usually an event enters the system from the outside world through some interface. Sometimes this event is triggered inside the system itself, for example, such as a timer, a drop below a certain level. It is believed that the event occurs instantly. An event can be either independent or related. When an event occurs, the system can change state or stay in the same state and / or initiate an action. Events may have associated parameters (card number, amount in the account). Depicted as a caption for a transition arrow.
Action - An operation initiated as a result of a state change. This is often some system response. Remember that an action occurs during the transition between states. The states themselves are static. It is indicated by a slash in the signature of the transition arrow after the event.
A state transition diagram is one specific entity (for example, a backup process). A common mistake is an attempt to mix different entities in one diagram (for example, Reservation and Passenger with events and actions associated with each of them).
It can be used when the system needs to know the background or the correct order of operations.
Based on the State Transition Diagram, a State Transition Table is compiled. The table contains 4 columns: current state, event, action, next state.
The advantage of the State transition table is that it is a list of all possible combinations of transitions from state to state, including invalid ones. When analyzing such a table, gaps in requirements may be noticed. Using a state transition table can help you track down invalid state transitions.
You can choose one of 4 options for creating test cases:
- Create test case sets so that all states are completed at least once. In one test case, a transition through several states can be described. This is a rather weak test coverage.
- Create test case sets so that all events are triggered at least once. Test cases that cover all events at the same time cover all conditions. Weak test coverage again.
- Create test case sets so that all paths are completed at least once. This method is good from the point of view of test coverage, but it is practically not feasible. If the diagram has cycles, then the number of possible paths can be infinite.
- Create test case sets so that all transitions are completed at least once. This method provides a good level of test coverage, so it is recommended to use it.
The recommended strategy for creating test cases is to test all state transitions at least once. In high-risk systems where more reliable test coverage is required, it is possible to create test cases for each path (chain of transitions) between states.
And now for something completely different. Monty Python
Use Case Testing
Equipment
Use case - these are scenarios that describe how an actor (usually a person, but maybe another system) uses the system to achieve a specific goal. Use cases are described from the perspective of the user, not the system. Internal work to maintain system health is not part of the use case.
At least one test case should check the main scenario, and at least one case should be in alternative scenarios.
Use Case Testing Tips
- Start with valid data and the most common scenarios.
- Check boundary values and invalid values (using previously discussed techniques).
- Rarely used scenarios critical to the system (the so-called Shut Down The Nuclear Reactor)
- Tests for each extension branch of each step
- Try to perform the operation in an unusual way
- Pervert precondition if it really can happen
- If a transaction has loops, run it in a loop, and not once or twice - be tougher
- Find a very long and winding path and follow it
- If it is expected that the transaction will be executed in a logical order, try to execute it in the reverse order (for example, fill the fields not from top to bottom, but from bottom to top)
- Create fool proof tests
Use Case Description Template
| Use Case Component
| Description
|
| Use Case Number or Identifier
(Number or ID) | Unique identificator
|
| Use Case Name
(Name) | In the form of a sentence containing a verb in active form (what to do?).
For example, Log in, Create an order |
| Goal in context
(Purpose and context) | A more detailed description of the purpose, if necessary.
For example, Create an order on behalf of the organization. |
| Scope (Borders)
| Corporation (General) | System | Subsystem
|
| Level
| General | Private | Subfunction
|
| Primary Actor
| Primary User Role or Description
|
| Preconditions
| The state the system must be in before the use case begins
|
| Success End Conditions
| The state the system should go into if the use case completes successfully
|
| Failed End Conditions
| The state the system should go into if the use case fails
|
| Trigger (Trigger Condition)
| Action to trigger this use case
|
| Main Success Scenario
(Main scenario) | Steps and actions
|
| Extensions
| Conditions under which alternatives may arise in the main steps of the scenario.
|
| Sub-variations
Alternatives | Steps and actions. Options that are not related to the main thread, but may arise. Described for the step.
|
| Priority
| Critical
|
| Response time
| The time required to complete this case
|
| Frequency
| Frequency of use
|
| Channels to Primary Actor
| Interactive | File | Database Interactive / File / Base
|
| Data due
| schedule
|
| Completeness Level
| Degree of completion
|
| Open issues
| Defects Reported
|
If you don't try strange things. you know the users will.
All Articles