A little about the simple. Test design. Part 1
Today, software testing is one of the key processes for creating a product. It doesn’t matter what methodology, approach, process, software testing you use, anyway, always exists in your process. In recent years (and maybe even a decade), software testing has developed into a separate area of IT, which is constantly evolving in the global community.
And yes, today we’ll talk about ordinary manual (functional) testers, without a bias in automation, workload and other technical types of testing!
Now the profession of a manual tester is one of the most popular IT processes and one of the easiest ways to get into IT.
Why?
Because testers do nothing, they don’t need knowledge. Everyone can test!
Because the profession of a manual tester at the initial stage does not require specific knowledge and skills. The main “knowledge” for the tester is the ability to “destroy” and analytical thinking. And most importantly - to have a non-standard mindset, to find non-trivial solutions to the tasks. Some monster who knows how to break and break :)
Hard skills can always be taught, but unfortunately soft skills are very difficult to teach, because this is the person’s character, his attitude to something, etc. Usually I look askance at managers who are recruiting specialists in manual testing for hard skills. Why are you doing this??? (you can leave answers in the comments) Well, okay, let's continue :)
If we consider the technical features of testing that a manual tester should know, then they can be divided into 2 main parts,perhaps many will disagree with me, they will shout like that, you are wrong, testing is very difficult - it is preparation for testing and testing.
We will consider the most interesting and fascinating part of testing - preparation for testing. It is on this part of the testing process that it depends on how well and correctly you perform the testing itself, find the necessary defects and ensure thesatisfied face of the Customer (or the product of the partner), the quality of the task after implementation.
Many of you who were involved in testing, one way or another, were preparing for testing. The difference is usually only in how much you formalize this stage of the testing process. If you are doing research testing, do not write test scripts, theygive you a system and you immediately rush into battle, anyway, you are preparing for testing. Often, on simple projects, the tester may not notice this, because the stage of analytics and preparation for testing takes place at an unconscious level. But even so, he is still there.
And in this series of articles we’ll talk about this.
At my workplace, I often provide training for hand-held testers, and I encounter situations that everyone seems to have heard about test design techniques, but nobody uses them in work.
It looks like this:
Why it happens? After all, test-design techniques are the basis for writing test scripts. This is the same as being able to drive a car, but not knowing traffic rules. Why don't testers use them in their work?
The answer is simple.
First, when testers are taught in testing courses (or self-study on books and articles), they are told how to apply test design techniques on elementary examples. And the main problem of such training is that testers cannot transfer the acquired knowledge to their real tasks. That is, use test design techniques in everyday work.
Second, when teaching test design techniques, this process is very formalized, which looks like a tester needs to formalize everything in his work. And usually no one needs time for this, no one has it.
In simple words, the test design techniques are a set of rules that allow you to correctly determine the list of checks for testing. And the most important thing is touse these rules always and everywhere :) to be able to apply these rules on an intuitive level. It is the ability to "conduct analytics in the head" that distinguishes a good tester!
In my organization, as well as generally accepted standards and practices, the tasks of test design are:
In this series of articles I will try to tell you not only about test design techniques, but also about how to use ALL of them (namely, all together, and not a specific one or two) in practice, including the example of the functionality of our bank. How to generate checks for testing using test design techniques for large systems and processes. And most importantly, you will get an answer to when and in which tests to apply test design techniques.
So, let's begin.
And we will start with the simplest, namely about 2 basic test design techniques that everyone heard about, and I’m sure they applied, but most likely on an intuitive level in their work.
These are equivalence classes and boundary values.
What are equivalence classes?
Equivalence class is a set of input (or output) software data that is processed by a program according to one algorithm or leads to one result.
That is, this is a certain set of values that you can substitute in the program and get the same result. The result can be not only specific values, program actions, but also just the scope. Therefore, the simplest equivalence classes into which the tests are divided are 2 main classes: positive and negative scenarios.
They are always there. Each tester divides the checks into these classes, but not every tester knows why he does it. The answer is equivalence classes.
Further, each equivalence class can be divided into additional classes, etc. until the checks will lead to point and specific test results.
Consider an example:
The scoring system calculates the interest rate on a loan for a client based on his age, which is entered in the form:
We define 2 main classes - these are positive and negative scenarios.
Positive scenarios will be all values that lead to a result, negative scenarios will be values whose results are not described as expected results.
Next, we divide the class of positive scenarios into 3 classes of input values 18-24, 25-44 and 45 +
In the class of negative scenarios, we form values based on the need to check for program failures, so we have 0, 1-17, negative values, character input, etc.
The result of this partition will be a value or range of values in which we need to perform only one check with any value from the data range. Situations such as a single value in a range may occur. This is also a separate equivalence class and also requires verification.
Total we have.
It is very important that test design techniques are not used independently of the others! Now we look at them separately, but in the end I will teach you how to use them together.
Another feature of equivalence classes is their application. I distinguish 3 levels of application of test design techniques to prepare for testing.
Visually, it looks like this:
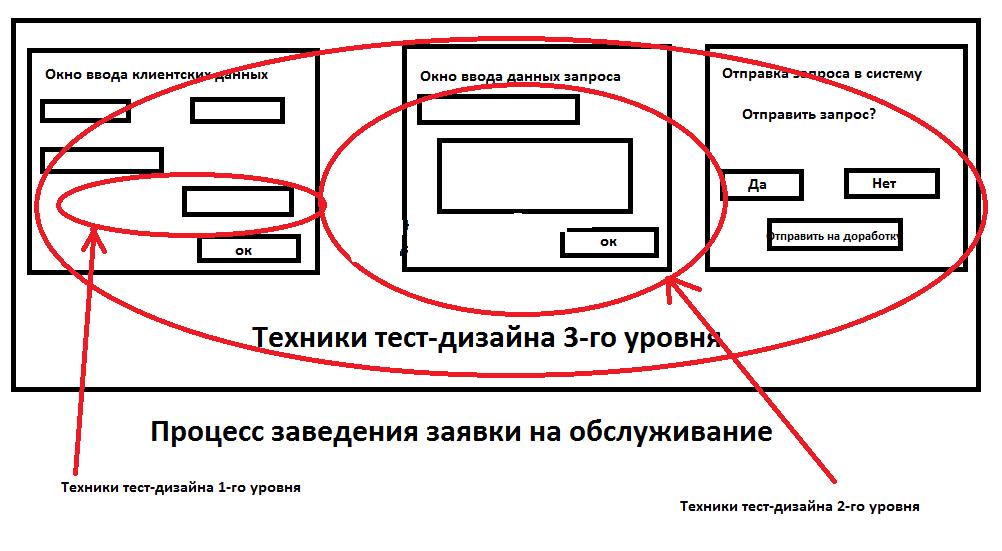
Equivalence classes are more relevant to the 1st level and are used to test program elements. But ideologically, this approach can be applied to other levels.
An integral part of checking any element is another technique - boundary values .
Boundary values complement equivalent classes, thereby completely covering the software element checks.
Boundary values are a test-design technique that supplements equivalence classes with additional checks at the boundary of changing conditions.
It seems that everything is simple!
Let us return to our example earlier.
The scoring system calculates the interest rate on a loan for a client based on his age, which is entered in the form:
What will be the border here?
If you thought about the length of the field on the Habra page, or about holidays in warm countries, I want to upset you, it’s not so :)
To determine the boundary values need something else. Namely, determine which values are the start and end for our class. And the most important!!! Years of research in the field of testing have shown that the majority of defects are found by testers at the junction of values that change the working conditions of the program.
Therefore, in addition to the boundary value, we use an additional 2 values for testing, the value before the boundary and the value after the boundary.
As a result, we have:
The boundaries of our classes: 17, 18, 19, 24, 25, 26, 44, 45, 46 and max.
Also, we have a negative class, it is from 0 to 18. Therefore, here we must also use the boundary values for testing: -1, 0, 1, 17,18
Next, we exclude duplicate values, and we obtain values for checking the data entry element.
-1, 0, 1, 17, 18, 19, 24, 25, 26, 44, 45, 46, max.
The max value is usually specified by the Customer or analyst. If you can’t provide, then you should drop it and not check, you need to choose the value that corresponds to common sense (hardly anyone will come for loans at the age of 100).
The next step is to impose boundary values on the values of equivalence classes, exclude unnecessary checks using the rule “one value is sufficient for checking one class” and finalize the list.
If earlier we had 3 values for 3 classes, 19, 30 and 48, then after determining the boundary values, we can exclude the values 30 and 48 from the list and replace them with pre-boundary values, such as 26 (instead of 30) and 46 ( instead of 48).
Boundary values are determined not only for numerical values, but also for alphabetic values (for example, the boundaries of the alphabet and encoding), date and time, and semantic values. The boundary of the numerical values depends on the input format, if you have integers, for example 2, then the boundary values will be 1 and 3. If fractional values, then the boundaries for number 2 will already be 1.9 (1.99) or 2.1 ( 2.01), etc.
Level 1 test design techniques are simple and straightforward. I think you will say that it’s easy, but why thoroughly check each element. And you will be right! ..
Most often they are used in the development of new software, because once after checking the elements of the system during development, they are subsequently not often subject to change at the level of operation of the element. You do not need to constantly check each element value in each screen of your program, but keep in mind that if the processing logic in the program elements changes, you need to re-verify that the element values are processed correctly.
Well, too easy ??? Now we will begin to analyze more complex techniques, get ready.
Level 2 test design technicians are responsible for data variability and combinatorics when checking software.
The main technique of test design is parwise testing (pairwise testing) . The essence of the technique is to minimize the variability of combinations of checks sufficient to ensure high quality software.
In simple words, the Pareto rule is applied in this technique, 80% of the quality can be achieved in only 20% of the data combination checks.
This technique was developed through more than 15 years of IEEE research in the field of analysis of the causes of defects in the system. The results of the study showed that 98% of all defects occur when a conflict of input data pair or one input parameter.
Why was the couple chosen?Dive into the jungle of mathematical statistics and probability theory to find the answer .
Of course, we won’t go there today. The theory of probability is too complicated for simple IT specialists, everything is simple, take an ordinary game of dice with 6 faces.
Let the loss of the value 2 is a defect, then the probability of a defect when throwing a cube is 1/6 = 0.167.
If we roll 2 dice, then the probability of falling 2 deuces (2 defects) becomes lower and equals 0.167 * 0.167 = 0.028, for 3 already 0.005, etc.
It turns out that the probability of a defect occurring with a combination of 3 or more parameters is so small that it can be discarded.
When we test the program, there are always n number of elements that affect the result, for example, the form for filling out data on a loan application. There are n number of fields that together give a result. It is the combinatorics of the data when filling in the fields that we check using pairwise testing.
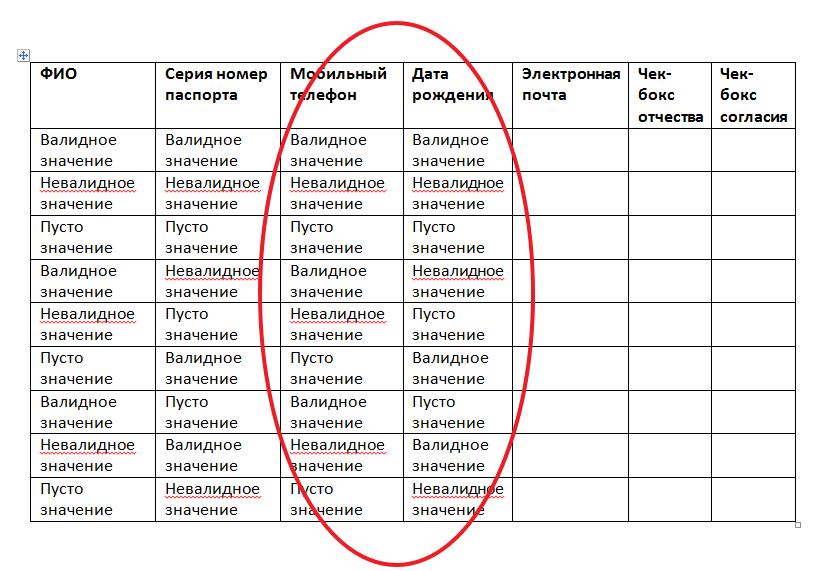
Let's look at an example of the functionality of a remote card design in a bank.

If we look carefully, we will see with you five data fields:
Our task, using first-level techniques, is to determine the list of equivalence classes that the program can take.
It is IMPORTANT that when using the pairwise testing technique, we are not talking about the test result. It is important for us to check the variability of the data when filling out the application.
So,
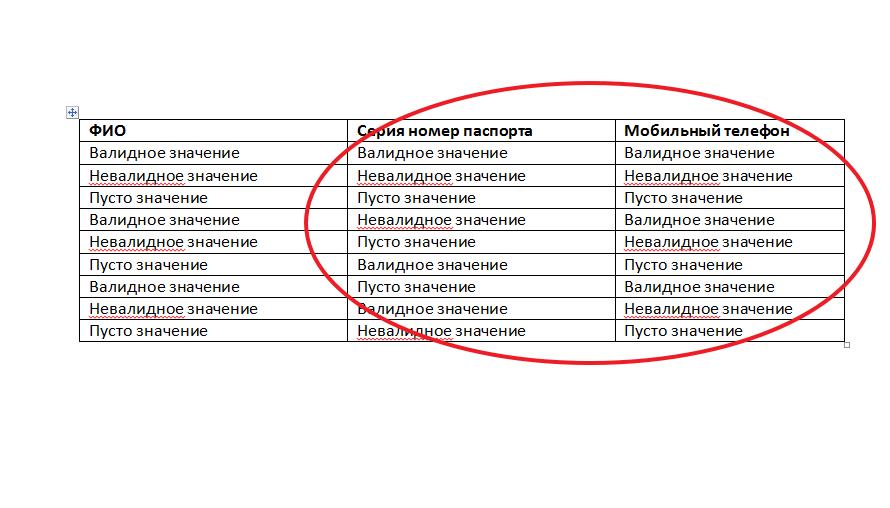
The full name field can take values (classes):
Very often testers do not understand what values to choose for a given technique, if they are not limited by the ability to enter. For example, if we have the opportunity to choose the gender of a person M or F, then everything is simple, there are 2 meanings. But when we have a line for data input, then in pairwise testing we do not check the correctness of filling in a specific field, because these checks should be performed at the first level of test design (or combine them with pairwise testing). We use the equivalence class for this field because we don’t care what kind of value it will be.
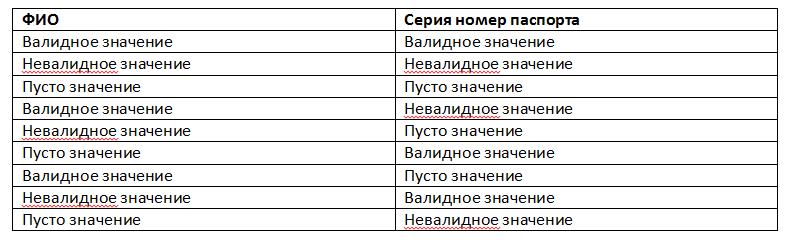
We go further, the date of birth , as well as the mobile phone, the series and passport number can also have 3 states:
Because email is optional, this field has 2 values:
Check boxes usually have only 2 states - Y or N.
To check all the combinations of this form, we would need to do over 1000 tests, but using pairwise testing, we need only 9 tests!
Magic, I don’t think :)
The next step is to compose an orthogonal array with data combinations. The easiest way to compile an array is to populate the data in pairs, starting with the elements with the highest number of values and then descending. Since in our example there are 4 elements with the same number of values, we can choose any pair.
We take full name and passport number series. Our task is to sort out all the values of a given pair among themselves:
After iterating over one pair, we create another pair and begin to iterate over the values (for example, the mobile phone number)
We connect the next element and so on until the entire table is completely filled, which will look like this:
Thus, we get 9 tests with specific equivalence classes that we can introduce to test the work of data variability for the form. We can fill the classes with specific values that we get with you using the 1st level of test design technique.
In conclusion of this article I will say that the test-design techniques reviewed cover only part of the checks for testing the program, namely, checking the correct operation of the program elements and the result of their combinations during its operation. In the second part, we will move on to test-design techniques that allow you to work the wonders of testing to test the logic of the program and processes. This is a very important component of manual testing, and it is precisely this that you often test at your work!
Hope it was helpful!
And yes, today we’ll talk about ordinary manual (functional) testers, without a bias in automation, workload and other technical types of testing!
Now the profession of a manual tester is one of the most popular IT processes and one of the easiest ways to get into IT.
Why?
Because the profession of a manual tester at the initial stage does not require specific knowledge and skills. The main “knowledge” for the tester is the ability to “destroy” and analytical thinking. And most importantly - to have a non-standard mindset, to find non-trivial solutions to the tasks. Some monster who knows how to break and break :)
Hard skills can always be taught, but unfortunately soft skills are very difficult to teach, because this is the person’s character, his attitude to something, etc. Usually I look askance at managers who are recruiting specialists in manual testing for hard skills. Why are you doing this??? (you can leave answers in the comments) Well, okay, let's continue :)
If we consider the technical features of testing that a manual tester should know, then they can be divided into 2 main parts,
We will consider the most interesting and fascinating part of testing - preparation for testing. It is on this part of the testing process that it depends on how well and correctly you perform the testing itself, find the necessary defects and ensure the
Many of you who were involved in testing, one way or another, were preparing for testing. The difference is usually only in how much you formalize this stage of the testing process. If you are doing research testing, do not write test scripts, they
And in this series of articles we’ll talk about this.
At my workplace, I often provide training for hand-held testers, and I encounter situations that everyone seems to have heard about test design techniques, but nobody uses them in work.
It looks like this:
- Why do we need test design techniques?
- To correctly identify validations for testing.
- Do you use them in your work?
- Explicitly not, we ourselves determine what needs to be checked.
Why it happens? After all, test-design techniques are the basis for writing test scripts. This is the same as being able to drive a car, but not knowing traffic rules. Why don't testers use them in their work?
The answer is simple.
First, when testers are taught in testing courses (or self-study on books and articles), they are told how to apply test design techniques on elementary examples. And the main problem of such training is that testers cannot transfer the acquired knowledge to their real tasks. That is, use test design techniques in everyday work.
Second, when teaching test design techniques, this process is very formalized, which looks like a tester needs to formalize everything in his work. And usually no one needs time for this, no one has it.
In simple words, the test design techniques are a set of rules that allow you to correctly determine the list of checks for testing. And the most important thing is to
In my organization, as well as generally accepted standards and practices, the tasks of test design are:
- Testing requirements and risks analysis
- Defining Checks for Testing
- Formalization of checks in the form of test scripts
- Prioritization of checks
- Defining Testing Approaches
In this series of articles I will try to tell you not only about test design techniques, but also about how to use ALL of them (namely, all together, and not a specific one or two) in practice, including the example of the functionality of our bank. How to generate checks for testing using test design techniques for large systems and processes. And most importantly, you will get an answer to when and in which tests to apply test design techniques.
So, let's begin.
And we will start with the simplest, namely about 2 basic test design techniques that everyone heard about, and I’m sure they applied, but most likely on an intuitive level in their work.
These are equivalence classes and boundary values.
What are equivalence classes?
Equivalence class is a set of input (or output) software data that is processed by a program according to one algorithm or leads to one result.
That is, this is a certain set of values that you can substitute in the program and get the same result. The result can be not only specific values, program actions, but also just the scope. Therefore, the simplest equivalence classes into which the tests are divided are 2 main classes: positive and negative scenarios.
They are always there. Each tester divides the checks into these classes, but not every tester knows why he does it. The answer is equivalence classes.
Further, each equivalence class can be divided into additional classes, etc. until the checks will lead to point and specific test results.
Consider an example:
The scoring system calculates the interest rate on a loan for a client based on his age, which is entered in the form:
- From 18 to 25 years old - 18%
- From 25 to 45 years old - 16%
- Over 45 years - 20%
We define 2 main classes - these are positive and negative scenarios.
Positive scenarios will be all values that lead to a result, negative scenarios will be values whose results are not described as expected results.
Next, we divide the class of positive scenarios into 3 classes of input values 18-24, 25-44 and 45 +
In the class of negative scenarios, we form values based on the need to check for program failures, so we have 0, 1-17, negative values, character input, etc.
The result of this partition will be a value or range of values in which we need to perform only one check with any value from the data range. Situations such as a single value in a range may occur. This is also a separate equivalence class and also requires verification.
Total we have.
- Positive checks: Entering values: 19, 30, 48 (values can be any from a given range of the class)
- Negative checks: 0, 3, -1, A, etc.
It is very important that test design techniques are not used independently of the others! Now we look at them separately, but in the end I will teach you how to use them together.
Another feature of equivalence classes is their application. I distinguish 3 levels of application of test design techniques to prepare for testing.
- The first level is checking the elements of the system (for example, fields, checkboxes, buttons, etc.)
- The second level - checking the logic of the system when combining data in the elements of the system
- The third level is checking the business process of the system and the logic of the program.
Visually, it looks like this:
Equivalence classes are more relevant to the 1st level and are used to test program elements. But ideologically, this approach can be applied to other levels.
An integral part of checking any element is another technique - boundary values .
Boundary values complement equivalent classes, thereby completely covering the software element checks.
Boundary values are a test-design technique that supplements equivalence classes with additional checks at the boundary of changing conditions.
It seems that everything is simple!
Let us return to our example earlier.
The scoring system calculates the interest rate on a loan for a client based on his age, which is entered in the form:
- From 18 to 25 years old - 18%
- From 25 to 45 years old - 16%
- Over 45 years - 20%
What will be the border here?
If you thought about the length of the field on the Habra page, or about holidays in warm countries, I want to upset you, it’s not so :)
To determine the boundary values need something else. Namely, determine which values are the start and end for our class. And the most important!!! Years of research in the field of testing have shown that the majority of defects are found by testers at the junction of values that change the working conditions of the program.
Therefore, in addition to the boundary value, we use an additional 2 values for testing, the value before the boundary and the value after the boundary.
As a result, we have:
The boundaries of our classes: 17, 18, 19, 24, 25, 26, 44, 45, 46 and max.
Also, we have a negative class, it is from 0 to 18. Therefore, here we must also use the boundary values for testing: -1, 0, 1, 17,18
Next, we exclude duplicate values, and we obtain values for checking the data entry element.
-1, 0, 1, 17, 18, 19, 24, 25, 26, 44, 45, 46, max.
The max value is usually specified by the Customer or analyst. If you can’t provide, then you should drop it and not check, you need to choose the value that corresponds to common sense (hardly anyone will come for loans at the age of 100).
The next step is to impose boundary values on the values of equivalence classes, exclude unnecessary checks using the rule “one value is sufficient for checking one class” and finalize the list.
If earlier we had 3 values for 3 classes, 19, 30 and 48, then after determining the boundary values, we can exclude the values 30 and 48 from the list and replace them with pre-boundary values, such as 26 (instead of 30) and 46 ( instead of 48).
Boundary values are determined not only for numerical values, but also for alphabetic values (for example, the boundaries of the alphabet and encoding), date and time, and semantic values. The boundary of the numerical values depends on the input format, if you have integers, for example 2, then the boundary values will be 1 and 3. If fractional values, then the boundaries for number 2 will already be 1.9 (1.99) or 2.1 ( 2.01), etc.
Level 1 test design techniques are simple and straightforward. I think you will say that it’s easy, but why thoroughly check each element. And you will be right! ..
Most often they are used in the development of new software, because once after checking the elements of the system during development, they are subsequently not often subject to change at the level of operation of the element. You do not need to constantly check each element value in each screen of your program, but keep in mind that if the processing logic in the program elements changes, you need to re-verify that the element values are processed correctly.
Level 2 test design technicians are responsible for data variability and combinatorics when checking software.
The main technique of test design is parwise testing (pairwise testing) . The essence of the technique is to minimize the variability of combinations of checks sufficient to ensure high quality software.
In simple words, the Pareto rule is applied in this technique, 80% of the quality can be achieved in only 20% of the data combination checks.
This technique was developed through more than 15 years of IEEE research in the field of analysis of the causes of defects in the system. The results of the study showed that 98% of all defects occur when a conflict of input data pair or one input parameter.
Why was the couple chosen?
Of course, we won’t go there today. The theory of probability is too complicated for simple IT specialists, everything is simple, take an ordinary game of dice with 6 faces.
Let the loss of the value 2 is a defect, then the probability of a defect when throwing a cube is 1/6 = 0.167.
If we roll 2 dice, then the probability of falling 2 deuces (2 defects) becomes lower and equals 0.167 * 0.167 = 0.028, for 3 already 0.005, etc.
It turns out that the probability of a defect occurring with a combination of 3 or more parameters is so small that it can be discarded.
When we test the program, there are always n number of elements that affect the result, for example, the form for filling out data on a loan application. There are n number of fields that together give a result. It is the combinatorics of the data when filling in the fields that we check using pairwise testing.
Let's look at an example of the functionality of a remote card design in a bank.
If we look carefully, we will see with you five data fields:
- Full name
- Date of Birth
- Mobile phone
- Passport Number Series
- Email,
- as well as 2 check boxes.
Our task, using first-level techniques, is to determine the list of equivalence classes that the program can take.
It is IMPORTANT that when using the pairwise testing technique, we are not talking about the test result. It is important for us to check the variability of the data when filling out the application.
So,
The full name field can take values (classes):
- Name in Russian
- Invalid value
- Empty value
Very often testers do not understand what values to choose for a given technique, if they are not limited by the ability to enter. For example, if we have the opportunity to choose the gender of a person M or F, then everything is simple, there are 2 meanings. But when we have a line for data input, then in pairwise testing we do not check the correctness of filling in a specific field, because these checks should be performed at the first level of test design (or combine them with pairwise testing). We use the equivalence class for this field because we don’t care what kind of value it will be.
We go further, the date of birth , as well as the mobile phone, the series and passport number can also have 3 states:
- Valid value
- Invalid value
- Empty value
Because email is optional, this field has 2 values:
- Valid value
- Invalid value
Check boxes usually have only 2 states - Y or N.
To check all the combinations of this form, we would need to do over 1000 tests, but using pairwise testing, we need only 9 tests!
Magic, I don’t think :)
The next step is to compose an orthogonal array with data combinations. The easiest way to compile an array is to populate the data in pairs, starting with the elements with the highest number of values and then descending. Since in our example there are 4 elements with the same number of values, we can choose any pair.
We take full name and passport number series. Our task is to sort out all the values of a given pair among themselves:
After iterating over one pair, we create another pair and begin to iterate over the values (for example, the mobile phone number)
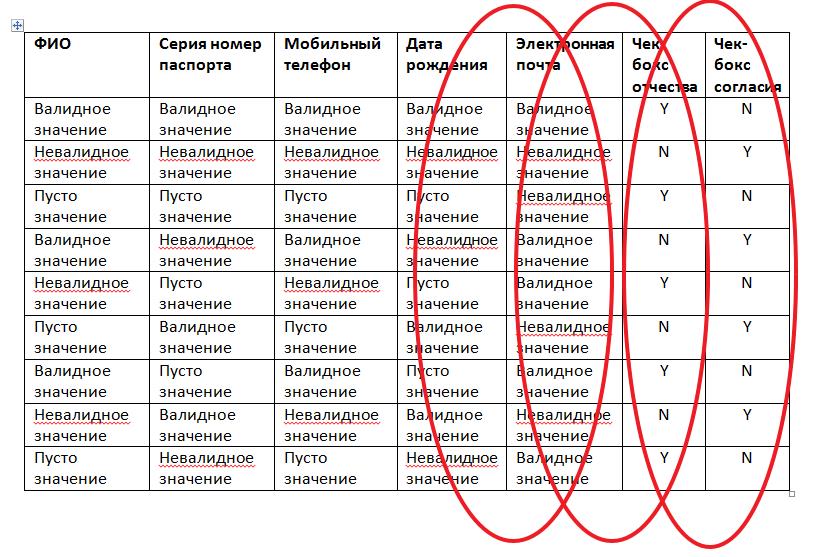
We connect the next element and so on until the entire table is completely filled, which will look like this:
Thus, we get 9 tests with specific equivalence classes that we can introduce to test the work of data variability for the form. We can fill the classes with specific values that we get with you using the 1st level of test design technique.
In conclusion of this article I will say that the test-design techniques reviewed cover only part of the checks for testing the program, namely, checking the correct operation of the program elements and the result of their combinations during its operation. In the second part, we will move on to test-design techniques that allow you to work the wonders of testing to test the logic of the program and processes. This is a very important component of manual testing, and it is precisely this that you often test at your work!
Hope it was helpful!
All Articles