Cart for a datacenter
How to deploy Python Telegram bot using Webhooks on Google Cloud Platform
Instead of the foreword

- Write a telegram bot. Now even schoolchildren write, ”she said.
“And why not,” I thought then (“Well, well,” I would say now).
We sat in Bean and over a cup of coffee we discussed the possibility of testing ideas with artificial intelligence models on a close and not very circle of friends. Lena, my former colleague, and in all respects not a blonde who had just graduated from a magistracy, reasoned as follows. By creating a bot, you can save time and energy on the interface by focusing on the core with machine learning. You must admit that it was impossible to resist such logic of “sportswoman, Komsomol member and just beautiful” on that beautiful Sunday morning. It is resolved. Telegram bot means telegram bot.
First of all, I crawled into Google and found a large number of links “how to make a bot in 30 minutes”. This inspired me so much that I didn’t go beyond the names and started creating a kernel. In the very first approximation, I had to write a search query processing system using NLP (natural language processing). Writing the kernel took some, quite reasonable, time (nevertheless, Coca-Cola's experience cannot be drunk). And a few days later I was ready for wrapping the first test version of the kernel in a couple of other send-receive commands in a couple of hours, running all this in Telegram for the benefit of my friends. But it was not there.
Suddenly, a whole bunch of problems arose. Having spent a couple of days searching the Internet and talking with colleagues in the shop, I realized that the obvious is not obvious, and another “instruction” will not hurt. So this article appeared.
Instead of entry. Libraries
There are several Python libraries for telegram bots. Telegram itself refers to three of them: python-telegram-bot , pyTelegramBotAPI , AIOGram . Links to these libraries and examples in other languages can be found on the Telegram website here . Of course, there is still the Telegram API itself . In the course of my experiments, I tried two variants of the Telegram API and pyTelegramBotAPI. And while stopped at the second.
In general, the impressions of the libraries are as follows. All are very similar, which is not surprising. Python-telegram-bot, it seemed to me, has the best documentation of all, although work on it has stopped (I hope I'm mistaken). It is seen that work continues on pyTelegramBotAPI, a new functionality appears. AIOGram seems younger and greener. In the latter I didn’t like that instead of the documentation on webhooks there was a link to the Telegram website. But everything flows, everything changes. And the final choice remains to be made.
We will not return to the issue of libraries in this article.
As for the code of the bot itself, as I have already noted, there are many manuals on the Internet devoted to creating simple and more complex programs. For the purposes of this article, this is unprincipled. Let's take for definiteness two examples from the official pyTelegramBotAPI github:
The most controversial topics with telegram bots are ssl certificates, webhooks, and diploing. Around this and focus our attention. Below I will give you step-by-step instructions that will allow you to place your telegram bot on one of the best cloud services in the world in the simplest and most reliable way in the shortest time (and at least in the first year). Creation of ssl certificates, their registration in the Telegram and other related issues will also be highlighted. If necessary, I will give explanations why we use this or that option, these or those teams.
Polling vs Webhook

If it were not for the confrontation between polling vs webhook and some difficulties (partially contrived) with webhook, this article would not have been necessary. Since this is of fundamental importance, let's understand in more detail.
What is a bot and how does it communicate with Telegram? Obviously, a bot is a program that runs on your computer or server. And communication with the Telegram occurs by sending and receiving messages. And if everything is clear with sending messages, one option is to send (the address “where” we know). There are two options for receiving bot messages from Telegram.
The first is a poll (literal translation of the word polling) of the Telegram server for messages for the bot. The second is a “mailbox” with an IP address (webhook - you can translate it as a web trap), to which messages from the Telegram server come.
The simplest analogy with real mail. Let mail (post office) is the Telegram server, and you are your bot. Then, in the first case (polling) you have to go to the post office for correspondence. And if you want to receive messages without delay, you will not have to go, but literally run back and forth without respite. As we understand, living in the mail waiting for messages is prohibited! In the second case, you tell the post office your home address and wait for the correspondence calmly at home, drinking tea or smoking bamboo.
Of course, for a person the first option seems the most severe. But, speaking between us, if we run after messages we send a piece of iron with a code, then we should not care. And so it would be, if not for one problem. From time to time, the mail (the Telegram server) then closes for lunch, then moves. And in your first option (polling) a tragedy occurs, which in the real world of bots ends with their hovering and failure.
In the second case, the “mailbox” with the address (webhook) does not happen. Because neither you, nor your bot, do not go anywhere, but simply wait. And you do not care where the post office has moved, because the postman brings the mail to you.
Thus, in terms of the amount of code (see link above), the first option seems simpler. And the second is more logical, but harder. For its implementation, you need to get an address, confirm its authenticity and raise the web server, to which messages from the Telegram will come.
Of course, for the first option it is possible to add exception handling to the code. For example, if the mail is closed, wait and wait. But the Internet claims that polling bots are just for fun anyway.
At first I did not believe that the problem was so serious. And he made an option with polling, suggesting that someday I’ll rewrite it on webhooks. But that did not work. On my home computer with macOS, the bot worked without problems for an hour and two (of course, with a VPN) and did not crash. But as soon as I transferred it to the cloud server on Linux, it could not work for 20 minutes. I tried to solve this problem in different ways and settings, but received only a different error code. Selawy, this is Telegram. Having lost a day, I had to take up webhooks, without delay. In the end, I wanted to launch the bot on the server now, and not in a year.
Rewriting code on webhook
The webhook is not as scary as it is painted.
If you already have a bot code with polling, then copying it to webhook will not be difficult. Compare codes from pyTelegramBotAPI library examples. You will find code intersection. Lines 13-25 of the first example are the same as lines 56-67 of the second example . This is a logical unit responsible for processing commands, messages and responses. In this case, the example is too simple, but it reflects the main essence.
# Handle '/start' and '/help' @bot.message_handler(commands=['help', 'start']) def send_welcome(message): bot.reply_to(message, """\ Hi there, I am EchoBot. I am here to echo your kind words back to you. Just say anything nice and I'll say the exact same thing to you!\ """) # Handle all other messages with content_type 'text' (content_types defaults to ['text']) @bot.message_handler(func=lambda message: True) def echo_message(message): bot.reply_to(message, message.text)
Thus, the logical block of the bot must be left unchanged, and the rest should be changed using the banal copy-past code outside the logical block from the second example (i.e., copy lines 1-55 and 70-87). If you look at the code you are copying, you can easily find out that using the aiohttp library , your bot installs an http server and starts listening on the port allocated for this port, while the Python ssl module is responsible for encryption and certificates. In addition to aiohttp, there are other similar libraries, examples of which can be found here .
So. We have a bot with a webhook. It remains to upload it to the server and run, simultaneously receiving data to fill in the empty values in the code API_TOKEN, WEBHOOK_HOST, WEBHOOK_PORT, WEBHOOK_SSL_CERT, WEBHOOK_SSL_PRIV. Behind each of these values is a certain procedure with a secret meaning.
Register bot in Telegram
Let's start with the bot token. To get it, go to the Telegram messenger and connect to the @BotFather bot. Enter the command “/ newbot”. In response, BotFather prompts us to enter the name and username of our bot and sends a coveted token of the form “712308912: DLGSteczdUnPdnNYLzNikaGOhome7l9q3vova” (of course, you will have a different one). We save the token, do not show it to anyone. In the code, assign it to the variable API_TOKEN.
Where to post? Google Cloud Platform vs Heroku
A few words about the torment of choosing a cloud service. On the Internet you will find many examples where telegram bots are hosted on Heroku. Heroku is a PaaS platform (platform as a service). You upload the code to GitHub, and from there to Heroku . And your bot starts working right away. No need to install the server, Python and libraries, everything has already been done for you. At least, ideally. This solution was also recommended to me by one of my friends. But I refused it.
As I understand it, the main message for Heroku recommendations in many “30 minute bot” guides is the availability of a free tariff plan on Heroku. But, if you look closely, it turns out that this plan is very limited and will not allow you to deploy a free bot that would work day and night.
Unlike Heroku, the Google Cloud Platform (GCP) offers a full year of free work on all services within $ 300. For this amount for the year a lot of things you can try. In my opinion, this is a gorgeous gift, especially for those who are engaged in data science. And, of course, GCP is also PaaS, a complete list of services is here . There are serverless solutions, as on Heroku. I chose a more conservative path for more control in the future, namely the Compute Engine server solution on GCP.
Google cloud platform
Project, instance, static ip, port
Create a project and server
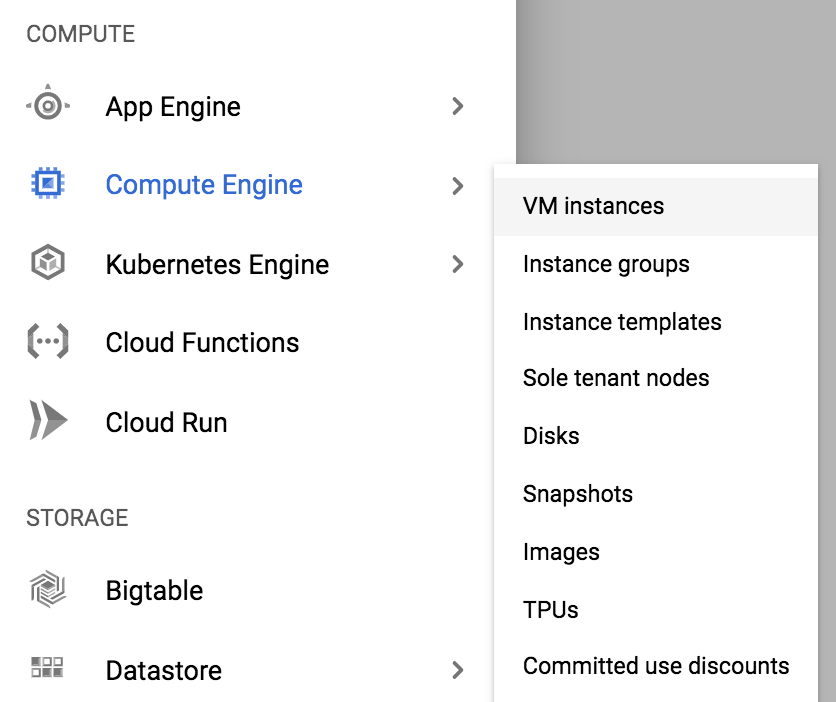
We go to GCP, select “Get started for free” and follow the instructions. If we do everything right, then we will have an account with an amount of $ 300 and even the first project created. We select this project or create another one in the top menu, which is not difficult. And then go to the “Compute Engine / VM Instance” tab in the side menu that opens.
Click “CREATE INSTANCE” and select the server configuration, for example, as shown in the screenshot below. You can choose the micro configuration and then it will cost only 4 dollars a month. You can also boo, the funds will be debited from a gift from Google in 300 dollars.
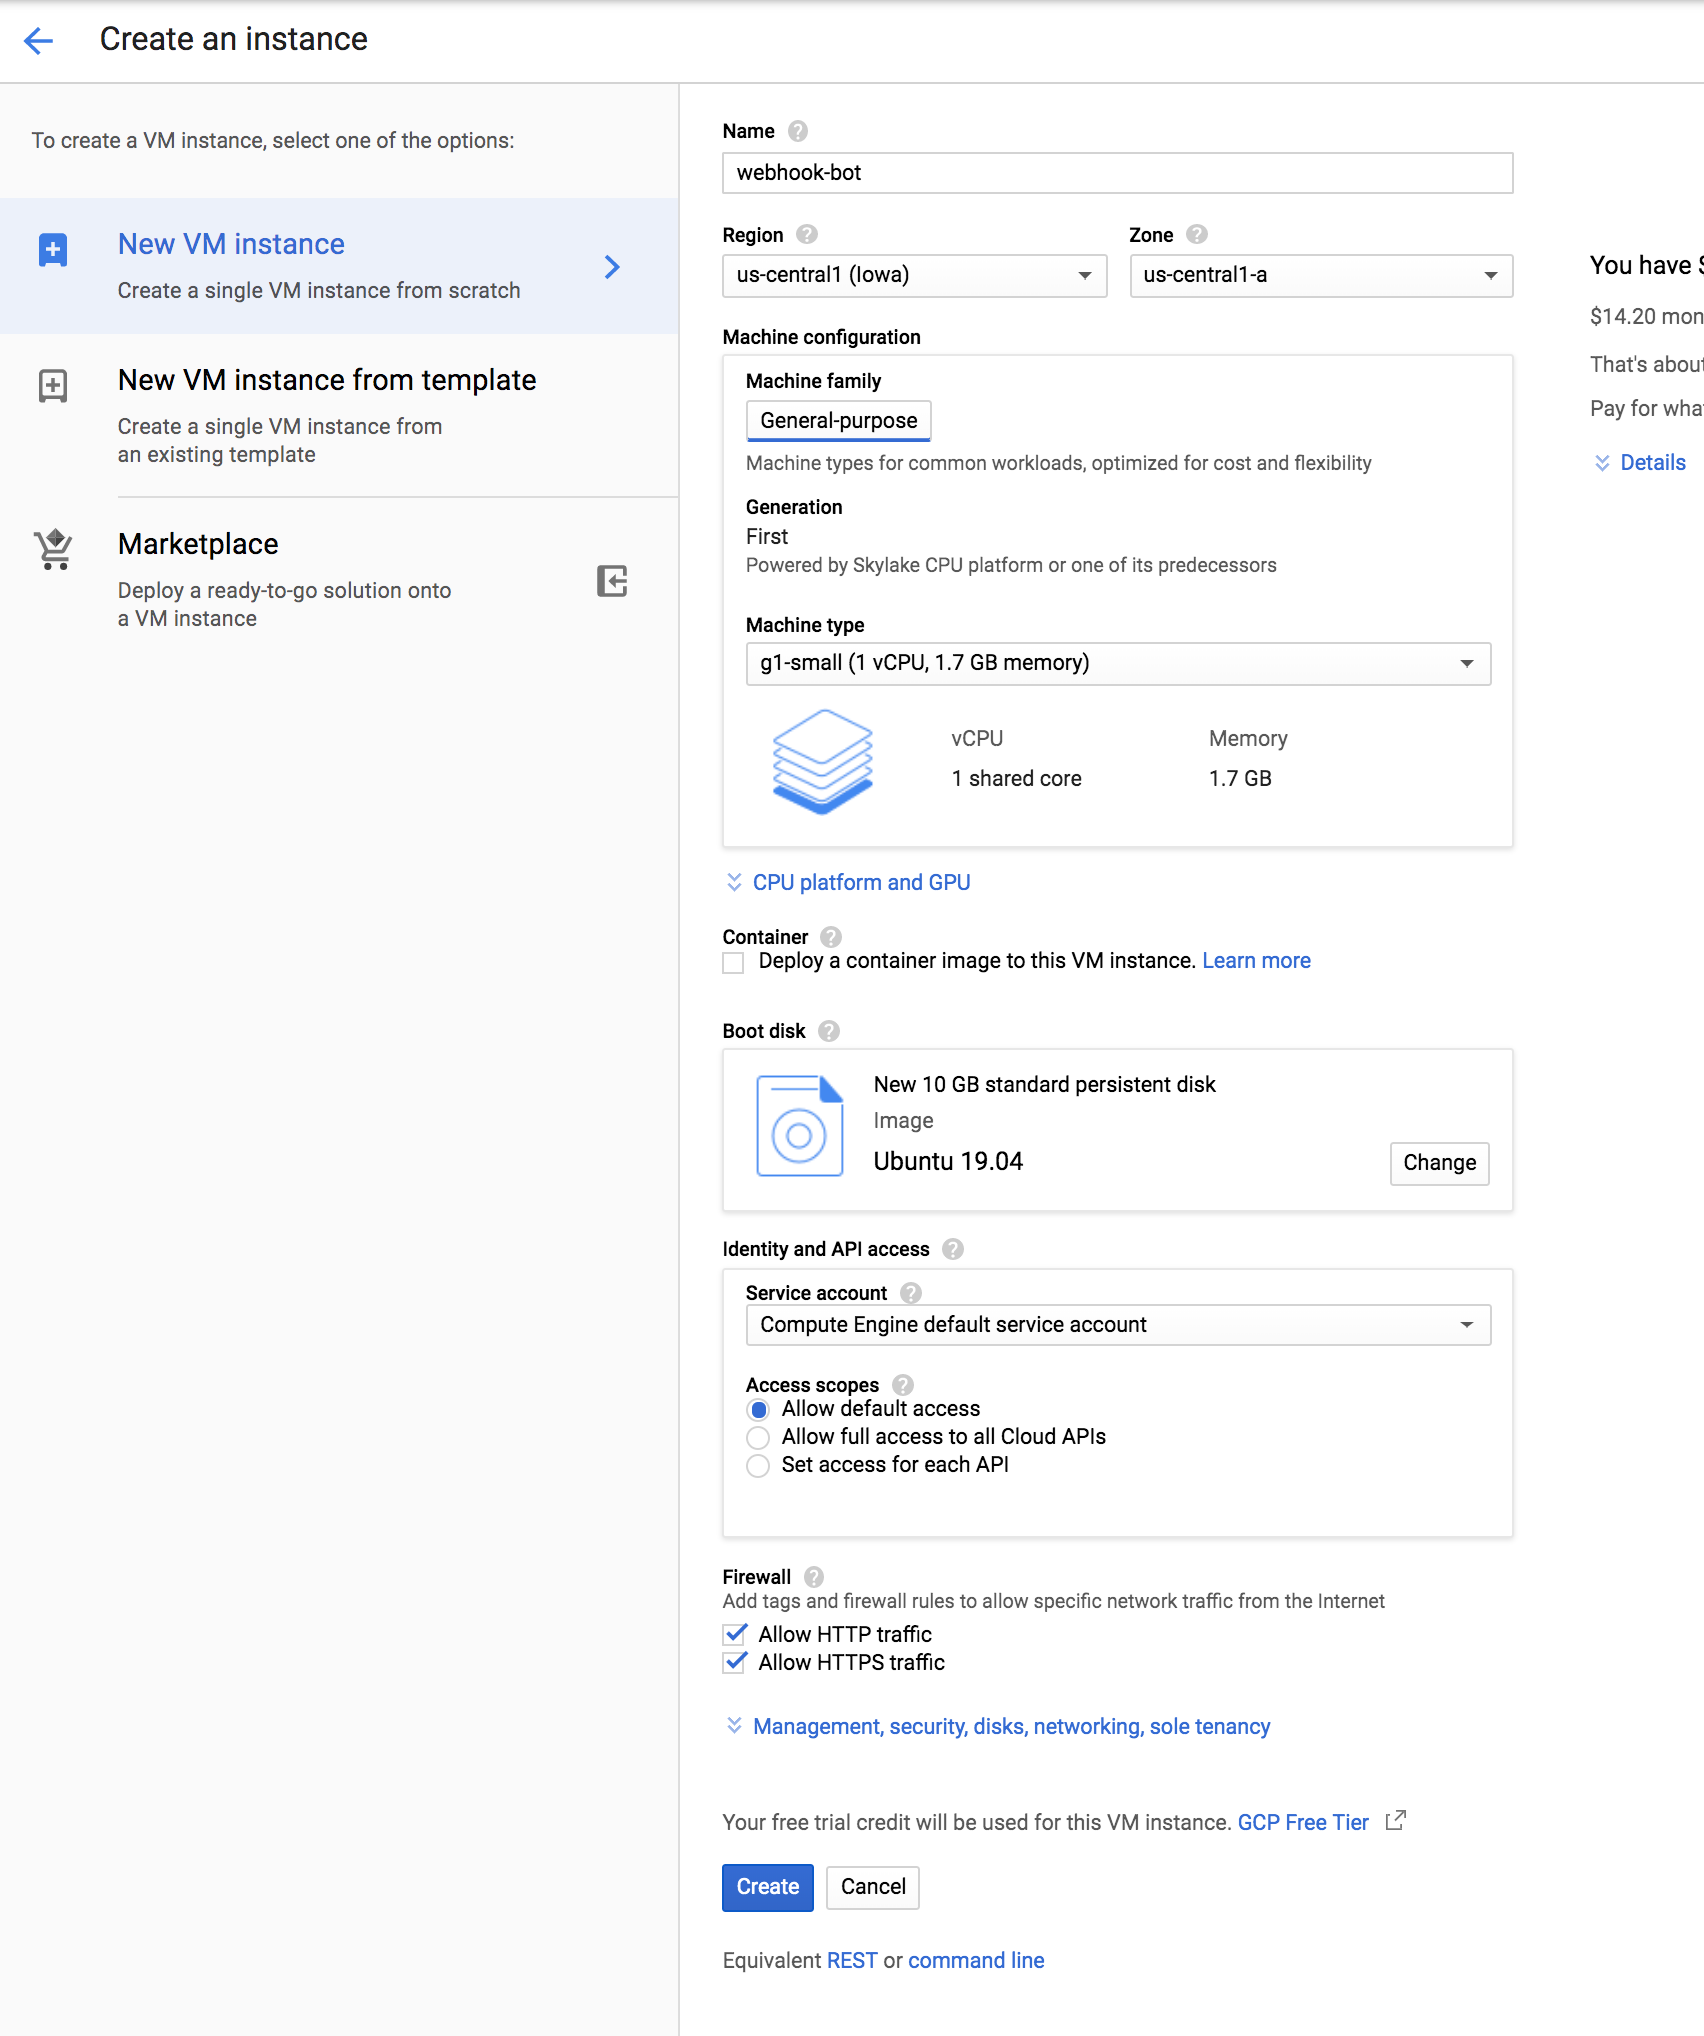
As a result, we get.

Making the ip address static
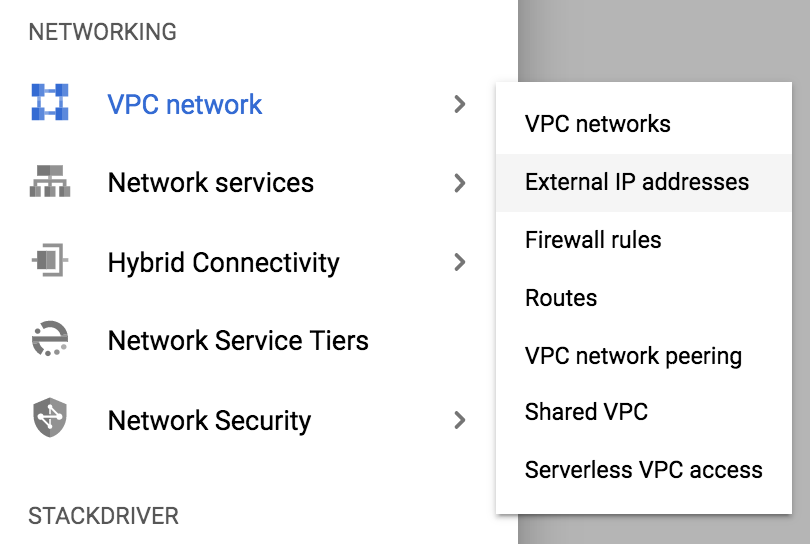
In the “External IP” column, we see the address that we drive into the WEBHOOK_HOST variable in our bot (in this example, it is 35.224.231.90). We will receive an ssl certificate to this address later. If you intend to use the bot for a long time (even if you change the server within GCP), then I recommend making this ip address static in order to preserve it when switching from one instance to another. This is done in the “VPC / External IP addresses” section.
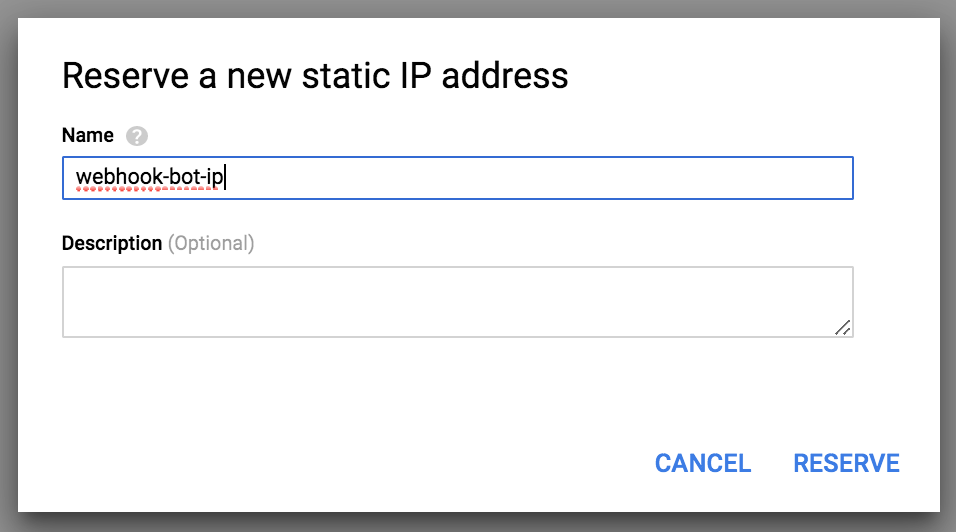
We change the “Type” field from “Ephemeral” to “Static”, giving a name to a static address so that you won’t get confused later if you have a dozen IP addresses later.


Open port
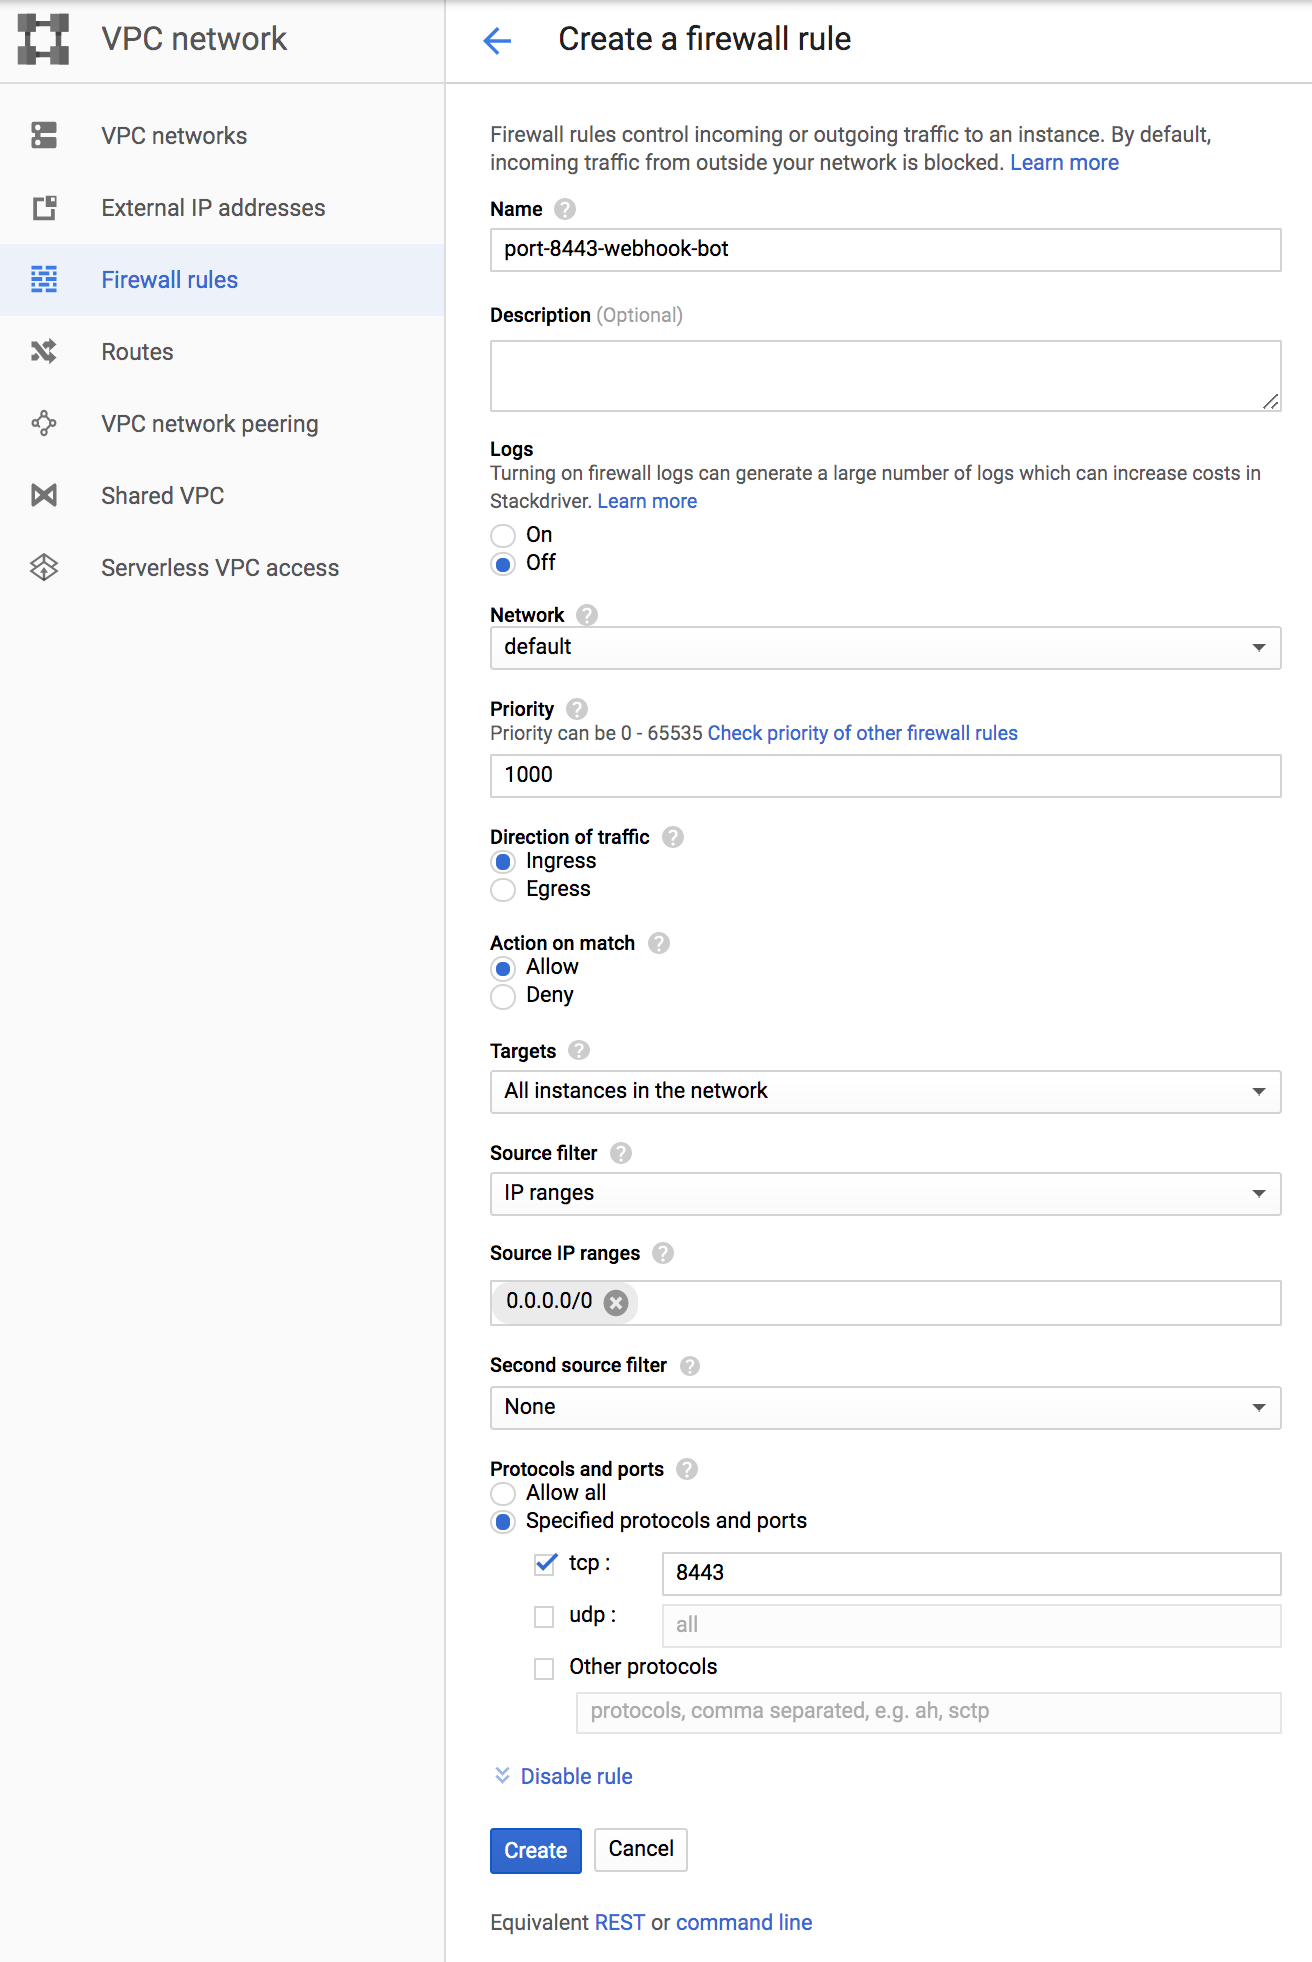
For the webhook to work correctly, we need to open the port on which Telegram will knock. Currently (July 2019) Telegram supports the following ports: 443, 80, 88, 8443. For more details, you can see the full Telegram guide on webhooks here . We will open port 8443. In our bot, this value is already assigned to the WEBHOOK_PORT variable. It remains to configure the firewall rule in GCP for our webhook-bot instance. How to do it? Go to the “VPC / Firewall rules” tab and click on “CREATE FIREWALL RULE”.

And create a rule, as shown in the screenshot below.
We connect to the server, install libraries
This completes the basic server setup on the Google Cloud Platform. We opened an account on GCP, created a project, created a server (instance) based on Ubuntu 19.04 as part of the project, reserved an IP address, opened port 8443.
Left a little. Hopefully we can do without a detailed description of the install part of Python and libraries. Therefore, briefly.
Go to the GCP tab “Compute Engine / VM Instance” and in the field “Connect” click on “SSH”.
On your local computer, a terminal should open with access to the instance on GCP. This is a normal Ubuntu environment. Install conda or virtualenv , create a virtual environment and install Python 3 with the main libraries. In addition, we install the libraries necessary for the operation of our bot:
pip install pyTelegramBotAPI
pip install aiohttp
After installation, do not close the terminal, we will need it.
Obtaining a self-signed SSL certificate for IP
I must say that on the Internet around the topic of ssl certificates for Telegram is a solid horror. As Mikhail Lermontov said in this regard:
“Horses mixed up in a heap, people,
And volleys of thousands of guns
Merged into a long howl ... "
If you read what they write on the Internet, it turns out that if the bot does not work on webhooks, then incorrectly received certificates are to blame. And yet, they can not be registered on ip. In general, Telegram does not accept self-signed certificates. And even if he accepts the certificate, this does not mean that your bot will work, and Telegram will not even send an error.
These are horror stories. Why am I writing this? Besides the fact that these horror stories cost me another lost day, I even had to skip watching “The Hobbit”. My bot initially refused to work on webhooks. This happened due to my mistakes when placing it on the server (then I did not know this). But because of the horror stories above, I was looking for the problem not there, focusing on solving problems with ssl certificates, which were not there. But I gained invaluable experience. I registered certificates for the years to come both for domain names and for ip, both self-signed and paid, both in the form of two files, and in the form of four. I found out what certificates come in and how to make chains of them. I hope this ever comes in handy.
One thing is good, you do not need to step on this rake, I already did it for you. I fully admit that as there is no “smoke without fire”, there was a reason for such horror stories. But for the current day the situation seems to have settled down.
Right now, we will receive an ssl certificate in the most convenient way for us, namely on ip (and not on a domain name), self-signed (i.e. for free) and costing just one line without any sites.
In the terminal (which we have not closed yet), prepare a separate directory in which we will save the certificate file and private key. Go into this directory and call the following command from it.
$ openssl req -newkey rsa:2048 -sha256 -nodes -keyout url_private.key -x509 -days 3560 -out url_cert.pem
In response, you will receive requests to fill out a number of simple fields. Fill them in the example below. But, of course, indicate the correct code for your country, region, city, company name (if any), substitute your ip and your email.
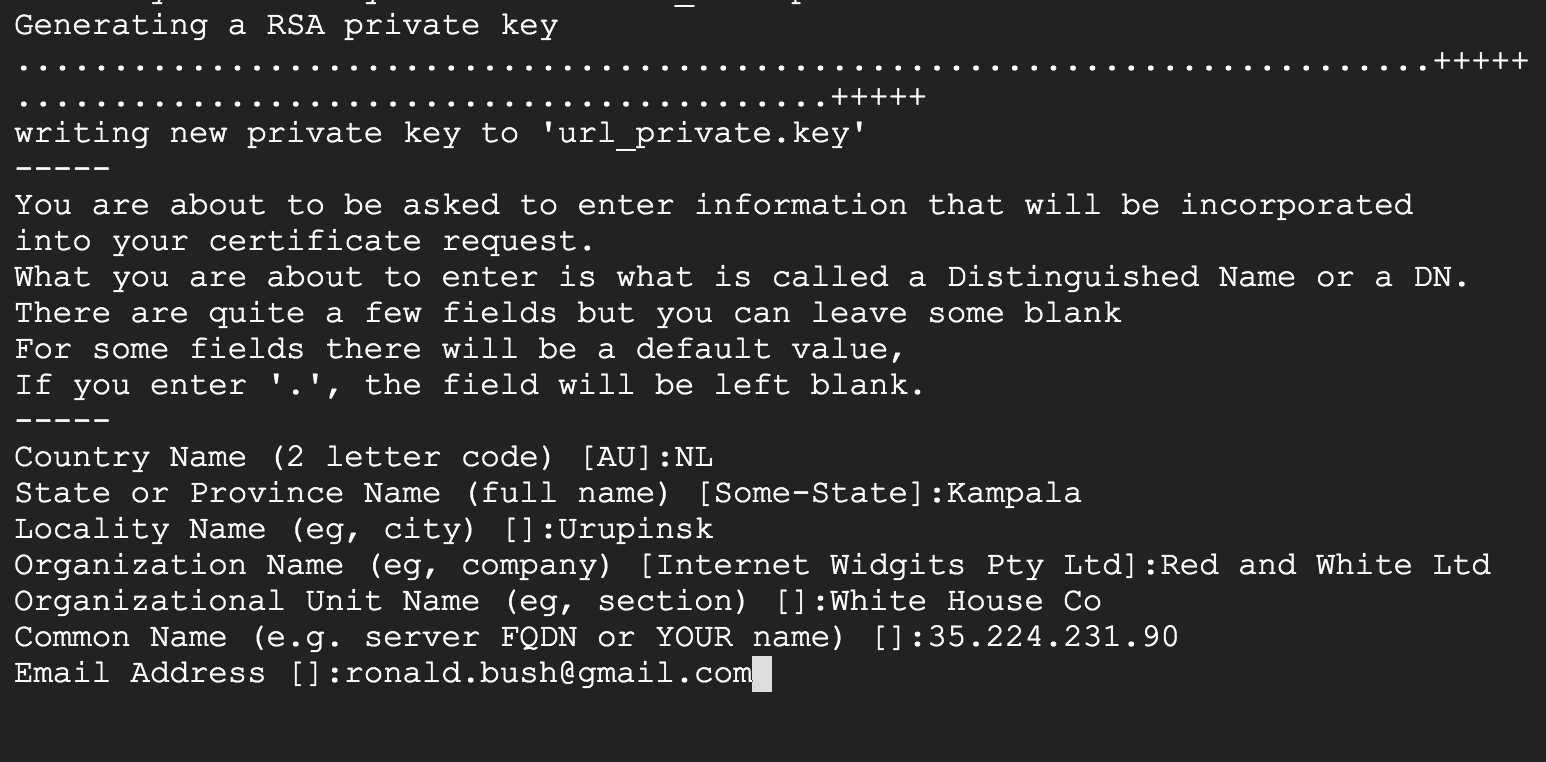
As a result, you will get two files in the directory from which you ran this command. One url_cert.pem file is your certificate, and the second private key is url_private.key. In the bot code, the variables WEBHOOK_SSL_CERT and WEBHOOK_SSL_PRIV are allocated for them, respectively. Do not forget to enter access paths to these files along with the names. Download copies and keep them for future reference.
Do not close the terminal.
Register webhook in Telegram
Register a webhook with a self-signed certificate
Perhaps this is the most exciting part of “What will Telegram say?”. Without any preambles, simply drive the following command into your terminal. Replace the IP address with yours; do not touch port 8443. Insert the token received from BotFather between “/ bot” and “/ setWebhook”) instead of YOUR-TOKEN. Run the command from the directory where the certificates are stored.
$ curl -F "url=https://35.224.231.90:8443" -F "certificate=@url_cert.pem" https://api.telegram.org/botYOUR-TOKEN/setWebhook
If everything is correct, you will receive in the terminal a concise message from the Telegram that the webhook is installed.
Registering a webhook with the “correct” certificate
If you do not have a self-signed certificate, then you can install webhook with the following command directly from the browser.
https://api.telegram.org/botYOUR-TOKEN/setWebhook?url=https://YOUR.DOMAIN:8443/YOUR-TOKEN/
Please note that your token is indicated twice. In addition, it is important that YOUR.DOMAIN be specified as shown in the certificate. For example. I registered mydreem.com domain, the registrar issued me an ssl certificate for the domain www.mydreem.com. Instead of YOUR.DOMAIN you need to specify the last www.mydreem.com.
How to check if webhook is installed?
You can check if webhook is installed from the browser with the following command:
https://api.telegram.org/botYOUR-TOKEN/getWebhookInfo
This works for all cases. In response, you should get something like this in case the webhook is installed and the bot is running:
{"ok":true,"result":{"url":"https://35.224.231.90:8443/712308912:DLGSteczdUnPdnNYLzNikaGOhome7l9q3vova/","has_custom_certificate":true,"pending_update_count":0,"max_connections":40}}
Or like this, when webhook is installed, but the bot does not work (not running):
{"ok":true,"result":{"url":"https://35.224.231.90:8443/712308912:DLGSteczdUnPdnNYLzNikaGOhome7l9q3vova/","has_custom_certificate":true,"pending_update_count":2,"last_error_date":1564506964,"last_error_message":"Connection refused","max_connections":40}}
How to reset webhook?
Sometimes you may need to change the certificate of the bot, for example, in case of moving to another server (domain). Then the token remains, and the certificate changes (the webhook is reinstalled). Or there is a need to run the bot not on the webhook, but on the polling (if the webhook is installed, polling will not work). In both cases, a command that resets the webhook is useful:
https://api.telegram.org/botYOUR-TOKEN/setWebhook
Now everything is ready to upload the code to the server and launch the bot. If you are a master of the game on the command line with ten fingers, then it will not be difficult for you. And in a minute your bot will work. If not, the next section will help to somewhat ease the task of uploading / downloading files to your server and managing them.
Cloud Shell or “Drop Dead Beautiful”
As a person far from system administration, it’s hard for me to understand why, in the age of triumph of artificial intelligence, we still communicate with the command line servers as in the old days on the EU / SM - computer. Suppose that there are reasons unknown to mere mortals. Then a phenomenon like Cloud Shell in GCP must be accepted with great joy. This tool allows, albeit with crutches, but to somewhat facilitate the work of the uninitiated. Although it may do harm if you do not know some of the nuances.
Cloud Shell provides access to cloud resources from the command line directly from the browser. You can easy manage your projects and resources without installing the Google Cloud SDK or other tools in your system (the last two sentences are taken from their page, it’s “easily” crossed out by me). How to manage your projects from the command line can be found here . But the main thing for us is not this. Launch Cloud Shell (see the gif below, taken from google).
You are logged in to Cloud Shell. Now, if you click on the button in the form of a pencil, the “beta version text editor” will open.

In the “Help / About” menu, you can find out that it is “theia-editor-for-cloudshell-preview 0.0.1”. At the end of the article I will not delve into the features of working with this editor. I will highlight only key points. This is not only an editor for several languages (tested only with Python), but also a file manager. You can easily organize file sharing between Cloud Shell and your local computer. You can transfer files and directories within the Cloud Shell space with your mouse.
Please note that I haven’t written anywhere above that using the editor you can edit and manage files on your server (instance). But even this is enough to make our lives easier. And more about that below. And now I’ll tell you something important about Cloud Shell. This must be understood so as not to get into the mess, as it happened to me.
Cloud Shell is a Debian-based server with 5GB of disk space and 1.7GB of RAM. Some software is already preinstalled on it (including Python). Cloud Shell can easily be mistaken for your instance, install conda on it, create env and run the bot. And, if the bot is polling, then it will work. If on webhook, then it won’t work, because all ports on Cloud Shell are closed! And how many do not open ports on the instance, they will not appear on Cloud Shell.
Due to my youthful inexperience and carelessness, I fell into this trap and tried to understand for a long time why Telegram does not see my bot with a webhook. Then I was very upset. But the wife warmed, and the sons reassured, and this article appeared.
By the way, Cloud Shell exists outside of space and time (a joke close to the truth). If you delete all instances and all projects from your home, your Cloud Shell will continue to exist for another 120 days with everything that you have uploaded to it. Do not confuse this with backing up your servers.
So. Forewarned is forearmed. And now we can talk about amenities and get to know a couple of useful commands.
For example, if you want to use Cloud Shell as a terminal to access your server (for example, webhook-bot), then you need to activate your instance on the command line:
$ gcloud compute ssh webhook-bot --zone us-central1-a
After that, you find yourself on the command line of your server. You can return to Cloud Shell with the “exit” command. Suppose you want to copy some files from Cloud Shell to an instance. To do this, at the Cloud Shell command prompt (not an instance), type the following command:
$ gcloud compute scp --recurse ~/telebot/my_favorite_robot.py webhook-bot:~/telebot --zone us-central1-a
If you change the source with the destination, then copying from the instance to the Cloud Shell will occur. In the example below, we copy the file “ex1.py” from the directory “/ examples” of the server “webhook-bot” to the directory “/ telebot2” of the Cloud Shell:
$ gcloud compute scp --recurse webhook-bot:~/examples/ex1.py --zone us-central1-a ~/telebot2
These and other file sharing commands can be found here . You can exchange not only files, but also entire directories. As a result, we get the following scheme that makes our life easier. From the local computer, we copy files by clicking a couple of buttons on the mouse in Cloud Shell through the file manager editor “theia-editor-for-cloudshell-preview 0.0.1”. And then we forward this to our server (instance) command line. If we need to quickly edit something, we can do it in the same editor in Cloud Shell and upload files with the same command to the server. It turns out quite quickly.
I believe that there are more elegant and convenient in every way ways of exchanging and managing files for a cloud server on GCP (without installing additional programs on the local computer). Perhaps through Cloud Storage . Frankly, I spent only a few hours searching and experimenting on this issue. Therefore, I would be grateful if you share your ideas or working solutions in the comments.
So. We uploaded the files to the server (instance). And, if you have not yet launched the bot, then it's time to do this by going to the server terminal, activating the necessary virtual environment and typing a command like “python my_webhook_bot.py”. Everything should work. In order for the bot to continue to work when the terminal is closed, it needs to be launched in the background. For example, “nohup python my_webhook_bot.py &”. The quest how to bring the process out of the background and complete it, I leave to you, unless, of course, you already know.
Conclusion
I hope this article was useful to you, it helped to save time and avoid the mistakes that I made when writing a telegram bot with webhooks and placing it on the server. Everything that was described in the article, I went through myself, and at the time of writing, July-August 2019, it worked just like that. I want to express special gratitude to Mikhail Krutikov for joint surfing on the expanses of GCP services and for helping to realize a number of important truths. I am open to questions, discussions, and I will be grateful for the advice in the comments to this article. Or feel free to write to me in Telegram @Eduard_Lanchev .
Until the last moment, the question was open for me whether it is worth giving a link to my telegram bot. Friends convinced me that it costs. You can chat with my bot at @AelitaSoccerBot . The bot is at the very beginning of the journey, and much work remains to be done on it. Therefore, write if something is wrong, write if you want to share your experience or give advice. My gratitude will not have limits within reasonable limits.
And in the end, I would like to wish success to all the botvods and my colleagues, datacientists!
useful links
- Telegram Bot API
- Bot Code Examples
- python-telegram-bot
- pyTelegramBotAPI
- AIOGram
- ssl - TLS / SSL wrapper for socket objects
- Heroku
- Google cloud platform
- Google compute engine
- Marvin's Marvelous Guide to All Things Webhook
- Conda
- Virtualenv
- Cloud shell
- The gcloud compute command-line tool
- Transferring files using the gcloud command-line tool
- Google cloud storage
All Articles