Making a garland with a child
Level of difficulty: for beginners.
The idea arose when the old festoon broke down for the new year. The son looked at the RGB-LED strip and asked if it was possible to make a garland of it. You can - I said, and the son began to describe for a long time exactly how the garland should blink. I did not understand, and decided to make it so that he could do as he wants on his own. I began by analyzing my own wishes for the project:
- Graphic development environment such as Scratch
- offline work - the ability to work the device when the computer is off
- Work by air, without connecting wires
- Reliability - no loaded program should “hang” the device until it needs to be rebooted
Hardware platform
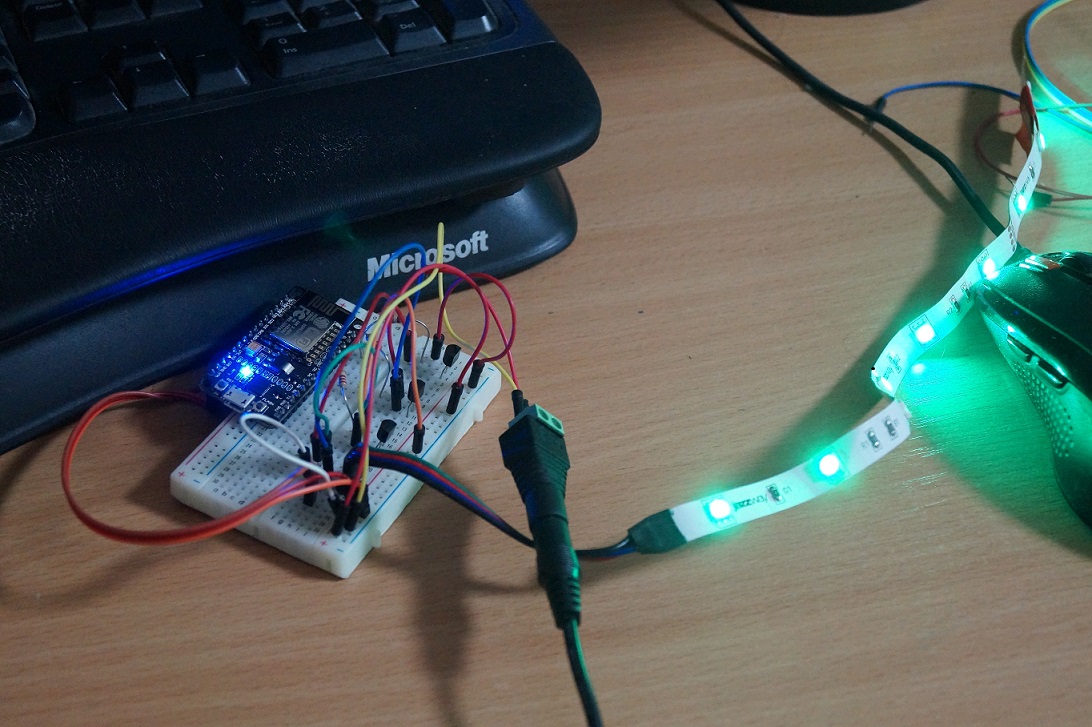
The basis was taken ESP8266 c NodeMCU ( like this ), it added a pair of transistors and resistors. The selected modules have a voltage regulator of 3-20 volts, which allows it to be powered from the same source as the tape. The esp outputs give a voltage of 3 volts with a current limit of 12mA, so I used ordinary bipolar transistors to control the tape.
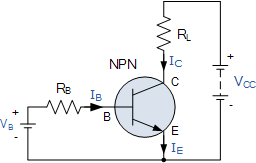
To prevent white smoke from the microcontroller, I put a 220 Ohm resistor between the output and the base. In esp software pwm, some pins have a special purpose, I selected experimentally.
Firmware
Before use, esp8266 needs to be flashed, I use NodeMCU with lua, although it has fewer features than Arduino with C ++. So, the easiest way is to start with the finished firmware from nodemcu-build.com . For our project, you will need to add the pwm module. After some time, the link to the image will drop to the mail. You need to take the one with the float.
You can flash it with any programmer from here , and I use NodeMCU Flasher.
NodeMCU has a file system, execution starts with the init.lua module, I use ESPlorer for loading.
Flashing diode
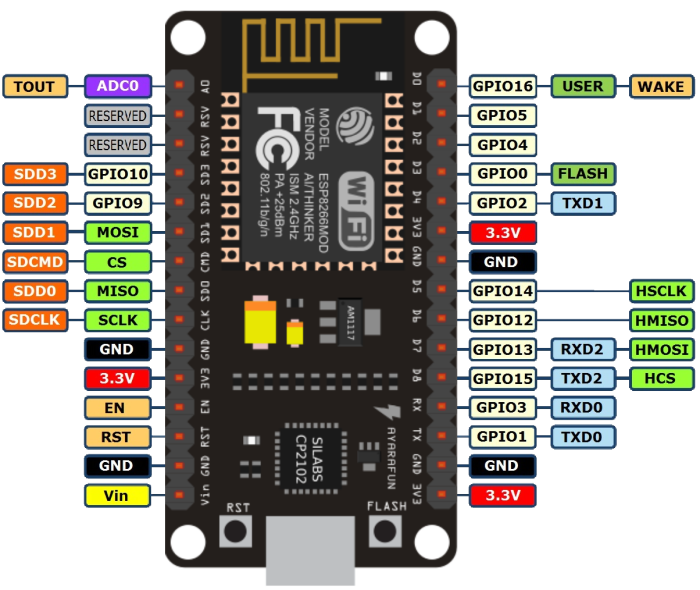
I was misled by the next moment. Internal numbering (GPIO0-16) is used only in native programs (Arduino / C ++). From lua we use notation from the board. For example, to use GPIO16 / D0 (built-in LED). from Lua, you need to write gpio.write (0, gpio.HIGH). You can flash the diode directly from the ESPlorer console.
Unlike Arduino, nodemcu cannot use delay and busy-loop, the console and wifi use the same processor to work. Also, a watchdog is built into the board, which will reset it if your code runs for more than 500ms. It is recommended not to occupy the processor for more than 2ms. There are node.task.post and tmr functions to solve the problem .
Choosing a development environment
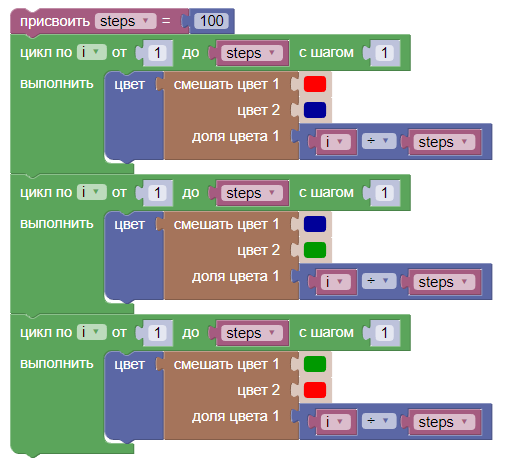
At first I wanted to use Scratch, but it didn’t suit me, as it doesn’t allow offline work - the program runs on the computer in the scratch environment, and all the boards work for it passively. Rummaging through the internet, I stumbled upon Google Blockly . This turned out to be exactly what you need: it supports code generation in lua, and creating your own blocks. After experiments, I decided to do my web-based project, chose nodejs as the server, and Blockly as the frontend. It was absolutely necessary to create 2 blocks - setting color and delay. Blockly has built-in functions for working with #ffffff colors, creating a function to set the color was not a problem.
Spoiler header
Blockly.Lua['set_color'] = function (block) { var parseColor = Blockly.Lua.provideFunction_( 'set_colour_rgb', ['function ' + Blockly.Lua.FUNCTION_NAME_PLACEHOLDER_ + '(s)', ' local rs,gs,bs = s.match(s, "#(..)(..)(..)");', ' setColor(tonumber(rs, 16),tonumber(gs, 16),tonumber(bs, 16));', 'end']); var value_color = Blockly.Lua.valueToCode(block, 'Color', Blockly.Lua.ORDER_ATOMIC); var code = `set_colour_rgb(${value_color})\n`; return code; };
Thus, 2 out of 3 requirements were closed.
Sleep () function
Then I had to specifically think about how to combine the reliable operation of OTA with the execution of user code. Luckily, lua has a coroutine library.
After deliberation and thoughtful reading of the documentation, I realized that all client code needed to run in coroutine, and use yield instead of sleep, so that the main module could set a timer.
Also, to protect the board from an infinite loop, I patched the code after the generator, inserting yield (0) at the beginning of each iteration of each loop
function MCUPostProcessLua(code) { return code.replace(/ do[ ]?\n/, ' do \ncoroutine.yield(0);\n'); }
OTA download
I decided to implement the simplest solution for the local network, the board connects to the home wifi, connects to the server at a fixed address, sends a unique identifier (in order to correctly handle re-connections), and waits for the program to be updated via this socket.
Result
github.com/farafonoff/BlocklyESP8266
You can add a lot, for example, some kind of authorization to work through public networks, a user-friendly tuner in hostap mode, improve the modularity of init.lua and support its OTA update (only the module with the loaded program is being updated).
All Articles