Understanding the genetic code of cryptocics
... and learn to work with the tools of Ethereum developers with a real example.
I have just finished my lectures on the full-stack course of developing decentralized Ethereum applications on Solidity in Chinese. I gave it in my free time to raise the level of knowledge about the blockchain and smart contracts among the Chinese developer community. During the work I made friends with a couple of students.
And just at the end of the course, we suddenly found ourselves surrounded by such creatures:

Image from cryptokitties.co
Like most people faced with this phenomenon, we also could not resist this cute crypto-creation and quickly became addicted to the game. We liked to display new cats and we even replaced the duckling method with the cryptoshack method. I think that dependence on games is bad, but not in this case, because the fascination with breeding kittens quickly led us to the question:
We decided to devote Saturday night to finding the answer to it, and we think we managed to make some progress in developing software that allows us to determine the genetic mutation of newborns cryptocause before they are born. In other words, this program can help you check and determine the appropriate time of fertilization of the cat-mother, and thereby obtain the most interesting of the possible mutations.
We publish this material in the hope that it will serve everyone as an introductory article to get acquainted with very useful development tools on Ethereum, just as the cryptototes themselves allowed many people unfamiliar with the blockchain to join the ranks of cryptocurrency users.
To begin with, we asked ourselves a question: how does a cryptococcal birth occur?
To answer this question, we used the excellent blocking-conductor of Etherscan, which allows us to do much more than “study the parameters and contents of the blocks”. So we found the source code of the CryptoKittiesCore contract:
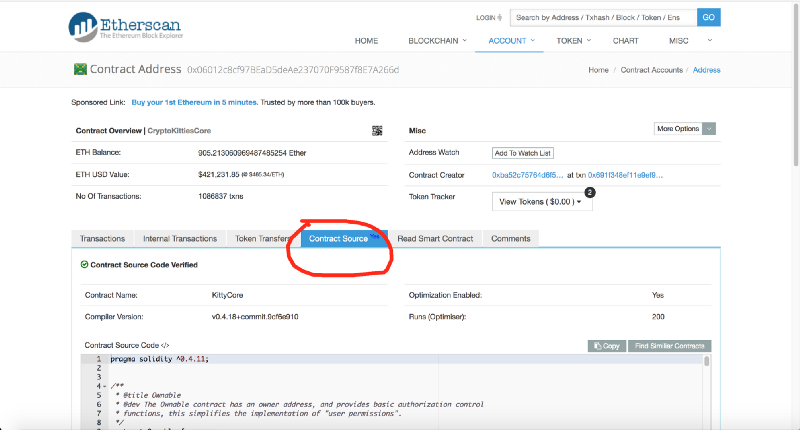
https://etherscan.io/address/0x06012c8cf97bead5deae237070f9587f8e7a266d#code
Please note that the expanded contract is actually somewhat different from the one used in the bounty program. According to this code, the baby kitten is formed in two steps: 1) the mother cat is fertilized by the cat; 2) a little later, when the period of ripening of the fruit comes to an end, the giveBirth function is called. This function is usually caused by a certain demon process, but, as you will see later, in order to get interesting mutations, you will need to correctly select the block in which your kitten was born.
In the code above, you can clearly see that the genes of a newborn kitten are determined right at the moment of birth, by calling the mixGenes function from the geneScience external smart contract. This function takes three parameters: the mother's gene, the father's gene, and the block number in which the cat will be ready to give birth.
You probably have a logical question, why are genes not determined at the moment of conception, as it happens in the real world? As you will see in the course of further narration, this allows you to gracefully defend yourself against attempts to predict and decipher genes. This approach eliminates the possibility of 100% accurate prediction of kitten's genes before the fact of pregnancy of the mother cat is recorded in the blockchain. And even if you could find out the exact code responsible for mixing genes, it would not give you any advantage.
Anyway, at the beginning we didn’t know it yet, so let's continue. Now we need to know the address of the geneScience contract. To do this, use MyEtherWallet:

Contract address geneScience
This is the contract bytecode:
By its appearance one cannot say that as a result something appears so cute as a kitten, but we are very lucky that this is a public address and we don’t need to look for it in the repository). In fact, we believe that it should not be made so easily accessible. If the developers really wanted to make sure that the address of the contract was correct, they should use the checkScienceAddress function, but we will not be annoying.
So, what do we want to achieve in the end? It should be understood that we do not set ourselves the goal of 100% compile bytecode, turning it into a human-readable solidity-code. We need a cheap (without having to pay for transactions in the combat blockchain) method of identifying kitten genes, provided that we know who his parents are. That's what we do.
First, let's use the Etherscan opcode tool for quick analysis. It looks like this:
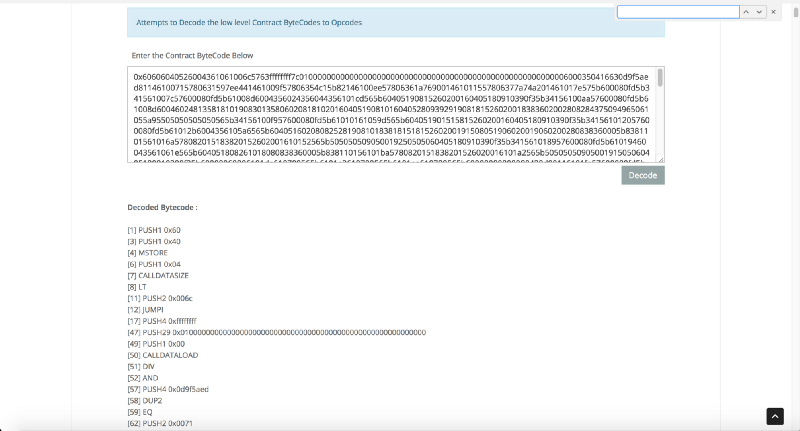
Much clearer
We follow the golden rule of decoding the assembler code: let's start with a simple and bold hypothesis about the program's behavior and, instead of trying to understand its work as a whole, we will focus on confirming the assumption. Let's run through the bytecode to answer some questions:
Having received the answer to these questions, we put forward and intend to test a simple hypothesis: the result of mixGene is determined by three and only three input parameters of this function. If this is so, then we could simply contract this contract locally, continue to call this function with the parameters we are interested in, and then perhaps we could get a set of kitten genes even before the mother-cat fertilization.
To test this assumption, we call the mixGene function in the main network with three random parameters: 1111115, 80, 40 and get some result X. Next, deploy this bytecode using truffle and testrpc . So our laziness led to a somewhat unconventional way of applying truffle.
We start with the skeleton of the contract, put it in the folder structure of the truffle framework and perform the truffle compile. However, instead of directly migrating this empty contract to testrpc, we replace the contract bytecode in the build folder with real deployed bytecode and runtime bytecode of the geneScience contract. This is not a typical, but fast way if you want to deploy a contract with bytecode alone and some limited open interface for local testing. After that, we directly call Mixgenes with parameters 1111115, 80, 40, and to our regret we get in response to an error with the answer revert. Well, look deeper. As we know, the signature of the mixGene functions is 0x0d9f5aed, so we take a pen and paper and monitor the execution of the bytecode starting from the entry point of this function to take into account changes in the stack and storage. After a few JUMPs, we find ourselves here:
Judging by the contents of these lines, if the current block number is less than the third parameter, revert () is called. Well, this is quite a reasonable behavior: calling a real function in the game with an indication of the block number from the future is impossible and that’s logical.
It is easy to get around this input check: we just mine some blocks on testrpc and call the function again. This time, the function successfully returns the value Y.
But unfortunately, X! = Y
It's a pity. This means that the result of the function depends not only on the input parameters, but also on the state of the blockchain of the main network, which, of course, differs from the state of the unreal blockchain testrpc.
Okay. So it's time to roll up your sleeves. Paper is no longer suitable for tracking stack status. So for more serious work we will launch a very useful EVM disassembler called evmdis .
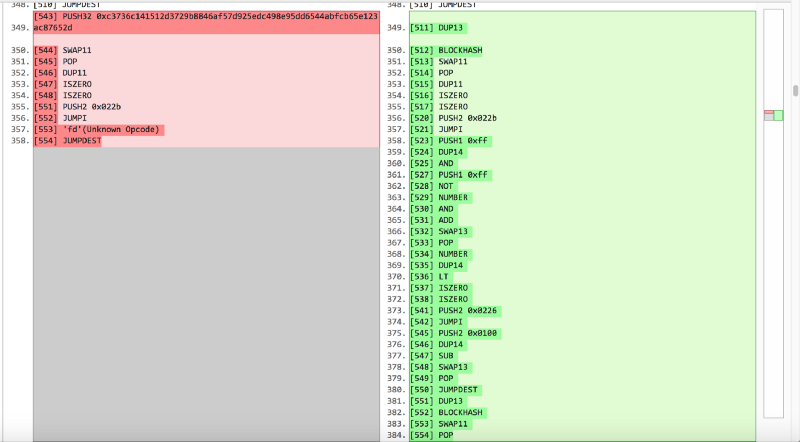
Compared to paper and pen, this is a significant step forward. We continue with what stopped in the last chapter. Further we give an encouraging conclusion with evmdis:
What evmdis really good is its usefulness for analyzing JUMPDEST into the right labels, which cannot be overestimated.
So, after we pass the initial require, we find ourselves on label 23. See DUP13 and, recalling from the previous chapter, that the number 13 on the stack is our third parameter. So we are trying to get the BLOCKHASH of our third parameter. However, BLOCKHASH is limited to 256 blocks. That is why it is followed by JUMPI (this is an if-construct). If we translate the logic of opcodes into pseudocode, we get something like this:
PaParam and bhash - another code related to thirdParam and block hash
Now we believe that we have found the reason why our results differ from those that we observe in the main network. More importantly, we, apparently, managed to find the source of chance. Namely: the hash block is calculated based on the third parameter, or the forecast of the third parameter. It is important to note that the third parameter in the stack is also replaced with this predicted block number.
Obviously, during local execution outside the main network, we do not have a simple option to impose the return of BLOCKHASH, which coincides with the values of the main network. However, since we know all three parameters, we can easily monitor the main network and get the hash of the H block for the third parameter, as well as the hash of the predicted block.
Then we can insert this hash directly into the byte code in our local test environment, and, if everything goes according to plan, we finally get the correct set of genes.
But there is one catch: DUP13 and BLOCKHASH are only 2 bytes in the code, and if we just replace them with 33 byte PUSH32 0x * hash *, the program counter will completely change and we will have to fix every JUMP and JUMPI. Or we have to do JUMP at the end of the code and replace the instructions of the expanded code and so on.
Well, since we have already gone so far, we will hunt some more. Since we are pushing a 32-byte non-zero hash into the if-branch, the condition will always hold true and therefore, everything that is written in the else part can simply be thrown out to make room for our 32-byte hash. Well, in general, so we did:
The key point is that since we abandoned the else-part of the condition, we need to replace the third input parameter of the mixGene function with the forecast of the third parameter before calling it.
This means that if you are trying to get the result of the operation
mixGene (X, Y, Z), where currentBlockNumber is Z <256, you only need to replace the PUSH32 hash with the Z block hash.
However, if you intend to do the following
mixGene (X, Y, Z), where currentBlockNumber is Z ≥ 256, you will need to replace the PUSH32 hash with the hash of the proj_Z block, where proj_Z is defined as follows:
Note that proj_Z will remain unchanged in a certain range of blocks. For example, if Z & 0xff = 128, then proj_Z changes only on each zero and 128th blocks.
To confirm this hypothesis and test whether there are any other pitfalls ahead of us, we changed the bytecode and used another cool utility called hevm .
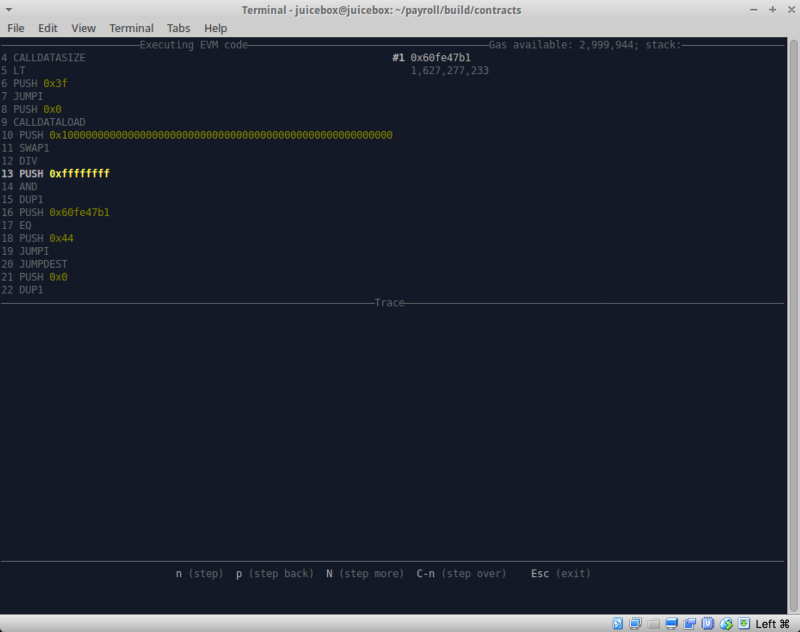
If you have not used hevm yet, I recommend trying it. The tool is available along with its own framework, but most of all in its collection one should note such an irreplaceably useful thing as an interactive debugger of the stack.
The above are launch options. The utility allows you to specify a variety of parameters. Among them is - debug, which gives you the opportunity to debag interactively.
So, here we made several calls to the geneScience contract that was deployed on the blockchain network and recorded the results. Then we used hevm to run our broken bytecode with data prepared taking into account the rules described above and ...
The results matched!
So what have we managed to achieve?
Using our hack software, you can predict a 256-bit newborn kitten's gene with a 100% chance if it is born in a range of blocks [coolDownEndBlock (when the baby is ready to appear), the current block is + 256 (approximately)]. You can talk about this as follows: when a baby is in the womb of a cat mother, its genes mutate over time, because of the entropy source in the form of a hash of the predicted coolDownEndBlock block, which also changes over time. Therefore, you can use this program to check how the baby's gene would look like if it were born right now. And if you don’t like this gene, you can wait about 256 more blocks (on average), and check the new gene.
Someone may say that this is not enough, since only 100% prediction accuracy can be considered an ideal burglary even before a mother cat is pregnant. However, this is not possible, since the kitten's gene is determined not only by the genes of its parents, but also by the predicted block hash as a mutation factor, which cannot simply be known before fertilization.
What can be improved and what are the nuances?
We quickly went over the changes that occur in the stack in the real logical part of the smart contract (label 25 and everything after it) and we believe that this predictable part of the mixGene code is completely subject to parsing and studying. We hope that the block hash as a mutation factor also carries some physical value, helping, for example, to determine which gene should be mutated. If we manage to figure it out, we get the original gene, without mutations. This is useful because if you do not have a good initial gene, even the best mutation may not be enough.
We also did not measure the correlation between the 256-bit gene and the kitten signs (eye color, tail type, etc.), but we believe that this is quite possible with the help of a high-performance bot and a simple classifier.
And in general, we are quite aware of the intention of the CryptoKitties development team to stabilize the mutation over a short time period. But the reverse side of this approach is the ability to make an analysis similar to what we have done.
We would also like to thank the wonderful ethereum community for developing tools like Etherscan, hevm, evmdis, truffle, testrpc, myetherwallet and Solidity. This is a very cool community and we are happy to be part of it.
And finally, the modified code https://github.com/modong/GeneScienceCracked/
Remember to change $ CONSTBLOCKHASH $ to the predicted block hash.

Part zero: the object came into view
I have just finished my lectures on the full-stack course of developing decentralized Ethereum applications on Solidity in Chinese. I gave it in my free time to raise the level of knowledge about the blockchain and smart contracts among the Chinese developer community. During the work I made friends with a couple of students.
And just at the end of the course, we suddenly found ourselves surrounded by such creatures:
Image from cryptokitties.co
Like most people faced with this phenomenon, we also could not resist this cute crypto-creation and quickly became addicted to the game. We liked to display new cats and we even replaced the duckling method with the cryptoshack method. I think that dependence on games is bad, but not in this case, because the fascination with breeding kittens quickly led us to the question:
How do certain cryptoclubs get their own set of genes?
We decided to devote Saturday night to finding the answer to it, and we think we managed to make some progress in developing software that allows us to determine the genetic mutation of newborns cryptocause before they are born. In other words, this program can help you check and determine the appropriate time of fertilization of the cat-mother, and thereby obtain the most interesting of the possible mutations.
We publish this material in the hope that it will serve everyone as an introductory article to get acquainted with very useful development tools on Ethereum, just as the cryptototes themselves allowed many people unfamiliar with the blockchain to join the ranks of cryptocurrency users.
Part one: high-level logic for generating small kittens
To begin with, we asked ourselves a question: how does a cryptococcal birth occur?
To answer this question, we used the excellent blocking-conductor of Etherscan, which allows us to do much more than “study the parameters and contents of the blocks”. So we found the source code of the CryptoKittiesCore contract:
https://etherscan.io/address/0x06012c8cf97bead5deae237070f9587f8e7a266d#code
Please note that the expanded contract is actually somewhat different from the one used in the bounty program. According to this code, the baby kitten is formed in two steps: 1) the mother cat is fertilized by the cat; 2) a little later, when the period of ripening of the fruit comes to an end, the giveBirth function is called. This function is usually caused by a certain demon process, but, as you will see later, in order to get interesting mutations, you will need to correctly select the block in which your kitten was born.
function giveBirth(uint256 _matronId) external whenNotPaused returns(uint256) { Kitty storage matron = kitties[_matronId]; // , - . require(matron.birthTime != 0); // , ! require(_isReadyToGiveBirth(matron)); // -. uint256 sireId = matron.siringWithId; Kitty storage sire = kitties[sireId]; // , uint16 parentGen = matron.generation; if (sire.generation > matron.generation) { parentGen = sire.generation; } // . uint256 childGenes = geneScience.mixGenes(matron.genes, sire.genes, matron.cooldownEndBlock - 1);
In the code above, you can clearly see that the genes of a newborn kitten are determined right at the moment of birth, by calling the mixGenes function from the geneScience external smart contract. This function takes three parameters: the mother's gene, the father's gene, and the block number in which the cat will be ready to give birth.
You probably have a logical question, why are genes not determined at the moment of conception, as it happens in the real world? As you will see in the course of further narration, this allows you to gracefully defend yourself against attempts to predict and decipher genes. This approach eliminates the possibility of 100% accurate prediction of kitten's genes before the fact of pregnancy of the mother cat is recorded in the blockchain. And even if you could find out the exact code responsible for mixing genes, it would not give you any advantage.
Anyway, at the beginning we didn’t know it yet, so let's continue. Now we need to know the address of the geneScience contract. To do this, use MyEtherWallet:
Contract address geneScience
This is the contract bytecode:
0x60606040526004361061006c5763ffffffff7c01000000000000000000000000000000000000000000000000000000006000350416630d9f5aed81146100715780631597ee441461009f57806354c15b82146100ee57806361a769001461011557806377a74a201461017e575b600080fd5b341561007c57600080fd5b61008d6004356024356044356101cd565b604051908152602001604051809........
By its appearance one cannot say that as a result something appears so cute as a kitten, but we are very lucky that this is a public address and we don’t need to look for it in the repository). In fact, we believe that it should not be made so easily accessible. If the developers really wanted to make sure that the address of the contract was correct, they should use the checkScienceAddress function, but we will not be annoying.
Part two: the collapse of the simple hypothesis
So, what do we want to achieve in the end? It should be understood that we do not set ourselves the goal of 100% compile bytecode, turning it into a human-readable solidity-code. We need a cheap (without having to pay for transactions in the combat blockchain) method of identifying kitten genes, provided that we know who his parents are. That's what we do.
First, let's use the Etherscan opcode tool for quick analysis. It looks like this:
Much clearer
We follow the golden rule of decoding the assembler code: let's start with a simple and bold hypothesis about the program's behavior and, instead of trying to understand its work as a whole, we will focus on confirming the assumption. Let's run through the bytecode to answer some questions:
- Does it use timestamps? No, because the TIMESTAMP opcode is missing. If there is any simple coincidence in it, then its source is definitely another opcode.
- Is the block hash used? Yes, BLOCKHASH occurs twice. Therefore, an accident, if any, may arise from their opcodes, but we are not sure about that yet.
- Are any hashes used at all? Yes, there is SHA3. It is not clear, however, what he does.
- Is msg.sender used? No, because the CALLER opcode is missing. Therefore, no access control is applied to the contract.
- Is any external contract used? No, there is no CALL opcode.
- Is COINBASE used? No, and so we exclude another possible source of chance.
Having received the answer to these questions, we put forward and intend to test a simple hypothesis: the result of mixGene is determined by three and only three input parameters of this function. If this is so, then we could simply contract this contract locally, continue to call this function with the parameters we are interested in, and then perhaps we could get a set of kitten genes even before the mother-cat fertilization.
To test this assumption, we call the mixGene function in the main network with three random parameters: 1111115, 80, 40 and get some result X. Next, deploy this bytecode using truffle and testrpc . So our laziness led to a somewhat unconventional way of applying truffle.
contract GeneScienceSkeleton { function mixGenes(uint256 genes1, uint256 genes2, uint256 targetBlock) public returns (uint256) {} }
We start with the skeleton of the contract, put it in the folder structure of the truffle framework and perform the truffle compile. However, instead of directly migrating this empty contract to testrpc, we replace the contract bytecode in the build folder with real deployed bytecode and runtime bytecode of the geneScience contract. This is not a typical, but fast way if you want to deploy a contract with bytecode alone and some limited open interface for local testing. After that, we directly call Mixgenes with parameters 1111115, 80, 40, and to our regret we get in response to an error with the answer revert. Well, look deeper. As we know, the signature of the mixGene functions is 0x0d9f5aed, so we take a pen and paper and monitor the execution of the bytecode starting from the entry point of this function to take into account changes in the stack and storage. After a few JUMPs, we find ourselves here:
[497] DUP1 [498] NUMBER [499] DUP14 [500] SWAP1 [501] GT [504] PUSH2 0x01fe [505] JUMPI [507] PUSH1 0x00 [508] DUP1 [509] 'fd'(Unknown Opcode)
Judging by the contents of these lines, if the current block number is less than the third parameter, revert () is called. Well, this is quite a reasonable behavior: calling a real function in the game with an indication of the block number from the future is impossible and that’s logical.
It is easy to get around this input check: we just mine some blocks on testrpc and call the function again. This time, the function successfully returns the value Y.
But unfortunately, X! = Y
It's a pity. This means that the result of the function depends not only on the input parameters, but also on the state of the blockchain of the main network, which, of course, differs from the state of the unreal blockchain testrpc.
Part Three: we roll up our sleeves and delve into the stack
Okay. So it's time to roll up your sleeves. Paper is no longer suitable for tracking stack status. So for more serious work we will launch a very useful EVM disassembler called evmdis .
Compared to paper and pen, this is a significant step forward. We continue with what stopped in the last chapter. Further we give an encouraging conclusion with evmdis:
............. :label22 # Stack: [@0x70E @0x70E @0x70E 0x0 0x0 0x0 @0x88 @0x85 @0x82 :label3 @0x34] 0x1EB PUSH(0x0) 0x1ED DUP1 0x1EE DUP1 0x1EF DUP1 0x1F0 DUP1 0x1F1 DUP1 0x1F3 DUP13 0x1F9 JUMPI(:label23, NUMBER() > POP()) # Stack: [0x0 0x0 0x0 0x0 0x0 0x0 @0x70E @0x70E @0x70E 0x0 0x0 0x0 @0x88 @0x85 @0x82 :label3 @0x34] 0x1FA PUSH(0x0) 0x1FC DUP1 0x1FD REVERT() :label23 # Stack: [0x0 0x0 0x0 0x0 0x0 0x0 @0x70E @0x70E @0x70E 0x0 0x0 0x0 @0x88 @0x85 @0x82 :label3 @0x34] 0x1FF DUP13 0x200 PUSH(BLOCKHASH(POP())) 0x201 SWAP11 0x202 POP() 0x203 DUP11 0x209 JUMPI(:label25, !!POP()) # Stack: [0x0 0x0 0x0 0x0 0x0 0x0 @0x70E @0x70E @0x70E 0x0 @0x200 0x0 @0x88 @0x85 @0x82 :label3 @0x34] 0x20C DUP13 0x213 PUSH((NUMBER() & ~0xFF) + (POP() & 0xFF)) 0x214 SWAP13 0x215 POP() 0x217 DUP13 0x21E JUMPI(:label24, !!(POP() < NUMBER())) # Stack: [0x0 0x0 0x0 0x0 0x0 0x0 @0x70E @0x70E @0x70E 0x0 @0x200 0x0 @0x213 @0x85 @0x82 :label3 @0x34] 0x222 DUP13 0x223 PUSH(POP() - 0x100) 0x224 SWAP13 0x225 POP() :label24 # Stack: [0x0 0x0 0x0 0x0 0x0 0x0 @0x70E @0x70E @0x70E 0x0 @0x200 0x0 [@0x223 | @0x213] @0x85 @0x82 :label3 @0x34] 0x227 DUP13 0x228 PUSH(BLOCKHASH(POP())) 0x229 SWAP11 0x22A POP() :label25 # Stack: [0x0 0x0 0x0 0x0 0x0 0x0 @0x70E @0x70E @0x70E 0x0 [@0x200 | @0x228] 0x0 [@0x88 | @0x223 | @0x213] @0x85 @0x82 :label3 @0x34] 0x22C DUP11 0x22D DUP16 0x22E DUP16 ...........
What evmdis really good is its usefulness for analyzing JUMPDEST into the right labels, which cannot be overestimated.
So, after we pass the initial require, we find ourselves on label 23. See DUP13 and, recalling from the previous chapter, that the number 13 on the stack is our third parameter. So we are trying to get the BLOCKHASH of our third parameter. However, BLOCKHASH is limited to 256 blocks. That is why it is followed by JUMPI (this is an if-construct). If we translate the logic of opcodes into pseudocode, we get something like this:
func blockhash(p) { if (currentBlockNumber - p < 256) return hash(p); return 0; } var bhash = blockhash(thrid); if (bhash == 0) { thirdProjection = (currentBlockNumber & ~0xff) + (thridParam & 0xff); if (thirdProjection > currentBlockNumber) { thirdProjection -= 256; } thirdParam = thirdProjection; bhash = blockhash(thirdProjection); } label 25 and beyond ..... some more stuff related to thirdParam and bhash
PaParam and bhash - another code related to thirdParam and block hash
Now we believe that we have found the reason why our results differ from those that we observe in the main network. More importantly, we, apparently, managed to find the source of chance. Namely: the hash block is calculated based on the third parameter, or the forecast of the third parameter. It is important to note that the third parameter in the stack is also replaced with this predicted block number.
Obviously, during local execution outside the main network, we do not have a simple option to impose the return of BLOCKHASH, which coincides with the values of the main network. However, since we know all three parameters, we can easily monitor the main network and get the hash of the H block for the third parameter, as well as the hash of the predicted block.
Then we can insert this hash directly into the byte code in our local test environment, and, if everything goes according to plan, we finally get the correct set of genes.
But there is one catch: DUP13 and BLOCKHASH are only 2 bytes in the code, and if we just replace them with 33 byte PUSH32 0x * hash *, the program counter will completely change and we will have to fix every JUMP and JUMPI. Or we have to do JUMP at the end of the code and replace the instructions of the expanded code and so on.
Well, since we have already gone so far, we will hunt some more. Since we are pushing a 32-byte non-zero hash into the if-branch, the condition will always hold true and therefore, everything that is written in the else part can simply be thrown out to make room for our 32-byte hash. Well, in general, so we did:
The key point is that since we abandoned the else-part of the condition, we need to replace the third input parameter of the mixGene function with the forecast of the third parameter before calling it.
This means that if you are trying to get the result of the operation
mixGene (X, Y, Z), where currentBlockNumber is Z <256, you only need to replace the PUSH32 hash with the Z block hash.
However, if you intend to do the following
mixGene (X, Y, Z), where currentBlockNumber is Z ≥ 256, you will need to replace the PUSH32 hash with the hash of the proj_Z block, where proj_Z is defined as follows:
proj_Z = (currentBlockNumber & ~0xff) + (Z & 0xff); if (proj_Z > currentBlockNumber) { proj_Z -= 256; } <b> Z proj_Z , mixGene(X, Y, proj_Z).</b>
Note that proj_Z will remain unchanged in a certain range of blocks. For example, if Z & 0xff = 128, then proj_Z changes only on each zero and 128th blocks.
To confirm this hypothesis and test whether there are any other pitfalls ahead of us, we changed the bytecode and used another cool utility called hevm .
If you have not used hevm yet, I recommend trying it. The tool is available along with its own framework, but most of all in its collection one should note such an irreplaceably useful thing as an interactive debugger of the stack.
Usage: hevm exec --code TEXT [--calldata TEXT] [--address ADDR] [--caller ADDR] [--origin ADDR] [--coinbase ADDR] [--value W256] [--gas W256] [--number W256] [--timestamp W256] [--gaslimit W256] [--gasprice W256] [--difficulty W256] [--debug] [--state STRING] Available options: -h,--help
The above are launch options. The utility allows you to specify a variety of parameters. Among them is - debug, which gives you the opportunity to debag interactively.
So, here we made several calls to the geneScience contract that was deployed on the blockchain network and recorded the results. Then we used hevm to run our broken bytecode with data prepared taking into account the rules described above and ...
The results matched!
Chapter last: conclusion and continuation of work (?)
So what have we managed to achieve?
Using our hack software, you can predict a 256-bit newborn kitten's gene with a 100% chance if it is born in a range of blocks [coolDownEndBlock (when the baby is ready to appear), the current block is + 256 (approximately)]. You can talk about this as follows: when a baby is in the womb of a cat mother, its genes mutate over time, because of the entropy source in the form of a hash of the predicted coolDownEndBlock block, which also changes over time. Therefore, you can use this program to check how the baby's gene would look like if it were born right now. And if you don’t like this gene, you can wait about 256 more blocks (on average), and check the new gene.
Someone may say that this is not enough, since only 100% prediction accuracy can be considered an ideal burglary even before a mother cat is pregnant. However, this is not possible, since the kitten's gene is determined not only by the genes of its parents, but also by the predicted block hash as a mutation factor, which cannot simply be known before fertilization.
What can be improved and what are the nuances?
We quickly went over the changes that occur in the stack in the real logical part of the smart contract (label 25 and everything after it) and we believe that this predictable part of the mixGene code is completely subject to parsing and studying. We hope that the block hash as a mutation factor also carries some physical value, helping, for example, to determine which gene should be mutated. If we manage to figure it out, we get the original gene, without mutations. This is useful because if you do not have a good initial gene, even the best mutation may not be enough.
We also did not measure the correlation between the 256-bit gene and the kitten signs (eye color, tail type, etc.), but we believe that this is quite possible with the help of a high-performance bot and a simple classifier.
And in general, we are quite aware of the intention of the CryptoKitties development team to stabilize the mutation over a short time period. But the reverse side of this approach is the ability to make an analysis similar to what we have done.
We would also like to thank the wonderful ethereum community for developing tools like Etherscan, hevm, evmdis, truffle, testrpc, myetherwallet and Solidity. This is a very cool community and we are happy to be part of it.
And finally, the modified code https://github.com/modong/GeneScienceCracked/
Remember to change $ CONSTBLOCKHASH $ to the predicted block hash.
All Articles