Programming and data transmission in the "Arduino" on the "air" using the ESP8266. Part Three Hello, "ANDROID"
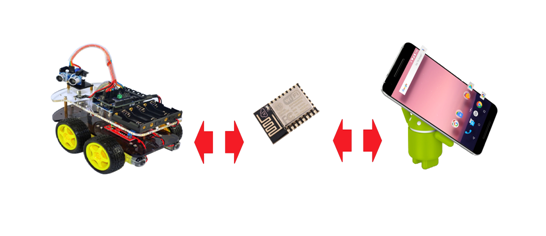
I offer you, dear GeekTimes readers, another article from the cycle on using the ESP8266 chip as a wireless bridge for AVR microcontrollers, using the example of the Arduino Uno (Nano) hardware platform. This time, for the flight to the Moon , we will use the ANDROID device instead of a computer to control the platform. Well, for example, a smartphone.
Details under the cut:
For our work, we will use the toolkit that was described in the previous article — the BABUINO wireless programmer and the MPDE (module for program and data exchange) code and data transfer module firmware in ESP8266.
As it turned out from the responses of users, the programmer himself, in general, came to the court and some personalities even use it successfully. Well, in principle, the thing is really comfortable; I started the application under Windows, selected a hex file from the desired folder and everything - after a few seconds the program in the desired device without any wires. Another thing is that I was in vain with excessive fervor attacking users of ARDUINO software, writing in Wiring C and using ARDUINO IDE with its sketches and libraries. Of course, everyone does as he is comfortable - whether in Arduin Wiring C or C in AVR studio. But in the end, for some reason, some users immediately decided that the programmer was in no way compatible with ARDUINO software.
In fact, there are no compatibility problems, of course. Absolutely also compile your sketch where it is convenient for you to the state of a hex file and absolutely also just send it via a wireless programmer to your Arduino UNO or NANO.
Data exchange under the software ARDUINO also does not cause any problems. Write magic lines:
Serial.begin (9600);
and then something like:
receiveByte = Serial.read (); // read byte from buffer
or:
Serial.write (receiveByte); // write byte
And you can exchange byte streams via WI-FI absolutely calmly. For the AVR microcontroller sends to ESP8266 and receives bytes from there via the UART serial port, any humanities can adjust the work with which in the Arduino, as we see.
Now let's get back to the subject of this article. In order to control the trolley using a smartphone, it is certainly necessary to write a corresponding application for this smartphone.
As a person who, a month ago, represented this process is extremely vague, I can now state with full responsibility that this is not really a difficult matter. Unless of course, you have at least some basic knowledge of Java.
For when writing Android applications, source code is written in Java, and then compiled into standard Java bytecode using traditional Java tools. Then other interesting things happen to the code, but we don’t need these details here.
It seems like there are still opportunities for writing C applications for notorious hardcore players leading a nanosecond account, and there is also some kind of package for broadcasting your code from Python, but here I can’t tell you anything, since I made the right choice .
So, Java and the Android Studio software package are an integrated development environment (IDE) for working with the Android platform based on InteBillia IDEA software from JetBrains, the official Android application development tool.
If you are already working with software from IntelliJ IDEA, then you will be pleasantly surprised by the familiar interface.
I got acquainted with the basics of building applications based on the book by B. Phillips and K. Stewart - “ANDROID” programming for professionals ". As I understand it, the authors consider readers as professionals to be at least a little familiar with Java SE. I did not find it, but for our purposes, the first ten chapters of the book are enough, the good thing is that in it all the code examples are provided when working with the aforementioned Android Studio.
Debugging of applications can be carried out both on the software emulator and directly on the smartphone, switching it to the “developer mode”.
In the previous article, the trolley control through a window application on Windows was described. That is, all the code for creating HTTP and UDP connections, as well as the control logic, we already have in theory. Therefore, adopting the Oracle slogan “Written in one place, works everywhere”, we will simply transfer these classes to a new program already for Android applications. But the GUI - a graphical user interface, for obvious reasons, will have to leave where it was. But on the other hand, on Android everything is done very similarly and rather quickly, so we will not stay in the loser.
We poke the finger in the screen

So, we create a new project “FourWheelRobotControl” in Android Studio.
This is a simple application and it will consist of activity.
and layout:
It is not necessary to write it with pens, it is automatically generated after your creations in the editor.
Now let's just transfer two classes from the program given in the previous article:
The essence of the program remains the same. MainActivity first starts HTTP and UDP clients, and then catches pressing and unlocking the on-screen buttons, sending the code pressing direction to form a UDP packet. And from there everything is - “forward”, “backward”, “leftward”, “rightward”, and when the “stop” is released, they leave via WI-FI by cart.
In addition to all this, we need to slightly edit the file of the so-called manifest, which again, mostly generated by itself.
It is true there is very little work for us.
prohibit screen rotation:
we allow work in the Internet:
And here it is all completely.
When starting up, we should see something like:
That is essentially all. Now the cart can be controlled from a mobile phone. The application is extremely simple, for the demo, without any “whistles and fakes”, such as finding a cart in the home network, connection, disconnection and other useful features that make life easier, but difficult to understand the code.
On the other hand, control with on-screen buttons is the same
Much more interesting, for example, to steer a cart with the help of standard accelerometers of the same smartphone.
Moreover, this feature is also implemented very simply, through the so-called intents. True, creating your intents is more difficult than using ready-made ones. Fortunately, no one forbids using ready-made ones.
ACCELEROMETER IN MASS
Therefore, our code in the MainActivity (and only in it) will change minimally.
Add variables for the accelerometer:
We will receive the sensor itself from the system and register it as a listener.
We implement the listener interface itself:
And we will write down four obligatory methods from which we will use only the last. The method works out when you change the readings of the accelerometer. Actually, I wanted to interrogate the accelerometer itself, like a normal periphery with a period of about 100 ms, since it was suspected (because of the name onChanged) that the method works out too often. But there everything is private and you will go through the FIGs for the interfaces.
The program displays the sensor readings in two axes on the smartphone screen. Instead of the third axis, which is not used, the variable direction "direction" is displayed. And the same data runs in the form of a byte stream on the cart. However, due to the fact that the stream is purely byte, to determine where the command "forward" or "stop" would be difficult. Therefore, I acted simply: each direction and angle of inclination has its own range of numbers. Roughly speaking, 1-20 is “forward” at an appropriate speed, 21-40 is “backward” and so on. Of course, it would be possible to transmit pure data via UDP, and the control commands themselves should be set via the TCP protocol and this would be absolutely correct. But for this you need to edit the program on the ESP8266 itself, which I do not want to do so far.
So, the cart rolls around the apartment, sensitively reacting to the tilts of my GalaxyS7, but even this, as the well-known Venia used to say, was not yet the same.
In our century, Siri and Alex, something there to turn his hands? Let him listen to voice control!
AND NOW LISTEN TO ME!

I quote:
Actually, everything turned out pretty clumsy for me, but most likely because I used the simplest option and didn’t dig into this API. Everything is also done through intents, with the help of which we appeal to the Google voice engine, namely to its speech recognition function. Therefore, you need a working Internet.
Again, only MainActivity.java changes, although I changed the layout a little more (the four buttons are now completely useless, one is enough).
The following has been added to MainActivity.java:
The same intent:
And what it returns:
And it returns an array of similar words, and in a rather “garbage form”, with all sorts of brackets and commas. And you just have to choose a word similar to the one you said. Well and, accordingly, if the word "forward" came across, then we go forward, if "to the right", then to the right, and so on. Of course, one must take into account where through “E”, where the extra comma clings (I cut off the brackets, but there was not enough strength for commas).
Well, to the heap one-button layout
The most amazing thing that really ezdiet and listens to the voice (as a rule). But, of course, the interface is braking; while you say, until recognized and back; shorter than the speed of movement, choose a small advance or the room opposite is better.
That's all for today, I will be glad if you like it.

Details under the cut:
For our work, we will use the toolkit that was described in the previous article — the BABUINO wireless programmer and the MPDE (module for program and data exchange) code and data transfer module firmware in ESP8266.
As it turned out from the responses of users, the programmer himself, in general, came to the court and some personalities even use it successfully. Well, in principle, the thing is really comfortable; I started the application under Windows, selected a hex file from the desired folder and everything - after a few seconds the program in the desired device without any wires. Another thing is that I was in vain with excessive fervor attacking users of ARDUINO software, writing in Wiring C and using ARDUINO IDE with its sketches and libraries. Of course, everyone does as he is comfortable - whether in Arduin Wiring C or C in AVR studio. But in the end, for some reason, some users immediately decided that the programmer was in no way compatible with ARDUINO software.
In fact, there are no compatibility problems, of course. Absolutely also compile your sketch where it is convenient for you to the state of a hex file and absolutely also just send it via a wireless programmer to your Arduino UNO or NANO.
Data exchange under the software ARDUINO also does not cause any problems. Write magic lines:
Serial.begin (9600);
and then something like:
receiveByte = Serial.read (); // read byte from buffer
or:
Serial.write (receiveByte); // write byte
And you can exchange byte streams via WI-FI absolutely calmly. For the AVR microcontroller sends to ESP8266 and receives bytes from there via the UART serial port, any humanities can adjust the work with which in the Arduino, as we see.
Now let's get back to the subject of this article. In order to control the trolley using a smartphone, it is certainly necessary to write a corresponding application for this smartphone.
As a person who, a month ago, represented this process is extremely vague, I can now state with full responsibility that this is not really a difficult matter. Unless of course, you have at least some basic knowledge of Java.
For when writing Android applications, source code is written in Java, and then compiled into standard Java bytecode using traditional Java tools. Then other interesting things happen to the code, but we don’t need these details here.
It seems like there are still opportunities for writing C applications for notorious hardcore players leading a nanosecond account, and there is also some kind of package for broadcasting your code from Python, but here I can’t tell you anything, since I made the right choice .
So, Java and the Android Studio software package are an integrated development environment (IDE) for working with the Android platform based on InteBillia IDEA software from JetBrains, the official Android application development tool.
If you are already working with software from IntelliJ IDEA, then you will be pleasantly surprised by the familiar interface.
I got acquainted with the basics of building applications based on the book by B. Phillips and K. Stewart - “ANDROID” programming for professionals ". As I understand it, the authors consider readers as professionals to be at least a little familiar with Java SE. I did not find it, but for our purposes, the first ten chapters of the book are enough, the good thing is that in it all the code examples are provided when working with the aforementioned Android Studio.
Debugging of applications can be carried out both on the software emulator and directly on the smartphone, switching it to the “developer mode”.
In the previous article, the trolley control through a window application on Windows was described. That is, all the code for creating HTTP and UDP connections, as well as the control logic, we already have in theory. Therefore, adopting the Oracle slogan “Written in one place, works everywhere”, we will simply transfer these classes to a new program already for Android applications. But the GUI - a graphical user interface, for obvious reasons, will have to leave where it was. But on the other hand, on Android everything is done very similarly and rather quickly, so we will not stay in the loser.
We poke the finger in the screen
So, we create a new project “FourWheelRobotControl” in Android Studio.
This is a simple application and it will consist of activity.
Class MainActivity.java
import android.content.Context; import android.hardware.Sensor; import android.support.v7.app.AppCompatActivity; import android.os.Bundle; import android.view.MotionEvent; import android.view.View; import android.widget.ImageButton; import android.widget.TextView; import android.widget.Toast; public class MainActivity extends AppCompatActivity { private ImageButton mButtonUP; private ImageButton mButtonDOWN; private ImageButton mButtonLEFT; private ImageButton mButtonRIGHT; public static byte direction = 100; @Override protected void onCreate(Bundle savedInstanceState) { super.onCreate(savedInstanceState); setContentView(R.layout.activity_main); new HTTP_client(40000); new Udp_client(); mButtonUP = (ImageButton) findViewById(R.id.imageButtonUP); mButtonUP.setOnTouchListener(new View.OnTouchListener() { @Override public boolean onTouch(View v, MotionEvent event) { if (event.getAction() == MotionEvent.ACTION_DOWN) { direction = 3; } } if (event.getAction() == MotionEvent.ACTION_UP) { direction = 100; } return false; } }); mButtonDOWN = (ImageButton) findViewById(R.id.imageButtonDown); mButtonDOWN.setOnTouchListener(new View.OnTouchListener() { @Override public boolean onTouch(View v, MotionEvent event) { if (event.getAction() == MotionEvent.ACTION_DOWN) { direction = 4; Toast.makeText(MainActivity.this, " " + direction, Toast.LENGTH_SHORT).show(); } if (event.getAction() == MotionEvent.ACTION_UP) { direction = 100; } return false; } }); mButtonLEFT = (ImageButton) findViewById(R.id.imageButtonLeft); mButtonLEFT.setOnTouchListener(new View.OnTouchListener() { @Override public boolean onTouch(View v, MotionEvent event) { if (event.getAction() == MotionEvent.ACTION_DOWN) { direction = 1; Toast.makeText(MainActivity.this, " " + direction, Toast.LENGTH_SHORT).show(); } if (event.getAction() == MotionEvent.ACTION_UP) { direction = 100; } return false; } }); mButtonRIGHT = (ImageButton) findViewById(R.id.imageButtonRight); mButtonRIGHT.setOnTouchListener(new View.OnTouchListener() { @Override public boolean onTouch(View v, MotionEvent event) { if (event.getAction() == MotionEvent.ACTION_DOWN) { direction = 2; Toast.makeText(MainActivity.this, " " + direction, Toast.LENGTH_SHORT).show(); } if (event.getAction() == MotionEvent.ACTION_UP) { direction = 100; } return false; } }); }
and layout:
layout
/spoiler/ activity_main.xml <?xml version="1.0" encoding="utf-8"?> <android.support.constraint.ConstraintLayout xmlns:android="http://schemas.android.com/apk/res/android" xmlns:app="http://schemas.android.com/apk/res-auto" xmlns:tools="http://schemas.android.com/tools" android:layout_width="match_parent" android:layout_height="match_parent" tools:context="mikhail_akhmetov.fourweelsrobotcontrol.MainActivity"> <ImageButton android:id="@+id/imageButtonRight" style="@android:style/Widget.Holo.ImageButton" android:layout_width="52dp" android:layout_height="52dp" android:layout_marginEnd="8dp" android:layout_marginLeft="8dp" android:layout_marginRight="8dp" android:layout_marginStart="8dp" android:background="@android:color/holo_orange_dark" app:layout_constraintBottom_toTopOf="@+id/linearLayout" app:layout_constraintHorizontal_bias="0.417" app:layout_constraintLeft_toRightOf="@+id/imageButtonLeft" app:layout_constraintRight_toRightOf="parent" app:layout_constraintTop_toTopOf="parent" app:layout_constraintVertical_bias="0.513" app:srcCompat="@android:drawable/ic_media_ff"/> <ImageButton android:id="@+id/imageButtonUP" style="@android:style/Widget.ImageButton" android:layout_width="52dp" android:layout_height="52dp" android:layout_marginBottom="8dp" android:layout_marginTop="8dp" android:background="@android:color/holo_orange_dark" app:layout_constraintBottom_toTopOf="@+id/imageButtonDown" app:layout_constraintLeft_toLeftOf="parent" app:layout_constraintRight_toRightOf="parent" app:layout_constraintTop_toTopOf="parent" app:layout_constraintVertical_bias="0.486" app:srcCompat="@android:drawable/arrow_up_float"/> <ImageButton android:id="@+id/imageButtonDown" style="@android:style/Widget.ImageButton" android:layout_width="52dp" android:layout_height="52dp" android:layout_marginBottom="57dp" android:layout_marginLeft="8dp" android:background="@android:color/holo_orange_dark" android:fadingEdge="horizontal" app:layout_constraintBottom_toTopOf="@+id/linearLayout" app:layout_constraintHorizontal_bias="0.487" app:layout_constraintLeft_toLeftOf="parent" app:layout_constraintRight_toRightOf="parent" app:srcCompat="@android:drawable/arrow_down_float" android:layout_marginStart="8dp"/> <ImageButton android:id="@+id/imageButtonLeft" style="@android:style/Widget.ImageButton" android:layout_width="52dp" android:layout_height="52dp" android:layout_marginLeft="94dp" android:layout_marginStart="94dp" android:background="@android:color/holo_orange_dark" app:layout_constraintBottom_toTopOf="@+id/linearLayout" app:layout_constraintLeft_toLeftOf="parent" app:layout_constraintTop_toTopOf="parent" app:layout_constraintVertical_bias="0.513" app:srcCompat="@android:drawable/ic_media_rew" /> <LinearLayout android:id="@+id/linearLayout" android:layout_width="368dp" android:layout_height="227dp" android:layout_marginBottom="11dp" android:layout_marginEnd="8dp" android:layout_marginLeft="8dp" android:layout_marginRight="8dp" android:layout_marginStart="8dp" android:orientation="vertical" android:weightSum="1" app:layout_constraintBottom_toBottomOf="parent" app:layout_constraintHorizontal_bias="1.0" app:layout_constraintLeft_toLeftOf="parent" app:layout_constraintRight_toRightOf="parent"> <TextView android:id="@+id/textViewX" android:layout_width="match_parent" android:layout_height="wrap_content" android:layout_weight="0.28" /> <TextView android:id="@+id/textViewY" android:layout_width="match_parent" android:layout_height="wrap_content" android:layout_weight="0.28" /> <TextView android:id="@+id/textViewZ" android:layout_width="match_parent" android:layout_height="wrap_content" android:layout_weight="0.23" /> </LinearLayout> </android.support.constraint.ConstraintLayout>
It is not necessary to write it with pens, it is automatically generated after your creations in the editor.
Now let's just transfer two classes from the program given in the previous article:
HTTP_client.java
import java.io.BufferedReader; import java.io.InputStreamReader; import java.io.OutputStreamWriter; import java.io.PrintWriter; import java.net.InetAddress; import java.net.Socket; public class HTTP_client extends Thread{ int port; String s; public static String host_address="192.168.1.138";// public String Greetings_from_S; HTTP_client(int port) { this.port = port; start(); } public void run() { try (Socket socket = new Socket(host_address,port)){ PrintWriter pw = new PrintWriter(new OutputStreamWriter(socket.getOutputStream()), true); BufferedReader br = new BufferedReader(new InputStreamReader(socket.getInputStream())); pw.println("stop data\r");// , pw.println("data\r");// Greetings with SERVER Greetings_from_S = br.readLine(); if (Greetings_from_S.equals("ready")) { new Udp_client(); } } catch (Exception e) { e.printStackTrace(); } } }
Udp_clent.java
import java.net.DatagramPacket; import java.net.DatagramSocket; import java.net.InetAddress; public class Udp_client extends Thread { int i =0; byte [] data = {0}; int udp_port=50000; InetAddress addr; DatagramSocket ds; public Udp_client() { try { ds = new DatagramSocket(); addr = InetAddress.getByName(HTTP_client.host_address); } catch (Exception e) { } start(); } public void run() { while (true) { byte temp = MainActivity.direction; String s = "" + MainActivity.direction; data = s.getBytes(); if(temp!=100 ) { DatagramPacket pack = new DatagramPacket(data, data.length, addr, udp_port); try { ds.send(pack); i=0; Thread.sleep(200); } catch (Exception e) { } } else { if(i==0) { s = "" + 0; data = s.getBytes(); DatagramPacket pack = new DatagramPacket(data, data.length, addr, udp_port); try { ds.send(pack); Thread.sleep(200); } catch (Exception e) { } } i=1;// } } } }
The essence of the program remains the same. MainActivity first starts HTTP and UDP clients, and then catches pressing and unlocking the on-screen buttons, sending the code pressing direction to form a UDP packet. And from there everything is - “forward”, “backward”, “leftward”, “rightward”, and when the “stop” is released, they leave via WI-FI by cart.
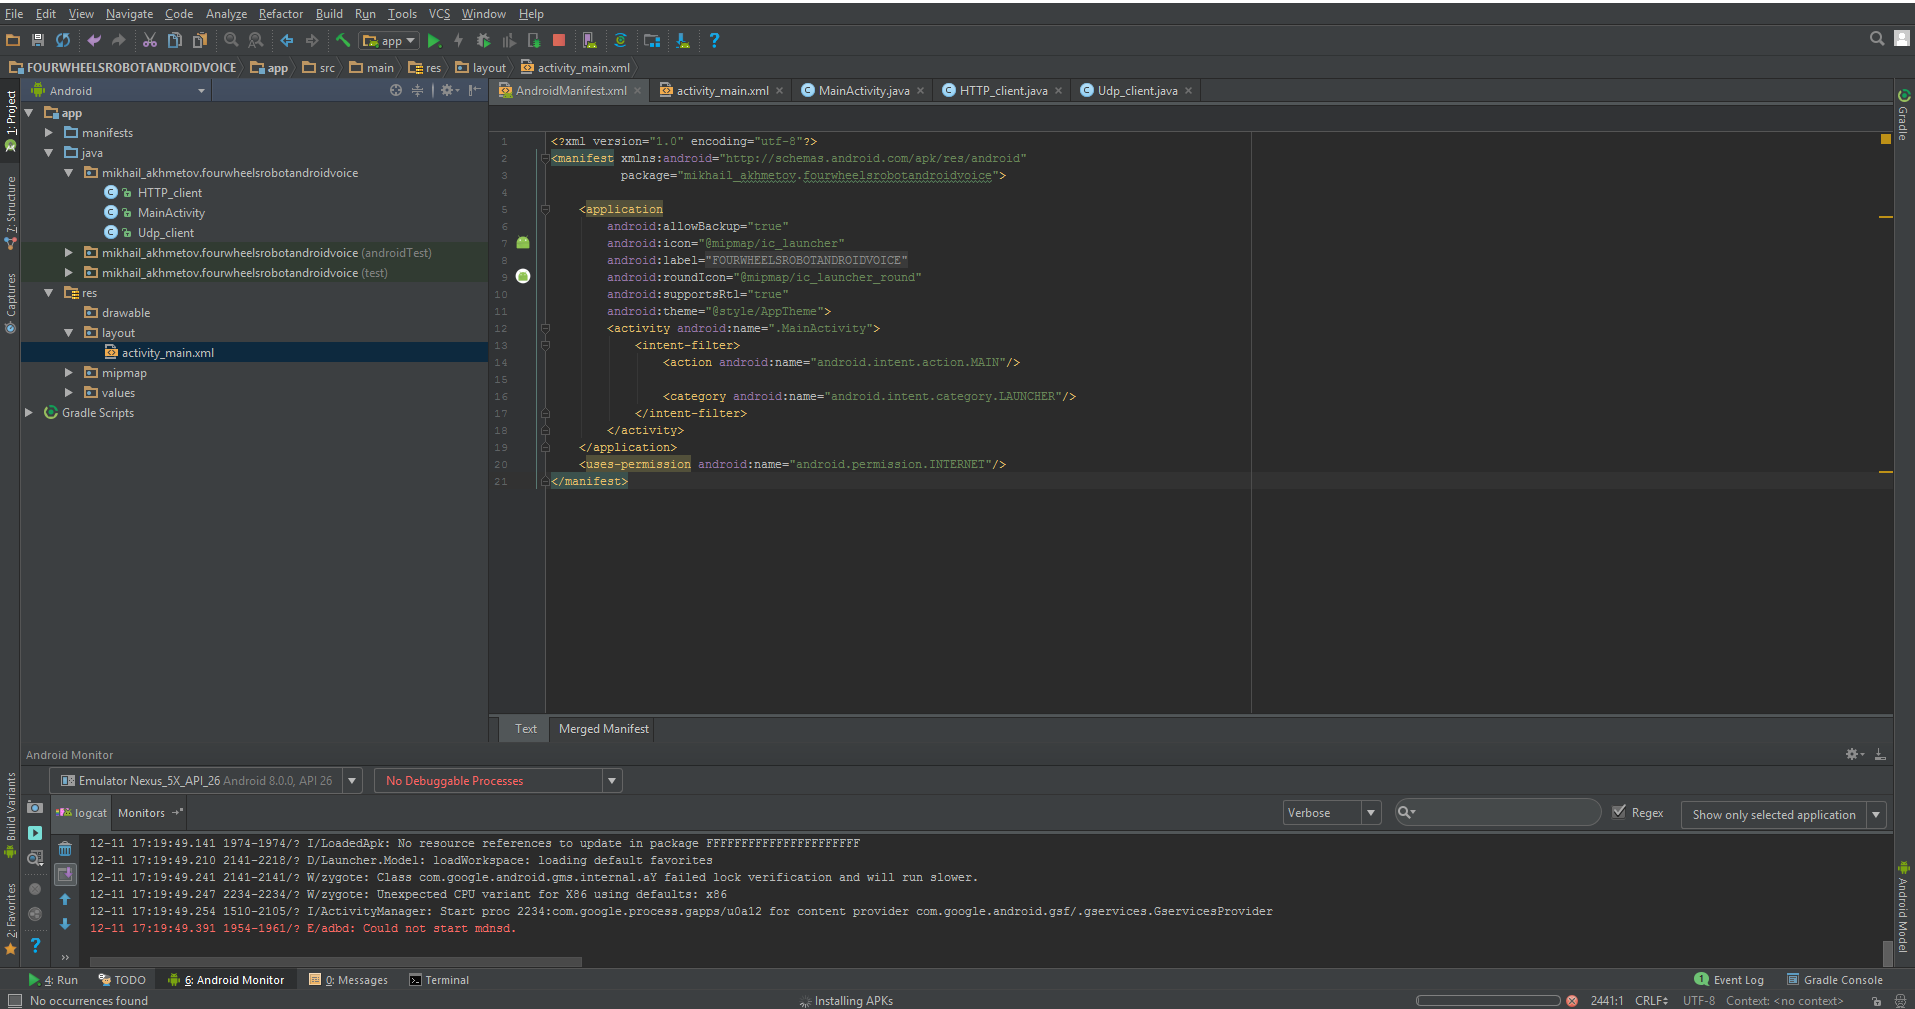
In addition to all this, we need to slightly edit the file of the so-called manifest, which again, mostly generated by itself.
The manifest (manifest) is an XML file with metadata describing your application for the Android OS. The manifest file is always called AndroidManifest.xml and is located in your project’s app / manifest directory.
It is true there is very little work for us.
prohibit screen rotation:
android:screenOrientation="portrait"
we allow work in the Internet:
<uses-permission android:name="android.permission.INTERNET"/>
And here it is all completely.
AndroidManifest.xml
<?xml version="1.0" encoding="utf-8"?> <manifest xmlns:android="http://schemas.android.com/apk/res/android" package="mikhail_akhmetov.fourweelsrobotcontrol"> <application android:allowBackup="true" android:icon="@mipmap/ic_launcher" android:label="@string/app_name" android:roundIcon="@mipmap/ic_launcher_round" android:supportsRtl="true" android:theme="@style/AppTheme" > <activity android:name=".MainActivity" android:screenOrientation="portrait" > <intent-filter> <action android:name="android.intent.action.MAIN" /> <category android:name="android.intent.category.LAUNCHER" /> </intent-filter> </activity> </application> <uses-permission android:name="android.permission.INTERNET"/> </manifest>
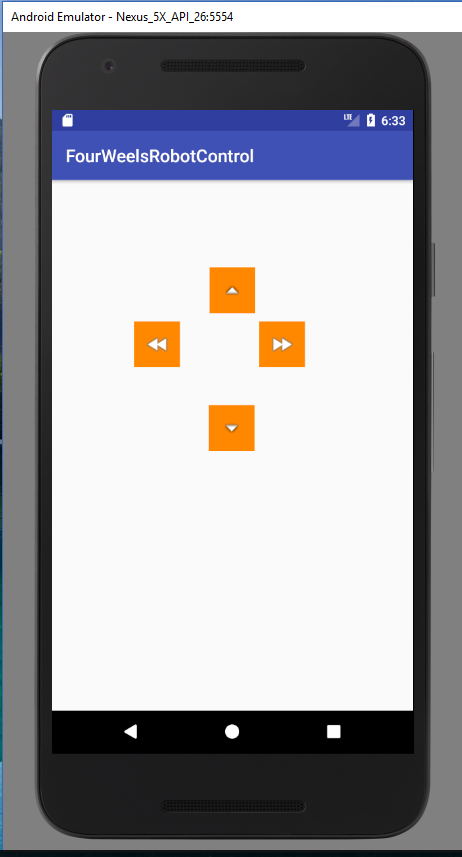
When starting up, we should see something like:
That is essentially all. Now the cart can be controlled from a mobile phone. The application is extremely simple, for the demo, without any “whistles and fakes”, such as finding a cart in the home network, connection, disconnection and other useful features that make life easier, but difficult to understand the code.
On the other hand, control with on-screen buttons is the same
"Just like drinking vodka, even from the neck - there is nothing in it except for the yearning of the spirit and vanity."And Venia Erofeev was right about that, absolutely.
Much more interesting, for example, to steer a cart with the help of standard accelerometers of the same smartphone.
Moreover, this feature is also implemented very simply, through the so-called intents. True, creating your intents is more difficult than using ready-made ones. Fortunately, no one forbids using ready-made ones.
ACCELEROMETER IN MASS
Therefore, our code in the MainActivity (and only in it) will change minimally.
Add variables for the accelerometer:
private SensorManager mSensorManager; private Sensor mOrientation; private float xy_angle; private float xz_angle;
We will receive the sensor itself from the system and register it as a listener.
mSensorManager = (SensorManager) getSystemService(Context.SENSOR_SERVICE); // mOrientation = mSensorManager.getDefaultSensor(Sensor.TYPE_ACCELEROMETER); // mSensorManager.registerListener(this, mOrientation, SensorManager.SENSOR_DELAY_NORMAL);
We implement the listener interface itself:
public class MainActivity implements SensorEventListener
And we will write down four obligatory methods from which we will use only the last. The method works out when you change the readings of the accelerometer. Actually, I wanted to interrogate the accelerometer itself, like a normal periphery with a period of about 100 ms, since it was suspected (because of the name onChanged) that the method works out too often. But there everything is private and you will go through the FIGs for the interfaces.
@Override public void onAccuracyChanged(Sensor sensor, int accuracy) { // } @Override protected void onResume() { super.onResume(); } @Override protected void onPause() { super.onPause(); } @Override public void onSensorChanged(SensorEvent event) {} //
As a result, MainActivity.java takes the following form
import android.hardware.SensorEvent; import android.hardware.SensorEventListener; import android.hardware.SensorManager; import android.content.Context; import android.hardware.Sensor; import android.support.v7.app.AppCompatActivity; import android.os.Bundle; import android.widget.ImageButton; import android.widget.TextView; public class MainActivity extends AppCompatActivity implements SensorEventListener { private ImageButton mButtonUP; private ImageButton mButtonDOWN; private ImageButton mButtonLEFT; private ImageButton mButtonRIGHT; public static byte direction = 100; private SensorManager mSensorManager; private Sensor mOrientation; private float xy_angle; private float xz_angle; private int x; private int y; private TextView xyView; private TextView xzView; private TextView zyView; @Override protected void onCreate(Bundle savedInstanceState) { super.onCreate(savedInstanceState); setContentView(R.layout.activity_main); new HTTP_client(40000); new Udp_client(); mSensorManager = (SensorManager) getSystemService(Context.SENSOR_SERVICE); // mOrientation = mSensorManager.getDefaultSensor(Sensor.TYPE_ACCELEROMETER); // mSensorManager.registerListener(this, mOrientation, SensorManager.SENSOR_DELAY_NORMAL); xyView = (TextView) findViewById(R.id.textViewX); // xzView = (TextView) findViewById(R.id.textViewY); // zyView = (TextView) findViewById(R.id.textViewZ);// "direction" mButtonUP = (ImageButton) findViewById(R.id.imageButtonUP); mButtonDOWN = (ImageButton) findViewById(R.id.imageButtonDown); mButtonLEFT = (ImageButton) findViewById(R.id.imageButtonLeft); mButtonRIGHT = (ImageButton) findViewById(R.id.imageButtonRight); // } @Override public void onAccuracyChanged(Sensor sensor, int accuracy) { // } @Override protected void onResume() { super.onResume(); } @Override protected void onPause() { super.onPause(); } @Override public void onSensorChanged(SensorEvent event) { // xy_angle = event.values[0]*10; // XY xz_angle = event.values[1]*10; // XZ x=-(int) xy_angle*1; y=-(int) xz_angle*1; xyView.setText(" x = "+ String.valueOf(x)); xzView.setText(" y = "+String.valueOf(y)); zyView.setText(" direction "+String.valueOf(direction)); if(y>-40&&y<-20){ direction=100;// , , if (x>10){// 10 30 20 direction=(byte)(x+30); if (direction>60){direction=60;} } if(x<-10){ direction=(byte)(-x+50); if (direction>80){direction=80;} } } else { if (y > -20) {// , -20: 20 40 direction = (byte) (y / 2 + 10); if (direction > 20) { direction = 20; } ; } if (y < -40) {// , -40: -80 40 direction = (byte) (-y - 20); if (direction > 40) { direction = 40; } ; } } } } // direction 100 // 1-20 , -20 // 21-40 , -40 // 41-60 , 10 // 61-80 , -10
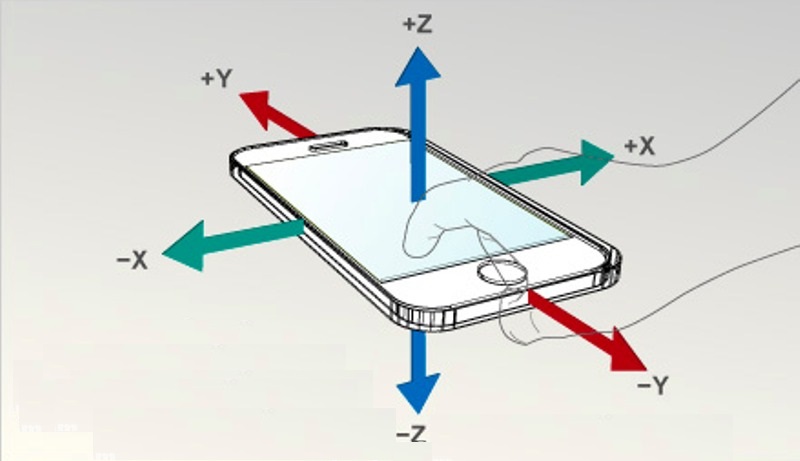
The program displays the sensor readings in two axes on the smartphone screen. Instead of the third axis, which is not used, the variable direction "direction" is displayed. And the same data runs in the form of a byte stream on the cart. However, due to the fact that the stream is purely byte, to determine where the command "forward" or "stop" would be difficult. Therefore, I acted simply: each direction and angle of inclination has its own range of numbers. Roughly speaking, 1-20 is “forward” at an appropriate speed, 21-40 is “backward” and so on. Of course, it would be possible to transmit pure data via UDP, and the control commands themselves should be set via the TCP protocol and this would be absolutely correct. But for this you need to edit the program on the ESP8266 itself, which I do not want to do so far.
So, the cart rolls around the apartment, sensitively reacting to the tilts of my GalaxyS7, but even this, as the well-known Venia used to say, was not yet the same.
“Now I offer you the last and the best. "The crown of works, above all awards," as the poet said. In short, I offer you the “Sweet Gut” cocktail, a drink that overshadows everything. This is not a drink - it is the music of the spheres. „
In our century, Siri and Alex, something there to turn his hands? Let him listen to voice control!
AND NOW LISTEN TO ME!
I quote:
In fact, working with speech recognition and speech synthesis in Android is very simple. All complex calculations are hidden from us in a rather elegant library with a simple API. You will be able to master this lesson, even if you have very superficial knowledge of programming for Android.
Actually, everything turned out pretty clumsy for me, but most likely because I used the simplest option and didn’t dig into this API. Everything is also done through intents, with the help of which we appeal to the Google voice engine, namely to its speech recognition function. Therefore, you need a working Internet.
Again, only MainActivity.java changes, although I changed the layout a little more (the four buttons are now completely useless, one is enough).
The following has been added to MainActivity.java:
The same intent:
Intent intent = new Intent(RecognizerIntent.ACTION_RECOGNIZE_SPEECH); intent.putExtra(RecognizerIntent.EXTRA_LANGUAGE_MODEL, RecognizerIntent.LANGUAGE_MODEL_FREE_FORM); intent.putExtra(RecognizerIntent.EXTRA_PROMPT, ", , -??? "); startActivityForResult(intent, Print_Words);
And what it returns:
@Override protected void onActivityResult(int requestCode, int resultCode, Intent data) { // : if (requestCode==Print_Words && resultCode==RESULT_OK) { // , : ArrayList<String>result=data.getStringArrayListExtra(RecognizerIntent.EXTRA_RESULTS); // TextView: stroka_otveta = result.toString(); }
And it returns an array of similar words, and in a rather “garbage form”, with all sorts of brackets and commas. And you just have to choose a word similar to the one you said. Well and, accordingly, if the word "forward" came across, then we go forward, if "to the right", then to the right, and so on. Of course, one must take into account where through “E”, where the extra comma clings (I cut off the brackets, but there was not enough strength for commas).
In total, the text itself MainActivity.java became
import android.support.v7.app.AppCompatActivity; import android.os.Bundle; import android.view.MotionEvent; import android.view.View; import android.widget.ImageButton; import android.widget.TextView; import java.util.ArrayList; import android.content.Intent; import android.speech.RecognizerIntent; public class MainActivity extends AppCompatActivity { private ImageButton mButtonUP; public static byte direction = 100; public String stroka_otveta; private static final int Print_Words = 100; private TextView EnteredText1; private TextView EnteredText2; public static TextView EnteredText3; private boolean slovo_raspoznano =false; @Override protected void onCreate(Bundle savedInstanceState) { super.onCreate(savedInstanceState); setContentView(R.layout.activity_main); new Udp_client(); new HTTP_client(40000); EnteredText1 = (TextView) findViewById(R.id.textViewX); // EnteredText2 = (TextView) findViewById(R.id.textViewY); // EnteredText3 = (TextView) findViewById(R.id.textViewZ); // mButtonUP = (ImageButton) findViewById(R.id.imageButtonUP); mButtonUP.setOnTouchListener(new View.OnTouchListener() { @Override public boolean onTouch(View v, MotionEvent event) { if (event.getAction() == MotionEvent.ACTION_DOWN){ if(HTTP_client.ok){ // RecognizerIntent : EnteredText3.setText(" http "); Intent intent = new Intent(RecognizerIntent.ACTION_RECOGNIZE_SPEECH); intent.putExtra(RecognizerIntent.EXTRA_LANGUAGE_MODEL, RecognizerIntent.LANGUAGE_MODEL_FREE_FORM); intent.putExtra(RecognizerIntent.EXTRA_PROMPT, ", , -??? "); startActivityForResult(intent, Print_Words); } else { EnteredText3.setText(" "); } } if (event.getAction() == MotionEvent.ACTION_UP ){ } return false; } }); } @Override protected void onActivityResult(int requestCode, int resultCode, Intent data) { // : if (requestCode==Print_Words && resultCode==RESULT_OK) { // , : ArrayList<String>result=data.getStringArrayListExtra(RecognizerIntent.EXTRA_RESULTS); // TextView: stroka_otveta = result.toString(); } StringBuffer sb = new StringBuffer(stroka_otveta); sb.deleteCharAt(stroka_otveta.length()-1); sb.deleteCharAt(0); stroka_otveta=sb.toString(); String[] words = stroka_otveta.split("\\s"); // () // for(int i = 0; i< words.length;i++) { if(words[i].equals(",")||words[i].equals("")) { direction = 1; slovo_raspoznano=true; stroka_otveta=words[i]; } if(words[i].equals(",")||words[i].equals("")){ direction=2; slovo_raspoznano=true; stroka_otveta=words[i]; } if(words[i].equals(",")|| words[i].equals("")){ direction=4; slovo_raspoznano=true; stroka_otveta=words[i]; } if(words[i].equals(",")|| words[i].equals(",")|| words[i].equals("") || words[i].equals("")){ direction=3; slovo_raspoznano=true; stroka_otveta=words[i]; } if(words[i].equals(",")|| words[i].equals(",")|| words[i].equals("") || words[i].equals("")){ direction=100; slovo_raspoznano=true; stroka_otveta=words[i]; } } if(!slovo_raspoznano){ direction=100; stroka_otveta=" , ... "; } EnteredText1.setText(" "+direction+" " +stroka_otveta); slovo_raspoznano=false; super.onActivityResult(requestCode, resultCode, data); } }
Well, to the heap one-button layout
activity_main.xml.
<?xml version="1.0" encoding="utf-8"?> <android.support.constraint.ConstraintLayout xmlns:android="http://schemas.android.com/apk/res/android" xmlns:app="http://schemas.android.com/apk/res-auto" xmlns:tools="http://schemas.android.com/tools" android:layout_width="match_parent" android:layout_height="match_parent" tools:context="mikhail_akhmetov.fourwheelsrobotandroidvoice.MainActivity"> <ImageButton android:id="@+id/imageButtonUP" style="@android:style/Widget.ImageButton" android:layout_width="160dp" android:layout_height="146dp" android:layout_marginTop="8dp" android:background="@android:color/holo_orange_dark" app:layout_constraintLeft_toLeftOf="parent" app:layout_constraintRight_toRightOf="parent" app:layout_constraintTop_toTopOf="parent" app:srcCompat="@android:drawable/arrow_up_float" android:layout_marginBottom="8dp" app:layout_constraintBottom_toTopOf="@+id/linearLayout"/> <LinearLayout android:id="@+id/linearLayout" android:layout_width="368dp" android:layout_height="227dp" android:layout_marginBottom="11dp" android:layout_marginEnd="8dp" android:layout_marginLeft="8dp" android:layout_marginRight="8dp" android:layout_marginStart="8dp" android:orientation="vertical" android:weightSum="1" app:layout_constraintBottom_toBottomOf="parent" app:layout_constraintHorizontal_bias="1.0" app:layout_constraintLeft_toLeftOf="parent" app:layout_constraintRight_toRightOf="parent"> <TextView android:id="@+id/textViewTitle" android:layout_width="match_parent" android:layout_height="wrap_content" android:text=" " android:textColor="@android:color/holo_red_dark"/> <TextView android:id="@+id/textViewX" android:layout_width="match_parent" android:layout_height="wrap_content" android:layout_weight="0.28" /> <TextView android:id="@+id/textViewY" android:layout_width="match_parent" android:layout_height="wrap_content" android:layout_weight="0.28" /> <TextView android:id="@+id/textViewZ" android:layout_width="match_parent" android:layout_height="wrap_content" android:layout_weight="0.23" /> </LinearLayout> </android.support.constraint.ConstraintLayout>
The most amazing thing that really ezdiet and listens to the voice (as a rule). But, of course, the interface is braking; while you say, until recognized and back; shorter than the speed of movement, choose a small advance or the room opposite is better.
That's all for today, I will be glad if you like it.
All Articles