Programming and data exchange with ARDUINO via WI-FI via ESP8266 Part Two
I suggest you, dear readers of GeekTimes, the following article from the cycle (hopefully not the last) on using the ESP8266 chip as a wireless bridge for AVR microcontrollers, using the Arduino Uno (Nano) hardware platform as an example.
After the first article on this topic, I received a lot of friendly responses: “Why the hell did you take arduin if everything could be done exclusively on ESP8266” or “Why did you not use esp-link ”. “Really why?” - I thought, and I already rolled out this article and updated several of my programs as new arguments.
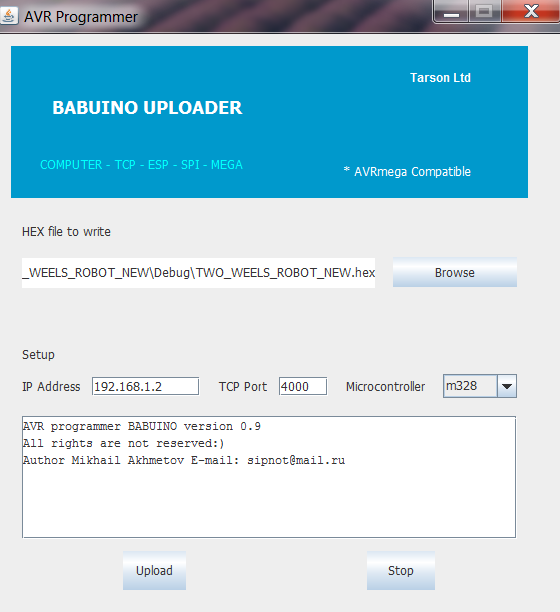
So, meet the wireless programmer for AVR microcontrollers BABUINO version 0.9
Details under the cut:
The original version of the program was published in the previous article and, in principle, did almost the same thing as the new version. But it was extremely inconvenient in work. As, however, and competing esp-link. Therefore, with a sigh, I screwed the GUI to JAVA. Now you can safely select the file you need to download via the window manager, and also edit the IP address of the target device. I nevertheless sewed the TCP port number tightly (it is edited only in the code), but in theory it needs to be changed only if this port is used somewhere else (but then you will have to change its number in the ESP8266 firmware).
The microcontroller is also used while the one with a FLASH memory size of 32 KB, for example, is the well-known Mega328P. As I mentioned in the last article, theoretically my programmer sews versions in 16 kbytes, and maybe even 8 kbytes. And of course in 64 KB and 128 KB versions of the AVR, he can probably even flash the first 32 KB of memory. But I don’t have such microcontrollers on my hands, and I really cannot say how it really is. The whole point is that 16-bit addresses in standard SPI programming commands are so cleverly divided and cut (bit here, bit there), that it’s not easy to understand how everything will be with a different memory size other than 32 kbyte.
Yes, the program after recording is not verified, the special registers of the AVR are not readable, the EEPROM also does not write. But all this is theoretically possible to do without problems (as opposed to the fundamental limitations of loading code through the UART, as in esp-link). You can add, I do not mind, the product is not commercial.
Here is the executable file for 64 bit windows . From it, you can tear out Java code. Or take on Github
So, we start.
Then everything is simple, open the HEX file you need (yes, the program learned to convert the BIN format to HEX, hooray!) Enter the IP address of ESP8266 that you need and click “Upload” (how to find the IP address of the ESP module - a separate story). If the programmer finds ESP8266, then he quickly (much faster than esp-link), stuffs your code into it, and she herself sends it further to the AVR microcontroller via SPI interface. The programmer describes in detail his actions in the window and can even be trusted, except for the fact that the program was recorded in the AVR. As I have already said, there is no verification of the record, but the SPI interface is purely synchronous, it generally is on the drum, is there anyone on the second end of the line or not. He throws the data, and the answer does not wait.
After closing the program (via “Stop” or simply closing the window), the data you entered (if you pressed the Upload button before) is saved in the tcp_dat.txt file in the root directory of drive C so that you do not have to suffer for a long time when you open it again recruit. In general, the program window can not be closed. By experience, it does not bother anyone.
Now let's turn in the direction of the ESP module and remember again, now it’s detailed how to connect it to the AVR and how to flash it in order to use the aforementioned programmer, and also just drive the data via WI-FI without wires.
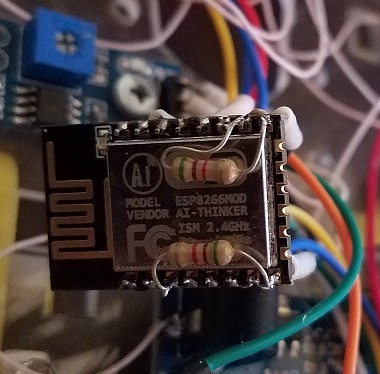
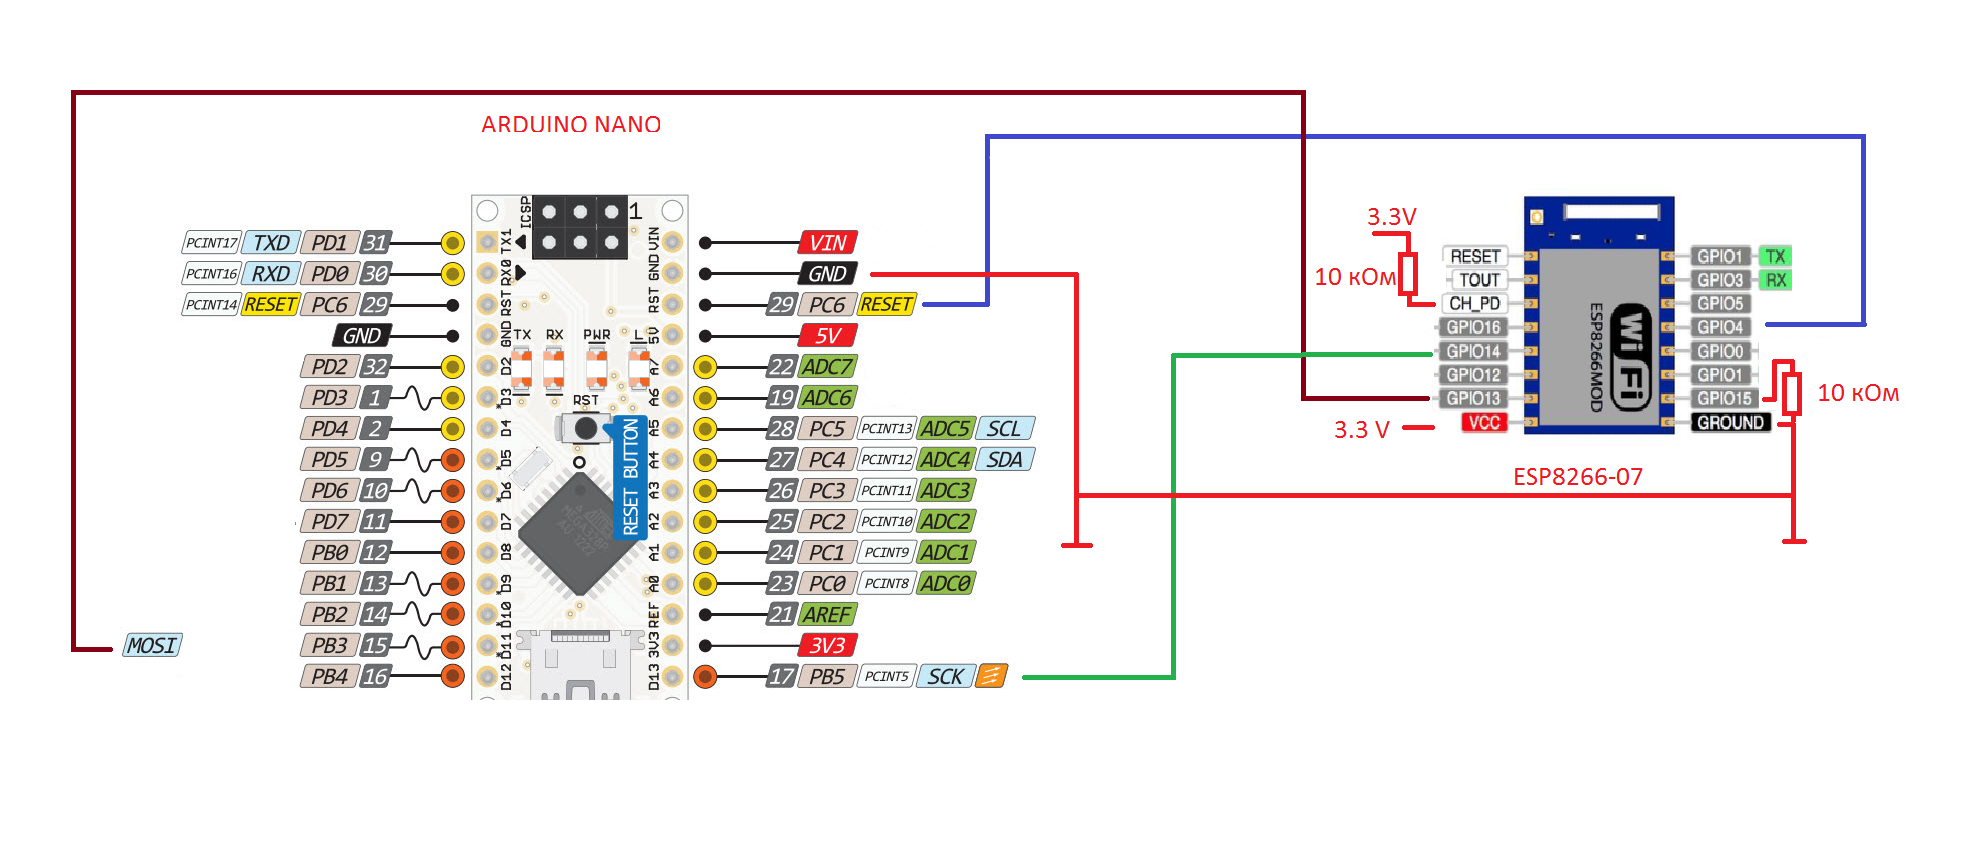
So, first of all the wiring diagram. Please note that we need ESP8266 in versions with a sufficient amount of GPIO. We will need free outputs for RESET, MOSI and SLK for programming on the SPI interface, apart from the fact that for data exchange we will also use the usual UART with its RX and TX. For this, the most convenient price and quality seemed to me ESP8266-07.
We take it and immediately solder two resistors with a nominal value of 5-10 kΩ. First to EN (CH-PD) and power, second to GPIO15 and ground
Now you can hook it to the adapter, through which we will upload the NodeMCU firmware, and then our loader program on LUA.
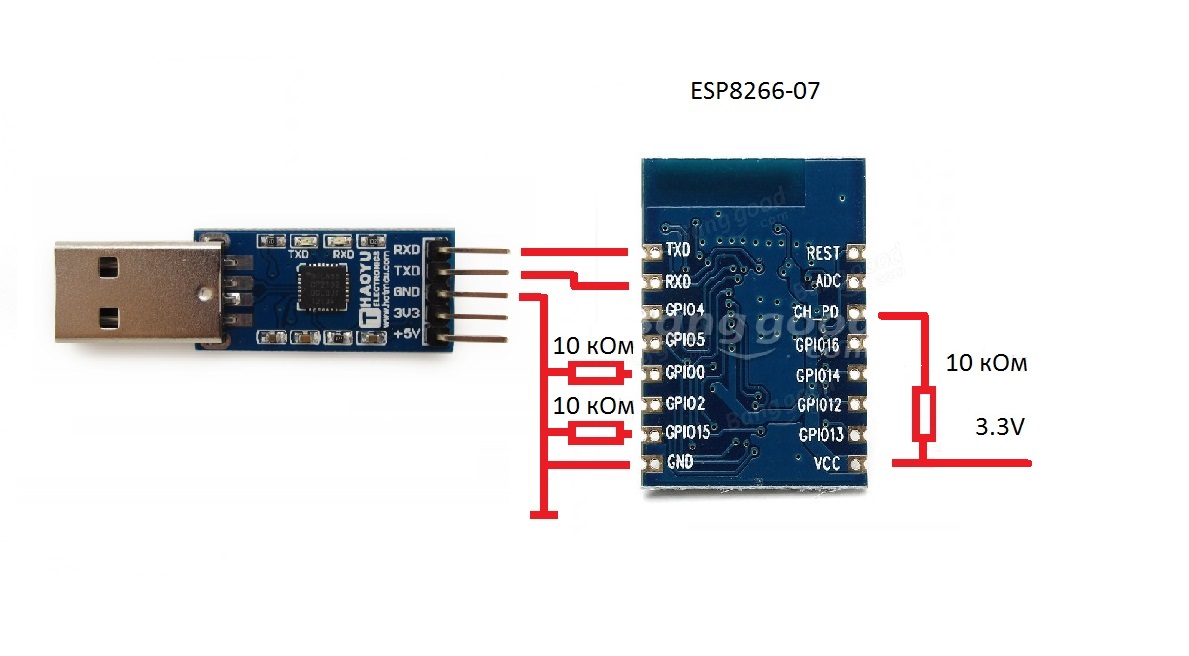
Adapters million, take any. Connect, as usual, RX c TX and vice versa. We make the earth common. Power to the ESP8266 is served separately, and the adapter is enough for its USB port. We throw zero on GPIO0 and fill in the latest NodeMCU firmware (you can take it here , or build your own) through the NODE MCU PyFlasher program .

All this is in principle described in the previous article and many times on the Internet. Next, remove the zero with GPIO0 (you can just leave it hanging, that's okay) and open the ESPlorer environment for debugging and downloading programs to Lua. True, this infection without the JAVA environment does not work. So this thing ( Download Java on your desktop computer now! ) You will have to install all the same beforehand.
After connecting to ESPlorer, he will slightly format the ESP module, informing you with appropriate messages. (the main thing at this moment not to touch anything), and then rebutnet ESP. You can start working on downloading LUA programs.
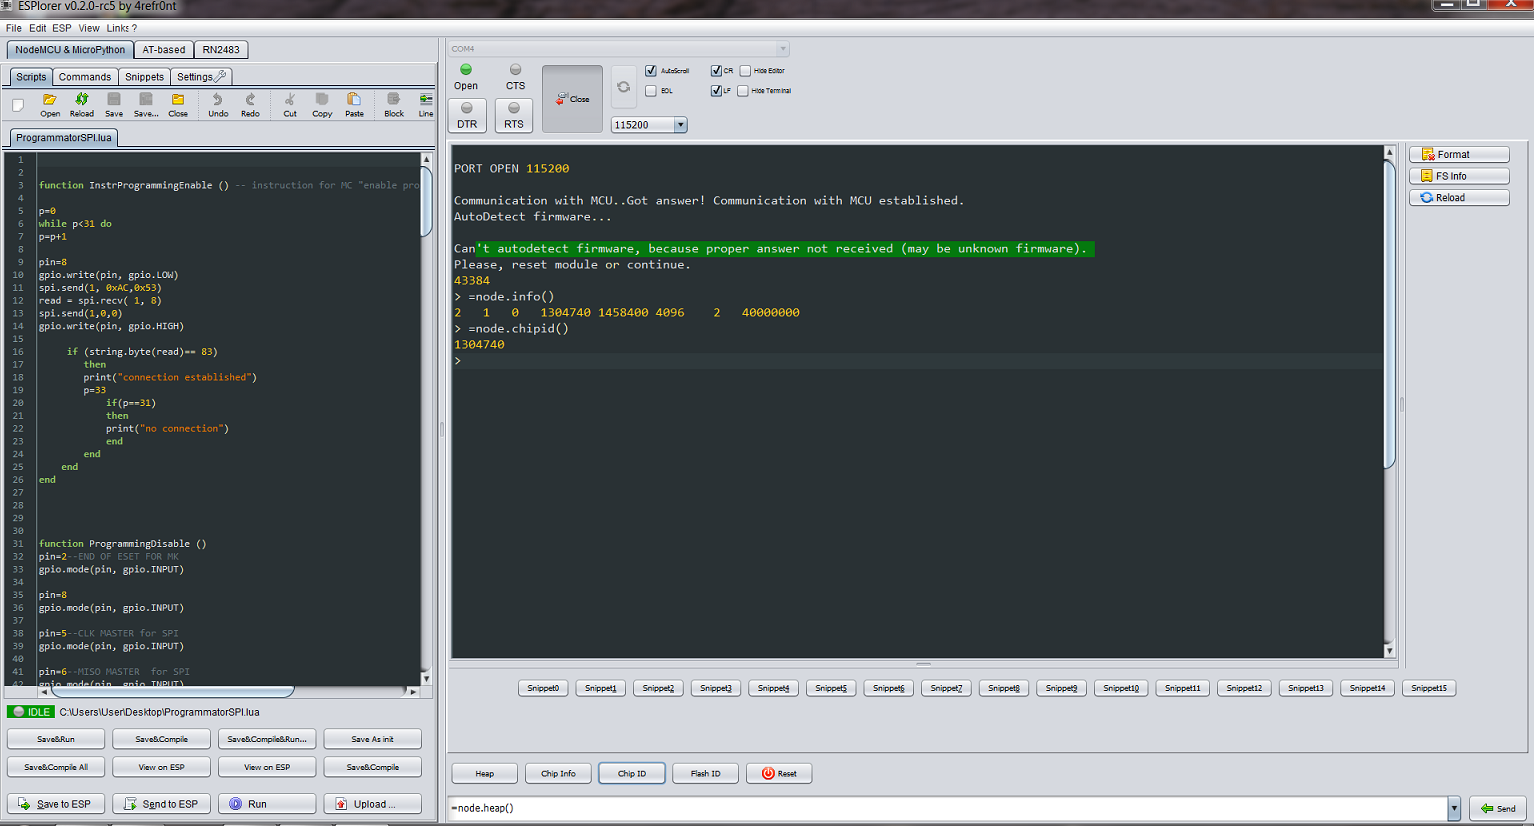
And we will have the following program:
It is almost the same as that described in the first part, but now it is able not only to transmit the data stream from the computer to the AVR microcontroller, but now to do it in the opposite direction.
In the process of writing had to resolve an interesting snag. When we pour data from a computer to ESP8266 using the UDP protocol, there are no problems. The IP address of the ESP module is known (we drive it ourselves at the beginning, if that), the port is known, everything is fine. But when we try to send data in the opposite direction, we cannot do this, because the ESP module does not know the IP address of the computer on which the programmer is running. Rather, he knows it, because before that we make contact via TCP protocol for sending control commands (program, data, stop). And when using this protocol, devices exchange their addresses, because it is bidirectional. But he won't tell us about it. In any case, I did not find a function in the NodeMCU API to pull it out. Of course, you can drive the IP of the computer directly into the bootloader on the ESP8266, but this is not an option. Suddenly, we run a program to exchange data on another computer. Or he does not have one network card.
So I made a crutch. We transfer the IP of the computer on which the program is running explicitly before the start of data exchange. Luckily in the JAVA API there is a function to determine the network address of the host on which the program is running. ESP8266, having received this address, can now easily send data not only to the AVR, but also from it. As for the program at LUA, it is very oak, naive and simple, and this is due to the fact that in this language I am still very badly oriented.
So, with the help of ESPlorer, we register the updated bootloader in ESP8266. Do not forget to either initially call the file as init.lua or rename it via ESPlorer,otherwise it will not take off . Well, of course, hammer into the body (where MAIN BLOCK) of the bootloader is your network name and password.
Next we need to determine and fix the IP address of the ESP module in our internal network. We go to the local router under admin rights and see something like that.
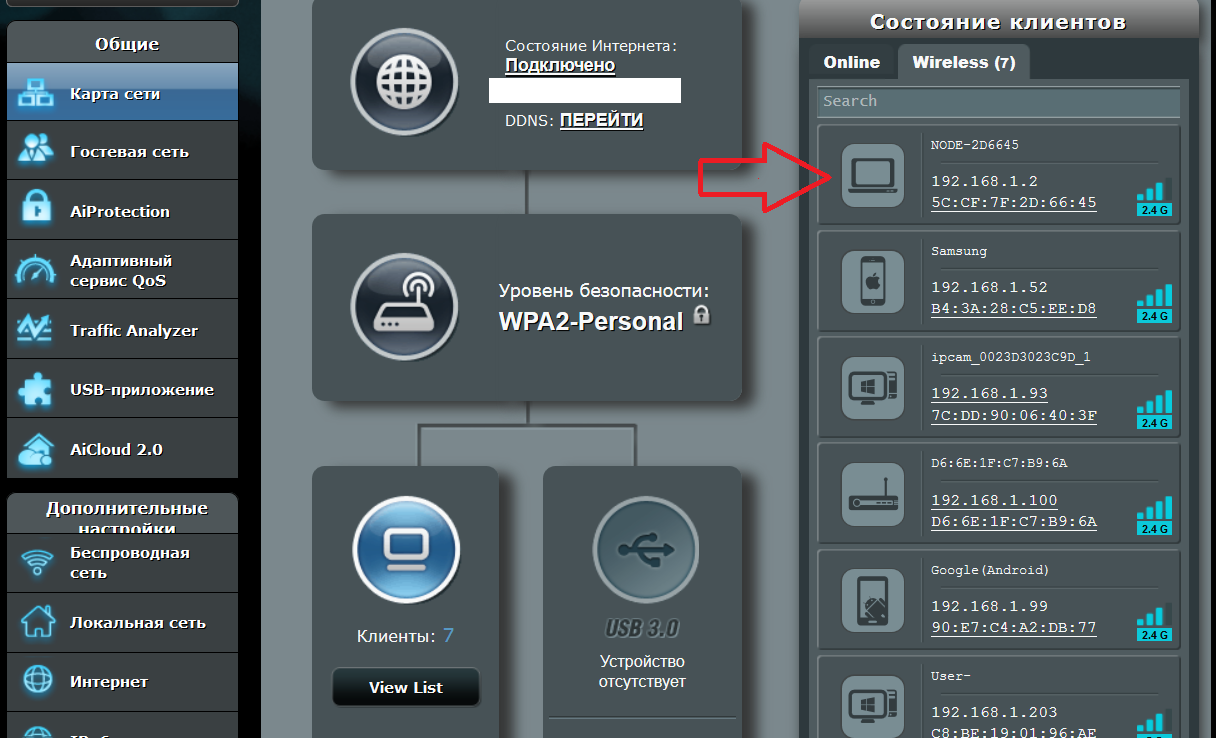
This address is still dynamic (that is, another one may be assigned after reconnection), so we make its binding to the ESP8266 MAC address in the same place in the router.
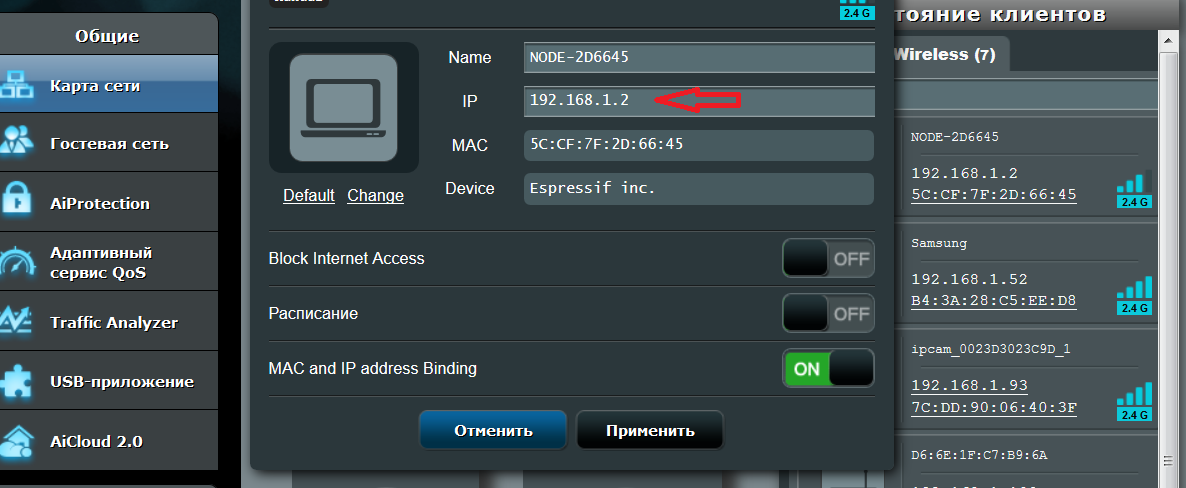
You can even write it (the last digits) on the module itself, if you have sclerosis.
The ESP module is ready for operation, you can connect it with the AVR microcontroller.
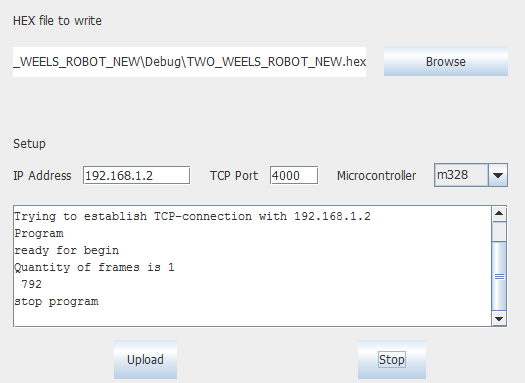
Run BABUINO, write the IP address of the ESP module, select the HEX file (some BLINK), click “Upload” and enjoy the flashing LED. The programmer will write something like this in his window:
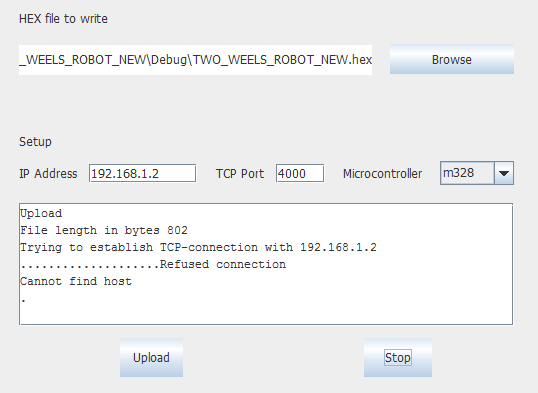
But sometimes it can be, if the ESP module for some reason keeps its mouth shut:
Now let's see how our boot loader in ESP8266 can exchange data in both directions. To do this, we will control the robot cart from the keyboard of the computer, and it will send us its own traversed path. My first four-wheel robo cart died the death of the brave, receiving a signal from Space and falling off the table (this astral fact will be explained later). Therefore, until a new acrylic frame comes from China, experiments will be conducted over a two-wheeled robot trolley, which, by the way, I’ve been trying to make it balance on two wheels for about a year, but so far without success. According to the wiring diagram of the electronics and the program for the AVR, these carts are no different, which we will use.

The program for the work of the cart is written in C and should not cause great difficulties in understanding. We are constantly writing a new speed value in the PWM controller registers, and it issues signals to the motors. There is a feedback circuit on the internal microcontroller ADC. When the battery voltage drops, the speed is programmatically increased. Due to this, up to a full drawdown, the cart rolls at a constant speed. The bottom line is that the tighter the PWM fill, the faster the motors spin, but since the battery voltage drops over time, they spin more slowly. Then the PWM filling increases and they spin faster again. And so while filling the PWM is not 100%, that is, the output will always be a logical “1”. There is nothing to be done. On charging!
The path traveled is considered a reed switch, which issues an INT10 external interrupt. As soon as the path is incremented, the data immediately pour into the UART. Accordingly, the control signals (forward, back, left, right, gas, brake, stop) come from the UART in the opposite direction.
Please note that the Chinese motors fonat with terrible force, so that no power capacitors help. In the reed switch chain such interference is caused that it seems that your trolley participates in Formula 1 according to the speed of the route. Rescues, only a 22 nF capacitor at the input of an external interrupt is swallowing this interference.
The program for taxiing the cart is taken from the previous article, where it previously controlled the mechanical arm. Only small additions have been made: two text boxes where you can see in real time the data received and sent (1,2,3,4,5,6,0 - forward, right, left, back, gas, brake, stop) , as well as the ability to edit and save the IP address of the ESP module through the GUI and the "Connect" button. We control the trolley using the arrows either from the keyboard or with the mouse in the window. True, since all the buttons in one cycle, changing the speed and direction at the same time will not work, only alternately. But of course, this is only due to the fact that the program is demonstration.

Executable file for 64 bit windows . From it, you can tear out Java code. Or take on Github .
Now that the programmer and data exchange have been tested (in general, probably, I have flashed AVR on WI-FI at least like this a hundred times), then we can return to the question of why I chose this path for myself, and not esp-link.
So let's start with the installation.
The ESP module firmware is a bit more complicated than that of a competitor. First we sew NodeMCU, then we upload the bootloader to LUA. In esp-link we sew only one firmware. But time costs are one-time. In the future, we do not touch the ESP module. On the other hand, in our case, we can finish my oak program on LUA, as we want, add our own modules, etc. etc. With esp-link this is more complicated. There knowledge of the basics of LUA and API NodeMCU will not get off.
On the computer side, the benefits are entirely in BABUINO. Just run the executable file and work. Even the JAVA environment is not necessary if you have a 64-bit version of Windows (but then you need a 200 MB disk). And if you have Linux or MacOS, then in general you can check Oracle's slogan about your Java, “Written in one place, works everywhere,” because the Java virtual machine and the same byte code. But, honestly, did not check, I do not know.
With esp-link, notable dances with tambourines are waiting for you, by installing the Tibbo manager (I know from experience). This is such a program to support virtual COM port. Requires setting parameters heap and constant presence in the system. Immediately hardly work, fasten. Then through the browser you need to configure the ESP module itself. It is important everywhere, including in Tibbo, to set the correct data exchange rates and all the stop and parity bits.
After that, already through the standard Arduino Uploader (from which I sleep ... I took the design) or through the Arduino IDE (again setting up COM), we start loading the program into the AVR very well-o-o-olgo. No, really, it is really loaded forever. Even if small. You can go to make tea during this time. The minus periodically falls off, leaving you completely puzzled why the download did not take place. And then there is only one way out - reset, restart, reset, restart ...
And BABUINO casts a lot faster, just like a regular SPI programmer (and files that fit into one packet are 1024 bytes, generally instantly). True, it does not verify. But it is fixable and will not take much time anyway, since it will be carried out simultaneously with the firmware (a good feature of the SPI protocol). Plus all SPI programming commands are available to us: fuse and lock bits, EEPROM firmware, etc. And if the entry fails, then you see all the reasons in the text box. Note. The commands are available, but there is no implementation yet. Oops.
This is what concerns wireless programming. We now turn to data transfer. In this regard, I did not use esp-link, so my reasoning will be purely theoretical.
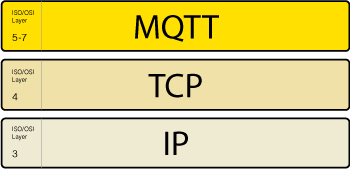
So, esp-link uses, as far as I know, the MQTT protocol. In essence, this is just an abstraction of the next level above TCP.
Without going into details, let's see why it is needed at all.
Well, for example, when you have a lot of devices in some smart home that work on this protocol. When you have something there goes to the cloud and back. When you integrate into some kind of network running on MQTT. When you have a joint project, so as not to invent something of your own, but use something ready-made and well-known colleagues.
And if you just need to send a byte stream back to back without wires, then what for you are so complicated? Why pile up another protocol on top?
Although, of course, I don’t deny the usefulness of the MQTT protocols in general, and even try to integrate its support into my downloader in the following workings and articles. But as long as I do not need him, we'll have a look further. And do you need it, decide for yourself.
In the meantime, my trolley obediently turns the wheels in the right direction and sends the telemetry of the path traveled to the computer (note that the computer firewall may not let out ESP packets). Next time we will try to control it from a mobile phone. I tried to balance it on two wheels from the keyboard, but the experience was unsuccessful. There is an idea to use smartphone accelerometers for this (I tried using a separate board with a gyroscope and an accelerometer, but it did not take off).
We now return to the second question, which was repeatedly raised during the discussion of the article in the comments. “Why not do everything on ESP? She can! And let AVR be like a port expander and suffice from it. ”
Of course it can! Although all the same, as we see without the AVR can not do.
Yes, she can, if:
1. You are a hereditary object-oriented programmer who loves to wrap himself in all sorts of wrappers, make callbacks, and does not think of life without meta tables.
2. You know well the details of the work of different operating systems. And you just spit to learn the new OS now RT (real time) its system calls and librarieswritten by the Chinese for a bowl of rice.
3. At the university, your acquaintance with microcontrollers was limited to one or two laboratory works, and you don’t even know what kind of bits and peripherals there are. And in general, you for PWM, for example, it is easier to take a software library than to use something hardware.
4. You do not need a device response in microseconds. No, of course, RTOS can try to provide it for you, for that it is a real-time operating system. But not the fact that it will provide.
5. You don’t have hundreds of kilobytes of already written code, and most importantly, already working without glitches on the AVR and you don’t need to port and debug it accordingly, but it’s easier to write on the native SDK (which you also need to learn to spit from English sources) from scratch.
Then yes. Do not read this article. And most importantly,do not write comments.
But if:
1. You have been picking with microcontrollers for many years and know their architecture by heart.
2. You do not need incomprehensibleChinese- origin bugs.
3. You have already written and debugged megabytes of code during your long life as a developer, and you absolutely do not want to rewrite and debug everything again.
4. You do not have the time or desire to study the native SDK and RTOS of anot very well-known company in the world (this is not Microsoft) in the language of the likely adversary , as well as wait and believe in their patches and updates.
5. When programming, you didn’t climb out anywhere especially for “begin if then do while switch end”, but consider the words lambda-function and korutin as abusive Latin.
6. You, as a matter of fact, to your already perfectly working device, but in accordance with the trends of the new times, you just need a wireless bridge for identification, programming and data exchange.
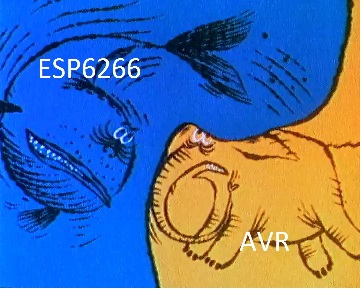
Well, use for this ESP8266. Just like a wireless bridge. You see, they use the AVR as a port extender for ESP. And we will do the opposite!
In fact, please do not take my last statements too seriously. In fact, this is just a joke. Any sufficiently experienced developer makes his choice based on many factors such as: speed and power consumption parameters, device life cycle, continuity with past developments, the cost of the product itself and the cost of transferring to a new platform, reliability, time required to study new architectures, SDK, operating systems, the availability of staff with such experience in a joint project, and so on.
Therefore, it is better when:

I would be glad if you liked the article. I do not cite a bibliography, it is the same as in the previous article.
PS
And finally, about the signals from space. The whole secret is that the ESP module with NodeMCU firmware loves to send all information to the console. For example, after an emergency reboot (and ESP happens sometimes, believe me, the glucose is still the same). Or, for example, if you forgot to remove print (“something there”) from the Lua program itself after debugging. Or when you get the Deprecated (outdated) API (you changed the firmware and must now use the new spelling, for example, when you start the UDP server) and ESP will now always remind you of this. Don't rewrite the code yet.
And the problem is that all of this is neatly and methodically sent to the console, that is, to the UART port. Well, what if your UART port is waiting for a command or data at this time to tell your cart to go ahead?Then your cart may fall off the table.
So that this moment is also worth considering.
After the first article on this topic, I received a lot of friendly responses: “Why the hell did you take arduin if everything could be done exclusively on ESP8266” or “Why did you not use esp-link ”. “Really why?” - I thought, and I already rolled out this article and updated several of my programs as new arguments.
So, meet the wireless programmer for AVR microcontrollers BABUINO version 0.9
Details under the cut:
The original version of the program was published in the previous article and, in principle, did almost the same thing as the new version. But it was extremely inconvenient in work. As, however, and competing esp-link. Therefore, with a sigh, I screwed the GUI to JAVA. Now you can safely select the file you need to download via the window manager, and also edit the IP address of the target device. I nevertheless sewed the TCP port number tightly (it is edited only in the code), but in theory it needs to be changed only if this port is used somewhere else (but then you will have to change its number in the ESP8266 firmware).
The microcontroller is also used while the one with a FLASH memory size of 32 KB, for example, is the well-known Mega328P. As I mentioned in the last article, theoretically my programmer sews versions in 16 kbytes, and maybe even 8 kbytes. And of course in 64 KB and 128 KB versions of the AVR, he can probably even flash the first 32 KB of memory. But I don’t have such microcontrollers on my hands, and I really cannot say how it really is. The whole point is that 16-bit addresses in standard SPI programming commands are so cleverly divided and cut (bit here, bit there), that it’s not easy to understand how everything will be with a different memory size other than 32 kbyte.
Yes, the program after recording is not verified, the special registers of the AVR are not readable, the EEPROM also does not write. But all this is theoretically possible to do without problems (as opposed to the fundamental limitations of loading code through the UART, as in esp-link). You can add, I do not mind, the product is not commercial.
Here is the executable file for 64 bit windows . From it, you can tear out Java code. Or take on Github
So, we start.
Then everything is simple, open the HEX file you need (yes, the program learned to convert the BIN format to HEX, hooray!) Enter the IP address of ESP8266 that you need and click “Upload” (how to find the IP address of the ESP module - a separate story). If the programmer finds ESP8266, then he quickly (much faster than esp-link), stuffs your code into it, and she herself sends it further to the AVR microcontroller via SPI interface. The programmer describes in detail his actions in the window and can even be trusted, except for the fact that the program was recorded in the AVR. As I have already said, there is no verification of the record, but the SPI interface is purely synchronous, it generally is on the drum, is there anyone on the second end of the line or not. He throws the data, and the answer does not wait.
After closing the program (via “Stop” or simply closing the window), the data you entered (if you pressed the Upload button before) is saved in the tcp_dat.txt file in the root directory of drive C so that you do not have to suffer for a long time when you open it again recruit. In general, the program window can not be closed. By experience, it does not bother anyone.
Now let's turn in the direction of the ESP module and remember again, now it’s detailed how to connect it to the AVR and how to flash it in order to use the aforementioned programmer, and also just drive the data via WI-FI without wires.
So, first of all the wiring diagram. Please note that we need ESP8266 in versions with a sufficient amount of GPIO. We will need free outputs for RESET, MOSI and SLK for programming on the SPI interface, apart from the fact that for data exchange we will also use the usual UART with its RX and TX. For this, the most convenient price and quality seemed to me ESP8266-07.
We take it and immediately solder two resistors with a nominal value of 5-10 kΩ. First to EN (CH-PD) and power, second to GPIO15 and ground
Now you can hook it to the adapter, through which we will upload the NodeMCU firmware, and then our loader program on LUA.
Adapters million, take any. Connect, as usual, RX c TX and vice versa. We make the earth common. Power to the ESP8266 is served separately, and the adapter is enough for its USB port. We throw zero on GPIO0 and fill in the latest NodeMCU firmware (you can take it here , or build your own) through the NODE MCU PyFlasher program .
All this is in principle described in the previous article and many times on the Internet. Next, remove the zero with GPIO0 (you can just leave it hanging, that's okay) and open the ESPlorer environment for debugging and downloading programs to Lua. True, this infection without the JAVA environment does not work. So this thing ( Download Java on your desktop computer now! ) You will have to install all the same beforehand.
After connecting to ESPlorer, he will slightly format the ESP module, informing you with appropriate messages. (the main thing at this moment not to touch anything), and then rebutnet ESP. You can start working on downloading LUA programs.
And we will have the following program:
Loader for AVR to Lua in ESP8266
function InstrProgrammingEnable () -- instruction for MC "enable programming" p=0 while p<31 do p=p+1 pin=8 gpio.write(pin, gpio.LOW) spi.send(1, 0xAC,0x53) read = spi.recv( 1, 8) spi.send(1,0,0) gpio.write(pin, gpio.HIGH) if (string.byte(read)== 83) then --print("connection established") p=33 if(p==31) then --print("no connection") end end end end function ProgrammingDisable () pin=2--END OF RESET FOR MK GPIO4 gpio.mode(pin, gpio.INPUT) pin=8 gpio.mode(pin, gpio.INPUT) -- CE chip enable not used GPIO15 pin=5--CLK MASTER for SPI GPIO14 used gpio.mode(pin, gpio.INPUT) pin=6--MISO MASTER for SPI GPIO 12 may not used gpio.mode(pin, gpio.INPUT) pin=7--MOSI MASTER for SPI //GPIO13 used gpio.mode(pin, gpio.INPUT) end --PROGRAMMING ENABLE function ProgrammingEnable () pin=2-- RESET FOR MK gpio.mode(pin, gpio.OUTPUT) gpio.write(pin, gpio.LOW) pin=2--POZITIV FOR 4MSEC RESET FOR MK gpio.mode(pin, gpio.OUTPUT) gpio.write(pin, gpio.HIGH) tmr.delay(4) gpio.mode(pin, gpio.OUTPUT) gpio.write(pin, gpio.LOW) tmr.delay(25000) end function InstrFlashErase() pin=8 gpio.write(pin, gpio.LOW) spi.send(1,0xAC,0x80,0,0) gpio.write(pin, gpio.HIGH) tmr.delay(15000) pin=2--RESET FOR MK gpio.mode(pin, gpio.OUTPUT) gpio.write(pin, gpio.HIGH) tmr.delay(20000) gpio.write(pin, gpio.LOW) --print( "FLASH is erased") InstrProgrammingEnable () end function InstrStorePAGE(H, address, data) pin=8 gpio.write(pin, gpio.LOW) spi.send(1,H,0,address,data) gpio.write(pin, gpio.HIGH) tmr.delay(500) end function InstrWriteFLASH(page_address_low,page_address_high) pin=8 gpio.write(pin, gpio.LOW) spi.send(1,0x4C,page_address_high,page_address_low,0) gpio.write(pin, gpio.HIGH) tmr.delay(5000)-- end function Programming (payload) pin=8--CS MASTER for SPI gpio.mode(pin, gpio.OUTPUT, gpio.PULLUP) pin=4--LED LIGHTS ON LOW gpio.mode(pin, gpio.OUTPUT) gpio.write(pin, gpio.LOW) --print(string.len(payload)) page_count = 7 -- 1 for k =0 ,page_count ,1 do--quantity of pages for i=0 , 127, 2 do-- -1 address = i/2 data=payload:byte(i+1+128*k) if data == nil then data = 0xff end InstrStorePAGE(0x40,address,data) -- tmr.delay(100)-- otherwise not in time write data =payload:byte(i+1+1+128*k) if data == nil then data = 0xff end InstrStorePAGE(0x48,address,data) -- tmr.delay(100) end page_address_low=bit.band(k ,3)*64 -- 3 11 page_address_high=k/4+frame1024*2 tmr.delay(1000) InstrWriteFLASH(page_address_low,page_address_high) tmr.wdclr() end pin=4--LED gpio.mode(pin, gpio.OUTPUT) gpio.write(pin, gpio.HIGH) end --MAIN BLOCK wifi.setmode(wifi.STATION) --wifi.sta.config("SSID","password ") -- set SSID and password of your access point station_cfg={} tmr.delay(30000) station_cfg.ssid="SSID" tmr.delay(30000) station_cfg.pwd="Password" tmr.delay(30000) wifi.sta.config(station_cfg) tmr.delay(30000) wifi.sta.connect() tmr.delay(1000000) --print(wifi.sta.status()) --print(wifi.sta.getip()) while ( wifi.sta.status()~=1 ) do if( wifi.sta.status()==5) then break end end prog_address=""; sv=net.createServer(net.TCP,30) tmr.delay(100) --print("SERVER READY") sv:listen(40000,function(c)-- , c:on("receive", function(c, payload) --print(payload) if (payload =="program\r\n") then c:send("ready\r\n") --print("ready for program\r\n") tmr.wdclr() spi.setup(1, spi.MASTER, spi.CPOL_LOW, spi.CPHA_LOW, spi.DATABITS_8,80,spi.FULLDUPLEX) -- SPI 320 115 000 -- 80 1 ProgrammingEnable () tmr.delay(100) InstrProgrammingEnable () tmr.delay(100) InstrFlashErase() tmr.delay(100) frame1024=0-- st=net.createServer(net.TCP,30)-- AWR, stop program st:listen(40001,function(c) c:on("receive", function(c, payload) tmr.wdclr() Programming (payload) frame1024=frame1024+1 end) end) end if (payload =="data\r\n") then tmr.wdclr() c:send("ready\r\n") -- print("ready for data\r\n") c:on("receive", function(c, prog_address_payload) prog_address=prog_address_payload-- IP UDP -- print(prog_address) c:send(prog_address) srv=net.createUDPSocket()-- , data stop srv:listen(50000) uart.setup(0,9600,8,0,1,0) srv:on("receive", function(srv, pl) -- UDP pl=pl*1 -- print(pl) uart.write(0,pl) -- UART AVR end) uart.on("data", 1, function(data) -- UART AVR srv:send(50000,prog_address,data) -- UDP end, 0) tmr.wdclr() end) end if (payload =="stop data\r\n") -- then ready = false if(srv~=nil) then srv:close() -- print("stop data") end collectgarbage() end if (payload =="stop program\r\n") then if(st~=nil) then st:close() frame1024=0 ProgrammingDisable () -- print("stop program") end collectgarbage() end end) end)
It is almost the same as that described in the first part, but now it is able not only to transmit the data stream from the computer to the AVR microcontroller, but now to do it in the opposite direction.
In the process of writing had to resolve an interesting snag. When we pour data from a computer to ESP8266 using the UDP protocol, there are no problems. The IP address of the ESP module is known (we drive it ourselves at the beginning, if that), the port is known, everything is fine. But when we try to send data in the opposite direction, we cannot do this, because the ESP module does not know the IP address of the computer on which the programmer is running. Rather, he knows it, because before that we make contact via TCP protocol for sending control commands (program, data, stop). And when using this protocol, devices exchange their addresses, because it is bidirectional. But he won't tell us about it. In any case, I did not find a function in the NodeMCU API to pull it out. Of course, you can drive the IP of the computer directly into the bootloader on the ESP8266, but this is not an option. Suddenly, we run a program to exchange data on another computer. Or he does not have one network card.
So I made a crutch. We transfer the IP of the computer on which the program is running explicitly before the start of data exchange. Luckily in the JAVA API there is a function to determine the network address of the host on which the program is running. ESP8266, having received this address, can now easily send data not only to the AVR, but also from it. As for the program at LUA, it is very oak, naive and simple, and this is due to the fact that in this language I am still very badly oriented.
So, with the help of ESPlorer, we register the updated bootloader in ESP8266. Do not forget to either initially call the file as init.lua or rename it via ESPlorer,
Next we need to determine and fix the IP address of the ESP module in our internal network. We go to the local router under admin rights and see something like that.
This address is still dynamic (that is, another one may be assigned after reconnection), so we make its binding to the ESP8266 MAC address in the same place in the router.
You can even write it (the last digits) on the module itself, if you have sclerosis.
The ESP module is ready for operation, you can connect it with the AVR microcontroller.
Run BABUINO, write the IP address of the ESP module, select the HEX file (some BLINK), click “Upload” and enjoy the flashing LED. The programmer will write something like this in his window:
But sometimes it can be, if the ESP module for some reason keeps its mouth shut:
Now let's see how our boot loader in ESP8266 can exchange data in both directions. To do this, we will control the robot cart from the keyboard of the computer, and it will send us its own traversed path. My first four-wheel robo cart died the death of the brave, receiving a signal from Space and falling off the table (this astral fact will be explained later). Therefore, until a new acrylic frame comes from China, experiments will be conducted over a two-wheeled robot trolley, which, by the way, I’ve been trying to make it balance on two wheels for about a year, but so far without success. According to the wiring diagram of the electronics and the program for the AVR, these carts are no different, which we will use.
The program for the work of the cart is written in C and should not cause great difficulties in understanding. We are constantly writing a new speed value in the PWM controller registers, and it issues signals to the motors. There is a feedback circuit on the internal microcontroller ADC. When the battery voltage drops, the speed is programmatically increased. Due to this, up to a full drawdown, the cart rolls at a constant speed. The bottom line is that the tighter the PWM fill, the faster the motors spin, but since the battery voltage drops over time, they spin more slowly. Then the PWM filling increases and they spin faster again. And so while filling the PWM is not 100%, that is, the output will always be a logical “1”. There is nothing to be done. On charging!
C program for microcontroller AVRmega328P
/* * TWO_WEELS_ROBOT_NEW.c * * Created: 22.09.2017 23:48:49 * Author : User */ #define F_CPU 16000000 #include <avr/io.h> #include <stdint.h>// #include <avr/interrupt.h> #include <math.h> // #include <stdio.h> // - #include <setjmp.h> #include <stdlib.h> // volatile uint8_t Speed_of_ADC_conversion=0; volatile uint8_t U_BATTERY; // volatile uint8_t avr_speed=30;// , // 8 - 110 // , 53. 10 volatile uint8_t komanda_s_kompa = 0; volatile uint8_t transmition_ready = 0; volatile uint8_t wheel_counter=0; #define Left_Speed OCR0A // #define Right_Speed OCR0B // void time_delay(long dell)// // { long i; cli(); sei(); dell=dell*1500; for(i=0;i<dell;i++){;;}; } ISR(USART_RX_vect) // UART { komanda_s_kompa=UDR0; } ISR(PCINT1_vect )//PC2 int 10 // { transmition_ready=1; wheel_counter++; } ISR(TIMER0_OVF_vect)// 30 , // , 90 { Speed_of_ADC_conversion++; if (Speed_of_ADC_conversion<2) {ADCSRA |=(1<<ADSC);}// if(Speed_of_ADC_conversion>2)// { ADCSRA &=~(1<<ADSC); Speed_of_ADC_conversion=0; U_BATTERY = ADCH;//// // , 1/3 // //. U = 8 (2 - LN298 1 ) = 7 / 2 // 3,5 .. , 1 if(U_BATTERY<=avr_speed)// {Right_Speed++;// - , Left_Speed++;} else {Right_Speed--;// , Left_Speed--;} } } void stop() { PORTD|=(1<<PORTD3); PORTD|=(1<<PORTD2); PORTD|=(1<<PORTD4); PORTD|=(1<<PORTD7); } void go_left() { PORTD|=(1<<PORTD3);// PORTD&=~(1<<PORTD2); PORTD|=(1<<PORTD4);// PORTD&=~(1<<PORTD7); } void go_right() { PORTD|=(1<<PORTD2);// PORTD&=~(1<<PORTD3); PORTD|=(1<<PORTD7);// PORTD&=~(1<<PORTD4); } void go_ahead()// { PORTD|=(1<<PORTD3);// PORTD&=~(1<<PORTD2); PORTD|=(1<<PORTD7);// PORTD&=~(1<<PORTD4); } void go_back()// { PORTD|=(1<<PORTD2);// PORTD&=~(1<<PORTD3); PORTD|=(1<<PORTD4);// PORTD&=~(1<<PORTD7); } int main(void) { cli(); // UART 9600 UCSR0A=0; UCSR0B=0b10011000; UCSR0C=0b00000110; UBRR0L=103; UBRR0H=0; // INT0 2 10 PCICR|=(1<<PCIE1);// 14-8 PCMSK1|=(1<<PCINT10);// INT10 DDRC&=~(1<<PORTC2); // PORTC|=(1<<PORTC2); // ADC1, ADMUX= 0b01100001; // V ref 5 , ADC1 , 2 ADCSRA=0b10010110;// ADCSRB=0; DDRC&=~(1<<PORTC1);// / // 0 , B TCCR0A |=(1<<COM0A1)|(1<<COM0B1);// TCCR0A &=~(1<<COM0A0)&~(1<<COM0B0); TCCR0A |=(1<<WGM00); TCCR0B &=~(1<<WGM02)&~(1<<WGM01);// c TCCR0B|=0b00000101; // 30 // CS02 CS01 CS00 - 000 - ; 001 ; 010 c 8; // 011 -64; 100 -256; 101 -1024 TIMSK0|=(1<<TOIE0);// 0 DDRB|=(1<<5);// DDRD=0b11111110; // , RX PORTD&=~(1<<PORTD5)&~(1<<PORTD6); // Left_Speed=10;// Right_Speed=10;// ( 8-12 ) sei(); PORTB |=(1<<5);// time_delay(500); PORTB &=~(1<<5); time_delay(500); PORTB |=(1<<5); time_delay(500); PORTB &=~(1<<5); time_delay(500); PORTB |=(1<<5); while (1) { if( (UDRE0)){ if(transmition_ready==1)// { UDR0=wheel_counter; transmition_ready=0; } } switch (komanda_s_kompa) { case 2: go_right(); break; case 1: go_left(); break; case 3: go_ahead(); break; case 4: go_back(); break; case 5: avr_speed++; if (avr_speed>100) { avr_speed=100; } time_delay(200); // break; case 6: avr_speed--; if (avr_speed<0) { avr_speed=0; } time_delay(200);// break; case 0: stop(); break; } } }
The path traveled is considered a reed switch, which issues an INT10 external interrupt. As soon as the path is incremented, the data immediately pour into the UART. Accordingly, the control signals (forward, back, left, right, gas, brake, stop) come from the UART in the opposite direction.
Please note that the Chinese motors fonat with terrible force, so that no power capacitors help. In the reed switch chain such interference is caused that it seems that your trolley participates in Formula 1 according to the speed of the route. Rescues, only a 22 nF capacitor at the input of an external interrupt is swallowing this interference.
The program for taxiing the cart is taken from the previous article, where it previously controlled the mechanical arm. Only small additions have been made: two text boxes where you can see in real time the data received and sent (1,2,3,4,5,6,0 - forward, right, left, back, gas, brake, stop) , as well as the ability to edit and save the IP address of the ESP module through the GUI and the "Connect" button. We control the trolley using the arrows either from the keyboard or with the mouse in the window. True, since all the buttons in one cycle, changing the speed and direction at the same time will not work, only alternately. But of course, this is only due to the fact that the program is demonstration.
Executable file for 64 bit windows . From it, you can tear out Java code. Or take on Github .
Now that the programmer and data exchange have been tested (in general, probably, I have flashed AVR on WI-FI at least like this a hundred times), then we can return to the question of why I chose this path for myself, and not esp-link.
So let's start with the installation.
The ESP module firmware is a bit more complicated than that of a competitor. First we sew NodeMCU, then we upload the bootloader to LUA. In esp-link we sew only one firmware. But time costs are one-time. In the future, we do not touch the ESP module. On the other hand, in our case, we can finish my oak program on LUA, as we want, add our own modules, etc. etc. With esp-link this is more complicated. There knowledge of the basics of LUA and API NodeMCU will not get off.
On the computer side, the benefits are entirely in BABUINO. Just run the executable file and work. Even the JAVA environment is not necessary if you have a 64-bit version of Windows (but then you need a 200 MB disk). And if you have Linux or MacOS, then in general you can check Oracle's slogan about your Java, “Written in one place, works everywhere,” because the Java virtual machine and the same byte code. But, honestly, did not check, I do not know.
With esp-link, notable dances with tambourines are waiting for you, by installing the Tibbo manager (I know from experience). This is such a program to support virtual COM port. Requires setting parameters heap and constant presence in the system. Immediately hardly work, fasten. Then through the browser you need to configure the ESP module itself. It is important everywhere, including in Tibbo, to set the correct data exchange rates and all the stop and parity bits.
After that, already through the standard Arduino Uploader (from which I sleep ... I took the design) or through the Arduino IDE (again setting up COM), we start loading the program into the AVR very well-o-o-olgo. No, really, it is really loaded forever. Even if small. You can go to make tea during this time. The minus periodically falls off, leaving you completely puzzled why the download did not take place. And then there is only one way out - reset, restart, reset, restart ...
And BABUINO casts a lot faster, just like a regular SPI programmer (and files that fit into one packet are 1024 bytes, generally instantly). True, it does not verify. But it is fixable and will not take much time anyway, since it will be carried out simultaneously with the firmware (a good feature of the SPI protocol). Plus all SPI programming commands are available to us: fuse and lock bits, EEPROM firmware, etc. And if the entry fails, then you see all the reasons in the text box. Note. The commands are available, but there is no implementation yet. Oops.
This is what concerns wireless programming. We now turn to data transfer. In this regard, I did not use esp-link, so my reasoning will be purely theoretical.
So, esp-link uses, as far as I know, the MQTT protocol. In essence, this is just an abstraction of the next level above TCP.
Without going into details, let's see why it is needed at all.
Well, for example, when you have a lot of devices in some smart home that work on this protocol. When you have something there goes to the cloud and back. When you integrate into some kind of network running on MQTT. When you have a joint project, so as not to invent something of your own, but use something ready-made and well-known colleagues.
And if you just need to send a byte stream back to back without wires, then what for you are so complicated? Why pile up another protocol on top?
Although, of course, I don’t deny the usefulness of the MQTT protocols in general, and even try to integrate its support into my downloader in the following workings and articles. But as long as I do not need him, we'll have a look further. And do you need it, decide for yourself.
In the meantime, my trolley obediently turns the wheels in the right direction and sends the telemetry of the path traveled to the computer (note that the computer firewall may not let out ESP packets). Next time we will try to control it from a mobile phone. I tried to balance it on two wheels from the keyboard, but the experience was unsuccessful. There is an idea to use smartphone accelerometers for this (I tried using a separate board with a gyroscope and an accelerometer, but it did not take off).
We now return to the second question, which was repeatedly raised during the discussion of the article in the comments. “Why not do everything on ESP? She can! And let AVR be like a port expander and suffice from it. ”
Of course it can! Although all the same, as we see without the AVR can not do.
Yes, she can, if:
1. You are a hereditary object-oriented programmer who loves to wrap himself in all sorts of wrappers, make callbacks, and does not think of life without meta tables.
2. You know well the details of the work of different operating systems. And you just spit to learn the new OS now RT (real time) its system calls and libraries
3. At the university, your acquaintance with microcontrollers was limited to one or two laboratory works, and you don’t even know what kind of bits and peripherals there are. And in general, you for PWM, for example, it is easier to take a software library than to use something hardware.
4. You do not need a device response in microseconds. No, of course, RTOS can try to provide it for you, for that it is a real-time operating system. But not the fact that it will provide.
5. You don’t have hundreds of kilobytes of already written code, and most importantly, already working without glitches on the AVR and you don’t need to port and debug it accordingly, but it’s easier to write on the native SDK (which you also need to learn to spit from English sources) from scratch.
Then yes. Do not read this article. And most importantly,
But if:
1. You have been picking with microcontrollers for many years and know their architecture by heart.
2. You do not need incomprehensible
3. You have already written and debugged megabytes of code during your long life as a developer, and you absolutely do not want to rewrite and debug everything again.
4. You do not have the time or desire to study the native SDK and RTOS of a
5. When programming, you didn’t climb out anywhere especially for “begin if then do while switch end”, but consider the words lambda-function and korutin as abusive Latin.
6. You, as a matter of fact, to your already perfectly working device, but in accordance with the trends of the new times, you just need a wireless bridge for identification, programming and data exchange.
Well, use for this ESP8266. Just like a wireless bridge. You see, they use the AVR as a port extender for ESP. And we will do the opposite!
In fact, please do not take my last statements too seriously. In fact, this is just a joke. Any sufficiently experienced developer makes his choice based on many factors such as: speed and power consumption parameters, device life cycle, continuity with past developments, the cost of the product itself and the cost of transferring to a new platform, reliability, time required to study new architectures, SDK, operating systems, the availability of staff with such experience in a joint project, and so on.
Therefore, it is better when:
I would be glad if you liked the article. I do not cite a bibliography, it is the same as in the previous article.
PS
And finally, about the signals from space. The whole secret is that the ESP module with NodeMCU firmware loves to send all information to the console. For example, after an emergency reboot (and ESP happens sometimes, believe me, the glucose is still the same). Or, for example, if you forgot to remove print (“something there”) from the Lua program itself after debugging. Or when you get the Deprecated (outdated) API (you changed the firmware and must now use the new spelling, for example, when you start the UDP server) and ESP will now always remind you of this. Don't rewrite the code yet.
And the problem is that all of this is neatly and methodically sent to the console, that is, to the UART port. Well, what if your UART port is waiting for a command or data at this time to tell your cart to go ahead?
So that this moment is also worth considering.
All Articles