How to participate in the Ethereum based ICO. Beginner's Guide
HYIP around ICO is growing and expanding, more and more new projects announce the collection of investments in this way.
There are a lot of advantages for teams, but also for ICO participants, that is, investors, there are enough of them. Firstly, this is the potential to increase the cost of tokens. Especially if you participate in pre-ICO, when tokens are sold at half price or even cheaper. Imagine if you bought shares of Apple, Google or Microsoft for a dozen dollars at the time of their release on the exchange, and even with a 50% discount?
Secondly, many services will use tokens issued by them to pay for their own services in the future. So these services, if you need them, can be received for years literally for a penny.
All this is very good and attractive, but how to take part in the ICO to a person who heard something before 2017, but did not have any practical experience with cryptocurrency? Let's figure it out.
First, recall what all these incomprehensible words mean.
ICO ("ICT") , short for Initial Coin Offering (initial supply of coins), is tracing from the reduction of Initial Public Offering (initial supply of stocks) - events when a private company becomes public and issues shares on the exchange. An ICO is the collection by any project, company, or team of funds to develop or develop a project. Moreover, funds are attracted in cryptocurrency to avoid a long and costly procedure of state regulation. This has its pros and cons, but here we will not discuss these issues.
The token is a “secondary” cryptocurrency, the internal currency of the project. A close analogue is a store coupon or gift certificate. Only in the world of cryptocurrencies tokens are usually also traded on the exchange. You can’t usually exchange the gift certificate of the store for money, but you can just token it.
Ethereum (“ethereum”) is a distributed virtual computer, on the basis of which most projects carry out their ICO. Ethereum has its own internal cryptocurrency - Ether ("ether"). In the Ethereum, you can create a smart contract (essentially an analogue of a contract, all items of which are strictly programmed), run it in this distributed virtual machine and after that no one, including developers, can change its conditions.
Wallet, a “wallet” for a cryptocurrency, is a long string of characters, something like an identifier, an analogue of an e-mail address if you like. There you can send a payment in cryptocurrency, and this payment will be saved at this address. A person can create any number of such wallets.
So, we decided to buy tokens in the ICO of a project. Let's figure out what to do.
Most ICOs are conducted on the Ethereum system and accept Ether as payment for their tokens. Therefore, we are interested in the Ethereum wallet, and with the support of the ERC-20 protocol.
In our opinion, the best services for creating wallets are:
In this article, we will use MyEtherWallet as an example. Go to the project site - you will immediately see the suggestion to create a wallet: Create New Wallet.
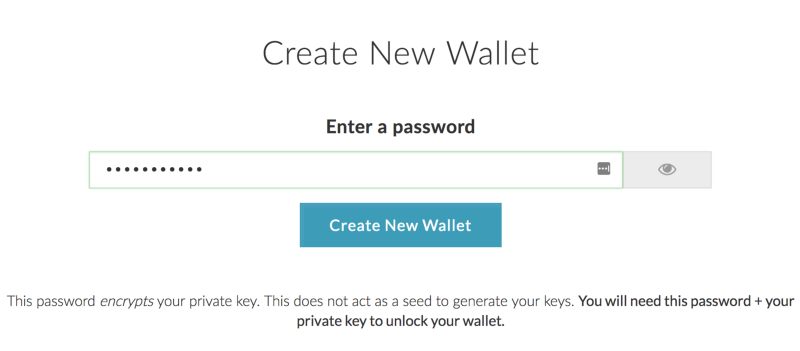
Create a good password, type it in the input line, remember or write it down and click on 'Create New Wallet'. Immediately make a reservation that MyEtherWallet does not store any passwords, codes and addresses, so that the safety of all passwords lies entirely on the user. The site recalls this at every turn.
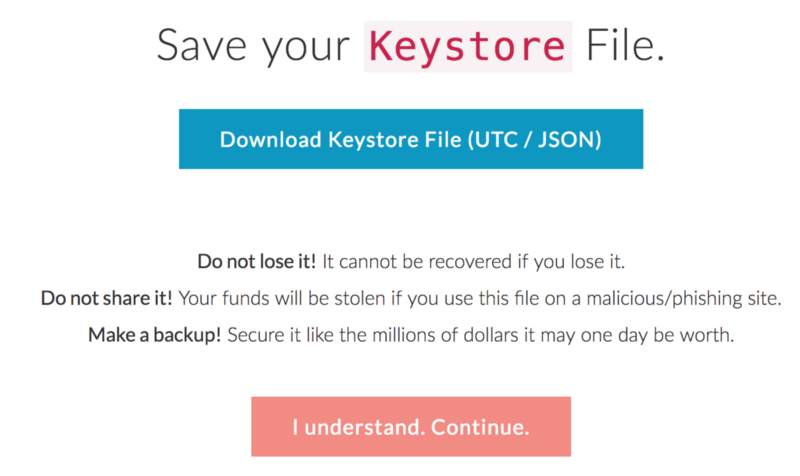
Here you are invited to save the Keystore File. This is a digital signature file for your wallet. Click 'Download Keystore File' and save the file somewhere in a very safe place, to a computer, on a USB flash drive and be sure to make a backup. The file must not be lost or prevented from being leaked to attackers, for example, in the event of a computer being infected with a virus. Remember, this is your money.
Go to the next step.
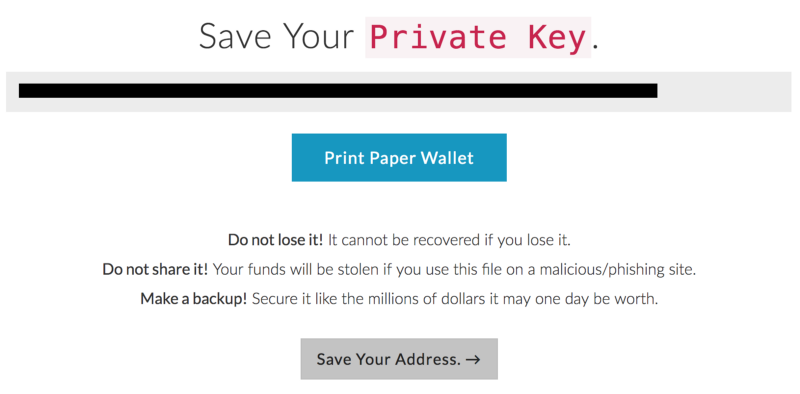
Here we see our “secret key”, the Private Key. This is a string of characters. Write it down or type it in to have a paper copy. Once again, if the secret key is lost, it is technically impossible to recover it, this is the whole essence of cryptocurrency.
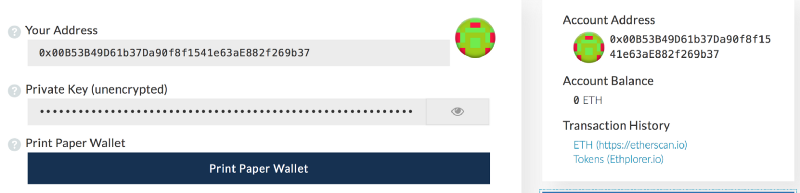
Congratulations, the wallet is created! Now you need to enter it, "log in". On the next screen, MyEtherWallet will offer to open the wallet with the newly created key.

There are several ways to enter your wallet. For simplicity, we use the method of entering the secret key, which was obtained in the previous step and, we hope, securely saved. Copy the secret key into the input box and click on 'Unlock'.
Another option is to use the key file that you saved on your computer, enter the password you created in the first step and then click 'Unlock'.
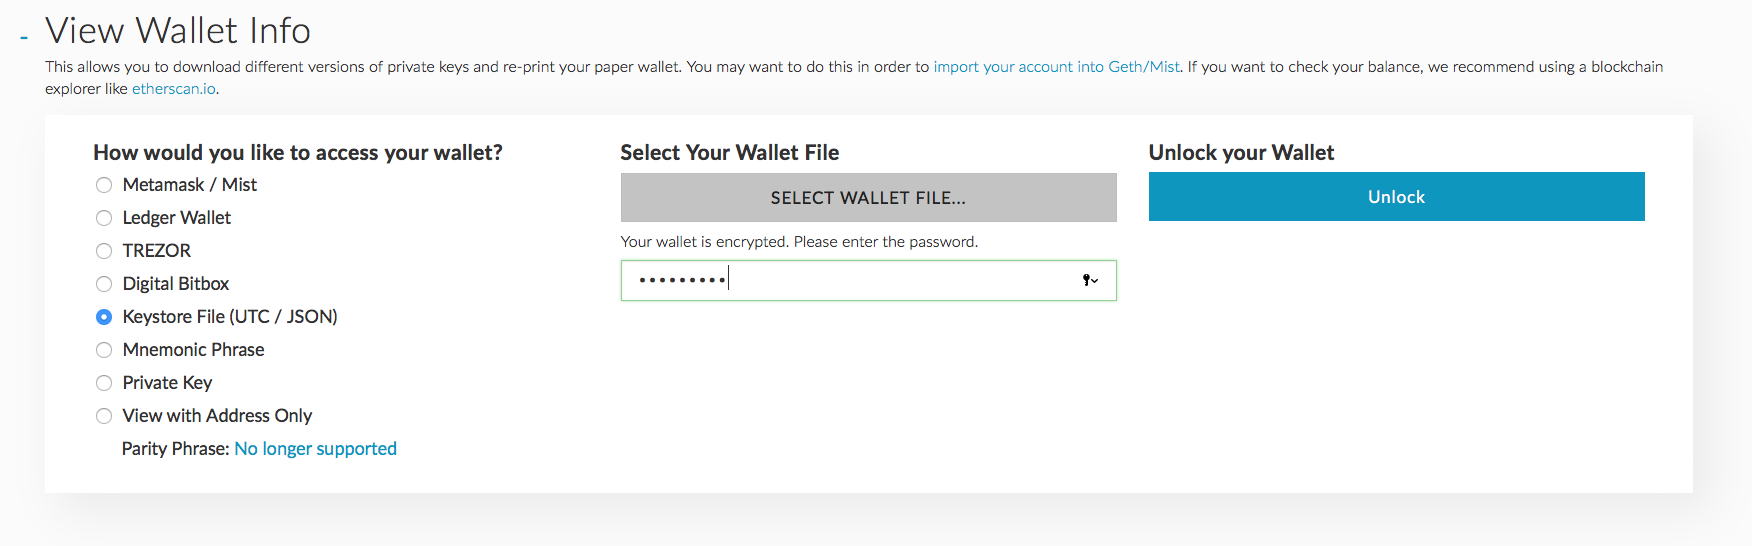
After successfully entering the key, you see the contents of your wallet and can perform operations.
Now, in order to have something to pay for the tokens of the project going out to the ICO, we need the Ethereum cryptocurrency, the “ether”. It is sold on cryptocurrency exchanges. There are many exchanges, for example, Coinbase , Kraken , Bitfinex , Bittrex . Some of them allow to exchange “ordinary” (fiat) money for cryptocurrency, that is, rubles, dollars, euros. Others work only with cryptocurrency, for example, allow you to buy broadcast for Bitcoin. On the exchanges you can find the most favorable exchange rate, but at the same time working with exchanges is not easy. You must send a passport photo and go through the verification process.
Fortunately, there is another, easier way to buy Ether for rubles - is to use one of the exchangers. We recommend to visit the site bestchange.ru and choose the best course.
We indicate the method of payment (for example, the Tinkoff card) and the currency we are going to buy (Ethereum).

Select the exchanger with the best rate and go into it. Next, you need to follow the instructions of a specific exchanger, in this article we will not go into this question. But you should have no problems.
Go to the site of the project you are interested in. For example, take the game project Lordmancer2. The team promises that after the ICO, these tokens will be able to pay for game things and characters, as well as to remove tokens from the game to the outside and exchange for cryptocurrency. That is, earn by playing. I think the value of these tokens will grow well.
On ICO sites there is usually a lot of information about the project, including a description of the business model (“whitepaper”), a team, mentors and a block that reflects the progress of the fundraising.
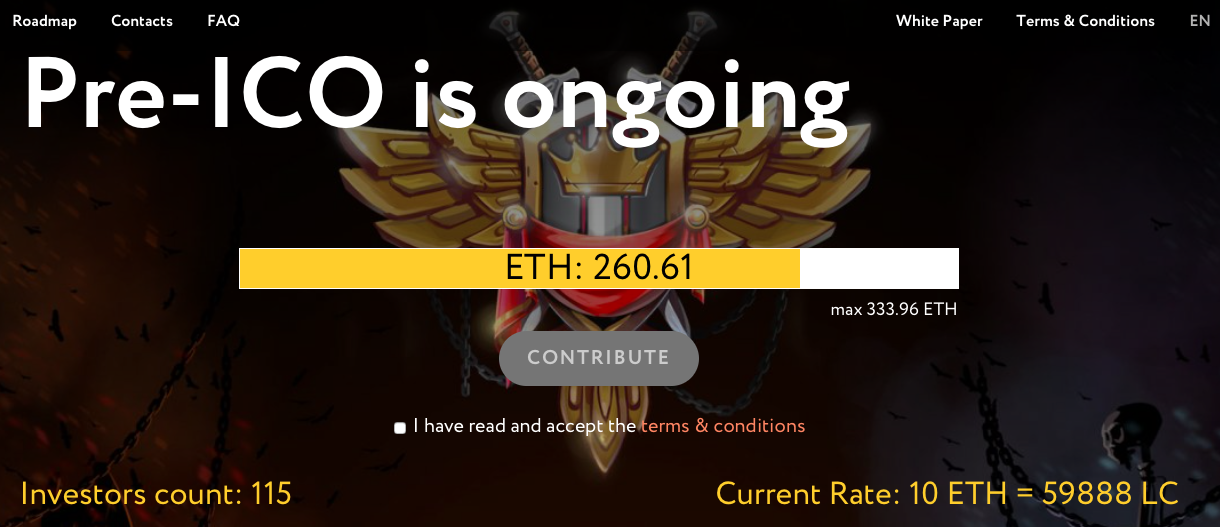
For example, it indicates the total amount of the “ether” collected by the project, the number of investors, and the exchange rate of the ether for the project tokens.
To buy tokens, you need to agree with the formal conditions and click on 'CONTRIBUTE'.

A window will appear that contains all the necessary information: the address of the wallet where you want to send the broadcast, the minimum purchase volume and the recommended “gas” (more on that later).
The most important thing here is the address of the wallet. This is the same wallet as yours. Its address is a long string of characters. Copy it to the clipboard (keys ctrl-c / cmd-c).
Now open MyEtherWallet and click on it 'Send Ether & Tokens'.

Insert the address of the ICO wallet (ctrl-v / cmd-v buttons), enter the amount of air that you decided to send, and the amount of "gas".
What is this gas? Each transaction in the Ethereum network requires a certain amount of "fuel" for the network to execute it. This is an analogue of the bank commission, only its size is set by the sender of the money voluntarily. If you set too low the amount of "gas", the transaction may either not be completed at all, or go for a very long time. In the case of ICO, this is not very good, because many ICOs collect money very quickly, and you and your transaction may simply not have time for distribution. In the wallet MyEtherWallet, the desired amount of "gas" is set in the upper right block.

We recommend setting the value between 4 and 10 Gwei. This is an economical, but well working option.
Finally, click 'Generate Transaction' and then 'Send Transaction'.
That's all! Your broadcast went to ICO, and tokens were sent to you in return. Since they are inherently “secondary” cryptocurrency over Ethereum, you can save them directly in your MyEtherWallet.
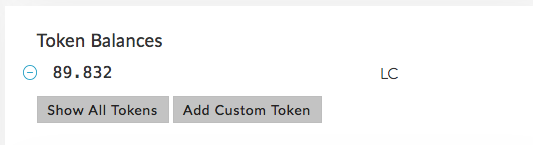
Click on 'View Wallet Info' and open the wallet as before. On the right you will see the block 'Token Balances'.
Click 'Add Custom Token'.
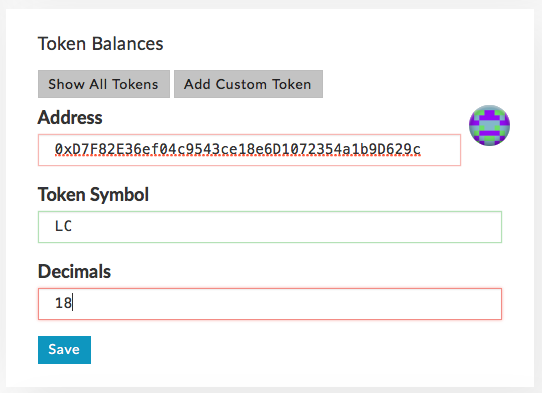
All the necessary information for these fields can usually be obtained on the ICO website, or ask them in the chat, you will be happy to help. A few seconds after clicking 'Save', you will see the balance of your tokens in your wallet.
Well that's all! You bought the tokens of the project that you liked, now they are completely safe in your wallet. You have supported, we hope, a cool project and an excellent team, and besides, you gave yourself a chance to make good money! See you at the next ICO!
There are a lot of advantages for teams, but also for ICO participants, that is, investors, there are enough of them. Firstly, this is the potential to increase the cost of tokens. Especially if you participate in pre-ICO, when tokens are sold at half price or even cheaper. Imagine if you bought shares of Apple, Google or Microsoft for a dozen dollars at the time of their release on the exchange, and even with a 50% discount?
Secondly, many services will use tokens issued by them to pay for their own services in the future. So these services, if you need them, can be received for years literally for a penny.
All this is very good and attractive, but how to take part in the ICO to a person who heard something before 2017, but did not have any practical experience with cryptocurrency? Let's figure it out.
Little about terms and names
First, recall what all these incomprehensible words mean.
ICO ("ICT") , short for Initial Coin Offering (initial supply of coins), is tracing from the reduction of Initial Public Offering (initial supply of stocks) - events when a private company becomes public and issues shares on the exchange. An ICO is the collection by any project, company, or team of funds to develop or develop a project. Moreover, funds are attracted in cryptocurrency to avoid a long and costly procedure of state regulation. This has its pros and cons, but here we will not discuss these issues.
The token is a “secondary” cryptocurrency, the internal currency of the project. A close analogue is a store coupon or gift certificate. Only in the world of cryptocurrencies tokens are usually also traded on the exchange. You can’t usually exchange the gift certificate of the store for money, but you can just token it.
Ethereum (“ethereum”) is a distributed virtual computer, on the basis of which most projects carry out their ICO. Ethereum has its own internal cryptocurrency - Ether ("ether"). In the Ethereum, you can create a smart contract (essentially an analogue of a contract, all items of which are strictly programmed), run it in this distributed virtual machine and after that no one, including developers, can change its conditions.
Wallet, a “wallet” for a cryptocurrency, is a long string of characters, something like an identifier, an analogue of an e-mail address if you like. There you can send a payment in cryptocurrency, and this payment will be saved at this address. A person can create any number of such wallets.
So, we decided to buy tokens in the ICO of a project. Let's figure out what to do.
Step 1. Create a Ethereum wallet
Most ICOs are conducted on the Ethereum system and accept Ether as payment for their tokens. Therefore, we are interested in the Ethereum wallet, and with the support of the ERC-20 protocol.
In our opinion, the best services for creating wallets are:
- Ethereum mist wallet
- Ethereum's online wallet
- MyEtherWallet
In this article, we will use MyEtherWallet as an example. Go to the project site - you will immediately see the suggestion to create a wallet: Create New Wallet.
Create a good password, type it in the input line, remember or write it down and click on 'Create New Wallet'. Immediately make a reservation that MyEtherWallet does not store any passwords, codes and addresses, so that the safety of all passwords lies entirely on the user. The site recalls this at every turn.
Here you are invited to save the Keystore File. This is a digital signature file for your wallet. Click 'Download Keystore File' and save the file somewhere in a very safe place, to a computer, on a USB flash drive and be sure to make a backup. The file must not be lost or prevented from being leaked to attackers, for example, in the event of a computer being infected with a virus. Remember, this is your money.
Go to the next step.
Here we see our “secret key”, the Private Key. This is a string of characters. Write it down or type it in to have a paper copy. Once again, if the secret key is lost, it is technically impossible to recover it, this is the whole essence of cryptocurrency.
Congratulations, the wallet is created! Now you need to enter it, "log in". On the next screen, MyEtherWallet will offer to open the wallet with the newly created key.
There are several ways to enter your wallet. For simplicity, we use the method of entering the secret key, which was obtained in the previous step and, we hope, securely saved. Copy the secret key into the input box and click on 'Unlock'.
Another option is to use the key file that you saved on your computer, enter the password you created in the first step and then click 'Unlock'.
After successfully entering the key, you see the contents of your wallet and can perform operations.
Step 2: buy air
Now, in order to have something to pay for the tokens of the project going out to the ICO, we need the Ethereum cryptocurrency, the “ether”. It is sold on cryptocurrency exchanges. There are many exchanges, for example, Coinbase , Kraken , Bitfinex , Bittrex . Some of them allow to exchange “ordinary” (fiat) money for cryptocurrency, that is, rubles, dollars, euros. Others work only with cryptocurrency, for example, allow you to buy broadcast for Bitcoin. On the exchanges you can find the most favorable exchange rate, but at the same time working with exchanges is not easy. You must send a passport photo and go through the verification process.
Fortunately, there is another, easier way to buy Ether for rubles - is to use one of the exchangers. We recommend to visit the site bestchange.ru and choose the best course.
We indicate the method of payment (for example, the Tinkoff card) and the currency we are going to buy (Ethereum).
Select the exchanger with the best rate and go into it. Next, you need to follow the instructions of a specific exchanger, in this article we will not go into this question. But you should have no problems.
Step 3: Pay Online for the Token
Go to the site of the project you are interested in. For example, take the game project Lordmancer2. The team promises that after the ICO, these tokens will be able to pay for game things and characters, as well as to remove tokens from the game to the outside and exchange for cryptocurrency. That is, earn by playing. I think the value of these tokens will grow well.
On ICO sites there is usually a lot of information about the project, including a description of the business model (“whitepaper”), a team, mentors and a block that reflects the progress of the fundraising.
For example, it indicates the total amount of the “ether” collected by the project, the number of investors, and the exchange rate of the ether for the project tokens.
To buy tokens, you need to agree with the formal conditions and click on 'CONTRIBUTE'.
A window will appear that contains all the necessary information: the address of the wallet where you want to send the broadcast, the minimum purchase volume and the recommended “gas” (more on that later).
The most important thing here is the address of the wallet. This is the same wallet as yours. Its address is a long string of characters. Copy it to the clipboard (keys ctrl-c / cmd-c).
Now open MyEtherWallet and click on it 'Send Ether & Tokens'.
Insert the address of the ICO wallet (ctrl-v / cmd-v buttons), enter the amount of air that you decided to send, and the amount of "gas".
What is this gas? Each transaction in the Ethereum network requires a certain amount of "fuel" for the network to execute it. This is an analogue of the bank commission, only its size is set by the sender of the money voluntarily. If you set too low the amount of "gas", the transaction may either not be completed at all, or go for a very long time. In the case of ICO, this is not very good, because many ICOs collect money very quickly, and you and your transaction may simply not have time for distribution. In the wallet MyEtherWallet, the desired amount of "gas" is set in the upper right block.
We recommend setting the value between 4 and 10 Gwei. This is an economical, but well working option.
Finally, click 'Generate Transaction' and then 'Send Transaction'.
That's all! Your broadcast went to ICO, and tokens were sent to you in return. Since they are inherently “secondary” cryptocurrency over Ethereum, you can save them directly in your MyEtherWallet.
Click on 'View Wallet Info' and open the wallet as before. On the right you will see the block 'Token Balances'.
Click 'Add Custom Token'.
All the necessary information for these fields can usually be obtained on the ICO website, or ask them in the chat, you will be happy to help. A few seconds after clicking 'Save', you will see the balance of your tokens in your wallet.
Well that's all! You bought the tokens of the project that you liked, now they are completely safe in your wallet. You have supported, we hope, a cool project and an excellent team, and besides, you gave yourself a chance to make good money! See you at the next ICO!
All Articles