ESP32 and Arduino

What happened was what everyone had been waiting for and what they had to say so much - the new ESP32 modules became widely sold and went to the people. Today we will talk about these modules from the point of view of a non-professional user who is used to working with Arduino and creating small projects for home automation or just for fun and self-study.
Does it work at all? What is there with the support of these modules in the Arduino IDE? Is it worth paying more or better to confine to the now familiar ESP8266? We will try to answer all these questions together, and at the end of the article I will give a link to the real implementation of ESP32 with Arduino - the distribution kit of the free version of Arduino Mega Server for the ESP32 platform.
Specs
I will not dwell here on the ESP32 specifications, you can easily find them on the Internet: each reviewer considers it his duty to bring a sheet of specifications at the beginning of the ESP32 review. I can only say that they are impressive and if you approach the matter seriously and thoughtfully, you can spend more than one year studying all the possibilities of the module and experimenting with it.
Let's leave it to professionals (or those who consider themselves as such) and focus on the practical side of the issue, understandable and accessible to the mere mortal.
Issue price
Let's start with the price. At the moment, the ESP32 module in Chinese online stores costs 350 rubles and 500 in the version of the board with strapping and USB interface. This is against 100 and 160 rubles for the ESP8266 module, respectively. As you can see, the difference is more than three times, although the absolute values are small, each, if desired, can afford to spend 350 - 500 rubles for a microcontroller. For comparison, the Arduino Mega 2560 in the same China costs 600 rubles, and in Russia around 1000 (plus the cost of Ethernet Shield).
It remains only to find out whether it is worth paying three times more than for ESP8266 and what we will get for it. (Looking ahead to say that in my opinion, definitely worth it.)
Arduino IDE Support
In order to do something with the module, you must first have its support in the Arduino IDE. At the moment, ESP32 support in the Arduino IDE is at the initial, but quite decent and workable level. Those who are afraid to meet the insurmountable difficulties here, can not worry - the main functions work normally and you, most likely, will not notice any difference in comparison with the work on other controllers.
Things are a little worse with device drivers, but this is certainly a temporary phenomenon. The module is so popular that support for any peripherals will inevitably appear soon.
Adding ESP32 support in Arduino IDE
Now a little practical information about the installation of ESP32 support in the Arduino IDE. The Internet is full of instructions on this topic, you can also find them in abundance in it. I note only that all instructions are divided into “old”, where Python is mentioned and “new”, where GIT is mentioned. You naturally need to be guided by new ones.
Of the many instructions, the best can be called (oddly enough) the official instructions from the manufacturer of the module.
github.com/espressif/arduino-esp32
Which I recommend to use. The only note is that it is not necessary to use GIT, you can simply download the distribution and unpack it into the necessary directory.
Note All of the following applies to installation under Windows 7 64-bit, since I performed all the experiments on it, in other operating systems the paths may differ from those indicated.
Distribution files should be in the folder
C:\Users\User\Documents\Arduino\hardware\espressif\esp32
where C: is the name of your Windows disk, and User is the name of the user in the operating system (both of which may differ from those specified).
Unobvious moments of an ESP32 installation
Many users complain that nothing works for them and ESP32 support does not appear in the Arduino IDE. The point is this: since the ESP32 drivers are only being developed, the order of the system directories is somewhat changed. As a folder for the location of sketches in the settings of the Arduino IDE should be specified folder
C:\Users\User\Documents\Arduino
(with the same amendments to the disk and user name), and distribution files should be located inside this folder as recommended by the manufacturer. If this moment is not taken into account, ESP32 support in the Arduino IDE will not appear and nothing will work.
Versions of the Arduino IDE
We often hear that ESP32 support is only available in recent versions of the Arduino IDE, this is not the case - ESP32 works fine in earlier versions, for example, the Arduino Mega Server distribution kit for ESP32 was developed in version 1.6.5 r2.
Advantages of ESP32
Now let's talk about the advantages of ESP32 over its predecessor, ESP8266. I will not dwell on such obvious things as processor power and RAM, I’ll just say that you need to try hard to load ESP32 completely on DIY tasks and home automation.
Pins
The Achilles heel of his predecessor, the ESP8266 module, was (and is) an extremely small number of findings. After working with such controllers as the Arduino Mega and Arduino Due with their dozens of digital and analog pins, working with the ESP8266 is puzzling: the GPIO account is literally one, and this greatly limits the use of this module in real projects.
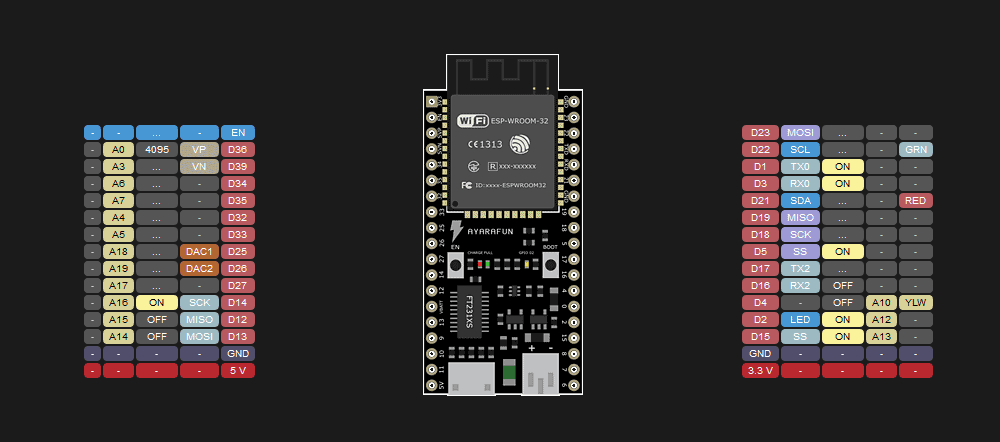
ESP32, if not completely, is largely devoid of this shortcoming. The number of available pins has been greatly increased, and many analog inputs have also appeared. 13 conclusions can be called completely free and available for use.
GPIO 2, 4, 12, 14, 13, 15, 16, 17, 25, 25, 27, 32, 33
If necessary, you can add to them partially functional and working only on input.
GPIO 34, 35, 36, 39
If you donate some features and do not use Serial, SPI or I2C in specific projects, then you can add 8 more pins to this number.
GPIO 1, 3, 5, 18, 19, 21, 22, 23
Well, maybe it will be possible to use another 6 pins, which are designed to work with internal flash memory (for example, if you connect an external SD card)
GPIO 6, 7, 8, 9, 10, 11
As you can see, there is no comparison with the ESP8266 - the new module looks just fine in the number of possible connections and this is very valuable in real projects where every pin is dear.
Work speed
I have already mentioned a powerful processor, now a few words need to be said about the speed of networking. I find it difficult to say what it is connected with, perhaps with a powerful processor, perhaps with the optimization of the network stack, but the ESP32 module running the Arduino Mega Server showed record network performance.
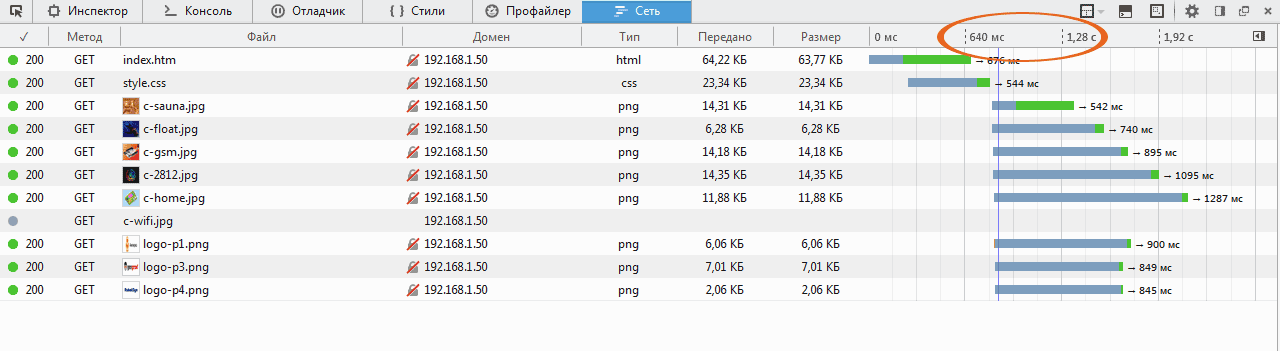
Loading a page with CSS and JavaScript volumetric code and an abundance of graphics takes only one and a small second - faster than on any other tested controller, including wired controllers with a W5100 and W5500 Ethernet interface.
With regard to the Arduino Mega Server, this removes all restrictions on the use of graphics and any JavaScript libraries, both in size and number.
Other advantages
ESP32 is an extremely high-tech device; a dry listing of available features alone can take more than one page, but a list of advantages and capabilities with comments will take a whole volume. Therefore, I will confine myself to this in order not to clutter up the article and give some examples of working with ESP32 code in the Arduino environment.
Code examples
Non-volatile memory
This is what we used to call EEPROM in relation to Arduino Mega. In ESP32, this memory is not as such, but this module has its counterpart and the corresponding library for working with it. This memory is called “NVS” (Non-volatile storage).
But for us there is no difference - you can also save values in the same way and read them after turning off and then turning on the controller.
An example of use. We connect the library:
#include <Preferences.h>
Create a prefs object
Preferences prefs;
Initialize the repository with an identifier, for example, "nvs":
prefs.begin("nvs", false);
false refers to the choice of read / write mode, in this case read and write. Save the byte as “addr”:
prefs.putUChar("addr", 65);
Read the saved byte:
byte b = prefs.getUChar("addr", 0);
Similarly, you can save and read the values of any other data types. Now delete the repository.
prefs.remove("nvs");
If to understand, then it is even simpler than working with standard non-volatile EEPROM memory on Arduino controllers.
AnalogWrite ()
Another innovation that can be confusing for a novice user is that ESP32 does not have the usual AnalogWrite () function. At first, this is very unusual, but in reality this function is only replaced by its more functional counterpart.
Consider an example. Let's start with connecting the corresponding library, although in the full sense of the word it cannot be called a library, rather it is a specialized file with a description of the necessary functions. The fact is that not all functions are directly present in the Arduino IDE, some of the functions are available in the files in the directory
...\Documents\Arduino\hardware\espressif\esp32\cores\esp32
In this case, we are interested in the file of work with PWM and LEDs, which we connect with the following instruction:
#include "esp32-hal-ledc.h"
Next, we need to set the channel number (0), the PWM frequency (for example, 50 Hz) and the resolution (8 bits).
ledcSetup(0, 50, 8);
Channel numbers can be set in the range from 0 to 15, and resolution from 1 to 16 bits. When the resolution is set to 8 bits, the range of data that controls the PWM will be in the range from 0 to 255.
Next, we need to bind our channel (0) to any GPIO pin, in this case to pin 22:
ledcAttachPin(22, 0);
And you need to remember in the usual way to set the 22nd pin to exit.
pinMode(22, OUTPUT);
Everything, now we can control, for example, the brightness of the LED, just by specifying the channel number and the PWM (brightness) value from 0 to 255.
ledcWrite(0, 50);
Other ESP32 Code Examples
The Arduino Mega Server distribution, a link to which I will give at the end of the article, besides a fully functioning system, is an extensive collection of structured code, tested and tested for performance on the ESP32 module. You can use it as an educational tool for entering the topic of programming for ESP32.
Job stability
The Arduino Mega Server for ESP8266 has proven uptime of several months and demonstrates absolutely stable performance and I have no reason to think that the ESP32 module may have some kind of stability issues. At least during the entire creation of the AMS distribution for ESP32, I have not observed a single failure or unauthorized reboot of the module. Everything works very clearly and predictably.
Arduino Mega Server for ESP32
This is another representative of the AMS ecosystem, including controllers and boards Arduino Mega, Due, 101, M0, AMS Home, ESP8266, Sonoff, ESP32, OLIMEX ESP32-EVB, etc. Thanks to a powerful processor and fast network operation of the ESP32 module, Arduino Mega Server interface contains an abundance of graphics and scripts and this does not affect the speed of its work - the page loads almost instantly.
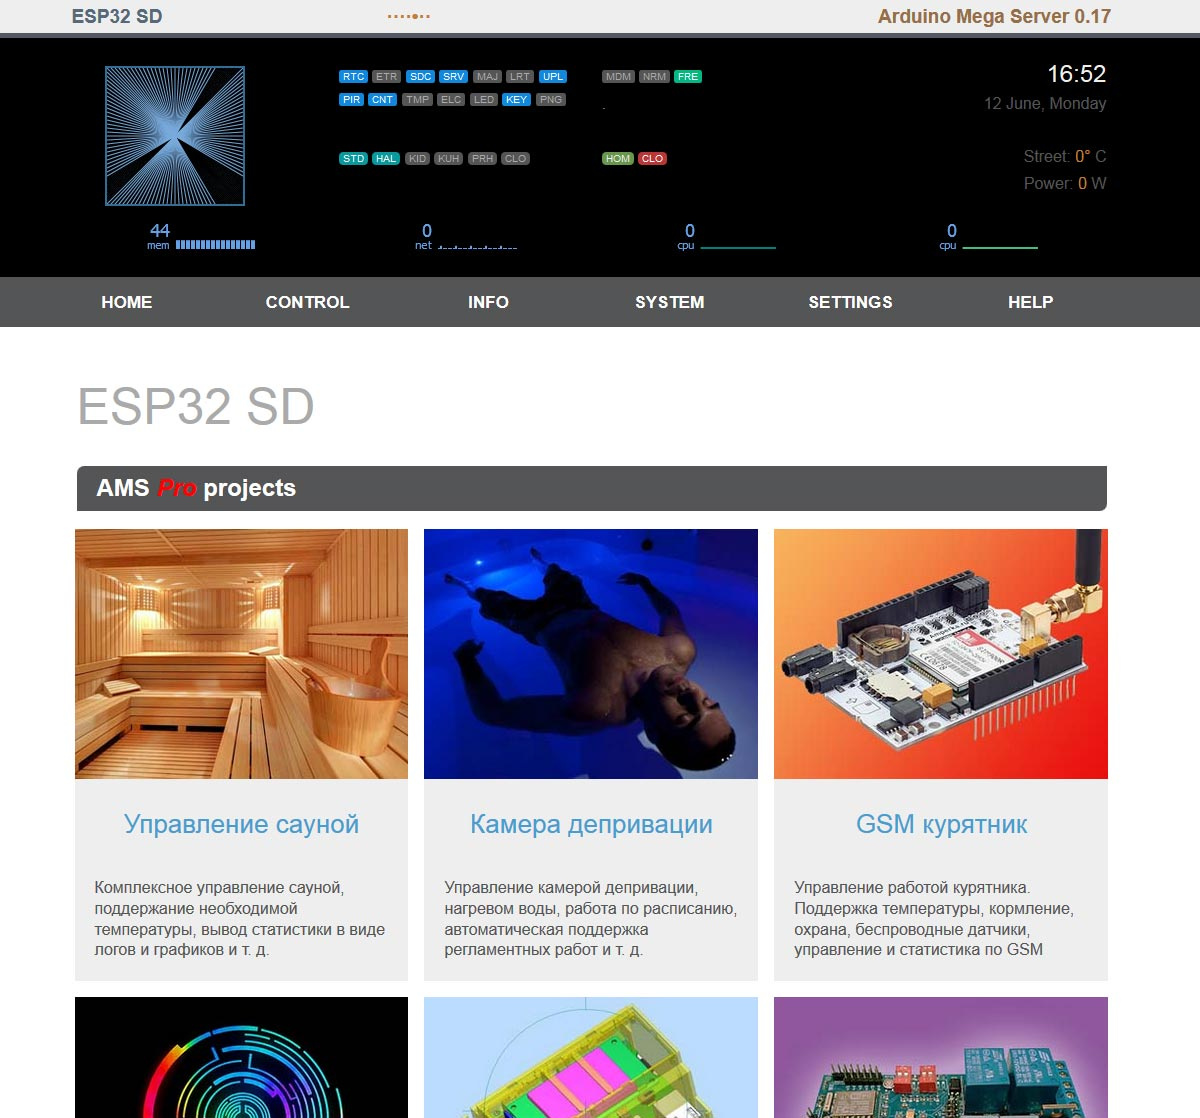
Everything works stably and predictably, no failures or inadequate behavior of the system or module have been identified. Below is the AMS boot log, from which you can find out some details about the system.

The temperature of the module, measured by the built-in temperature sensor, ranges from 50 degrees Celsius at start up to 55 degrees during operation. During operation, the current consumption of the module is about 130 mA.
Perspectives
You do not need to be a special expert to predict that now, like mushrooms, after the rain, boards will start appearing on ESP32 of various formats and with diverse functionality. Here is one of the first swallows of OLIMEX ESP32-EVB , a very interesting card for which will soon be released specialized distribution kit Arduino Mega Server.

Conclusion
That's all I can say about the new ESP32 module and its work with Arduino. The impressions he leaves are extremely positive, at least it was very pleasant and interesting for me to work with him. The lack of libraries to support sensors and peripherals spoils the picture a bit, but this is a temporary phenomenon and soon everything will be fine with this.
You can download the Arduino Mega Server for ESP32 distribution kit on the official website’s download page, soon the corresponding documentation will appear there, but for now you can use the short instruction from the readme.txt file located in the distribution kit.
All Articles