Carrying out Telephone Lines with Audiocodes VoIP Gateways
In one of our previous articles, we considered the issue of carrying out subscriber telephone lines using a pair of Grandstream voice gateways. During the time that has elapsed since its release, many of our clients have noted that this article turned out to be very useful for them and helped them easily and quickly accomplish the task. At the same time, another part of the clients asked us to write similar articles-instructions for other popular gateway models. Keeping the promises given to them, today we will look at how to organize the removal of a part of the numbering capacity using the equipment of the well-known Israeli company AudioCodes.
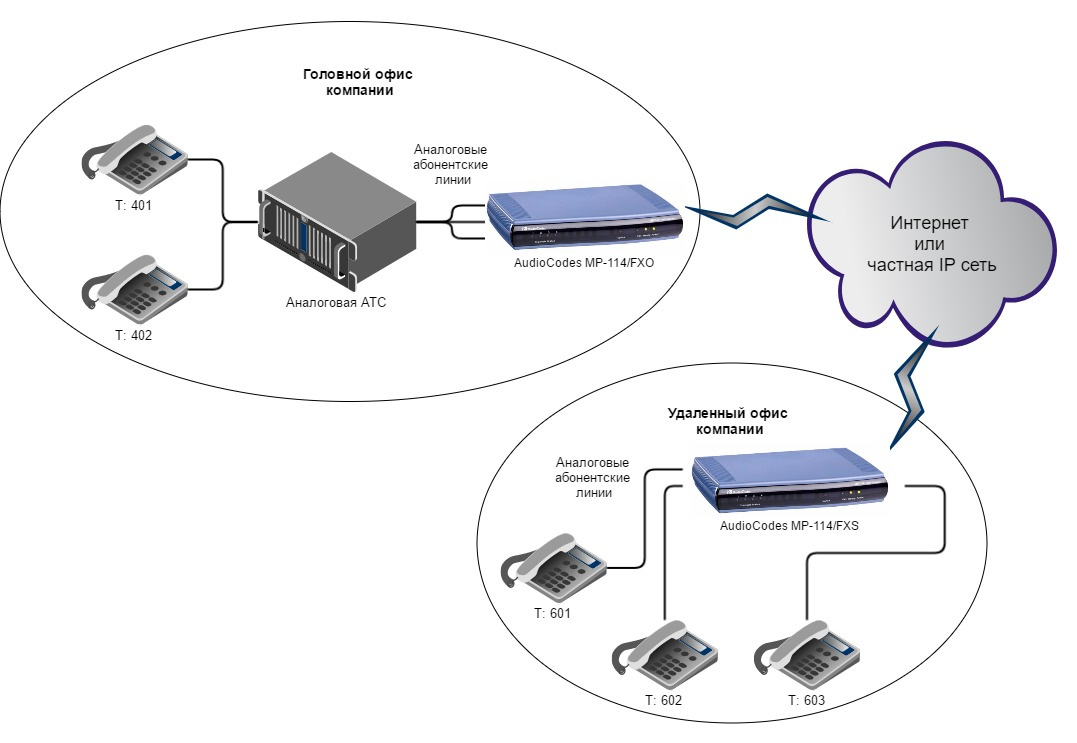
In brief, we recall the formulation of the problem - there is a head office with an analog PBX and internal numbering 401, 402, and so on. There is also a remote office (in another building, city or country), in which it is impossible to stretch telephone lines from the head office, but four subscribers need to be connected to it with numbers 601 - 604.
In the head office, we install an AudioCodes VoIP gateway with FXO ports - for example, MP-114 / FXO or MP-118 / FXO . In a remote office, we will use a FXS port with MP-114 / FXS or MP-118 / FXS ports. At the telephone office of the head office, we allocate four internal ports, to which we give numbers 601 - 604 and connect these ports with four ports of the FXO-gateway (for simplicity, hereinafter we will use the model MP-114 / FXO). On the remote office side, for the time being, we simply connect four regular telephones to the FXS ports of the MP-114 / FXS. Both gateways must be connected to the local network and have static IP addresses.
Now we need to solve two problems:
In addition to such concepts as a port or a channel, AudioCodes gateways also use the concept of the Hunt Group - that is, the logical combination of several channels into one group. With the help of the Hunt Group in the future, you can configure a rather complex logic of call routing. For us, this functionality is redundant, since the scheme we use is point-to-point and all the calls from the PBX to the FXO gateway cannot be sent anywhere except to the FXS gateway in the remote office. However, to activate the lines, we need to give them a unique number and combine them into some sort of Hunt Group, otherwise this scheme will not work.
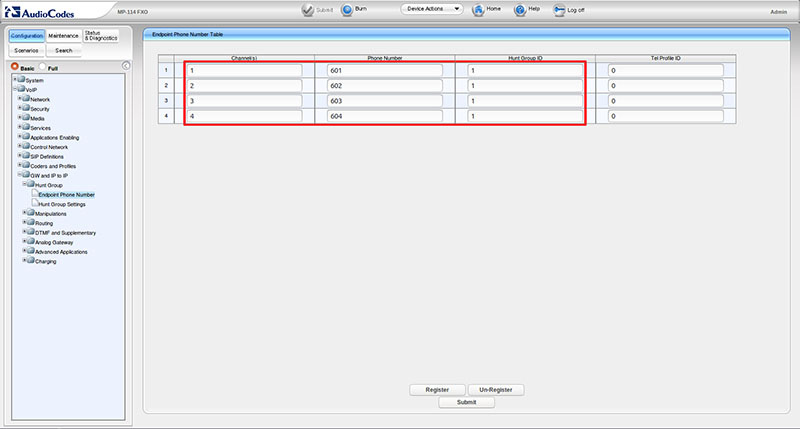
Go to the section Configuration - VoIP - GW and IP to IP - Hunt Group - Endpoint Phone Number and assign lines 601 to 604 to lines 1-4 and combine all lines in Hunt Group with number 1.
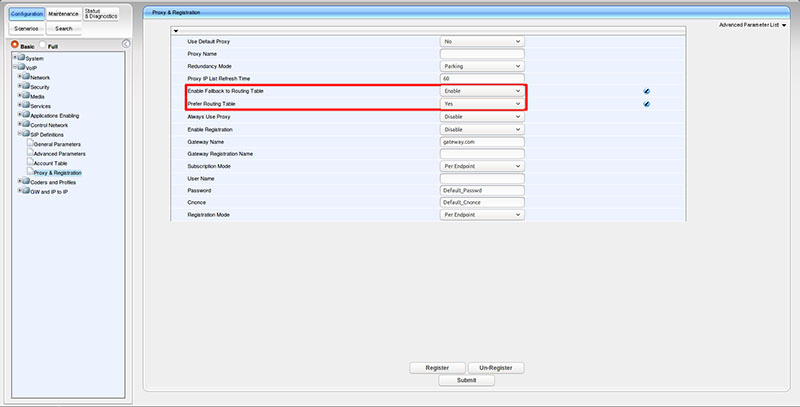
Now we need to route the FXO-gateway to use the routing table, which we fill in the next step. Go to the section Configuration - VoIP - SIP Definitions - Proxy & Registration . We expose the options: Enable Fallback to Routing Table to the Enable position and the Prefer Routing Table to Yes . Click Submit in the lower left corner to save the settings.
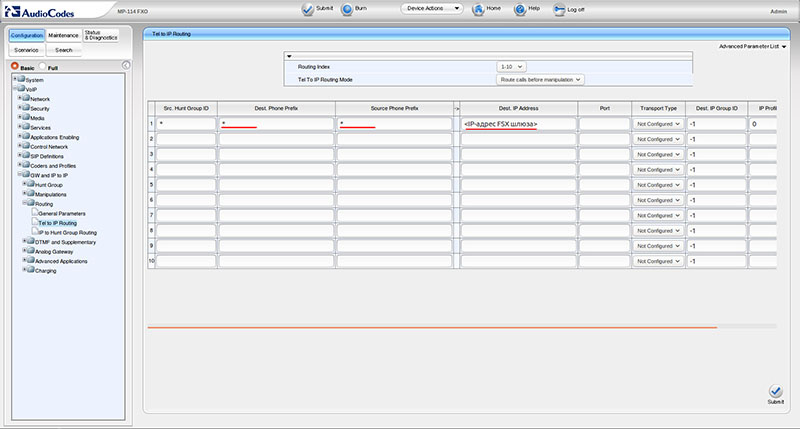
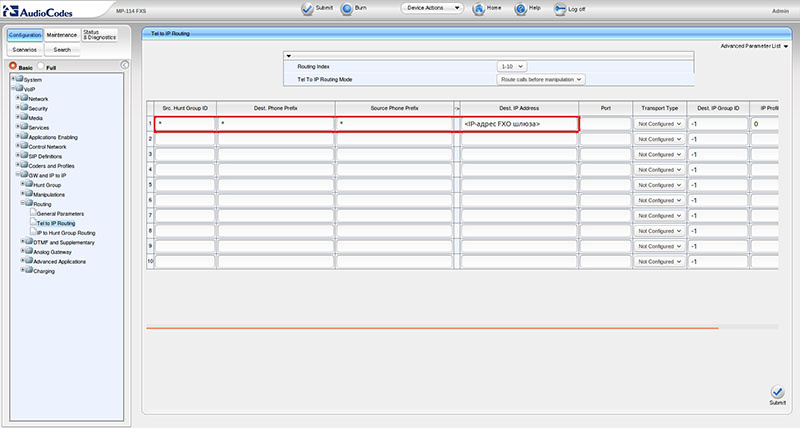
At the last stage, we set up our AudioCodes MP-114 / FXO FXO gateway to prioritize the use of the routing table, now we need to fill this table. To do this, go to the section Configuration - VoIP - GW and IP to IP - Routing - Tel to IP Routing . As we noted above, this routing table will have a rather primitive look. Namely: all calls from any Hunt Group (and we have only one) from any number (port) to any number should be sent to the IP address of the FXS gateway installed in the remote office.
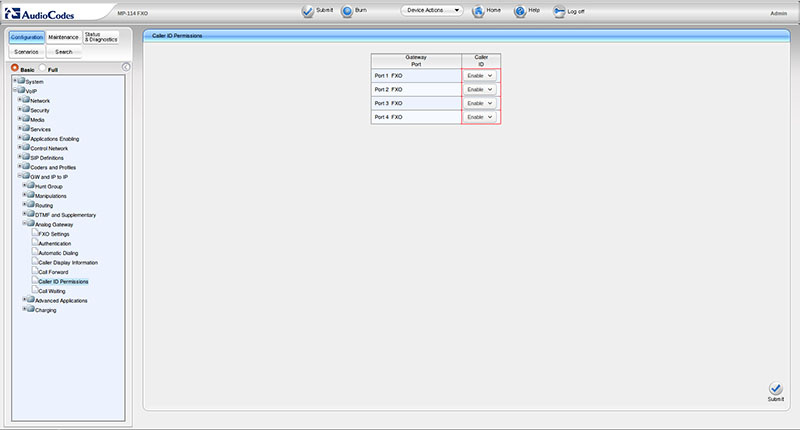
At the moment, we have ensured that all calls that come from the PBX to the FXO gateway will be redirected to the IP address of the remote FXS gateway. However, there is a small problem that, by default, the FXO gateway will replace the original CallerID from the PBX with the number of its line to which the call came. That is, all calls that came to the first gateway line will be sent to the remote FXS gateway with CallerID 601, to the second - from 602, and so on. That is, instead of a city number or an internal number of a colleague, the subscriber in the remote office will always see his own number, which is not good.
In order to avoid this, go to the Configuration - VoIP - GW and IP to IP - Analog Gateway - Caller ID Permissions section. And on all four ports we set Enable .
Now it’s time to ask the following question: if all phone calls will be sent to the remote FXS gateway indiscriminately, and even with the original CallerID, then how can our remote FXS gateway figure out which of the phones connected to it or another challenge?
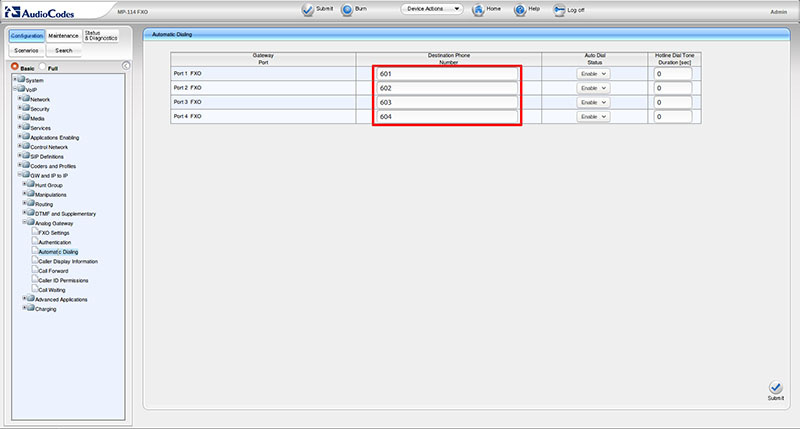
To resolve this issue, we use the Destination Phone Number field, that is, the destination number that is configured in the Configuration - VoIP - Automatic Dialing Gateway section. If the call arrives on port No. 1 of the gateway, then it will substitute the number 601 in this field and transfer the call to the FXS gateway. For a call to port number 2 - the number 602 will be substituted in the Destination Phone Number field and so on. Based on this field, the FXS gateway, as we will see later, will distribute the calls between the devices connected to it.
We have completed all the work on part 1 of subtask on the FXO gateway, and we can safely move to a remote branch to configure the FXS gateway. Here we also have to start by activating the lines and merging them into one Hunt Group. Go to the Configuration - VoIP - GW and IP to IP - Hunt Group - Endpoint Phone Number section and fill it in a completely similar FXO-gateway way: lines 1-4 give unique numbers 601-604 and combine them into one Hunt Group with number 1. However, it should be noted that if the consolidation of all the numbers into one Hunt Group is rather formal, then the assignment of numbers to lines is a setting, as we will see later.

Also quite formal setting - in the Configuration - VoIP - GW and IP to IP - Routing - IP To Hunt Group section The Routing Table indicates that calls from any numbers to any numbers from the IP address of our FXO gateway should be sent to the Hunt Group from Number 1. It is one and it unites all four ports.
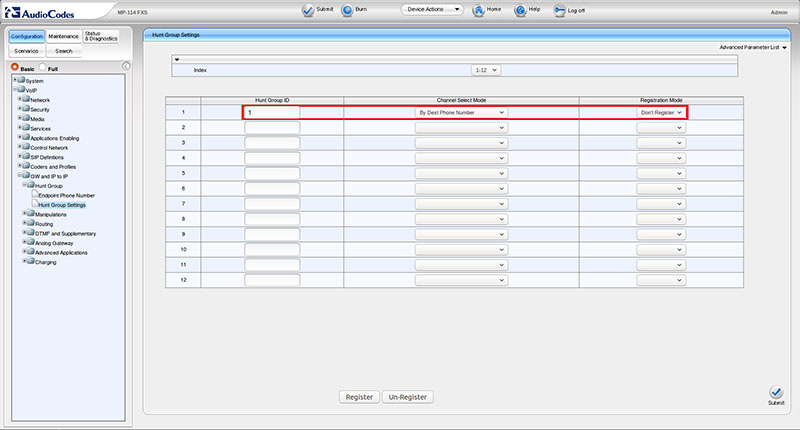
But this setting, on the contrary, is the most important: we previously configured the FXO gateway so that it fills the field of the Destination Phone Number depending on the line to which the call came. Now we need to configure the FXS gateway so that it will distribute calls between its phones based on this information. Go to the section Configuration - VoIP - GW and IP to IP - Hunt Group - Hunt Group Settings and set the rule for our only Hunt Group: set the Hunt Group ID option to 1 (this is the ID of our only group), select the Channel Select Mode option choose the option By Dest Phone Number , which means to choose a line by destination number, and in the option Registration Mode you need to choose the mode Don't Register .
That is, having received a call with an assignment number, for example - 603, the FXS gateway will send this call to its line with the number 603. Therefore, assigning numbers to the lines in step 6 is crucial - these numbers must match the numbers specified in step 5. What is As for the Don't Register option, everything is simple, we use our gateway not in conjunction with an IP-PBX, but in point-to-point mode with another gateway, so all our work is done in a mode without registration.
We take any internal telephone from the head office and dial 601 on it - the call should go to the telephone connected to the first port of the FXS gateway. When dialing 602 - on the second and so on. If everything works correctly, then the work on task No. 1 can be considered completed and proceed to the second task.
In fact, we have already done most of the work to solve the second task - we activated the lines on the gateways, assigning numbers to them and combining them into the Hunt Group. Now we, in fact, need to mirror the settings made in the previous stages.
Go to the Configuration - VoIP - GW and IP to IP - Routing - Tel to IP Routing section on the FXS gateway and create a rule that states that calls from any Hunt Group from any number to any number should be sent to the FXO IP address - gateway. As you can see, filling in the routing table on the FXS gateway is completely analogous to the routing table on the FXO gateway. In principle, the configuration of the MP-114 / FXS gateway ends there, and we can return to the MP-114 / FXO gateway at the company's head office.
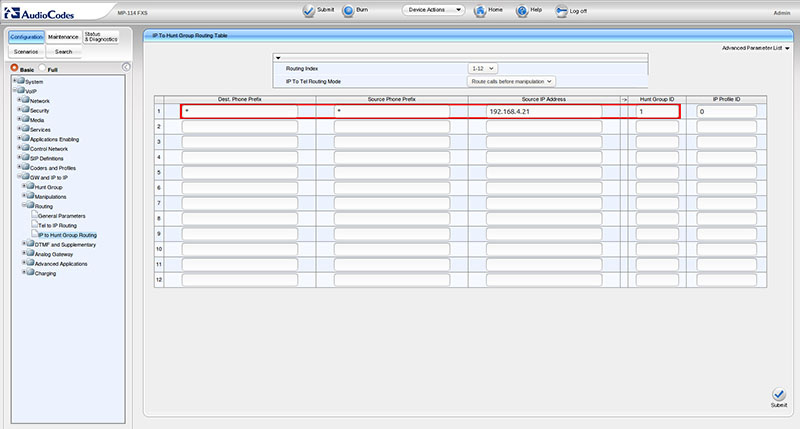
Remember that the main entity in call routing on AudioCodes gateways is the so-called Hunt Group. Therefore, the first thing we need to do is to configure the FXO gateway so that all calls from the FXS gateway go to our only Hunt Group number 1. Go to the Configuration section - VoIP - GW and IP to IP - Routing - IP To Hunt Group Routing Table and create the only rule. In the options Dest. Phone Prefix and Source Phone Prefix put the symbol “*”, in the Source IP Address option we specify the IP address of the FXS gateway, and in the Hunt Group ID option - number 1. All, now all calls from any and to any number that came from the FXS gateway will be processed by Hunt Group №1. And how they will be processed there, we will configure in the next step.

So, we are sending all calls from the FXS gateway to the Hunt Group No. 1 of the FXO gateway indiscriminately. However, the latter needs to understand through which of his lines he should send a call further to the PBX, because each of the subscribers in the remote office has a certain line on the FXO gateway and, as a result, the port on the PBX. To do this, we need to go to the Configuration - VoIP - GW and IP to IP - Hunt Group - Hunt Group Settings section and indicate that all calls that came to Hunt Group 1 should be sent to the PBX via a line in accordance with the source number. Technically, this is done in the following way: in the Hunt Group ID option, set the value to 1 (this is the ID of our search group), in the Channel Select Mode option, select the By Source Phone Number option, and in the Registration Mode option, choose the Don't Register mode.

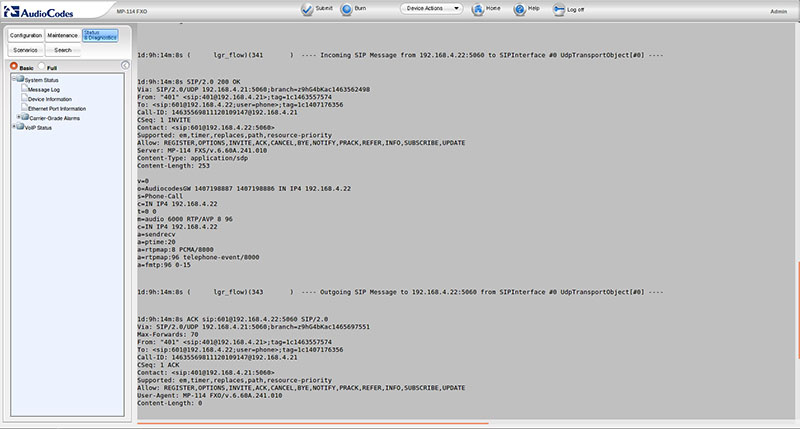
In order to better this logic, consider the part of the SIP message INVITE method, which receives the FXO gateway from the FXS gateway when the remote subscriber attempts to dial a number:
As you can see, there are two From and To fields in the SIP message. The From field contains the number 601 - from this number a call is made from the remote office, and it is on the basis of this field that the FXO gateway uses its line 601 to transfer this call to the PBX. If we go back to the very first stage of the first task, we will see that number 601 corresponds to the first port of the FXO gateway. The To field determines to which number the call will be sent - in this case, the number 401 - the number of the internal subscriber of the head office. 192.168.4.21 is the IP address of the FXO gateway, and 192.168.4.22 is the IP address of the FXS gateway.
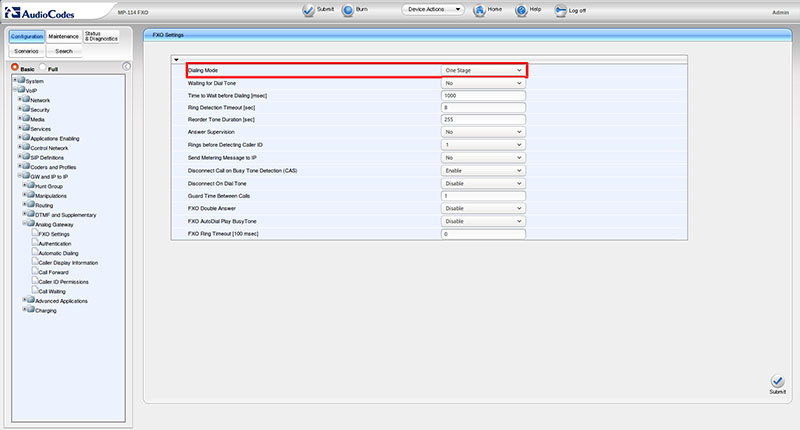
Gateway Audiocodes MP-114 FXO has two modes of making calls from the IP network in the direction of analog lines: a call to 2 actions (Two Stages) and a call to one action (One Stage). The difference between them is as follows: in the two-way call mode, the call that came to the gateway will be answered by the gateway itself and connected to the PBX port, and the caller will hear the usual dial tone, as if he would just pick up his phone, after which he would have to dial required to call. In the single-call mode, the gateway will immediately redirect the call to the analog port in accordance with the specified settings.
For our example, we will need the One Action mode (One Stage), since the caller's number and the called subscriber number are formed on the FXS side of the gateway. To do this, in the section Configuration - VoIP - Analog Gateway - FXO Settings, in the Dialing Mode option, select the One Stage mode.
At this, setting up the removal of telephone lines has been completed, in general, it is enough to carry out several standard checks by calling both sides and make sure that everything is working properly. If, for any reason, something did not work or you solve another problem, for example, carrying several lines not into one location, but into several, then you should use the debugging tools built into AudioCodes gateways.
The easiest way is to view the message log directly in the device’s web interface in the section Status & Diagnostics - System Status - Message Log . However, when writing the article, I used sending messages to the Syslog server, the settings of which are performed in the Configuration - System - Syslog Settings section. Rsyslog was used as the syslog server. To receive a log message, the following settings must be present in the configuration file of the Rsyslog daemon:
AudioCodes gateways are valued by many professionals for their flexibility, reliability, and functionality. At the same time, their configuration can cause considerable difficulties for an inexperienced user due to the presence of a large number of options and the specific logic of the operation of devices. However, having a little acquainted with these gateways, after some time you realize that everything is implemented very logically and correctly. I hope this article will help newcomers to go through the first stage of acquaintance with the AudioCodes gateways as painlessly as possible.
In brief, we recall the formulation of the problem - there is a head office with an analog PBX and internal numbering 401, 402, and so on. There is also a remote office (in another building, city or country), in which it is impossible to stretch telephone lines from the head office, but four subscribers need to be connected to it with numbers 601 - 604.
In the head office, we install an AudioCodes VoIP gateway with FXO ports - for example, MP-114 / FXO or MP-118 / FXO . In a remote office, we will use a FXS port with MP-114 / FXS or MP-118 / FXS ports. At the telephone office of the head office, we allocate four internal ports, to which we give numbers 601 - 604 and connect these ports with four ports of the FXO-gateway (for simplicity, hereinafter we will use the model MP-114 / FXO). On the remote office side, for the time being, we simply connect four regular telephones to the FXS ports of the MP-114 / FXS. Both gateways must be connected to the local network and have static IP addresses.
Now we need to solve two problems:
- Allow subscribers of the head office (No. 401, No. 402, etc.) to call the subscribers of the remote office (No. 601 - 604)
- Allow remote office subscribers to call subscribers of the company's head office
Task 1. Calls from the head office to the remote
Step 1. Activate lines on the FXO gateway.
In addition to such concepts as a port or a channel, AudioCodes gateways also use the concept of the Hunt Group - that is, the logical combination of several channels into one group. With the help of the Hunt Group in the future, you can configure a rather complex logic of call routing. For us, this functionality is redundant, since the scheme we use is point-to-point and all the calls from the PBX to the FXO gateway cannot be sent anywhere except to the FXS gateway in the remote office. However, to activate the lines, we need to give them a unique number and combine them into some sort of Hunt Group, otherwise this scheme will not work.
Go to the section Configuration - VoIP - GW and IP to IP - Hunt Group - Endpoint Phone Number and assign lines 601 to 604 to lines 1-4 and combine all lines in Hunt Group with number 1.
Step 2: Enable the routing table on the FXO gateway
Now we need to route the FXO-gateway to use the routing table, which we fill in the next step. Go to the section Configuration - VoIP - SIP Definitions - Proxy & Registration . We expose the options: Enable Fallback to Routing Table to the Enable position and the Prefer Routing Table to Yes . Click Submit in the lower left corner to save the settings.
Step 3. Fill in the call routing table on the FXO gateway
At the last stage, we set up our AudioCodes MP-114 / FXO FXO gateway to prioritize the use of the routing table, now we need to fill this table. To do this, go to the section Configuration - VoIP - GW and IP to IP - Routing - Tel to IP Routing . As we noted above, this routing table will have a rather primitive look. Namely: all calls from any Hunt Group (and we have only one) from any number (port) to any number should be sent to the IP address of the FXS gateway installed in the remote office.
Step 4. Substitute the caller's number on the FXO gateway.
At the moment, we have ensured that all calls that come from the PBX to the FXO gateway will be redirected to the IP address of the remote FXS gateway. However, there is a small problem that, by default, the FXO gateway will replace the original CallerID from the PBX with the number of its line to which the call came. That is, all calls that came to the first gateway line will be sent to the remote FXS gateway with CallerID 601, to the second - from 602, and so on. That is, instead of a city number or an internal number of a colleague, the subscriber in the remote office will always see his own number, which is not good.
In order to avoid this, go to the Configuration - VoIP - GW and IP to IP - Analog Gateway - Caller ID Permissions section. And on all four ports we set Enable .
Step 5. Automatic dialing of the remote number on the FXO gateway
Now it’s time to ask the following question: if all phone calls will be sent to the remote FXS gateway indiscriminately, and even with the original CallerID, then how can our remote FXS gateway figure out which of the phones connected to it or another challenge?
To resolve this issue, we use the Destination Phone Number field, that is, the destination number that is configured in the Configuration - VoIP - Automatic Dialing Gateway section. If the call arrives on port No. 1 of the gateway, then it will substitute the number 601 in this field and transfer the call to the FXS gateway. For a call to port number 2 - the number 602 will be substituted in the Destination Phone Number field and so on. Based on this field, the FXS gateway, as we will see later, will distribute the calls between the devices connected to it.
Step 6: Activate Lines on the FXS Gateway
We have completed all the work on part 1 of subtask on the FXO gateway, and we can safely move to a remote branch to configure the FXS gateway. Here we also have to start by activating the lines and merging them into one Hunt Group. Go to the Configuration - VoIP - GW and IP to IP - Hunt Group - Endpoint Phone Number section and fill it in a completely similar FXO-gateway way: lines 1-4 give unique numbers 601-604 and combine them into one Hunt Group with number 1. However, it should be noted that if the consolidation of all the numbers into one Hunt Group is rather formal, then the assignment of numbers to lines is a setting, as we will see later.
Step 7: Routing Incoming Calls on the FXS Gateway
Also quite formal setting - in the Configuration - VoIP - GW and IP to IP - Routing - IP To Hunt Group section The Routing Table indicates that calls from any numbers to any numbers from the IP address of our FXO gateway should be sent to the Hunt Group from Number 1. It is one and it unites all four ports.
Step 8. Configuring the behavior of the hunt group on the FXS gateway
But this setting, on the contrary, is the most important: we previously configured the FXO gateway so that it fills the field of the Destination Phone Number depending on the line to which the call came. Now we need to configure the FXS gateway so that it will distribute calls between its phones based on this information. Go to the section Configuration - VoIP - GW and IP to IP - Hunt Group - Hunt Group Settings and set the rule for our only Hunt Group: set the Hunt Group ID option to 1 (this is the ID of our only group), select the Channel Select Mode option choose the option By Dest Phone Number , which means to choose a line by destination number, and in the option Registration Mode you need to choose the mode Don't Register .
That is, having received a call with an assignment number, for example - 603, the FXS gateway will send this call to its line with the number 603. Therefore, assigning numbers to the lines in step 6 is crucial - these numbers must match the numbers specified in step 5. What is As for the Don't Register option, everything is simple, we use our gateway not in conjunction with an IP-PBX, but in point-to-point mode with another gateway, so all our work is done in a mode without registration.
Stage 9. Verification
We take any internal telephone from the head office and dial 601 on it - the call should go to the telephone connected to the first port of the FXS gateway. When dialing 602 - on the second and so on. If everything works correctly, then the work on task No. 1 can be considered completed and proceed to the second task.
Task 2. Calls from a remote office to the head office
Step 1: Routing Outgoing Calls on an FXS Gateway
In fact, we have already done most of the work to solve the second task - we activated the lines on the gateways, assigning numbers to them and combining them into the Hunt Group. Now we, in fact, need to mirror the settings made in the previous stages.
Go to the Configuration - VoIP - GW and IP to IP - Routing - Tel to IP Routing section on the FXS gateway and create a rule that states that calls from any Hunt Group from any number to any number should be sent to the FXO IP address - gateway. As you can see, filling in the routing table on the FXS gateway is completely analogous to the routing table on the FXO gateway. In principle, the configuration of the MP-114 / FXS gateway ends there, and we can return to the MP-114 / FXO gateway at the company's head office.
Step 2: Routing Incoming Calls on the FXO Gateway
Remember that the main entity in call routing on AudioCodes gateways is the so-called Hunt Group. Therefore, the first thing we need to do is to configure the FXO gateway so that all calls from the FXS gateway go to our only Hunt Group number 1. Go to the Configuration section - VoIP - GW and IP to IP - Routing - IP To Hunt Group Routing Table and create the only rule. In the options Dest. Phone Prefix and Source Phone Prefix put the symbol “*”, in the Source IP Address option we specify the IP address of the FXS gateway, and in the Hunt Group ID option - number 1. All, now all calls from any and to any number that came from the FXS gateway will be processed by Hunt Group №1. And how they will be processed there, we will configure in the next step.
Step 3. Configuring the behavior of the hunt group on the FXO gateway.
So, we are sending all calls from the FXS gateway to the Hunt Group No. 1 of the FXO gateway indiscriminately. However, the latter needs to understand through which of his lines he should send a call further to the PBX, because each of the subscribers in the remote office has a certain line on the FXO gateway and, as a result, the port on the PBX. To do this, we need to go to the Configuration - VoIP - GW and IP to IP - Hunt Group - Hunt Group Settings section and indicate that all calls that came to Hunt Group 1 should be sent to the PBX via a line in accordance with the source number. Technically, this is done in the following way: in the Hunt Group ID option, set the value to 1 (this is the ID of our search group), in the Channel Select Mode option, select the By Source Phone Number option, and in the Registration Mode option, choose the Don't Register mode.
In order to better this logic, consider the part of the SIP message INVITE method, which receives the FXO gateway from the FXS gateway when the remote subscriber attempts to dial a number:
INVITE sip:401@192.168.4.21;user=phone SIP/2.0 Via: SIP/2.0/UDP 192.168.4.22:5060;branch=z9hG4bKac2108928548 Max-Forwards: 70 From: <sip:601@gateway.com>;tag=1c2108923745 To: <sip:401@192.168.4.21;user=phone>
As you can see, there are two From and To fields in the SIP message. The From field contains the number 601 - from this number a call is made from the remote office, and it is on the basis of this field that the FXO gateway uses its line 601 to transfer this call to the PBX. If we go back to the very first stage of the first task, we will see that number 601 corresponds to the first port of the FXO gateway. The To field determines to which number the call will be sent - in this case, the number 401 - the number of the internal subscriber of the head office. 192.168.4.21 is the IP address of the FXO gateway, and 192.168.4.22 is the IP address of the FXS gateway.
Stage 4. Setting up a call in one action
Gateway Audiocodes MP-114 FXO has two modes of making calls from the IP network in the direction of analog lines: a call to 2 actions (Two Stages) and a call to one action (One Stage). The difference between them is as follows: in the two-way call mode, the call that came to the gateway will be answered by the gateway itself and connected to the PBX port, and the caller will hear the usual dial tone, as if he would just pick up his phone, after which he would have to dial required to call. In the single-call mode, the gateway will immediately redirect the call to the analog port in accordance with the specified settings.
For our example, we will need the One Action mode (One Stage), since the caller's number and the called subscriber number are formed on the FXS side of the gateway. To do this, in the section Configuration - VoIP - Analog Gateway - FXO Settings, in the Dialing Mode option, select the One Stage mode.
Stage 5. Testing and diagnostics
At this, setting up the removal of telephone lines has been completed, in general, it is enough to carry out several standard checks by calling both sides and make sure that everything is working properly. If, for any reason, something did not work or you solve another problem, for example, carrying several lines not into one location, but into several, then you should use the debugging tools built into AudioCodes gateways.
The easiest way is to view the message log directly in the device’s web interface in the section Status & Diagnostics - System Status - Message Log . However, when writing the article, I used sending messages to the Syslog server, the settings of which are performed in the Configuration - System - Syslog Settings section. Rsyslog was used as the syslog server. To receive a log message, the following settings must be present in the configuration file of the Rsyslog daemon:
module(load="imudp") input(type="imudp" port="514") $template FILENAME,"/var/log/rsyslogd/%fromhost-ip%.log *.* ?FILENAME
Conclusion
AudioCodes gateways are valued by many professionals for their flexibility, reliability, and functionality. At the same time, their configuration can cause considerable difficulties for an inexperienced user due to the presence of a large number of options and the specific logic of the operation of devices. However, having a little acquainted with these gateways, after some time you realize that everything is implemented very logically and correctly. I hope this article will help newcomers to go through the first stage of acquaintance with the AudioCodes gateways as painlessly as possible.
All Articles