この例では、認証にOAuthプロトコルを使用し、ツイートを送信して友人のステータスを表示できるAIRアプリケーションの実装について説明します。
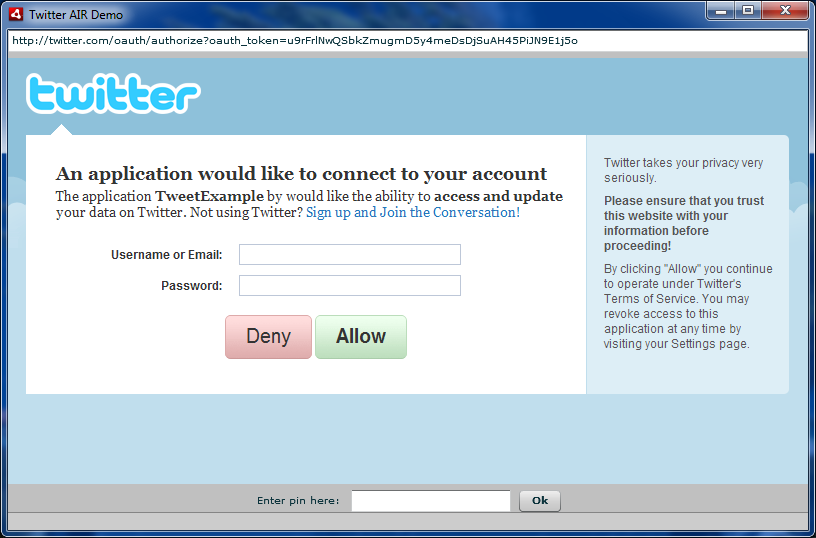
開始するには、必要なmxml構造を作成します。 ViewStackには2つのウィンドウが必要です。 最初のウィンドウは認証ウィンドウです( HTMLコンポーネントとPINコード入力フィールドがあります)。
<mx:VBox width= "100%" height= "100%" id= "authScreen" > <mx:TextInput text= "{authHTML.location}" editable= "false" width= "100%" /> <mx:HTML id= "authHTML" width= "100%" height= "100%" /> <mx:HBox width= "100%" horizontalAlign= "center" verticalAlign= "middle" > <mx:Label text= "Enter pin here:" /> <mx:TextInput id= "pinTextInput" /> <mx:Button label= "Ok" click= "pinOkButton_clickHandler(event)" id= "pinOkButton" /> </mx:HBox > </mx:VBox >
<mx:VBox width= "100%" height= "100%" id= "authScreen" > <mx:TextInput text= "{authHTML.location}" editable= "false" width= "100%" /> <mx:HTML id= "authHTML" width= "100%" height= "100%" /> <mx:HBox width= "100%" horizontalAlign= "center" verticalAlign= "middle" > <mx:Label text= "Enter pin here:" /> <mx:TextInput id= "pinTextInput" /> <mx:Button label= "Ok" click= "pinOkButton_clickHandler(event)" id= "pinOkButton" /> </mx:HBox > </mx:VBox >
<mx:VBox width= "100%" height= "100%" id= "authScreen" > <mx:TextInput text= "{authHTML.location}" editable= "false" width= "100%" /> <mx:HTML id= "authHTML" width= "100%" height= "100%" /> <mx:HBox width= "100%" horizontalAlign= "center" verticalAlign= "middle" > <mx:Label text= "Enter pin here:" /> <mx:TextInput id= "pinTextInput" /> <mx:Button label= "Ok" click= "pinOkButton_clickHandler(event)" id= "pinOkButton" /> </mx:HBox > </mx:VBox >
<mx:VBox width= "100%" height= "100%" id= "authScreen" > <mx:TextInput text= "{authHTML.location}" editable= "false" width= "100%" /> <mx:HTML id= "authHTML" width= "100%" height= "100%" /> <mx:HBox width= "100%" horizontalAlign= "center" verticalAlign= "middle" > <mx:Label text= "Enter pin here:" /> <mx:TextInput id= "pinTextInput" /> <mx:Button label= "Ok" click= "pinOkButton_clickHandler(event)" id= "pinOkButton" /> </mx:HBox > </mx:VBox >
<mx:VBox width= "100%" height= "100%" id= "authScreen" > <mx:TextInput text= "{authHTML.location}" editable= "false" width= "100%" /> <mx:HTML id= "authHTML" width= "100%" height= "100%" /> <mx:HBox width= "100%" horizontalAlign= "center" verticalAlign= "middle" > <mx:Label text= "Enter pin here:" /> <mx:TextInput id= "pinTextInput" /> <mx:Button label= "Ok" click= "pinOkButton_clickHandler(event)" id= "pinOkButton" /> </mx:HBox > </mx:VBox >
<mx:VBox width= "100%" height= "100%" id= "authScreen" > <mx:TextInput text= "{authHTML.location}" editable= "false" width= "100%" /> <mx:HTML id= "authHTML" width= "100%" height= "100%" /> <mx:HBox width= "100%" horizontalAlign= "center" verticalAlign= "middle" > <mx:Label text= "Enter pin here:" /> <mx:TextInput id= "pinTextInput" /> <mx:Button label= "Ok" click= "pinOkButton_clickHandler(event)" id= "pinOkButton" /> </mx:HBox > </mx:VBox >
<mx:VBox width= "100%" height= "100%" id= "authScreen" > <mx:TextInput text= "{authHTML.location}" editable= "false" width= "100%" /> <mx:HTML id= "authHTML" width= "100%" height= "100%" /> <mx:HBox width= "100%" horizontalAlign= "center" verticalAlign= "middle" > <mx:Label text= "Enter pin here:" /> <mx:TextInput id= "pinTextInput" /> <mx:Button label= "Ok" click= "pinOkButton_clickHandler(event)" id= "pinOkButton" /> </mx:HBox > </mx:VBox >
<mx:VBox width= "100%" height= "100%" id= "authScreen" > <mx:TextInput text= "{authHTML.location}" editable= "false" width= "100%" /> <mx:HTML id= "authHTML" width= "100%" height= "100%" /> <mx:HBox width= "100%" horizontalAlign= "center" verticalAlign= "middle" > <mx:Label text= "Enter pin here:" /> <mx:TextInput id= "pinTextInput" /> <mx:Button label= "Ok" click= "pinOkButton_clickHandler(event)" id= "pinOkButton" /> </mx:HBox > </mx:VBox >
<mx:VBox width= "100%" height= "100%" id= "authScreen" > <mx:TextInput text= "{authHTML.location}" editable= "false" width= "100%" /> <mx:HTML id= "authHTML" width= "100%" height= "100%" /> <mx:HBox width= "100%" horizontalAlign= "center" verticalAlign= "middle" > <mx:Label text= "Enter pin here:" /> <mx:TextInput id= "pinTextInput" /> <mx:Button label= "Ok" click= "pinOkButton_clickHandler(event)" id= "pinOkButton" /> </mx:HBox > </mx:VBox >
2番目のウィンドウは、友達のツイートとツイートを送信するフィールドのリストです。
- <mx:VBox幅= "100%"高さ= "100%" id = "twitterScreen" >
- <mx:リストの幅= "100%"高さ= "100%" dataProvider = "{twitterStatuses}" id = "tweetsList" >
- <mx:itemRenderer >
- <mx:コンポーネント >
- <mx:HBox幅= "100%"高さ= "100" borderStyle = "solid" >
- <mx:画像の高さ= "100%"ソース= "{data.user.profileImageUrl}" />
- <mx:VBoxの高さ= "100%"幅= "100" >
- <mx:テキスト幅= "100%"テキスト= "{data.user.screenName}" />
- <mx:テキスト幅= "100%"テキスト= "{data.createdAt}" />
- </ mx:VBox >
- <mx:テキストの幅= "100%"高さ= "100%"テキスト= "{data.text}" />
- </ mx:HBox >
- </ mx:コンポーネント >
- </ mx:itemRenderer >
- </ mx:リスト >
- <mx:HBox width = "100%" horizontalAlign = "center" verticalAlign = "middle" >
- <mx:TextArea width = "100%" height = "100%" id = "tweetTextInput"
- textInput = "tweetTextInput_textInputHandler(event)" />
- <mx:ボタンラベル= 「送信」クリック= 「sendTweetButton_clickHandler(イベント)」
- enabled = "{tweetTextInput.text!= ''}"
- 高さ= "100%"
- id = "sendTweetButton" />
- </ mx:HBox >
- </ mx:VBox >
デスクトップアプリケーションのOAuth認証アルゴリズムは次のとおりです。
- リクエストトークンを受け取ります。 これにはCONSUMER_KEYとCONSUMER_SECRETが必要です 。これらはここで取得できます 。
- ブラウザーで、ユーザーがアプリケーションに自分のプロファイルへのアクセスを許可する必要がある承認ウィンドウを開く必要があります。 これを行うには、データを入力してPINコードを取得する必要があります。 (承認ウィンドウのURLは、受信した要求トークンに基づいて取得されます)。
- 入力されたPINが正しい場合、アクセストークンがアプリケーションに返され、サービスでのすべての操作に使用されます。
Twitter APIとのすべての対話は、 TwitterAPIクラスを介して行われます。
- var twitterApi : TwitterAPI = new TwitterAPI ( ) ;
そして、 twitterApi.connectionプロパティを介したOAuth認証。
- //イベントを受信するリクエストトークンをリッスンします
- twitterApi.connection。 addEventListener ( OAuthTwitterEvent.REQUEST_TOKEN_RECEIVED、handleRequestTokenReceived ) ;
- //リクエストトークンrequestのエラーイベントをリッスンします
- twitterApi.connection。 addEventListener ( OAuthTwitterEvent.REQUEST_TOKEN_ERROR、handleRequestTokenError ) ;
- //アクセストークンアクセスエラーイベントをリッスンします
- twitterApi.connection。 addEventListener ( OAuthTwitterEvent.ACCESS_TOKEN_ERROR、handleAccessTokenError ) ;
- //認証成功のイベントをリッスンします
- twitterApi.connection。 addEventListener ( OAuthTwitterEvent.AUTHORIZED、handleAuthorized ) ;
- //ログイン
- twitterApi.connection.authorize ( CONSUMER_KEY、CONSUMER_SECRET ) ;
リクエストトークンを正常に受信したら、Twitterへのユーザーアクセスを表示する必要があります。
これは次のように行われます。
- 保護された 関数 handleRequestTokenReceived (イベント: OAuthTwitterEvent ) : void
- {
- authHTML.location = twitterApi.connection.authorizeURL;
- }
ユーザーがPINコードを入力したら、APIに送り返す必要があります。
- 保護された 関数 pinOkButton_clickHandler ( event : MouseEvent ) : void
- {
- twitterApi.connection.grantAccess ( pinTextInput。text ) ;
- }
認証が成功すると、 twitterScreenウィンドウに切り替えてツイートをアップロードします。
- //ステータスの読み込み操作を初期化します
- var op : TwitterOperation = new LoadHomeTimeline ( ) ;
- //コマンド完了イベントをリッスンします
- var handler : Function = function ( event : TwitterEvent ) : void
- {
- op。 removeEventListener ( TwitterEvent。COMPLETE、ハンドラー) ;
- if ( event.success )
- {
- //操作は正常に完了しました
- status = "Tweets loaded" ;
- //ダウンロードしたツイートのリストを取得します
- twitterStatuses =イベント。 ArrayCollection としての データ 。
- }
- 他に
- {
- //操作は失敗しました
- status = "読み込みエラー:" +イベント。 データ toString ( ) ;
- }
- } ;
- op。 addEventListener ( TwitterEvent。COMPLETE、ハンドラー) ;
- //操作を実行します
- twitterApi.post ( op ) ;
ツイート自体は次のように送信されます。
- var text : String = tweetTextInput。 テキスト
- //ステータス更新操作を初期化します
- var op : TwitterOperation = new UpdateStatus ( text ) ;
- var handler : Function = function ( event : TwitterEvent ) : void
- {
- op。 removeEventListener ( TwitterEvent。COMPLETE、ハンドラー) ;
- if ( event.success )
- {
- //操作は正常に完了しました
- status = "Tweet sent" ;
- loadTweets ( ) ;
- tweetTextInput。 テキスト = "" ;
- }
- 他に
- {
- //操作は失敗しました
- status = "ステータス送信エラー:" +イベント。 データ toString ( ) ;
- }
- } ;
- op。 addEventListener ( TwitterEvent。COMPLETE、ハンドラー) ;
- //操作を実行します
- twitterApi.post ( op ) ;
どの操作もtwitterApi.post(operation、postType、priority)メソッドで実行できます。 さらに、各コマンドの指定された優先度で順次実行することも、前の操作を完了することなくpost()メソッドを実行した直後に実行することもできます。 このため、 postTypeフィールドはそれぞれPOST_TYPE_NORMALまたはPOST_TYPE_ASYNCである必要があります。 サポートされているすべての操作のリストはこちらです: dev.dborisenko.com/twitter-actionscript-api/docs/commands-summary.html
ソースの例: dev.dborisenko.com/twitter-actionscript-api/examples/TwitterAIRDemo/srcview
コンパイルされた例: twitter-actionscript-api.googlecode.com/files/TwitterAIRDemo.air
ライブラリリンク: twitter-actionscript-api.googlecode.com/files/TwitterAPI_v1.2.swc
ライブラリドキュメント: dev.dborisenko.com/twitter-actionscript-api/docs
Google Codeのライブラリ自体: code.google.com/p/twitter-actionscript-api