最近、ASP.NET CoreのOpenId Connectで認証がどのように行われるかを理解する必要がありました。 例から始めて、仕様を読むことは避けられないことがすぐに明らかになり、ソースコードと開発者の記事を読む必要がありました。 その結果、ASP.NET CoreプラットフォームでOpenId Connect Implicit Flowの実用的な実装を作成する方法を理解するために必要なすべてを1か所に集めたいという要望がありました。
この記事は実装の詳細に関するものなので、記事で提案されているコードに従ってソリューションを再現することをお勧めします。そうしないと、コンテキストを把握することが困難になります。 コメントおよび記事の本文にある重要なコメントのほとんどには、ソースへのリンクが含まれています。 一部の用語は、一般的にロシア語への翻訳を受け入れていないため、英語のままにしました。
OpenId Connectについて少し
OpenId Connectを理解していれば、次のパートから読み始めることができます。
OpenId Connect(OpenIdと混同しないでください)は、OAuth2.0承認プロトコルに基づいて構築された認証プロトコルです。 実際、OAuth2タスクにはユーザーの承認のみが含まれ、認証は含まれません。 OpenID Connectは、クレームと呼ばれる値のセットとしてユーザープロファイルを取得および表示する標準的な方法も定義しています。 OpenId Connectは、この情報を返すUserInfoエンドポイントを記述します。 また、クライアントアプリケーションは、署名されたJSON Webトークン( JWT )の形式でユーザー情報を受信できるため、サーバーに送信するリクエストを減らすことができます。
公式サイトのプロトコルに慣れるのは理にかなっています。Connect2id 、 Auth0、Stormpathなどのクラウドベースの認証ソリューションの商用プロバイダーのサイトを読むと便利です。 必要なすべての用語の説明は行いません。まず、テキストの壁になります。次に、必要なものはすべてこれらのリンクにあります。
Identity Serverに慣れていない場合は、優れたドキュメントとこのような素晴らしい例を読むことから始めることをお勧めします。
結果として何を得たいですか
OpenId Connect Implicit Flowを実装します。これは、SPAを含むブラウザーのJavaScriptアプリケーションに推奨されます。 このプロセスでは、ウォークスルーで通常行われることよりも少し深く、さまざまな重要な設定について説明します。 次に、OpenId Connectプロトコルの観点から実装がどのように機能するかを確認し、実装がプロトコルにどのように関連するかを調べます。
ツール
- サーバー側では、 IdentityServer4を使用します
- クライアント側では、 oidc-clientライブラリを使用します
両方のライブラリの主な著者は、 Brock AllenとDominic Brierです。
相互作用のシナリオ
3つのプロジェクトがあります。
- IdentityServerは、OpenId Connect認証サーバーです。
- ApiはテストWebサービスです。
- Clientは、 JavaScriptClientコードに基づいたJavaScriptクライアントアプリケーションです。
対話のシナリオは次のとおりです。クライアントクライアントアプリケーションはIdentityServer認証サーバーで認証され、access_token(JWT)を受信します。これは、 ApiサーバーでWebサービスを呼び出すベアラートークンとして使用されます。
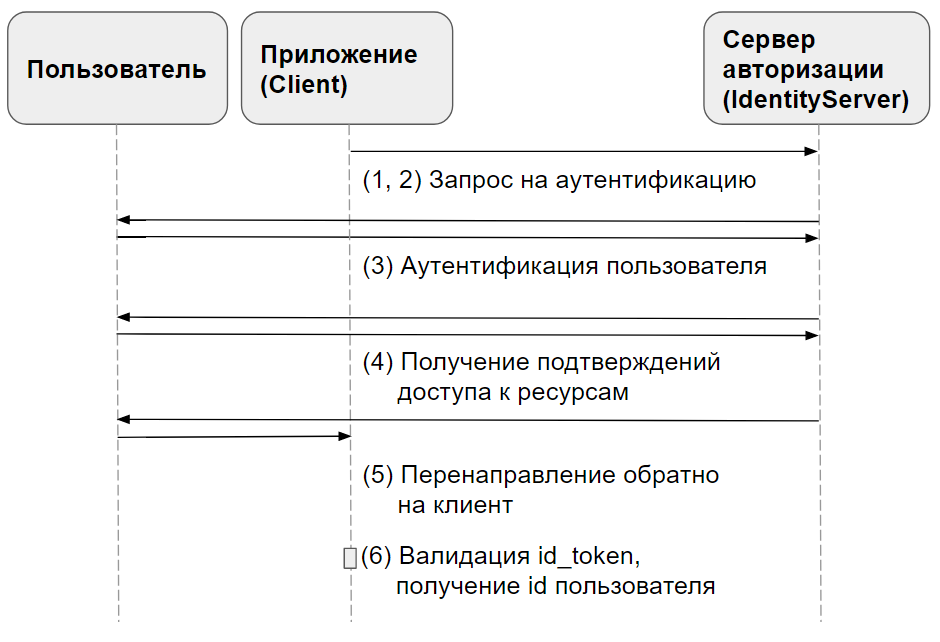
OpenId Connect標準では、さまざまな認証手順が説明されています。 標準言語のこれらのオプションは、フローと呼ばれます。
この記事で検討する暗黙的なフローには、 次の手順が含まれます 。
- クライアントは、目的の要求パラメーターを含む認証要求を準備します。
- クライアントは 、認証 サーバーに 認証要求を送信し ます 。
- 認可サーバーはエンドユーザーを認証します 。
- 認可サーバーは、 エンドユーザーから確認を受け取ります 。
- 許可サーバーは 、id_tokenおよび必要に応じてaccess_tokenを使用して、 エンドユーザーをクライアントに送り返します 。
- クライアントはid_tokenを検証し、 エンドユーザーの サブジェクト識別子を受け取ります 。
実装
ログインとログアウトに関連するページの記述を大幅に節約するために、 公式のクイックスタートコードを使用します 。
この演習では、 ApiとIdentityServerをdotnet run
ことをお勧めしdotnet run
。IdentityServerは作業中に多くの有用な診断情報を書き込みます。この情報はすぐにコンソールに表示されます。
簡単にするために、ユーザーのブラウザーが実行されているコンピューターと同じコンピューターですべてのプロジェクトが実行されていると想定しています。
始めましょう。 明確にするために、Visual Studio 2017(15.3)を使用していると仮定します。 完成したソリューションコードはこちらで確認できます
空のOpenIdConnectSampleソリューションを作成します。
ほとんどのコードはIdentityServerのドキュメントのサンプルに基づいていますが、この記事のコードは、公式ドキュメントに欠けているもので補足され、注釈が付けられています。
すべての公式の例をよく理解することをお勧めしますが、暗黙的なフローについて詳しく見ていきます。
1. IdentityServer
空のプロジェクトでソリューションを作成し、プラットフォームとしてASP.NET Core 1.1を選択します。
これらのNuGetパッケージをインストールする
Install-Package Microsoft.AspNetCore.Mvc -Version 1.1.3 Install-Package Microsoft.AspNetCore.StaticFiles -Version 1.1.2 Install-Package IdentityServer4 -Version 1.5.2
パッケージのバージョンはここで重要です Install-Package
は、デフォルトで最新バージョンをインストールします。 著者は、devブランチのAsp.NET Core 2.0にすでにIdentityServerポートを作成していましたが、執筆時点では、まだQuickstart UIを移植していませんでした。 .NET Core 1.1と2.0のサンプルコードの違いはわずかです。
Main
Program.csメソッドを次のように変更します
public static void Main(string[] args) { Console.Title = "IdentityServer"; // https://docs.microsoft.com/en-us/aspnet/core/fundamentals/servers/kestrel?tabs=aspnetcore2x var host = new WebHostBuilder() .UseKestrel() // , Kestrel .UseUrls("http://localhost:5000") // UI - .UseContentRoot(Directory.GetCurrentDirectory()) .UseIISIntegration() .UseStartup<Startup>() .Build(); host.Run(); }
その後、 Startup.csで
- 名前空間を追加する
using System.Security.Claims; using IdentityServer4; using IdentityServer4.Configuration; using IdentityServer4.Models; using IdentityServer4.Test;
- IdentityServer設定を含むいくつかのヘルパーメソッドを追加し、コメントに注意してください。 これらのメソッドは、後で
ConfigureServices
で呼び出されます。 プロジェクトにメソッドを追加する前にメソッドのテキストを読むことをお勧めします-一方で、これにより、何が起こっているのかを全体的に把握できるようになります。一方で、余計なことはあまりありません。
クライアントアプリケーションの情報設定
public static IEnumerable<IdentityResource> GetIdentityResources() { // , scopes IdentityServer return new List<IdentityResource> { // "sub" claim new IdentityResources.OpenId(), // claims profile scope // http://openid.net/specs/openid-connect-core-1_0.html#ScopeClaims new IdentityResources.Profile(), }; }
これらの設定はClaim sub
サポートを追加します。これは、OpenId Connectトークン、および名前、性別、生年月日などのOpenId Connect標準で記述されたプロファイルフィールドを含むクレームスコープprofile
と一致するための最小要件です。
これは以前の設定に似ていますが、情報はAPIを対象としています
public static IEnumerable<ApiResource> GetApiResources() { // claims scopes access_token return new List<ApiResource> { // scope "api1" IdentityServer new ApiResource("api1", "API 1", // claims scope api1 new[] {"name", "role" }) }; }
クライアントアプリケーション自体、サーバーについて知る必要があります
public static IEnumerable<Client> GetClients() { return new List<Client> { new Client { // , client_id ClientId = "js", ClientName = "JavaScript Client", AllowedGrantTypes = GrantTypes.Implicit, AllowAccessTokensViaBrowser = true, // , // false UserInfo endpoint AlwaysIncludeUserClaimsInIdToken = true, // // User Agent, RedirectUris = { // "http://localhost:5003/callback.html", // access_token iframe "http://localhost:5003/callback-silent.html" }, PostLogoutRedirectUris = { "http://localhost:5003/index.html" }, // , CORS- AllowedCorsOrigins = { "http://localhost:5003" }, // scopes, AllowedScopes = { IdentityServerConstants.StandardScopes.OpenId, IdentityServerConstants.StandardScopes.Profile, "api1" }, AccessTokenLifetime = 3600, // , IdentityTokenLifetime = 300, // , // refresh- scope offline_access AllowOfflineAccess = false, } }; }
テストユーザー、 ボブには管理者がいることに注意してください
public static List<TestUser> GetUsers() { return new List<TestUser> { new TestUser { SubjectId = "1", Username = "alice", Password = "password", Claims = new List<Claim> { new Claim("name", "Alice"), new Claim("website", "https://alice.com"), new Claim("role", "user"), } }, new TestUser { SubjectId = "2", Username = "bob", Password = "password", Claims = new List<Claim> { new Claim("name", "Bob"), new Claim("website", "https://bob.com"), new Claim("role", "admin"), } } }; }
-
ConfigureServices
メソッドを変更します
public void ConfigureServices(IServiceCollection services) { services.AddMvc(); services.AddIdentityServer(options => { // http://docs.identityserver.io/en/release/reference/options.html#refoptions options.Endpoints = new EndpointsOptions { // Implicit Flow EnableAuthorizeEndpoint = true, // EnableCheckSessionEndpoint = true, // EnableEndSessionEndpoint = true, // claims // http://openid.net/specs/openid-connect-core-1_0.html#UserInfo EnableUserInfoEndpoint = true, // OpenId Connect EnableDiscoveryEndpoint = true, // , EnableIntrospectionEndpoint = false, // .. Implicit Flow access_token authorization_endpoint EnableTokenEndpoint = false, // refresh reference tokens // http://docs.identityserver.io/en/release/topics/reference_tokens.html EnableTokenRevocationEndpoint = false }; // IdentitySever cookie options.Authentication = new IdentityServer4.Configuration.AuthenticationOptions { CookieLifetime = TimeSpan.FromDays(1) }; }) // x509-, IdentityServer RS256 JWT .AddDeveloperSigningCredential() // id_token .AddInMemoryIdentityResources(GetIdentityResources()) // access_token .AddInMemoryApiResources(GetApiResources()) // .AddInMemoryClients(GetClients()) // .AddTestUsers(GetUsers()); }
この方法では、 IdentityServer設定、特にトークンの署名に使用される証明書、OpenId ConnectとOAuth2.0の意味でのscope
設定、クライアントアプリケーション設定、およびユーザー設定を指定します。
もう少し。 AddIdentityServer
は、 IdentityServerサービスをASP.NET Core依存関係解決メカニズムに登録しますAddIdentityServer
ミドルウェアとして追加するには、これを行う必要があります。
- IdentityServerは RSA SHA 256を使用してトークンに署名するため、秘密鍵と公開鍵のペアが必要です。
AddDeveloperSigningCredential
は、JWTトークンに署名するためのテストキー、つまり、この場合id_token 、AddDeveloperSigningCredential
追加します。 本番環境では、これらのキーを置き換える必要があります。たとえば、 自己署名証明書を生成することにより、これを行うことができます。 -
AddInMemoryIdentityResources
。 ここでリソースが意味するものとそれらがなぜ必要かについて読むことができます 。
Configure
方法は次のようになります
public void Configure(IApplicationBuilder app, IHostingEnvironment env, ILoggerFactory loggerFactory) { loggerFactory.AddConsole(LogLevel.Debug); app.UseDeveloperExceptionPage(); // middleware IdentityServer app.UseIdentityServer(); // 2 , app.UseStaticFiles(); app.UseMvcWithDefaultRoute(); }
IdentityServerの 公式のスターターUI リポジトリからダウンロードし、ファイルをプロジェクトフォルダーにコピーして、フォルダーの構造が一致するようにします(たとえば、wwwrootとwwwroot)。
プロジェクトがコンパイルされていることを確認します。
2. API
このプロジェクトは、アクセスが制限されたおもちゃのAPIサーバーです。
別の空のApiプロジェクトをソリューションに追加し、プラットフォームとしてASP.NET Core 1.1を選択します。 なぜなら このプロジェクトでは本格的なWebアプリケーションを作成するのではなく、JSONを提供する軽量のWebサービスのみを作成するため、完全なMvcではなくMvcCoreミドルウェアに制限します。
パッケージマネージャーコンソールでこれらのコマンドを実行して、必要なパッケージを追加します
Install-Package Microsoft.AspNetCore.Mvc.Core -Version 1.1.3 Install-Package Microsoft.AspNetCore.Mvc.Formatters.Json -Version 1.1.3 Install-Package Microsoft.AspNetCore.Cors -Version 1.1.2 Install-Package IdentityServer4.AccessTokenValidation -Version 1.2.1
まず、必要なKestrel設定をProgram.csに追加します。
public static void Main(string[] args) { Console.Title = "API"; var host = new WebHostBuilder() .UseKestrel() .UseUrls("http://localhost:5001") .UseContentRoot(Directory.GetCurrentDirectory()) .UseIISIntegration() .UseStartup<Startup>() .Build(); host.Run(); }
Startup.csは、わずかに少ない変更で済みます。
ConfigureServices
public void ConfigureServices(IServiceCollection services) { services.AddCors(options=> { // CORS, API options.AddPolicy("default", policy => { policy.WithOrigins("http://localhost:5003") .AllowAnyHeader() .AllowAnyMethod(); }); }); // MVC Core Razor, DataAnnotations , Asp.NET 4.5 WebApi services.AddMvcCore() // , Authorize .AddAuthorization(options => // Roles magic strings, options.AddPolicy("AdminsOnly", policyUser => { policyUser.RequireClaim("role", "admin"); }) ) // AddMVC, AddMvcCore, JSON .AddJsonFormatters(); }
そして、それはConfigure
ように見えるはずです
public void Configure(IApplicationBuilder app, IHostingEnvironment env, ILoggerFactory loggerFactory) { loggerFactory.AddConsole(LogLevel.Debug); // middleware CORS app.UseCors("default"); // middleware OpenId Connect JWT- app.UseIdentityServerAuthentication(new IdentityServerAuthenticationOptions { // IdentityServer Authority = "http://localhost:5000", // , HTTPS IdentityServer, true // https://docs.microsoft.com/en-us/aspnet/core/api/microsoft.aspnetcore.builder.openidconnectoptions RequireHttpsMetadata = false, // aud access_token JWT ApiName = "api1", // , api scopes scope // AllowedScopes = { "api1.read", "api1.write" } // JWT- claims HttpContext.User Authorize , AutomaticAuthenticate = true, // middleware authentication challenge AutomaticChallenge = true, // [Authorize], IdentityServerAuthenticationOptions - RoleClaimType = "role", }); app.UseMvc(); }
コントローラーを追加するために残り、ユーザーの現在のクレームを返します。これは、ミドルウェア認証IdentityServerが access_tokenを復号化する方法を理解するのに便利です。
単一のIdentityController
をプロジェクトに追加します。
ファイルの内容は次のようになります。
using System.Linq; using Microsoft.AspNetCore.Mvc; using Microsoft.AspNetCore.Authorization; namespace Api.Controllers { [Authorize] public class IdentityController : ControllerBase { [HttpGet] [Route("identity")] public IActionResult Get() { return new JsonResult(from c in User.Claims select new { c.Type, c.Value }); } [HttpGet] [Route("superpowers")] [Authorize(Policy = "AdminsOnly")] public IActionResult Superpowers() { return new JsonResult("Superpowers!"); } } }
プロジェクトがコンパイルされていることを確認してください。
3.クライアント
このプロジェクトには、実際には重要なサーバー部分は含まれていません。 すべてのサーバーコードは、静的クライアントファイルを提供するように、Kestrel Webサーバーの設定にすぎません。
前の2回と同様に、空のプロジェクトをソリューションに追加し、 Clientという名前を付けます。
静的ファイルを操作するためのパッケージをインストールします。
Install-Package Microsoft.AspNetCore.StaticFiles -Version 1.1.2
Program.csファイルを変更する
public static void Main(string[] args) { var host = new WebHostBuilder() .UseKestrel() .UseUrls("http://localhost:5003") .UseContentRoot(Directory.GetCurrentDirectory()) .UseIISIntegration() .UseStartup<Startup>() .Build(); host.Run(); }
Startup
クラスにはこのコードが含まれている必要があります。
public void ConfigureServices(IServiceCollection services) { } public void Configure(IApplicationBuilder app) { app.UseDefaultFiles(); app.UseStaticFiles(); }
一方、JavaScriptクライアントコードには、すべての認証ロジックとApi呼び出しが含まれています。
次のファイルをプロジェクトのwwwrootフォルダーに1つずつ追加します。
-
index.html
さまざまなアクションのボタンとapp.js
およびoidc-client.js
アプリケーションJavaScriptファイルへのリンクを備えたシンプルなHTMLファイル。 -
oidc-client.js
-OpenId Connectを実装するクライアントライブラリ -
app.js
- oidc-client設定とボタンイベントハンドラー -
callback.html
認証サーバーがクライアントアプリケーションをリダイレクトするページ。ログイン手順を完了するために必要なパラメーターを渡します。 -
callback-silent.html
-callback.html
に似たページ。ただし、iframeを介した「バックグラウンド」再ログインが発生した場合のみ。 これは、refresh_token
を使用せずにリソースへのユーザーアクセスを拡張するために必要refresh_token
。
index.html
この名前の新しいHTMLファイルをプロジェクトのwwwrootフォルダーに追加します。
<!DOCTYPE html> <html> <head> <meta charset="utf-8" /> <title></title> </head> <body> <button id="login">Login</button> <button id="getUser">Get User</button> <button id="getSuperpowers">Get Superpowers!</button> <button id="api">Call API</button> <button id="logout">Logout</button> <pre id="results"></pre> <script src="oidc-client.js"></script> <script src="app.js"></script> </body> </html>
oidc-client.js
ここ (1.3.0) からこのファイルをダウンロードして、プロジェクトに追加します。
app.js
この名前の新しいJavaScriptファイルをプロジェクトのwwwrootフォルダーに追加します。
追加する
/// <reference path="oidc-client.js" />
IntelliSenseサポートのファイルの先頭。
このコードをapp.js
の上部に貼り付けます
Oidc.Log.logger = console; Oidc.Log.level = 4;
最初の行は、呼び出されたメソッドとの互換性を使用して、標準ブラウザコンソールをoidc-clientの標準ロガーとして設定します 。 2行目は、すべてのメッセージを表示することです。 これにより、記事の第2部に進み、実装がどのように機能するかを見るときに、詳細を確認できます。
それでは、このファイルに残りの部分のコードを追加しましょう。
コードのこの部分は最も長く、おそらく最も興味深いものです。 oidc-clientライブラリのメインUserManager
オブジェクトのライブラリ設定とその作成が含まれています。 設定自体とそれらのコメントに精通することをお勧めします。
var config = { authority: "http://localhost:5000", // IdentityServer client_id: "js", // IdentityServer // , // - OpenId Connect redirect_uri: "http://localhost:5003/callback.html", // Response Type , Authorization Endpoint // , Implicit Flow // http://openid.net/specs/openid-connect-core-1_0.html#Authentication response_type: "id_token token", // subject id , id_token, access_token api1 (. c IdentityServer) scope: "openid profile api1", // , post_logout_redirect_uri: "http://localhost:5003/index.html", // IdentityServer, true monitorSession: true, // , , 2000 checkSessionInterval: 30000, // access_token https://tools.ietf.org/html/rfc7009 revokeAccessTokenOnSignout: true, // , , 300 // https://github.com/IdentityModel/oidc-client-js/blob/1.3.0/src/JoseUtil.js#L95 clockSkew: 300, // UserInfo endpoint , loadUserInfo: true, }; var mgr = new Oidc.UserManager(config);
次に、ボタンのハンドラーを追加してサブスクライブします。
function login() { // mgr.signinRedirect(); } function displayUser() { mgr.getUser().then(function (user) { if (user) { log("User logged in", user.profile); } else { log("User not logged in"); } }); } function api() { // claims requestUrl(mgr, "http://localhost:5001/identity"); } function getSuperpowers() { // endpoint requestUrl(mgr, "http://localhost:5001/superpowers"); } function logout() { // mgr.signoutRedirect(); } document.getElementById("login").addEventListener("click", login, false); document.getElementById("api").addEventListener("click", api, false); document.getElementById("getSuperpowers").addEventListener("click", getSuperpowers, false); document.getElementById("logout").addEventListener("click", logout, false); document.getElementById("getUser").addEventListener("click", displayUser, false); // displayUser();
いくつかのユーティリティを追加します
function requestUrl(mgr, url) { mgr.getUser().then(function (user) { var xhr = new XMLHttpRequest(); xhr.open("GET", url); xhr.onload = function () { log(xhr.status, 200 == xhr.status ? JSON.parse(xhr.responseText) : "An error has occured."); } // Authorization access_token Bearer - . xhr.setRequestHeader("Authorization", "Bearer " + user.access_token); xhr.send(); }); } function log() { document.getElementById('results').innerText = ''; Array.prototype.forEach.call(arguments, function (msg) { if (msg instanceof Error) { msg = "Error: " + msg.message; } else if (typeof msg !== 'string') { msg = JSON.stringify(msg, null, 2); } document.getElementById('results').innerHTML += msg + '\r\n'; }); }
原則として、これは終了した可能性がありますが、ログイン手順を完了するために必要なページをさらに2つ追加する必要があります。 このコードを含むページをwwwroot
追加します。
callback.html
<!DOCTYPE html> <html> <head> <meta charset="utf-8" /> <title></title> </head> <body> <script src="oidc-client.js"></script> <script> new Oidc.UserManager().signinRedirectCallback().then(function () { window.location = "index.html"; }).catch(function (e) { console.error(e); }); </script> </body> </html>
callback-silent.html
<!DOCTYPE html> <html> <head> <meta charset="utf-8" /> <title></title> </head> <body> <script src='oidc-client.js'></script> <script> new Oidc.UserManager().signinSilentCallback(); </script> </body> </html>
できた!
仕組み
次のようなプロジェクトを開始することをお勧めします。コンソールを起動し、プロジェクトフォルダーに移動して、 dotnet run
コマンドを実行します。 これにより、 IdentityServerおよび他のアプリケーションがコンソールにログインしていることを確認できます。
最初にIdentityServerとApiを起動し、次にClientを起動します。
http://localhost:5003/index.html
Clientページを開きます。
この時点で、コンソールをclear()
でclear()
することができます。
次に、コンソールを設定して、すべての興味深い情報を実際に表示します。
たとえば、Chrome 60の場合、コンソール設定は次のようになります。

開発者のツールの[ ネットワーク ]タブで、[ ログの保存]の横のチェックボックスをオンにして、将来リダイレクトがさまざまなパラメーターの値を確認するのを妨げないようにすることができます。
CTRL + F5でページを更新します。
ハッピーパス
仕様の最初の2つのステップに対応するアクションを見てみましょう。
1. クライアントは、必要な要求パラメーターを含む認証要求を準備します。
2. クライアントは 、認証 サーバーに 認証要求を送信し ます 。
[ログイン]ボタンをクリックします。
許可サーバーとの対話は、アドレスへのGET要求で始まります
http://localhost:5000/.well-known/openid-configuration
このリクエストにより、 oidc-clientは、OpenId Connectプロバイダーのメタデータを受け取ります(このアドレスを別のタブで開くことをお勧めします)。これにはauthorization_endpoint
含まauthorization_endpoint
http://localhost:5000/connect/authorize
WebStorageはユーザー情報の保存に使用されることに注意してください。 oidc-clientを使用すると、使用するオブジェクトを指定できます。デフォルトではsessionStorage
です。
この時点で、認証リクエストはこれらのクエリ文字列パラメーターとともにauthorization_endpoint
に送信さauthorization_endpoint
ます
| 名 | 価値 |
|---|---|
| client_id | js |
| redirect_uri | http:// localhost:5003 / callback.html |
| response_type | id_tokenトークン |
| 範囲 | openidプロファイルapi1 |
| 状態 | 予測不可能な意味 |
| 一回だけ | 予測不可能な意味 |
redirect_uriは、 IdentityServer設定でclient_id
jsを使用してクライアントに指定したアドレスに対応することに注意してください。
なぜなら ユーザーがまだ認証されていない場合、 IdentityServerは ログインフォームへのリダイレクトを回答として送信します。
次に、ブラウザーはhttp://localhost:5000/account/login
リダイレクトされhttp://localhost:5000/account/login
。
3. 認証サーバーはエンドユーザーを認証します 。
4. 承認サーバーは、 エンドユーザーから確認を受け取ります 。
5. 認可サーバーは 、IDトークンと、必要に応じてアクセストークンとともにエンドユーザーをクライアントに送り返します。
ログインとしてbobを、 パスワードとしてpasswordを入力して、フォームを送信します。
最初にauthorization_endpoint
にリダイレクトさauthorization_endpoint
、そこからさまざまなスコープへの証明書利用者(この場合はjs-client)アクセスを受信するためのOpenId Connect許可に従って確認ページにリダイレクトされます。
すべてに同意し、フォームを送信します。 認証フォームと同様に、フォームの送信に応じてauthorization_endpoint
にリダイレクトさauthorization_endpoint
、 authorization_endpoint
データはCookieを使用して送信されます。
そこから、ブラウザは元の認証要求でredirect_uri
として指定されたアドレスにredirect_uri
れます。
暗黙フローを使用する場合、 #
ます。 これは、これらの値をJavaScriptアプリケーションで使用できるようにするために必要ですが、Webサーバーには送信されません。
| 名 | 価値 |
|---|---|
| id_token | クライアントのユーザーデータを含むトークン |
| access_token | APIへのアクセスに必要なデータを含むトークン |
| token_type | access_token
と入力します。この場合はBearer |
| expires_in | access_token
アクション access_token
|
| 範囲 | scopes |
6. id token Subject Identifier .
oidc-client state, nonce id_token
. , (, sub
claim id_token
). id_token
oidc-client .
id_token
( Network ), , payload -
{ "nbf": 1505143180, "exp": 1505146780, "iss": "http://localhost:5000", "aud": "js", "nonce": "2bd3ed0b260e407e8edd0d03a32f150c", "iat": 1505143180, "at_hash": "UAeZEg7xr23ToH2R2aUGOA", "sid": "053b5d83fd8d3ce3b13d3b175d5317f2", "sub": "2", "auth_time": 1505143180, "idp": "local", "name": "Bob", "website": "https://bob.com", "amr": [ "pwd" ] }
access_token
payload , , .
{ "nbf": 1505143180, "exp": 1505143480, "iss": "http://localhost:5000", "aud": [ "http://localhost:5000/resources", "api1" ], "client_id": "js", "sub": "2", "auth_time": 1505143180, "idp": "local", "name": "Bob", "role": "admin", "scope": [ "openid", "profile", "api1" ], "amr": [ "pwd" ] }
, loadUserInfo
, UserInfo Endpoint . UserInfo Endpoint claims Authorization Bearer - access_token
, claims JavaScript- .
loadUserInfo
access_token
, HTTP-, .
API
"Call API".
ajax- http://localhost:5001/identity
.
, OPTIONS- CORS .. , "" ( Authorization
, ).
, , GET -. , Authorization Bearer < access_token> .
IdentityServer middleware . IdentityServer middleware Asp.Net Core JwtBearerMiddleware .
, 200.
Logout
GET- end_session_endpoint
| id_token_hint | id_token
|
| post_logout_redirect_uri | URI, , |
, .
, . , - , - .
alice Get Superpowers! , bob .
do not allow
Logout ,
Username: alice
Password: password
http://localhost:5000/consent
No, Do Not Allow .
http://localhost:5003/callback.html
.
, URL #error=access_denied
, signinRedirectCallback
, rejected .
callback.html
catch-, .
id_token
URL , claims, scope profile.
API .
api1
claim api1
"scope": [ "openid", "profile" ],
Api 401 (Unathorized).
access_token
access_token
, Call API .
API ! , IdentityServer middleware Asp.Net Core, ClockSkew. , , , , . ClockSkew 5 .
5 , API 401 (Unathorized).
401, access_token
.
access_token
app.js
config
,
var config = { // ... // true, access_token , false automaticSilentRenew: true, // "" iframe silent_redirect_uri: 'http://localhost:5003/callback-silent.html', // oidc-client access_token accessTokenExpiringNotificationTime: 60, // ... }
access_token
. Call API , .
id_token
access_token
API , , , id_token
. js-. .
おわりに
, :
- OpenId Connect Implicit Flow IdentityServer oidc-client ASP.NET Core 1.1.
- , .
- , , , , , .
便利なリンク
- .
- IdentityServer4
- oidc-client .
- ASP.NET Core. .
- Authorize IdentityServer.
- OpenId Connect 2 —
id_token
access_token
. - OpenId Connect ASP.NET Core.