 みなさんこんにちは。 GreenLightでのSpaceLabゲームのリリースに関連して、C#/ Unityでのゲーム開発に関する一連の記事を開始することにしました。 開発の実際の経験に基づいており、初心者向けの標準ガイドとは少し異なります。
第一に、言い換えると、ドキュメントを繰り返しません。
第二に、私が書いていることを理解するにはプログラミングの知識が必要です。
残念ながら、マウスだけを使用してカジュアルゲームを作成する場合、この記事は役に立ちません。
しかし、私たちの経済戦略のゲームロジックが機能するエンジンを作成することについて、順を追って説明します。
ネタバレが好きな人やコードを読みたい人のために-最後にリポジトリへのリンクがあり、各アイテムは別々のコミットで追加されます。
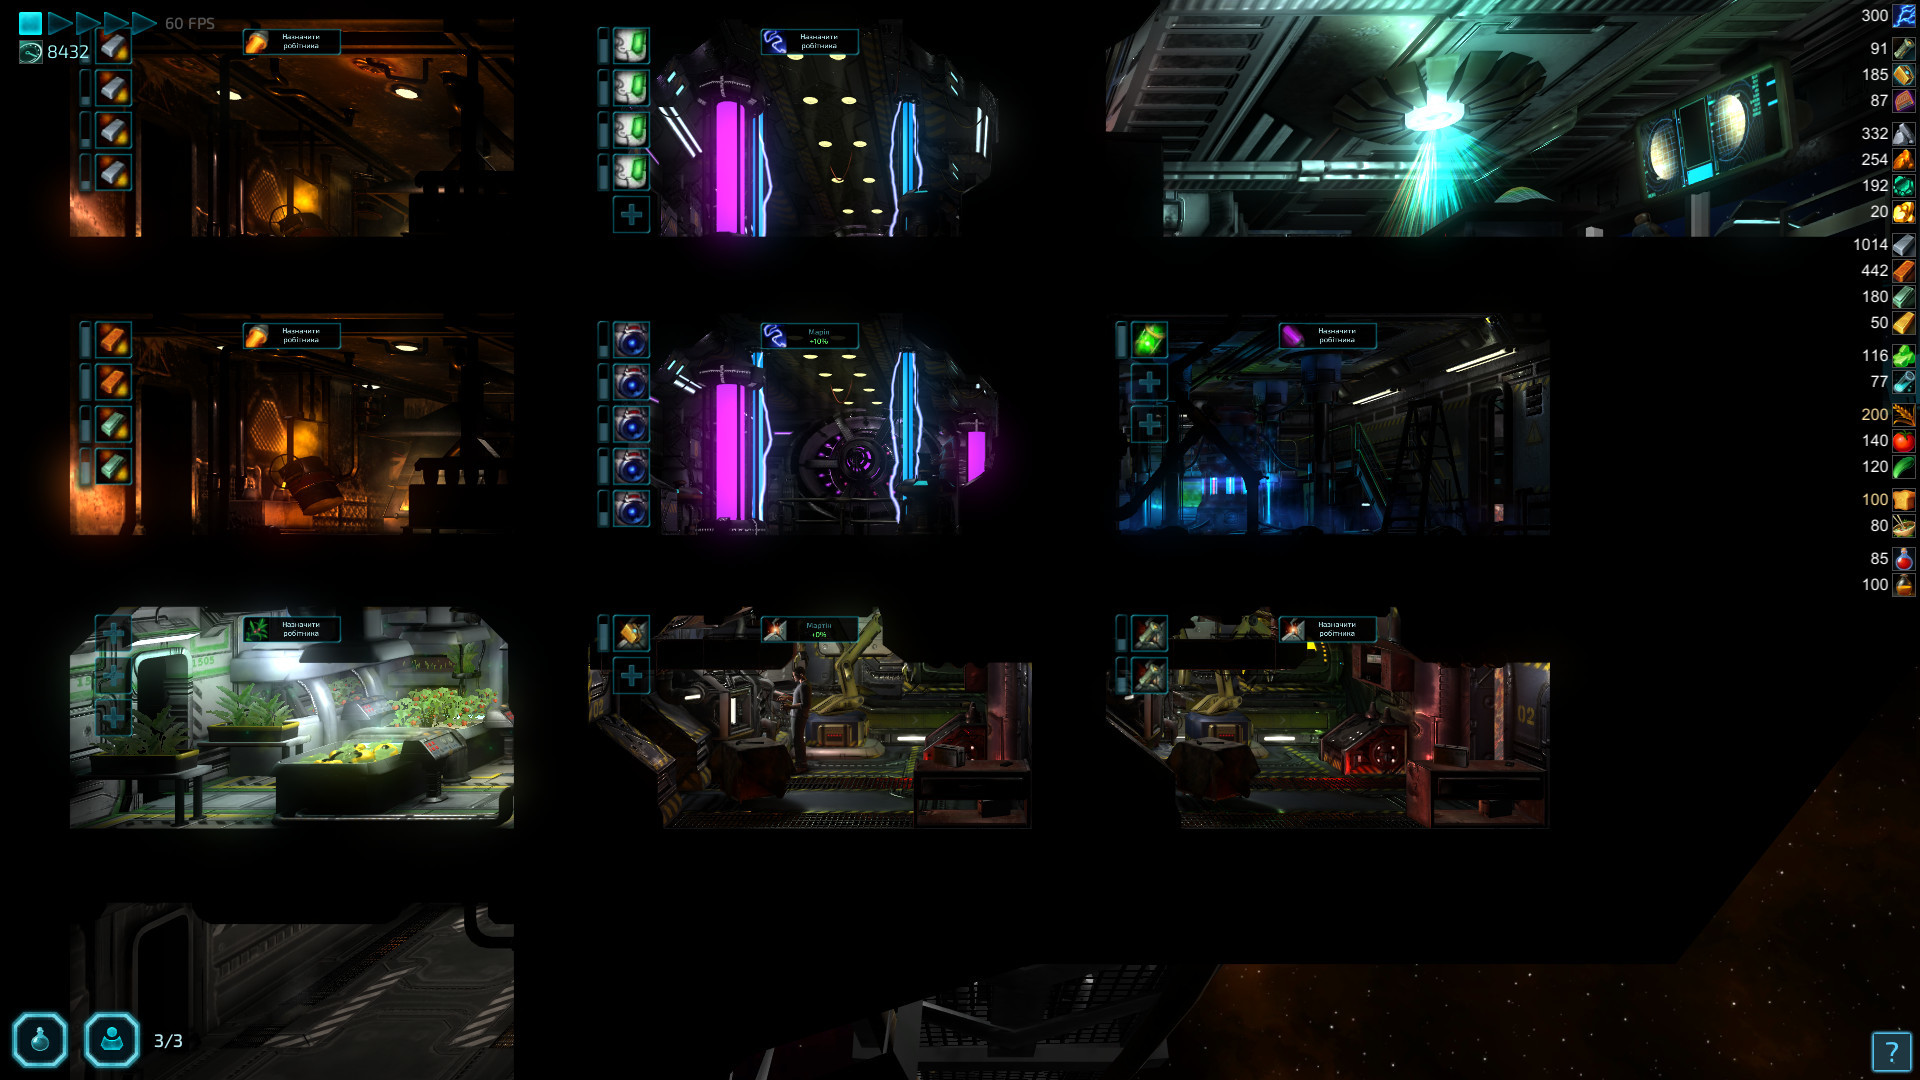
以下のビデオと無料ダウンロードへのリンクがあるゲームの種類を知りたい人。
すぐに警告します。膨大な数のパターンを理想的に適用したり、TTD手法へのアプローチを説明したりする目標はありません。 この記事では、読みやすく、サポートされた、不注意なコードを書きます。 おそらく、C#とゲームの作成に大きなスキルを持っている人にとっては、この記事は明白なように思えます。 それにもかかわらず、私はゲームロジックをどのように書くかという質問を非常に頻繁に耳にしました。この記事は、サーバーの作成に興味がある人やUnityでクライアントの作成に興味がある人に最適です。
達成したいGDの簡単な説明
1.プレイヤーが船を制御します。 船では部屋を構築でき、部屋ではスロットにモジュールを追加できます。
2.何かを構築するには、リソースを費やして時間を待つ必要があります。
6か月の開発後、結果は次のようになります)
作業計画
1.プロジェクトを設定する
2.コアの作成-基本構造
3.最初のコマンドを追加してテストします-構造とモジュールを構築します
4.建物とモジュールの設定を別のファイルに取り出します
5.時間の経過を追加する
6.構築可能を追加、しばらくの間建物が建設中
7.リソースを追加します。構築にはリソースが必要です
8.生産サイクルを追加します-モジュールはリソースを消費して発行します
この記事は非常に膨大であることが判明したため、2つの部分に分割する必要がありました。 このパートでは最初の5つのポイントを行い、2番目のパートでは終了します
1.プロジェクトを設定する
最初はUnity Editorは必要ありません-Game Logicを作成します。 VSを開き、
GameLogic
と
LogicTests
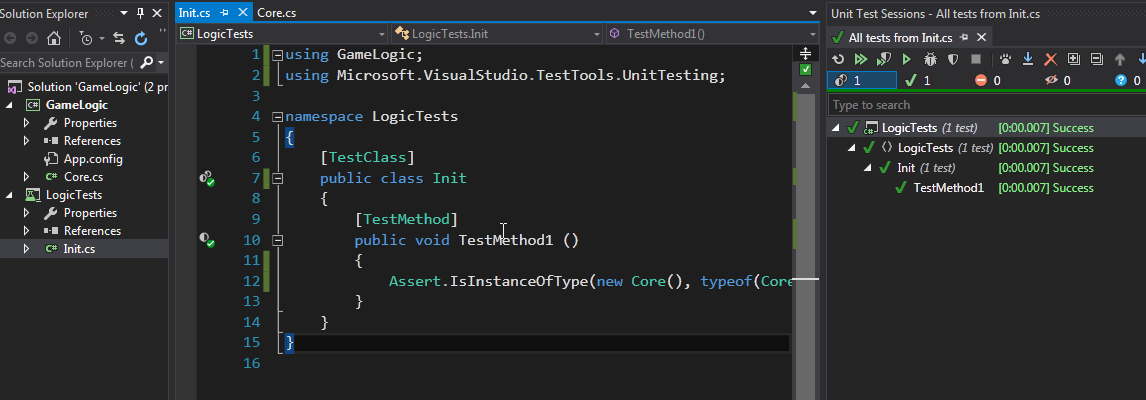
(ユニットテストプロジェクト)の2つのプロジェクトを作成します。 最初は、名前空間Unityを使用せずに純粋なC#でゲームの実際のロジックを記述し、2番目は組み込みのテストツールでロジックをテストします。 最初のCoreクラスをGameLogicに追加し、バンドルをテストする最初のテストを記述します。
public class Core { public static void Main () {} public Core () {} }
[TestClass] public class Init { [TestMethod] public void TestMethod1 () { Assert.IsInstanceOfType(new Core(), typeof(Core)); } }
2.コアの作成-基本構造
さて、これは正しく構成されており、プログラミングロジックに進むことができることを示しています。
それでは、ゲームデザインを理解しましょう。 船(船)、部屋(部屋)、部屋(建物)を各部屋に構築でき、各構造にモジュール(モジュール)を含めることができます。 もちろん、部屋と建物を1つのエンティティに統合することもできますが、このような分離はさらに役立ちます。
これらのすべての構造について、個別の名前空間アーキテクチャとベースクラスを作成します。 また、部屋のインデックスを列挙します。 現在行っていることの多くは一時的なものであり、最初のゲームロジックテストを実行するために必要です。
public enum BuildingType { Empty, PowerPlant }
public enum ModuleType { Generator }
public class Core { public static void Main () {} public readonly Ship Ship = new Ship(); public Core () { Ship.CreateEmptyRooms(); } }
public class Ship { // public readonly int RoomsLimit = 10; private readonly List<Room> rooms = new List<Room>(); public IEnumerable<Room> Rooms { get { return rooms; } } public void CreateEmptyRooms () { for (var i = 0; i < RoomsLimit; i++) { rooms.Add(new Room(i)); } } public Room GetRoom (int index) { return rooms[index]; } }
public class Room { public readonly int Index; // public Building Building { get; set; } public Room (int index) { Index = index; // - - Building = new Building(BuildingType.Empty); } }
public class Building { // , public readonly int ModulesLimit = 10; public readonly BuildingType Type; // private readonly Dictionary<int, Module> modules = new Dictionary<int, Module>(); public IEnumerable<Module> Modules { get { return modules.Values; } } public Building (BuildingType type) { Type = type; } public Module GetModule (int position) { return modules.ContainsKey(position) ? modules[position] : null; } public void SetModule (int position, Module module) { if (position < 0 || position >= ModulesLimit) { throw new IndexOutOfRangeException( "Position " + position + " is out of range [0:" + ModulesLimit + "]" ); } modules[position] = module; } }
public class Module { public readonly ModuleType Type; public Module (ModuleType type) { Type = type; } }
3.最初のコマンドを追加してテストします-構造とモジュールを構築します
これで、最初の「機能」、つまり建物の建設とその中のモジュールの建設を書くことができます。 このようなアクションはすべて、Commandクラスから継承される別のクラスで説明します。
public abstract class Command { public Core Core { get; private set; } public bool IsValid { get; private set; } public Command Execute (Core core) { Core = core; IsValid = Run(); return this; } protected abstract bool Run (); }
そして今ではそのような小さな構造でさえ不要です-それの少し後に私たちが必要なイベントを台無しにします。 そして、個別のチームに各アトミックアクションが存在することで、それらを組み合わせることができます。 最初の2つのアクションを記述します。
public class BuildingConstruct : Command { public readonly Room Room; public readonly Building Building; public BuildingConstruct (Room room, Building building) { Room = room; Building = building; } protected override bool Run () { // , - if (Room.Building.Type != BuildingType.Empty) { return false; } // if (Building.Type == BuildingType.Empty) { return false; } Room.Building = Building; return true; } }
public class ModuleConstruct : Command { public readonly Building Building; public readonly Module Module; public readonly int Position; public ModuleConstruct (Building building, Module module, int position) { Building = building; Module = module; Position = position; } protected override bool Run () { if (Building.Type == BuildingType.Empty) { return false; } if (Position < 0 || Position >= Building.ModulesLimit) { return false; } if (Building.GetModule(Position) != null) { return false; } Building.SetModule(Position, Module); return true; } }
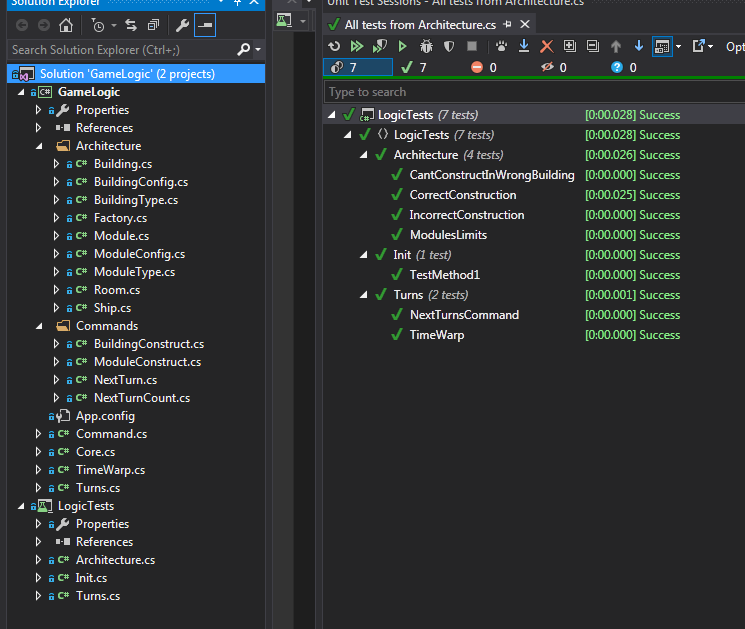
エンジンが動作しているかどうかを確認します。 テストでは、カーネルを作成し、部屋を構築し、そこにモジュールを構築しようとします。 さらに、ゲームロジックでビルドできないものをビルドすることは不可能であるというチェックを追加する価値があります。
[TestClass] public class Architecture { [TestMethod] public void CorrectConstruction () { var core = new Core(); var room = core.Ship.GetRoom(0); Assert.AreEqual(BuildingType.Empty, room.Building.Type); Assert.AreEqual(0, room.Building.Modules.Count()); Assert.IsTrue( new BuildingConstruct( room, new Building(BuildingType.PowerPlant) ) .Execute(core) .IsValid ); Assert.AreEqual(BuildingType.PowerPlant, room.Building.Type); Assert.AreEqual(0, room.Building.Modules.Count()); Assert.IsTrue( new ModuleConstruct( room.Building, new Module(ModuleType.Generator), 2 ) .Execute(core) .IsValid ); Assert.AreEqual(BuildingType.PowerPlant, room.Building.Type); Assert.AreEqual(ModuleType.Generator, room.Building.GetModule(2).Type); Assert.AreEqual(1, room.Building.Modules.Count()); } [TestMethod] public void IncorrectConstruction () { var core = new Core(); var room = core.Ship.GetRoom(0); Assert.IsFalse( new BuildingConstruct( room, new Building(BuildingType.Empty) ) .Execute(core) .IsValid ); Assert.IsFalse( new ModuleConstruct( room.Building, new Module(ModuleType.Generator), 2 ) .Execute(core) .IsValid ); new BuildingConstruct( room, new Building(BuildingType.PowerPlant) ) .Execute(core); Assert.IsFalse( new BuildingConstruct( room, new Building(BuildingType.PowerPlant) ) .Execute(core) .IsValid ); Assert.IsFalse( new ModuleConstruct( room.Building, new Module(ModuleType.Generator), 666 ) .Execute(core) .IsValid ); } }

4.建物とモジュールの設定を別のファイルに取り出します
幸いなことに、テストは完全に合格しました。 ここで、建物とモジュールの数を直線的に拡張する機能が必要です。そのためには、次のことを行う必要があります。
- 建物とモジュールの構成を作成します-「
class BuildingConfig
」と「class ModuleConfig
」、構造のすべての設定を保存します。 - 建物とモジュールは、作成時に適切な設定を取る必要があります
- モジュールと建物を作成するための工場を作る
- 複数の建物とモジュールの設定を追加します
- 既存のコードを新しい入力に適応させる
// public class BuildingConfig { public BuildingType Type; // public int ModulesLimit; // public ModuleType[] AvailableModules; }
public class ModuleConfig { public ModuleType Type; }
public class Building { // ... public readonly BuildingConfig Config; // ... // , public Building (BuildingConfig config) { Type = config.Type; ModulesLimit = config.ModulesLimit; Config = config; } }
public class Module { // ... public readonly ModuleConfig Config; // , public Module (ModuleConfig config) { // ... Type = config.Type; Config = config; } }
理解できるように、コードは機能していません。 毎回コンフィグを持ち運ばないように、タイプだけを知っている施設を生産する工場を作ります。 名前はまだ一般的すぎることがわかっていますが、IDEのおかげでいつでも簡単に名前を変更でき、2つの工場に分割できます。
public class Factory { public Building ProduceBuilding (BuildingType type) { throw new Exception("Not implemented yet"); } public Module ProduceModule (ModuleType type) { throw new Exception("Not implemented yet"); } }
// : public class Core { // ... public readonly Factory Factory = new Factory(); public Core () { // Ship.CreateEmptyRooms(Factory); } }
// : public class Ship { // ... public void CreateEmptyRooms (Factory factory) { for (var i = 0; i < RoomsLimit; i++) { rooms.Add(new Room(i, factory.ProduceBuilding(BuildingType.Empty))); } }
// - -: public class Room { // ... public Room (int index, Building building) { Index = index; Building = building; } }
IDEはエラーのある場所を示します-コンストラクターの呼び出しをそこでファクトリーに置き換えます。
// new Building(Type); // core.Factory.ProduceBuilding(Type);
// new Module(Type); // core.Factory.ProduceModule(Type);
そして、コードは正しくなっていますが、テストを実行すると、
"Not implemented yet"
ます。 これを行うには、工場に戻り、いくつかの建物とモジュールを販売します。
public class Factory { private readonly Dictionary<BuildingType, BuildingConfig> buildings = new Dictionary<BuildingType, BuildingConfig>() { { BuildingType.Empty, new BuildingConfig() { Type = BuildingType.Empty }}, { BuildingType.PowerPlant, new BuildingConfig() { Type = BuildingType.PowerPlant, ModulesLimit = 5, AvailableModules = new[]{ ModuleType.Generator } }}, { BuildingType.Smeltery, new BuildingConfig() { Type = BuildingType.Smeltery, ModulesLimit = 4, AvailableModules = new[]{ ModuleType.Furnace } }}, { BuildingType.Roboport, new BuildingConfig() { Type = BuildingType.Roboport, ModulesLimit = 3, AvailableModules = new[]{ ModuleType.Digger, ModuleType.Miner } }} }; private readonly Dictionary<ModuleType, ModuleConfig> modules = new Dictionary<ModuleType, ModuleConfig>() { { ModuleType.Generator, new ModuleConfig() { Type = ModuleType.Generator }}, { ModuleType.Furnace, new ModuleConfig() { Type = ModuleType.Furnace }}, { ModuleType.Digger, new ModuleConfig() { Type = ModuleType.Digger }}, { ModuleType.Miner, new ModuleConfig() { Type = ModuleType.Miner }} }; public Building ProduceBuilding (BuildingType type) { if (!buildings.ContainsKey(type)) { throw new ArgumentException("Unknown building type: " + type); } return new Building(buildings[type]); } public Module ProduceModule (ModuleType type) { if (!modules.ContainsKey(type)) { throw new ArgumentException("Unknown module type: " + type); } return new Module(modules[type]); } }
テストでカバーできるように、すぐにいくつかの建物とモジュールを追加しました。 そして、すぐに言います-はい、これらの設定をすべて工場に保存しても意味がありません。 これらは構造ごとに1つのJSONファイルに個別に配置され、解析されてファクトリーに転送されます。 幸いなことに、私たちのエンジンはこの変更に気付くことさえありません。 それまでの間、JSSに提出すること、テストの実行方法、すべてが正しく機能するかどうかを確認することはそれほど重要ではありません。 幸いなことに、はい。 同時に、PowerPlantのFurnaceなど、間違った部屋でモジュールをビルドできないテストを追加します。
[TestMethod] public void CantConstructInWrongBuilding () { var core = new GameLogic.Core(); var room = core.Ship.GetRoom(0); new BuildingConstruct( room, core.Factory.ProduceBuilding(BuildingType.PowerPlant) ) .Execute(core); Assert.IsFalse( new ModuleConstruct( room.Building, core.Factory.ProduceModule(ModuleType.Furnace), 2 ) .Execute(core) .IsValid ); Assert.AreEqual(null, room.Building.GetModule(2)); }
悲しいかな、あなたが推測できるように、誰も検証ロジックを書きませんでした。 検証条件をモジュール構築チームに追加し、その後、テストに合格します。
public class ModuleConstruct : Command { // ... protected override bool Run () { // ... if (!Building.Config.AvailableModules.Contains(Module.Type)) { return false; } // ...
さて、今ではすべてが正しいです。 同時に、制限の正しい動作のためのテストを追加し、さらに先へ進みます。
[TestMethod] public void ModulesLimits () { var core = new GameLogic.Core(); var roomRoboport = core.Ship.GetRoom(0); var roomPowerPlant = core.Ship.GetRoom(1); Assert.IsTrue( new BuildingConstruct( roomRoboport, core.Factory.ProduceBuilding(BuildingType.Roboport) ) .Execute(core) .IsValid ); Assert.IsTrue( new BuildingConstruct( roomPowerPlant, core.Factory.ProduceBuilding(BuildingType.PowerPlant) ) .Execute(core) .IsValid ); Assert.IsFalse( new ModuleConstruct( roomRoboport.Building, core.Factory.ProduceModule(ModuleType.Miner), 3 ) .Execute(core) .IsValid ); Assert.IsTrue( new ModuleConstruct( roomPowerPlant.Building, core.Factory.ProduceModule(ModuleType.Generator), 3 ) .Execute(core) .IsValid ); }

5.時間の経過を追加する
コンピューターは個別です。 そして、すべてのゲームは個別です。 簡単に言えば、すべてのゲームがターンベースであることを想像してください。 ほとんどのゲームでは、1秒間に60回ステップが自動的にスキップされます。 このようなゲームはリアルタイムと呼ばれます。 これは非常に失礼であることは理解していますが、ゲームロジックの実装では、ゲームがターンベースであり、そのようなカテゴリーで考えることは非常に便利です。 そして、クライアント上で2つの状態間でトゥイーンを実行でき、ユーザーは美しくなり、ゲームはすぐに動作します。 まず、ムーブの概念を紹介します。
public class Turns { public int CurrentTurn { get; private set; } internal void NextTurn () { CurrentTurn++; } }
public class Core { public readonly Turns Turns = new Turns(); }
また、コースを切り替えることができるコマンドを入力します。 すぐにいくつかの動きを切り替えることができるコマンドを追加しました-テスト中に非常に便利です。 1発のテストでは、2羽の鳥を1石で覆います。
public class NextTurn : Command { protected override bool Run () { // Core.Turns.NextTurn(); return true; } }
public class NextTurnCount : Command { public const int Max = 32; public readonly int Count; public NextTurnCount (int count) { Count = count; } protected override bool Run () { if (Count < 0 || Count > Max) { return false; } for (var i = 0; i < Count; i++) { var nextTurn = new NextTurn().Execute(Core); if (!nextTurn.IsValid) return false; } return true; } }
[TestClass] public class Turns { [TestMethod] public void NextTurnsCommand () { var core = new Core(); Assert.AreEqual(0, core.Turns.CurrentTurn); Assert.IsTrue( new NextTurnCount(4) .Execute(core) .IsValid ); Assert.AreEqual(4, core.Turns.CurrentTurn); } }
今後、ギアを異なる速度で実行できるゲームに切り替える方法を説明します。
public class TimeWarp { public readonly int Speed_Stop = 0; public readonly int Speed_X1 = 1000; public readonly int Speed_X2 = 500; public readonly int Speed_X5 = 200; public readonly Core Core; private int currentSpeed; public int currentTime { get; private set; } public TimeWarp (Core core) { currentSpeed = Speed_Stop; Core = core; } public void SetSpeed (int speed) { currentSpeed = speed; currentTime = Math.Min(speed, currentTime); } public int GetSpeed () { return currentSpeed; } public bool IsStopped () { return currentSpeed == Speed_Stop; } public void AddTime (int ms) { if (IsStopped()) return; currentTime += ms; // // while (currentTime >= currentSpeed) NextTurn // ? // 20 if (currentTime < currentSpeed) return; currentTime -= currentSpeed; new NextTurn().Execute(ore); } }
[TestMethod] public void TimeWarp () { var core = new Core(); var time = new TimeWarp(core); Assert.AreEqual(0, core.Turns.CurrentTurn); time.SetSpeed(time.Speed_X5); time.AddTime(50); time.AddTime(50); time.AddTime(50); time.AddTime(50); Assert.AreEqual(1, core.Turns.CurrentTurn); time.AddTime(199); Assert.AreEqual(1, core.Turns.CurrentTurn); time.AddTime(1); Assert.AreEqual(2, core.Turns.CurrentTurn); }
これで、Unityで任意の更新を停止して、デルタ時間をTimeWarpに転送するだけで十分になります。
public TimeComponent : MonoBehaviour { public TimeWarp timeWarp; public void Awake () { timeWarp = ...; // } public void Update () { timeWarp.AddTime( Time.deltaTime ); } }
続行するには...
次の記事では、次の点を実装して、エンジンの実行可能なフレームワークの作成を完了します。
6.構築可能を追加、しばらくの間建物が建設中
7.リソースを追加します。構築にはリソースが必要です
8.生産サイクルを追加します-モジュールはリソースを消費して発行します
コードが好きな人のために-Githubに別のリポジトリがあります
さらに、SpaceLabの開発に関する質問に興味がある場合は、コメントまたは別の記事で回答します。
GreenLightのSpaceLabページから無料でSMSなしでWindows、Linux、Mac用にダウンロードできます。