どういうわけか私は、通常の画像を装った秘密のメッセージを送信する方法があるといいと思いました。 その結果、私はJailbirdを呼び出しました。
自分が独房に閉じ込められているのに気づいて、情報を野生に送って1つのことをやり直す必要があったので、警備員が何も気付かないようにしましたか? さて、あなたは適切な解決策を見つけました!
いいでしょう
今日は、シェークスピアのハムレットをほとんど気付かずに画像に保存する方法を紹介したいと思います。 (彼、多くの人がハムレットをどこかに密輸する問題を抱えていると思う...)
ソース、ルークを使用
ソースコードはGithubで入手できます: https : //github.com/ClanCatsStation/Jailbird
大きさ
開始するには、必要なスペースを知る必要があります。 (サイズが重要です;))。
ハムレットを取り、それをhamlet.txt


    ファイルに入れました。 次に、 size.php


    というphpスクリプトを作成しました。 
 コマンドラインからphp


    スクリプトを削除するには、インタープリターをインストールして実行します: 
 #!/usr/bin/env php <?php


       データを取得するには、 STDIN


    からコンテンツを読み取りSTDIN


     。 
 echo strlen(stream_get_contents(STDIN));


      次のコマンドを実行します。
 $ cat hamlet.txt | ./size.php


        175132


    等しい文字列長/バイト数を175132


    ます。 アーカイブしてみましょう: 
 echo strlen(gzcompress(stream_get_contents(STDIN), 9));


       取得: 70681


    バイト。 
Jailbirdは、 ピクセルごとに色ごとに1ビットを格納できます。
 合計565'448


    ビット。つまり、 188'483


    ピクセルが必要188'483


     。 または、少なくとも435x435ピクセルのサイズの画像。 
 これらの計算をsize.php


    スクリプトに追加すると、必要なサイズの画像を簡単に見つけることができます。 
 #!/usr/bin/env php <?php $neededBits = (strlen(gzcompress(stream_get_contents(STDIN), 9)) + 16) * 8; $neededPixels = ceil($neededBits / 3); $neededSize = ceil(sqrt($neededPixels)); echo sprintf("bits: %s pixels: %s min-size: %sx%s \n", $neededBits, $neededPixels, $neededSize, $neededSize);


       コンテンツの長さに16バイトを追加したのはなぜですか? 文字のシーケンスの存在によってデータの終わりを判断する必要があり@endOfJailbird;


    これが@endOfJailbird;


    行であると@endOfJailbird;


    た@endOfJailbird;


      、16文字が含まれています。 
データインジェクション
実際に私たちはここにいるもの。 (そして、私は何かを解散した)
バイナリ文字列の準備
画像にデータを埋め込む最も簡単な方法は、データをバイナリ文字列に変換することだと思いました。
 #!/usr/bin/env php <?php $content = gzcompress(stream_get_contents(STDIN), 9) . '@endOfJailbird; '; $data = ''; for($i=0; $i<strlen($content); $i++) { $data .= sprintf( "%08d", decbin(ord($content[$i]))); }


        ord


    関数は、ASCII表現でバイトを返します。 
 次に、関数decbin


    使用して、結果の数値をバイナリに変換し、 sprintf


    ラップして先行ゼロを保存します。 
出力では、0と1のかなり大きな文字列を取得します
 string(565448) "01111000110110101010110011111101110010011001001011100011010110001101001000101100000011001010111001111111001111000000010101111101110100111101110011010000111111010000000111101000000010111001011111001000001100011111110011011110110010001000100010111100000110010101000110010101010100101111110101001001001011010100000000000010001001001001000100001110000000100010110000001100110011100110010000111101011111011001101110101010100110100001110110000000011101001100111111111010101111101101101111011101001000100101010100011001"...


      記録ビット
 ここでは、記録する画像が必要です。  inject.php


    スクリプトの最初の引数として画像へのパスをinject.php


    ます。 
 //     array_shift($argv); //    $imagePath = array_shift($argv);


      画像にアクセスできるかどうかを確認します。
 if ((!file_exists($imagePath)) || (!is_readable($imagePath))) { die("The given image does not exist or is not readable.\n"); }


      書き込みコマンドは次のようになります。
 $ cat hamlet.txt | ./inject.php cats.png
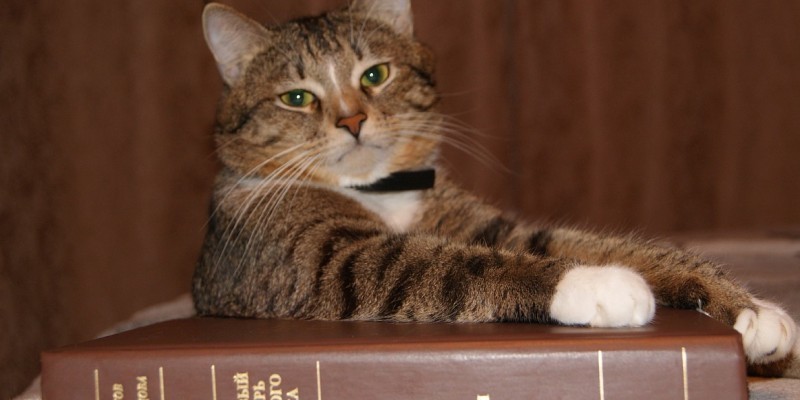


        cats.png


    の画像(元の、約Per。) KDPVから取得したもの: 

ループを実行します。
 //     GD $image = imagecreatefrompng($imagePath); $imageWidth = imagesx($image); $imageHeight = imagesy($image); //  ,     //     $dataIndex = 0; //      Y for ($iy = 0; $iy < $imageHeight; $iy++) { //   for ($ix = 0; $ix < $imageWidth; $ix++) { $rgb = imagecolorat($image, $ix, $iy); //  rgb    $rgb = [($rgb >> 16) & 0xFF, ($rgb >> 8) & 0xFF, $rgb & 0xFF]; //     for($ic = 0; $ic < 3; $ic++) { // ,     if (!isset($data[$dataIndex])) { break 2; } $color = $rgb[$ic]; $bit = $data[$dataIndex]; //    //   } imagesetpixel($image, $ix, $iy, imagecolorallocate($image, $rgb[0], $rgb[1], $rgb[2])); } }


      このコードは、単にピクセルの色を順番に渡し、色の変更をピクセルに保存します。
なに?
そして、最も重要なことは次のとおりです。
 $negative = ($color % 2 == 0);


      この短いコード行は、現在のピクセルの色が偶数かどうかを示します。
 そして、 $bit = $data[$dataIndex];


     現在の色の値が偶数か奇数かを示します。 
したがって、カラー値を偶数または奇数に単純に丸めることにより、画像の上にデータの別のレイヤーを作成します。
これで、色の値を更新するだけで済みます。
 // should it be positive if ($bit == '1') { // should be positive but is negative if ($negative) { if ($color < 255) { $color++; } else { $color--; } } } // should be negative else { // should be negative but is positive if (!$negative) { if ($color < 255) { $color++; } else { $color--; } } } // set the new color $rgb[$ic] = $color; // update the index $dataIndex++;


      そして実際にはすべて! 画像を保存するためだけに残ります:
 imagepng($image, dirname($imagePath) . '/jailbirded_' . basename($imagePath), 0);


      データ抽出
逆のプロセス-実装を理解した後、データ抽出は非常に簡単です。
 新しいextract.php


    ファイルを作成します。 
データ抽出スクリプトは、引数として画像パスも受け取ります。
 #!/usr/bin/env php <?php // we dont need the first argument array_shift($argv); // get image by argument $imagePath = array_shift($argv); if ((!file_exists($imagePath)) || (!is_readable($imagePath))) { die("The given image does not exist or is not readable.\n"); }


      その後、ほとんど同じ繰り返しを行いますが、何も変更する必要はなく、値が偶数かどうかを確認するだけです。
 // load the image with GD $image = imagecreatefrompng($imagePath); $imageWidth = imagesx($image); $imageHeight = imagesy($image); // create an empty string where our data will end up $data = ''; // and start iterating y for ($iy = 0; $iy < $imageHeight; $iy++) { // and x for ($ix = 0; $ix < $imageWidth; $ix++) { $rgb = imagecolorat($image, $ix, $iy); // split rgb to an array $rgb = [($rgb >> 16) & 0xFF, ($rgb >> 8) & 0xFF, $rgb & 0xFF]; // and for every color for($ic = 0; $ic < 3; $ic++) { $color = $rgb[$ic]; // what is the current pixel if ($color % 2 == 0) { $data .= '0'; } else { $data .= '1'; } } } }


        $data


    変数には、バイトに変換する必要がある生データが含まれています。 
 $content = ''; foreach(str_split($data, 8) as $char) { $content .= chr(bindec($char)); }


       結果のコンテンツはアーカイブされ、値endOfJailbird


    ます。 それ以降のすべてをドロップできます。 
 // does the jailbird end of line exist? if (strpos($content, '@endOfJailbird;') === false) { die('Image does not contain any jailbird data.'); } // cut the compressed data out, // decompress it and print it. echo gzuncompress(substr($content, 0, strpos($content, '@endOfJailbird;')));


      その結果、スクリプトを実行できます。
$ ./extract.php jailbirded_cats.png
そして、美しいシェイクスピア劇を再生してください。
おわりに
2つの画像を並べて配置した場合、わずかなぼかしに気付くかもしれませんが、おそらく違いはありません。

ただし、さらにいくつかの点があります。
実際には、圧縮せずに画像を保存します。そうしないと、データが失われます。 ソースファイルの重量は307 KBですが、データを保存すると759 KBになります。 しかし、残念ながら、この問題の解決策は見当たりません。
また、たとえば、facebook、reddit、またはtwitterに画像を送信すると、これらのサービスのサーバーで画像が圧縮され、データが失われる可能性が高くなります。
最後に、それはかなり楽しい実験でした、私はそれの上にかなりの数時間を過ごしました。 また、このアイデアがおもしろく、この時間を無駄に費やさなかったことを願っています。 (それ以外の場合:hehe、私はあなたの時間を盗んだ!)
決してあきらめない
