所要時間: 30分
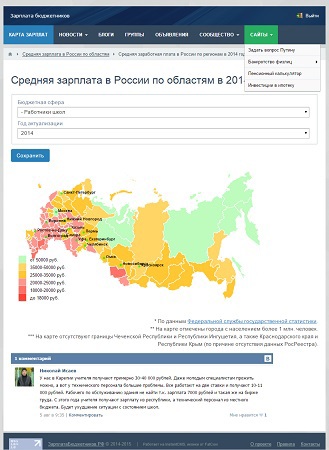
この記事では、InstantCMS2エンジン用の独自のコンポーネントを作成する方法について説明しています。 記事の最後に、ソースコードとこの命令からのすべてのファイルの内容を含むアーカイブへのリンクがあります。 このチュートリアルを使用して作成できるコンポーネントの外観の例を図に示します(写真はクリック可能です)。
最初に、ソーシャルネットワーク/コミュニティ/ブログとソーシャルネットワークのInstantCMS2のエンジンについていくつか説明します。 この無料のCMSは、おそらく最高の妥協案となります。
基本バージョンには、LiveStreet CMSと比較してすでに豊富な機能があります。
リンクはInstantCMSエンジンの最新バージョンに関する情報を提供しないため、機能比較のスクリーンショットは提供しません。
InstantCMS2の長所と短所
マイナス-モジュールの数、追加など、このエンジンではかなり制限されています。 テクニカルサポートの質はわずかです。 このエンジンの周りに活発に活動しているコミュニティはありません。フォーラムへの登録は通常招待のみです。 しかし、これらの欠点はすべて、InstantCMS 2エンジンが無料であるという事実によってカバーされる以上のものです。
プロから-箱から出してすぐに提供されます:フォーラム、友人、記事、ブログ、ニュース、グループ、フォトアルバム、サイトの静的なページに追加できるユーザープロファイル。 コメント、RSSフィード、RSSフィールド、メインメニューをカスタマイズする機能、通常のモデレート、非常に便利な管理パネルだけでなく、
プロジェクトの公式サイトから、自動インストール機能を備えたInstantCMS 2エンジンをダウンロードできます 。
インストールプロセスはよく文書化されており、直感的です。
InstantCMS2の独自のコンポーネント
別のコンポーネントを作成するという質問に直接進みます。
新しいコンポーネントを作成するには、\ SiteDirectory \ system \ controllers \ディレクトリにコンポーネントを作成するフォルダを作成します(newcomponentと呼びましょう)、つまり作成されたディレクトリの完全なアドレスは\ SiteDirectory \ system \ controllers \ newcomponent \-コンポーネント名は小文字でなければなりません、これは重要です!
次に、このフォルダーにファイルfrontend.phpを作成します。これは、コンポーネントが機能しないメインファイルです。
このファイルでは、同じ名前のクラスを作成します。 クラスの名前は、フォルダーの名前と一致します。 そして、このクラスはcmsFrontendシステムクラスを継承しています。
このクラスでは、コンポーネントのアクションを記述するメソッドを追加できます。
コンポーネントアクションとは何ですか? 次の画像を見てみましょう。
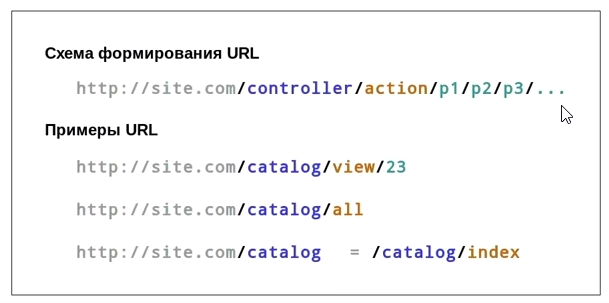
各ページアドレスは、いくつかのセグメントで構成されています。
- /コントローラー-コンポーネントの名前。
- / action-アクションの名前。 各コンポーネントには、複数のアクションを含めることができます。
- / p1 / p2 / p3 / ...-このアクションに必要な任意の数のパラメーター。
コンポーネントのアクションはどのように決定されますか? パブリックメソッドはコンポーネントクラスで定義され、actionActionName With Large Letterと呼ばれます。 siteaddress.ru/newcomponent/コンポーネントのメインページでは、actionIndex()メソッドを定義する必要があります。 siteaddress.ru/newcomponent/act/コンポーネントの内部ページの場合、actionAct()メソッドを定義する必要があります。
Frontend.phpファイル
<?php class newcomponent extends cmsFrontend { public function actionIndex() { $template = cmsTemplate::getInstance(); $template->render('index'); } public function actionAct() { $errors = false; $form = $this->getForm('newForm'); $is_submitted = $this->request->has('submit'); $newForm = $form->parse($this->request, $is_submitted); if ($is_submitted){ $errors = $form->validate($this, $newForm); if (!errors) { $choropleth = $this->model->getChoropleth($newForm); } if (!errors) { cmsUser::addSessionMessage(LANG_FORM_ERRORS, 'error'); } } $template = cmsTemplate::getInstance(); $template->render('act', array( 'form' => $form, 'errors' => $errors, 'newForm' => $newForm )); } } ?>
注意深い読者は、$ this-> model-> getChoropleth()メソッドの使用に気づきました。
\ SiteDirectory \ system \ controllers \ newcomponent \ディレクトリでモデルメソッドを使用するには、model.phpファイルを作成します
ただし、ファイルからデータを読み取るため、ここにスタブを配置します。 モデルファイルの説明は、トレーニング目的で提供されています。
ファイルmodel.php
<?php class modelNewComponent extends cmsModel { public function getChoropleth($average_zarplata) { $choropleth = array(); return $choropleth; } } ?>
文字列$ template-> render( 'index'); このテンプレートの出力を定義します。これは、\ SiteDirectory \ templates \ default \ controllers \ newcomponent \ディレクトリに作成する必要があります。 \ defaultはサイトで使用されるテーマの名前です(instantcmsコミュニティサイトから新しいテーマを見つけてダウンロードし、管理パネルから使用するテーマを変更できます)。\ newcomponentフォルダーを自分で作成する必要があります。これは新しいコンポーネントのテンプレートのフォルダーです。
コンポーネントのメインページ用にこのフォルダーにindex.tpl.phpファイルを作成し、内部ページ用にact.tpl.phpを作成する必要があります。
Index.tpl.phpファイル
<?php $this->setPageTitle(' '); $this->addBreadcrumb(' '); $this->addToolButton(array( 'class' => 'item', 'title' => ' ', 'href' => $this->href_to('act') )); ?> <h1> </h1> <p> </p>
コンポーネントの内部ページには、パラメーター選択フォームが含まれます。
まず、コンポーネント\ SiteDirectory \システム\コントローラー\ newcomponent \のフォルダーに\フォーム\フォルダーを作成します。
\ SiteDirectory \ system \ controllers \ newcomponent \ forms \ディレクトリで、form_newForm.phpファイルを作成します
フォームは非常にシンプルで、ドロップダウンリストから2つのオプションを選択するようユーザーに求めます。
ファイルform_newForm.php
<?php class formNewcomponentnewform extends cmsForm { public function init() { return array( array( 'type' => 'fieldset', 'childs' => array ( new fieldList('par1', array( 'title' => '1', 'items' => array ( "1" => "1", "2" => "2" ) )), new fieldList('par2', array( 'title' => '2', 'items' => array ( 1 => "1", 2 => "2" ) )) ) ) ); } } ?>
インタラクティブなSVGカートグラム
その後、/ actコンポーネントの内部ページのテンプレートの作成に移りましょう-act.tpl.phpファイルを作成し、\ SiteDirectory \ templates \ default \ controllers \ newcomponent \ディレクトリに配置します。
ユニークなサービスを作成するために、 KoGorユーザーの開発を使用します(この機会を利用して、 KoGorが行った作業とよくデザインされた直感的な記事に 深い感謝を伝えたい)-地域分布を伴うロシア連邦の地図のインフォグラフィック
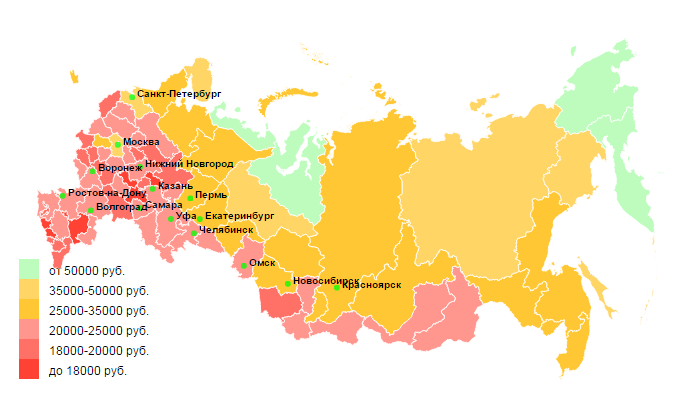
その結果、ロシアのこの素敵な地図のようなものを取得する必要があります。
act.tpl.phpファイル
<?php $this->setPageTitle(' '); $this->addBreadcrumb(' ', $this->href_to('')); $this->addBreadcrumb(' '); $arr_par1_id = array('1' => 1 , '2' => 2 ); $filename='/upload/zarplata-'.$arr_par1_id[$_GET['par1']].'-'.$_GET['par2'].'.csv'; if (!isset ($_GET['par1']) || !isset ($_GET['par2'])) $filename='/upload/zarplata-1-1.csv'; $this->renderForm($form, $newForm, array( 'action' => '', 'method' => 'get', 'toolbar' => false ), $errors); ?> <script type="text/javascript" src="http://d3js.org/d3.v3.min.js"></script> <script type="text/javascript" src="http://d3js.org/queue.v1.min.js"></script> <script type="text/javascript" src="http://d3js.org/topojson.v0.min.js"></script> <!-- <script type="text/javascript" src="http://d3js.org/topojson.v1.min.js"></script> --> <style> path { stroke:white; stroke-width: 1px; } body { font-family: Arial, sans-serif; } .city { font: 10px sans-serif; font-weight: bold; } .legend { font-size: 12px; } div.tooltip { position: absolute; text-align: center; width: 150px; height: 25px; padding: 2px; font-size: 10px; background: #FFFFE0; border: 1px; border-radius: 8px; pointer-events: none; } </style> <script type="text/javascript"> var width = 720, height = 375; // Setting color domains(intervals of values) for our map var color_domain = [10000, 15000, 20000, 30000, 50000] var ext_color_domain = [0, 10000, 15000, 20000, 30000, 50000] var legend_labels = [" 10000 .", "10000-15000 .", "15000-20000 .", "20000-30000 .", "30000-50000 .", " 50000 ."] var color = d3.scale.threshold() .domain(color_domain) .range(["#ff1300", "#ff4e40", "#ff7d73", "#ffba00", "#ffcb40", "#adfcad"]); var div = d3.select("form").append("div") .attr("class", "tooltip") .style("opacity", 0); var svg = d3.select("form").append("svg") .attr("width", width) .attr("height", height) .style("margin", "10px auto"); var projection = d3.geo.albers() .rotate([-105, 0]) .center([-10, 65]) .parallels([52, 64]) .scale(500) .translate([width / 2, height / 2]); var path = d3.geo.path().projection(projection); //Reading map file and data queue() .defer(d3.json, "/upload/russia.json") .defer(d3.csv, "<?php echo $filename; ?>") .await(ready); //Start of Choropleth drawing function ready(error, map, data) { var rateById = {}; var nameById = {}; data.forEach(function(d) { rateById[d.RegionCode] = +d.AverageZarplata; nameById[d.RegionCode] = d.RegionName; }); //Drawing Choropleth svg.append("g") .attr("class", "region") .selectAll("path") .data(topojson.object(map, map.objects.russia).geometries) //.data(topojson.feature(map, map.objects.russia).features) <-- in case topojson.v1.js .enter().append("path") .attr("d", path) .style("fill", function(d) { return color(rateById[d.properties.region]); }) .style("opacity", 0.8) //Adding mouseevents .on("mouseover", function(d) { d3.select(this).transition().duration(300).style("opacity", 1); div.transition().duration(300) .style("opacity", 1) div.text(nameById[d.properties.region] + " : " + rateById[d.properties.region]) .style("left", (d3.event.pageX) + "px") .style("top", (d3.event.pageY -30) + "px"); }) .on("mouseout", function() { d3.select(this) .transition().duration(300) .style("opacity", 0.8); div.transition().duration(300) .style("opacity", 0); }) // Adding cities on the map d3.tsv("/upload/cities.tsv", function(error, data) { var city = svg.selectAll("g.city") .data(data) .enter() .append("g") .attr("class", "city") .attr("transform", function(d) { return "translate(" + projection([d.lon, d.lat]) + ")"; }); city.append("circle") .attr("r", 3) .style("fill", "lime") .style("opacity", 0.75); city.append("text") .attr("x", 5) .text(function(d) { return d.City; }); }); }; // <-- End of Choropleth drawing //Adding legend for our Choropleth var legend = svg.selectAll("g.legend") .data(ext_color_domain) .enter().append("g") .attr("class", "legend"); var ls_w = 20, ls_h = 20; legend.append("rect") .attr("x", 20) .attr("y", function(d, i){ return height - (i*ls_h) - 2*ls_h;}) .attr("width", ls_w) .attr("height", ls_h) .style("fill", function(d, i) { return color(d); }) .style("opacity", 0.8); legend.append("text") .attr("x", 50) .attr("y", function(d, i){ return height - (i*ls_h) - ls_h - 4;}) .text(function(d, i){ return legend_labels[i]; }); </script>
カートグラムのソースデータ
カードが機能するためには、最後の手順が残ります。 ファイル、citys.tsv、russia.json、zarplata-1-1.csv、zarplata-1-2.csv、zarplata-2-1.csv、zarplata-2-2.csvを配置します(アーカイブには、リンクがあります)記事の最後に)\ SiteDirectory \ upload \ディレクトリにあります。
アドレスsiteaddress.ru/newcomponent/act/に移動します。ここでは、ロシアの地図上のすべての地域が濃い灰色で色付けされ、ホバリングするとその地域の名前が表示されます-NaN。 実際のデータを表示するには、.csvファイルの最後の列の値を数値データに置き換えます。
コンポーネントデモ
ボーナス
最後に、小さなヒント。 InstantCMS 2のデフォルトのデフォルトテンプレートでは、ブラウザウィンドウの幅が狭くなると、サイドメニューとアクションメニューが消えます。 しかし、モバイルデバイスでは、サイドカラムとアクションメニューが消えることはあまり便利ではありません。 ユーザーは多くの可能なアクションを失います。 この状況を変更するには、次のことができます。 \ templates \ default \ css \ディレクトリでtheme-layout.cssファイルを見つけて、その中のコードを置き換えます
/* Media Queries ============================================================ */ @media screen and (max-width: 980px) { #body section { width:100% !important; } #body aside { display:none; } } @media screen and (max-width: 800px) { #body section { width:100% !important; } #body aside { display:none; }
に
/* Media Queries ============================================================ */ @media screen and (max-width: 980px) { #body section { width:100% !important; } #body aside { width:100% !important; } } @media screen and (max-width: 800px) { #body section { width:100% !important; } #body aside { width:100% !important; }
つまり 実際には、#bodyの2行だけは別として{display:none; } #body aside {width:100%!重要; }-この後、ブラウザの幅が縮小されると、サイド列はその中のコンテンツの後(フッターの前)にメイン列に移動します。
ソースコード
説明されているすべてのスクリプトとファイルはアーカイブにダウンロードできます。これは、InstantCMS2で実行しているサイトのルートディレクトリにダウンロードして解凍するだけです。
PS個人メッセージのタイプミス、エラー、不正確さについて書いてください。