現時点では、そのような束にはすでにかなり多くのガイドがありますが、私の意見では、第一に、それらは少し時代遅れであり、第二に、これが可能であることを示すために具体的だが簡単なことをする方法に関するガイドがあるべきだと思います。
したがって、xml構成ファイルをデータベースと0(ゼロ)に保存してSpring MVCを試してみたい場合は、catを使用してください!
内容
もちろん、すぐにアプリケーションを起動したいのですが、最初に少し準備します。
1.打ち上げの準備
1.1 IDE
すべての開発はIntellij IDEAで行われますが、別のIDEでの実装がはるかに複雑になるとは思いません。
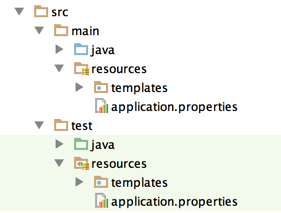
1.2フォルダー構造
まず、プロジェクトフォルダーを作成し、ForHabrahabrという名前を付けます
このプロジェクトでは、次のようなフォルダーツリーを作成する必要があります。
(次のセクションの残りの手順に従うだけです)
1.3 Gradle&Git
独立した
そこで、アプリケーションフレームワークを取得しました。
次に、バージョン管理とコレクターを追加します。
これを行うには、次のコンテンツでForgabrabr .gitignoreを追加します。
.gradle
.idea
* .iml
ビルド/
コンソールからこのディレクトリに移動して、
次に、アプリケーションの作成時に役立つすべての依存関係を含むbulid.gradleを追加します。
次に、build.gradleが書き込む同じディレクトリのコンソールで
次に、バージョン管理とコレクターを追加します。
これを行うには、次のコンテンツでForgabrabr .gitignoreを追加します。
.gradle
.idea
* .iml
ビルド/
コンソールからこのディレクトリに移動して、
git init
次に、アプリケーションの作成時に役立つすべての依存関係を含むbulid.gradleを追加します。
build.gradle
buildscript {
リポジトリ{
mavenCentral()
}
依存関係{
クラスパス( "org.springframework.boot:spring-boot-gradle-plugin:1.2.5.RELEASE")
クラスパス 'mysql:mysql-connector-java:5.1.34'
}
}
プラグインを適用: 'java'
プラグインの適用:「eclipse」
プラグインを適用: 'idea'
プラグインの適用: 'spring-boot'
jar {
baseName = 'gs-rest-service'
バージョン= '0.1.0'
}
リポジトリ{
mavenCentral()
}
sourceCompatibility = 1.8
targetCompatibility = 1.8
依存関係{
コンパイル( "org.springframework.boot:spring-boot-starter-web")
コンパイル( "org.springframework.boot:spring-boot-starter-data-jpa")
コンパイル( "org.springframework.boot:spring-boot-starter-security")
コンパイル( "org.springframework.boot:spring-boot-starter-thymeleaf")
'mysql:mysql-connector-java:5.1.31'をコンパイルします
「commons-dbcp:commons-dbcp:1.4」をコンパイルします
testCompile( "org.springframework:spring-test")
testCompile( "junit:junit")
testCompile 'org.springframework.security:spring-security-test-00-00.0.1.RELEASE'
}
タスクラッパー(タイプ:ラッパー){
gradleVersion = '2.3'
}
リポジトリ{
mavenCentral()
}
依存関係{
クラスパス( "org.springframework.boot:spring-boot-gradle-plugin:1.2.5.RELEASE")
クラスパス 'mysql:mysql-connector-java:5.1.34'
}
}
プラグインを適用: 'java'
プラグインの適用:「eclipse」
プラグインを適用: 'idea'
プラグインの適用: 'spring-boot'
jar {
baseName = 'gs-rest-service'
バージョン= '0.1.0'
}
リポジトリ{
mavenCentral()
}
sourceCompatibility = 1.8
targetCompatibility = 1.8
依存関係{
コンパイル( "org.springframework.boot:spring-boot-starter-web")
コンパイル( "org.springframework.boot:spring-boot-starter-data-jpa")
コンパイル( "org.springframework.boot:spring-boot-starter-security")
コンパイル( "org.springframework.boot:spring-boot-starter-thymeleaf")
'mysql:mysql-connector-java:5.1.31'をコンパイルします
「commons-dbcp:commons-dbcp:1.4」をコンパイルします
testCompile( "org.springframework:spring-test")
testCompile( "junit:junit")
testCompile 'org.springframework.security:spring-security-test-00-00.0.1.RELEASE'
}
タスクラッパー(タイプ:ラッパー){
gradleVersion = '2.3'
}
次に、build.gradleが書き込む同じディレクトリのコンソールで
グラドルラッパー
 ./gradlew build
 (またはWindows ./gradlew.batビルドの場合)
これで、OSに応じてgradlew.bat / gradlewを使用できます。
1.3.1その他
- コンソールを介して、Ideaプロジェクトがあるフォルダーに移動します
- git clone github.com/MaxPovver/ForHabrahabr.git
- git cd ForHabrahabr /
- git checkout quikstart
- これで準備完了のプロジェクト構造が完成しました。
1.4データベース
データベースとして、最も簡単なクイックスタートとしてMySQLを選択します。 ローカルホストで作成し、
その中でforhabrahabrデータベースを作成し、将来的にはタブレットを作成します
ユーザー
役割
users_roles
投稿
好き
しかし、これについては後で説明します。今のところは、データベースを作成するだけで十分です。
2.コーディングを開始します
2.1プロジェクトの作成
まず、Intellj IDEAで新しく作成したプロジェクトを開いてみましょう。彼女はGradleを見て、それを使用することを提案します。
(ItelliJ IDEAへようこそ->開く-> ForHabrahabr)。
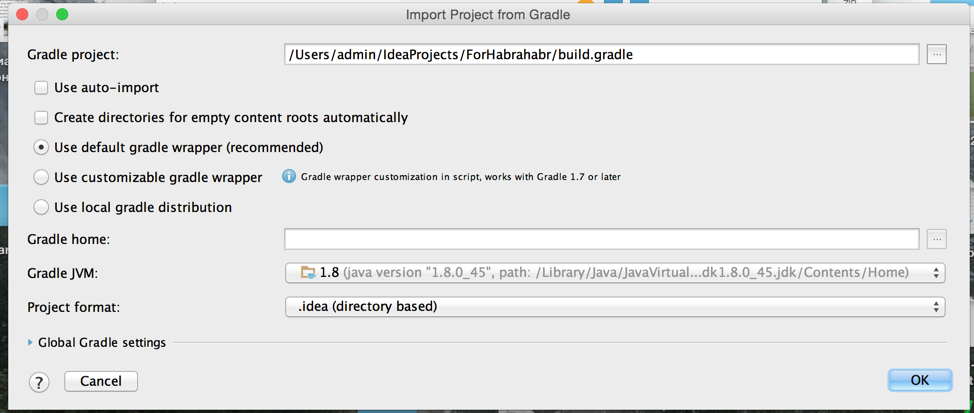
そうでない場合(またはGradle JVMの問題)、このウィンドウで[OK]をクリックするだけです。HPに連絡してください。何が間違っているのか理解できます。
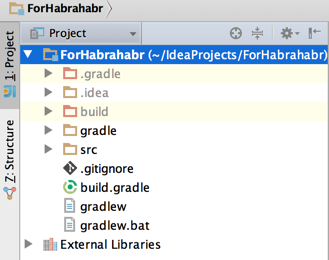
結果はそのようなプロジェクトになるはずです:
2.2最初のコードを追加する
まず、すべてのクラスのパッケージを作成し、habraspring(src / main / java /の通常のフォルダー)と呼び、その中の最初の
アプリケーションクラス:
クラスコード
package habraspring; import org.springframework.boot.SpringApplication; import org.springframework.boot.autoconfigure.SpringBootApplication; import org.springframework.context.annotation.ComponentScan; import org.springframework.data.jpa.repository.config.EnableJpaRepositories; @SpringBootApplication @ComponentScan @EnableJpaRepositories(basePackages = {"habraspring"}) public class Application { public static void main(String[] args) { SpringApplication.run(Application.class, args); } }
ただし、このフォームでは、アプリケーションはまだ起動しません。データベースが置かれている場所にオートコンフィギュレーターを表示する必要があります。そのため、ファイルをresources / application.propertiesフォルダーに追加します。
このコンテンツで
 #データベースの設定
 spring.datasource.url = jdbc:mysql:// localhost / forhabrahabr
 spring.datasource.username = root
 spring.datasource.password =
 spring.datasource.driver-class-name = com.mysql.jdbc.Driver
 #オンにして遅延読み込みを有効にします
 spring.jpa.properties.hibernate.enable_lazy_load_no_trans = true
また、テンプレートエンジン用のresources / folder templatesに作成する必要があります。
リソースフォルダーは次のようになります。

.gitkeepファイルには注意を払わないでください。プログラムが機能するために必要ではありません。ファイルを安全に削除/作成できません。
完了したら、クラッシュすることなくアプリケーションを初めて起動できます。
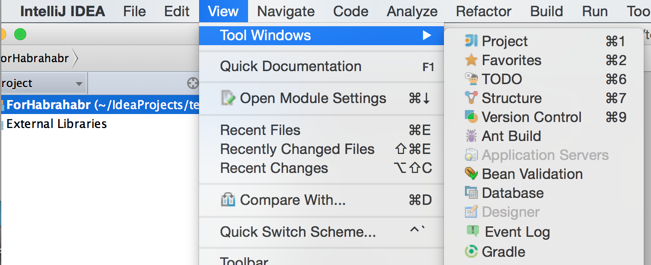
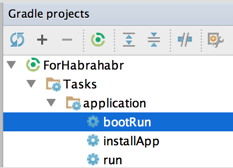
開始するには、bootRunタスクを実行する必要があります(ダブルクリックします):
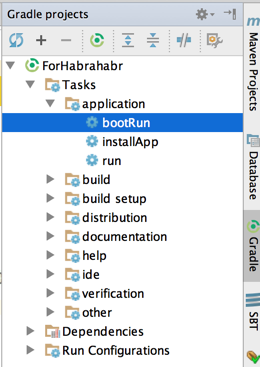
そのようなパネルがない場合は、表示->ツールウィンドウ-> Gradleに移動します。
アプリケーションログには次のようなものがあります。
起動ログ
15:24:47:外部タスク「bootRun」の実行...
:compileJava UP-TO-DATE
:processResources
:クラス
:findMainClass
:bootRun
。 ____ _ __ _ _
/ \\ / ___'_ __ _ _(_)_ __ __ _ \ \ \ \
(()\ ___ | '_ |' _ | | '_ \ / _` | \ \ \ \
\\ / ___)| | _)| | | | | || (_ | |))))))
'| ____ | .__ | _ | | _ | _ | | _ \ __、| / / / /
========= | _ | =============== | ___ / = / _ / _ / _ /
::スプリングブート::(v1.2.5.RELEASE)
2015-07-11 14:24:49.180 INFO 12590 --- [main] habraspring.Application:PID 12590でMacBook-Pro-Maksim.localでアプリケーションを起動(/ユーザー/管理者/ IdeaProjects / ForHabrahabr /ビルド/クラス/メイン/ユーザー/管理者/ IdeaProjects / ForHabrahabrの管理者によって開始されました)
2015-07-11 14:24:49.230 INFO 12590 --- [main] ationConfigEmbeddedWebApplicationContext:Refreshing org.springframework.boot.context.embedded.AnnotationConfigEmbeddedWebApplicationContext@2eda0940:startup date [Sat Jul 11 14:24:49 MSK 2015]; コンテキスト階層のルート
2015-07-11 14:24:50.029 INFO 12590 --- [main] osbfsDefaultListableBeanFactory:Bean 'beanNameViewResolver'のBean定義を上書き:[ルートBean:クラス[null]; スコープ=; abstract = false; lazyInit = false; autowireMode = 3; dependencyCheck = 0; autowireCandidate = true; primary = false; factoryBeanName = org.springframework.boot.autoconfigure.web.ErrorMvcAutoConfiguration $ WhitelabelErrorViewConfiguration; factoryMethodName = beanNameViewResolver; initMethodName = null; destroyMethodName =(推測); [ルートBean:クラス[null]を使用して、クラスパスリソース[org / springframework / boot / autoconfigure / web / ErrorMvcAutoConfiguration $ WhitelabelErrorViewConfiguration.class]]で定義されています。 スコープ=; abstract = false; lazyInit = false; autowireMode = 3; dependencyCheck = 0; autowireCandidate = true; primary = false; factoryBeanName = org.springframework.boot.autoconfigure.web.WebMvcAutoConfiguration $ WebMvcAutoConfigurationAdapter; factoryMethodName = beanNameViewResolver; initMethodName = null; destroyMethodName =(推測); クラスパスリソースで定義されています[org / springframework / boot / autoconfigure / web / WebMvcAutoConfiguration $ WebMvcAutoConfigurationAdapter.class]]
2015-07-11 14:24:50.701 INFO 12590 --- [main] trationDelegate $ BeanPostProcessorChecker:Bean [org.springframework.transaction.annotation.ProxyTransactionManagementConfiguration 'タイプの[class org.springframework.transaction.annotation.ProxyTransactionCanpran $$ 1f1e9ae]は、すべてのBeanPostProcessorsで処理される資格がありません(例:自動プロキシの資格がありません)
2015-07-11 14:24:50.727 INFO 12590 --- [main] trationDelegate $ BeanPostProcessorChecker:タイプ[class org.springframework.transaction.annotation.AnnotationTransactionAttributeSource]のBean 'transactionAttributeSource'は、すべてのBeanPostPorsによる処理に適格ではありません例:自動プロキシの対象ではありません)
2015-07-11 14:24:50.741 INFO 12590 --- [main] trationDelegate $ BeanPostProcessorChecker:タイプ[class org.springframework.transaction.interceptor.TransactionInterceptor]のBean 'transactionInterceptor'は、すべてのBeanPostProcessors(例:自動プロキシの対象ではありません)
2015-07-11 14:24:50.746 INFO 12590 --- [main] trationDelegate $ BeanPostProcessorChecker:タイプ[class org.springframework.transaction.interceptor.BeanFactoryTransactionAttribute notourceのBean 'org.springframework.transaction.config.internalTransactionAdvisor'すべてのBeanPostProcessorsによって処理される資格があります(例:自動プロキシの資格がありません)
2015-07-11 14:24:51.168 INFO 12590 --- [main] sbcetTomcatEmbeddedServletContainer:Tomcatがポート(s)で初期化されました:8080(http)
2015-07-11 14:24:51.408 INFO 12590 --- [main] o.apache.catalina.core.StandardService:サービスTomcatの開始
2015-07-11 14:24:51.409 INFO 12590 --- [main] org.apache.catalina.core.StandardEngine:サーブレットエンジンの起動:Apache Tomcat / 8.0.23
2015-07-11 14:24:51.601 INFO 12590 --- [ost-startStop-1] oaccC [Tomcat]。[Localhost]。[/]:Spring embedded WebApplicationContextの初期化
2015-07-11 14:24:51.601 INFO 12590 --- [ost-startStop-1] osweb.context.ContextLoader:ルートWebApplicationContext:初期化は2374ミリ秒で完了しました
2015-07-11 14:24:52.570 INFO 12590 --- [ost-startStop-1] basAuthenticationManagerConfiguration:
デフォルトのセキュリティパスワードを使用:bd1659e1-4c49-43a2-9fd6-2ca7d46e9e23
2015-07-11 14:24:52.614 INFO 12590 --- [ost-startStop-1] ossweb.DefaultSecurityFilterChain:フィルターチェーンの作成:Ant [パターン= '/ css / **']、[]
2015-07-11 14:24:52.614 INFO 12590 --- [ost-startStop-1] ossweb.DefaultSecurityFilterChain:フィルターチェーンの作成:Ant [パターン= '/ js / **']、[]
2015-07-11 14:24:52.614 INFO 12590 --- [ost-startStop-1] ossweb.DefaultSecurityFilterChain:フィルターチェーンの作成:Ant [パターン= '/ images / **']、[]
2015-07-11 14:24:52.614 INFO 12590 --- [ost-startStop-1] ossweb.DefaultSecurityFilterChain:フィルターチェーンの作成:Ant [パターン= '/ ** / favicon.ico']、[]
2015-07-11 14:24:52.614 INFO 12590 --- [ost-startStop-1] ossweb.DefaultSecurityFilterChain:フィルターチェーンの作成:Ant [パターン= '/エラー']、[]
2015-07-11 14:24:52.650 INFO 12590 --- [ost-startStop-1] ossweb.DefaultSecurityFilterChain:フィルターチェーンの作成:OrRequestMatcher [requestMatchers = [Ant [pattern = '/ **']]]、[org .springframework.security.web.context.request.async.WebAsyncManagerIntegrationFilter @ 5854c7d0、org.springframework.security.web.context.SecurityContextPersistenceFilter@874f491、org.springframework.security.hfcerferworkerferworkergeergeer .web.authentication.logout.LogoutFilter @ 609329b3、org.springframework.security.web.authentication.www.BasicAuthenticationFilter @ a37632c、org.springframework.security.web.savedrequest.RequestCacheAwareFilter @ 33a36df4 workweb .SecurityContextHolderAwareRequestFilter @ a3153e3、org.springframework.security.web.authentication.AnonymousAuthenticationFilter@1b8b1dc9、org.springframework.security.web.session.SessionManagementFilter @ 5ad0989aception.servicefreccessfreterfservicefreceptionfilter @ 5ad0988 4、org.springframework.security.web.access.intercept.FilterSecurityInterceptor @ 1fb86c05]
2015-07-11 14:24:52.723 INFO 12590 --- [ost-startStop-1] osbcembedded.FilterRegistrationBean:Mapping filter: 'characterEncodingFilter' to:[/ *]
2015-07-11 14:24:52.724 INFO 12590 --- [ost-startStop-1] osbcembedded.FilterRegistrationBean:Mapping filter: 'hiddenHttpMethodFilter' to:[/ *]
2015-07-11 14:24:52.724 INFO 12590 --- [ost-startStop-1] osbcembedded.FilterRegistrationBean:Mapping filter: 'springSecurityFilterChain' to:[/ *]
2015-07-11 14:24:52.724 INFO 12590 --- [ost-startStop-1] osbceServletRegistrationBean:マッピングサーブレット: 'dispatcherServlet'から[/]
2015-07-11 14:24:53.410 INFO 12590 --- [メイン] j.LocalContainerEntityManagerFactoryBean:永続性ユニット「デフォルト」のJPAコンテナEntityManagerFactoryの構築
2015-07-11 14:24:53.425 INFO 12590 --- [main] o.hibernate.jpa.internal.util.LogHelper:HHH000204:Processing PersistenceUnitInfo [
名前:デフォルト
...]
2015-07-11 14:24:53.500 INFO 12590 --- [main] org.hibernate.Version:HHH000412:Hibernate Core {4.3.10.Final}
2015-07-11 14:24:53.503 INFO 12590 --- [main] org.hibernate.cfg.Environment:HHH000206:hibernate.properties not found
2015-07-11 14:24:53.505 INFO 12590 --- [main] org.hibernate.cfg.Environment:HHH000021:バイトコードプロバイダー名:javassist
2015-07-11 14:24:53.628 INFO 12590 --- [main] o.hibernate.annotations.common.Version:HCANN000001:Hibernate Commons Annotations {4.0.5.Final}
2015-07-11 14:24:53.711 INFO 12590 --- [main] org.hibernate.dialect.Dialect:HHH000400:ダイアレクトの使用:org.hibernate.dialect.MySQL5Dialect
2015-07-11 14:24:53.774 INFO 12590 --- [main] ohhiast.ASTQueryTranslatorFactory:HHH000397:Using ASTQueryTranslatorFactory
2015-07-11 14:24:54.244 INFO 12590 --- [main] swsmmaRequestMappingHandlerAdapter:@ControllerAdviceを探しています:org.springframework.boot.context.embedded.AnnotationConfigEmbeddedWebApplicationContext@2eda0940:startup date [Sat Jul 11 14:24:49 MSK 2015]; コンテキスト階層のルート
2015-07-11 14:24:54.328 INFO 12590 --- [main] swsmmaRequestMappingHandlerMapping:Mapped "{[/ error]}" into public org.springframework.http.ResponseEntity <java.util.Map <java.lang.String 、java.lang.Object >> org.springframework.boot.autoconfigure.web.BasicErrorController.error(javax.servlet.http.HttpServletRequest)
2015-07-11 14:24:54.328 INFO 12590 --- [main] swsmmaRequestMappingHandlerMapping:マッピングされた「{[/ error]、produces = [text / html]}」をパブリックorg.springframework.web.servlet.ModelAndView組織に。 springframework.boot.autoconfigure.web.BasicErrorController.errorHtml(javax.servlet.http.HttpServletRequest)
2015-07-11 14:24:54.356 INFO 12590 --- [main] oswshandler.SimpleUrlHandlerMapping:タイプ[class org.springframework.web.servlet.resource.ResourceHttpRequestHandler]のハンドラーにマッピングされたURLパス[/ webjars / **]
2015-07-11 14:24:54.357 INFO 12590 --- [main] oswshandler.SimpleUrlHandlerMapping:タイプ[class org.springframework.web.servlet.resource.ResourceHttpRequestHandler]のハンドラーにマッピングされたURLパス[/ **]
2015-07-11 14:24:54.393 INFO 12590 --- [main] oswshandler.SimpleUrlHandlerMapping:タイプ[class org.springframework.web.servlet.resource。]のハンドラーにマッピングされたURLパス[/**/favicon.ico]。 ResourceHttpRequestHandler]
2015-07-11 14:24:54.723 INFO 12590 --- [main] osjeaAnnotationMBeanExporter:起動時のJMX公開用のBeanの登録
2015-07-11 14:24:54.800 INFO 12590 --- [main] sbcetTomcatEmbeddedServletContainer:Tomcatはポート(s)で開始されました:8080(http)
2015-07-11 14:24:54.803 INFO 12590 --- [main] habraspring.Application:5.945秒でアプリケーションを開始(JVMは6.529で実行)
http:// localhost:8080のアドレスに移動してみてください。
さて、今私はいくつかのコンテンツを見たいですよね?
2.3内容
これを行うには、configサブフォルダーで2つの構成クラスを作成する必要があります(XMLなし!)。home.html(index.htmlのアナログ)をリソースフォルダーに追加します。
コントローラーのないページに使用するため、最も単純な構成ファイルがあります。
config / MvcConfig.java
package habraspring.config; import org.springframework.context.annotation.Configuration; import org.springframework.web.servlet.config.annotation.ViewControllerRegistry; import org.springframework.web.servlet.config.annotation.WebMvcConfigurerAdapter; @Configuration public class MvcConfig extends WebMvcConfigurerAdapter { @Override public void addViewControllers(ViewControllerRegistry registry) { registry.addViewController("/home").setViewName("home"); registry.addViewController("/").setViewName("home"); } }
config / WebSecurityConfig.java
package habraspring.config; import org.springframework.boot.autoconfigure.security.SecurityProperties; import org.springframework.context.annotation.Configuration; import org.springframework.core.annotation.Order; import org.springframework.security.config.annotation.method.configuration.EnableGlobalMethodSecurity; import org.springframework.security.config.annotation.web.builders.HttpSecurity; import org.springframework.security.config.annotation.web.configuration.WebSecurityConfigurerAdapter; import org.springframework.security.config.annotation.web.servlet.configuration.EnableWebMvcSecurity; @Configuration @EnableWebMvcSecurity @EnableGlobalMethodSecurity(prePostEnabled = true) @Order(SecurityProperties.ACCESS_OVERRIDE_ORDER) public class WebSecurityConfig extends WebSecurityConfigurerAdapter { @Override protected void configure(HttpSecurity http) throws Exception { http .authorizeRequests() .antMatchers("/", "/home").permitAll(); } }
さて、最も簡単なホームページ:
home.html
<!DOCTYPE html> <html xmlns="http://www.w3.org/1999/xhtml" xmlns:th="http://www.thymeleaf.org" xmlns:sec="http://www.thymeleaf.org/thymeleaf-extras-springsecurity3"> <head> <title>Habrahabr</title> </head> <body> <h1>Welcome!</h1> <p>Yours home page.</p> </body> </html>
この段階でプロジェクトがどのように見えるかは、ここで確認(およびダウンロード)できます。
github.com/MaxPovver/ForHabrahabr/tree/withbasicmvc
*コンソールのgit checkout withbasicmvcのプロジェクトフォルダーに書き込むことを忘れないでください
現時点ですべてが正しく行われている場合、 http:// localhost:8080で取得できます
ようこそ!

あなたのホームページ。
3.データベースに作業を追加します
そのため、コントローラーを追加し、それらへのアクセスが許可されたユーザーのみに許可されるようにしますが、まだ持っていません。
承認メカニズムが機能するためには、ユーザーの本質をプロジェクトに追加する必要があります。
必要な手順:
- データベース内のユーザーの本質を記述するクラスを追加します
- 新しいエンティティリポジトリを追加する
- Spring Securityエンジンとエンティティ間に「リンク」を追加します
- どこでもすべてを登録する
- Spring Securityを有効にする
3.1「ユーザー」の本質
最初に、id、username、passwordフィールドを使用して、データベースに最も単純なユーザーラベルを作成します。
エンティティのエンティティサブパッケージを作成し、その中にUserクラスを作成します。
エンティティ/ User.java
package habraspring.entities; import javax.persistence.*; @Entity @Table(name="users") public class User { @Id @GeneratedValue(strategy = GenerationType.AUTO) private long id; private String username; private String password; public String getPassword() { return password; } public void setPassword(String password) { this.password = password; } public long getId() { return id; } public void setId(long id) { this.id = id; } public String getUsername() { return username; } public void setUsername(String username) { this.username = username; } protected User(){} public User(String name, String pass) { username = name; password = pass; } }
hbm.xmlは必要ありません。フィールドに注釈を付ける必要もありません(例外はIDフィールドです。常にマークする必要があります)
3.2 UsersRepositoryリポジトリ
ここでは、Springがすべてを行います。生成する必要があるものを理解するために、それを継承するだけで十分です。コードを記述する必要はまったくありません。
UsersRepository.java
package habraspring.repositories; import habraspring.entities.User; import org.springframework.data.repository.CrudRepository; public interface UsersRepository extends CrudRepository<User, Long> { User findByUsername(String username); }
3.3ユーザーとSpring Security間の接続の追加
これを行うには、UserDetailsServiceインターフェイスを実装するクラスを作成し、WebSecurityConfigで有効にする必要があります
utils / MySQLUserDetailsService.java
package habraspring.utils; import habraspring.entities.User; import habraspring.repositories.UsersRepository; import org.springframework.beans.factory.annotation.Autowired; import org.springframework.security.authentication.InternalAuthenticationServiceException; import org.springframework.security.core.GrantedAuthority; import org.springframework.security.core.userdetails.UserDetails; import org.springframework.security.core.userdetails.UserDetailsService; import org.springframework.security.core.userdetails.UsernameNotFoundException; import org.springframework.stereotype.Service; import java.util.ArrayList; import java.util.Collection; import java.util.List; @Service public class MySQLUserDetailsService implements UserDetailsService { @Autowired UsersRepository users; @Override public UserDetails loadUserByUsername(String username) throws UsernameNotFoundException { UserDetails loadedUser; try { User client = users.findByUsername(username); loadedUser = new org.springframework.security.core.userdetails.User( client.getUsername(), client.getPassword(), DummyAuthority.getAuth()); } catch (Exception repositoryProblem) { throw new InternalAuthenticationServiceException(repositoryProblem.getMessage(), repositoryProblem); } return loadedUser; } static class DummyAuthority implements GrantedAuthority { static Collection<GrantedAuthority> getAuth() { List<GrantedAuthority> res = new ArrayList<>(1); res.add(new DummyAuthority()); return res; } @Override public String getAuthority() { return "USER"; } } }
次に、WebSecurityConfigコードを変更します。
ネタバレ見出し
package habraspring.config; import habraspring.utils.MySQLUserDetailsService; import org.springframework.beans.factory.annotation.Autowired; import org.springframework.boot.autoconfigure.security.SecurityProperties; import org.springframework.context.annotation.Configuration; import org.springframework.core.annotation.Order; import org.springframework.security.config.annotation.authentication.builders.AuthenticationManagerBuilder; import org.springframework.security.config.annotation.method.configuration.EnableGlobalMethodSecurity; import org.springframework.security.config.annotation.web.builders.HttpSecurity; import org.springframework.security.config.annotation.web.configuration.WebSecurityConfigurerAdapter; import org.springframework.security.config.annotation.web.servlet.configuration.EnableWebMvcSecurity; @Configuration @EnableWebMvcSecurity @EnableGlobalMethodSecurity(prePostEnabled = true) @Order(SecurityProperties.ACCESS_OVERRIDE_ORDER) public class WebSecurityConfig extends WebSecurityConfigurerAdapter { @Override protected void configure(HttpSecurity http) throws Exception { http .authorizeRequests() .antMatchers("/", "/home").permitAll() .anyRequest().authenticated() .and() .formLogin() .loginPage("/login") .permitAll() .and() .logout() .permitAll(); } @Autowired private MySQLUserDetailsService mySQLUserDetailsService; @Autowired public void configureGlobal(AuthenticationManagerBuilder auth) throws Exception { auth.userDetailsService(mySQLUserDetailsService); } }
login.htmlログインページと「secret」(許可された場合のみ)secret.htmlページを追加します。
彼らのコード
secret.html
<!DOCTYPE html> <html xmlns="http://www.w3.org/1999/xhtml" xmlns:th="http://www.thymeleaf.org" xmlns:sec="http://www.thymeleaf.org/thymeleaf-extras-springsecurity3"> <head> <title>Secret page</title> </head> <body> <h1 th:inline="text">Hello [[${#httpServletRequest.remoteUser}]]!</h1> <form th:action="@{/logout}" method="post"> <input type="submit" value="Sign Out"/> </form> </body> </html>
login.html
<!DOCTYPE html> <html xmlns="http://www.w3.org/1999/xhtml" xmlns:th="http://www.thymeleaf.org" xmlns:sec="http://www.thymeleaf.org/thymeleaf-extras-springsecurity3"> <head> <title>Login page</title> </head> <body> <div th:if="${param.error}"> Invalid username and password. </div> <div th:if="${param.logout}"> You have been logged out. </div> <form th:action="@{/login}" method="post"> <div><label> User Name : <input type="text" name="username"/> </label></div> <div><label> Password: <input type="password" name="password"/> </label></div> <div><input type="submit" value="Sign In"/></div> </form> </body> </html>
そして、WebMvcConfigに2行追加することで、コントローラーなしで新しいページを利用可能にします。
registry.addViewController("/login").setViewName("login"); registry.addViewController("/secret").setViewName("secret");
できた! これで、 http:// localhost:8080で 、すべてが正常になり、
ただし、 http:// localhost:8080 / secretのアドレスにアクセスすることはできません。有効なユーザーとパスワードのペアを必要とする/ loginにそれをスローします。
次に、forhabrahabr.usersテーブルに、パスワードとユーザー名user、userを含むエントリを追加します(または、dbでスクリプトgithub.com/MaxPovver/ForHabrahabr/blob/withauth/import_me.sqlを実行します)。
あなたがすべてを正しくやったなら、今、あなたは/秘密に許可されるべきです。
4.私たちは何に来ましたか
そのため、セキュリティにはSpring Securityを使用し、データベースの操作にはSpring JPAを使用した完全なSpring MVCアプリケーションを既に使用しています。 そしてXMLはありません。
4.1完成したプロジェクトを開始したい人向け
- git clone github.com/MaxPovver/ForHabrahabr.git
- cd ForHabrahabr /
- git checkout withauth
- ローカルmysql dbでimport_me.sqlを実行します(または手でタブレットとデータを作成します)
- IDEAで作成したForHabrahabrフォルダーを開きます

- Gradleソケットはありませんか? ここで開く
- bootRunを実行する
- すべてがこのステップで機能するはずです。
完全に混同しないように、多くのことを省略したり説明したりしませんでしたが、今すぐ何かを追加する必要があると思われる場合は、PMに書き込みます。
もちろん、トピックに関連性がない限り、少なくとも1つ以上の資料が残っています。 (コントローラー、EntityToEntity(ManyToOne OneToOneなど)、ユーザーロール、テストなど)
前半のコメント
記事自体でいくつかのポイントを見逃さなければなりませんでしたが、ここでそれらの最大数について書きます。 この部分はアプリケーションを実行するために必要ではありませんが、あいまいな点を見つけるのに役立ちます。
読む...
もう一度彼のコードをあげます。
このメソッドは何をしますか? アドレスバーからのリクエストをリソース/フォルダーからのテンプレートにバインドします。
たとえば、サーバーに「/」または「/ home」の内容を表示するように要求された場合、home.htmlが返されます。
同様に、リクエスト "/ login"はlogin.htmlを返します。
このクラスを順番に検討してください。
このリストからリクエストを送信する人にリクエストを送信できます:
残りは許可されたユーザーのみに開かれ、ログインフォームの場所を示し、全員とその終了ページを開きます。
また、セキュリティシステムからユーザーを取得する場所も決定します。これには@Autowiredアノテーションを使用し、Springは必要なサービスのインスタンスをそこにロードします。
そして、それをメソッドに渡して、Spring Securityユーザーとデータベースのユーザーを接続するためのサービスを定義できるようにします。
loadUserByUsernameの実装を検討してください。
ここで再び@Autowiredを使用して、springがユーザーのデータベースから実装されたユーザーリポジトリインターフェースを置き換え、その助けを借りてデータベースから指定されたニックネームを持つユーザーを引き出します。
そしてここで、データベースエンティティからSpring Securityエンティティに「変換された」ユーザーを返します。 しかし、問題があります-ユーザーにはまだロールが割り当てられていないので(後で行います)、既存のユーザーにユーザー権限を付与するスタブクラスを作成します。 ユーザーが存在しない場合、コードは例外を使用して以前にクラッシュします。 次に、このユーザー自身のSpringは、入力されたパスワードとデータベース内のオブジェクトのパスワードとこのユーザー名との対応を確認します。
コードを1行ずつ検討してください。
Entityアノテーションを追加することにより、このクラスをデータベース内のテーブルにバインドする必要があることをSpringクローラーに伝えます。
Tableアノテーションでは、このクラスをバインドするテーブルの名前を示します(多くの場合、このクラスを省略することもできますが、これを行わないことをお勧めします。そうしないと、テーブル名を変更すると問題が発生する可能性があります)
フィールドを使用すると、すべてがはるかに簡単になります。同じ名前のデータベース内のフィールドに自動的に添付されるため、何も書く必要はありません。IDであるフィールドと、データベースに保存するときに新しいエンティティ用にフィールドを生成する方法を指定する必要があります。
/( , ).
— — , , user friendly UsersRepository.
, Gradle :
, ( ):
Mvcconfig
もう一度彼のコードをあげます。
Mvcconfig.java
package habraspring.config; import org.springframework.context.annotation.Configuration; import org.springframework.web.servlet.config.annotation.ViewControllerRegistry; import org.springframework.web.servlet.config.annotation.WebMvcConfigurerAdapter; @Configuration public class MvcConfig extends WebMvcConfigurerAdapter { @Override public void addViewControllers(ViewControllerRegistry registry) { registry.addViewController("/home").setViewName("home"); registry.addViewController("/").setViewName("home"); registry.addViewController("/login").setViewName("login"); registry.addViewController("/secret").setViewName("secret"); } }
このメソッドは何をしますか? アドレスバーからのリクエストをリソース/フォルダーからのテンプレートにバインドします。
たとえば、サーバーに「/」または「/ home」の内容を表示するように要求された場合、home.htmlが返されます。
同様に、リクエスト "/ login"はlogin.htmlを返します。
WebSecurityConfig
WebSecurityConfig.java
package habraspring.config; import habraspring.utils.MySQLUserDetailsService; import org.springframework.beans.factory.annotation.Autowired; import org.springframework.boot.autoconfigure.security.SecurityProperties; import org.springframework.context.annotation.Configuration; import org.springframework.core.annotation.Order; import org.springframework.security.config.annotation.authentication.builders.AuthenticationManagerBuilder; import org.springframework.security.config.annotation.method.configuration.EnableGlobalMethodSecurity; import org.springframework.security.config.annotation.web.builders.HttpSecurity; import org.springframework.security.config.annotation.web.configuration.WebSecurityConfigurerAdapter; import org.springframework.security.config.annotation.web.servlet.configuration.EnableWebMvcSecurity; @Configuration @EnableWebMvcSecurity @EnableGlobalMethodSecurity(prePostEnabled = true) @Order(SecurityProperties.ACCESS_OVERRIDE_ORDER) public class WebSecurityConfig extends WebSecurityConfigurerAdapter { @Override protected void configure(HttpSecurity http) throws Exception { http .authorizeRequests() .antMatchers("/", "/home").permitAll() .anyRequest().authenticated() .and() .formLogin() .loginPage("/login") .permitAll() .and() .logout() .permitAll(); } @Autowired private MySQLUserDetailsService mySQLUserDetailsService; @Autowired public void configureGlobal(AuthenticationManagerBuilder auth) throws Exception { auth.userDetailsService(mySQLUserDetailsService); } }
このクラスを順番に検討してください。
このリストからリクエストを送信する人にリクエストを送信できます:
.authorizeRequests() .antMatchers("/", "/home").permitAll()
残りは許可されたユーザーのみに開かれ、ログインフォームの場所を示し、全員とその終了ページを開きます。
.anyRequest().authenticated() .and() .formLogin() .loginPage("/login") .permitAll() .and() .logout() .permitAll();
また、セキュリティシステムからユーザーを取得する場所も決定します。これには@Autowiredアノテーションを使用し、Springは必要なサービスのインスタンスをそこにロードします。
@Autowired private MySQLUserDetailsService mySQLUserDetailsService;
そして、それをメソッドに渡して、Spring Securityユーザーとデータベースのユーザーを接続するためのサービスを定義できるようにします。
@Autowired public void configureGlobal(AuthenticationManagerBuilder auth) throws Exception { auth.userDetailsService(mySQLUserDetailsService); }
MySQLUserDetailsService
MySQLUserDetailsService.java
package habraspring.utils; import habraspring.entities.User; import habraspring.repositories.UsersRepository; import org.springframework.beans.factory.annotation.Autowired; import org.springframework.security.authentication.InternalAuthenticationServiceException; import org.springframework.security.core.GrantedAuthority; import org.springframework.security.core.userdetails.UserDetails; import org.springframework.security.core.userdetails.UserDetailsService; import org.springframework.security.core.userdetails.UsernameNotFoundException; import org.springframework.stereotype.Service; import java.util.ArrayList; import java.util.Collection; import java.util.List; @Service public class MySQLUserDetailsService implements UserDetailsService { @Autowired UsersRepository users; @Override public UserDetails loadUserByUsername(String username) throws UsernameNotFoundException { UserDetails loadedUser; try { User client = users.findByUsername(username); loadedUser = new org.springframework.security.core.userdetails.User( client.getUsername(), client.getPassword(), DummyAuthority.getAuth()); } catch (Exception repositoryProblem) { throw new InternalAuthenticationServiceException(repositoryProblem.getMessage(), repositoryProblem); } return loadedUser; } static class DummyAuthority implements GrantedAuthority { static Collection<GrantedAuthority> getAuth() { List<GrantedAuthority> res = new ArrayList<>(1); res.add(new DummyAuthority()); return res; } @Override public String getAuthority() { return "USER"; } } }
loadUserByUsernameの実装を検討してください。
ここで再び@Autowiredを使用して、springがユーザーのデータベースから実装されたユーザーリポジトリインターフェースを置き換え、その助けを借りてデータベースから指定されたニックネームを持つユーザーを引き出します。
@Autowired UsersRepository users; .... User client = users.findByUsername(username);
そしてここで、データベースエンティティからSpring Securityエンティティに「変換された」ユーザーを返します。 しかし、問題があります-ユーザーにはまだロールが割り当てられていないので(後で行います)、既存のユーザーにユーザー権限を付与するスタブクラスを作成します。 ユーザーが存在しない場合、コードは例外を使用して以前にクラッシュします。 次に、このユーザー自身のSpringは、入力されたパスワードとデータベース内のオブジェクトのパスワードとこのユーザー名との対応を確認します。
loadedUser = new org.springframework.security.core.userdetails.User( client.getUsername(), client.getPassword(), DummyAuthority.getAuth());
ユーザー
User.java
package habraspring.entities; import javax.persistence.*; @Entity @Table(name="users") public class User { @Id @GeneratedValue(strategy = GenerationType.AUTO) private long id; private String username; private String password; public String getPassword() { return password; } public void setPassword(String password) { this.password = password; } public long getId() { return id; } public void setId(long id) { this.id = id; } public String getUsername() { return username; } public void setUsername(String username) { this.username = username; } protected User(){} public User(String name, String pass) { username = name; password = pass; } }
コードを1行ずつ検討してください。
Entityアノテーションを追加することにより、このクラスをデータベース内のテーブルにバインドする必要があることをSpringクローラーに伝えます。
Tableアノテーションでは、このクラスをバインドするテーブルの名前を示します(多くの場合、このクラスを省略することもできますが、これを行わないことをお勧めします。そうしないと、テーブル名を変更すると問題が発生する可能性があります)
@Entity @Table(name="users") public class User {
フィールドを使用すると、すべてがはるかに簡単になります。同じ名前のデータベース内のフィールドに自動的に添付されるため、何も書く必要はありません。IDであるフィールドと、データベースに保存するときに新しいエンティティ用にフィールドを生成する方法を指定する必要があります。
@Id @GeneratedValue(strategy = GenerationType.AUTO) private long id; private String username; private String password;
/( , ).
— — , , user friendly UsersRepository.
protected User(){} public User(String name, String pass) { username = name; password = pass; }
グラドル
buildscript { repositories { mavenCentral() } dependencies { classpath("org.springframework.boot:spring-boot-gradle-plugin:1.2.5.RELEASE") classpath 'mysql:mysql-connector-java:5.1.34' } } apply plugin: 'java' apply plugin: 'eclipse' apply plugin: 'idea' apply plugin: 'spring-boot' jar { baseName = 'gs-rest-service' version = '0.1.0' } repositories { mavenCentral() } sourceCompatibility = 1.8 targetCompatibility = 1.8 dependencies { compile("org.springframework.boot:spring-boot-starter-web") compile("org.springframework.boot:spring-boot-starter-data-jpa") compile("org.springframework.boot:spring-boot-starter-security") compile("org.springframework.boot:spring-boot-starter-thymeleaf") compile 'mysql:mysql-connector-java:5.1.31' compile 'commons-dbcp:commons-dbcp:1.4' testCompile("org.springframework:spring-test") testCompile("junit:junit") testCompile 'org.springframework.security:spring-security-test:4.0.1.RELEASE' } task wrapper(type: Wrapper) { gradleVersion = '2.3' }
, Gradle :
dependencies { compile("org.springframework.boot:spring-boot-starter-web") - Spring MVC compile("org.springframework.boot:spring-boot-starter-data-jpa") - Spring Jpa( ) compile("org.springframework.boot:spring-boot-starter-security") - Spring Security compile("org.springframework.boot:spring-boot-starter-thymeleaf") - resources/tempates compile 'mysql:mysql-connector-java:5.1.31' - mysql to spring compile 'commons-dbcp:commons-dbcp:1.4'
, ( ):
testCompile("org.springframework:spring-test") testCompile("junit:junit") testCompile 'org.springframework.security:spring-security-test:4.0.1.RELEASE'
UPDパート2:XMLを使用しないSpring。 パート2