
ボタンもあります。 そのため、ボタンを押すと、 甘やかされるのではなく、LEDマトリックスに何か有用なものが表示されるという要望がありました。 また、Pythonを学ぶために-OOP、フロー、解析など。 これは私の最初の便利なpythonプロジェクトと言えるでしょう。 したがって、この記事はホームインフォーマーを作成したい人にとって同時に有用であり、さらに、有益であることを願っています。
マトリックスがPythonで正しく機能するためには、そのようなものが必要です 。 そして、出力のための情報がロードされます
- bank-ua.com
- worldweatheronline.com
これらのサービスは一例であり、完全に無料です。 他のものを使用できます。 必要に応じて、Yandexによると交通渋滞を取得することもできますが、取得はそれほど簡単ではありません。
Yandex.Trafficポイントの取得
必要なもの:
PHPを使用したWebサーバー-たとえば、 www.penguintutor.com / linux / light - webserver 。
xvfb-sudo apt-get install xvfb;
CutyCapt-cutycapt.sourceforge.net;
結果:輻輳のある画像と、輻輳ポイントの値を含むテキストファイル。
save.php
probki.html
ブラウザでこのファイルを開くと、渋滞のある地図、天気と交通のウィジェットが表示されます。最も重要なことは、渋滞の値とその写真が含まれるprobki.txtファイルが「@」フォルダーに表示されることです。 その後、指定されたスケジュールに従ってサーバーにこのページを自動的に開かせることができます。 したがって、cronに次を追加します。
PHPを使用したWebサーバー-たとえば、 www.penguintutor.com / linux / light - webserver 。
xvfb-sudo apt-get install xvfb;
CutyCapt-cutycapt.sourceforge.net;
結果:輻輳のある画像と、輻輳ポイントの値を含むテキストファイル。
save.php
<?php $f = "@/probki.txt"; $fileHandle = fopen($f, 'w') or die("Unable to open the ".$f); fwrite($fileHandle, $_GET["val"]); fclose($fileHandle); echo file_get_contents($f); ?>
probki.html
<!DOCTYPE html PUBLIC "-//W3C//DTD XHTML 1.0 Transitional//EN" "http://www.w3.org/TR/xhtml1/DTD/xhtml1-transitional.dtd"> <html xmlns="http://www.w3.org/1999/xhtml"> <head> <title></title> <meta http-equiv="Content-Type" content="text/html; charset=utf-8" /> <script src="//api-maps.yandex.ru/2.1/?lang=ru_RU" type="text/javascript"></script> <style> html, body, #map { width: 100%; height: 100%; padding: 0; margin: 0; } </style> <script type="text/javascript"> ymaps.ready(init); function init () { var myMap = new ymaps.Map("map", { // . . center: [50.47,30.54], zoom: 12, controls: [] }); // "" . var actualProvider = new ymaps.traffic.provider.Actual({}, { infoLayerShown: true }); // . actualProvider.setMap(myMap); actualProvider.state.events.add("change", function () { var jamlevel = actualProvider.state.get("level"); if (jamlevel!== null) { // - PHP , , . document.getElementById("val").src="save.php?val="+jamlevel; } }); } </script> </head> <body bgcolor="#555555"> <!-- --> <div style="position: absolute;left: 30px; top: 0px; z-index: 2;"> <a href="http://clck.yandex.ru/redir/dtype=stred/pid=7/cid=1228/*http://pogoda.yandex.ru/kyiv"><img src="http://info.weather.yandex.net/kyiv/2_white.uk.png" border="0" alt="$ <img width="1" height="1" src="http://clck.yandex.ru/click/dtype=stred/pid=7/cid=1227/*http://img.yandex.ru/i/pix.gif" alt="" border="0"/></a> </div> <!-- --> <div style="position: absolute; right: 30px; top: 0px; z-index: 3;"> <img src="http://info.maps.yandex.net/traffic/kiev/tends_200.png" alt=" ." border="0"/> </div> <div id="map"> </div><!-- PHP --> <img id="val" src="" style="display:none" /> </body> </html>
ブラウザでこのファイルを開くと、渋滞のある地図、天気と交通のウィジェットが表示されます。最も重要なことは、渋滞の値とその写真が含まれるprobki.txtファイルが「@」フォルダーに表示されることです。 その後、指定されたスケジュールに従ってサーバーにこのページを自動的に開かせることができます。 したがって、cronに次を追加します。
/usr/bin/xvfb-run -a -s "-screen 0 1600x1200x16" /usr/bin/CutyCapt --url=http://mywebsite/probki.html --out=/var/www/mywebsite/@/probki.jpg --javascript=on --delay=5000 --min-width=1600 --min-height=1200
APIの呼び出し回数を減らすには、30分ごとに結果をキャッシュし、ボタンに触れるだけでキャッシュされた値を読み取ります。
キャッシング天気、為替レート、交通渋滞
#!/bin/bash ########################################################### echo $(date +%F/%T%Z) "UpdateInfo started" > /var/log/updateinfo rm -f /var/www/mywebsite/@/currrate.xml /usr/bin/wget http://bank-ua.com/export/currrate.xml -P /var/www/mywebsite/@/ -q -N echo $(date +%F/%T%Z) "UpdateInfo currate" >> /var/log/updateinfo rm -f /var/www/mywebsite/@/weather.json /usr/bin/wget "http://api.worldweatheronline.com/free/v1/weather.ashx?q=Kyyiv&format=json&extra=localObsTime&num_of_days=5&includelocation=yes&lang=uk&key=13a4e16719a757403c5db6f4a8f3067e4534b4d8" -O /var/www/mywebsite/@/weather.json -q -N echo $(date +%F/%T%Z) "UpdateInfo weather" >> /var/log/updateinfo rm -f /var/www/mywebsite/@/probki.jpg rm -f /var/www/mywebsite/@/probki.txt /usr/bin/xvfb-run -a -s "-screen 0 1600x1200x16" /usr/bin/CutyCapt --url=http://mywebsite/probki.php --out=/var/www/mywebsite/@/probki.jpg --javascript=on --delay=5000 --min-width=1600 --min-height=1200 echo $(date +%F/%T%Z) "UpdateInfo Traffic" >> /var/log/updateinfo
それでは、楽しい部分に移りましょう。 るつぼに接続されたボタンが何かを開始するには、GPIOの状態の変化に応答するスクリプトデーモンを作成する必要があります。 各ボタンの長押しと短押し、およびそれらの組み合わせを処理する、Pythonで記述されたこのようなスクリプトの例を考えてみましょう。
4つのボタンを用意します。 ループなしで、ボタン処理を順番に作成しました。 それは簡単で、誰かがループを書く必要があるほど多くのボタンを持っているとは思いません。
ロジックは簡単です。 指定されたGPIOピンを高電圧読み取りモードにします。 次に、短い休止時間のある無限のサイクルに入ります。このサイクルでは、ピンの現在の値を記憶し、前の値と比較します。 値が異なる場合、ボタンのステータスが変更されています。 そして、タイマーを追加することで、このロジックに従ってボタンを長押しするトリガーを作成できます:ボタンが押されたが、今は押されておらず、ボタンが押されてから2秒以上が経過した場合、ボタンの長押しに応答します。
同様に、2つ(またはそれ以上)のボタンの条件を同時に追加することにより、ボタンの組み合わせを処理できます。 そのため、次のスクリプトは、4つのボタンの長いクリックと短いクリック、および1番目と2番目のボタンの同時クリックを処理します。
buttondaemon.py
# This Python file uses the following encoding: utf-8 import RPi.GPIO as GPIO import time import os import sys import logging logger = logging.getLogger('buttons_daemon') hdlr = logging.FileHandler('/MyLogs/main.log') formatter = logging.Formatter('%(asctime)s %(levelname)s %(message)s') hdlr.setFormatter(formatter) logger.addHandler(hdlr) logger.setLevel(logging.WARNING) suffix = " > /dev/null&" #adjust for where your switch is connected button1Pin = 18 button2Pin = 13 button3Pin = 16 button4Pin = 15 prev_input1 = 0 prev_input2 = 0 prev_input3 = 0 prev_input4 = 0 btimer12 = 0 btimer1= 0 btimer2= 0 btimer3= 0 btimer4= 0 GPIO.setmode(GPIO.BOARD) GPIO.setup(button1Pin,GPIO.IN, pull_up_down=GPIO.PUD_DOWN) GPIO.setup(button2Pin,GPIO.IN, pull_up_down=GPIO.PUD_DOWN) GPIO.setup(button3Pin,GPIO.IN, pull_up_down=GPIO.PUD_DOWN) GPIO.setup(button4Pin,GPIO.IN, pull_up_down=GPIO.PUD_DOWN) while True: #assuming the script to call is long enough we can ignore bouncing input1 = GPIO.input(button1Pin) input2 = GPIO.input(button2Pin) input3 = GPIO.input(button3Pin) input4 = GPIO.input(button4Pin) if (input1): btimer1 += 1 if (input2): btimer2 += 1 if (input3): btimer3 += 1 if (input4): btimer4 += 1 #Some button up if ((not input1) and (not input2) and (not input3) and (not input4) and ( (prev_input1) or (prev_input2) or (prev_input3) or (prev_input4) ) ): #Button 12 if ((prev_input1) and (prev_input2) and (not prev_input3) and (not prev_input4) ): if ((btimer1>20) and (btimer2>20)): logger.warning("Button12 long"); os.system("sudo /leds+buttons/button12long"+suffix) else: logger.warning("Button12"); os.system("sudo /leds+buttons/button12"+suffix) #Button 1 if ((prev_input1) and (not prev_input2) and (not prev_input3) and (not prev_input4) ): if (btimer1>20): logger.warning("Button1 long"); os.system("sudo /leds+buttons/button1long"+suffix) else: logger.warning("Button1"); os.system("sudo /leds+buttons/button1"+suffix) #Button 2 if ((prev_input2) and (not prev_input1) and (not prev_input3) and (not prev_input4) ): if (btimer2>20): logger.warning("Button2 long"); os.system("sudo /leds+buttons/button2long"+suffix) else: logger.warning("Button2"); os.system("sudo /leds+buttons/button2"+suffix) #Button 3 if ((prev_input3) and (not prev_input2) and (not prev_input1) and (not prev_input4) ): if (btimer3>20): logger.warning("Button3 long"); os.system("sudo /leds+buttons/button3long"+suffix) else: logger.warning("Button3"); os.system("sudo /leds+buttons/button3"+suffix) #Button 4 if ((prev_input4) and (not prev_input2) and (not prev_input3) and (not prev_input1) ): if (btimer4>20): logger.warning("Button4 long"); os.system("sudo /leds+buttons/button4long"+suffix) else: logger.warning("Button4"); os.system("sudo /leds+buttons/button4"+suffix) btimer1=0 btimer2=0 btimer3=0 btimer4=0 prev_input1 = input1 prev_input2 = input2 prev_input3 = input3 prev_input4 = input4 time.sleep(0.2)
特定のボタンまたは組み合わせが押されると、/ leds +ボタンフォルダーから対応するbashスクリプトが呼び出されます。 スクリプトのように、対応する名前のダミーファイルを作成します。 そのようなファイルの例(button1long):
#!/bin/bash echo Button 1 pressed | wall #Do something exit
次に、Pythonスクリプトからデーモンを作成します。 buttondaemonという名前のファイルを/etc/init.dフォルダーに作成します
ボタンデーモン
startコマンドはPythonスクリプトを開始し、stopコマンドはそれを停止します。 すべてのスクリプトに必要な権利を配布します。 これで、コンソールに入力してテストできます。
画面に表示される内容に応じて、ボタンを押します。 出来上がり!
#! /bin/sh # /etc/init.d/buttondaemon ### BEGIN INIT INFO # Provides: buttondaemon # Required-Start: $remote_fs $syslog # Required-Stop: $remote_fs $syslog # Default-Start: 2 3 4 5 # Default-Stop: 0 1 6 # Short-Description: Daemon to control button events # Description: Daemon which starts python script to control GPIO button events. ### END INIT INFO # If you want a command to always run, put it here # Carry out specific functions when asked to by the system case "$1" in start) echo "Starting button daemon" # run application you want to start sudo python /leds+buttons/buttondaemon.py& ;; stop) echo "Stopping button daemon" # kill application you want to stop kill -9 $(ps -ef | grep -v "grep" | grep buttondaemon.py | awk '{ print $2 }') &> /dev/null ;; *) echo "Usage: /etc/init.d/buttondaemon {start|stop}" exit 1 ;; esac exit 0
startコマンドはPythonスクリプトを開始し、stopコマンドはそれを停止します。 すべてのスクリプトに必要な権利を配布します。 これで、コンソールに入力してテストできます。
sudo /etc/init.d/buttondaemon start
画面に表示される内容に応じて、ボタンを押します。 出来上がり!
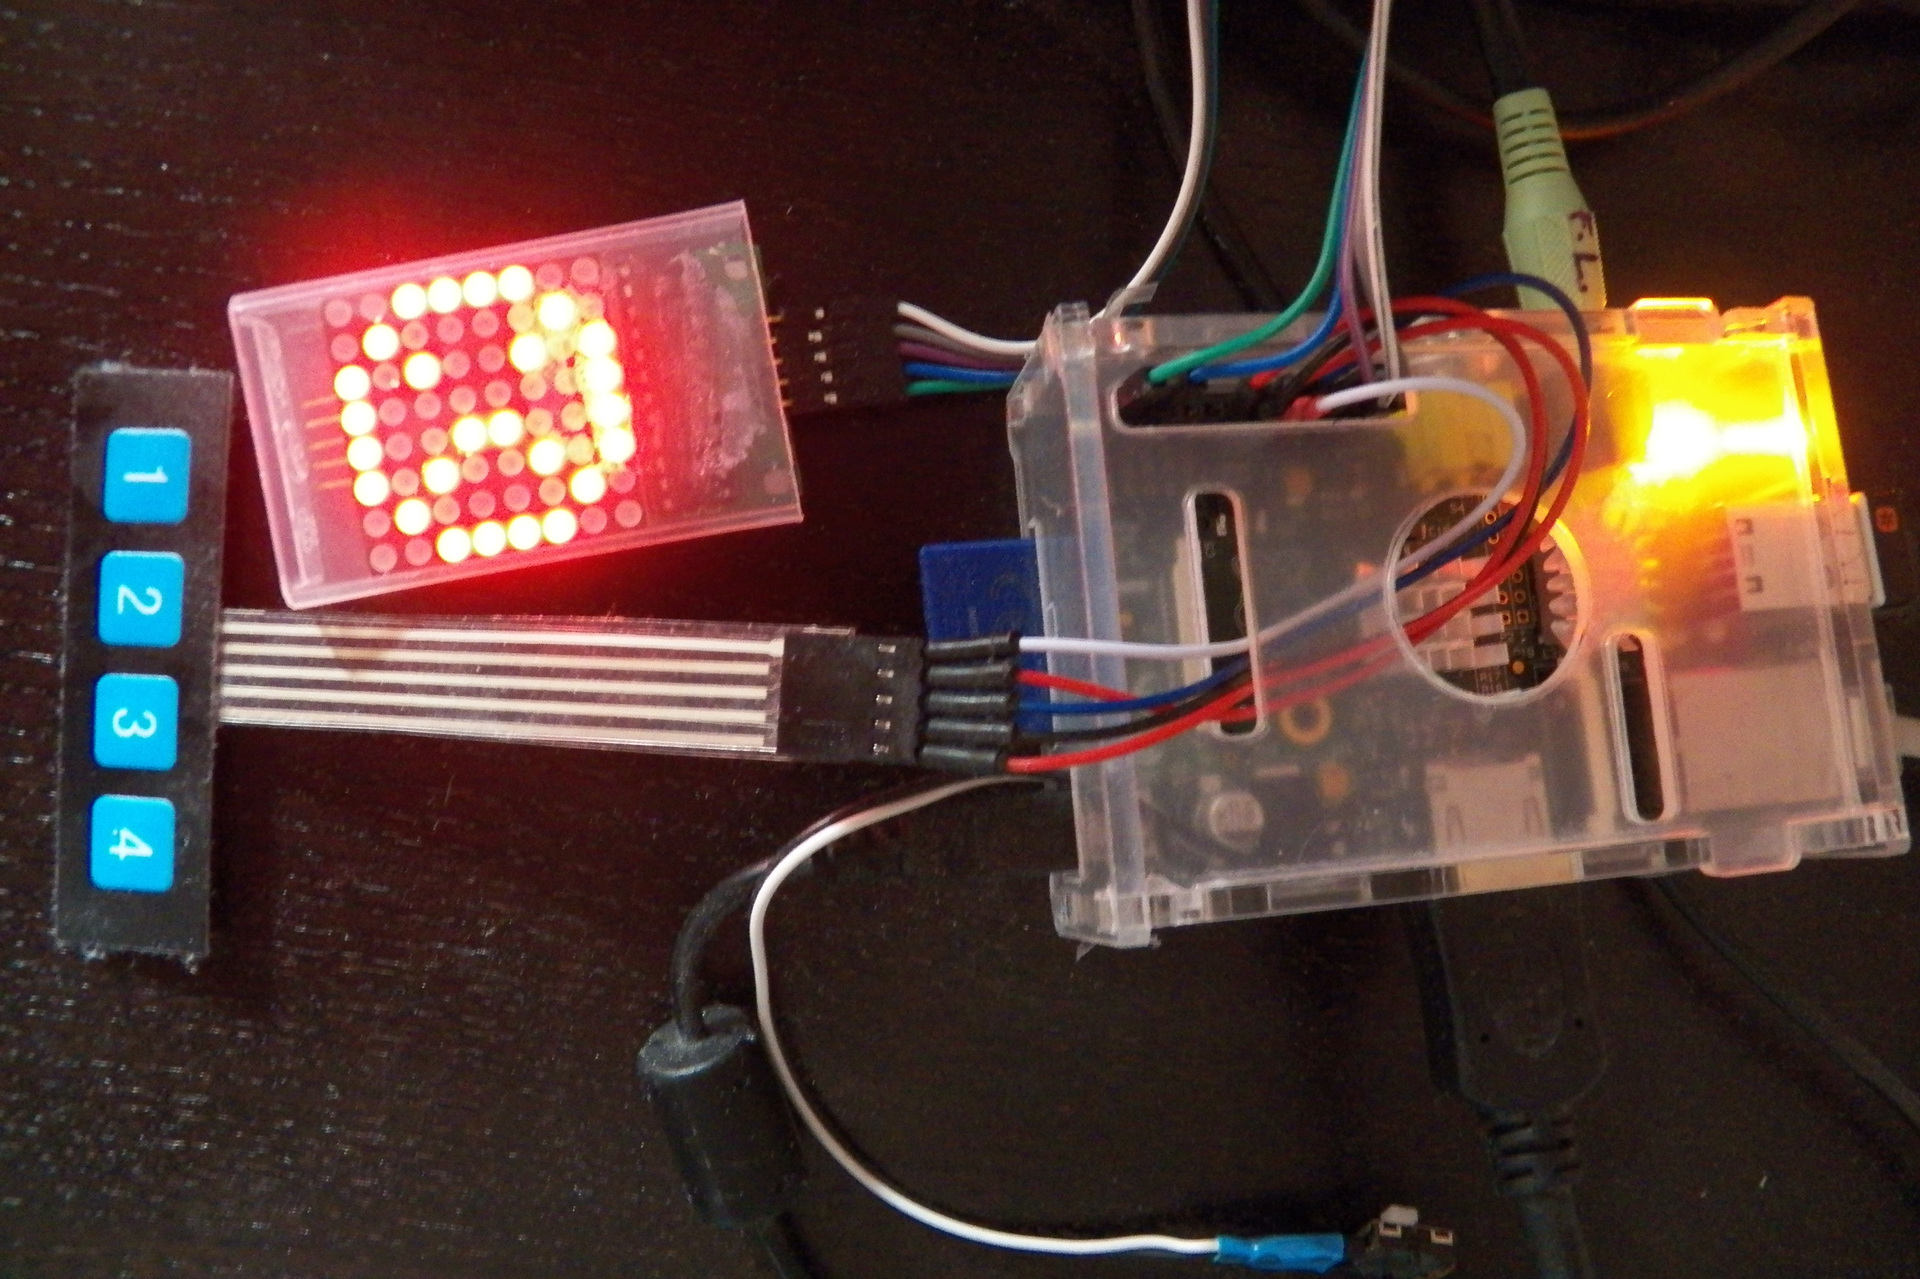
ここで、LEDマトリックスに何かを出力する必要があります。 ボタンをクリックするだけで実行されるPythonスクリプトを作成します。 何らかの理由で、urlgetは少なくとも2秒間で1秒間動作しますが、ブラウザーによって同じリンクが即座に開きます。 スクリプトの開始を確認し、空のマトリックスに2秒は貼り付けないようにするために、スクリプトはデータの読み込み中にアニメーションを表示します。
まず、現在の気温と降水量を表示します。 温度が画面上にあることを理解するために、右上隅に度の符号を象徴するポイントを表示します。
画面に2桁の数字をコンパクトに表示するために、3x6のサイズで数字を描画します。
digits.py
#!/usr/bin/env python # -*- coding: utf-8 -*- rows = 6 columns = 3 symbol = [[[0 for x in range(columns)] for x in range(rows)] for x in range(10)] symbol[1] = [ [0,0,1], [0,1,1], [0,0,1], [0,0,1], [0,0,1], [0,0,1], ] symbol[2] = [ [1,1,1], [0,0,1], [1,1,1], [1,0,0], [1,0,0], [1,1,1], ] symbol[3] = [ [1,1,1], [0,0,1], [0,1,1], [0,0,1], [0,0,1], [1,1,1], ] symbol[4] = [ [1,0,0], [1,0,0], [1,0,1], [1,1,1], [0,0,1], [0,0,1], ] symbol[5] = [ [1,1,1], [1,0,0], [1,1,1], [0,0,1], [0,0,1], [1,1,1], ] symbol[6] = [ [1,1,1], [1,0,0], [1,1,1], [1,0,1], [1,0,1], [1,1,1], ] symbol[7] = [ [1,1,1], [0,0,1], [0,1,0], [0,1,0], [0,1,0], [0,1,0], ] symbol[8] = [ [1,1,1], [1,0,1], [0,1,0], [1,0,1], [1,0,1], [1,1,1], ] symbol[9] = [ [1,1,1], [1,0,1], [1,0,1], [1,1,1], [0,0,1], [1,1,1], ] symbol[0] = [ [1,1,1], [1,0,1], [1,0,1], [1,0,1], [1,0,1], [1,1,1], ]
降水量については別途。 それらを温度とともに1つの画面に表示したかったのです。 したがって、それらは左上隅に0から3までのポイントとして表示されます。
現在、すべてのトラフィックおよび為替レートのリクエストは、並列フローを背景に実行可能です。 マトリックス上のデータの変更は、シフトによってアニメーション化されます。 一部のデータをロードできなかった場合は、代わりに悲しい顔文字が表示されます。
informer.py
#!/usr/bin/env python # -*- coding: utf-8 -*- import max7219.led as led import max7219.font as font import threading, sys, time import digits import urllib2 import json import xml.etree.ElementTree as ET debug=0 def log(message): if debug==1: print(message) device = led.matrix(cascaded=1) device.brightness(0) hourglass = [ [0,1,1,1,1,1,1,0], [0,1,0,0,0,0,1,0], [0,0,1,0,0,1,0,0], [0,0,0,1,1,0,0,0], [0,0,0,1,1,0,0,0], [0,0,1,0,0,1,0,0], [0,1,0,0,0,0,1,0], [0,1,1,1,1,1,1,0], ] jopa = [ [0,0,1,1,1,1,1,0], [0,1,1,1,1,1,1,1], [0,1,0,0,1,0,0,1], [0,1,1,1,1,1,1,1], [0,0,1,1,0,1,1,0], [0,0,1,1,1,1,1,0], [0,0,1,1,1,1,1,0], [0,0,1,0,1,0,1,0], ] sad = [ [0,0,1,1,1,1,0,0], [0,1,0,0,0,0,1,0], [1,0,1,0,0,1,0,1], [1,0,0,0,0,0,0,1], [1,0,0,1,1,0,0,1], [1,0,1,0,0,1,0,1], [0,1,0,0,0,0,1,0], [0,0,1,1,1,1,0,0], ] #Thread with wait animation class TAnimationThread (threading.Thread): def __init__(self, threadID): threading.Thread.__init__(self) self.threadID = threadID self.Continue=True def run(self): log("Starting animation") counter=0 while (self.Continue): DrawAnimation(counter) counter+=1 if counter==7: counter=0 time.sleep(0.8) def stop(self): self.Continue = False log("Stopping animation") def DrawAnimation(counter): #draw log("Drawing animation"+str(counter)) if counter==0: for j in range(8): for i in range(8): if hourglass[j][i] == 1: device.pixel(i, 7-j, 1, redraw=False) elif counter>0 and counter<5: device.pixel(1+counter, 1, 1, redraw=False) elif counter==5 or counter==6: device.pixel(counter-2, 2, 1, redraw=False) else: device.clear() device.flush() def fetch_traffic(url): global TrafficData try: response = urllib2.urlopen(url) TrafficData = int(response.read()) log("Traffic fetched") except BaseException: TrafficData=-100 log(TrafficData) def fetch_currrate(url): global CurrencyData try: response = urllib2.urlopen(url) root = ET.fromstring(response.read()) CurrencyData=float(root[16][5].text)/100 log("Currency fetched") except BaseException: CurrencyData=-100 log(CurrencyData) #Let's begin log("Starting animation thread") AnimationThread = TAnimationThread(1) AnimationThread.start() log("Starting traffic thread") TrafficThread = threading.Thread(target=fetch_traffic, args=("http://tarasius.name/@/probki.txt",)) TrafficThread.start() CurrencyThread = threading.Thread(target=fetch_currrate, args=("http://tarasius.name/@/currrate.xml",)) CurrencyThread.start() # Get and show temperature log("Starting weather fetch") try: response = urllib2.urlopen("http://tarasius.name/@/weather.json") data = json.loads(response.read()) response.close() temp = int(data["data"]["current_condition"][0]["temp_C"]) precip = float(data["data"]["current_condition"][0]["precipMM"]) temp1 = abs(temp)/10 temp2 = abs(temp)%10 except BaseException: temp=-100 precip=-100 temp1=-100 temp2=-100 log("Stopping animation thread") AnimationThread.stop() device.clear() device.flush() m = [[0 for x in range(8)] for x in range(64)] if precip==-100: #cloudcover was unavailable for j in range(8): for i in range(8): if sad[i][j] == 1: m[j][7-i]=1 #draw cloudcover elif precip>1.5: m[0][7] = 1 m[2][7] = 1 m[4][7] = 1 elif precip<=1.5 and precip>0.5: m[1][7] = 1 m[3][7] = 1 elif precip<=0.5 and precip>0.1: m[2][7] = 1 if temp>-100: if temp<0: #Draw minus m[0][3] = 1 if temp1==0: m[1][3]=1 m[2][3]=1 m[3][3]=1 if temp1<>0: #Draw first digit for j in range(digits.rows): for i in range(digits.columns): if digits.symbol[temp1][j][i] == 1: m[i+1][5-j] = 1 #draw second digit for j in range(digits.rows): for i in range(digits.columns): if digits.symbol[temp2][j][i] == 1: m[i+5][5-j] = 1 #draw celsium sign m[7][7] = 1 log("Drawing temperature") for i in range(8): for j in range(8): if m[j][i]==1: device.pixel(j, i, 1, redraw=False) device.flush() time.sleep(5) #Show traffic #Draw first digit TrafficThread.join() if TrafficData==10: for j in range(8): for i in range(8): if jopa[j][i] == 1: m[10+i][j]=1 elif TrafficData==-100: for j in range(8): for i in range(8): if sad[j][i] == 1: m[10+i][7-j]=1 else: #draw car m[10][6]=1 m[10][3]=1 m[11][7]=1 m[11][6]=1 m[11][5]=1 m[11][4]=1 m[11][3]=1 m[11][2]=1 m[12][5]=1 m[12][4]=1 TrafficData = TrafficData%10 #draw second digit for j in range(digits.rows): for i in range(digits.columns): if digits.symbol[TrafficData][j][i] == 1: m[i+15][5-j]=1 log("Drawing traffic") for step in range(9): device.clear() for i in range(8): for j in range(8): if m[i+step+2][j]==1: device.pixel(i, j, 1, redraw=False) device.flush() time.sleep(0.2) time.sleep(5) #Show currency CurrencyThread.join() if CurrencyData==-100: for j in range(8): for i in range(8): if sad[j][i] == 1: m[22+i][7-j]=1 else: cur=str(CurrencyData) for d in range(5): if cur[d]==".": digit=-1 else: digit=int(cur[d]) if digit==-1: m[22+d*5][0]=1 else: for j in range(digits.rows): for i in range(digits.columns): if digits.symbol[digit][j][i] == 1: m[i+21+d*5][5-j]=1 log("Drawing currency") for step in range(36): device.clear() for i in range(8): for j in range(8): if m[i+step+11][j]==1: device.pixel(i, j, 1, redraw=False) device.flush() time.sleep(0.2) device.clear() device.flush() sys.exit()
すべてが機能することをテストした後、ボタンでインフォーマーコールを終了します。
#!/bin/bash echo "Button 1 pressed" | wall python /leds+buttons/informer.py > /dev/null& exit
このすべての結果は次のようになります-7度、明らかに、渋滞2ポイント、ユーロからグリブナ32.02へ:
ご清聴ありがとうございました!