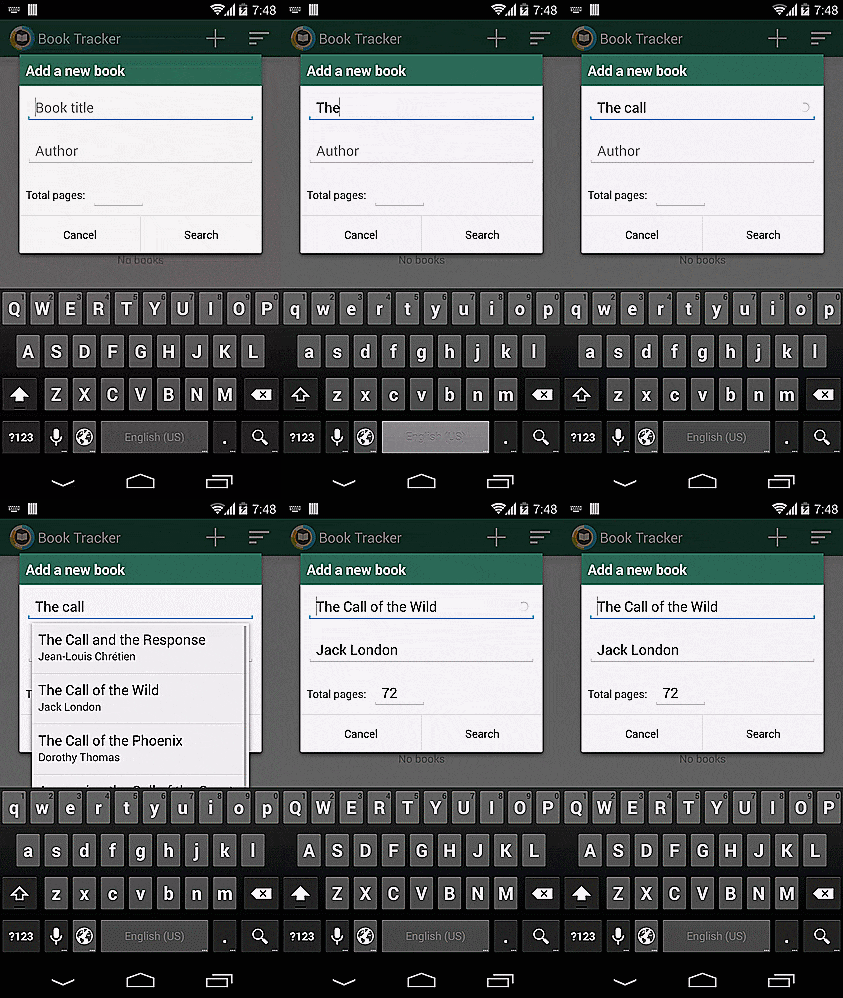
コンポーネントのタスクは次のとおりです。
- UIストリームをブロックしないように、データの読み込みは別のストリームで実行する必要があります。
- プロンプトのダウンロードは、ユーザーがダイヤルを一時停止した場合にのみ開始する必要があります(各文字が入力された後にサーバーに複数の要求が送信されるのを防ぐため)。
- ユーザーが最小長の文字列を入力した場合、ヒントをロードする必要があります(2文字または3文字の文字列のデータのロードを開始しても意味がありません)。
- サーバーにクエリを実行するとき、アニメーション化された進行状況がフィールドの右側に表示され、ダウンロードについてユーザーに通知されます。
最終結果:

手順1-AutoCompleteTextViewのカスタムアダプターの実装
AutoCompleteTextViewのアダプターは、ツールチップがロードおよび保存される重要なコンポーネントです。 BookAutoCompleteAdapterは、Filterableインターフェイスを実装して、AutoCompleteTextViewからのユーザー入力をインターセプトし、検索要求としてWebサービスに渡します。 唯一のFilterableインターフェイスメソッドはgetFilter()です。これは、データをロードして公開するFilterクラスのインスタンスを返す必要があります。 Filterクラスの子孫は、performFiltering(CharSequence制約)およびpublishResults(CharSequence制約、Filter.FilterResults結果)の2つのメソッドを実装する必要があります。
performFilteringメソッドは別のスレッドで自動的に呼び出されるため、新しいスレッドを手動で作成して開始する必要はありません。 これは、開発者向けのFilterクラスで既に行われています。 publishResultsメソッドはUIスレッドで呼び出され、結果を画面に公開します。
BookAutoCompleteAdapter.java
public class BookAutoCompleteAdapter extends BaseAdapter implements Filterable { private static final int MAX_RESULTS = 10; private final Context mContext; private List<Book> mResults; public BookAutoCompleteAdapter(Context context) { mContext = context; mResults = new ArrayList<Book>(); } @Override public int getCount() { return mResults.size(); } @Override public Book getItem(int index) { return mResults.get(index); } @Override public long getItemId(int position) { return position; } @Override public View getView(int position, View convertView, ViewGroup parent) { if (convertView == null) { LayoutInflater inflater = LayoutInflater.from(mContext); convertView = inflater.inflate(R.layout.simple_dropdown_item_2line, parent, false); } Book book = getItem(position); ((TextView) convertView.findViewById(R.id.text1)).setText(book.getTitle()); ((TextView) convertView.findViewById(R.id.text2)).setText(book.getAuthor()); return convertView; } @Override public Filter getFilter() { Filter filter = new Filter() { @Override protected FilterResults performFiltering(CharSequence constraint) { FilterResults filterResults = new FilterResults(); if (constraint != null) { List<Books> books = findBooks(mContext, constraint.toString()); // Assign the data to the FilterResults filterResults.values = books; filterResults.count = books.size(); } return filterResults; } @Override protected void publishResults(CharSequence constraint, FilterResults results) { if (results != null && results.count > 0) { mResults = (List<Books>) results.values; notifyDataSetChanged(); } else { notifyDataSetInvalidated(); } }}; return filter; } /** * Returns a search result for the given book title. */ private List<Book> findBooks(String bookTitle) { // GoogleBooksService is a wrapper for the Google Books API GoogleBooksService service = new GoogleBooksService (mContext, MAX_RESULTS); return service.findBooks(bookTitle); } }
ステップ2-ツールチップのXMLマークアップを作成する
ヒントが読み込まれると、結果を含むドロップダウンリストが表示されます。 各行は、本の名前と著者の名前の2つの要素で構成されています。
simple_dropdown_item_2line.xml
<?xml version="1.0" encoding="utf-8"?> <TwoLineListItem xmlns:android="http://schemas.android.com/apk/res/android" android:layout_width="match_parent" android:layout_height="wrap_content" android:minHeight="?android:attr/listPreferredItemHeight" android:mode="twoLine" android:paddingStart="?android:attr/listPreferredItemPaddingStart" android:paddingEnd="?android:attr/listPreferredItemPaddingEnd"> <TextView android:id="@+id/text1" android:layout_width="match_parent" android:layout_height="wrap_content" android:layout_marginTop="16dp" android:textAppearance="?android:attr/textAppearanceLargePopupMenu"/> <TextView android:id="@+id/text2" android:layout_width="match_parent" android:layout_height="wrap_content" android:layout_below="@id/text1" android:layout_alignStart="@id/text1" android:layout_marginBottom="16dp" android:textAppearance="?android:attr/textAppearanceSmall"/> </TwoLineListItem>
ステップ3-サーバーにリクエストを送信する前に遅延を追加する
標準のAutoCompleteTextViewを使用すると、各文字が入力された後にリクエストがトリガーされます。 ユーザーが停止せずに入力した場合、後続の各文字を入力するときに、前の要求に対して受信したプロンプトは関係ない場合があります。 これにより、サーバーに対する不要でリソース集約的な呼び出しが生成され、Webサービスが持つAPIの制限を超える可能性があり、クエリ文字列の以前の状態に対して読み込まれた古い結果が返されます。
上記の問題を回避するには、キャラクターを入力してからサーバーにリクエストを送信するまでにわずかな遅延を追加する必要があります。 この遅延の間に人が次の文字を入力すると、前の行の要求はキャンセルされ、遅延の間、繰り越されます。 この時間中にユーザーが行を変更しない場合、リクエストはサーバーに送信されます。
上記の動作を実装するには、AutoCompleteTextViewのカスタム実装を作成し、performFilteringメソッド(CharSequenceテキスト、int keyCode)をオーバーライドする必要があります。 mAutoCompleteDelayフィールドは、ユーザーが新しい文字を入力していない場合にリクエストがサーバーに送信されるまでの時間をミリ秒単位で定義します。
DelayAutoCompleteTextView.java
public class DelayAutoCompleteTextView extends AutoCompleteTextView { private static final int MESSAGE_TEXT_CHANGED = 100; private static final int DEFAULT_AUTOCOMPLETE_DELAY = 750; private int mAutoCompleteDelay = DEFAULT_AUTOCOMPLETE_DELAY; private ProgressBar mLoadingIndicator; private final Handler mHandler = new Handler() { @Override public void handleMessage(Message msg) { DelayAutoCompleteTextView.super.performFiltering((CharSequence) msg.obj, msg.arg1); } }; public DelayAutoCompleteTextView(Context context, AttributeSet attrs) { super(context, attrs); } public void setLoadingIndicator(ProgressBar progressBar) { mLoadingIndicator = progressBar; } public void setAutoCompleteDelay(int autoCompleteDelay) { mAutoCompleteDelay = autoCompleteDelay; } @Override protected void performFiltering(CharSequence text, int keyCode) { if (mLoadingIndicator != null) { mLoadingIndicator.setVisibility(View.VISIBLE); } mHandler.removeMessages(MESSAGE_TEXT_CHANGED); mHandler.sendMessageDelayed(mHandler.obtainMessage(MESSAGE_TEXT_CHANGED, text), mAutoCompleteDelay); } @Override public void onFilterComplete(int count) { if (mLoadingIndicator != null) { mLoadingIndicator.setVisibility(View.GONE); } super.onFilterComplete(count); } }
ステップ4-入力フィールドにアニメーションの進行状況を追加する
ユーザーが入力するときにフィードバックを提供することは非常に重要です。 本のタイトル入力フィールドにアニメーションの進行状況を表示する必要があります。 ヒントが読み込まれ、すぐに表示されることをユーザーに通知するには、進行状況が必要です。 したがって、ユーザーは認識し、表示されるまで待つことができます。 このようなフィードバックがないと、人はフィールドにプロンプトが表示されることを疑うことさえありません。
ProgressBarおよびDelayAutoCompleteTextView要素は、FrameLayoutに配置され、親グループの右側のProgressBarと整列する必要があります。 また、最初にandroid:visibility = "gone"属性を設定して進行状況を隠す必要があります。
<?xml version="1.0" encoding="utf-8"?> <FrameLayout android:layout_width="match_parent" android:layout_height="wrap_content" android:layout_margin="16dp"> <com.melnykov.booktracker.ui.DelayAutoCompleteTextView android:id="@+id/book_title" android:inputType="textCapSentences" android:layout_width="match_parent" android:layout_height="wrap_content" android:paddingRight="32dp" android:imeOptions="flagNoExtractUi|actionSearch"/> <ProgressBar android:id="@+id/progress_bar" style="?android:attr/progressBarStyleSmall" android:layout_width="wrap_content" android:layout_height="wrap_content" android:layout_gravity="center_vertical|right" android:layout_marginRight="16dp" android:visibility="gone"/> </FrameLayout>
ProgressBarは、後者のsetLoadingIndicator(ProgressBarビュー)メソッドを使用してDelayAutoCompleteTextViewに接続します。 プログレス要素の可視性は、プロンプトがロードされるときにView.VISIBLEで設定され、ダウンロードが完了するとView.GONEで設定されます。
ステップ5-コンポーネントの接続
すべての部品の準備ができたので、それらを接続する必要があります。
DelayAutoCompleteTextView bookTitle = (DelayAutoCompleteTextView) findViewById(R.id.book_title); bookTitle.setThreshold(4); bookTitle.setAdapter(new BookAutoCompleteAdapter(context)); bookTitle.setLoadingIndicator((ProgressBar) findViewById(R.id.progress_bar)); bookTitle.setOnItemClickListener(new AdapterView.OnItemClickListener() { @Override public void onItemClick(AdapterView<?> adapterView, View view, int position, long id) { Book book = (Book) adapterView.getItemAtPosition(position); bookTitle.setText(book.getTitle()); } });
bookTitle.setThreshold(4)は、プロンプトを表示するためにユーザーが入力する必要のある最小文字数を定義します。
bookTitle.setLoadingIndicator((ProgressBar)findViewById(R.id.progress_bar))は、ProgressBarをDelayAutoCompleteTextViewに接続します。
DelayAutoCompleteTextViewのOnItemClickListenerを設定し、正しい値を入力フィールドに割り当てることが重要です。 これが行われない場合、選択されたオブジェクトのtoString()メソッドを呼び出した結果は、本の名前の代わりにフィールドに挿入されます。