 おはようございます%ユーザー名%。 少し前に、LibGDXを使用してゆるい鳥のゲームのクローンを作成するための良いチュートリアルに出くわしました。そのシンプルさと詳細からこのチュートリアルが気に入りました。
私はこのおもちゃのクローンを作成するというトピックがそれ自体を食い物にしたことを知っていますが、別の良いチュートリアルが誰かに役立つかもしれません。
チュートリアルは12日間に分かれており、多くの写真、コードのキャンバスが含まれ、ソースコードは日ごとに壊れています。 誰も気にしない、猫へようこそ。
内容
- 1日目-ゆるい鳥-深い分析
- 2日目-libGDXの準備と構成
- 3日目-LibGDXが食べるものを理解する
- 4日目-GameWorld、GameRenderer、および正投影カメラ
- 5日目-死者の飛行-鳥の追加
- 6日目-グラフィック要素の追加-ネクロポリスへようこそ
- 7日目-草、鳥、頭蓋骨とトランペット
- 8日目-衝突検出と音響効果
- 9日目-ゲームプレイと基本的なUIを完成させる
- 10日目-GameStatesとベストスコア
- 11日目-iOS / Android + SplashScreen、メニューおよびトゥイーンのサポートを追加
- 12日目-最終的なUIとソースコード
 1日目-ゆるい鳥-深い分析
ゲームをコピーするには、そのロジック、動作を完全に理解する必要があります。 このセクションでは、ゲームプロセスを十分に正確にエミュレートできるように、さまざまなゲームメカニズムとゆるい鳥のプロセスを分析します。
ゲームプレイのすべての要素を定義してペイントします。 もちろん、これはすべてかなりおおよそであり、一般的に私は完全に誤解される可能性がありますが、繰り返しますが、エミュレーションを成功させるには、ゲームプレイを非常に正確に記述する必要があります。 プレイ中に重大な変更が発生した場合、私はそれらを通知します。
ゲームプレイのすべて-GamePlay
Flappy Birdを繰り返すか、さらに改善するために、ゲームプレイに焦点を当てる必要があります。 対処しなければならない2つの主要なゲームプレイ要素は、BirdとTrumpetsです。 私たちの鳥はゆるい鳥のように移動し、パイプは緑色の「先祖」のように生成され、移動する必要があります。
鳥
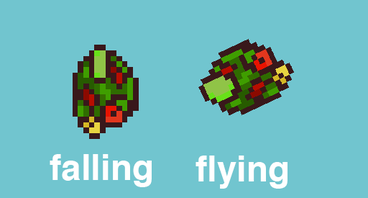
 鳥をすばやく分析すると、その寸法は17ピクセル(幅)x 12ピクセル(高さ)であることがわかります。 また、鳥は7色しか使用せず、ゲーム画面の幅の1/8しか占有しません(目で見ると、画面の幅は約135〜136ピクセルです)。 また、異なる画面幅のデバイスで見栄えがするように鳥がスケーリングされます。 鳥には、ランダムに使用される3つの異なる配色もあります。
 鳥の物理学
このゲームで物理学を実験することは多くの死を伴うことなく困難でしたが、最終的には次のことがわかりました。
- 秋の間に-鳥が加速します。
- しかし、制限があります-鳥はセットリミッターより速く落ちることはできません。
- 画面を突くと、落下の速度に関係なく、鳥は同じ高さの値にジャンプします。
- 鳥は対応する動きの方向、つまり 落下-鳥が見下ろし、離陸-上昇。 アニメーション(羽ばたき)は、鳥が飛ぶときにのみ表示されます。
私たちの主な目標は、元のゲームにできるだけ近いものをすべて作成することです。 すべてのゲームプレイは主に物理学に依存しています。
衝突検出
私たちの鳥の死の条件は何ですか? オリジナルのゲームでそれがどのように実現されたかはわかりません。 しかし、私が見る限り、ピクセル衝突のチェックは私たちのオプションです。 鳥の「ヒットボックス」を作成し、それを使用してパイプとの衝突を判断します。
ヒットボクシングが小さすぎる場合、ゲームは非常に簡単になり、大きな場合、鳥の根拠のない死のために人々は怒ります。
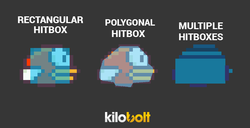 Rectangleを使用してヒットボックスを作成します。
パイプ
 パイプはおそらく適切に行うのが最も難しい部分です。すべてを正しく行うことが非常に重要です。
このおもちゃの魅力のほとんどは、その複雑さです。 クローンの複雑さが元のゲームと多少異なる場合、速度が誤って計算されるか、パイプが一貫して生成されない場合、プレイヤーはゲームから否定的な感情を抱きます。 効果はありません:失望-報酬-中毒。
ある時点で、6本のパイプを生成する必要があります。元のゲームでは、6本を超えるパイプは表示できません。 パイプは同じ間隔で表示されるため、パイプ間の距離は一定になります。 パイプのセットが画面の左の境界線の後ろに消えるとすぐに、パイプの高さを再定義し(詳細は以下)、画面の右の境界線を超えて次のパイプのキューの正しい位置に移動します。
パイプ間の空きスペースの高さ位置は異なりますが、常に同じサイズです。 最も簡単な方法は、それを実装することです-Xに沿って移動するときに、パイプをYに沿ってランダムな値だけシフトします。パイプのロジックを作成するときに、パイプが実際にランダムな値によってシフトするかどうか、およびシフトできる量のパターンを詳細に調べます上下する。
アニメーション
これは非常にシンプルなゲームです。 その中の静的要素は背景と砂です。 彼らは決して変わりません。 鳥は画面の幅の約1/3の水平に固定されています。 Grass(?)そして、パイプはゲーム内で水平方向にスクロールする必要がある唯一の要素であり、同じ速度でスクロールします。 草を作成するのが最も簡単なステップになるので、ここでは説明しません。
さまざまな画面サイズの問題
 私のデバイスでは、鳥は垂直方向の中央にあります(左の写真の赤い線に注意してください)。 これを見て、ゲーム空間のサイズ(または比率)が同じになるように、ゲームが上下に均等に伸びることを提案しました。
3.5インチ画面のiPhoneでゲームをテストしました。このゲームはもともとこのサイズ用に作られたもので、ゲームエリアのサイズは左の写真と同じでした。 そのため、次の原則に従ってさまざまな画面サイズのサポートを実装します。
- アプリケーションの標準として、3.6インチ画面のRetina iPhoneを使用します
- すべてのゲームプレイは、使用される画面の計算から取得された長方形で行われます。
- 鳥のサイズ-17ピクセル(比例的に拡大縮小)
- ゲームの幅〜135ピクセル、比例的にスケーリング(iPhoneでは4.75倍)
- ゲームの高さはデバイスによって異なりますが、競技場の高さ(ゲームプロセス全体が行われる場所)は(960/640)* 135 = 203ピクセルになります。
2日目-libGDXの準備と構成
このセクションでは、libGDXフレームワークを設定します。これにより、ゲームプレイに集中できるように、全体として低レベルのタスクを実行します。
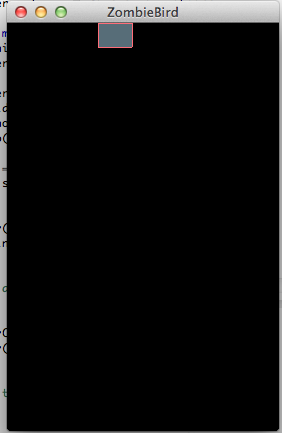
続行する前に、Kiloboltのクリエイティブ部門である左側のゾンビバードをご覧ください。 ゾンビバードは私たちのゲームの主人公です。 いつものように、インストール/構成は、マニュアルの最も退屈な部分です。 libGDXチームのおかげで、このプロセスは迅速かつ簡単です!
Javaのインストール、ADTのダウンロード
Javaがインストールされておらず、Android開発ツールを備えたEclipseがない場合は、 ここにアクセスしてインストールしてください。
libGDXをダウンロードしてプロジェクトを作成する
LibGDXはクロスプラットフォーム開発を提供するため、一度コードを記述し、多くのプラットフォームで使用します。 これはlibGDXアーキテクチャのおかげで可能です。1つのメインJavaプロジェクトで、すべてのファーストクラスコードを作成します(特に、さまざまな種類のインターフェイスを使用)。
各プラットフォームのメインJavaプロジェクトと補助プロジェクトを構成するには、リストアクションを実行します。
- ここをスクロールして、libGDXインストールをダウンロードします。
- ダウンロードするには、次のいずれかの方法をインストールする必要があります。
- Macの場合-jarファイルをダブルクリックしてみてください。
- PCで、ダウンロードしたファイルをデスクトップにコピーし、ターミナル/コンソールを開きます。 次を入力します。
cd path_to_desktop java -jar gdx-setup.jar
- これを行うとすぐに、次のウィンドウが表示されます。

- 以下に示す情報を入力します(上の図に示されているとおり)。プロジェクトフォルダーへのパスを他のものに変更できます。
名前 :ゾンビ鳥
パッケージ :com.kilobolt.zombiebird
ゲームクラス :ZBGame
目的地 :あなたの選択。 この方法だけを覚えてください。
Android SDK : Android SDKの場所。 ADTバンドル( Android Developer Tools :Eclipse + Android SDK)を使用する場合、 sdkはadt-bundleフォルダー内にあります。
プロジェクトのデスクトップ、Android、iOS、およびHTMLが選択されていることを確認し、すべての拡張機能(libGDXのサポート機能が異なる追加のクラス)の選択を解除します。
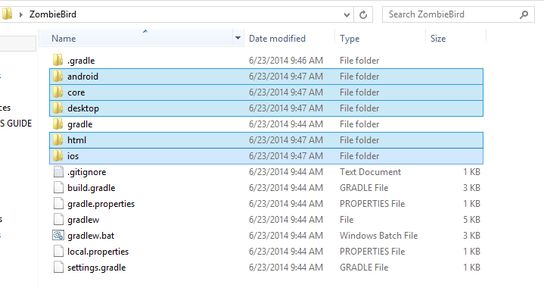
このインストールでは、Destinationパラメーターで指定したパスであるフォルダーに5つのJavaプロジェクトが自動的に作成されます。 メインプロジェクト(コアプロジェクト)は、ゲームのすべてのコードを記述するプロジェクトです。 Android、iOS、およびHTMLプロジェクトは、メインプロジェクトにアクセスし、各プラットフォームに固有の実装で実行します。これは、ゲームがすべてのプラットフォームで動作するために必要です。
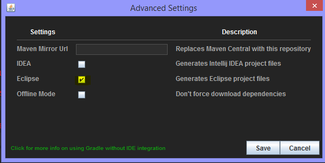
- [詳細設定]をクリックしてEclipseを選択し、Eclipseプロジェクトを生成します。
注: libGDXはGradleと呼ばれるコレクターを使用します。 このビルダーは、プロジェクトのアセンブリを自動化し、.JAR依存関係を管理し、プロジェクト上の他のユーザーとのコラボレーションを簡素化します。 Grandleは別の大きなトピックです。AntやMavenなどのコレクターでの経験が必要です。 どういうわけか、Gradleでの作業に関する記事を公開するかもしれませんが、この記事の枠組み内ではありません。
- 準備ができたらすぐに、「Rushed!」という言葉を使って、「Generate」ボタンをクリックします
- インストーラーはすべての必要なファイルをダウンロードし、プロジェクトを構成します。 次のメッセージが表示されたら、すぐにインストーラーを閉じることができます。

- これで、インストーラー設定で指定したフォルダーに5つのプロジェクトが表示され、Eclipseにインポートできます。 Eclipseを開きます。
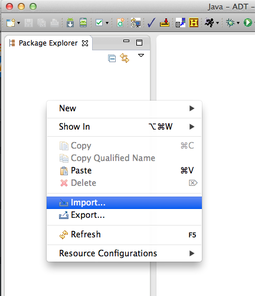
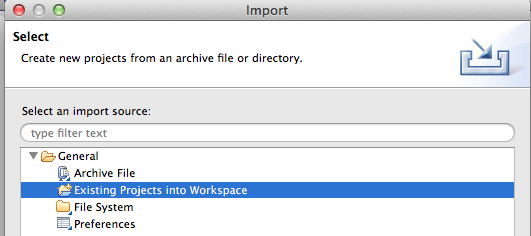
- 以下に示すように、パッケージエクスプローラーで右クリックし、[インポート]を選択します。
- 「一般」>「既存プロジェクトをワークスペースに」を選択します
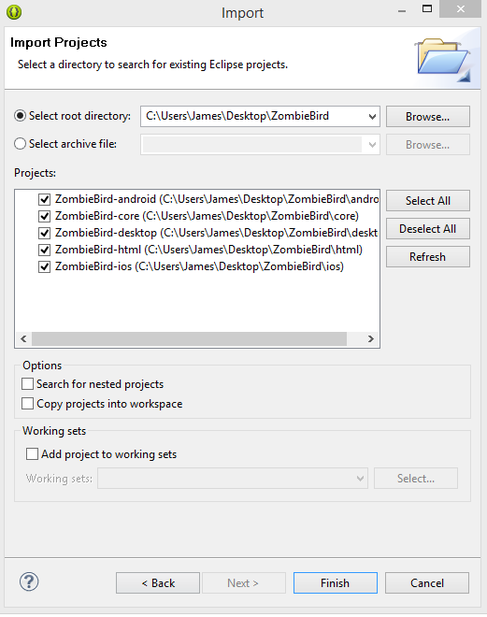
- 「ルートディレクトリの選択」の右側にある[参照]をクリックします。

- プロジェクトフォルダー(6番目の手順で示されるパス)に移動し、[開く]をクリックします。

- 5つのプロジェクトをすべて選択し、[完了]をクリックします。
- 以上で、プロジェクトをEclipseにインポートし、コードを書き始める準備ができました。
エラーメッセージを表示しますか?
EclipseでANDROIDプロジェクトのエラーを宣誓している場合は、このプロジェクトを右クリックして[プロパティ]を選択し、[Android]をクリックして、Androidのバージョンがインストールされていることを確認します。 そうでない場合は、ここをクリックして次の手順に進みます。
II。 バンドルのインストール:Eclipse / Android SDK / Eclipse ADT Plugin 、
現在のレッスンを続ける前に。
- すべてが正しく設定されていることを確認するには、ZombieBird-desktopプロジェクトを開き、DesktopLauncher.javaクラスに移動します。 次のように更新します。
package com.kilobolt.zombiebird.desktop; import com.badlogic.gdx.backends.lwjgl.LwjglApplication; import com.badlogic.gdx.backends.lwjgl.LwjglApplicationConfiguration; import com.kilobolt.zombiebird.ZBGame; public class DesktopLauncher { public static void main (String[] arg) { LwjglApplicationConfiguration config = new LwjglApplicationConfiguration(); config.title = "Zombie Bird"; config.width = 480; config.height = 320; new LwjglApplication(new ZBGame(), config); } }
- デスクトッププロジェクトを右クリックし、[実行]を選択してDesktopLauncherクラスを選択します。

すべてが正しい場合、次が表示されます。
- このポイントに到達した場合、libGDXが正しく機能していることを意味し、さらに続行できます。
3日目-LibGDXが食べるものを理解する
このセクションでは、ゲームの作成中に使用する補助クラスとメソッドを作成します。 ただし、コードを書き始める前に、次の技術的なニュアンスに注意する必要があります。
libGDXはApache 2.0ライセンスを使用します。これにより、オリジナルの作者を参照して、コードを自由に変更および配布できます。 libGDXのすべての組み込みクラスには、Apache 2.0ライセンスに関するコメントがあります。 このレッスンの一部として元のファイルを変更するつもりはなく、ライセンス記述ファイルは既にプロジェクトに含まれているため、ライセンス自体を心配する必要はありません。
ただし、念のため、ここでライセンスを確認してください(このファイルはプロジェクトにあります): http : //www.apache.org/licenses/LICENSE-2.0.html
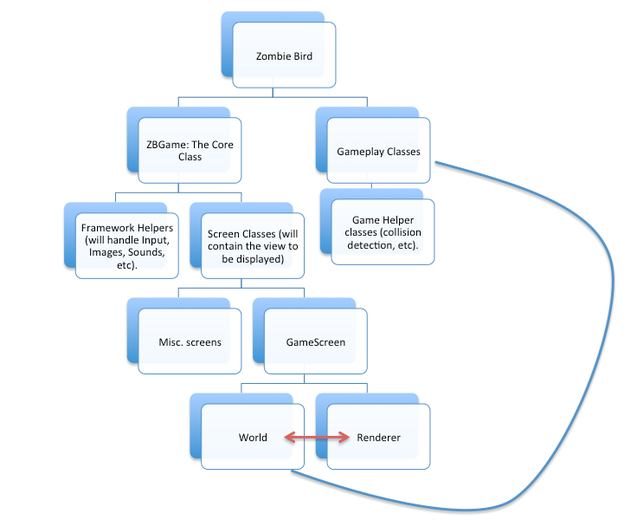
基本構造(ゲームを設計する方法と作成する方法)
少し時間をかけて、ゲームをどのように作成するかを議論しましょう。 以下は、プロジェクトを一般的に表示するチャートです。

チャートのZBGameブランチで作業を開始します。 フレームワークヘルパーとスクリーンクラスを作成します(GameScreenダイアグラム上)。
GameScreenは、WorldとRendererの2つのヘルパークラスに依存しています。 WorldはGameplayクラスと対話し、プレイ中にゲームのオブジェクトを作成します。
上記のすべてが明確な場合-続けましょう。
注意! 次は、レッスン全体で最も概念的に難しい部分になります。
しかし...あなたはそれをスキップすることができます。
あなたは一見してできる限り理解しようとし、質問をし、さらに続けることができます。 このセクションのほとんどの情報は重要ではないため、レッスンのこの部分については考えないでください。 重要でないものにこだわるのは意味がありません。
何か困惑した場合は、「 コードを書く 」の部分までさらに大胆にスクロールしてください。 Zombie Birdゲームを作成できます。
自信がありますか? 読んでください。 神経質? さらにスクロールします。
拡張して実装します(スキップできます)
継承をメモリ内で更新する必要がある場合は、 ここに渡します 。
インターフェースは要件のリストであり、実装のないメソッドの名前であることを思い出させてください。 インターフェイスは、このクラスがインターフェイスと同じタイプになる場合に備えて、一部のクラスが実装する必要があるすべてのメソッドをリストします(メソッドの説明、メソッドの本体を提供します)。 Javaライブラリには、Listというインターフェイスが含まれていますが、それ自体は機能を提供しません。 Listインターフェイスは、Listオブジェクトカテゴリに割り当てるために別のクラスが実装する必要があるメソッドをリストするファイルです。
たとえば、Listインターフェイスのすべてのメソッドには、次のものがあります。
- list.get(int index)。指定されたインデックスを持つアイテムを返します。
- list.add()、リストの最後にアイテムを追加します。
- list.isEmpty()。Listが空の場合にtrueを返します。
ArrayListという新しいクラスを作成しましょう。 このクラスは、Listインターフェース、つまり list.add()やlist.get(int index)など、Listインターフェイスのすべてのメソッドを実装する必要があります。
Listインターフェースのメソッドの実装をArrayListクラスに追加すると、以下に示すように、クラスはListクラスであるかのように自身を形成できます。
List<String> strings = new ArrayList<String>();
List型の文字列変数がArrayListとして作成されたことに注意してください。 つまり この変数は、必要に応じてリストのように、またはArrayListとして機能できます。
文字列はListインターフェースの実装であることがわかっているため、文字列にこのインターフェースのすべてのメソッドが含まれていることを確認できます。 これにより、List型のオブジェクトを何らかのメソッドに渡す必要がある場合は、stringsという名前のArrayList型のオブジェクト(ポリモーフィズム)を安全に渡すことができます。
public void printLastWordFrom(List<String> someList) { if (someList.isEmpty()) { System.out.println("Your list is empty."); return; } String lastWord = someList.get(someList.size() - 1)); System.out.println("Your last word is" + lastWord); }
これらの原則は、開発プロセスの後半で使用するため、知っておく必要があります。
このチュートリアルで使用される規則(読むことが重要です!)
レッスンでは、libGDXライブラリのビルトインクラス、たとえば以下のGameクラスについて何度か言及します。 これらのクラスはライブラリに組み込まれているため、自分で作成する必要はありません。 言及するクラスを参照してください。 これらのクラスはすべてApache 2.0でライセンスされており、作成者はすべてhttps://github.com/libgdx/libgdx/blob/master/gdx/AUTHORSにリストされています 。
組み込みクラスの場合、コメントのコードの見出しにBuilt-inを記述します。
以下のGameクラスをチェックしてください。コピーしたり再入力したりする必要はなく、一目見ただけです。
ゲームクラス
//Built-in public abstract class Game implements ApplicationListener { private Screen screen; @Override public void dispose () { if (screen != null) screen.hide(); } @Override public void pause () { if (screen != null) screen.pause(); } @Override public void resume () { if (screen != null) screen.resume(); } @Override public void render () { if (screen != null) screen.render(Gdx.graphics.getDeltaTime()); } @Override public void resize (int width, int height) { if (screen != null) screen.resize(width, height); } /** Sets the current screen. {@link Screen#hide()} is called on any old screen, and {@link Screen#show()} is called on the new * screen, if any. * @param screen may be {@code null} */ public void setScreen (Screen screen) { if (this.screen != null) this.screen.hide(); this.screen = screen; if (this.screen != null) { this.screen.show(); this.screen.resize(Gdx.graphics.getWidth(), Gdx.graphics.getHeight()); } } /** @return the currently active {@link Screen}. */ public Screen getScreen () { return screen; } }
ゲームクラスを探索する(スキップできます)
GameクラスはApplicationListenerインターフェイスの実装です。このクラスは、コードと、デバイスで直接実行されるプラットフォーム固有のアプリケーションとの間のインターフェイスになります。
たとえば、Androidがアプリを起動すると、ApplicationListenerがチェックされます。 私たちの側では、必要なインターフェースを実装するGameオブジェクトを提供できます。
小さな機能のみがあります。 Gameクラスは抽象であることに注意してください。 これは、GameクラスがApplicationListenerインターフェースからのすべてのメソッドを実装するわけではないことを意味します。自分で実装する必要があります。
Gameクラスのコンテンツをコピーし、欠落しているメソッドを実装できます。create()メソッドのみが欠落しています。 ただし、これを行わないために、Gameクラスを継承する独自のクラスを作成します。
継承は、インターフェイスを実装するよりもはるかに簡単です。 抽象クラスGameを取得し、Gameクラスのすべてのパブリックメソッドと変数をサブクラスの一部であるかのように継承するサブクラスを作成します。 そして、独自のメソッドをサブクラスに追加できます。
クラスを作成しましょう。
コードを書いています! (ついに!)
 2日目に作成したZBGame.javaを開きます。 クラス内のすべてのメソッドとすべての変数を削除します。 コードは次のようになります。
package com.kilobolt.zombiebird; public class ZBGame { }
Gameクラスを拡張する
ゲームの基本クラスを拡張します。これは、コードとプラットフォームに依存しないコード(iOS、Androidなど)の間のブリッジになります。
- 拡張ゲームを追加
- 次のインポートを追加します。
import com.badlogic.gdx.Game;
インポートとは、次のことを意味します。「ねえ、コンパイラ、ここで私が参照するGameクラスの完全なアドレスです。」 Gameという名前の多くのクラスが存在する可能性があり、使用するGameという名前のクラスを示す必要があるため、これを行う必要があります。
package com.kilobolt.ZombieBird; import com.badlogic.gdx.Game; public class ZBGame extends Game { }
Eclipseは次の警告を発行します。
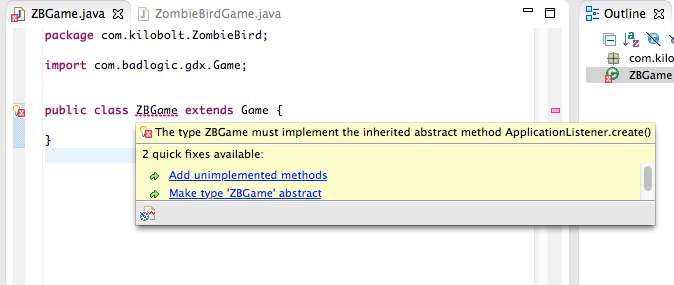
これは、ZBGameクラスがGameクラスになるための要件があることを意味します。つまり、クラスはcreate()メソッドを実装する必要があります。 [未実装のメソッドを追加]をクリックすると、このメソッドが自動的にクラスに追加されます。 新しいメソッドにコード行を追加しましょう:
(注意、System.out.println()の代わりにGdx.app.logを使用します。Gdx.app.logメソッドは、コンソールに値を出力するために使用されます。このメソッドは、プラットフォームごとに独自の方法で実装されます(Androidでは、このメソッドLogクラスを使用します。Javaでは、System.out.println()を使用します。このメソッドのパラメーターには、クラス名とメッセージ本文を指定できます)。
package com.kilobolt.zombiebird; import com.badlogic.gdx.Game; import com.badlogic.gdx.Gdx; public class ZBGame extends Game { @Override public void create() { Gdx.app.log("ZBGame", "created"); } }
数分間、速度を落とさないようにしましょう...
ZBGameクラスがGame型のオブジェクトである必要があるのはなぜですか?
理由その1 :
前述したように、libGDXはプラットフォーム固有のコードの実装を隠しています。 iOS / Android / HTML / Windows / Mac用に記述する必要のあるすべてのコードは、すでに作成されています。 ゲーム開発者として、ビジネスロジックを処理する必要があります。これを行うには、ApplicationInterfaceを作成します。
Gameクラス(サブクラスApplicationInterface)を拡張すると、ZBGameはコードとアプリケーションが実行されるプラットフォームとの間のインターフェイスになります。 Android、iOS、HTMLなどの背後にあるすべてのコード ZBGameクラスと通信し、一緒に不思議な仕事をすることができます。
理由その2 :
上記に加えて、ZBGameはGameクラスからすべての便利なメソッドにアクセスできます(忘れた場合は上にスクロールします)。
一般的に、これは最初の理由を指します。 これらのメソッドは、クロスプラットフォームコードをひきつけます。
プラットフォームの1つでアプリケーションを実行すると、クロスプラットフォームコードがcreate()メソッドを実行し、「created」がコンソールに表示されます。
これが何を意味するのか見てみましょう。
最初の画面(後でチャートからGameScreenになります)を作成し、ZBGameで使用します。
GameScreen Creation
メイン(CORE)ZombieBirdプロジェクト内のsrcフォルダーを右クリックして、com.kilobolt.screensという新しいJavaパッケージを作成します。
その中に、新しいクラスを作成し、Screenクラスをインポートします。
package com.kilobolt.screens; import com.badlogic.gdx.Screen; public class GameScreen implements Screen { }
Screenインターフェースからメソッドを実装する必要があります。 「ZBGameで既に行ったように」「未実装のメソッドを追加する」をクリックするか、以下のようにメソッドを追加して、自動生成を使用できます。 各メソッドにGdx.app.log()を追加します。
ゲーム画面
package com.kilobolt.screens; import com.badlogic.gdx.Gdx; import com.badlogic.gdx.Screen; import com.badlogic.gdx.graphics.GL20; public class GameScreen implements Screen { public GameScreen() { Gdx.app.log("GameScreen", "Attached"); } @Override public void render(float delta) { // Sets a Color to Fill the Screen with (RGB = 10, 15, 230), Opacity of 1 (100%) Gdx.gl.glClearColor(10/255.0f, 15/255.0f, 230/255.0f, 1f); // Fills the screen with the selected color Gdx.gl.glClear(GL20.GL_COLOR_BUFFER_BIT); } @Override public void resize(int width, int height) { Gdx.app.log("GameScreen", "resizing"); } @Override public void show() { Gdx.app.log("GameScreen", "show called"); } @Override public void hide() { Gdx.app.log("GameScreen", "hide called"); } @Override public void pause() { Gdx.app.log("GameScreen", "pause called"); } @Override public void resume() { Gdx.app.log("GameScreen", "resume called"); } @Override public void dispose() { // Leave blank } }
GameScreenの使用をZBGameクラスに追加します
ZBGameクラスの現在の画面を、作成したGameScreenクラスのオブジェクトにしましょう。 これを行うには、ZBGame.javaファイルに戻ります。
- create()メソッドに次を追加します。
setScreen(new GameScreen());
注:setScreen()メソッドは、継承のおかげで使用可能です!
- GameScreenクラスをインポートします。
import com.kilobolt.screens.GameScreen;
package com.kilobolt.zombiebird; import com.badlogic.gdx.Game; import com.badlogic.gdx.Gdx; import com.kilobolt.screens.GameScreen; public class ZBGame extends Game { @Override public void create() { Gdx.app.log("ZBGame", "created"); setScreen(new GameScreen()); } }
これでゲームを起動できます(このため、いつものように、ZombieBird-デスクトッププロジェクトに移動し、DesktopLauncherを実行します)。 美しい青い窓が表示されます。
コンソールに表示される内容を見てください。
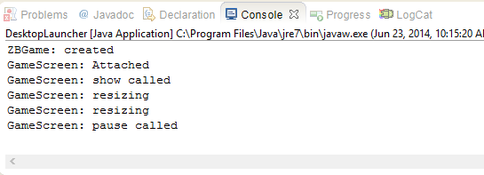
これは最もクールなレッスンではなかったと理解していますが、少し時間をかけてコードを確認し、すべての行を確認してください。
重要なことは、これらのメソッドを自分で呼び出さないことです。 この作業はlibGDXに任せました。
各メソッドの実行順序を理解することは非常に重要です。そうすることで、正しい時間でオブジェクトを作成し、ゲーム内でスムーズに移行できます。
準備ができたら、先に進みましょう。 次のパートでは、ゲームプレイの作成を開始します。
1日あたりのソースコード
自分でコードを書く気がない場合は、ここからダウンロードしてください。
4日目-GameWorld、GameRenderer、および正投影カメラ
4日目へようこそ! このセクションでは、GameScreenの2つのヘルパークラスを作成して、ゲームプレイの作成を開始できるようにします。 その後、ゲームに正投影カメラといくつかのフィギュアを追加します!
クイックリマインダー
libGDXインストーラーを使用して生成した5つのJavaプロジェクトがあります。 ただし、一般的に、ゲームの作成中に使用するのは3つだけです。
- クラスを開くか、新しいパッケージを作成するように依頼する場合は、ZombieBirdプロジェクトの一部として実行してください。
- プロジェクトを開始するように依頼する場合、ZombieBird-desktopプロジェクトを開き、DesktopLauncherクラスを実行します。
- 写真や音声を追加する必要がある場合は、それらをAssetsフォルダーのZombieBird-androidプロジェクトに追加します。 他のすべてのプロジェクトは、このフォルダーの内容のコピーを受け取ります。
GameScreenクラスの探索
Eclipseを起動し、GameScreenクラスを開きます。 3日目に、このクラスの各メソッドが起動される方法とタイミングについて説明しました。 このクラスに小さな変更を加えましょう。 render()メソッドを見てください。 デルタ引数が1つあり、float型です。 なぜそれが必要なのかを理解するには、次の行をメソッドに追加します。Gdx.app.log( "GameScreen FPS"、(1 / delta)+ ""); :
@Override public void render(float delta) { // (RGB = 10, 15, 230), 1 (100%) Gdx.gl.glClearColor(10/255.0f, 15/255.0f, 230/255.0f, 1f); // Gdx.gl.glClear(GL20.GL_COLOR_BUFFER_BIT); // Gdx.app.log("GameScreen FPS", (1/delta) + ""); }
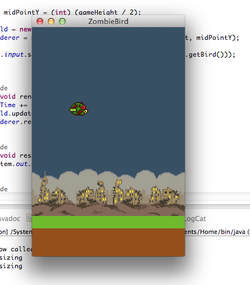
ゲーム(デスクトッププロジェクト内のDesktopLauncher.java)を開始してみてください。 以下が表示されます。
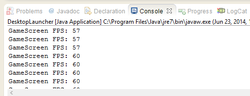
フロートデルタは、最後のレンダリングメソッドが実行されてから経過した秒数(通常は非常に小さい値)です。 値1 / deltaをコンソールに出力するように要求したとき、それは1秒以内にrenderメソッドが呼び出される回数を意味していました。 この値は、FPSと同等です。
ダックスフント、 レンダリングメソッドがゲームループと見なすことができることが明らかになったと思います 。 ゲームループでは、次の2つのことを行います。
まず、すべてのゲームオブジェクトを更新します。 次に、これらのオブジェクトを描画します。
OOP原則と設計パターンを使用するには、次の原則に従う必要があります。
- GameScreenは1つのことを行う必要があるため、...
- ゲームオブジェクトの更新は補助クラスの肩にあるべきです。
- ゲームオブジェクトの描画は、 別のヘルパークラスの責任である必要があります。
いいね! 2つのヘルパークラスが必要です。 GameWorldとGameRendererという視覚的な名前を付けます。
com.kilobolt.gameworldという新しいパッケージを作成し、その中にこれらの2つのクラスを作成します。 しばらく空白のままにします。
GameWorld.java
| Gamerenderer.java
|
GameScreenでは、 更新とレンダリングをそれぞれGameWorldクラスとGameRendererクラスに委任します。 起動するには、次の手順を実行します。
- GameScreenの作成中に、GameWorldやGameRendererなどの2つの新しいオブジェクトを作成する必要があります。
- GameScreenクラスのrenderメソッド内で、GameWorldクラスとGameRendererクラスの更新とレンダリングをそれぞれ要求する必要があります。
あなたがこれで立ち往生した場合、私は今あなたにそれを行うように頼みます-下にスクロールします
1. GameWorldおよびGameRendererの作成
GameScreenを開きます。 クラスコンストラクターでGameWorldおよびGameRendererオブジェクトを作成します。 render()メソッドでそれらのメソッドを呼び出します。 これを行うには:
- インスタンスオブジェクトには2つの変数が必要です(これらの変数はクラス内のどこからでも利用できるはずです)。 クラスヘッダーで次を宣言します。
private GameWorld world; private GameRenderer renderer;
- GameScreenはコンストラクターで作成されます。コンストラクター内に次の行を追加して、変数を初期化します。
world = new GameWorld(); // initialize world renderer = new GameRenderer(); // initialize renderer
- 必要なインポートを追加します。
import com.kilobolt.gameworld.GameRenderer; import com.kilobolt.gameworld.GameWorld;
2. GameWorldにGameRendererの更新と描画を依頼します
クラスの存在の全体の本質GameWorldとGameRendererことGameScreenは、アップグレードを行うと、自分自身をレンダリングするべきではありません。彼はこれを行うためにヘルパークラスを要求する場合があります。
renderメソッドのすべてのコードを次のものに置き換えます。
// delta update , , - world.update(delta); // GameWorld updates renderer.render(); // GameRenderer renders
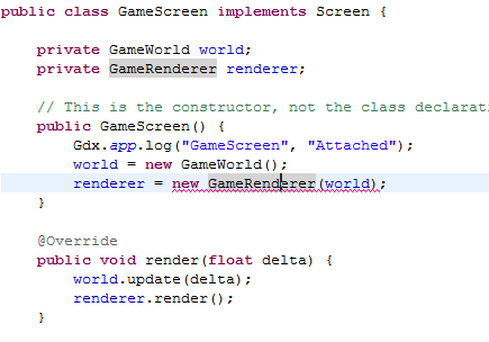
GameScreenは次のようになります。
GameScreen.java
package com.kilobolt.screens; import com.badlogic.gdx.Gdx; import com.badlogic.gdx.Screen; import com.badlogic.gdx.graphics.GL20; import com.kilobolt.gameworld.GameRenderer; import com.kilobolt.gameworld.GameWorld; public class GameScreen implements Screen { private GameWorld world; private GameRenderer renderer; public GameScreen() { Gdx.app.log("GameScreen", "Attached"); world = new GameWorld(); renderer = new GameRenderer(); } @Override public void render(float delta) { world.update(delta); renderer.render(); } @Override public void resize(int width, int height) { } @Override public void show() { Gdx.app.log("GameScreen", "show called"); } @Override public void hide() { Gdx.app.log("GameScreen", "hide called"); } @Override public void pause() { Gdx.app.log("GameScreen", "pause called"); } @Override public void resume() { Gdx.app.log("GameScreen", "resume called"); } @Override public void dispose() { // } }
あなたがupdateメソッドで宣言されていないことをEclipseのrugnetsya GameWorldをしてでレンダリングGameRenderer。それをやってみましょう:
ゲームワールド
| ゲーマーレンダラー
|
ゲームを開始してみてください(デスクトッププロジェクトのDesktopLauncherクラス)。
注意:ゲームがちらつくことがあります(何も描画しません)。
コンソールに次のように表示されます。

素晴らしい。まとめ:2つのタスク(ゲームの更新とレンダリング)を委任したので、GameScreenはそれについて心配する必要はありません。もう一度チャートを見てみましょう(現在の位置がわかりますか?):
小さな変更を加える必要があります。私たちのGameRendererがへのアクセスが必要GameWorldを、彼が描画されます。これを行うには、「GameRendererとGameWorldの両方にアクセスできるのは誰ですか?」と自問してください。図を見ると、これがGameScreenであることがわかります。それを開いて、コンストラクタに次の変更を加えましょう。
// , public GameScreen() { Gdx.app.log("GameScreen", "Attached"); world = new GameWorld(); renderer = new GameRenderer(world); }
おっと、EclipseはGameRendererクラスのコンストラクターの誤用を誓います。それを変えましょう。GameRendererクラスを
開きます。GameRendererクラス内の変数として世界を保存する必要があります。これにより、将来GameGameのオブジェクトが必要になったときにworld変数を使用できるようになります。
- 変数を作成します。
private GameWorld myWorld;
- コンストラクター内で、新しい引数を追加し、その値をmyWorld変数に割り当てます。
package com.kilobolt.gameworld; import com.badlogic.gdx.Gdx; public class GameRenderer { private GameWorld myWorld; public GameRenderer(GameWorld world) { myWorld = world; } public void render() { Gdx.app.log("GameRenderer", "render"); } }
しばらくコードを書くことから注意をそらす
私たちがやったことを理解するのに多くの時間を費やさないでください。コードを確認し、使用した3つのクラスの間に3方向の関係があることを確認してください。GameScreen、GameWorld、およびGameRendererクラスの役割と、それらがどのように連携するかを理解してください。
続行する準備はできましたか?
このチュートリアルでは、GameObjectの作成方法と実装方法を示すために、他のことを行います。しかし、まず、正投影カメラについて説明します。
正投影カメラ
libGDXは、3Dゲームを作成するためのフレームワークです。しかし、私たちのゲームは2Dになります。これはすべて私たちにとって何を意味するのでしょうか?一般に、何もありません。正射投影カメラと呼ばれるものを使用できるからです。
あなたが見ることができる多くの2Dゲームは、実際には3Dで作られています。多くの最新のプラットフォーマー(ピクセルアートを使用するものも含む)は、3Dエンジンを使用して描画され、開発者は2Dよりも3Dでより多くのシーンを作成します。
たとえば、彼女のファンが作ったマリオを見てください。このゲームでは、3Dモデルを使用して全世界が構築されました。
上記のマリオ2.5Dでプレイすると、ゲームが3Dであることが明らかになります。キャラクターには「深さ」があります。
このゲームを2Dで作成するには、ゲームを正面から見られるようにカメラを回転させる必要があります。信じられないかもしれませんが、ゲームは3Dのままです。自分でプレイしてみてください。
なぜそう3D環境(周囲を見る)では、遠くにあるオブジェクトは観察者には小さく見えるためです。それにも関わらず、マリオでは垂直の角度から見ると、この3Dワールドの一部のオブジェクト(レンガ/ブロックなど)は、私たちに近い(カメラに近い)ブロックよりも小さくなります。
それはまさにそのような場合で、正射投影カメラがシーンに表示されます。正投影を使用すると、ステージ上のすべてのオブジェクトは、それらの遠隔性に関係なく、1本のバーの下に投影されます。ステージ上のすべてのオブジェクトが覆われた大きなキャンバスを想像してください。キャンバスとの接触により、これらのオブジェクトは固定された画像サイズで平らになります。これが正投影カメラが提供するものであり、これが3D空間で2Dゲームを作成する方法です。
そして、ここで使用する場合はゲームルックスは、どのようだ正射投影カメラ:
使用して正射投影カメラを、我々が観察するための単一の平面内に3Dを投影することができます。
3D空間とカメラの投影に関するこの話であなたを怖がらせなかったことを願っています。コードを記述すると、すべてを理解できます。実際、すべてが非常に単純です。それでは、ゲームにカメラを追加しましょう。
デスクトッププロジェクトのDesktopLauncher.javaに別の変更を追加してみましょう(ゲームの起動に使用します)。画面の解像度を変更します。
package com.kilobolt.zombiebird.desktop; import com.badlogic.gdx.backends.lwjgl.LwjglApplication; import com.badlogic.gdx.backends.lwjgl.LwjglApplicationConfiguration; import com.kilobolt.zombiebird.ZBGame; public class DesktopLauncher { public static void main (String[] arg) { LwjglApplicationConfiguration config = new LwjglApplicationConfiguration(); config.title = "Zombie Bird"; config.width = 272; config.height = 408; new LwjglApplication(new ZBGame(), config); } }
カメラを作成する
GameRendererクラスを開きます。その中で、新しい正投影カメラオブジェクトを作成します。
- クラスで変数を宣言します。
private OrthographicCamera cam;
- インポートを追加:
import com.badlogic.gdx.graphics.OrthographicCamera;
- コンストラクター内でオブジェクトのインスタンスを作成します。
cam = new OrthographicCamera(); cam.setToOrtho(true, 136, 204);
3つの引数の意味は次のとおりです。
- 正投影を使用しますか(必要です)
- 幅はどうあるべきか
- 高さはどうですか
これがゲーム世界の大きさです。後で、コードのこの部分に変更を加えます。これまで、例としてこのコードを作成しました。DesktopLauncher.javaでゲームの割り当てを次の272 x 408に設定することを忘れないでください。これは、ゲームに含まれるすべてのものが、レンダリング時に2倍にスケーリングされることを意味します。
ShapeRendererを作成する
カメラをテストするために、ShapeRendererタイプのオブジェクトを作成し、シェイプとラインを描画します。この機能はlibGDXによって提供されます!
GameRendererの内部:
- クラスで変数を宣言します。
private ShapeRenderer shapeRenderer;
- インポートを追加:
import com.badlogic.gdx.graphics.glutils.ShapeRenderer;
- shapeRendererを初期化し、クラスコンストラクター内でカメラにバインドします。
shapeRenderer = new ShapeRenderer(); shapeRenderer.setProjectionMatrix(cam.combined);
その結果、次のものが必要になります。
package com.kilobolt.gameworld; import com.badlogic.gdx.Gdx; import com.badlogic.gdx.graphics.OrthographicCamera; import com.badlogic.gdx.graphics.glutils.ShapeRenderer; public class GameRenderer { private GameWorld myWorld; private OrthographicCamera cam; private ShapeRenderer shapeRenderer; public GameRenderer(GameWorld world) { myWorld = world; cam = new OrthographicCamera(); cam.setToOrtho(true, 136, 204); shapeRenderer = new ShapeRenderer(); shapeRenderer.setProjectionMatrix(cam.combined); } public void render() { Gdx.app.log("GameRenderer", "render"); } }
私たちのShapeRenderer準備は、のは、レンダリングすることができるようになります何かを作成してみましょう!GameRenderer内に正方形のオブジェクトを作成できますが、これは設計原則に違反しています。GameWorld内にすべてのゲームオブジェクトを作成し、GameRendererでレンダリングする必要があります。
GameWorldを開き、次の変更を行います。
package com.kilobolt.gameworld; import com.badlogic.gdx.Gdx; import com.badlogic.gdx.math.Rectangle; public class GameWorld { private Rectangle rect = new Rectangle(0, 0, 17, 12); public void update(float delta) { Gdx.app.log("GameWorld", "update"); rect.x++; if (rect.x > 137) { rect.x = 0; } } public Rectangle getRect() { return rect; } }
新しいRectangleを作成し、rectという名前を付け、import:com.badlogic.gdx.math.Rectangleというインポートも追加しました。一部のプラットフォームでは使用できないため、Java Rectangleを使用しないことに注意してください(gdx.math.Rectangleの実装により、プラットフォームに応じて正しいRectangleが作成されます)。
また、Rectangleにプライベートの可視性を追加し、GameWorldオブジェクトの外部でRectangleにアクセスするためのgetメソッドを追加しました(ゲッターを使用した理由の良い説明はこちらにあります)。次に、rectを移動するコードを追加しました
右に(そして開始位置に戻ります)!
Rectangleを描画する準備ができたので、GameRendererに戻ることができます。GameRendererを開き、レンダリングメソッドに変更を追加します(メソッドを3つのメインセクションに分割しました。コメントを読んで、何が起こっているのかを理解してください)。
Gamerenderer.java
package com.kilobolt.gameworld; import com.badlogic.gdx.Gdx; import com.badlogic.gdx.graphics.GL20; import com.badlogic.gdx.graphics.OrthographicCamera; import com.badlogic.gdx.graphics.glutils.ShapeRenderer; import com.badlogic.gdx.graphics.glutils.ShapeRenderer.ShapeType; public class GameRenderer { private GameWorld myWorld; private OrthographicCamera cam; private ShapeRenderer shapeRenderer; public GameRenderer(GameWorld world) { myWorld = world; cam = new OrthographicCamera(); cam.setToOrtho(true, 136, 204); shapeRenderer = new ShapeRenderer(); shapeRenderer.setProjectionMatrix(cam.combined); } public void render() { Gdx.app.log("GameRenderer", "render"); /* * 1. , */ Gdx.gl.glClearColor(0, 0, 0, 1); Gdx.gl.glClear(GL20.GL_COLOR_BUFFER_BIT); /* * 2. */ // shapeRenderer shapeRenderer.begin(ShapeType.Filled); // RGB Color 87, 109, 120, shapeRenderer.setColor(87 / 255.0f, 109 / 255.0f, 120 / 255.0f, 1); // myWorld ( ShapeType.Filled) shapeRenderer.rect(myWorld.getRect().x, myWorld.getRect().y, myWorld.getRect().width, myWorld.getRect().height); // shapeRenderer // shapeRenderer.end(); /* * 3. */ // shapeRenderer shapeRenderer.begin(ShapeType.Line); // RGB Color 255, 109, 120, shapeRenderer.setColor(255 / 255.0f, 109 / 255.0f, 120 / 255.0f, 1); // myWorld (Using ShapeType.Line) shapeRenderer.rect(myWorld.getRect().x, myWorld.getRect().y, myWorld.getRect().width, myWorld.getRect().height); shapeRenderer.end(); } }
バグはありませんか? いいね! 以下の画像のようなものが表示されるはずです。
あまり時間をかけずに、コードを試してください。フォームの描画方法を学んだ場合は、次に描画する画像を描画できます。
私は進歩が非常に遅いことを知っていますが、私はゲームの開発のペースを上げていると信じています、今では基本的なGameScreenがあります!
1日あたりのソースコード
あなたは、コードを自分で書くことが気分の外にある場合は、こちらからダウンロード:
5日目-死者の飛行-鳥の追加
このセクションでは、鳥をゲームに追加します。
私たちの主人公について少し話しましょう。フラップは面白い赤い鳥で、下水道で誰かがノックするまでそのビジネスを行き来します。しかし、今ではフラップスが戻ってきて、あなたの後ろを非常によく見ています!(申し訳ありませんが、カイル、これは今まで見た中で一番uい鳥です)。
これで、メインキャラクターに精通しました。飛ぶように彼に教えましょう。
記憶をリフレッシュする
libGDXインストーラーを使用して生成した5つのJavaプロジェクトがあります。ただし、次の3つのプロジェクトですべての魔法を実行します。
- クラスを開くか、新しいパッケージを作成するように要求した場合、ZombieBirdプロジェクトで実行します。
- 私はあなたのコードを実行するように依頼した場合、プロジェクトZombieBirdの開いてデスクトップをし、実行しDesktopLauncher.javaを。
- 画像またはサウンドを追加する場合、それらをAssets フォルダーのZombieBird- androidプロジェクトに追加します。他のすべてのプロジェクトには、このフォルダーへのポインターがあります。
座標系
Y-Down座標系を使用することを言及するのを忘れました(おそらく既にご存知でしょう)。これは、左上隅に座標(0、0)があることを意味します。
これはどういう意味ですか?私たちの鳥はYの正の加速度になるなら、それは飛ぶだろうダウン。
画面解像度
私たちのゲームは、iPhoneからiPad、そして多くのAndroidデバイスで動作します。画面解像度を正しく処理する必要があります。
これを実現するために、ゲームを136ピクセルの固定幅に設定します。高さは動的に決定されます!デバイスの画面解像度を決定した後、ゲームの高さを設定します。
Bird.javaクラスの作成
フラップには独自のクラスが必要です。やってみましょう。
新しいパッケージを作成してcom.kilobolt.gameobjectsという名前を付け、その中にBirdクラスを作成します。
クラスの
変数:Birdには次の変数が必要です:位置、速度、加速度(これについては後で説明します)。また、幅と高さだけでなく、鳥の回転角度の値も保存する必要があります。
private Vector2 position; private Vector2 velocity; private Vector2 acceleration; private float rotation; // private int width; private int height;
Vector2は、 libGDXに組み込まれている非常に強力なクラスです。数学のベクトルが苦手な場合でも心配しないでください!ここでは、Vector2を2つの変数xおよびyのコンテナとして使用します。
position.xは、 -軸Xの位置を決定し、velocity.y Y.軸の速度を担う加速度 -このパラメータは、我々の速度を制御し、より大きな加速度、速度より大きい。
このおridgeはすべて、少し後でより透明になります。
コンストラクター
Birdを作成するには何が必要ですか?位置の値と鳥のサイズが必要です。
public Bird(float x, float y, int width, int height) { this.width = width; this.height = height; position = new Vector2(x, y); velocity = new Vector2(0, 0); acceleration = new Vector2(0, 460); }
BirdオブジェクトはGameWorldに保存されます。次のメソッドが必要です。
- GameWorldの更新中に実行される更新メソッド
- 画面上でクリック/タッチを実行するonClickメソッド
また、Birdオブジェクトのいくつかの変数にアクセスするためのメソッドを作成する必要があります。
Bird.java
package com.kilobolt.gameobjects; import com.badlogic.gdx.math.Vector2; public class Bird { private Vector2 position; private Vector2 velocity; private Vector2 acceleration; private float rotation; // For handling bird rotation private int width; private int height; public Bird(float x, float y, int width, int height) { this.width = width; this.height = height; position = new Vector2(x, y); velocity = new Vector2(0, 0); acceleration = new Vector2(0, 460); } public void update(float delta) { velocity.add(acceleration.cpy().scl(delta)); if (velocity.y > 200) { velocity.y = 200; } position.add(velocity.cpy().scl(delta)); } public void onClick() { velocity.y = -140; } public float getX() { return position.x; } public float getY() { return position.y; } public float getWidth() { return width; } public float getHeight() { return height; } public float getRotation() { return rotation; } }
上記のロジックは非常に単純です。Birdクラスのupdateメソッドが実行されるたびに、次の2つのことを行います。
- 速度ベクトルにスケーリングされた加速度ベクトルを追加します(これに戻ります)。したがって、新しい速度が得られます。したがって、原則として、重力は機能します。引力の速度は毎秒9.8 m / sずつ増加します。
- Flappy Bird物理学には最大速度制限があることに注意してください。実験後、velocity.yの最大値を200 に設定しました。
- ( ).
パラグラフ1および3の「スケーリングされた」とはどういう意味ですか?加速度と速度をデルタで乗算します。これは、更新メソッドが最後に実行されてから経過した時間です。これは正規化効果です。
何らかの理由でゲームの速度が低下し始めると、デルタが増加します(プロセッサが最後のサイクルを完了するか、繰り返し、またはより長い時間繰り返します)。ベクターをデルタでスケーリングすることにより、フレームレートからの独立性を実現できます。更新方法が2倍実行された場合、単に2ずつ増加した速度でキャラクターをシフトします。
これらの原則は後ほど適用します!
鳥の準備ができました。GameWorldでリリースしましょう!
ご注意
新しいObjectを作成するたびに、このオブジェクト用にRAMに多くのメモリを割り当てません(より正確にはHeapに)。ヒープがオーバーフローするとすぐに、ガベージコレクター(以降GC、ガベージコレクター /コレクター)と呼ばれるルーチンがシーンに入り、メモリ不足の状況を回避するためにメモリをクリーンアップします。これはクールですが、ゲームを作成するときはそうではありません。GCの実行中、ゲームは数ミリ秒の間スローダウンし始めます。GCの頻繁な操作を回避するには、可能であれば、新しいオブジェクトの作成を避ける必要があります。
最近、Vector2.cpy()メソッド既存のインスタンスを再利用する代わりに、Vector2型の新しいインスタンスを作成します。つまり、60 FPSでVector2.cpy()を呼び出すことにより、Vector2型の60個の 新しいオブジェクトを毎秒作成します。これにより、Java GCが非常に頻繁にシーンに表示されます。
念頭に置いてください。この問題は後で解決します。
GameWorldクラスを開く
先ほど作成したRectオブジェクトを削除しましょう。必要なものは次のとおりです。
package com.kilobolt.gameworld; public class GameWorld { public void update(float delta) { } }
必要に応じて、GameRendererのRectオブジェクトレンダリングロジックを削除して、Eclipseのエラーを取り除くこともできます。翌日それを行います。最初にGameWorldクラスのコンストラクタを作成しましょう:
public GameWorld() { }
Birdクラスをインポートし、GameWorldクラスにBird型の新しい変数を作成します(まだ初期化しないでください)。GameWorld.update(float delta)で鳥の更新メソッドを呼び出します。取得したものは次のとおりです。
package com.kilobolt.gameworld; import com.kilobolt.gameobjects.Bird; public class GameWorld { private Bird bird; public GameWorld() { // Bird } public void update(float delta) { bird.update(delta); } public Bird getBird() { return bird; } }
次に、バーディーを作成する必要があります。どのような情報が必要ですか?座標とサイズ(x、y、幅、高さは、Birdクラスのコンストラクターを呼び出す必要がある4つの変数です)。
Xの値は33である必要があります(これは、鳥がゲーム時間中に留まる場所です)。幅は17でなければなりません。高さ12.
Yはどうですか。私の理由により、これは画面の垂直中央の5ピクセル上に等しい値である必要があります(すべてを137 x ???画面解像度にスケーリングします。ここで、高さは画面の高さと幅の間の係数に137を掛けて決定されます)。
この行をコンストラクタに追加します。
bird = new Bird(33, midPointY - 5, 17, 12);
midPointYを取得するにはどうすればよいですか?GameScreenからこの値をリクエストします。GameScreenがGameWorld型のオブジェクトを作成すると、GameWorldコンストラクターが呼び出されることに注意してください。したがって、GameWorldクラスのコンストラクターに新しい引数を追加し、GameScreenに渡すことができます。
これをGameWorldコンストラクターに追加します:(int midPointY)
これができるはずです。
package com.kilobolt.gameworld; import com.kilobolt.gameobjects.Bird; public class GameWorld { private Bird bird; public GameWorld(int midPointY) { bird = new Bird(33, midPointY - 5, 17, 12); } public void update(float delta) { bird.update(delta); } public Bird getBird() { return bird; } }
ここで、GameScreenクラスを変更する必要があります。開いてみましょう。

予想どおり、GameWorldコンストラクターが呼び出される行にエラーがあります。エラーは次のように言います:「新しいGameWorldを作成するには、整数を指定する必要があります」(新しいGameWorldを作成するには、整数を渡す必要があります)、やろう!
ただし、最初に画面のmidPointYを計算し、この値をGameWorldコンストラクターに渡します。
midPointYと言うとき、これが私が意味することです。ゲームの幅は136ユニットになることに注意してください。画面の幅は1080ピクセルであるため、すべてを1/8にスケーリングできます。ゲームの高さを取得するには、画面の高さを取得し、同じ要素にスケーリングする必要があります!
:私たちの画面の高さと幅を取得するには、我々は次の方法を使用することができますGdx.graphics.getWidth()とGdx.graphics.getHeightを() 。
この情報を使用して、コンストラクターロジックを実装しましょう。
GameScreen.java
package com.kilobolt.screens; import com.badlogic.gdx.Gdx; import com.badlogic.gdx.Screen; import com.kilobolt.gameworld.GameRenderer; import com.kilobolt.gameworld.GameWorld; public class GameScreen implements Screen { private GameWorld world; private GameRenderer renderer; // This is the constructor, not the class declaration public GameScreen() { float screenWidth = Gdx.graphics.getWidth(); float screenHeight = Gdx.graphics.getHeight(); float gameWidth = 136; float gameHeight = screenHeight / (screenWidth / gameWidth); int midPointY = (int) (gameHeight / 2); world = new GameWorld(midPointY); renderer = new GameRenderer(world); } @Override public void render(float delta) { world.update(delta); renderer.render(); } @Override public void resize(int width, int height) { } @Override public void show() { Gdx.app.log("GameScreen", "show called"); } @Override public void hide() { Gdx.app.log("GameScreen", "hide called"); } @Override public void pause() { Gdx.app.log("GameScreen", "pause called"); } @Override public void resume() { Gdx.app.log("GameScreen", "resume called"); } @Override public void dispose() { // Leave blank } }
鳥を作成したので、それを制御することを学ばなければなりません。入力ハンドラーを作成しましょう!
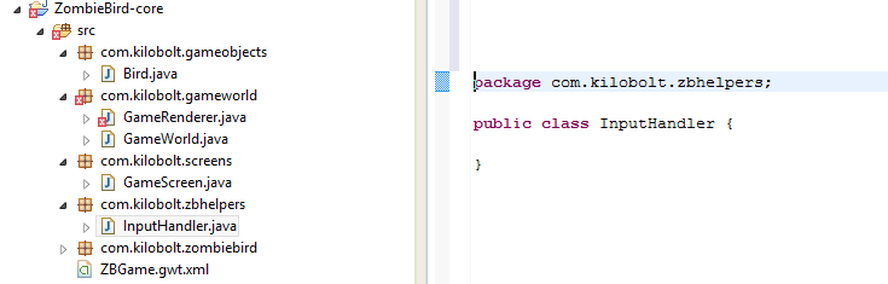
ZBHelpersを作成する
 チャートが反撃します!次に、第3レベルのフレームワークヘルパーに注目します。 ZBGameには、入力、画像、音声などを処理する機能が必要です。
ここで2つのクラスを作成します。
最初のクラスはInputHandlerで、名前が示すように、さまざまな種類の入力アクションに反応します。心配する必要があるのはタッチだけです(PC / Macでは、すべてのクリックがタッチに変換されます)。
2番目のクラスはAssetLoaderです。このクラスは、写真、アニメーション、サウンドなどをアップロードします。
すぐにAssetLoaderに戻ります。まず、InputHandlerを実装してみましょう。
新しいパッケージcom.kilobolt.zbHelpersを作成し、その中に新しいクラスInputHandlerを作成します。
InputHandlerは非常に簡単に実装できます。コードとクロスプラットフォームコード間のインターフェースであるInputProcessorを実装するだけです。プラットフォーム(Android、iOSなど)が何らかの入力(タッチなど)を受け取ると、InputProcessorのメソッドを呼び出します。これを実装して提供します。
「implements InputProcessor」をクラス宣言行に追加します(また、このクラスをインポートします)。未実現のメソッドを追加する必要があるというエラーが表示されます。やってみましょう:
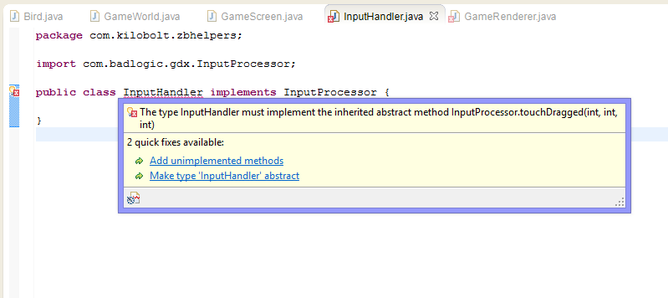
次のものが必要です。
InputHandler.java
package com.kilobolt.ZBHelpers; import com.badlogic.gdx.InputProcessor; import com.kilobolt.GameObjects.Bird; public class InputHandler implements InputProcessor { @Override public boolean touchDown(int screenX, int screenY, int pointer, int button) { return false; } @Override public boolean keyDown(int keycode) { return false; } @Override public boolean keyUp(int keycode) { return false; } @Override public boolean keyTyped(char character) { return false; } @Override public boolean touchUp(int screenX, int screenY, int pointer, int button) { return false; } @Override public boolean touchDragged(int screenX, int screenY, int pointer) { return false; } @Override public boolean mouseMoved(int screenX, int screenY) { return false; } @Override public boolean scrolled(int amount) { return false; } }
ご覧のとおり、作業できる新しいメソッドがたくさんあります。今のところ、touchDown()メソッドを処理する必要があります。
TouchDownはBirdクラスのonClickメソッドを呼び出す必要がありますが、Birdオブジェクトへのリンクは追加していません。このオブジェクトへのリンクがあるまで、Birdオブジェクトからメソッドを呼び出すことはできません。自問してみましょう:私たちの鳥のオブジェクトへのリンクを持っているのは誰ですか?もちろん、GameScreenに属するGameWorld!そのため、GameScreenにBirdをInputHandlerに渡すように依頼します。GameScreenに戻る前に、まずInputHandlerクラスを終了しましょう。
- InputHandlerクラスに変数を作成して、鳥へのリンクを保存します。
private Bird myBird;
- InputHandlerコンストラクター内でBirdへのリンクを要求する必要があります。
public InputHandler(Bird bird) { myBird = bird; }
- これで、touchDownメソッドで鳥のonClickを呼び出すことができます。
myBird.onClick()
InputHandler.java
package com.kilobolt.zbhelpers; import com.badlogic.gdx.InputProcessor; import com.kilobolt.gameobjects.Bird; public class InputHandler implements InputProcessor { private Bird myBird; // Bird InputHandler . public InputHandler(Bird bird) { // myBird bird gameWorld. myBird = bird; } @Override public boolean touchDown(int screenX, int screenY, int pointer, int button) { myBird.onClick(); return true; // true , . } @Override public boolean keyDown(int keycode) { return false; } @Override public boolean keyUp(int keycode) { return false; } @Override public boolean keyTyped(char character) { return false; } @Override public boolean touchUp(int screenX, int screenY, int pointer, int button) { return false; } @Override public boolean touchDragged(int screenX, int screenY, int pointer) { return false; } @Override public boolean mouseMoved(int screenX, int screenY) { return false; } @Override public boolean scrolled(int amount) { return false; } }
ここで、GameScreenに戻って新しいInputHandlerを作成し、ゲームに固定する必要があります!GameScreenを
開きます。コンストラクターを次のように更新します。最後に、libGDXに新しいInputHandlerを独自のプロセッサーとして使用するように指示します。
public GameScreen() { float screenWidth = Gdx.graphics.getWidth(); float screenHeight = Gdx.graphics.getHeight(); float gameWidth = 136; float gameHeight = screenHeight / (screenWidth / gameWidth); int midPointY = (int) (gameHeight / 2); world = new GameWorld(midPointY); renderer = new GameRenderer(world); Gdx.input.setInputProcessor(new InputHandler(world.getBird())); }
Gdx.input.setInputProcessor()は、InputProcessor型のオブジェクトを入力として受け取ります。私たちはInputProcessorで実装しているのでInputHandler、私たちはInputHandler入力に渡すことができます。Worldから取得
するBirdオブジェクトへの参照を渡すことにより、コンストラクターを呼び出すことに注意してください。これは、次の簡単な説明です。
Bird bird = world.getBird(); InputHandler handler = new InputHandler(bird); Gdx.input.setInputProcessor(handler);
今、私たちはどんな光に照らされていますか
Birdクラスを作成し、GameWorld内にBird型のオブジェクトを作成し、BirdクラスのonClickメソッドを呼び出すInputHandlerを作成して、鳥が飛び立つようにしました!次のパートでは、鳥とそのネクロポリスを描きます。
1日あたりのソースコード
あなたは、コードを自分で書くことが気分の外にある場合は、こちらからダウンロード:
6日目-グラフィック要素の追加-ネクロポリスへようこそ

6日目に私に参加してくれてありがとう。フレームワークのセットアップはすばらしい仕事をしましたが、このセクションの後、それが価値があることがわかります。
フラップを本来の生息地に移す時が来ました。このチュートリアルでは、AssetLoaderオブジェクトを作成し、アニメーションと多数のテクスチャをロードし、レンダラーを使用して鳥とその不吉な都市を描画します。
クラスAssetLoader
com.kilobolt.zbhelpersパッケージにAssetLoaderクラスを作成することから始めます(GameRendererにエラーが必要です)。次のタイプのオブジェクトを作成します(それらはすべてlibGDXに含まれています)。
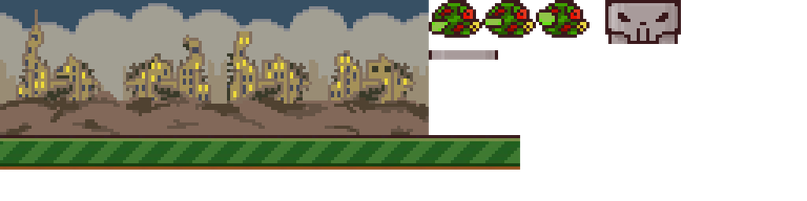
- テクスチャ -これは画像ファイルであると考えてください。多くの写真を1つのファイルに結合し、このファイルを使用します。
- TextureRegionはTextureの正方形の領域です。下の写真を見てください。画像には、背景、草、フラップ、頭蓋骨など、テクスチャのある多くの領域があります。
- アニメーション -テクスチャを使用して多くの領域を取得し、鳥をアニメーション化する方法を知っているAnimationオブジェクトを作成できます。
下の写真はダウンロードしないでください!4倍に増えたため、コードでは機能しません。代わりに、以下に示すファイルをダウンロードします(提供された画像についてKiloboltのアーティストに感謝します)。
完全なAssetLoaderクラス:
AssetLoader.java
package com.kilobolt.zbhelpers; import com.badlogic.gdx.Gdx; import com.badlogic.gdx.graphics.Texture; import com.badlogic.gdx.graphics.Texture.TextureFilter; import com.badlogic.gdx.graphics.g2d.Animation; import com.badlogic.gdx.graphics.g2d.TextureRegion; public class AssetLoader { public static Texture texture; public static TextureRegion bg, grass; public static Animation birdAnimation; public static TextureRegion bird, birdDown, birdUp; public static TextureRegion skullUp, skullDown, bar; public static void load() { texture = new Texture(Gdx.files.internal("data/texture.png")); texture.setFilter(TextureFilter.Nearest, TextureFilter.Nearest); bg = new TextureRegion(texture, 0, 0, 136, 43); bg.flip(false, true); grass = new TextureRegion(texture, 0, 43, 143, 11); grass.flip(false, true); birdDown = new TextureRegion(texture, 136, 0, 17, 12); birdDown.flip(false, true); bird = new TextureRegion(texture, 153, 0, 17, 12); bird.flip(false, true); birdUp = new TextureRegion(texture, 170, 0, 17, 12); birdUp.flip(false, true); TextureRegion[] birds = { birdDown, bird, birdUp }; birdAnimation = new Animation(0.06f, birds); birdAnimation.setPlayMode(Animation.PlayMode.LOOP_PINGPONG); skullUp = new TextureRegion(texture, 192, 0, 24, 14); // Create by flipping existing skullUp skullDown = new TextureRegion(skullUp); skullDown.flip(false, true); bar = new TextureRegion(texture, 136, 16, 22, 3); bar.flip(false, true); } public static void dispose() { // , texture.dispose(); } }
コードを見ていきましょう。ご覧のとおり、静的メソッドと変数が多数あります。つまり、Assetクラスのインスタンスは作成されず、コピーは1つしかありません。loadとdisposeの
2つのメソッドもあります。loadメソッドはゲームの開始時に呼び出され、disposeメソッドはゲームの終了時に呼び出されます。
load()メソッドを調べる
テクスチャ
loadメソッドは、texture.pngファイルを使用してTextureタイプの新しいオブジェクトを作成することから始まります。次に、enum定数TextureFilter.Nearestを使用して、縮小フィルターと増加フィルターが設定されます(画像が拡大または縮小されるときに使用されます)。これは重要です。小さなピクセルアートの画像が大きなサイズに引き伸ばされると、各ピクセルはその形状を保持し、ぼやけることがないからです。TextureRegion我々のようなオブジェクトを作成するためにテクスチャを使用することができますTextureRegionを、私たちは5つの引数を必要とする:適切なオブジェクトタイプのテクスチャを
このテクスチャの必要な領域の正方形のフレーム。たとえば、画像の左上隅から開始してx、y、幅、および高さを渡します。たとえば、背景には次のパラメーターがあります:0、0、136、43。libGDXはデフォルトのYアップ座標を使用するため、
すべてのTextureRegionを反転する必要があります。Yダウン座標系を使用し、各画像を反転する必要があります(スカルアップは例外です)。Animation TextureRegion型のオブジェクトの配列を作成し、それをAnimation型の新しいオブジェクトのコンストラクターに渡すことができます。
TextureRegion[] birds = { birdDown, bird, birdUp }; // TextureRegion birdAnimation = new Animation(0.06f, birds); // Animation 0.06 , . birdAnimation.setPlayMode(Animation.PlayMode.LOOP_PINGPONG); // ping pong, -.
Animationで 3フレームをハイライトしました。フレームの変更は0.06秒ごとに発生します(ダウン、ミッド、アップ、ミッド、ダウン、...)。
テクスチャファイルをダウンロードする
以下に提供されているテクスチャをダウンロードし、ZombieBird-androidプロジェクト内のasset / data / folderに配置してください!これは非常に重要です。
画像の使用に関する注意:画像を更新する場合(および独自の画像を使用する場合)、更新を有効にするためにEclipseでプロジェクトをクリーンアップする必要があります。ダウンロードしたテクスチャを追加したらすぐに、Project> Clean> Clean all projectsの順に実行します。texture.png

ファイルをダウンロードする

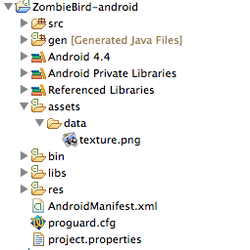 左に示すように、写真を正しいフォルダーに入れてください(ZombieBird-androidプロジェクト内にいることに注意してください。デフォルトでlibGDXに付属しているlibgdx.pngファイルを削除できます)。
すべてが正しい場合は、プロジェクトをクリーンアップして続行することを忘れないでください。
Loadメソッドを呼び出す
私たちのAssetLoaderレディ(とあなたがイメージをダウンロードし、正しいフォルダに入れて、だけでなく、プロジェクトクリーンアップしている)、私たちのオープンクラスZBGame我々はすべての画像を初期化するためにzagruki追加できるように、GameScreenを。createメソッドに次の行を追加します(GameScreenを作成する行の前)。
AssetLoader.load(); (Import com.kilobolt.zbhelpers.AssetLoader)
ZBGameクラスのdisposeメソッドがクロスプラットフォームコードによって呼び出された場合、AssetLoader.dispose()も呼び出す必要があります。これを行うには、既存のdisposeメソッドのオーバーライドをクラスに追加する必要があります。
それほど複雑で複雑に見えることはありませんが、実際には次のことだけを行う必要があります(完全なコード例)。
package com.kilobolt.zombiebird; import com.badlogic.gdx.Game; import com.badlogic.gdx.Gdx; import com.kilobolt.screens.GameScreen; import com.kilobolt.zbhelpers.AssetLoader; public class ZBGame extends Game { @Override public void create() { Gdx.app.log("ZBGame", "created"); AssetLoader.load(); setScreen(new GameScreen()); } @Override public void dispose() { super.dispose(); AssetLoader.dispose(); } }
すべての画像が読み込まれたので、GameRendererでそれらの描画を開始できます!
開けましょう。TextureRegion
を描画するには、SpriteBatchを作成する必要があります(ShapeRendererで行ったように)。 SpriteBatchは、渡されたポインター(通常はx、y、幅、高さ)を使用して画像をレンダリングします。以下に示すように、GameRendererからすべての必須ではないコードを削除し、SpriteBatchを作成しましょう。
package com.kilobolt.gameworld; import com.badlogic.gdx.Gdx; import com.badlogic.gdx.graphics.GL20; import com.badlogic.gdx.graphics.OrthographicCamera; import com.badlogic.gdx.graphics.g2d.SpriteBatch; import com.badlogic.gdx.graphics.glutils.ShapeRenderer; public class GameRenderer { private GameWorld myWorld; private OrthographicCamera cam; private ShapeRenderer shapeRenderer; private SpriteBatch batcher; public GameRenderer(GameWorld world) { myWorld = world; cam = new OrthographicCamera(); cam.setToOrtho(true, 137, 204); batcher = new SpriteBatch(); // batcher batcher.setProjectionMatrix(cam.combined); shapeRenderer = new ShapeRenderer(); shapeRenderer.setProjectionMatrix(cam.combined); } public void render() { Gdx.gl.glClearColor(0, 0, 0, 1); Gdx.gl.glClear(GL20.GL_COLOR_BUFFER_BIT); } }
カメラの幅を136に変更し、高さをGameScreenで定義されたゲームの高さに変更する必要があります。これを行うには、コンストラクターを変更して、2つのgameHeightおよびmidPointY引数を受け取ります。
これらの2つの新しい変数をクラスに追加し(古い4つを削除しないでください)、コンストラクターを次のように変更します(幅と高さをそれぞれ136に、値をgameHeightから必ず変更してください)。
package com.kilobolt.gameworld; import com.badlogic.gdx.Gdx; import com.badlogic.gdx.graphics.GL20; import com.badlogic.gdx.graphics.OrthographicCamera; import com.badlogic.gdx.graphics.g2d.SpriteBatch; import com.badlogic.gdx.graphics.glutils.ShapeRenderer; public class GameRenderer { private GameWorld myWorld; private OrthographicCamera cam; private ShapeRenderer shapeRenderer; private SpriteBatch batcher; private int midPointY; private int gameHeight; public GameRenderer(GameWorld world, int gameHeight, int midPointY) { myWorld = world; // this // // GameScreen. this.gameHeight = gameHeight; this.midPointY = midPointY; cam = new OrthographicCamera(); cam.setToOrtho(true, 136, gameHeight); batcher = new SpriteBatch(); batcher.setProjectionMatrix(cam.combined); shapeRenderer = new ShapeRenderer(); shapeRenderer.setProjectionMatrix(cam.combined); } public void render() { Gdx.gl.glClearColor(0, 0, 0, 1); Gdx.gl.glClear(GL20.GL_COLOR_BUFFER_BIT); } }
次に、renderメソッドに引数を追加する必要もあります。
public void render(float runTime) { ... }
この引数は、鳥のアニメーションから表示するフレームを決定するために必要です。Animationオブジェクトは、この値(および以前に設定されたフレーム長の値)を使用して、表示するテクスチャの領域を決定します。
コンストラクターが変更されたため、GameScreenに表示されるエラーを修正する必要があります。GameScreen
クラスを開き、次の行を置き換えます。
renderer = new GameRenderer(world);
これに:
renderer = new GameRenderer(world, (int) gameHeight, midPointY);
また、runTimeという追加の変数を作成する必要があります。この変数には、ゲームの持続時間の値が格納されます。この値をGameRendererクラスのrenderメソッドに渡します!
runTimeという名前のクラスに変数を作成し、開始値を0に設定します。
private float runTime = 0;
render(float delta)メソッド内で、runTime値をdeltaの値だけ増やし、新しい値をrenderメソッドに渡します(ここで、結果の値を使用してアニメーションをレンダリングします)。
@Override public void render(float delta) { runTime += delta; world.update(delta); renderer.render(runTime); }
GameScreenクラスは次のようになっているはずです。
GameScreen.java
package com.kilobolt.screens; import com.badlogic.gdx.Gdx; import com.badlogic.gdx.Screen; import com.kilobolt.gameworld.GameRenderer; import com.kilobolt.gameworld.GameWorld; import com.kilobolt.zbhelpers.InputHandler; public class GameScreen implements Screen { private GameWorld world; private GameRenderer renderer; private float runTime; // , public GameScreen() { float screenWidth = Gdx.graphics.getWidth(); float screenHeight = Gdx.graphics.getHeight(); float gameWidth = 136; float gameHeight = screenHeight / (screenWidth / gameWidth); int midPointY = (int) (gameHeight / 2); world = new GameWorld(midPointY); renderer = new GameRenderer(world, (int) gameHeight, midPointY); Gdx.input.setInputProcessor(new InputHandler(world.getBird())); } @Override public void render(float delta) { runTime += delta; world.update(delta); renderer.render(runTime); } @Override public void resize(int width, int height) { } @Override public void show() { Gdx.app.log("GameScreen", "show called"); } @Override public void hide() { Gdx.app.log("GameScreen", "hide called"); } @Override public void pause() { Gdx.app.log("GameScreen", "pause called"); } @Override public void resume() { Gdx.app.log("GameScreen", "resume called"); } @Override public void dispose() { // } }
これらすべてのファイルのジャンプについておIび申し上げます!6日目を覚えるために1つのメソッドのみに焦点を当てます。:)
GameRendererクラスに戻り、次のようにrenderメソッドを変更します。
Gamerenderer.java
package com.kilobolt.gameworld; import com.badlogic.gdx.Gdx; import com.badlogic.gdx.graphics.GL20; import com.badlogic.gdx.graphics.OrthographicCamera; import com.badlogic.gdx.graphics.g2d.SpriteBatch; import com.badlogic.gdx.graphics.glutils.ShapeRenderer; import com.badlogic.gdx.graphics.glutils.ShapeRenderer.ShapeType; import com.kilobolt.gameobjects.Bird; import com.kilobolt.zbhelpers.AssetLoader; public class GameRenderer { private GameWorld myWorld; private OrthographicCamera cam; private ShapeRenderer shapeRenderer; private SpriteBatch batcher; private int midPointY; private int gameHeight; public GameRenderer(GameWorld world, int gameHeight, int midPointY) { myWorld = world; // this // // GameScreen. this.gameHeight = gameHeight; this.midPointY = midPointY; cam = new OrthographicCamera(); cam.setToOrtho(true, 136, gameHeight); batcher = new SpriteBatch(); batcher.setProjectionMatrix(cam.combined); shapeRenderer = new ShapeRenderer(); shapeRenderer.setProjectionMatrix(cam.combined); } public void render(float runTime) { // , Bird bird = myWorld.getBird(); // Gdx.gl.glClearColor(0, 0, 0, 1); Gdx.gl.glClear(GL20.GL_COLOR_BUFFER_BIT); // ShapeRenderer shapeRenderer.begin(ShapeType.Filled); // Background shapeRenderer.setColor(55 / 255.0f, 80 / 255.0f, 100 / 255.0f, 1); shapeRenderer.rect(0, 0, 136, midPointY + 66); // Grass shapeRenderer.setColor(111 / 255.0f, 186 / 255.0f, 45 / 255.0f, 1); shapeRenderer.rect(0, midPointY + 66, 136, 11); // Dirt shapeRenderer.setColor(147 / 255.0f, 80 / 255.0f, 27 / 255.0f, 1); shapeRenderer.rect(0, midPointY + 77, 136, 52); // ShapeRenderer shapeRenderer.end(); // SpriteBatch batcher.begin(); // // , batcher.disableBlending(); batcher.draw(AssetLoader.bg, 0, midPointY + 23, 136, 43); // , batcher.enableBlending(); // . Animation AssetLoader // runTime . batcher.draw(AssetLoader.birdAnimation.getKeyFrame(runTime), bird.getX(), bird.getY(), bird.getWidth(), bird.getHeight()); // SpriteBatch batcher.end(); } }
コード(DesktopLauncher.java)を実行して、クリックを開始してください(さもなければ、鳥は忘却の空に飛び立ちます)。次のものが必要です
。renderメソッドに戻って、ロジックがどのようになったかを見てみましょう。常に最初に行うことは、背景を描画することです。なぜなら、描画は常にレイヤーで行われるからです。普通の色を描き始めます。TextureRegionを使用して背景を塗りつぶすのではなく、単色で塗りつぶされたShapeを描画します。草がどこにあるべきかを示すために一時的な緑の長方形を描き、汚れがある場所に茶色の長方形を描きます。次に、SpriteBatchを開始します
、再び、背景-都市の絵を描き始めます。次に、runTimeを使用してAnimationオブジェクトから現在のTextureRegionを取得し、ブレンドを有効にして鳥を描画します。render()メソッド内で作成したコメントを読んでください!それらはあなたの理解にとって重要です。さて、あなたは言うことができます-私たちは始めました!Flapsキャラクターが再び飛ぶと、ゲームが形になり始めます。次の7日目に参加して、ゲームにスクロール可能な要素を追加します:草とパイプ。
1日あたりのソースコード
あなたは、コードを自分で書くことが気分の外にある場合は、こちらからダウンロード:
7日目-草、鳥、頭蓋骨とトランペット
7日目へようこそ!今日のレッスンでは、鳥を回転させる方法と、頭蓋骨で草やパイプをスクロールする方法を学びます。Birdクラスを変更し、草とパイプのロジックを含む新しいクラスを作成する必要があります。
さあ始めましょう!
回転する鳥
コードを書く前に、鳥がどのように回転するかを調べてみましょう。Flappy Birdでは、鳥には2つの主要な状態があります。鳥はクリック後に離陸するか、落下します。これら2つの状態では、鳥は次のように回転します。
回転はY速度を使用して制御されます。私たちのゲームでは、重力により下向きに加速します(これは速度が上がることを意味します)。速度が負の場合(つまり、鳥が上に動いている場合)、鳥は反時計回りに回転し始めます。速度が正の値よりも大きくなると、鳥は時計回りに回転し始めます(鳥が加速し始めるまで回転し始めません)。
アニメーション
アニメーションにも注意を払う必要があります。鳥は落下中に羽ばたいてはいけません。代わりに、彼女の翼は中央に戻るはずです。鳥が離陸し始めるとすぐに、再び羽ばたきを始めます。
これをコードに実装しましょう:
- 2つのメソッドを作成することから始めます。これらの方法では、経験的に得られた値を使用します。Birdクラスのどこかに、これらのメソッドを作成します。
public boolean isFalling() { return velocity.y > 110; } public boolean shouldntFlap() { return velocity.y > 70; }
isFallingメソッドを使用して、鳥を倒すかどうかを決定します。鳥の羽ばたきを停止するタイミングを決定
するメソッドshouldntFlap。
- 次に、更新メソッドにいくつかの変更を加える必要があります。回転というフロート変数があることを覚えていますか?この変数は、鳥をどれだけ回すべきかの値を保持します。正の値は時計回りの回転、負の値は反時計回りの回転です。
これら2つのコードブロックをupdateメソッドの最後に追加します。毎時および反時計回りの回転(上昇と下降)を処理します。
// if (velocity.y < 0) { rotation -= 600 * delta; if (rotation < -20) { rotation = -20; } } // if (isFalling()) { rotation += 480 * delta; if (rotation > 90) { rotation = 90; } }
ゲームがスローダウンし始めた(またはより速く動作し始めた)場合でも、鳥が同じ速度で回転するように、回転をデルタだけ増加させることを忘れないでください。
これらの両方のチェックには、何らかの回転制限があります。ターンでそれをやり過ぎた場合、ゲームはそれを修正します。Birdクラス
は次のようになります。
package com.kilobolt.gameobjects; import com.badlogic.gdx.math.Vector2; public class Bird { private Vector2 position; private Vector2 velocity; private Vector2 acceleration; private float rotation; // For handling bird rotation private int width; private int height; public Bird(float x, float y, int width, int height) { this.width = width; this.height = height; position = new Vector2(x, y); velocity = new Vector2(0, 0); acceleration = new Vector2(0, 460); } public void update(float delta) { velocity.add(acceleration.cpy().scl(delta)); if (velocity.y > 200) { velocity.y = 200; } position.add(velocity.cpy().scl(delta)); // if (velocity.y < 0) { rotation -= 600 * delta; if (rotation < -20) { rotation = -20; } } // if (isFalling()) { rotation += 480 * delta; if (rotation > 90) { rotation = 90; } } } public boolean isFalling() { return velocity.y > 110; } public boolean shouldntFlap() { return velocity.y > 70; } public void onClick() { velocity.y = -140; } public float getX() { return position.x; } public float getY() { return position.y; } public float getWidth() { return width; } public float getHeight() { return height; } public float getRotation() { return rotation; } }
素晴らしい。我々はすべて追加されると、我々は唯一に行くことができGameRendererとメソッドの使用shouldntFlapを私たちの鳥かどうかをアニメーション化する必要があるかどうかを判断するために、。
ご注意
前に5日目に言及しました(重要なため、ここで繰り返します!)。
新しいObjectを作成するたびに、このオブジェクト用にRAMに多くのメモリを割り当てません(より正確にはHeapに)。ヒープがオーバーフローするとすぐに、ガベージコレクター(以降GC、ガベージコレクター /コレクター)と呼ばれるルーチンがシーンに入り、メモリ不足の状況を回避するためにメモリをクリーンアップします。これはクールですが、ゲームを作成するときはそうではありません。GCの実行中、ゲームは数ミリ秒の間スローダウンし始めます。GCの頻繁な操作を回避するには、可能であれば、新しいオブジェクトの作成を避ける必要があります。
最近、Vector2.cpy()メソッドが既存のインスタンスを再利用する代わりに、Vector2型の新しいインスタンスを作成することを発見しました。つまり、60 FPSでVector2.cpy()を呼び出すことにより、Vector2型の60個の 新しいオブジェクトを毎秒作成します。これにより、Java GCが非常に頻繁にシーンに表示されます。
念頭に置いてください。この問題は、後ほど解決します。
GameRendererをクリーニングする
ゲームで高いパフォーマンスを実現するには、ゲームループで行われる作業を最小限に抑える必要があります。6日目に、この原則に違反するコードを作成しました。renderメソッドを見てください。次の行があります。
Bird bird = myWorld.getBird();
renderメソッドが呼び出されるたびに(1秒あたり約60回)、ゲームにmyWorldを見つけてからBirdオブジェクトを見つけてGameRendererに返し、ローカル変数としてスタックに配置するように依頼します。
このコードを変更して、GameRendererが最初に作成されたときに一度Birdオブジェクトを取得し、BirdオブジェクトをGameRendererクラスの変数として保存するようにします。
AssetLoaderのTextureRegionsでも、これから作成するすべての新しいオブジェクトでも同じことを行います。
- GameRendererクラスに次の変数を追加することから始めます(必要に応じてクラスもインポートします。com.badlogic.gdx.graphics.g2d.Animationを使用してアニメーションをインポートします)。
// Game Objects private Bird bird; // Game Assets private TextureRegion bg, grass; private Animation birdAnimation; private TextureRegion birdMid, birdDown, birdUp; private TextureRegion skullUp, skullDown, bar;
次に、コンストラクタでそれらを初期化します。ただし、コンストラクターを詰まらせるよりも、これらの変数を初期化する2つのヘルパーメソッドを作成しましょう。
- 次の2つのメソッドをGameRendererに追加します。
private void initGameObjects() { bird = myWorld.getBird(); } private void initAssets() { bg = AssetLoader.bg; grass = AssetLoader.grass; birdAnimation = AssetLoader.birdAnimation; birdMid = AssetLoader.bird; birdDown = AssetLoader.birdDown; birdUp = AssetLoader.birdUp; skullUp = AssetLoader.skullUp; skullDown = AssetLoader.skullDown; bar = AssetLoader.bar; }
次に、コンストラクターでこれらのメソッドを呼び出します。
public GameRenderer(GameWorld world, int gameHeight, int midPointY) { myWorld = world; this.gameHeight = gameHeight; this.midPointY = midPointY; cam = new OrthographicCamera(); cam.setToOrtho(true, 136, gameHeight); batcher = new SpriteBatch(); batcher.setProjectionMatrix(cam.combined); shapeRenderer = new ShapeRenderer(); shapeRenderer.setProjectionMatrix(cam.combined); // , initGameObjects(); initAssets(); }
最後に、renderメソッドに変更を加える必要があります。より正確には、AssetLoaderへのすべての参照を削除し、行を削除します。
Bird bird = myWorld.getBird().
次に、rotationを使用できるように、鳥をレンダリングするメソッドを変更します。また、AssetLoaderへのすべての参照(特にAssetLoader.bg)を変更します。作業の結果は次のようになります。
public void render(float runTime) { Gdx.gl.glClearColor(0, 0, 0, 1); Gdx.gl.glClear(GL20.GL_COLOR_BUFFER_BIT); shapeRenderer.begin(ShapeType.Filled); // shapeRenderer.setColor(55 / 255.0f, 80 / 255.0f, 100 / 255.0f, 1); shapeRenderer.rect(0, 0, 136, midPointY + 66); // Grass shapeRenderer.setColor(111 / 255.0f, 186 / 255.0f, 45 / 255.0f, 1); shapeRenderer.rect(0, midPointY + 66, 136, 11); // Dirt shapeRenderer.setColor(147 / 255.0f, 80 / 255.0f, 27 / 255.0f, 1); shapeRenderer.rect(0, midPointY + 77, 136, 52); shapeRenderer.end(); batcher.begin(); batcher.disableBlending(); batcher.draw(bg, 0, midPointY + 23, 136, 43); batcher.enableBlending(); if (bird.shouldntFlap()) { batcher.draw(birdMid, bird.getX(), bird.getY(), bird.getWidth() / 2.0f, bird.getHeight() / 2.0f, bird.getWidth(), bird.getHeight(), 1, 1, bird.getRotation()); } else { batcher.draw(birdAnimation.getKeyFrame(runTime), bird.getX(), bird.getY(), bird.getWidth() / 2.0f, bird.getHeight() / 2.0f, bird.getWidth(), bird.getHeight(), 1, 1, bird.getRotation()); } batcher.end(); }
そして、GameRendererクラスは次のようになります。
Gamerenderer.java
package com.kilobolt.gameworld; import com.badlogic.gdx.Gdx; import com.badlogic.gdx.graphics.GL20; import com.badlogic.gdx.graphics.OrthographicCamera; import com.badlogic.gdx.graphics.g2d.Animation; import com.badlogic.gdx.graphics.g2d.SpriteBatch; import com.badlogic.gdx.graphics.g2d.TextureRegion; import com.badlogic.gdx.graphics.glutils.ShapeRenderer; import com.badlogic.gdx.graphics.glutils.ShapeRenderer.ShapeType; import com.kilobolt.gameobjects.Bird; import com.kilobolt.zbhelpers.AssetLoader; public class GameRenderer { private GameWorld myWorld; private OrthographicCamera cam; private ShapeRenderer shapeRenderer; private SpriteBatch batcher; private int midPointY; private int gameHeight; // private Bird bird; // Assets private TextureRegion bg, grass; private Animation birdAnimation; private TextureRegion birdMid, birdDown, birdUp; private TextureRegion skullUp, skullDown, bar; public GameRenderer(GameWorld world, int gameHeight, int midPointY) { myWorld = world; this.gameHeight = gameHeight; this.midPointY = midPointY; cam = new OrthographicCamera(); cam.setToOrtho(true, 136, gameHeight); batcher = new SpriteBatch(); batcher.setProjectionMatrix(cam.combined); shapeRenderer = new ShapeRenderer(); shapeRenderer.setProjectionMatrix(cam.combined); // , initGameObjects(); initAssets(); } public void render(float runTime) { Gdx.gl.glClearColor(0, 0, 0, 1); Gdx.gl.glClear(GL20.GL_COLOR_BUFFER_BIT); shapeRenderer.begin(ShapeType.Filled); // shapeRenderer.setColor(55 / 255.0f, 80 / 255.0f, 100 / 255.0f, 1); shapeRenderer.rect(0, 0, 136, midPointY + 66); // Grass shapeRenderer.setColor(111 / 255.0f, 186 / 255.0f, 45 / 255.0f, 1); shapeRenderer.rect(0, midPointY + 66, 136, 11); // Dirt shapeRenderer.setColor(147 / 255.0f, 80 / 255.0f, 27 / 255.0f, 1); shapeRenderer.rect(0, midPointY + 77, 136, 52); shapeRenderer.end(); batcher.begin(); batcher.disableBlending(); batcher.draw(bg, 0, midPointY + 23, 136, 43); batcher.enableBlending(); if (bird.shouldntFlap()) { batcher.draw(birdMid, bird.getX(), bird.getY(), bird.getWidth() / 2.0f, bird.getHeight() / 2.0f, bird.getWidth(), bird.getHeight(), 1, 1, bird.getRotation()); } else { batcher.draw(birdAnimation.getKeyFrame(runTime), bird.getX(), bird.getY(), bird.getWidth() / 2.0f, bird.getHeight() / 2.0f, bird.getWidth(), bird.getHeight(), 1, 1, bird.getRotation()); } batcher.end(); } private void initGameObjects() { bird = myWorld.getBird(); } private void initAssets() { bg = AssetLoader.bg; grass = AssetLoader.grass; birdAnimation = AssetLoader.birdAnimation; birdMid = AssetLoader.bird; birdDown = AssetLoader.birdDown; birdUp = AssetLoader.birdUp; skullUp = AssetLoader.skullUp; skullDown = AssetLoader.skullDown; bar = AssetLoader.bar; } }
コードを実行してみてください!予想通り、鳥は羽ばたいて回転します。
スクロール可能なクラスを作成する
次に、ゲームで草とパイプを作成します。
草とパイプは、右から左へ同じ速度で移動します。次のパラメーターを使用します。
- 3つのパイプがあります(各列は1つのパイプです)
- 水平に(長さで)接続された2本の長い草を使用します
- パイプまたは草が完全に見えなくなった場合-それらの位置をリセットします
- 草の位置をリセットするには、単に草を右に動かし、2本目の草の端に取り付けます
- パイプの位置をリセットするには、3番目のパイプの直後のパイプキューの最後に配置し、パイプの高さも変更します
パイプとグラスの動作は同じです。同じロジックを別のScrollableクラスに分離し、PipeやGrassなどの子クラスから継承します。
オブジェクトのパラメーターをリセットする部分は、少しわかりにくいかもしれません。
3つのパイプがある場合のロジックの例を次に示します。
- パイプ1は、リセット時に、パイプ3の直後に挿入する必要があります
- パイプ2はリセット時に、パイプ1の直後に挿入する必要があります
- パイプ3は、リセット時に、パイプ2の直後に挿入する必要があります
オブジェクトをリンクし、どのオブジェクトがどのオブジェクトの背後にあるかを明確に知る代わりに、オブジェクトの移動を容易にするScrollHandlerオブジェクトを作成します。まず、使用可能なPipeおよびGrassオブジェクトのパラメーターを使用
するScrollableクラス(com.kilobolt.gameobjectsパッケージ内)を作成します。
パイプ草や以下のパラメータがあります:
クラスオプションの
位置、速度、幅、高さ及びisScrolledLeftのタイプのオブジェクトときを決定するboolean型を、スクロール可能に表示されていないと、そのパラメータがリセットされなければなりません。
メソッド:
更新とリセットおよびさまざまなクラス変数にアクセスするためのメソッド。
完全なコード例(非常にシンプルで簡単です)。resetメソッドを除き、これまでに見たことのない新しいものはありません。コメントを読んでください:
package com.kilobolt.gameobjects; import com.badlogic.gdx.math.Vector2; public class Scrollable { // Protected private, . protected Vector2 position; protected Vector2 velocity; protected int width; protected int height; protected boolean isScrolledLeft; public Scrollable(float x, float y, int width, int height, float scrollSpeed) { position = new Vector2(x, y); velocity = new Vector2(scrollSpeed, 0); this.width = width; this.height = height; isScrolledLeft = false; } public void update(float delta) { position.add(velocity.cpy().scl(delta)); // Scrollable : if (position.x + width < 0) { isScrolledLeft = true; } } // Reset: , // public void reset(float newX) { position.x = newX; isScrolledLeft = false; } // public boolean isScrolledLeft() { return isScrolledLeft; } public float getTailX() { return position.x + width; } public float getX() { return position.x; } public float getY() { return position.y; } public int getWidth() { return width; } public int getHeight() { return height; } }
Scrollable基本クラスができたので、それを継承する子クラスを作成できます。同じパッケージcom.kilobolt.gameobjectsで、次の2つのクラスを作成します。
パイプを
package com.kilobolt.gameobjects; import java.util.Random; public class Pipe extends Scrollable { private Random r; // Pipe – (Scrollable) public Pipe(float x, float y, int width, int height, float scrollSpeed) { super(x, y, width, height, scrollSpeed); // Random r = new Random(); } @Override public void reset(float newX) { // reset (Scrollable) super.reset(newX); // height = r.nextInt(90) + 15; } }
草
package com.kilobolt.gameobjects; public class Grass extends Scrollable { // Grass – (Scrollable) public Grass(float x, float y, int width, int height, float scrollSpeed) { super(x, y, width, height, scrollSpeed); } }
上記のクラスは両方ともScrollableクラスを親として使用し(継承のおかげ)、パラメーターとメソッドも追加します(Pipeの場合、コンストラクターの新しい引数と新しいメソッド)。オーバーライドとスーパー
とは何ですか?継承では、子クラスは親クラスのメソッドにアクセスできます。これは、PipeとGrassが自宅で再定義しなくてもリセット方法を使用できることを意味します。これは、子クラスであるScrollableクラスの機能の拡張機能の一種であり、既にresetメソッドを備えているためです。たとえば、次のようなことができます。
Grass g = new Grass(...); g.reset(); // reset Scrollable.
親クラスのメソッドに対してより具体的なロジックが必要な場合、Overrideを使用して、コンパイラに次のことを伝えます。親クラスのリセットメソッドの代わりに、子クラスのこのリセットメソッドを使用します。Pipe子クラスのresetメソッドをオーバーライドします。
したがって、これを行う場合:
Pipe p = new Pipe(...); p.reset(); // reset Pipe.
しかし、スーパーという言葉は何ですか?
再定義中であっても、子クラスは親クラスの元のメソッドにアクセスできます。オーバーライドされたリセットメソッド内でsuper.reset(...)を呼び出すと、オーバーライドされたメソッドと親の両方のメソッドが呼び出されます。
なぜGrassクラスが必要なのですか?
現時点では、Grassクラスには独自のパラメーターがないため、意味がありません。しかし、後でコリジョンを決定するためのパラメーターを追加します。そのため、芝生用に別のクラスを作成しました。
今、私たちのことをスクロール可能なクラスの準備ができている、我々はにロジックを実装することができScrollHandler、それらを更新オブジェクトグラスとパイプの作成を引き継ぐと、リセット処理。com.kilobolt.gameobjectsパッケージ内に
新しいScrollHandlerクラスを作成します。簡単なことから始めます。
- 地球を作成する場所(草と下のパイプがある場所)を知るために、Y軸に沿った座標の値をコンストラクターに渡す必要があります。
- また、クラスには5つの変数が必要です:Grassタイプのオブジェクト用に2つ、Pipeタイプのオブジェクト用に3つ(現時点では、1つの列が1つのPipeオブジェクトであると仮定します)
- これらすべてのオブジェクトへのアクセス方法が必要です。
- そして、更新メソッドも必要です
package com.kilobolt.gameobjects; public class ScrollHandler { // ScrollHandler private Grass frontGrass, backGrass; private Pipe pipe1, pipe2, pipe3; // ScrollHandler // , // // public static final int SCROLL_SPEED = -59; public static final int PIPE_GAP = 49; // Y , // Grass Pipe . public ScrollHandler(float yPos) { } public void update(float delta) { } // public Grass getFrontGrass() { return frontGrass; } public Grass getBackGrass() { return backGrass; } public Pipe getPipe1() { return pipe1; } public Pipe getPipe2() { return pipe2; } public Pipe getPipe3() { return pipe3; } }
ここで、コンストラクタとupdateメソッドに注目する必要があります。コンストラクター内で、すべてのScrollableオブジェクトを初期化します。
frontGrass = new Grass(0, yPos, 143, 11, SCROLL_SPEED); backGrass = new Grass(frontGrass.getTailX(), yPos, 143, 11, SCROLL_SPEED); pipe1 = new Pipe(210, 0, 22, 60, SCROLL_SPEED); pipe2 = new Pipe(pipe1.getTailX() + PIPE_GAP, 0, 22, 70, SCROLL_SPEED); pipe3 = new Pipe(pipe2.getTailX() + PIPE_GAP, 0, 22, 60, SCROLL_SPEED);
ここでのロジックは単純です。 Scrollable型のオブジェクトのコンストラクターは、x、y、幅、高さ、およびスクロール速度を渡すように要求することに注意してください。これらの各パラメーターを渡します。
backGrassオブジェクトは、frontGrassオブジェクトの尾部にドッキングする必要があるため、frontGrassの尾部に作成します。PIPE_GAP
を追加して49ピクセルのパイプ間にギャップを作成することを除いて、Pipeタイプのオブジェクトは同様のスキームに従って作成されます(実験的に計算)。
ここで、5つのオブジェクトすべてに対してupdateメソッドを呼び出すupdateメソッドを終了します。さらに、コンストラクターの1つに単純なロジックを使用して、オブジェクトのパラメーターをリセットします。コードは次のようになります。
package com.kilobolt.gameobjects; public class ScrollHandler { private Grass frontGrass, backGrass; private Pipe pipe1, pipe2, pipe3; public static final int SCROLL_SPEED = -59; public static final int PIPE_GAP = 49; public ScrollHandler(float yPos) { frontGrass = new Grass(0, yPos, 143, 11, SCROLL_SPEED); backGrass = new Grass(frontGrass.getTailX(), yPos, 143, 11, SCROLL_SPEED); pipe1 = new Pipe(210, 0, 22, 60, SCROLL_SPEED); pipe2 = new Pipe(pipe1.getTailX() + PIPE_GAP, 0, 22, 70, SCROLL_SPEED); pipe3 = new Pipe(pipe2.getTailX() + PIPE_GAP, 0, 22, 60, SCROLL_SPEED); } public void update(float delta) { // frontGrass.update(delta); backGrass.update(delta); pipe1.update(delta); pipe2.update(delta); pipe3.update(delta); // // if (pipe1.isScrolledLeft()) { pipe1.reset(pipe3.getTailX() + PIPE_GAP); } else if (pipe2.isScrolledLeft()) { pipe2.reset(pipe1.getTailX() + PIPE_GAP); } else if (pipe3.isScrolledLeft()) { pipe3.reset(pipe2.getTailX() + PIPE_GAP); } // - if (frontGrass.isScrolledLeft()) { frontGrass.reset(backGrass.getTailX()); } else if (backGrass.isScrolledLeft()) { backGrass.reset(frontGrass.getTailX()); } } public Grass getFrontGrass() { return frontGrass; } public Grass getBackGrass() { return backGrass; } public Pipe getPipe1() { return pipe1; } public Pipe getPipe2() { return pipe2; } public Pipe getPipe3() { return pipe3; } }
スクロール可能なオブジェクトは完全にカスタマイズされています!次のステップは次のとおりです。
- 作成したオブジェクトScrollHandler内部GameWorld(このアクションは、自動的に私たちの5つの施設を作成します)
- レンダリングScrollHandlerの内部でオブジェクトをGameRenderer
1. ScrollHandlerオブジェクトの作成
GameWorldを開きます。小さな変更を行います。
- クラスに変数を追加(インポートも追加)
private ScrollHandler scroller
- コンストラクターでスクロールを初期化します(草が開始するY座標、midPointYの下66ピクセルを含む):
scroller = new ScrollHandler(midPointY + 66);
- GameWorldのupdateメソッド内でScrollerのupdateメソッドを呼び出します
scroller.update(delta);
- Scrollerオブジェクトにアクセスするためのメソッドを作成します(ScrollHandler scrollを返します)
この手順のソースコードは次のとおりです。
package com.kilobolt.gameworld; import com.kilobolt.gameobjects.Bird; import com.kilobolt.gameobjects.ScrollHandler; public class GameWorld { private Bird bird; private ScrollHandler scroller; public GameWorld(int midPointY) { bird = new Bird(33, midPointY - 5, 17, 12); // 66 midPointY scroller = new ScrollHandler(midPointY + 66); } public void update(float delta) { bird.update(delta); scroller.update(delta); } public Bird getBird() { return bird; } public ScrollHandler getScroller() { return scroller; } }
2. ScrollHandlerオブジェクトの描画
クラスに6つの変数を作成することから始めます
。ScrollHandlerに1
つ、3つのパイプに5つ+草に2つ
- Birdオブジェクトを宣言した直後に以下を追加します。
// Game Objects private Bird bird; private ScrollHandler scroller; private Grass frontGrass, backGrass; private Pipe pipe1, pipe2, pipe3;
- 次のインポートを追加します。
import com.kilobolt.gameobjects.Bird; import com.kilobolt.gameobjects.Grass; import com.kilobolt.gameobjects.Pipe;
- 次に、initGameObjectsメソッド内でこれらの変数を初期化する必要があります。
private void initGameObjects() { bird = myWorld.getBird(); scroller = myWorld.getScroller(); frontGrass = scroller.getFrontGrass(); backGrass = scroller.getBackGrass(); pipe1 = scroller.getPipe1(); pipe2 = scroller.getPipe2(); pipe3 = scroller.getPipe3(); }
次に、これらのオブジェクトをrenderメソッドで描画する必要があります。Pipeオブジェクトはまだ準備ができていないため、空のレンダリングメソッドを追加し、後で置き換えます。ヘルパーメソッドを作成して、コードを多少読みやすくします。表示さ
れる幅/高さ/などの変数の値は、慎重に計算して取得したものです。自分で計算するよりも既成概念を好むと思いました!
private void drawGrass() { // batcher.draw(grass, frontGrass.getX(), frontGrass.getY(), frontGrass.getWidth(), frontGrass.getHeight()); batcher.draw(grass, backGrass.getX(), backGrass.getY(), backGrass.getWidth(), backGrass.getHeight()); } private void drawSkulls() { // , :) // , Pipe . batcher.draw(skullUp, pipe1.getX() - 1, pipe1.getY() + pipe1.getHeight() - 14, 24, 14); batcher.draw(skullDown, pipe1.getX() - 1, pipe1.getY() + pipe1.getHeight() + 45, 24, 14); batcher.draw(skullUp, pipe2.getX() - 1, pipe2.getY() + pipe2.getHeight() - 14, 24, 14); batcher.draw(skullDown, pipe2.getX() - 1, pipe2.getY() + pipe2.getHeight() + 45, 24, 14); batcher.draw(skullUp, pipe3.getX() - 1, pipe3.getY() + pipe3.getHeight() - 14, 24, 14); batcher.draw(skullDown, pipe3.getX() - 1, pipe3.getY() + pipe3.getHeight() + 45, 24, 14); } private void drawPipes() { // , :) // , Pipe . batcher.draw(bar, pipe1.getX(), pipe1.getY(), pipe1.getWidth(), pipe1.getHeight()); batcher.draw(bar, pipe1.getX(), pipe1.getY() + pipe1.getHeight() + 45, pipe1.getWidth(), midPointY + 66 - (pipe1.getHeight() + 45)); batcher.draw(bar, pipe2.getX(), pipe2.getY(), pipe2.getWidth(), pipe2.getHeight()); batcher.draw(bar, pipe2.getX(), pipe2.getY() + pipe2.getHeight() + 45, pipe2.getWidth(), midPointY + 66 - (pipe2.getHeight() + 45)); batcher.draw(bar, pipe3.getX(), pipe3.getY(), pipe3.getWidth(), pipe3.getHeight()); batcher.draw(bar, pipe3.getX(), pipe3.getY() + pipe3.getHeight() + 45, pipe3.getWidth(), midPointY + 66 - (pipe3.getHeight() + 45)); }
これで、renderメソッドでこれらのメソッドを正しい順序で呼び出すことができます。すべての変更(1 ... 2 ... 3 ...)にタグを追加しました。すべてのコードの例:
Gamerenderer.java
package com.kilobolt.gameworld; import com.badlogic.gdx.Gdx; import com.badlogic.gdx.graphics.GL20; import com.badlogic.gdx.graphics.OrthographicCamera; import com.badlogic.gdx.graphics.g2d.Animation; import com.badlogic.gdx.graphics.g2d.SpriteBatch; import com.badlogic.gdx.graphics.g2d.TextureRegion; import com.badlogic.gdx.graphics.glutils.ShapeRenderer; import com.badlogic.gdx.graphics.glutils.ShapeRenderer.ShapeType; import com.kilobolt.gameobjects.Bird; import com.kilobolt.gameobjects.Grass; import com.kilobolt.gameobjects.Pipe; import com.kilobolt.gameobjects.ScrollHandler; import com.kilobolt.zbhelpers.AssetLoader; public class GameRenderer { private GameWorld myWorld; private OrthographicCamera cam; private ShapeRenderer shapeRenderer; private SpriteBatch batcher; private int midPointY; private int gameHeight; // Game Objects private Bird bird; private ScrollHandler scroller; private Grass frontGrass, backGrass; private Pipe pipe1, pipe2, pipe3; // Game Assets private TextureRegion bg, grass; private Animation birdAnimation; private TextureRegion birdMid, birdDown, birdUp; private TextureRegion skullUp, skullDown, bar; public GameRenderer(GameWorld world, int gameHeight, int midPointY) { myWorld = world; this.gameHeight = gameHeight; this.midPointY = midPointY; cam = new OrthographicCamera(); cam.setToOrtho(true, 136, gameHeight); batcher = new SpriteBatch(); batcher.setProjectionMatrix(cam.combined); shapeRenderer = new ShapeRenderer(); shapeRenderer.setProjectionMatrix(cam.combined); // initGameObjects(); initAssets(); } private void initGameObjects() { bird = myWorld.getBird(); scroller = myWorld.getScroller(); frontGrass = scroller.getFrontGrass(); backGrass = scroller.getBackGrass(); pipe1 = scroller.getPipe1(); pipe2 = scroller.getPipe2(); pipe3 = scroller.getPipe3(); } private void initAssets() { bg = AssetLoader.bg; grass = AssetLoader.grass; birdAnimation = AssetLoader.birdAnimation; birdMid = AssetLoader.bird; birdDown = AssetLoader.birdDown; birdUp = AssetLoader.birdUp; skullUp = AssetLoader.skullUp; skullDown = AssetLoader.skullDown; bar = AssetLoader.bar; } private void drawGrass() { // batcher.draw(grass, frontGrass.getX(), frontGrass.getY(), frontGrass.getWidth(), frontGrass.getHeight()); batcher.draw(grass, backGrass.getX(), backGrass.getY(), backGrass.getWidth(), backGrass.getHeight()); } private void drawSkulls() { // , :) // , Pipe . batcher.draw(skullUp, pipe1.getX() - 1, pipe1.getY() + pipe1.getHeight() - 14, 24, 14); batcher.draw(skullDown, pipe1.getX() - 1, pipe1.getY() + pipe1.getHeight() + 45, 24, 14); batcher.draw(skullUp, pipe2.getX() - 1, pipe2.getY() + pipe2.getHeight() - 14, 24, 14); batcher.draw(skullDown, pipe2.getX() - 1, pipe2.getY() + pipe2.getHeight() + 45, 24, 14); batcher.draw(skullUp, pipe3.getX() - 1, pipe3.getY() + pipe3.getHeight() - 14, 24, 14); batcher.draw(skullDown, pipe3.getX() - 1, pipe3.getY() + pipe3.getHeight() + 45, 24, 14); } private void drawPipes() { // , :) // , Pipe . batcher.draw(bar, pipe1.getX(), pipe1.getY(), pipe1.getWidth(), pipe1.getHeight()); batcher.draw(bar, pipe1.getX(), pipe1.getY() + pipe1.getHeight() + 45, pipe1.getWidth(), midPointY + 66 - (pipe1.getHeight() + 45)); batcher.draw(bar, pipe2.getX(), pipe2.getY(), pipe2.getWidth(), pipe2.getHeight()); batcher.draw(bar, pipe2.getX(), pipe2.getY() + pipe2.getHeight() + 45, pipe2.getWidth(), midPointY + 66 - (pipe2.getHeight() + 45)); batcher.draw(bar, pipe3.getX(), pipe3.getY(), pipe3.getWidth(), pipe3.getHeight()); batcher.draw(bar, pipe3.getX(), pipe3.getY() + pipe3.getHeight() + 45, pipe3.getWidth(), midPointY + 66 - (pipe3.getHeight() + 45)); } public void render(float runTime) { Gdx.gl.glClearColor(0, 0, 0, 1); Gdx.gl.glClear(GL20.GL_COLOR_BUFFER_BIT); shapeRenderer.begin(ShapeType.Filled); // shapeRenderer.setColor(55 / 255.0f, 80 / 255.0f, 100 / 255.0f, 1); shapeRenderer.rect(0, 0, 136, midPointY + 66); // Grass shapeRenderer.setColor(111 / 255.0f, 186 / 255.0f, 45 / 255.0f, 1); shapeRenderer.rect(0, midPointY + 66, 136, 11); // Dirt shapeRenderer.setColor(147 / 255.0f, 80 / 255.0f, 27 / 255.0f, 1); shapeRenderer.rect(0, midPointY + 77, 136, 52); shapeRenderer.end(); batcher.begin(); batcher.disableBlending(); batcher.draw(bg, 0, midPointY + 23, 136, 43); // 1. Grass drawGrass(); // 2. Pipes drawPipes(); batcher.enableBlending(); // 3. Skulls ( ) drawSkulls(); if (bird.shouldntFlap()) { batcher.draw(birdMid, bird.getX(), bird.getY(), bird.getWidth() / 2.0f, bird.getHeight() / 2.0f, bird.getWidth(), bird.getHeight(), 1, 1, bird.getRotation()); } else { batcher.draw(birdAnimation.getKeyFrame(runTime), bird.getX(), bird.getY(), bird.getWidth() / 2.0f, bird.getHeight() / 2.0f, bird.getWidth(), bird.getHeight(), 1, 1, bird.getRotation()); } batcher.end(); } }
私たちは7日目に多くのことをしました!ゲームがどのように見えるか見てみましょう:

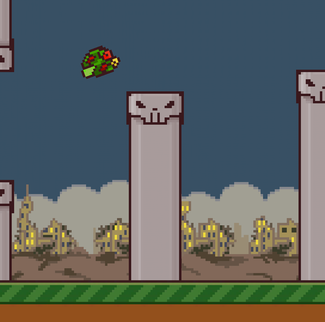
お読みいただき、おめでとうございます!これで、レンダリングに必要なものはすべて揃いました。コロシアムで作業する時間です。翌日参加してください!
1日あたりのソースコード
あなたは、コードを自分で書くことが気分の外にある場合は、こちらからダウンロード:
8日目-衝突検出と音響効果
Flappy Birdのクローンの作成に関するlibGDXチュートリアルにようこそ!今日は、衝突を判定するロジックを追加します。後で、それを使用して、鳥がいつ死ぬべきかを判定します。
Flappy Birdでは、鳥は2つの方法で死ぬことができます。鳥が地面にぶつかる、またはパイプの1つと衝突する。
今日のレッスンでは、2番目のタイプの死を実装し、衝突中に再生するサウンドエフェクトも追加します!始めましょう。7日目に停止したことから始めます。今日から続けたい場合は、7日目からソースコードをダウンロードして戻ってください。
多数の間違いを取り除く
私のソースコードを使用した場合、100%のエラーが発生するはずです:)。私が誤って同じものを複製した場合...そして、私たちも過剰を取り除く必要があります。Bird
クラスを開き、updateメソッドまでスクロールダウンして、次の繰り返しのいずれかを削除します(独自のコードを記述した場合、このコードブロックはありません)。
if (velocity.y > 200) { velocity.y = 200; } if (velocity.y > 200) { velocity.y = 200; }
コロシアムについて議論しましょう
最初は、回転ポリゴンを使用して衝突を判断することを考えていましたが、実験の後、円を作成する方がはるかに簡単で、より効率的であることに気付きました。そのため、最も簡単なソリューションを実装しています。
アイデアは、円が常に同じポイントに中心を置くということです。彼は回転する必要はありません。円は常に鳥の頭の領域を覆います。鳥は常に前方に飛ぶため、鳥の背中とパイプの衝突について考える必要はありません。したがって、この領域での衝突チェックに煩わされることはありません。
このゲームのPipeオブジェクトには、上下両方のパイプが含まれています。これらの各パイプは、長方形を使用して作成されます。 1つの長方形が頭蓋骨を覆い、他の長方形がパイプの主要部分を覆います。
衝突チェックでは、組み込みのIntersectorクラスを使用します。このクラスには、四角形と円の間の衝突をチェックするメソッドがあります。コロシアムに出会ったらすぐに、このイベントをゲームに通知し、すべての動いているオブジェクトを停止するように指示します。

バードクラス-テクニカルサークル
まず、鳥の円枠を作成します。Birdクラスを開きます。
- タイプCircleのクラスに変数を追加し、クラスのインポートを追加しますimport com.badlogic.gdx.math.Circle; そしてboundingCircleと名付けます:
private Circle boundingCircle;
- クラスコンストラクターで初期化します。
boundingCircle = new Circle();
鳥が動くたびに円の座標を変更する必要があります。我々は追加の鳥の移動速度を当社に位置するので、この行の直後に追加position.add(velocity.cpy()SCL(デルタ )。) としては、次のとおりです。
boundingCircle.set(position.x + 9, position.y + 6, 6.5f);
- 新しいboundingCircle変数にアクセス方法を追加します。
これで、Birdクラスは次のようになります。
Bird.java
package com.kilobolt.gameobjects; import com.badlogic.gdx.math.Circle; import com.badlogic.gdx.math.Vector2; public class Bird { private Vector2 position; private Vector2 velocity; private Vector2 acceleration; private float rotation; private int width; private int height; private Circle boundingCircle; public Bird(float x, float y, int width, int height) { this.width = width; this.height = height; position = new Vector2(x, y); velocity = new Vector2(0, 0); acceleration = new Vector2(0, 460); boundingCircle = new Circle(); } public void update(float delta) { velocity.add(acceleration.cpy().scl(delta)); if (velocity.y > 200) { velocity.y = 200; } position.add(velocity.cpy().scl(delta)); // (9, 6) . // 6.5f; boundingCircle.set(position.x + 9, position.y + 6, 6.5f); // if (velocity.y < 0) { rotation -= 600 * delta; if (rotation < -20) { rotation = -20; } } // if (isFalling()) { rotation += 480 * delta; if (rotation > 90) { rotation = 90; } } } public boolean isFalling() { return velocity.y > 110; } public boolean shouldntFlap() { return velocity.y > 70; } public void onClick() { velocity.y = -140; } public float getX() { return position.x; } public float getY() { return position.y; } public float getWidth() { return width; } public float getHeight() { return height; } public float getRotation() { return rotation; } public Circle getBoundingCircle() { return boundingCircle; } }
さらに、サークルが正しく配置されていると確信します。GameRendererクラスを開き、次のコードをrenderメソッドの一番下に追加します。boundingCircleオブジェクトを描画します。
shapeRenderer.begin(ShapeType.Filled); shapeRenderer.setColor(Color.RED); shapeRenderer.circle(bird.getBoundingCircle().x, bird.getBoundingCircle().y, bird.getBoundingCircle().radius); shapeRenderer.end();
ゲームを実行すると、次のようになります。

パイプクラス-技術的な四角形
鳥の円ができたので、次に示すように、Rectangle型のオブジェクトを作成して、Pipe型のオブジェクトを描画する必要があります。Pipeクラスを開きます。

適切な数学
プレイに沿って、視覚的に類似した一連のピクセル単位の幅と高さが使用されるため、下の図を使用してください。また、あなたが私の考えを理解できるように、コードに残したコメントも注意深く読んでください。

上の図に描かれているすべてを実装します。
- クラスに次の変数を作成し、インポートを追加します(import com.badlogic.gdx.math.Rectangle):
private Rectangle skullUp, skullDown, barUp, barDown;
- 45 :
public static final int VERTICAL_GAP = 45; public static final int SKULL_WIDTH = 24; public static final int SKULL_HEIGHT = 11;
- , , ( ). :
private float groundY;
- , skullUp, skullDown, barUp, barDown groundY :
public Pipe(float x, float y, int width, int height, float scrollSpeed, float groundY) { super(x, y, width, height, scrollSpeed); // Random r = new Random(); skullUp = new Rectangle(); skullDown = new Rectangle(); barUp = new Rectangle(); barDown = new Rectangle(); this.groundY = groundY; }
- , , :
public Rectangle getSkullUp() { return skullUp; } public Rectangle getSkullDown() { return skullDown; } public Rectangle getBarUp() { return barUp; } public Rectangle getBarDown() { return barDown; }
鳥のboundingCircleと同様に、Pipeの位置が変更されたときに4つの長方形すべてを更新する必要があります。 Pipeクラスにはupdateメソッドはありません。ただし、このクラスはScrollableクラスからupdateメソッドを継承します。 Scrollableクラスで四角形を更新することもできますが、Override更新メソッドを使用してこれを行う方が簡単です(忘れてしまった場合は、このテーマの7日目を参照してください)。superを呼び出す
ことにより、Scrollableクラスに属する元のupdateメソッドを呼び出します。superを呼び出した後に来るコードは追加機能です。この場合、4つの四角形を簡単に更新します。
Mathと上記の画像で説明した計算を使用して、updateメソッドに以下の変更を加えます(これは、Pipeクラスが今どのように見えるはずです):
Pipe.java
package com.kilobolt.gameobjects; import java.util.Random; import com.badlogic.gdx.math.Rectangle; public class Pipe extends Scrollable { private Random r; private Rectangle skullUp, skullDown, barUp, barDown; public static final int VERTICAL_GAP = 45; public static final int SKULL_WIDTH = 24; public static final int SKULL_HEIGHT = 11; private float groundY; // Pipe – super (Scrollable) public Pipe(float x, float y, int width, int height, float scrollSpeed, float groundY) { super(x, y, width, height, scrollSpeed); // Random r = new Random(); skullUp = new Rectangle(); skullDown = new Rectangle(); barUp = new Rectangle(); barDown = new Rectangle(); this.groundY = groundY; } @Override public void update(float delta) { // update (Scrollable) super.update(delta); // set() - x, y // width height barUp.set(position.x, position.y, width, height); barDown.set(position.x, position.y + height + VERTICAL_GAP, width, groundY - (position.y + height + VERTICAL_GAP)); // 24 . 22 . // 1 ( // ). // : (SKULL_WIDTH - width) / 2 skullUp.set(position.x - (SKULL_WIDTH - width) / 2, position.y + height - SKULL_HEIGHT, SKULL_WIDTH, SKULL_HEIGHT); skullDown.set(position.x - (SKULL_WIDTH - width) / 2, barDown.y, SKULL_WIDTH, SKULL_HEIGHT); } @Override public void reset(float newX) { // reset (Scrollable) super.reset(newX); // height = r.nextInt(90) + 15; } public Rectangle getSkullUp() { return skullUp; } public Rectangle getSkullDown() { return skullDown; } public Rectangle getBarUp() { return barUp; } public Rectangle getBarDown() { return barDown; } }
ScrollHandlerクラスの更新
Pipeクラスのコンストラクタを変更し、Pipe型の新しいオブジェクトを作成するときに、入力に別の引数を追加する必要があります。次の行に貼り付けます。
pipe1 = new Pipe(210, 0, 22, 60, SCROLL_SPEED); pipe2 = new Pipe(pipe1.getTailX() + PIPE_GAP, 0, 22, 70, SCROLL_SPEED); pipe3 = new Pipe(pipe2.getTailX() + PIPE_GAP, 0, 22, 60, SCROLL_SPEED);
これらの変更:
pipe1 = new Pipe(210, 0, 22, 60, SCROLL_SPEED, yPos); pipe2 = new Pipe(pipe1.getTailX() + PIPE_GAP, 0, 22, 70, SCROLL_SPEED, yPos); pipe3 = new Pipe(pipe2.getTailX() + PIPE_GAP, 0, 22, 60, SCROLL_SPEED, yPos);
GameRendererに戻り、renderメソッドの最後に数行のコードを追加しましょう。これはテスト用の一時的なコードです。以下のようにコピーして貼り付けてください。
GameRenderer.render()
public void render(float runTime) { Gdx.gl.glClearColor(0, 0, 0, 1); Gdx.gl.glClear(GL20.GL_COLOR_BUFFER_BIT); shapeRenderer.begin(ShapeType.Filled); // shapeRenderer.setColor(55 / 255.0f, 80 / 255.0f, 100 / 255.0f, 1); shapeRenderer.rect(0, 0, 136, midPointY + 66); // Grass shapeRenderer.setColor(111 / 255.0f, 186 / 255.0f, 45 / 255.0f, 1); shapeRenderer.rect(0, midPointY + 66, 136, 11); // Dirt shapeRenderer.setColor(147 / 255.0f, 80 / 255.0f, 27 / 255.0f, 1); shapeRenderer.rect(0, midPointY + 77, 136, 52); shapeRenderer.end(); batcher.begin(); batcher.disableBlending(); batcher.draw(bg, 0, midPointY + 23, 136, 43); // 1. Grass drawGrass(); // 2. Pipes drawPipes(); batcher.enableBlending(); // 3. Skulls ( ) drawSkulls(); if (bird.shouldntFlap()) { batcher.draw(birdMid, bird.getX(), bird.getY(), bird.getWidth() / 2.0f, bird.getHeight() / 2.0f, bird.getWidth(), bird.getHeight(), 1, 1, bird.getRotation()); } else { batcher.draw(birdAnimation.getKeyFrame(runTime), bird.getX(), bird.getY(), bird.getWidth() / 2.0f, bird.getHeight() / 2.0f, bird.getWidth(), bird.getHeight(), 1, 1, bird.getRotation()); } batcher.end(); shapeRenderer.begin(ShapeType.Filled); shapeRenderer.setColor(Color.RED); shapeRenderer.circle(bird.getBoundingCircle().x, bird.getBoundingCircle().y, bird.getBoundingCircle().radius); /* * . * . */ // 1, 2 3 shapeRenderer.rect(pipe1.getBarUp().x, pipe1.getBarUp().y, pipe1.getBarUp().width, pipe1.getBarUp().height); shapeRenderer.rect(pipe2.getBarUp().x, pipe2.getBarUp().y, pipe2.getBarUp().width, pipe2.getBarUp().height); shapeRenderer.rect(pipe3.getBarUp().x, pipe3.getBarUp().y, pipe3.getBarUp().width, pipe3.getBarUp().height); // 1, 2 3 shapeRenderer.rect(pipe1.getBarDown().x, pipe1.getBarDown().y, pipe1.getBarDown().width, pipe1.getBarDown().height); shapeRenderer.rect(pipe2.getBarDown().x, pipe2.getBarDown().y, pipe2.getBarDown().width, pipe2.getBarDown().height); shapeRenderer.rect(pipe3.getBarDown().x, pipe3.getBarDown().y, pipe3.getBarDown().width, pipe3.getBarDown().height); // 1, 2 3 shapeRenderer.rect(pipe1.getSkullUp().x, pipe1.getSkullUp().y, pipe1.getSkullUp().width, pipe1.getSkullUp().height); shapeRenderer.rect(pipe2.getSkullUp().x, pipe2.getSkullUp().y, pipe2.getSkullUp().width, pipe2.getSkullUp().height); shapeRenderer.rect(pipe3.getSkullUp().x, pipe3.getSkullUp().y, pipe3.getSkullUp().width, pipe3.getSkullUp().height); // 1, 2 and 3 shapeRenderer.rect(pipe1.getSkullDown().x, pipe1.getSkullDown().y, pipe1.getSkullDown().width, pipe1.getSkullDown().height); shapeRenderer.rect(pipe2.getSkullDown().x, pipe2.getSkullDown().y, pipe2.getSkullDown().width, pipe2.getSkullDown().height); shapeRenderer.rect(pipe3.getSkullDown().x, pipe3.getSkullDown().y, pipe3.getSkullDown().width, pipe3.getSkullDown().height); shapeRenderer.end(); }
ゲームを起動してください!ゲームは次の図のようになります

。衝突をチェックするために必要なブロックができました。次に、衝突を処理するロジックを追加します。
オブジェクト間のコリースを定義する
衝突の定義には、いくつかのクラスが含まれます。
- ScrollHandlerクラスは、すべてのパイプとその技術的な長方形にアクセスできるため、本質的に、これは衝突をチェックする必要があるクラスです。
- GameWorldクラスは、衝突がいつ発生するかを認識して、正しく処理できるようにする必要があります(現在のスコアを取得する、鳥を残す、音楽の再生を停止するなど)。
- GameRendererクラスは、鳥が死ぬとすぐに反応する必要があります(スコアの表示、フラッシュの表示)。
GameWorldクラスから始めます。更新メソッドに次を追加します。
public void update(float delta) { bird.update(delta); scroller.update(delta); if (scroller.collides(bird)) { // Clean up on game over scroller.stop(); } }
次に、クラス内の二つの方法作成ScrollHandler方法:停止及び方法衝突します。ScrollHandlerクラスに行き、これらのメソッドを追加しましょう。
public void stop() { frontGrass.stop(); backGrass.stop(); pipe1.stop(); pipe2.stop(); pipe3.stop();} // True - public boolean collides(Bird bird) { return (pipe1.collides(bird) || pipe2.collides(bird) || pipe3.collides(bird)); }
完全なクラスコード:
<spoiler title = "ScrollHandler.java>
package com.kilobolt.gameobjects; public class ScrollHandler { private Grass frontGrass, backGrass; private Pipe pipe1, pipe2, pipe3; public static final int SCROLL_SPEED = -59; public static final int PIPE_GAP = 49; public ScrollHandler(float yPos) { frontGrass = new Grass(0, yPos, 143, 11, SCROLL_SPEED); backGrass = new Grass(frontGrass.getTailX(), yPos, 143, 11, SCROLL_SPEED); pipe1 = new Pipe(210, 0, 22, 60, SCROLL_SPEED, yPos); pipe2 = new Pipe(pipe1.getTailX() + PIPE_GAP, 0, 22, 70, SCROLL_SPEED, yPos); pipe3 = new Pipe(pipe2.getTailX() + PIPE_GAP, 0, 22, 60, SCROLL_SPEED, yPos); } public void update(float delta) { // frontGrass.update(delta); backGrass.update(delta); pipe1.update(delta); pipe2.update(delta); pipe3.update(delta); // // if (pipe1.isScrolledLeft()) { pipe1.reset(pipe3.getTailX() + PIPE_GAP); } else if (pipe2.isScrolledLeft()) { pipe2.reset(pipe1.getTailX() + PIPE_GAP); } else if (pipe3.isScrolledLeft()) { pipe3.reset(pipe2.getTailX() + PIPE_GAP); } // if (frontGrass.isScrolledLeft()) { frontGrass.reset(backGrass.getTailX()); } else if (backGrass.isScrolledLeft()) { backGrass.reset(frontGrass.getTailX()); } } public void stop() { frontGrass.stop(); backGrass.stop(); pipe1.stop(); pipe2.stop(); pipe3.stop(); } public boolean collides(Bird bird) { return (pipe1.collides(bird) || pipe2.collides(bird) || pipe3 .collides(bird)); } public Grass getFrontGrass() { return frontGrass; } public Grass getBackGrass() { return backGrass; } public Pipe getPipe1() { return pipe1; } public Pipe getPipe2() { return pipe2; } public Pipe getPipe3() { return pipe3; } }
そして今、エラーを修正するために、2つの変更を行う必要があります。Scrollableオブジェクト(PipeおよびGrass)を停止できるようにする必要があるため、Scrollableクラス内にstopメソッドを追加します。
- Scrollableクラスを開き、次のメソッドを追加します。
public void stop() { velocity.x = 0; }
- , Pipe , . Pipe :
public boolean collides(Bird bird) { if (position.x < bird.getX() + bird.getWidth()) { return (Intersector.overlaps(bird.getBoundingCircle(), barUp) || Intersector.overlaps(bird.getBoundingCircle(), barDown) || Intersector.overlaps(bird.getBoundingCircle(), skullUp) || Intersector .overlaps(bird.getBoundingCircle(), skullDown)); } return false; }
このメソッドでは、position.xがbird.getX + bird.getWidthより小さいかどうかをチェックすることから始めます。そうでない場合、衝突は不可能です。これは非常に安価なチェックです(ゲームのパフォーマンスには影響しません)。ほとんどの場合、この条件はfalseを返すため、負荷の高いチェックを実行する必要はありません。
この条件がtrueを返す場合、Intersector.overlaps()に「高価な」呼び出しを行います(円が長方形と交差する場合はtrueを返します)。4つの長方形のいずれかが鳥の技術的円と交差する場合、trueを返します。
更新されたPipeおよびScrollableクラスの完全なコード:
<spoiler title =»Updated Pipe.java>
package com.kilobolt.gameobjects; import java.util.Random; import com.badlogic.gdx.math.Intersector; import com.badlogic.gdx.math.Rectangle; public class Pipe extends Scrollable { private Random r; private Rectangle skullUp, skullDown, barUp, barDown; public static final int VERTICAL_GAP = 45; public static final int SKULL_WIDTH = 24; public static final int SKULL_HEIGHT = 11; private float groundY; // Pipe – (Scrollable) public Pipe(float x, float y, int width, int height, float scrollSpeed, float groundY) { super(x, y, width, height, scrollSpeed); // Random r = new Random(); skullUp = new Rectangle(); skullDown = new Rectangle(); barUp = new Rectangle(); barDown = new Rectangle(); this.groundY = groundY; } @Override public void update(float delta) { // update (Scrollable) super.update(delta); // set() - x, y // width height barUp.set(position.x, position.y, width, height); barDown.set(position.x, position.y + height + VERTICAL_GAP, width, groundY - (position.y + height + VERTICAL_GAP)); // 24 . 22 . // 1 ( // ). // This shift is equivalent to: (SKULL_WIDTH - width) / 2 skullUp.set(position.x - (SKULL_WIDTH - width) / 2, position.y + height - SKULL_HEIGHT, SKULL_WIDTH, SKULL_HEIGHT); skullDown.set(position.x - (SKULL_WIDTH - width) / 2, barDown.y, SKULL_WIDTH, SKULL_HEIGHT); } @Override public void reset(float newX) { // reset (Scrollable) super.reset(newX); // height = r.nextInt(90) + 15; } public Rectangle getSkullUp() { return skullUp; } public Rectangle getSkullDown() { return skullDown; } public Rectangle getBarUp() { return barUp; } public Rectangle getBarDown() { return barDown; } public boolean collides(Bird bird) { if (position.x < bird.getX() + bird.getWidth()) { return (Intersector.overlaps(bird.getBoundingCircle(), barUp) || Intersector.overlaps(bird.getBoundingCircle(), barDown) || Intersector.overlaps(bird.getBoundingCircle(), skullUp) || Intersector .overlaps(bird.getBoundingCircle(), skullDown)); } return false; } }
<spoiler title = "更新可能なScrollable.java>
package com.kilobolt.gameobjects; import com.badlogic.gdx.math.Vector2; public class Scrollable { // Protected private, // . protected Vector2 position; protected Vector2 velocity; protected int width; protected int height; protected boolean isScrolledLeft; public Scrollable(float x, float y, int width, int height, float scrollSpeed) { position = new Vector2(x, y); velocity = new Vector2(scrollSpeed, 0); this.width = width; this.height = height; isScrolledLeft = false; } public void update(float delta) { position.add(velocity.cpy().scl(delta)); // Scollable : if (position.x + width < 0) { isScrolledLeft = true; } } // Reset: . public void reset(float newX) { position.x = newX; isScrolledLeft = false; } public void stop() { velocity.x = 0; } // public boolean isScrolledLeft() { return isScrolledLeft; } public float getTailX() { return position.x + width; } public float getX() { return position.x; } public float getY() { return position.y; } public int getWidth() { return width; } public int getHeight() { return height; } }
コードをテストします!
これで、すべての衝突をチェックし、ゲームを開始し、すべてが機能することを確認するためのコードの記述が終了しました!9日目に、より洗練された死を加えます。しかし、今度は、鳥が死んだときにファイルから音を再生してみましょう。
音声ファイルをダウンロードする
この音声ファイルは、私が使用して作成したbfxr
 ダウンロードファイルdead.wavの
ZombieBird-のAndroidプロジェクト資産/データフォルダ内のファイルをダウンロードして配置します。

ここにファイルをコピーし、リンクを作成しないようにしてください。
更新クラスAssetLoder
最後に、サウンドファイルがあり、AssetLoaderクラスでSoundタイプのオブジェクトを作成できます。サウンドオブジェクトはメモリに保存され、一度だけロードされ、非常に使いやすいです(これは小さなファイル、短いサウンドに適用されます)。
- AssetLoaderクラスに次の変数を作成します。
public static Sound dead;
- loadメソッドで次のように初期化します。
dead = Gdx.audio.newSound(Gdx.files.internal("data/dead.wav"));
完全なコード例:
AssetLoader.java
package com.kilobolt.zbhelpers; import com.badlogic.gdx.Gdx; import com.badlogic.gdx.audio.Sound; import com.badlogic.gdx.graphics.Texture; import com.badlogic.gdx.graphics.Texture.TextureFilter; import com.badlogic.gdx.graphics.g2d.Animation; import com.badlogic.gdx.graphics.g2d.TextureRegion; public class AssetLoader { public static Texture texture; public static TextureRegion bg, grass; public static Animation birdAnimation; public static TextureRegion bird, birdDown, birdUp; public static TextureRegion skullUp, skullDown, bar; public static Sound dead; public static void load() { texture = new Texture(Gdx.files.internal("data/texture.png")); texture.setFilter(TextureFilter.Nearest, TextureFilter.Nearest); bg = new TextureRegion(texture, 0, 0, 136, 43); bg.flip(false, true); grass = new TextureRegion(texture, 0, 43, 143, 11); grass.flip(false, true); birdDown = new TextureRegion(texture, 136, 0, 17, 12); birdDown.flip(false, true); bird = new TextureRegion(texture, 153, 0, 17, 12); bird.flip(false, true); birdUp = new TextureRegion(texture, 170, 0, 17, 12); birdUp.flip(false, true); TextureRegion[] birds = { birdDown, bird, birdUp }; birdAnimation = new Animation(0.06f, birds); birdAnimation.setPlayMode(Animation.PlayMode.LOOP_PINGPONG); skullUp = new TextureRegion(texture, 192, 0, 24, 14); // skullUp skullDown = new TextureRegion(skullUp); skullDown.flip(false, true); bar = new TextureRegion(texture, 136, 16, 22, 3); bar.flip(false, true); dead = Gdx.audio.newSound(Gdx.files.internal("data/dead.wav")); } public static void dispose() { // , dispose. texture.dispose(); } }
サウンドファイルをプログラムしましょう
Sound型のオブジェクトができたので、ゲームで再生できます。GameWorldクラスを開き、クラスに次の変数を作成します。
private boolean isAlive = true;
そして、更新方法に次の変更を加えます。
public void update(float delta) { bird.update(delta); scroller.update(delta); if (isAlive && scroller.collides(bird)) { scroller.stop(); AssetLoader.dead.play(); isAlive = false; } }
これで、鳥が死ぬと、サウンドファイルが再生されます(繰り返しはせずに1回だけ)。クラスGameWorldを更新しました。ゲームを実行してみてください!
package com.kilobolt.gameworld; import com.kilobolt.gameobjects.Bird; import com.kilobolt.gameobjects.ScrollHandler; import com.kilobolt.zbhelpers.AssetLoader; public class GameWorld { private Bird bird; private ScrollHandler scroller; private boolean isAlive = true; public GameWorld(int midPointY) { bird = new Bird(33, midPointY - 5, 17, 12); // 66 midPointY scroller = new ScrollHandler(midPointY + 66); } public void update(float delta) { bird.update(delta); scroller.update(delta); if (scroller.collides(bird) && isAlive) { scroller.stop(); AssetLoader.dead.play(); isAlive = false; } } public Bird getBird() { return bird; } public ScrollHandler getScroller() { return scroller; } }
最後に、GameRendererからすべての技術的な長方形と円を削除できます。衝突検出ロジックは正常に機能しています。GameRendererクラスの例を次に示します。
Gamerenderer.java
package com.kilobolt.gameworld; import com.badlogic.gdx.Gdx; import com.badlogic.gdx.graphics.GL20; import com.badlogic.gdx.graphics.OrthographicCamera; import com.badlogic.gdx.graphics.g2d.Animation; import com.badlogic.gdx.graphics.g2d.SpriteBatch; import com.badlogic.gdx.graphics.g2d.TextureRegion; import com.badlogic.gdx.graphics.glutils.ShapeRenderer; import com.badlogic.gdx.graphics.glutils.ShapeRenderer.ShapeType; import com.kilobolt.gameobjects.Bird; import com.kilobolt.gameobjects.Grass; import com.kilobolt.gameobjects.Pipe; import com.kilobolt.gameobjects.ScrollHandler; import com.kilobolt.zbhelpers.AssetLoader; public class GameRenderer { private GameWorld myWorld; private OrthographicCamera cam; private ShapeRenderer shapeRenderer; private SpriteBatch batcher; private int midPointY; private int gameHeight; // private Bird bird; private ScrollHandler scroller; private Grass frontGrass, backGrass; private Pipe pipe1, pipe2, pipe3; // Assets private TextureRegion bg, grass; private Animation birdAnimation; private TextureRegion birdMid, birdDown, birdUp; private TextureRegion skullUp, skullDown, bar; public GameRenderer(GameWorld world, int gameHeight, int midPointY) { myWorld = world; this.gameHeight = gameHeight; this.midPointY = midPointY; cam = new OrthographicCamera(); cam.setToOrtho(true, 136, gameHeight); batcher = new SpriteBatch(); batcher.setProjectionMatrix(cam.combined); shapeRenderer = new ShapeRenderer(); shapeRenderer.setProjectionMatrix(cam.combined); // , initGameObjects(); initAssets(); } private void initGameObjects() { bird = myWorld.getBird(); scroller = myWorld.getScroller(); frontGrass = scroller.getFrontGrass(); backGrass = scroller.getBackGrass(); pipe1 = scroller.getPipe1(); pipe2 = scroller.getPipe2(); pipe3 = scroller.getPipe3(); } private void initAssets() { bg = AssetLoader.bg; grass = AssetLoader.grass; birdAnimation = AssetLoader.birdAnimation; birdMid = AssetLoader.bird; birdDown = AssetLoader.birdDown; birdUp = AssetLoader.birdUp; skullUp = AssetLoader.skullUp; skullDown = AssetLoader.skullDown; bar = AssetLoader.bar; } private void drawGrass() { // batcher.draw(grass, frontGrass.getX(), frontGrass.getY(), frontGrass.getWidth(), frontGrass.getHeight()); batcher.draw(grass, backGrass.getX(), backGrass.getY(), backGrass.getWidth(), backGrass.getHeight()); } private void drawSkulls() { // , :) // Pipe. batcher.draw(skullUp, pipe1.getX() - 1, pipe1.getY() + pipe1.getHeight() - 14, 24, 14); batcher.draw(skullDown, pipe1.getX() - 1, pipe1.getY() + pipe1.getHeight() + 45, 24, 14); batcher.draw(skullUp, pipe2.getX() - 1, pipe2.getY() + pipe2.getHeight() - 14, 24, 14); batcher.draw(skullDown, pipe2.getX() - 1, pipe2.getY() + pipe2.getHeight() + 45, 24, 14); batcher.draw(skullUp, pipe3.getX() - 1, pipe3.getY() + pipe3.getHeight() - 14, 24, 14); batcher.draw(skullDown, pipe3.getX() - 1, pipe3.getY() + pipe3.getHeight() + 45, 24, 14); } private void drawPipes() { // , :) // Grass. batcher.draw(bar, pipe1.getX(), pipe1.getY(), pipe1.getWidth(), pipe1.getHeight()); batcher.draw(bar, pipe1.getX(), pipe1.getY() + pipe1.getHeight() + 45, pipe1.getWidth(), midPointY + 66 - (pipe1.getHeight() + 45)); batcher.draw(bar, pipe2.getX(), pipe2.getY(), pipe2.getWidth(), pipe2.getHeight()); batcher.draw(bar, pipe2.getX(), pipe2.getY() + pipe2.getHeight() + 45, pipe2.getWidth(), midPointY + 66 - (pipe2.getHeight() + 45)); batcher.draw(bar, pipe3.getX(), pipe3.getY(), pipe3.getWidth(), pipe3.getHeight()); batcher.draw(bar, pipe3.getX(), pipe3.getY() + pipe3.getHeight() + 45, pipe3.getWidth(), midPointY + 66 - (pipe3.getHeight() + 45)); } public void render(float runTime) { Gdx.gl.glClearColor(0, 0, 0, 1); Gdx.gl.glClear(GL20.GL_COLOR_BUFFER_BIT); shapeRenderer.begin(ShapeType.Filled); // shapeRenderer.setColor(55 / 255.0f, 80 / 255.0f, 100 / 255.0f, 1); shapeRenderer.rect(0, 0, 136, midPointY + 66); // Grass shapeRenderer.setColor(111 / 255.0f, 186 / 255.0f, 45 / 255.0f, 1); shapeRenderer.rect(0, midPointY + 66, 136, 11); // Dirt shapeRenderer.setColor(147 / 255.0f, 80 / 255.0f, 27 / 255.0f, 1); shapeRenderer.rect(0, midPointY + 77, 136, 52); shapeRenderer.end(); batcher.begin(); batcher.disableBlending(); batcher.draw(bg, 0, midPointY + 23, 136, 43); // 1. Grass drawGrass(); // 2. Pipes drawPipes(); batcher.enableBlending(); // 3. Skulls ( ) drawSkulls(); if (bird.shouldntFlap()) { batcher.draw(birdMid, bird.getX(), bird.getY(), bird.getWidth() / 2.0f, bird.getHeight() / 2.0f, bird.getWidth(), bird.getHeight(), 1, 1, bird.getRotation()); } else { batcher.draw(birdAnimation.getKeyFrame(runTime), bird.getX(), bird.getY(), bird.getWidth() / 2.0f, bird.getHeight() / 2.0f, bird.getWidth(), bird.getHeight(), 1, 1, bird.getRotation()); } batcher.end(); } }
ほぼ完了です!
私たちのゲームはほとんど合法です。翌日、9日目に、ゲームワールドの残りの部分を終了し、ユーザーインターフェイスの追加を開始します。自分を引き締めます!ネクロポリスは近い!
1日あたりのソースコード
あなたは、コードを自分で書くことが気分の外にある場合は、こちらからダウンロード:
9日目-ゲームプレイと基本的なUIを完成させる
9日目へようこそ。今日は、巨像の定義を地面に追加してゲームプレイを終了し、鳥の死を改善します。次に、アカウント管理を実装し、BitmapFontの使用を構成してアカウントを表示します!
前日に終了した瞬間から続けます。ソースがない場合は、8日目にダウンロードしてください。
サウンドエフェクトをさらに追加します。
鳥の飛ぶ音とスコアを上げる音を追加する必要があります。
- クラスに2つの新しい変数を作成し、それらにflapとcoinという名前を付け、それらをloadメソッド内で初期化します。
flap = Gdx.audio.newSound(Gdx.files.internal("data/flap.wav")); coin = Gdx.audio.newSound(Gdx.files.internal("data/coin.wav"));
- また、disposeメソッドに以下を追加します。
dead.dispose(); flap.dispose(); coin.dispose();
ZombieGame-androidプロジェクトのasset / dataフォルダーに次のファイルをダウンロードして配置します:coin.wav flap.wav
テキストを追加してください!
非常にアクティブに見えるように、Hieroを使用して生成された.fontファイルを追加します。 Hieroは、テキストファイルを、ゲームのテクスチャに似た.pngテクスチャ画像に変換します。ただ、Hieroは作成の.fnt設定ファイルをそのlibGDX読み、絵に何の文字を認識することが可能。
これらのファイルを作成しました。以下からダウンロードできます。ゲームでどのように使用できるかを示します。

フォントは04b_19と呼ばれ、Flappy Birdで使用されており、無料です。
次の4つのファイルをダウンロードします
 。shadow.fnt
text.fnt
shadow.png
text.png
。shadow.fnt
text.fnt
shadow.png
text.png
これらの各ファイルを開いて、どのように機能するか確認してください。 4つのファイルすべてをフォルダー内に配置しますZombieGame-androidプロジェクトのアセット/データ。
これらのペアを使用できます。FNTと.pngのファイルは、型のオブジェクトを作成するにはBitmapFont私たちが使用して線を描くことを可能にする、SpriteBatchを私たちにGameRendererを新しい文字列を毎回作成する必要がなく、。BitmapFontは、各文字と数字がでている場所を決定するために使用をの.fnt TextureRegion。したがって、一般的に、余分な作業を行う必要はありません。彼らは私たちのためにすべてを行います。AssetLoaderで
これらのフォントを作成するには、次の手順に従います。
- クラスに新しい変数を作成します。
public static BitmapFont font, shadow;
- loadメソッドに次を追加します。
font = new BitmapFont(Gdx.files.internal("data/text.fnt")); font.setScale(.25f, -.25f); shadow = new BitmapFont(Gdx.files.internal("data/shadow.fnt")); shadow.setScale(.25f, -.25f);
これにより、ファイルがアップロードされ、必要なサイズに変更されます。
- また、disposeメソッドに次を追加します。
font.dispose(); shadow.dispose();
AssetLoaderは次のようになります。
AssetLoader
package com.kilobolt.ZBHelpers; import com.badlogic.gdx.Gdx; import com.badlogic.gdx.audio.Sound; import com.badlogic.gdx.graphics.Texture; import com.badlogic.gdx.graphics.Texture.TextureFilter; import com.badlogic.gdx.graphics.g2d.Animation; import com.badlogic.gdx.graphics.g2d.BitmapFont; import com.badlogic.gdx.graphics.g2d.TextureRegion; public class AssetLoader { public static Texture texture; public static TextureRegion bg, grass; public static Animation birdAnimation; public static TextureRegion bird, birdDown, birdUp; public static TextureRegion skullUp, skullDown, bar; public static Sound dead, flap, coin; public static BitmapFont font, shadow; public static void load() { texture = new Texture(Gdx.files.internal("data/texture.png")); texture.setFilter(TextureFilter.Nearest, TextureFilter.Nearest); bg = new TextureRegion(texture, 0, 0, 136, 43); bg.flip(false, true); grass = new TextureRegion(texture, 0, 43, 143, 11); grass.flip(false, true); birdDown = new TextureRegion(texture, 136, 0, 17, 12); birdDown.flip(false, true); bird = new TextureRegion(texture, 153, 0, 17, 12); bird.flip(false, true); birdUp = new TextureRegion(texture, 170, 0, 17, 12); birdUp.flip(false, true); TextureRegion[] birds = { birdDown, bird, birdUp }; birdAnimation = new Animation(0.06f, birds); birdAnimation.setPlayMode(Animation.LOOP_PINGPONG); skullUp = new TextureRegion(texture, 192, 0, 24, 14); // skullUp skullDown = new TextureRegion(skullUp); skullDown.flip(false, true); bar = new TextureRegion(texture, 136, 16, 22, 3); bar.flip(false, true); dead = Gdx.audio.newSound(Gdx.files.internal("data/dead.wav")); flap = Gdx.audio.newSound(Gdx.files.internal("data/flap.wav")); coin = Gdx.audio.newSound(Gdx.files.internal("data/coin.wav")); font = new BitmapFont(Gdx.files.internal("data/text.fnt")); font.setScale(.25f, -.25f); shadow = new BitmapFont(Gdx.files.internal("data/shadow.fnt")); shadow.setScale(.25f, -.25f); } public static void dispose() { // – texture.dispose(); // dead.dispose(); flap.dispose(); coin.dispose(); font.dispose(); shadow.dispose(); }
地球が痛い
GameWorldクラスに進みましょう。
- isALive変数を削除することから始めましょう。私たちは鳥の死という事実の論理を再考します。
- 鳥が地面に落ちたら死にたいです。今、それを行います。
長方形を作成して草オブジェクトとの衝突を判断して更新する代わりに、簡単にするために、地球を静的ボックスとして定義します。
- クラスに新しい変数を作成することから始めます。
(import com.badlogic.gdx.math) private Rectangle ground;
- コンストラクタで次のように初期化します。
ground = new Rectangle(0, midPointY + 66, 136, 11);
- 次に、更新方法を次のように変更します。
public void update(float delta) { // delta, // , if (delta > .15f) { delta = .15f; } bird.update(delta); scroller.update(delta); if (scroller.collides(bird) && bird.isAlive()) { scroller.stop(); bird.die(); AssetLoader.dead.play(); } if (Intersector.overlaps(bird.getBoundingCircle(), ground)) { scroller.stop(); bird.die(); bird.decelerate(); } }
私たちの鳥を修正しましょう
ここで、Birdクラスの間違いを修正する必要があります。
- :
private boolean isAlive
- :
isAlive = true;
- :
public boolean isAlive() { return isAlive; }
- isAlive , shouldntFlap . , , ( , , ):
public boolean shouldntFlap() { return velocity.y > 70 || !isAlive; }
true (, Y – ).
- onClick , :
public void onClick() { if (isAlive) { AssetLoader.flap.play(); velocity.y = -140; } }
: com.kilobolt.ZBHelpers.AssetLoader;
- dieとdecelerateの 2つの新しいメソッドを追加します。すべてが非常に簡単です:
public void die() { isAlive = false; velocity.y = 0; } public void decelerate() { // acceleration.y = 0; }
- そして最後に、更新メソッドの最後のifに新しい条件を追加します。
if (isFalling() || !isAlive) { ... }
したがって、上向きに飛んでいる鳥がヒットした場合、Flappy Birdの鳥のように、鼻を地面に向けます。
フルバードクラス:
Bird.java
package com.kilobolt.GameObjects; import com.badlogic.gdx.math.Circle; import com.badlogic.gdx.math.Vector2; import com.kilobolt.ZBHelpers.AssetLoader; public class Bird { private Vector2 position; private Vector2 velocity; private Vector2 acceleration; private float rotation; private int width; private int height; private boolean isAlive; private Circle boundingCircle; public Bird(float x, float y, int width, int height) { this.width = width; this.height = height; position = new Vector2(x, y); velocity = new Vector2(0, 0); acceleration = new Vector2(0, 460); boundingCircle = new Circle(); isAlive = true; } public void update(float delta) { velocity.add(acceleration.cpy().scl(delta)); if (velocity.y > 200) { velocity.y = 200; } position.add(velocity.cpy().scl(delta)); // (9, 6) // 6.5f; boundingCircle.set(position.x + 9, position.y + 6, 6.5f); // if (velocity.y < 0) { rotation -= 600 * delta; if (rotation < -20) { rotation = -20; } } // if (isFalling() || !isAlive) { rotation += 480 * delta; if (rotation > 90) { rotation = 90; } } } public boolean isFalling() { return velocity.y > 110; } public boolean shouldntFlap() { return velocity.y > 70 || !isAlive; } public void onClick() { if (isAlive) { AssetLoader.flap.play(); velocity.y = -140; } } public void die() { isAlive = false; velocity.y = 0; } public void decelerate() { acceleration.y = 0; } public float getX() { return position.x; } public float getY() { return position.y; } public float getWidth() { return width; } public float getHeight() { return height; } public float getRotation() { return rotation; } public Circle getBoundingCircle() { return boundingCircle; } public boolean isAlive() { return isAlive; } }
コードを実行してください!
ゲームは、衝突と死の定義とともにプレイ可能でなければなりません。次に、アカウント管理システムを実装します。
アカウント管理

ゆるい鳥では、鳥が各パイプスパンの約半分を飛ぶときにポイントを取得します。この動作をシミュレートし、追跡します。プレーヤーのスコアを保存する整数変数を作成する必要があります。GameWorldクラスで行います。
GameWorldクラスを開きます。
- クラスに新しい変数を作成します。
private int score = 0;
- 次に、この変数にアクセスするメソッドと、スコアを増加させるメソッドを作成します。
public int getScore() { return score; } public void addScore(int increment) { score += increment; }
GameWorldクラスは次のようになります。
GameWorld.java
package com.kilobolt.GameWorld; import com.badlogic.gdx.math.Intersector; import com.badlogic.gdx.math.Rectangle; import com.kilobolt.GameObjects.Bird; import com.kilobolt.GameObjects.ScrollHandler; import com.kilobolt.ZBHelpers.AssetLoader; public class GameWorld { private Bird bird; private ScrollHandler scroller; private Rectangle ground; private int score = 0; public GameWorld(int midPointY) { bird = new Bird(33, midPointY - 5, 17, 12); // 66 midPointY scroller = new ScrollHandler(midPointY + 66); ground = new Rectangle(0, midPointY + 66, 137, 11); } public void update(float delta) { // , // , if (delta > .15f) { delta = .15f; } bird.update(delta); scroller.update(delta); if (scroller.collides(bird) && bird.isAlive()) { scroller.stop(); bird.die(); AssetLoader.dead.play(); } if (Intersector.overlaps(bird.getBoundingCircle(), ground)) { scroller.stop(); bird.die(); bird.decelerate(); } } public Bird getBird() { return bird; } public ScrollHandler getScroller() { return scroller; } public int getScore() { return score; } public void addScore(int increment) { score += increment; } }
スコアを上げる
スコアを増加させるロジックは、ScrollHandlerクラスにあります。開けましょう。アカウントで操作できるように、GameWorld
へのリンクが必要です。だから、コンストラクタにオブジェクトGameWorldへの参照を与え、そして名前のクラス変数に保存しGameWorld。インポートをGameWorldクラス(com.kilobolt.GameWorld.GameWorld)に追加してください。新しいScrollHandlerクラスコンストラクター:
public ScrollHandler(GameWorld gameWorld, float yPos) { this.gameWorld = gameWorld; frontGrass = new Grass(0, yPos, 143, 11, SCROLL_SPEED); backGrass = new Grass(frontGrass.getTailX(), yPos, 143, 11, SCROLL_SPEED); pipe1 = new Pipe(210, 0, 22, 60, SCROLL_SPEED, yPos); pipe2 = new Pipe(pipe1.getTailX() + PIPE_GAP, 0, 22, 70, SCROLL_SPEED, yPos); pipe3 = new Pipe(pipe2.getTailX() + PIPE_GAP, 0, 22, 60, SCROLL_SPEED, yPos); }
GameWorldクラスに移動し、次のようにScrollHandlerの作成を更新します。
scroller = new ScrollHandler(this, midPointY + 66);
一般的に、ロジックは次のとおりです。
- Xに関してパイプの中央が鳥のくちばしよりも小さい場合、スコアに1ポイントを追加します。
- 同じパイプに対してこのアクションを繰り返したくないので、新しいisScored 変数タイプのブール値をpipeに追加します。isScoredがfalseの場合のみ、スコアを増やします(プロセス中にisScoreをtrueに設定します。パイプ位置をリセットした後、isScoredをfalseに戻す必要があります)。
これは、以下で説明する新しい衝突ロジックです。
public boolean collides(Bird bird) { if (!pipe1.isScored() && pipe1.getX() + (pipe1.getWidth() / 2) < bird.getX() + bird.getWidth()) { addScore(1); pipe1.setScored(true); AssetLoader.coin.play(); } else if (!pipe2.isScored() && pipe2.getX() + (pipe2.getWidth() / 2) < bird.getX() + bird.getWidth()) { addScore(1); pipe2.setScored(true); AssetLoader.coin.play(); } else if (!pipe3.isScored() && pipe3.getX() + (pipe3.getWidth() / 2) < bird.getX() + bird.getWidth()) { addScore(1); pipe3.setScored(true); AssetLoader.coin.play(); } return (pipe1.collides(bird) || pipe2.collides(bird) || pipe3 .collides(bird)); }
今行ったすべての間違いを取り除くために、次のことを行う必要があります。
- AseetLoaderクラス(com.kilobolt.ZBHelpers.AssetLoader)のインポートを取得します。
- 次のaddScoreメソッドを作成します。
private void addScore(int increment) { gameWorld.addScore(increment); }
- Pipeクラスに移動し、isScoredという名前のブール型の変数を追加します。
ScrollHandlerクラスの完全な例:
ScrollHandler.java
package com.kilobolt.GameObjects; import com.kilobolt.GameWorld.GameWorld; import com.kilobolt.ZBHelpers.AssetLoader; public class ScrollHandler { private Grass frontGrass, backGrass; private Pipe pipe1, pipe2, pipe3; public static final int SCROLL_SPEED = -59; public static final int PIPE_GAP = 49; private GameWorld gameWorld; public ScrollHandler(GameWorld gameWorld, float yPos) { this.gameWorld = gameWorld; frontGrass = new Grass(0, yPos, 143, 11, SCROLL_SPEED); backGrass = new Grass(frontGrass.getTailX(), yPos, 143, 11, SCROLL_SPEED); pipe1 = new Pipe(210, 0, 22, 60, SCROLL_SPEED, yPos); pipe2 = new Pipe(pipe1.getTailX() + PIPE_GAP, 0, 22, 70, SCROLL_SPEED, yPos); pipe3 = new Pipe(pipe2.getTailX() + PIPE_GAP, 0, 22, 60, SCROLL_SPEED, yPos); } public void update(float delta) { // frontGrass.update(delta); backGrass.update(delta); pipe1.update(delta); pipe2.update(delta); pipe3.update(delta); // , // if (pipe1.isScrolledLeft()) { pipe1.reset(pipe3.getTailX() + PIPE_GAP); } else if (pipe2.isScrolledLeft()) { pipe2.reset(pipe1.getTailX() + PIPE_GAP); } else if (pipe3.isScrolledLeft()) { pipe3.reset(pipe2.getTailX() + PIPE_GAP); } // if (frontGrass.isScrolledLeft()) { frontGrass.reset(backGrass.getTailX()); } else if (backGrass.isScrolledLeft()) { backGrass.reset(frontGrass.getTailX()); } } public void stop() { frontGrass.stop(); backGrass.stop(); pipe1.stop(); pipe2.stop(); pipe3.stop(); } public boolean collides(Bird bird) { if (!pipe1.isScored() && pipe1.getX() + (pipe1.getWidth() / 2) < bird.getX() + bird.getWidth()) { addScore(1); pipe1.setScored(true); AssetLoader.coin.play(); } else if (!pipe2.isScored() && pipe2.getX() + (pipe2.getWidth() / 2) < bird.getX() + bird.getWidth()) { addScore(1); pipe2.setScored(true); AssetLoader.coin.play(); } else if (!pipe3.isScored() && pipe3.getX() + (pipe3.getWidth() / 2) < bird.getX() + bird.getWidth()) { addScore(1); pipe3.setScored(true); AssetLoader.coin.play(); } return (pipe1.collides(bird) || pipe2.collides(bird) || pipe3 .collides(bird)); } private void addScore(int increment) { gameWorld.addScore(increment); } public Grass getFrontGrass() { return frontGrass; } public Grass getBackGrass() { return backGrass; } public Pipe getPipe1() { return pipe1; } public Pipe getPipe2() { return pipe2; } public Pipe getPipe3() { return pipe3; } }
パイプクラス-isScoredブール値
- クラスに新しい変数を作成します。
private boolean isScored = false;
この変数は、ユーザーが現在のパイプを完了するためのポイントを獲得したときにtrueに設定されます。
- 更新方法は、リセット露出、isScoredを falseにパイプのとき、リセット位置。
@Override public void reset(float newX) { super.reset(newX); height = r.nextInt(90) + 15; isScored = false; }
次に、この変数のアクセス方法を作成します。
public boolean isScored() { return isScored; } public void setScored(boolean b) { isScored = b; }
Pipeクラスは次のようになります。
Pipe.java
package com.kilobolt.GameObjects; import java.util.Random; import com.badlogic.gdx.math.Intersector; import com.badlogic.gdx.math.Rectangle; public class Pipe extends Scrollable { private Random r; private Rectangle skullUp, skullDown, barUp, barDown; public static final int VERTICAL_GAP = 45; public static final int SKULL_WIDTH = 24; public static final int SKULL_HEIGHT = 11; private float groundY; private boolean isScored = false; // Pipe – (Scrollable) public Pipe(float x, float y, int width, int height, float scrollSpeed, float groundY) { super(x, y, width, height, scrollSpeed); // Random, r = new Random(); skullUp = new Rectangle(); skullDown = new Rectangle(); barUp = new Rectangle(); barDown = new Rectangle(); this.groundY = groundY; } @Override public void update(float delta) { // update (Scrollable) super.update(delta); barUp.set(position.x, position.y, width, height); barDown.set(position.x, position.y + height + VERTICAL_GAP, width, groundY - (position.y + height + VERTICAL_GAP)); // : (SKULL_WIDTH - width) / 2 skullUp.set(position.x - (SKULL_WIDTH - width) / 2, position.y + height - SKULL_HEIGHT, SKULL_WIDTH, SKULL_HEIGHT); skullDown.set(position.x - (SKULL_WIDTH - width) / 2, barDown.y, SKULL_WIDTH, SKULL_HEIGHT); } @Override public void reset(float newX) { // reset (Scrollable) super.reset(newX); // height = r.nextInt(90) + 15; isScored = false; } public Rectangle getSkullUp() { return skullUp; } public Rectangle getSkullDown() { return skullDown; } public Rectangle getBarUp() { return barUp; } public Rectangle getBarDown() { return barDown; } public boolean collides(Bird bird) { if (position.x < bird.getX() + bird.getWidth()) { return (Intersector.overlaps(bird.getBoundingCircle(), barUp) || Intersector.overlaps(bird.getBoundingCircle(), barDown) || Intersector.overlaps(bird.getBoundingCircle(), skullUp) || Intersector .overlaps(bird.getBoundingCircle(), skullDown)); } return false; } public boolean isScored() { return isScored; } public void setScored(boolean b) { isScored = b; } }
コードを実行してください!
パイプのペアを完了するポイントを取得するたびに、Coin.wavの再生を聞く必要があります。しかし、スコアがどのように成長するかを聞きたくありません。スコアがどのように変化しているかを確認したい!
画面にテキストを描画してスコアを表示します。
GameRendererでスコアを表示する
テキストの表示は簡単なタスクです。batcher.begin()とbatcher.end()の呼び出しの間に、次の行を追加する必要があります。
AssetLoader.shadow.draw(batcher, "hello world", x, y);
BitmapFont型のオブジェクトには、上記のように、SpriteBatch、線、およびこの線を描画するx座標とy座標を受け取るdrawメソッドがあります。
- renderメソッドのbatcher.end()呼び出しの前に、次のコード行を追加します。
AssetLoader.shadow.draw(batcher, "hello world", x, y);
//整数を文字
列に変換文字列スコア= myWorld.getScore()+ "";
//まず、影を描画します
AssetLoader.shadow.draw(batcher、„“ + myWorld.getScore()、(136/2)-(3 * score.length())、12);
//テキスト自体を描画します
AssetLoader.font.draw(batcher、„“ + myWorld.getScore()、(136/2)-(3 * score.length()-1)、11);
batcher.end();
まず、BitmapFontを使用して値を描画できるように、IntegerをStringに変換します。カウントの長さに基づいてX座標の適切な値を計算し、画面の中央にテキストを適切に中央揃えできるようにします。
GameRendererクラスの完全な例:
Gamerenderer.java
package com.kilobolt.GameWorld; import com.badlogic.gdx.Gdx; import com.badlogic.gdx.graphics.Color; import com.badlogic.gdx.graphics.GL20; import com.badlogic.gdx.graphics.OrthographicCamera; import com.badlogic.gdx.graphics.g2d.Animation; import com.badlogic.gdx.graphics.g2d.SpriteBatch; import com.badlogic.gdx.graphics.g2d.TextureRegion; import com.badlogic.gdx.graphics.glutils.ShapeRenderer; import com.badlogic.gdx.graphics.glutils.ShapeRenderer.ShapeType; import com.badlogic.gdx.math.Rectangle; import com.kilobolt.GameObjects.Bird; import com.kilobolt.GameObjects.Grass; import com.kilobolt.GameObjects.Pipe; import com.kilobolt.GameObjects.ScrollHandler; import com.kilobolt.ZBHelpers.AssetLoader; public class GameRenderer { private GameWorld myWorld; private OrthographicCamera cam; private ShapeRenderer shapeRenderer; private SpriteBatch batcher; private int midPointY; private int gameHeight; // private Bird bird; private ScrollHandler scroller; private Grass frontGrass, backGrass; private Pipe pipe1, pipe2, pipe3; // private TextureRegion bg, grass; private Animation birdAnimation; private TextureRegion birdMid, birdDown, birdUp; private TextureRegion skullUp, skullDown, bar; public GameRenderer(GameWorld world, int gameHeight, int midPointY) { myWorld = world; this.gameHeight = gameHeight; this.midPointY = midPointY; cam = new OrthographicCamera(); cam.setToOrtho(true, 136, gameHeight); batcher = new SpriteBatch(); batcher.setProjectionMatrix(cam.combined); shapeRenderer = new ShapeRenderer(); shapeRenderer.setProjectionMatrix(cam.combined); // , initGameObjects(); initAssets(); } private void initGameObjects() { bird = myWorld.getBird(); scroller = myWorld.getScroller(); frontGrass = scroller.getFrontGrass(); backGrass = scroller.getBackGrass(); pipe1 = scroller.getPipe1(); pipe2 = scroller.getPipe2(); pipe3 = scroller.getPipe3(); } private void initAssets() { bg = AssetLoader.bg; grass = AssetLoader.grass; birdAnimation = AssetLoader.birdAnimation; birdMid = AssetLoader.bird; birdDown = AssetLoader.birdDown; birdUp = AssetLoader.birdUp; skullUp = AssetLoader.skullUp; skullDown = AssetLoader.skullDown; bar = AssetLoader.bar; } private void drawGrass() { // batcher.draw(grass, frontGrass.getX(), frontGrass.getY(), frontGrass.getWidth(), frontGrass.getHeight()); batcher.draw(grass, backGrass.getX(), backGrass.getY(), backGrass.getWidth(), backGrass.getHeight()); } private void drawSkulls() { batcher.draw(skullUp, pipe1.getX() - 1, pipe1.getY() + pipe1.getHeight() - 14, 24, 14); batcher.draw(skullDown, pipe1.getX() - 1, pipe1.getY() + pipe1.getHeight() + 45, 24, 14); batcher.draw(skullUp, pipe2.getX() - 1, pipe2.getY() + pipe2.getHeight() - 14, 24, 14); batcher.draw(skullDown, pipe2.getX() - 1, pipe2.getY() + pipe2.getHeight() + 45, 24, 14); batcher.draw(skullUp, pipe3.getX() - 1, pipe3.getY() + pipe3.getHeight() - 14, 24, 14); batcher.draw(skullDown, pipe3.getX() - 1, pipe3.getY() + pipe3.getHeight() + 45, 24, 14); } private void drawPipes() { batcher.draw(bar, pipe1.getX(), pipe1.getY(), pipe1.getWidth(), pipe1.getHeight()); batcher.draw(bar, pipe1.getX(), pipe1.getY() + pipe1.getHeight() + 45, pipe1.getWidth(), midPointY + 66 - (pipe1.getHeight() + 45)); batcher.draw(bar, pipe2.getX(), pipe2.getY(), pipe2.getWidth(), pipe2.getHeight()); batcher.draw(bar, pipe2.getX(), pipe2.getY() + pipe2.getHeight() + 45, pipe2.getWidth(), midPointY + 66 - (pipe2.getHeight() + 45)); batcher.draw(bar, pipe3.getX(), pipe3.getY(), pipe3.getWidth(), pipe3.getHeight()); batcher.draw(bar, pipe3.getX(), pipe3.getY() + pipe3.getHeight() + 45, pipe3.getWidth(), midPointY + 66 - (pipe3.getHeight() + 45)); } public void render(float runTime) { Gdx.gl.glClearColor(0, 0, 0, 1); Gdx.gl.glClear(GL20.GL_COLOR_BUFFER_BIT); shapeRenderer.begin(ShapeType.Filled); // shapeRenderer.setColor(55 / 255.0f, 80 / 255.0f, 100 / 255.0f, 1); shapeRenderer.rect(0, 0, 136, midPointY + 66); // shapeRenderer.setColor(111 / 255.0f, 186 / 255.0f, 45 / 255.0f, 1); shapeRenderer.rect(0, midPointY + 66, 136, 11); // shapeRenderer.setColor(147 / 255.0f, 80 / 255.0f, 27 / 255.0f, 1); shapeRenderer.rect(0, midPointY + 77, 136, 52); shapeRenderer.end(); batcher.begin(); batcher.disableBlending(); batcher.draw(bg, 0, midPointY + 23, 136, 43); // 1. drawGrass(); // 2. drawPipes(); batcher.enableBlending(); // 3. ( ) drawSkulls(); if (bird.shouldntFlap()) { batcher.draw(birdMid, bird.getX(), bird.getY(), bird.getWidth() / 2.0f, bird.getHeight() / 2.0f, bird.getWidth(), bird.getHeight(), 1, 1, bird.getRotation()); } else { batcher.draw(birdAnimation.getKeyFrame(runTime), bird.getX(), bird.getY(), bird.getWidth() / 2.0f, bird.getHeight() / 2.0f, bird.getWidth(), bird.getHeight(), 1, 1, bird.getRotation()); } // integer String String score = myWorld.getScore() + ""; // AssetLoader.shadow.draw(batcher, "" + myWorld.getScore(), (136 / 2) - (3 * score.length()), 12); // AssetLoader.font.draw(batcher, "" + myWorld.getScore(), (136 / 2) - (3 * score.length() - 1), 11); batcher.end(); } }
これで実用的なメガネシステムが完成し、画面にテキストを表示することもできました。翌日、GameStatesを実装して、ゲームを再起動できるようにします。その後、何らかのUIを追加しようとします!
1日あたりのソースコード
あなたは、コードを自分で書くことが気分の外にある場合は、こちらからダウンロード:
10日目-GameStatesとベストスコア
このセクションでは、最終的に実装するGameStatesについて説明します:「タッチ/クリックで開始」、一時停止、および再起動。その後、「より良いスコア」を維持するために、libGDX機能を使用して「設定」を操作します。10日目の終わりには、ゲームFlappy Birdの本格的なクローンが作成されます。11日目に、いくつかの最近の変更を追加します。
準備ができたら、始めましょう!
クイックフィックス-天井のあるコロシアム
天井のあるコロシアムのチェックを追加するのを忘れました。Birdクラス内のupdateメソッドを更新します!
public void update(float delta) { velocity.add(acceleration.cpy().scl(delta)); if (velocity.y > 200) { velocity.y = 200; } // if (position.y < -13) { position.y = -13; velocity.y = 0; } position.add(velocity.cpy().scl(delta)); // (9, 6) . // 6.5f; boundingCircle.set(position.x + 9, position.y + 6, 6.5f); // if (velocity.y < 0) { rotation -= 600 * delta; if (rotation < -20) { rotation = -20; } } // if (isFalling() || !isAlive) { rotation += 480 * delta; if (rotation > 90) { rotation = 90; } } }
GameStatesを追加
GameStateを使用する本質は、ゲームを複数の状態(「実行中」や「ゲームオーバー」など)に分割することです。また、IFまたはSWITCHを使用して、現在の状態に応じてゲームの進行を制御します。
GameState実装の簡単なバージョンはEnumを作成することです。これは、指定された値のみをとることができる単なる変数です。興味がある場合は、ここで Enumの詳細を読むことができます。コードを見たい場合は、読み続けてください!GameWorldに
enumを追加します。 GameWorldクラス内のどこかに次のコードを追加します。
public enum GameState { READY, RUNNING, GAMEOVER }
- これで、他の変数を作成するのと同じ方法でGameState型の変数を作成できます。クラス内に変数を作成します。
private GameState currentState;
- コンストラクターで初期化します。
currentState = GameState.READY;

次に、updateメソッドに多くの変更を加える必要があります。本質的に、このメソッドの名前をupdateRunningに変更します。
これらの変更を行ったら、次のように新しい更新メソッドとupdateReadyメソッドを作成します。
public void update(float delta) { switch (currentState) { case READY: updateReady(delta); break; case RUNNING: default: updateRunning(delta); break; } } private void updateReady(float delta) { // }
これで、更新メソッドは、目的の更新ロジックを開始する前にゲームの現在の状態をチェックします。
次に、鳥が死んだ場合に備えてGameStateを変更する必要があります。鳥が地面に触れたときに完全に死んだと仮定します。updateRunningメソッド(以前に更新された更新メソッド)内で、次のifの最後に次の行を追加します。
currentState = GameState.GAMEOVER;
最後に、GameStateの管理に役立つ次のメソッドを追加します。
isReadyは、curentStateがGameState.READYと等しい場合にtrueを返します。
startはcurrentStateをGameState.RUNNINGに変更します。
再起動は、以前の方法よりも興味深い-ゲーム中に変更を受けたオブジェクト内のすべての変数をリセットします。ゲームを再起動するためのすべてのロジックです。restart
メソッドが呼び出されると、すべての依存オブジェクトを調べて、それらのonRestartメソッドを呼び出します。その結果、すべてのオブジェクトのデフォルト値に完全にリセットされます。onRestartメソッドに渡す引数
?これらは、ゲーム中に変更された可能性のある変数のデフォルト値です。たとえば、鳥の位置の値はYであるため、Yの位置の開始値を渡します。
public void restart() { currentState = GameState.READY; score = 0; bird.onRestart(midPointY - 5); scroller.onRestart(); currentState = GameState.READY; }
また、現在クラスコンストラクターに格納されていないmidpoint変数へのアクセスも必要です。それを変えましょう。
次の変数をクラスに追加します。
public int midPointY;
クラスコンストラクターで初期化します。
this.midPointY = midPointY;
混乱している場合に備えて、GameWorldクラスの完全なコードを次に示します。
GameWorld.java
package com.kilobolt.GameWorld; import com.badlogic.gdx.math.Intersector; import com.badlogic.gdx.math.Rectangle; import com.kilobolt.GameObjects.Bird; import com.kilobolt.GameObjects.ScrollHandler; import com.kilobolt.ZBHelpers.AssetLoader; public class GameWorld { private Bird bird; private ScrollHandler scroller; private Rectangle ground; private int score = 0; private int midPointY; private GameState currentState; public enum GameState { READY, RUNNING, GAMEOVER } public GameWorld(int midPointY) { currentState = GameState.READY; this.midPointY = midPointY; bird = new Bird(33, midPointY - 5, 17, 12); // 66 midPointY scroller = new ScrollHandler(this, midPointY + 66); ground = new Rectangle(0, midPointY + 66, 137, 11); } public void update(float delta) { switch (currentState) { case READY: updateReady(delta); break; case RUNNING: default: updateRunning(delta); break; } } private void updateReady(float delta) { // } public void updateRunning(float delta) { if (delta > .15f) { delta = .15f; } bird.update(delta); scroller.update(delta); if (scroller.collides(bird) && bird.isAlive()) { scroller.stop(); bird.die(); AssetLoader.dead.play(); } if (Intersector.overlaps(bird.getBoundingCircle(), ground)) { scroller.stop(); bird.die(); bird.decelerate(); currentState = GameState.GAMEOVER; } } public Bird getBird() { return bird; } public ScrollHandler getScroller() { return scroller; } public int getScore() { return score; } public void addScore(int increment) { score += increment; } public boolean isReady() { return currentState == GameState.READY; } public void start() { currentState = GameState.RUNNING; } public void restart() { currentState = GameState.READY; score = 0; bird.onRestart(midPointY - 5); scroller.onRestart(); currentState = GameState.READY; } public boolean isGameOver() { return currentState == GameState.GAMEOVER; } }
次に、onRestartメソッドをBirdクラスとScrollerクラスに追加しましょう。最も簡単なクラス、鳥から始めましょう。
鳥をゼロにする
バーディーでonRestartメソッドを作成します。メソッド内では、すべてのクラス変数のデフォルト値を返す必要があります。
public void onRestart(int y) { rotation = 0; position.y = y; velocity.x = 0; velocity.y = 0; acceleration.x = 0; acceleration.y = 460; isAlive = true; }
さて、それだけです!次のような結果になるはずです。
Bird.java
package com.kilobolt.GameObjects; import com.badlogic.gdx.math.Circle; import com.badlogic.gdx.math.Vector2; import com.kilobolt.ZBHelpers.AssetLoader; public class Bird { private Vector2 position; private Vector2 velocity; private Vector2 acceleration; private float rotation; private int width; private int height; private boolean isAlive; private Circle boundingCircle; public Bird(float x, float y, int width, int height) { this.width = width; this.height = height; position = new Vector2(x, y); velocity = new Vector2(0, 0); acceleration = new Vector2(0, 460); boundingCircle = new Circle(); isAlive = true; } public void update(float delta) { velocity.add(acceleration.cpy().scl(delta)); if (velocity.y > 200) { velocity.y = 200; } position.add(velocity.cpy().scl(delta)); boundingCircle.set(position.x + 9, position.y + 6, 6.5f); // if (velocity.y < 0) { rotation -= 600 * delta; if (rotation < -20) { rotation = -20; } } // if (isFalling() || !isAlive) { rotation += 480 * delta; if (rotation > 90) { rotation = 90; } } } public boolean isFalling() { return velocity.y > 110; } public boolean shouldntFlap() { return velocity.y > 70 || !isAlive; } public void onClick() { if (isAlive) { AssetLoader.flap.play(); velocity.y = -140; } } public void die() { isAlive = false; velocity.y = 0; } public void decelerate() { acceleration.y = 0; } public void onRestart(int y) { rotation = 0; position.y = y; velocity.x = 0; velocity.y = 0; acceleration.x = 0; acceleration.y = 460; isAlive = true; } public float getX() { return position.x; } public float getY() { return position.y; } public float getWidth() { return width; } public float getHeight() { return height; } public float getRotation() { return rotation; } public Circle getBoundingCircle() { return boundingCircle; } public boolean isAlive() { return isAlive; } }
OnRestart-ScrollHandler
ScrollHandlerクラスに移動して、クラス変数の値をリセットする同様のメソッドを作成する必要があります!複数のオブジェクトで存在しないonRestartメソッドを呼び出すことに注意してください。さらに進んで追加します。
public void onRestart() { frontGrass.onRestart(0, SCROLL_SPEED); backGrass.onRestart(frontGrass.getTailX(), SCROLL_SPEED); pipe1.onRestart(210, SCROLL_SPEED); pipe2.onRestart(pipe1.getTailX() + PIPE_GAP, SCROLL_SPEED); pipe3.onRestart(pipe2.getTailX() + PIPE_GAP, SCROLL_SPEED); }
OnRestart-グラス
簡単です。草を元の位置に戻し、速度をSCROLL_SPEEDに変更するだけです。
package com.kilobolt.GameObjects; public class Grass extends Scrollable { public Grass(float x, float y, int width, int height, float scrollSpeed) { super(x, y, width, height, scrollSpeed); } public void onRestart(float x, float scrollSpeed) { position.x = x; velocity.x = scrollSpeed; } }
OnRestart-パイプ
パイプのonRestartメソッドは、grassのonRestartメソッドほど複雑ではありません。次のメソッドを追加します。
public void onRestart(float x, float scrollSpeed) { velocity.x = scrollSpeed; reset(x); }
完全なパイプクラスの例:
Pipe.java
package com.kilobolt.GameObjects; import java.util.Random; import com.badlogic.gdx.math.Intersector; import com.badlogic.gdx.math.Rectangle; public class Pipe extends Scrollable { private Random r; private Rectangle skullUp, skullDown, barUp, barDown; public static final int VERTICAL_GAP = 45; public static final int SKULL_WIDTH = 24; public static final int SKULL_HEIGHT = 11; private float groundY; private boolean isScored = false; public Pipe(float x, float y, int width, int height, float scrollSpeed, float groundY) { super(x, y, width, height, scrollSpeed); r = new Random(); skullUp = new Rectangle(); skullDown = new Rectangle(); barUp = new Rectangle(); barDown = new Rectangle(); this.groundY = groundY; } @Override public void update(float delta) { super.update(delta); barUp.set(position.x, position.y, width, height); barDown.set(position.x, position.y + height + VERTICAL_GAP, width, groundY - (position.y + height + VERTICAL_GAP)); skullUp.set(position.x - (SKULL_WIDTH - width) / 2, position.y + height - SKULL_HEIGHT, SKULL_WIDTH, SKULL_HEIGHT); skullDown.set(position.x - (SKULL_WIDTH - width) / 2, barDown.y, SKULL_WIDTH, SKULL_HEIGHT); } @Override public void reset(float newX) { super.reset(newX); height = r.nextInt(90) + 15; isScored = false; } public void onRestart(float x, float scrollSpeed) { velocity.x = scrollSpeed; reset(x); } public Rectangle getSkullUp() { return skullUp; } public Rectangle getSkullDown() { return skullDown; } public Rectangle getBarUp() { return barUp; } public Rectangle getBarDown() { return barDown; } public boolean collides(Bird bird) { if (position.x < bird.getX() + bird.getWidth()) { return (Intersector.overlaps(bird.getBoundingCircle(), barUp) || Intersector.overlaps(bird.getBoundingCircle(), barDown) || Intersector.overlaps(bird.getBoundingCircle(), skullUp) || Intersector .overlaps(bird.getBoundingCircle(), skullDown)); } return false; } public boolean isScored() { return isScored; } public void setScored(boolean b) { isScored = b; } }
さて、ここにいます!私たちがやったことを見てみましょう。GameStateをGameWorldクラスに追加することから始めました。次に、BirdおよびScrollHandlerクラスのrestartメソッドを呼び出すrestartメソッドを追加しました。これは、チェーン内でPipeやGrassなどのオブジェクトのresetメソッドを呼び出します。あとは、再起動メソッドを開始する必要があることをゲームに伝えるロジックを追加するだけです。
InputHandlerに移動
InputHandlerには、GameWorldオブジェクトへの参照が必要です。これにより、現在のGameStateを確認し、タッチ/クリックを正しく処理できます。コンストラクタに別の引数を追加する代わりに、既存のコンストラクタを次のように変更します。
public InputHandler(GameWorld myWorld) { this.myWorld = myWorld; myBird = myWorld.getBird(); }
- クラスに変数を作成します。
private GameWorld myWorld;
- クラスのインポートを忘れずに追加してください!
次に、touchDownメソッドを更新します。
@Override public boolean touchDown(int screenX, int screenY, int pointer, int button) { if (myWorld.isReady()) { myWorld.start(); } myBird.onClick(); if (myWorld.isGameOver()) { // , GameState.READ myWorld.restart(); } return true; }
完全なクラスコード:
InputHandler.java
package com.kilobolt.ZBHelpers; import com.badlogic.gdx.InputProcessor; import com.kilobolt.GameObjects.Bird; import com.kilobolt.GameWorld.GameWorld; public class InputHandler implements InputProcessor { private Bird myBird; private GameWorld myWorld; // Bird InputHandler . public InputHandler(GameWorld myWorld) { // myBird Bird gameWorld. this.myWorld = myWorld; myBird = myWorld.getBird(); } @Override public boolean touchDown(int screenX, int screenY, int pointer, int button) { if (myWorld.isReady()) { myWorld.start(); } myBird.onClick(); if (myWorld.isGameOver()) { // , GameState.READ myWorld.restart(); } return true; } @Override public boolean keyDown(int keycode) { return false; } @Override public boolean keyUp(int keycode) { return false; } @Override public boolean keyTyped(char character) { return false; } @Override public boolean touchUp(int screenX, int screenY, int pointer, int button) { return false; } @Override public boolean touchDragged(int screenX, int screenY, int pointer) { return false; } @Override public boolean mouseMoved(int screenX, int screenY) { return false; } @Override public boolean scrolled(int amount) { return false; } }
GameScreenを修正
もちろん、理由は私たちのisparvlenyデザイナーのInputHandler、私たちは更新する必要がGameScreenむしろInputHandler初期化、。
この行を変更します。
Gdx.input.setInputProcessor(new InputHandler(world.getBird()));
これに:
Gdx.input.setInputProcessor(new InputHandler(world));
完全なクラスの例:
GameScreen.java
package com.kilobolt.Screens; import com.badlogic.gdx.Gdx; import com.badlogic.gdx.Screen; import com.kilobolt.GameWorld.GameRenderer; import com.kilobolt.GameWorld.GameWorld; import com.kilobolt.ZBHelpers.InputHandler; public class GameScreen implements Screen { private GameWorld world; private GameRenderer renderer; private float runTime; public GameScreen() { float screenWidth = Gdx.graphics.getWidth(); float screenHeight = Gdx.graphics.getHeight(); float gameWidth = 136; float gameHeight = screenHeight / (screenWidth / gameWidth); int midPointY = (int) (gameHeight / 2); world = new GameWorld(midPointY); renderer = new GameRenderer(world, (int) gameHeight, midPointY); Gdx.input.setInputProcessor(new InputHandler(world)); } @Override public void render(float delta) { runTime += delta; world.update(delta); renderer.render(runTime); } @Override public void resize(int width, int height) { System.out.println("GameScreen - resizing"); } @Override public void show() { System.out.println("GameScreen - show called"); } @Override public void hide() { System.out.println("GameScreen - hide called"); } @Override public void pause() { System.out.println("GameScreen - pause called"); } @Override public void resume() { System.out.println("GameScreen - resume called"); } @Override public void dispose() { // } }
GameRendererを変更する
再起動コードはこれで完了です。これで、ゲームが開始されると、READYステータスで開始され、何も起こりません。ゲームを開始するには、画面をクリックする必要があります。鳥が死んだら、ゲームをGAMEOVERステータスに移行します。このステータスでは、画面をクリックして最初からゲームを開始できます。
これまでのところ、ボタンはありませんが、これはほんの始まりです!
次に、プロセス全体をより直感的にするために、GameRendererにいくつかの変更を加え、有用な情報を表示します。
クラスGameRendererにおける方法の変更レンダリングを以下のように:
Gamerenderer.java
package com.kilobolt.GameWorld; import com.badlogic.gdx.Gdx; import com.badlogic.gdx.graphics.Color; import com.badlogic.gdx.graphics.GL20; import com.badlogic.gdx.graphics.OrthographicCamera; import com.badlogic.gdx.graphics.g2d.Animation; import com.badlogic.gdx.graphics.g2d.SpriteBatch; import com.badlogic.gdx.graphics.g2d.TextureRegion; import com.badlogic.gdx.graphics.glutils.ShapeRenderer; import com.badlogic.gdx.graphics.glutils.ShapeRenderer.ShapeType; import com.badlogic.gdx.math.Rectangle; import com.kilobolt.GameObjects.Bird; import com.kilobolt.GameObjects.Grass; import com.kilobolt.GameObjects.Pipe; import com.kilobolt.GameObjects.ScrollHandler; import com.kilobolt.ZBHelpers.AssetLoader; public class GameRenderer { private GameWorld myWorld; private OrthographicCamera cam; private ShapeRenderer shapeRenderer; private SpriteBatch batcher; private int midPointY; private int gameHeight; private Bird bird; private ScrollHandler scroller; private Grass frontGrass, backGrass; private Pipe pipe1, pipe2, pipe3; private TextureRegion bg, grass; private Animation birdAnimation; private TextureRegion birdMid, birdDown, birdUp; private TextureRegion skullUp, skullDown, bar; public GameRenderer(GameWorld world, int gameHeight, int midPointY) { myWorld = world; this.gameHeight = gameHeight; this.midPointY = midPointY; cam = new OrthographicCamera(); cam.setToOrtho(true, 136, gameHeight); batcher = new SpriteBatch(); batcher.setProjectionMatrix(cam.combined); shapeRenderer = new ShapeRenderer(); shapeRenderer.setProjectionMatrix(cam.combined); initGameObjects(); initAssets(); } private void initGameObjects() { bird = myWorld.getBird(); scroller = myWorld.getScroller(); frontGrass = scroller.getFrontGrass(); backGrass = scroller.getBackGrass(); pipe1 = scroller.getPipe1(); pipe2 = scroller.getPipe2(); pipe3 = scroller.getPipe3(); } private void initAssets() { bg = AssetLoader.bg; grass = AssetLoader.grass; birdAnimation = AssetLoader.birdAnimation; birdMid = AssetLoader.bird; birdDown = AssetLoader.birdDown; birdUp = AssetLoader.birdUp; skullUp = AssetLoader.skullUp; skullDown = AssetLoader.skullDown; bar = AssetLoader.bar; } private void drawGrass() { batcher.draw(grass, frontGrass.getX(), frontGrass.getY(), frontGrass.getWidth(), frontGrass.getHeight()); batcher.draw(grass, backGrass.getX(), backGrass.getY(), backGrass.getWidth(), backGrass.getHeight()); } private void drawSkulls() { batcher.draw(skullUp, pipe1.getX() - 1, pipe1.getY() + pipe1.getHeight() - 14, 24, 14); batcher.draw(skullDown, pipe1.getX() - 1, pipe1.getY() + pipe1.getHeight() + 45, 24, 14); batcher.draw(skullUp, pipe2.getX() - 1, pipe2.getY() + pipe2.getHeight() - 14, 24, 14); batcher.draw(skullDown, pipe2.getX() - 1, pipe2.getY() + pipe2.getHeight() + 45, 24, 14); batcher.draw(skullUp, pipe3.getX() - 1, pipe3.getY() + pipe3.getHeight() - 14, 24, 14); batcher.draw(skullDown, pipe3.getX() - 1, pipe3.getY() + pipe3.getHeight() + 45, 24, 14); } private void drawPipes() { batcher.draw(bar, pipe1.getX(), pipe1.getY(), pipe1.getWidth(), pipe1.getHeight()); batcher.draw(bar, pipe1.getX(), pipe1.getY() + pipe1.getHeight() + 45, pipe1.getWidth(), midPointY + 66 - (pipe1.getHeight() + 45)); batcher.draw(bar, pipe2.getX(), pipe2.getY(), pipe2.getWidth(), pipe2.getHeight()); batcher.draw(bar, pipe2.getX(), pipe2.getY() + pipe2.getHeight() + 45, pipe2.getWidth(), midPointY + 66 - (pipe2.getHeight() + 45)); batcher.draw(bar, pipe3.getX(), pipe3.getY(), pipe3.getWidth(), pipe3.getHeight()); batcher.draw(bar, pipe3.getX(), pipe3.getY() + pipe3.getHeight() + 45, pipe3.getWidth(), midPointY + 66 - (pipe3.getHeight() + 45)); } public void render(float runTime) { Gdx.gl.glClearColor(0, 0, 0, 1); Gdx.gl.glClear(GL20.GL_COLOR_BUFFER_BIT); shapeRenderer.begin(ShapeType.Filled); shapeRenderer.setColor(55 / 255.0f, 80 / 255.0f, 100 / 255.0f, 1); shapeRenderer.rect(0, 0, 136, midPointY + 66); shapeRenderer.setColor(111 / 255.0f, 186 / 255.0f, 45 / 255.0f, 1); shapeRenderer.rect(0, midPointY + 66, 136, 11); shapeRenderer.setColor(147 / 255.0f, 80 / 255.0f, 27 / 255.0f, 1); shapeRenderer.rect(0, midPointY + 77, 136, 52); shapeRenderer.end(); batcher.begin(); batcher.disableBlending(); batcher.draw(bg, 0, midPointY + 23, 136, 43); drawGrass(); drawPipes(); batcher.enableBlending(); drawSkulls(); if (bird.shouldntFlap()) { batcher.draw(birdMid, bird.getX(), bird.getY(), bird.getWidth() / 2.0f, bird.getHeight() / 2.0f, bird.getWidth(), bird.getHeight(), 1, 1, bird.getRotation()); } else { batcher.draw(birdAnimation.getKeyFrame(runTime), bird.getX(), bird.getY(), bird.getWidth() / 2.0f, bird.getHeight() / 2.0f, bird.getWidth(), bird.getHeight(), 1, 1, bird.getRotation()); } // ! : if (myWorld.isReady()) { // AssetLoader.shadow.draw(batcher, "Touch me", (136 / 2) - (42), 76); // AssetLoader.font.draw(batcher, "Touch me", (136 / 2) - (42 - 1), 75); } else { if (myWorld.isGameOver()) { AssetLoader.shadow.draw(batcher, "Game Over", 25, 56); AssetLoader.font.draw(batcher, "Game Over", 24, 55); AssetLoader.shadow.draw(batcher, "Try again?", 23, 76); AssetLoader.font.draw(batcher, "Try again?", 24, 75); } String score = myWorld.getScore() + ""; AssetLoader.shadow.draw(batcher, "" + myWorld.getScore(), (136 / 2) - (3 * score.length()), 12); AssetLoader.font.draw(batcher, "" + myWorld.getScore(), (136 / 2) - (3 * score.length() - 1), 11); } batcher.end(); } }
ゲームプレイが終了しました!


以上で、ゲームプレイは終了しました。物事を整理して、アカウント管理を実装しましょう!
より良いスコアを実装する
LibGDXを使用して記述されたゲームの少量のデータを保存する簡単な方法は、Preferencesクラスを使用することです。このクラスはキーと値のペアをバインドします。これは、いくつかのキーとそれに対応する値を保存できることを意味し、キーによって値を取得することもできます!
例を見てみましょう:
// Preferences Preferences prefs = Gdx.app.getPreferences("PreferenceName"); // 10 "highScore" prefs.putInteger("highScore", 10); prefs.flush(); // Preferences
1週間後、次を完了しようとします。
System.out.println(prefs.getInteger("highScore"));
結果は10のコンソール出力になります!
そのため、知っておくべき3つの重要な方法があります。
- 入れて...
- 取得...
- フラッシュ(保存用)
次のように、さまざまなデータタイプを保存できます。
putBoolean("soundEnabled", true); // getBoolean("soundEnabled") boolean. putString("playerName", "James");
この知識を適用して、より良いスコアを維持しましょう。
AssetLoaderクラスを開きます
クラスに静的変数を作成します。
public static Preferences prefs;
loadメソッド内に、次のコード行を追加します。
// ( ) preferences prefs = Gdx.app.getPreferences("ZombieBird"); // 0 if (!prefs.contains("highScore")) { prefs.putInteger("highScore", 0); }
これで、ゲームのどこからでもprefs変数にアクセスできます!AssetsLoader内の設定で動作するヘルパーメソッドを作成しましょう。
次のメソッドを追加します。
// hishScore public static void setHighScore(int val) { prefs.putInteger("highScore", val); prefs.flush(); } // hishScore public static int getHighScore() { return prefs.getInteger("highScore"); }
完全なクラスの例:
AssetLoader.java
package com.kilobolt.ZBHelpers; import com.badlogic.gdx.Gdx; import com.badlogic.gdx.Preferences; import com.badlogic.gdx.audio.Sound; import com.badlogic.gdx.graphics.Texture; import com.badlogic.gdx.graphics.Texture.TextureFilter; import com.badlogic.gdx.graphics.g2d.Animation; import com.badlogic.gdx.graphics.g2d.BitmapFont; import com.badlogic.gdx.graphics.g2d.TextureRegion; public class AssetLoader { public static Texture texture; public static TextureRegion bg, grass; public static Animation birdAnimation; public static TextureRegion bird, birdDown, birdUp; public static TextureRegion skullUp, skullDown, bar; public static Sound dead, flap, coin; public static BitmapFont font, shadow; private static Preferences prefs; public static void load() { texture = new Texture(Gdx.files.internal("data/texture.png")); texture.setFilter(TextureFilter.Nearest, TextureFilter.Nearest); bg = new TextureRegion(texture, 0, 0, 136, 43); bg.flip(false, true); grass = new TextureRegion(texture, 0, 43, 143, 11); grass.flip(false, true); birdDown = new TextureRegion(texture, 136, 0, 17, 12); birdDown.flip(false, true); bird = new TextureRegion(texture, 153, 0, 17, 12); bird.flip(false, true); birdUp = new TextureRegion(texture, 170, 0, 17, 12); birdUp.flip(false, true); TextureRegion[] birds = { birdDown, bird, birdUp }; birdAnimation = new Animation(0.06f, birds); birdAnimation.setPlayMode(Animation.LOOP_PINGPONG); skullUp = new TextureRegion(texture, 192, 0, 24, 14); skullDown = new TextureRegion(skullUp); skullDown.flip(false, true); bar = new TextureRegion(texture, 136, 16, 22, 3); bar.flip(false, true); dead = Gdx.audio.newSound(Gdx.files.internal("data/dead.wav")); flap = Gdx.audio.newSound(Gdx.files.internal("data/flap.wav")); coin = Gdx.audio.newSound(Gdx.files.internal("data/coin.wav")); font = new BitmapFont(Gdx.files.internal("data/text.fnt")); font.setScale(.25f, -.25f); shadow = new BitmapFont(Gdx.files.internal("data/shadow.fnt")); shadow.setScale(.25f, -.25f); // ( ) preferences prefs = Gdx.app.getPreferences("ZombieBird"); if (!prefs.contains("highScore")) { prefs.putInteger("highScore", 0); } } public static void setHighScore(int val) { prefs.putInteger("highScore", val); prefs.flush(); } public static int getHighScore() { return prefs.getInteger("highScore"); } public static void dispose() { texture.dispose(); dead.dispose(); flap.dispose(); coin.dispose(); font.dispose(); shadow.dispose(); } }
GameWorldに戻り、ベストスコアを保存/更新するためのロジックを追加しましょう。HIGHSCORE
定数の4番目の列挙を追加することから始めましょう:
public enum GameState { READY, RUNNING, GAMEOVER, HIGHSCORE }
鳥の死のイベントを処理するロジックを拡張します(鳥と地面の衝突をチェックする更新方法)。新しいアカウントが以前に保存された最高のアカウントよりも大きい場合はチェックを追加し、そうであれば、最高のアカウントを新しい値で更新します。
if (Intersector.overlaps(bird.getBoundingCircle(), ground)) { scroller.stop(); bird.die(); bird.decelerate(); currentState = GameState.GAMEOVER; if (score > AssetLoader.getHighScore()) { AssetLoader.setHighScore(score); currentState = GameState.HIGHSCORE; } }
ゲームがHIGHSCORE状態にあるかどうかを確認する別のメソッドを追加します。
public boolean isHighScore() { return currentState == GameState.HIGHSCORE; }
戻る私たちのGameRendererへとでハイスコア状態にロジックを追加GameStateだけでなく、ゲームの最後に最高のスコアを表示:
更新されたクラスUpdateRendererを:
警告:これは明らかにロジックを示すために、一時的なコードです:
Gamerenderer.java
package com.kilobolt.GameWorld; import com.badlogic.gdx.Gdx; import com.badlogic.gdx.graphics.Color; import com.badlogic.gdx.graphics.GL20; import com.badlogic.gdx.graphics.OrthographicCamera; import com.badlogic.gdx.graphics.g2d.Animation; import com.badlogic.gdx.graphics.g2d.SpriteBatch; import com.badlogic.gdx.graphics.g2d.TextureRegion; import com.badlogic.gdx.graphics.glutils.ShapeRenderer; import com.badlogic.gdx.graphics.glutils.ShapeRenderer.ShapeType; import com.badlogic.gdx.math.Rectangle; import com.kilobolt.GameObjects.Bird; import com.kilobolt.GameObjects.Grass; import com.kilobolt.GameObjects.Pipe; import com.kilobolt.GameObjects.ScrollHandler; import com.kilobolt.ZBHelpers.AssetLoader; public class GameRenderer { private GameWorld myWorld; private OrthographicCamera cam; private ShapeRenderer shapeRenderer; private SpriteBatch batcher; private int midPointY; private int gameHeight; private Bird bird; private ScrollHandler scroller; private Grass frontGrass, backGrass; private Pipe pipe1, pipe2, pipe3; private TextureRegion bg, grass; private Animation birdAnimation; private TextureRegion birdMid, birdDown, birdUp; private TextureRegion skullUp, skullDown, bar; public GameRenderer(GameWorld world, int gameHeight, int midPointY) { myWorld = world; this.gameHeight = gameHeight; this.midPointY = midPointY; cam = new OrthographicCamera(); cam.setToOrtho(true, 136, gameHeight); batcher = new SpriteBatch(); batcher.setProjectionMatrix(cam.combined); shapeRenderer = new ShapeRenderer(); shapeRenderer.setProjectionMatrix(cam.combined); initGameObjects(); initAssets(); } private void initGameObjects() { bird = myWorld.getBird(); scroller = myWorld.getScroller(); frontGrass = scroller.getFrontGrass(); backGrass = scroller.getBackGrass(); pipe1 = scroller.getPipe1(); pipe2 = scroller.getPipe2(); pipe3 = scroller.getPipe3(); } private void initAssets() { bg = AssetLoader.bg; grass = AssetLoader.grass; birdAnimation = AssetLoader.birdAnimation; birdMid = AssetLoader.bird; birdDown = AssetLoader.birdDown; birdUp = AssetLoader.birdUp; skullUp = AssetLoader.skullUp; skullDown = AssetLoader.skullDown; bar = AssetLoader.bar; } private void drawGrass() { batcher.draw(grass, frontGrass.getX(), frontGrass.getY(), frontGrass.getWidth(), frontGrass.getHeight()); batcher.draw(grass, backGrass.getX(), backGrass.getY(), backGrass.getWidth(), backGrass.getHeight()); } private void drawSkulls() { batcher.draw(skullUp, pipe1.getX() - 1, pipe1.getY() + pipe1.getHeight() - 14, 24, 14); batcher.draw(skullDown, pipe1.getX() - 1, pipe1.getY() + pipe1.getHeight() + 45, 24, 14); batcher.draw(skullUp, pipe2.getX() - 1, pipe2.getY() + pipe2.getHeight() - 14, 24, 14); batcher.draw(skullDown, pipe2.getX() - 1, pipe2.getY() + pipe2.getHeight() + 45, 24, 14); batcher.draw(skullUp, pipe3.getX() - 1, pipe3.getY() + pipe3.getHeight() - 14, 24, 14); batcher.draw(skullDown, pipe3.getX() - 1, pipe3.getY() + pipe3.getHeight() + 45, 24, 14); } private void drawPipes() { batcher.draw(bar, pipe1.getX(), pipe1.getY(), pipe1.getWidth(), pipe1.getHeight()); batcher.draw(bar, pipe1.getX(), pipe1.getY() + pipe1.getHeight() + 45, pipe1.getWidth(), midPointY + 66 - (pipe1.getHeight() + 45)); batcher.draw(bar, pipe2.getX(), pipe2.getY(), pipe2.getWidth(), pipe2.getHeight()); batcher.draw(bar, pipe2.getX(), pipe2.getY() + pipe2.getHeight() + 45, pipe2.getWidth(), midPointY + 66 - (pipe2.getHeight() + 45)); batcher.draw(bar, pipe3.getX(), pipe3.getY(), pipe3.getWidth(), pipe3.getHeight()); batcher.draw(bar, pipe3.getX(), pipe3.getY() + pipe3.getHeight() + 45, pipe3.getWidth(), midPointY + 66 - (pipe3.getHeight() + 45)); } public void render(float runTime) { Gdx.gl.glClearColor(0, 0, 0, 1); Gdx.gl.glClear(GL20.GL_COLOR_BUFFER_BIT); shapeRenderer.begin(ShapeType.Filled); shapeRenderer.setColor(55 / 255.0f, 80 / 255.0f, 100 / 255.0f, 1); shapeRenderer.rect(0, 0, 136, midPointY + 66); shapeRenderer.setColor(111 / 255.0f, 186 / 255.0f, 45 / 255.0f, 1); shapeRenderer.rect(0, midPointY + 66, 136, 11); shapeRenderer.setColor(147 / 255.0f, 80 / 255.0f, 27 / 255.0f, 1); shapeRenderer.rect(0, midPointY + 77, 136, 52); shapeRenderer.end(); batcher.begin(); batcher.disableBlending(); batcher.draw(bg, 0, midPointY + 23, 136, 43); drawGrass(); drawPipes(); batcher.enableBlending(); drawSkulls(); if (bird.shouldntFlap()) { batcher.draw(birdMid, bird.getX(), bird.getY(), bird.getWidth() / 2.0f, bird.getHeight() / 2.0f, bird.getWidth(), bird.getHeight(), 1, 1, bird.getRotation()); } else { batcher.draw(birdAnimation.getKeyFrame(runTime), bird.getX(), bird.getY(), bird.getWidth() / 2.0f, bird.getHeight() / 2.0f, bird.getWidth(), bird.getHeight(), 1, 1, bird.getRotation()); } // ! ! if (myWorld.isReady()) { // AssetLoader.shadow.draw(batcher, "Touch me", (136 / 2) - (42), 76); // AssetLoader.font .draw(batcher, "Touch me", (136 / 2) - (42 - 1), 75); } else { if (myWorld.isGameOver() || myWorld.isHighScore()) { if (myWorld.isGameOver()) { AssetLoader.shadow.draw(batcher, "Game Over", 25, 56); AssetLoader.font.draw(batcher, "Game Over", 24, 55); AssetLoader.shadow.draw(batcher, "High Score:", 23, 106); AssetLoader.font.draw(batcher, "High Score:", 22, 105); String highScore = AssetLoader.getHighScore() + ""; AssetLoader.shadow.draw(batcher, highScore, (136 / 2) - (3 * highScore.length()), 128); AssetLoader.font.draw(batcher, highScore, (136 / 2) - (3 * highScore.length() - 1), 127); } else { AssetLoader.shadow.draw(batcher, "High Score!", 19, 56); AssetLoader.font.draw(batcher, "High Score!", 18, 55); } AssetLoader.shadow.draw(batcher, "Try again?", 23, 76); AssetLoader.font.draw(batcher, "Try again?", 24, 75); // integer String String score = myWorld.getScore() + ""; AssetLoader.shadow.draw(batcher, score, (136 / 2) - (3 * score.length()), 12); AssetLoader.font.draw(batcher, score, (136 / 2) - (3 * score.length() - 1), 11); } String score = myWorld.getScore() + ""; AssetLoader.shadow.draw(batcher, "" + myWorld.getScore(), (136 / 2) - (3 * score.length()), 12); AssetLoader.font.draw(batcher, "" + myWorld.getScore(), (136 / 2) - (3 * score.length() - 1), 11); } batcher.end(); } }

以下に示すように、GameWorldクラスのupdateメソッドを変更しましょう。
public void update(float delta) { switch (currentState) { case READY: updateReady(delta); break; case RUNNING: updateRunning(delta); break; default: break; } }
最後に行う必要があるのは、InputHandlerクラスの1行を変更することです。
if (myWorld.isGameOver() || myWorld.isHighScore()) { // Reset all variables, go to GameState.READ myWorld.restart(); }
それだけです!私たちは次の日に世紀の建設を続けます。読んでくれてありがとう。
1日あたりのソースコード
自分でコードを書く気がない場合は、こちらからダウンロードしてください:
11日目-iOS / Android + SplashScreen、メニューおよびトゥイーンのサポートを追加
11日目へようこそ!我々はゲームプレイを用意したときに今、我々は対処しますUIを、追加画面を作成し、使用してトランジションを追加トゥイーンエンジンにオーレリアンRibonによります。2日目に、libGDXインストーラーを使用してUniversal Tween Engineパッケージをダウンロードするように依頼しました。プロジェクトでこのオプションを選択するのを忘れたため、libGDXインストーラーを再度使用してプロジェクトを更新します。

libGDXプロジェクトにTween Engine Libraryを追加する
Tween Engineライブラリが正しく構成されていることを確認するには、Eclipseでコアプロジェクトを確認する必要があります。次の画像で強調表示されているこれらの2つのファイルが必要です。

プロジェクトにこれらのファイルが含まれている場合、あなたは幸せな人であり、すべてがあなたと一緒です。そうでない場合は、libGDXインストーラーを使用して追加する必要があります。これを行うには、次の手順に従います(または、このセクションの最後にあるday_11_starting.zipファイルをダウンロードします)。
- コアプロジェクトの物理的な場所を見つけます。プロジェクトを右クリック(MacではControl +クリック)し、[ プロパティ]を選択すると確認できます。Locationの値を覚えておいてください。
- 2日目に行ったようにgdx-setup-ui.jarを開きます。必要に応じて、このファイルをここからダウンロードします
- 下図に示すように、コアプロジェクトへのパスを指定します
- 「ユニバーサルトゥイーンエンジン」オプションが選択されていることを確認します。

- 右側の[更新画面を開く]をクリックします
- 次の図のような画面が表示されます。起動をクリックします!
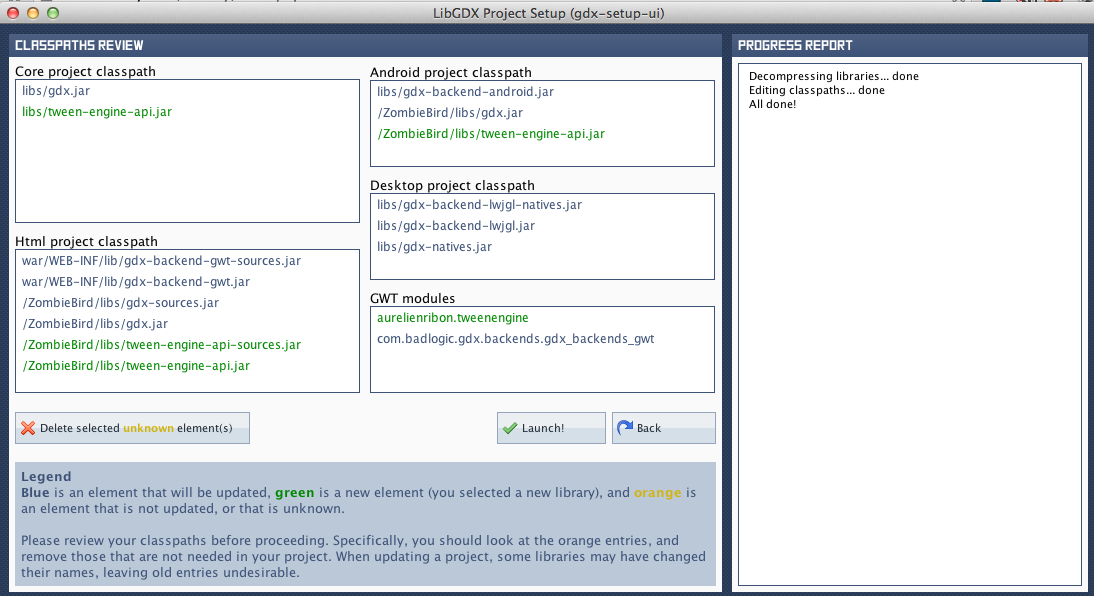


以上です。これで、Eclipseプロジェクトでtween-engine-apiを使用できます。
更新されたソース
Androidプロジェクトのセットアップ
次に、Androidデバイスでゲームをテストできるように、Androidプロジェクトをセットアップします。ZombieGame-androidプロジェクトを開きます。
- .
, res -> drawable-hdpi . ic_launcher.png , , :
 ic_launcher.png
- .
libGDX – landscape . portrait . AndroidManifest.xml :
android:screenOrientation="landscape"
android:screenOrientation="portrait"

- , .
values -> string.xml :


これで、Androidプロジェクトの準備ができました!プロジェクトをAndroidアプリケーションとして実行することにより、モバイルデバイスまたは仮想環境でプロジェクトを再生できます。
IOSプロジェクトのセットアップ
iOSプロジェクトをテストするには、IntelベースのMacが必要です。この点でうまくいっていれば、コンピューターでRoboVMのセットアップを続けてください。リンクhttp://www.robovm.org/docs#startをたどって、JDK 7、Xcode、およびRoboVM for Eclipseをダウンロードします。
EclipseでRoboVMを追加するには、ヘルプに行く- >新規ソフトウェアをインストールし、次のアドレスを入力します。
download.robovm.org/eclipseを
ダウンロードし、インストールを完了できますどのように、あなたのEclipseを再起動してください。
続行する前に、Xcodeを開きます。
次に、EclipseがJDK 7を使用していることを確認します。Eclipse設定を開き、JDK 7へのパスが選択されていることを確認します。


Eclipseを再起動します。
あなたは、フォルダ内の自分のアイコンを変更することができますデータ。Apple Human Interfaceによれば、さまざまな画面サイズのアイコンが保存されます。詳細はこちら。
iOSでモバイルアプリケーションを起動すると、アプリケーションのデフォルトの画像が表示され、アプリケーションをすばやく読み込むように錯覚します。また、フォルダ内のデフォルトの画像を追加することができますデータ。

次に、画面の向きを変更します。Info.plist.xmlファイルを開きます。次のキーを見つけます。
<key>UISupportedInterfaceOrientations</key> <array> <string>UIInterfaceOrientationLandscapeLeft</string> <string>UIInterfaceOrientationLandscapeRight</string> </array> <key>UISupportedInterfaceOrientations~ipad</key> <array> <string>UIInterfaceOrientationLandscapeLeft</string> <string>UIInterfaceOrientationLandscapeRight</string> </array>
そしてこれを次のように変更します。
<key>UISupportedInterfaceOrientations</key> <array> <string>UIInterfaceOrientationPortrait</string> </array> <key>UISupportedInterfaceOrientations~ipad</key> <array> <string>UIInterfaceOrientationPortrait</string> </array>
アプリケーションの名前を変更するだけです。robovm.propertiesファイルを開き、次の変更を行います。
#Fri May 31 13:01:40 CEST 2013 app.version=1.0 app.id=com.kilobolt.ZombieBird app.main.kilobolt.ZombieBird.RobovmLauncher app.executable=ZBGame app.build=1 app.name=Zombie Bird
これで、アプリケーションをiPhone Simulatorアプリケーションとして実行できます。このプロセスには時間がかかりますので、しばらくお待ちください。

アプリケーションを起動すると、以下に示すようにiOSシミュレーターにロードされます!libGDX画像が表示されている場合、これがデフォルトの画像なので、すべてが正常です。


更新された画像ファイルのダウンロード:
 logo.png
texture.png
logo.png
texture.png
SimpleButtonオブジェクト
com.kilobolt.uiという名前の新しいパッケージを作成します。内部で、新しいSimpleButtonクラスを作成します。シンプルなUIに使用します。以下のコードを確認してください。これ以上の説明はありません。
package com.kilobolt.ui; import com.badlogic.gdx.graphics.g2d.SpriteBatch; import com.badlogic.gdx.graphics.g2d.TextureRegion; import com.badlogic.gdx.math.Rectangle; public class SimpleButton { private float x, y, width, height; private TextureRegion buttonUp; private TextureRegion buttonDown; private Rectangle bounds; private boolean isPressed = false; public SimpleButton(float x, float y, float width, float height, TextureRegion buttonUp, TextureRegion buttonDown) { this.x = x; this.y = y; this.width = width; this.height = height; this.buttonUp = buttonUp; this.buttonDown = buttonDown; bounds = new Rectangle(x, y, width, height); } public boolean isClicked(int screenX, int screenY) { return bounds.contains(screenX, screenY); } public void draw(SpriteBatch batcher) { if (isPressed) { batcher.draw(buttonDown, x, y, width, height); } else { batcher.draw(buttonUp, x, y, width, height); } } public boolean isTouchDown(int screenX, int screenY) { if (bounds.contains(screenX, screenY)) { isPressed = true; return true; } return false; } public boolean isTouchUp(int screenX, int screenY) { // touchUp . if (bounds.contains(screenX, screenY) && isPressed) { isPressed = false; return true; } // , , . isPressed = false; return false; } }
AssetLoaderを更新する
古いテクスチャを更新し、新しい画像を追加したため、AssetLoaderにこれらの変更を加える必要があります。
AssetLoader.java
package com.kilobolt.ZBHelpers; import com.badlogic.gdx.Gdx; import com.badlogic.gdx.Preferences; import com.badlogic.gdx.audio.Sound; import com.badlogic.gdx.graphics.Texture; import com.badlogic.gdx.graphics.Texture.TextureFilter; import com.badlogic.gdx.graphics.g2d.Animation; import com.badlogic.gdx.graphics.g2d.BitmapFont; import com.badlogic.gdx.graphics.g2d.TextureRegion; public class AssetLoader { public static Texture texture, logoTexture; public static TextureRegion logo, zbLogo, bg, grass, bird, birdDown, birdUp, skullUp, skullDown, bar, playButtonUp, playButtonDown; public static Animation birdAnimation; public static Sound dead, flap, coin; public static BitmapFont font, shadow; private static Preferences prefs; public static void load() { logoTexture = new Texture(Gdx.files.internal("data/logo.png")); logoTexture.setFilter(TextureFilter.Linear, TextureFilter.Linear); logo = new TextureRegion(logoTexture, 0, 0, 512, 114); texture = new Texture(Gdx.files.internal("data/texture.png")); texture.setFilter(TextureFilter.Nearest, TextureFilter.Nearest); playButtonUp = new TextureRegion(texture, 0, 83, 29, 16); playButtonDown = new TextureRegion(texture, 29, 83, 29, 16); playButtonUp.flip(false, true); playButtonDown.flip(false, true); zbLogo = new TextureRegion(texture, 0, 55, 135, 24); zbLogo.flip(false, true); bg = new TextureRegion(texture, 0, 0, 136, 43); bg.flip(false, true); grass = new TextureRegion(texture, 0, 43, 143, 11); grass.flip(false, true); birdDown = new TextureRegion(texture, 136, 0, 17, 12); birdDown.flip(false, true); bird = new TextureRegion(texture, 153, 0, 17, 12); bird.flip(false, true); birdUp = new TextureRegion(texture, 170, 0, 17, 12); birdUp.flip(false, true); TextureRegion[] birds = { birdDown, bird, birdUp }; birdAnimation = new Animation(0.06f, birds); birdAnimation.setPlayMode(Animation.LOOP_PINGPONG); skullUp = new TextureRegion(texture, 192, 0, 24, 14); skullDown = new TextureRegion(skullUp); skullDown.flip(false, true); bar = new TextureRegion(texture, 136, 16, 22, 3); bar.flip(false, true); dead = Gdx.audio.newSound(Gdx.files.internal("data/dead.wav")); flap = Gdx.audio.newSound(Gdx.files.internal("data/flap.wav")); coin = Gdx.audio.newSound(Gdx.files.internal("data/coin.wav")); font = new BitmapFont(Gdx.files.internal("data/text.fnt")); font.setScale(.25f, -.25f); shadow = new BitmapFont(Gdx.files.internal("data/shadow.fnt")); shadow.setScale(.25f, -.25f); prefs = Gdx.app.getPreferences("ZombieBird"); if (!prefs.contains("highScore")) { prefs.putInteger("highScore", 0); } } public static void setHighScore(int val) { prefs.putInteger("highScore", val); prefs.flush(); } public static int getHighScore() { return prefs.getInteger("highScore"); } public static void dispose() { texture.dispose(); dead.dispose(); flap.dispose(); coin.dispose(); font.dispose(); shadow.dispose(); } }
トゥイーンエンジン
プロジェクトにTween Engineライブラリを追加しました。なぜ必要なのか見てみましょう。
Tweenエンジンは、最初の値と2番目の値の間の数学的補間を可能にします。
たとえば、値が0のfloat変数xがあります。この値を指数関数的に1ずつ変更します(変化率が増加するにつれて0から1に徐々に増加します)。正確に2.8秒間やってみましょう。
これがまさにTween Engineができることです。
一般的な意味では、Tweenエンジンは次のように機能します。
デフォルト値を持つPointクラスがあります
。float x = 0;
float y = 0;
Tweenエンジンを使用してxを1に、yを5に数学的に補間するには、PointAccessorという名前のTweenAccessorを作成する必要があります。
このクラスには2つのメソッドがあります。最初の方法はゲッターです。 Pointオブジェクトで変更するすべてのパラメーターを受け取り、配列内に保存します。
次に、Tweenエンジンはこれらの値を受け取り、変更します。オブジェクトにPointを渡すことができる2番目のセッターメソッドから変更された値を取得します。
例を見てみましょう。
新しいパッケージを作成し、名前com.kilobolt.TweenAccessorsをしてクラスを作成SpriteAccessorを:
package com.kilobolt.TweenAccessors; import aurelienribon.tweenengine.TweenAccessor; import com.badlogic.gdx.graphics.g2d.Sprite; public class SpriteAccessor implements TweenAccessor<Sprite> { public static final int ALPHA = 1; @Override public int getValues(Sprite target, int tweenType, float[] returnValues) { switch (tweenType) { case ALPHA: returnValues[0] = target.getColor().a; return 1; default: return 0; } } @Override public void setValues(Sprite target, int tweenType, float[] newValues) { switch (tweenType) { case ALPHA: target.setColor(1, 1, 1, newValues[0]); break; } } }
上記のクラスは、SpriteクラスのTweenAccessor実装です。前述したように、TweenEngineを使用して変更するクラスには、独自のアクセサーが必要です。TweenAccessorは1つの値(透明度)のみを変更します。さらに多くのパラメーターを変更する必要がある場合は、アクセサーが変更できる他のパラメーター(回転角度など)を示すために、より多くの定数を作成します。すべてのTweenAccessorsには、getValuesとsetValuesの 2つのメソッドが必要です。それぞれのメソッドは、変更のための特定のクラスを対象としています。この場合はSpriteです。
TweenAccessorの作成における役割は非常に簡単です。1.オブジェクトから変更する値を取得し、それらを配列に入れます。 Tweenエンジンに任せましょう。 2.次に、変更された値を取得し、オブジェクトに渡します。
:のは、以下の方法がその役割を果たす方法を見てみましょう
1. にgetValuesの方法、あなたは、オブジェクト型スプライトを変更し、returnValuesと呼ばれる配列に格納したいことをすべての値を取得する必要があります。私たちの場合、returnValues配列の最初のインデックスの後ろに保存できるように、1つの値のみを変更します。
returnValues[0]
さらに、この値はTweenEngineロジックを使用して自動的に変更されます。
2.このマジックの後、変更された値はsetValuesメソッドに渡されます(getValuesメソッドで残したのと同じ順序で)。returnValues [0]に入れたものはすべてnewValues [0]で利用できます。次に、この値をSprite型のオブジェクトに渡すだけです。
これらのメソッドは自動的に呼び出されます。初期値と、それをもたらす必要のある値のみを渡す必要があります。アクセサが動作しているのを見ると、書かれたものはすべてより意味があると思います。
以下に示すように、com.kilobolt.Screens内に新しいSplashScreenクラスを作成します。
SplashScreen.java
package com.kilobolt.Screens; import aurelienribon.tweenengine.BaseTween; import aurelienribon.tweenengine.Tween; import aurelienribon.tweenengine.TweenCallback; import aurelienribon.tweenengine.TweenEquations; import aurelienribon.tweenengine.TweenManager; import com.badlogic.gdx.Gdx; import com.badlogic.gdx.Screen; import com.badlogic.gdx.graphics.GL10; import com.badlogic.gdx.graphics.g2d.Sprite; import com.badlogic.gdx.graphics.g2d.SpriteBatch; import com.kilobolt.TweenAccessors.SpriteAccessor; import com.kilobolt.ZBHelpers.AssetLoader; import com.kilobolt.ZombieBird.ZBGame; public class SplashScreen implements Screen { private TweenManager manager; private SpriteBatch batcher; private Sprite sprite; private ZBGame game; public SplashScreen(ZBGame game) { this.game = game; } @Override public void show() { sprite = new Sprite(AssetLoader.logo); sprite.setColor(1, 1, 1, 0); float width = Gdx.graphics.getWidth(); float height = Gdx.graphics.getHeight(); float desiredWidth = width * .7f; float scale = desiredWidth / sprite.getWidth(); sprite.setSize(sprite.getWidth() * scale, sprite.getHeight() * scale); sprite.setPosition((width / 2) - (sprite.getWidth() / 2), (height / 2) - (sprite.getHeight() / 2)); setupTween(); batcher = new SpriteBatch(); } private void setupTween() { Tween.registerAccessor(Sprite.class, new SpriteAccessor()); manager = new TweenManager(); TweenCallback cb = new TweenCallback() { @Override public void onEvent(int type, BaseTween<?> source) { game.setScreen(new GameScreen()); } }; Tween.to(sprite, SpriteAccessor.ALPHA, .8f).target(1) .ease(TweenEquations.easeInOutQuad).repeatYoyo(1, .4f) .setCallback(cb).setCallbackTriggers(TweenCallback.COMPLETE) .start(manager); } @Override public void render(float delta) { manager.update(delta); Gdx.gl.glClearColor(1, 1, 1, 1); Gdx.gl.glClear(GL10.GL_COLOR_BUFFER_BIT); batcher.begin(); sprite.draw(batcher); batcher.end(); } @Override public void resize(int width, int height) { } @Override public void hide() { } @Override public void pause() { } @Override public void resume() { } @Override public void dispose() { } }
ZBGameを変更する
新しいSplashScreenの機能について説明する前に、ZBGameクラスのGameScreenに置き換えます。したがって、GameScreenではなくSplashScreenが最初に表示されます。ZBGameを開いて変更を加えましょう。
package com.kilobolt.ZombieBird; import com.badlogic.gdx.Game; import com.kilobolt.Screens.SplashScreen; import com.kilobolt.ZBHelpers.AssetLoader; public class ZBGame extends Game { @Override public void create() { AssetLoader.load(); setScreen(new SplashScreen(this)); } @Override public void dispose() { super.dispose(); AssetLoader.dispose(); } }
ここでSpashScreenクラスに戻ります。
まず、setupTweenメソッドに注目しましょう。このメソッドのコードには説明は不要です。
privateTween.registerAccessor(Sprite.class, new SpriteAccessor());
1.この行は、新しいアクセサーを登録します。文字通り、「Tweenエンジンを使用してスプライトを変更したい。これが私のアクセサーです。仕様を使用して作成しました(getValuesメソッドとsetValuesメソッドが必要です)。
manager = new TweenManager();
2. Tweenエンジンを機能させるには、renderメソッドで新しいデルタを渡すTweenManagerが必要です。このマネージャーは、SpriteAccessorを使用して補間します。
TweenCallback cb = new TweenCallback() { @Override public void onEvent(int type, BaseTween<?> source) { game.setScreen(new GameScreen()); } };
3. Tweeningの終了時にメソッドが呼び出されるTweenCallbackオブジェクトを作成できます。cbという新しいTweenCallbackを作成し、そのonEventメソッド(Tweeningが終了したときに呼び出す)がGameScreenにリダイレクトします。
より重要なことに進む前に、私たちが達成しようとしていることを見てみましょう。ロゴスプライトを取得して、透明度を0に設定し、透明度を1(100%)に増やして0に戻し
ます。この大きなコードを詳しく見てみましょう。
Tween.to(sprite, SpriteAccessor.ALPHA, .8f).target(1).ease(TweenEquations.easeInOutQuad).repeatYoyo(1, .4f) .setCallback(cb).setCallbackTriggers(TweenCallback.COMPLETE) .start(manager);
Tween.to(sprite, SpriteAccessor.ALPHA, .8f).target(1)
-SpriteAccessorのtweenType ALPHAを使用してスプライトオブジェクトを変更します。この操作は.8秒続きます。開始値(これはSpriteAccessorクラスで示されています)を1に等しい新しい値に変更します。
.ease(TweenEquations.easeInOutQuad).repeatYoyo(1, .4f)
-二次補間を使用して(意味を確認します)、このアクションをYoyoとして1回繰り返します(繰り返しの間隔は.4秒)。
.setCallback(cb).setCallbackTriggers(TweenCallback.COMPLETE)
- 以前に作成してcbという名前を付けたコールバックを使用し、トゥイーンが終了したときに通知します。
.start(manager);
-最後に、どのマネージャーがこの作業をすべて実行するかを示します。
次に、renderメソッドに移動して、マネージャーが何をするかを確認し、コードを実行します。
おそらくこれは非常に紛らわしいです!そして、これらすべてをすぐに理解することは困難ですが、あなたはただ実験する必要があります。続行する前に、さまざまなオプションや効果を試してみることをお勧めします。
さらにTweenAccessorsが必要です
TweenAccessorsの仕組みがわかったので、com.kilobolt.TweenAccessorsパッケージ内に2つの新しいクラスを作成します。
最初のクラスはValueクラスで、フロート変数のラッパーになります。Tweenエンジンで使用できるのはオブジェクトのみであるため、これにはクラスを使用します(プリミティブでは機能しません)。したがって、フロートを変更するには、このためのクラスが必要です。
package com.kilobolt.TweenAccessors; public class Value { private float val = 1; public float getValue() { return val; } public void setValue(float newVal) { val = newVal; } }
ValueAccessorクラスは、Valueクラスのval変数を変更するのに役立ちます。
package com.kilobolt.TweenAccessors; import aurelienribon.tweenengine.TweenAccessor; public class ValueAccessor implements TweenAccessor<Value> { @Override public int getValues(Value target, int tweenType, float[] returnValues) { returnValues[0] = target.getValue(); return 1; } @Override public void setValues(Value target, int tweenType, float[] newValues) { target.setValue(newValues[0]); } }
ValueAccessorは、float変数を補間するときに使用されます。たとえば、正方形の透明度を変更して画面上でフラッシュを作成する場合、Value型の新しいオブジェクトを作成し、ValueAccessorに渡して処理します。実際、このロジックを使用して、SpalshScreenからGameScreenにシームレスに移行します。
InputScreen、GameWorld、およびGameRendererで構成されるGameScreenクラスにいくつかの変更を加えます。
11日目を3つのレッスンに分けないために、コードの主な変更点のみを説明します。ほとんどの場合、変更は簡単で理解しやすいものであり、実験すればすべてを確実に理解できます。
InputHandlerクラスの変更から始めましょう。
InputHandler.java
package com.kilobolt.ZBHelpers; import java.util.ArrayList; import java.util.List; import com.badlogic.gdx.Input.Keys; import com.badlogic.gdx.InputProcessor; import com.kilobolt.GameObjects.Bird; import com.kilobolt.GameWorld.GameWorld; import com.kilobolt.ui.SimpleButton; public class InputHandler implements InputProcessor { private Bird myBird; private GameWorld myWorld; private List<SimpleButton> menuButtons; private SimpleButton playButton; private float scaleFactorX; private float scaleFactorY; public InputHandler(GameWorld myWorld, float scaleFactorX, float scaleFactorY) { this.myWorld = myWorld; myBird = myWorld.getBird(); int midPointY = myWorld.getMidPointY(); this.scaleFactorX = scaleFactorX; this.scaleFactorY = scaleFactorY; menuButtons = new ArrayList<SimpleButton>(); playButton = new SimpleButton( 136 / 2 - (AssetLoader.playButtonUp.getRegionWidth() / 2), midPointY + 50, 29, 16, AssetLoader.playButtonUp, AssetLoader.playButtonDown); menuButtons.add(playButton); } @Override public boolean touchDown(int screenX, int screenY, int pointer, int button) { screenX = scaleX(screenX); screenY = scaleY(screenY); System.out.println(screenX + " " + screenY); if (myWorld.isMenu()) { playButton.isTouchDown(screenX, screenY); } else if (myWorld.isReady()) { myWorld.start(); } myBird.onClick(); if (myWorld.isGameOver() || myWorld.isHighScore()) { myWorld.restart(); } return true; } @Override public boolean touchUp(int screenX, int screenY, int pointer, int button) { screenX = scaleX(screenX); screenY = scaleY(screenY); if (myWorld.isMenu()) { if (playButton.isTouchUp(screenX, screenY)) { myWorld.ready(); return true; } } return false; } @Override public boolean keyDown(int keycode) { if (keycode == Keys.SPACE) { if (myWorld.isMenu()) { myWorld.ready(); } else if (myWorld.isReady()) { myWorld.start(); } myBird.onClick(); if (myWorld.isGameOver() || myWorld.isHighScore()) { myWorld.restart(); } } return false; } @Override public boolean keyUp(int keycode) { return false; } @Override public boolean keyTyped(char character) { return false; } @Override public boolean touchDragged(int screenX, int screenY, int pointer) { return false; } @Override public boolean mouseMoved(int screenX, int screenY) { return false; } @Override public boolean scrolled(int amount) { return false; } private int scaleX(int screenX) { return (int) (screenX / scaleFactorX); } private int scaleY(int screenY) { return (int) (screenY / scaleFactorY); } public List<SimpleButton> getMenuButtons() { return menuButtons; } }
InputHandlerの大きな変更点は、ここでボタンを生成することです。これは最良の方法ではありませんが、ボタンは入力に非常に依存しているため、ここで作成しました。
InputHandlerの役割は、上記のように、ボタンを作成し、ボタンとの相互作用を処理することです。
また、ゲームワールドの幅と高さに関係なく、タッチ(現在は画面サイズに依存)を画面のサイズに合わせてスケーリングするメソッドを作成しました。これで、タッチ座標はGameWorld座標として変換されます。
また、キーボードを使用したい人のためにスペースバー(スペース)を使用する機能も追加しました。
変更を有効にするには、GameScreenクラスを更新する必要があります。これらの変更は小さすぎるので、自分で気付くようにしてください:)(変更されたrenderer.render()の呼び出しに注意してください)。
GameScreen.java
package com.kilobolt.Screens; import com.badlogic.gdx.Gdx; import com.badlogic.gdx.Screen; import com.kilobolt.GameWorld.GameRenderer; import com.kilobolt.GameWorld.GameWorld; import com.kilobolt.ZBHelpers.InputHandler; public class GameScreen implements Screen { private GameWorld world; private GameRenderer renderer; private float runTime; public GameScreen() { float screenWidth = Gdx.graphics.getWidth(); float screenHeight = Gdx.graphics.getHeight(); float gameWidth = 136; float gameHeight = screenHeight / (screenWidth / gameWidth); int midPointY = (int) (gameHeight / 2); world = new GameWorld(midPointY); Gdx.input.setInputProcessor(new InputHandler(world, screenWidth / gameWidth, screenHeight / gameHeight)); renderer = new GameRenderer(world, (int) gameHeight, midPointY); } @Override public void render(float delta) { runTime += delta; world.update(delta); renderer.render(delta, runTime); } @Override public void resize(int width, int height) { } @Override public void show() { } @Override public void hide() { } @Override public void pause() { } @Override public void resume() { } @Override public void dispose() { } }
GameWorldクラスでは、マイナーな変更も行いました(GameStateといくつかの新しいメソッドに注意してください):
GameWorld.java
package com.kilobolt.GameWorld; import com.badlogic.gdx.math.Intersector; import com.badlogic.gdx.math.Rectangle; import com.kilobolt.GameObjects.Bird; import com.kilobolt.GameObjects.ScrollHandler; import com.kilobolt.ZBHelpers.AssetLoader; public class GameWorld { private Bird bird; private ScrollHandler scroller; private Rectangle ground; private int score = 0; private float runTime = 0; private int midPointY; private GameState currentState; public enum GameState { MENU, READY, RUNNING, GAMEOVER, HIGHSCORE } public GameWorld(int midPointY) { currentState = GameState.MENU; this.midPointY = midPointY; bird = new Bird(33, midPointY - 5, 17, 12); scroller = new ScrollHandler(this, midPointY + 66); ground = new Rectangle(0, midPointY + 66, 137, 11); } public void update(float delta) { runTime += delta; switch (currentState) { case READY: case MENU: updateReady(delta); break; case RUNNING: updateRunning(delta); break; default: break; } } private void updateReady(float delta) { bird.updateReady(runTime); scroller.updateReady(delta); } public void updateRunning(float delta) { if (delta > .15f) { delta = .15f; } bird.update(delta); scroller.update(delta); if (scroller.collides(bird) && bird.isAlive()) { scroller.stop(); bird.die(); AssetLoader.dead.play(); } if (Intersector.overlaps(bird.getBoundingCircle(), ground)) { scroller.stop(); bird.die(); bird.decelerate(); currentState = GameState.GAMEOVER; if (score > AssetLoader.getHighScore()) { AssetLoader.setHighScore(score); currentState = GameState.HIGHSCORE; } } } public Bird getBird() { return bird; } public int getMidPointY() { return midPointY; } public ScrollHandler getScroller() { return scroller; } public int getScore() { return score; } public void addScore(int increment) { score += increment; } public void start() { currentState = GameState.RUNNING; } public void ready() { currentState = GameState.READY; } public void restart() { currentState = GameState.READY; score = 0; bird.onRestart(midPointY - 5); scroller.onRestart(); currentState = GameState.READY; } public boolean isReady() { return currentState == GameState.READY; } public boolean isGameOver() { return currentState == GameState.GAMEOVER; } public boolean isHighScore() { return currentState == GameState.HIGHSCORE; } public boolean isMenu() { return currentState == GameState.MENU; } public boolean isRunning() { return currentState == GameState.RUNNING; } }
BirdクラスとScrollHandlerクラスに小さな変更を加えることは残っています。
Bird.java
package com.kilobolt.GameObjects; import com.badlogic.gdx.math.Circle; import com.badlogic.gdx.math.Vector2; import com.kilobolt.ZBHelpers.AssetLoader; public class Bird { private Vector2 position; private Vector2 velocity; private Vector2 acceleration; private float rotation; private int width; private float height; private float originalY; private boolean isAlive; private Circle boundingCircle; public Bird(float x, float y, int width, int height) { this.width = width; this.height = height; this.originalY = y; position = new Vector2(x, y); velocity = new Vector2(0, 0); acceleration = new Vector2(0, 460); boundingCircle = new Circle(); isAlive = true; } public void update(float delta) { velocity.add(acceleration.cpy().scl(delta)); if (velocity.y > 200) { velocity.y = 200; } if (position.y < -13) { position.y = -13; velocity.y = 0; } position.add(velocity.cpy().scl(delta)); boundingCircle.set(position.x + 9, position.y + 6, 6.5f); if (velocity.y < 0) { rotation -= 600 * delta; if (rotation < -20) { rotation = -20; } } if (isFalling() || !isAlive) { rotation += 480 * delta; if (rotation > 90) { rotation = 90; } } } public void updateReady(float runTime) { position.y = 2 * (float) Math.sin(7 * runTime) + originalY; } public boolean isFalling() { return velocity.y > 110; } public boolean shouldntFlap() { return velocity.y > 70 || !isAlive; } public void onClick() { if (isAlive) { AssetLoader.flap.play(); velocity.y = -140; } } public void die() { isAlive = false; velocity.y = 0; } public void decelerate() { acceleration.y = 0; } public void onRestart(int y) { rotation = 0; position.y = y; velocity.x = 0; velocity.y = 0; acceleration.x = 0; acceleration.y = 460; isAlive = true; } public float getX() { return position.x; } public float getY() { return position.y; } public float getWidth() { return width; } public float getHeight() { return height; } public float getRotation() { return rotation; } public Circle getBoundingCircle() { return boundingCircle; } public boolean isAlive() { return isAlive; } }
ScrollHandler.java
package com.kilobolt.GameObjects; import com.kilobolt.GameWorld.GameWorld; import com.kilobolt.ZBHelpers.AssetLoader; public class ScrollHandler { private Grass frontGrass, backGrass; private Pipe pipe1, pipe2, pipe3; public static final int SCROLL_SPEED = -59; public static final int PIPE_GAP = 49; private GameWorld gameWorld; public ScrollHandler(GameWorld gameWorld, float yPos) { this.gameWorld = gameWorld; frontGrass = new Grass(0, yPos, 143, 11, SCROLL_SPEED); backGrass = new Grass(frontGrass.getTailX(), yPos, 143, 11, SCROLL_SPEED); pipe1 = new Pipe(210, 0, 22, 60, SCROLL_SPEED, yPos); pipe2 = new Pipe(pipe1.getTailX() + PIPE_GAP, 0, 22, 70, SCROLL_SPEED, yPos); pipe3 = new Pipe(pipe2.getTailX() + PIPE_GAP, 0, 22, 60, SCROLL_SPEED, yPos); } public void updateReady(float delta) { frontGrass.update(delta); backGrass.update(delta); if (frontGrass.isScrolledLeft()) { frontGrass.reset(backGrass.getTailX()); } else if (backGrass.isScrolledLeft()) { backGrass.reset(frontGrass.getTailX()); } } public void update(float delta) { frontGrass.update(delta); backGrass.update(delta); pipe1.update(delta); pipe2.update(delta); pipe3.update(delta); if (pipe1.isScrolledLeft()) { pipe1.reset(pipe3.getTailX() + PIPE_GAP); } else if (pipe2.isScrolledLeft()) { pipe2.reset(pipe1.getTailX() + PIPE_GAP); } else if (pipe3.isScrolledLeft()) { pipe3.reset(pipe2.getTailX() + PIPE_GAP); } if (frontGrass.isScrolledLeft()) { frontGrass.reset(backGrass.getTailX()); } else if (backGrass.isScrolledLeft()) { backGrass.reset(frontGrass.getTailX()); } } public void stop() { frontGrass.stop(); backGrass.stop(); pipe1.stop(); pipe2.stop(); pipe3.stop(); } public boolean collides(Bird bird) { if (!pipe1.isScored() && pipe1.getX() + (pipe1.getWidth() / 2) < bird.getX() + bird.getWidth()) { addScore(1); pipe1.setScored(true); AssetLoader.coin.play(); } else if (!pipe2.isScored() && pipe2.getX() + (pipe2.getWidth() / 2) < bird.getX() + bird.getWidth()) { addScore(1); pipe2.setScored(true); AssetLoader.coin.play(); } else if (!pipe3.isScored() && pipe3.getX() + (pipe3.getWidth() / 2) < bird.getX() + bird.getWidth()) { addScore(1); pipe3.setScored(true); AssetLoader.coin.play(); } return (pipe1.collides(bird) || pipe2.collides(bird) || pipe3 .collides(bird)); } private void addScore(int increment) { gameWorld.addScore(increment); } public Grass getFrontGrass() { return frontGrass; } public Grass getBackGrass() { return backGrass; } public Pipe getPipe1() { return pipe1; } public Pipe getPipe2() { return pipe2; } public Pipe getPipe3() { return pipe3; } public void onRestart() { frontGrass.onRestart(0, SCROLL_SPEED); backGrass.onRestart(frontGrass.getTailX(), SCROLL_SPEED); pipe1.onRestart(210, SCROLL_SPEED); pipe2.onRestart(pipe1.getTailX() + PIPE_GAP, SCROLL_SPEED); pipe3.onRestart(pipe2.getTailX() + PIPE_GAP, SCROLL_SPEED); } }
最も多くの変更がGameRendererクラスの魂に影響を及ぼしましたが、再び、それらはすべてマイナーです。
Gamerenderer.java
package com.kilobolt.GameWorld; import java.util.List; import aurelienribon.tweenengine.Tween; import aurelienribon.tweenengine.TweenEquations; import aurelienribon.tweenengine.TweenManager; import com.badlogic.gdx.Gdx; import com.badlogic.gdx.graphics.GL10; import com.badlogic.gdx.graphics.OrthographicCamera; import com.badlogic.gdx.graphics.g2d.Animation; import com.badlogic.gdx.graphics.g2d.SpriteBatch; import com.badlogic.gdx.graphics.g2d.TextureRegion; import com.badlogic.gdx.graphics.glutils.ShapeRenderer; import com.badlogic.gdx.graphics.glutils.ShapeRenderer.ShapeType; import com.kilobolt.GameObjects.Bird; import com.kilobolt.GameObjects.Grass; import com.kilobolt.GameObjects.Pipe; import com.kilobolt.GameObjects.ScrollHandler; import com.kilobolt.TweenAccessors.Value; import com.kilobolt.TweenAccessors.ValueAccessor; import com.kilobolt.ZBHelpers.AssetLoader; import com.kilobolt.ZBHelpers.InputHandler; import com.kilobolt.ui.SimpleButton; public class GameRenderer { private GameWorld myWorld; private OrthographicCamera cam; private ShapeRenderer shapeRenderer; private SpriteBatch batcher; private int midPointY; private Bird bird; private ScrollHandler scroller; private Grass frontGrass, backGrass; private Pipe pipe1, pipe2, pipe3; private TextureRegion bg, grass, birdMid, skullUp, skullDown, bar; private Animation birdAnimation; private TweenManager manager; private Value alpha = new Value(); private List<SimpleButton> menuButtons; public GameRenderer(GameWorld world, int gameHeight, int midPointY) { myWorld = world; this.midPointY = midPointY; this.menuButtons = ((InputHandler) Gdx.input.getInputProcessor()) .getMenuButtons(); cam = new OrthographicCamera(); cam.setToOrtho(true, 136, gameHeight); batcher = new SpriteBatch(); batcher.setProjectionMatrix(cam.combined); shapeRenderer = new ShapeRenderer(); shapeRenderer.setProjectionMatrix(cam.combined); initGameObjects(); initAssets(); setupTweens(); } private void setupTweens() { Tween.registerAccessor(Value.class, new ValueAccessor()); manager = new TweenManager(); Tween.to(alpha, -1, .5f).target(0).ease(TweenEquations.easeOutQuad) .start(manager); } private void initGameObjects() { bird = myWorld.getBird(); scroller = myWorld.getScroller(); frontGrass = scroller.getFrontGrass(); backGrass = scroller.getBackGrass(); pipe1 = scroller.getPipe1(); pipe2 = scroller.getPipe2(); pipe3 = scroller.getPipe3(); } private void initAssets() { bg = AssetLoader.bg; grass = AssetLoader.grass; birdAnimation = AssetLoader.birdAnimation; birdMid = AssetLoader.bird; skullUp = AssetLoader.skullUp; skullDown = AssetLoader.skullDown; bar = AssetLoader.bar; } private void drawGrass() { batcher.draw(grass, frontGrass.getX(), frontGrass.getY(), frontGrass.getWidth(), frontGrass.getHeight()); batcher.draw(grass, backGrass.getX(), backGrass.getY(), backGrass.getWidth(), backGrass.getHeight()); } private void drawSkulls() { batcher.draw(skullUp, pipe1.getX() - 1, pipe1.getY() + pipe1.getHeight() - 14, 24, 14); batcher.draw(skullDown, pipe1.getX() - 1, pipe1.getY() + pipe1.getHeight() + 45, 24, 14); batcher.draw(skullUp, pipe2.getX() - 1, pipe2.getY() + pipe2.getHeight() - 14, 24, 14); batcher.draw(skullDown, pipe2.getX() - 1, pipe2.getY() + pipe2.getHeight() + 45, 24, 14); batcher.draw(skullUp, pipe3.getX() - 1, pipe3.getY() + pipe3.getHeight() - 14, 24, 14); batcher.draw(skullDown, pipe3.getX() - 1, pipe3.getY() + pipe3.getHeight() + 45, 24, 14); } private void drawPipes() { batcher.draw(bar, pipe1.getX(), pipe1.getY(), pipe1.getWidth(), pipe1.getHeight()); batcher.draw(bar, pipe1.getX(), pipe1.getY() + pipe1.getHeight() + 45, pipe1.getWidth(), midPointY + 66 - (pipe1.getHeight() + 45)); batcher.draw(bar, pipe2.getX(), pipe2.getY(), pipe2.getWidth(), pipe2.getHeight()); batcher.draw(bar, pipe2.getX(), pipe2.getY() + pipe2.getHeight() + 45, pipe2.getWidth(), midPointY + 66 - (pipe2.getHeight() + 45)); batcher.draw(bar, pipe3.getX(), pipe3.getY(), pipe3.getWidth(), pipe3.getHeight()); batcher.draw(bar, pipe3.getX(), pipe3.getY() + pipe3.getHeight() + 45, pipe3.getWidth(), midPointY + 66 - (pipe3.getHeight() + 45)); } private void drawBirdCentered(float runTime) { batcher.draw(birdAnimation.getKeyFrame(runTime), 59, bird.getY() - 15, bird.getWidth() / 2.0f, bird.getHeight() / 2.0f, bird.getWidth(), bird.getHeight(), 1, 1, bird.getRotation()); } private void drawBird(float runTime) { if (bird.shouldntFlap()) { batcher.draw(birdMid, bird.getX(), bird.getY(), bird.getWidth() / 2.0f, bird.getHeight() / 2.0f, bird.getWidth(), bird.getHeight(), 1, 1, bird.getRotation()); } else { batcher.draw(birdAnimation.getKeyFrame(runTime), bird.getX(), bird.getY(), bird.getWidth() / 2.0f, bird.getHeight() / 2.0f, bird.getWidth(), bird.getHeight(), 1, 1, bird.getRotation()); } } private void drawMenuUI() { batcher.draw(AssetLoader.zbLogo, 136 / 2 - 56, midPointY - 50, AssetLoader.zbLogo.getRegionWidth() / 1.2f, AssetLoader.zbLogo.getRegionHeight() / 1.2f); for (SimpleButton button : menuButtons) { button.draw(batcher); } } private void drawScore() { int length = ("" + myWorld.getScore()).length(); AssetLoader.shadow.draw(batcher, "" + myWorld.getScore(), 68 - (3 * length), midPointY - 82); AssetLoader.font.draw(batcher, "" + myWorld.getScore(), 68 - (3 * length), midPointY - 83); } public void render(float delta, float runTime) { Gdx.gl.glClearColor(0, 0, 0, 1); Gdx.gl.glClear(GL10.GL_COLOR_BUFFER_BIT); shapeRenderer.begin(ShapeType.Filled); shapeRenderer.setColor(55 / 255.0f, 80 / 255.0f, 100 / 255.0f, 1); shapeRenderer.rect(0, 0, 136, midPointY + 66); shapeRenderer.setColor(111 / 255.0f, 186 / 255.0f, 45 / 255.0f, 1); shapeRenderer.rect(0, midPointY + 66, 136, 11); shapeRenderer.setColor(147 / 255.0f, 80 / 255.0f, 27 / 255.0f, 1); shapeRenderer.rect(0, midPointY + 77, 136, 52); shapeRenderer.end(); batcher.begin(); batcher.disableBlending(); batcher.draw(bg, 0, midPointY + 23, 136, 43); drawGrass(); drawPipes(); batcher.enableBlending(); drawSkulls(); if (myWorld.isRunning()) { drawBird(runTime); drawScore(); } else if (myWorld.isReady()) { drawBird(runTime); drawScore(); } else if (myWorld.isMenu()) { drawBirdCentered(runTime); drawMenuUI(); } else if (myWorld.isGameOver()) { drawBird(runTime); drawScore(); } else if (myWorld.isHighScore()) { drawBird(runTime); drawScore(); } batcher.end(); drawTransition(delta); } private void drawTransition(float delta) { if (alpha.getValue() > 0) { manager.update(delta); Gdx.gl.glEnable(GL10.GL_BLEND); Gdx.gl.glBlendFunc(GL10.GL_SRC_ALPHA, GL10.GL_ONE_MINUS_SRC_ALPHA); shapeRenderer.begin(ShapeType.Filled); shapeRenderer.setColor(1, 1, 1, alpha.getValue()); shapeRenderer.rect(0, 0, 136, 300); shapeRenderer.end(); Gdx.gl.glDisable(GL10.GL_BLEND); } } }
もちろん、UIを改善するための多くの作業が残っています。そして、これが私たちがやることです。完成したゲームのサンプルコードを12日目にレイアウトします。このサンプルには完成したUIが含まれます。そして、これはセクション1の終わりになり、その目的はFlappy Birdの動作をコピーすることでした。
1日あたりのソースコード
自分でコードを書く気がない場合は、こちらからダウンロードしてください:
12日目-最終的なUIとソースコード
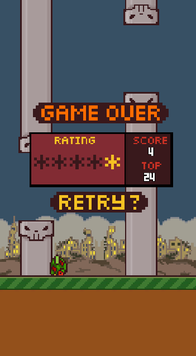 12日目へようこそ。以下には、次のコードの最終バージョンがあります。
- 完成したUI
- トランジションを適用する簡単な方法を追加しました
- ゲームオーバー画面を追加しました
- ゲームオーバー画面に星の形で評価の表示を追加しました
- 新しい効果音(バードドロップ)を追加しました
- 効果音のロジックを変更
- 修正されたボリュームの問題
- 多数のコードの改善
新しい概念を追加しなかったので、12日目はリストされた変更を説明しません。コードを確認し、質問がある場合は私に尋ねてください!
1日あたりのソースコード
サンプルの最新バージョンをダウンロードします。アーカイブを解凍し、プロジェクトをEclipseにインポートします。
また、ここで取得したもので遊ぶことができます。