アスタリスクとYandexの音声認識サービスを統合した経験を共有することにしました。
私のクライアントは、彼のPBXにVoice2Text機能を導入するために火をつけました。
PBXとしてFreePBXが使用されました。
すぐにGoogleの音声認識サービスを使用することになりましたが、目的の結果を達成するために数時間失敗した後、同様のYandexサービスを試すことにしました。
カットの下の詳細。
ソースデータ:
FreePBX Distro 12 Stable-6.12.65、CentOS 6.5、Asterisk 11 + Voice2Text機能を実装するという信じられないほどの願望:)
デフォルトでは、FreePBXはすべてのエントリを.wavに書き込みますが、認識のためにファイルを.mp3に転送する必要があります。 これにはsendmailmp3を使用します。
Sendmailmp3は、いくつかの段階に分けられます。
- ストリームをキャッチ
- メールの内容を分析する
- メッセージを部分に分割する
- オーディオファイルを抽出する
- wavをmp3に変換する
- メールの内容を回復する
- sendmailコマンドにメッセージを送信します
sendmailmp3と作業に必要なすべてのパッケージをインストールするスクリプトを使用します。
/ tmpに移動します。
cd /tmp
sendmailmp3をインストールするスクリプトをダウンロードします。
wget http://pbxinaflash.com/installmp3stt.sh
ファイルを実行可能にします:
chmod +x installmp3stt.sh
そして、スクリプトを実行します。
./installmp3stt.sh
次に、FreePBX Webインターフェイス、[設定]タブ、[ボイスメール管理]、[設定]に移動します。
そして、mailcmdフィールドに/ usr / sbin / sendmailmp3と書き込みます
そして、フォーマット:wavフィールド
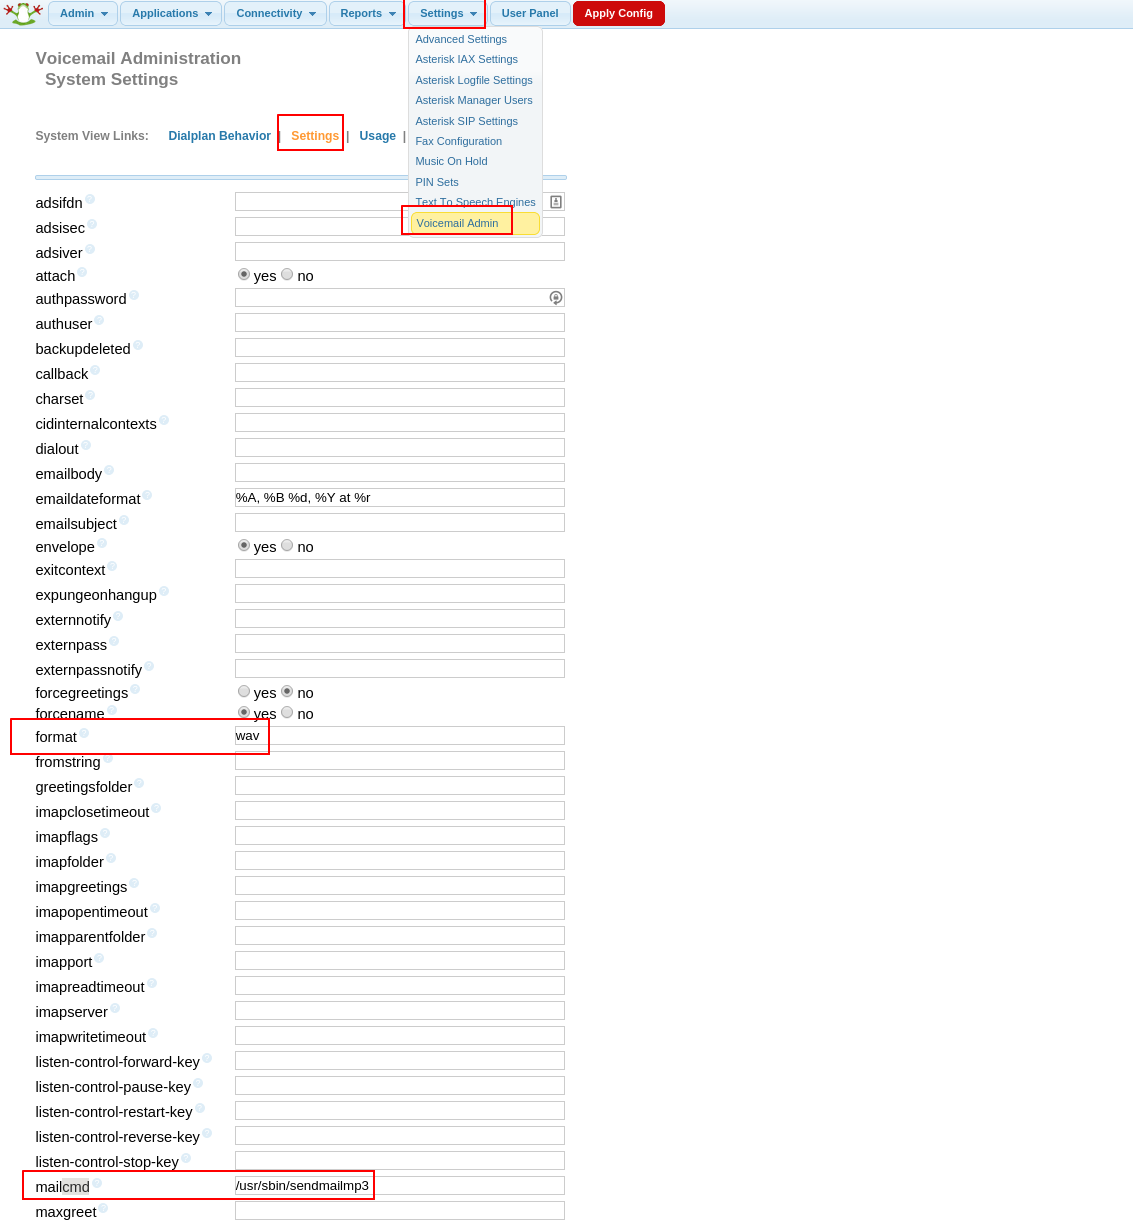
これで、メッセージがmp3形式でメールに送信され、Voice2Text機能が追加されます。
Yandexサービスの選択は、ファイルをflacまたはspeexにトランスコードするのではなく、mp3に直接送信できるという事実(サポートされている形式に関する少なくとも他の情報は見つかりませんでした)と、最大メッセージ長がGoogleよりもはるかに長いという事実によるものです。
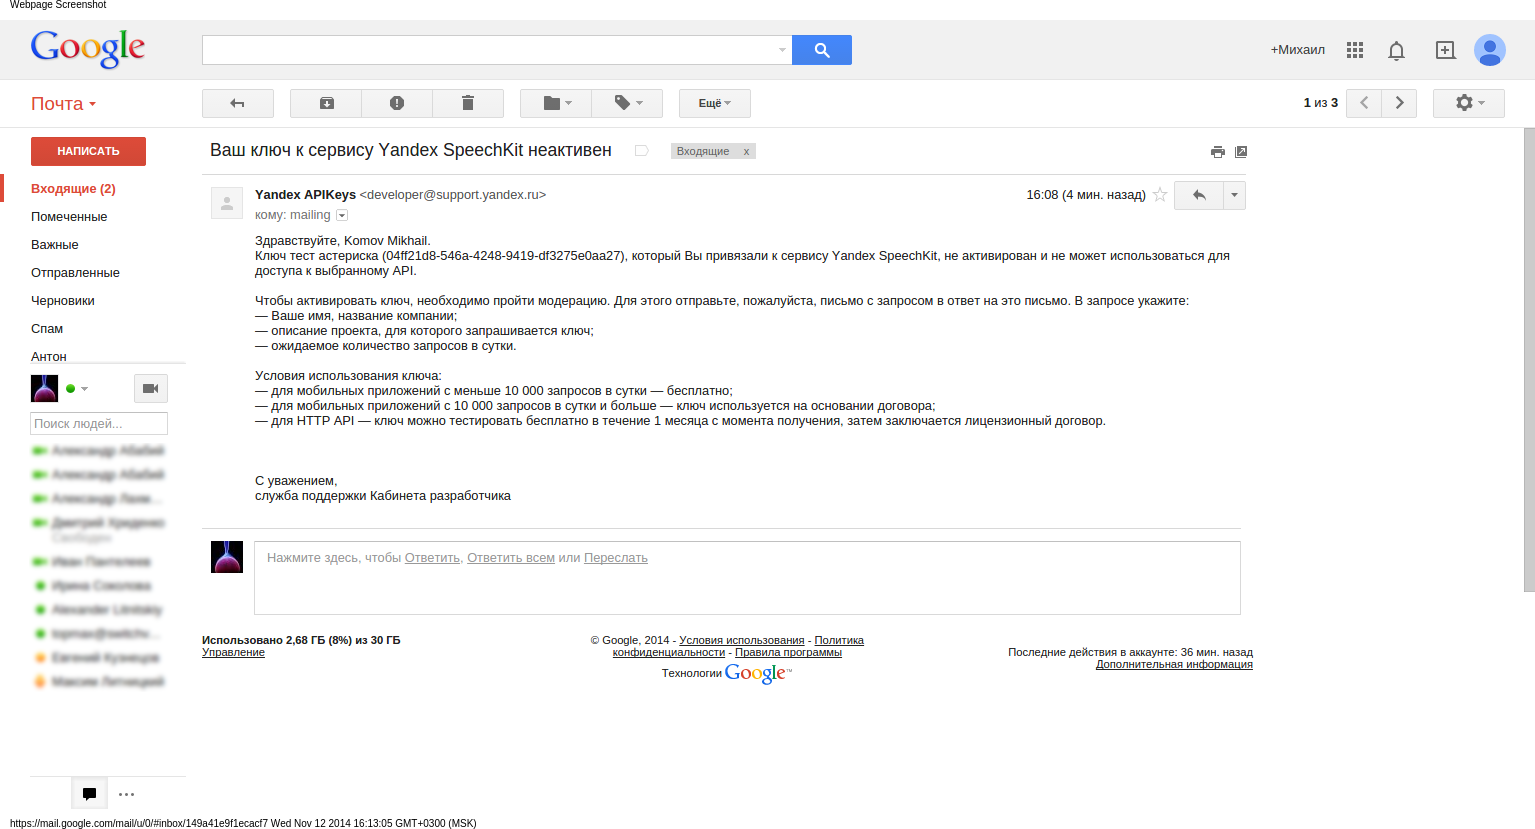
スクリプトが完全に機能するようになる前に、 リンクをたどり、開発者のオフィスに行き、Yandexメールボックスを使用してログインし、APIキーを要求する必要があります。 その後、指定されたメールに追加の指示が書かれた手紙が届きます。
キーをアクティブにした後、認識のためにファイルを送信するcurlリクエストを作成する必要があります。 ビューは次のようになります。
asr.yandex.net/asr_xml ?
uuid = <一意のユーザーID>
&キー= <APIキー>
&topic = <音声リクエストトピック>
&[lang = <クエリ言語>]
次の形式がサポートされています。
- オーディオ/ x-speex 1
- オーディオ/ x-pcm;ビット= 16;レート= 8000
- オーディオ/ x-pcm;ビット= 16;レート= 16000 2
- オーディオ/ x-alaw;ビット= 13;レート= 8000
- オーディオ/ x-wav
- オーディオ/ x-mpeg-3 3
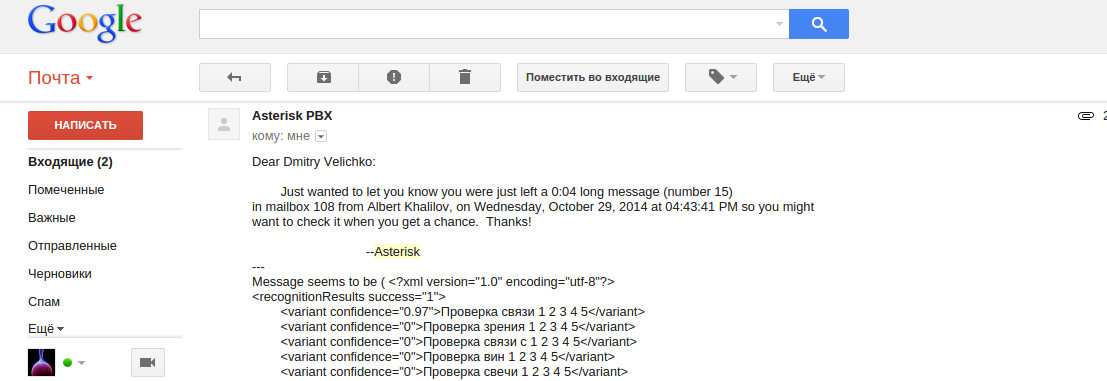
応答はXMLで返されます。これには、各仮説の確実性の度合いを示す認識仮説のnベストリスト(最大5つの値)が含まれます。
成功した認識の例:
<?xml version = "1.0" encoding = "utf-8"?>
バスマナヤ通り
失敗した認識の例:
<?xml version = "1.0" encoding = "utf-8"?>
/>
その結果、認識オプションとこれに似たmp3ファイルの添付ファイルを含むメッセージは、指定したメールボックスに分類されます。
結果のスクリプトは次のようになります。
sendmailmp3
#! /bin/sh # Asterisk voicemail attachment conversion script, including voice recognition using Google API # # Revision history : # 22/11/2010 - V1.0 - Creation by N. Bernaerts # 07/02/2012 - V1.1 - Add handling of mails without attachment (thanks to Paul Thompson) # 01/05/2012 - V1.2 - Use mktemp, pushd & popd # 08/05/2012 - V1.3 - Change mp3 compression to CBR to solve some smartphone compatibility (thanks to Luca Mancino) # 01/08/2012 - V1.4 - Add PATH definition to avoid any problem (thanks to Christopher Wolff) # 31/01/2013 - V2.0 - Add Google Voice Recognition feature (thanks to Daniel Dainty idea and sponsoring :-) # 04/02/2013 - V2.1 - Handle error in case of voicemail too long to be converted # set language for voice recognition (en-US, en-GB, fr-FR, ...) LANGUAGE="ru_RU" # set PATH PATH="/usr/local/sbin:/usr/local/bin:/usr/sbin:/usr/bin:/sbin:/bin" # save the current directory pushd . # create a temporary directory and cd to it TMPDIR=$(mktemp -d) cd $TMPDIR # dump the stream to a temporary file cat >> stream.org # get the boundary BOUNDARY=`grep "boundary=" stream.org | cut -d'"' -f 2` # cut the file into parts # stream.part - header before the boundary # stream.part1 - header after the bounday # stream.part2 - body of the message # stream.part3 - attachment in base64 (WAV file) # stream.part4 - footer of the message awk '/'$BOUNDARY'/{i++}{print > "stream.part"i}' stream.org # if mail is having no audio attachment (plain text) PLAINTEXT=`cat stream.part1 | grep 'plain'` if [ "$PLAINTEXT" != "" ] then # prepare to send the original stream cat stream.org > stream.new # else, if mail is having audio attachment else # cut the attachment into parts # stream.part3.head - header of attachment # stream.part3.wav.base64 - wav file of attachment (encoded base64) sed '7,$d' stream.part3 > stream.part3.wav.head sed '1,6d' stream.part3 > stream.part3.wav.base64 # convert the base64 file to a wav file dos2unix -o stream.part3.wav.base64 base64 -di stream.part3.wav.base64 > stream.part3.wav # convert wav file to mp3 file # -b 24 is using CBR, giving better compatibility on smartphones (you can use -b 32 to increase quality) # -V 2 is using VBR, a good compromise between quality and size for voice audio files lame -mm -b 24 stream.part3.wav stream.part3.mp3 # convert back mp3 to base64 file base64 stream.part3.mp3 > stream.part3.mp3.base64 # generate the new mp3 attachment header # change Type: audio/x-wav to Type: audio/mpeg # change name="msg----.wav" to name="msg----.mp3" sed 's/x-wav/mpeg/g' stream.part3.wav.head | sed 's/.wav/.mp3/g' > stream.part3.mp3.head # convert wav file to flac compatible for Google speech recognition # sox stream.part3.wav -r 16000 -b 16 -c 1 audio.flac vad reverse vad reverse lowpass -2 2500 # call Google Voice Recognition sending flac file as POST curl -v -4 "asr.yandex.net/asr_xml?key=23988820-8719-4a2e-82ba-9ddd5a9bfe67&uuid=12345678123456781234567812345678&topic=queries&lang=ru-RU" -H "Content-Type: audio/x-mpeg-3" --data-binary "@stream.part3.mp3" 1>audio.txt # curl --data-binary @audio.flac --header 'Content-type: audio/x-flac; rate=16000' 'https://www.google.com/speech-api/v2/recognize?key=AIzaSyB5lwncPRYpNrHXtN-Sy-LNDMLLU5vM1n8&xjerr=1&client=chromium&pfilter=0&lang='ru_RU'&maxresults=1' 1>audio.txt # extract the transcript and confidence results FILETOOBIG=`cat audio.txt | grep "<HTML>"` TRANSCRIPT=`cat audio.txt | cut -d"," -f3 | sed 's/^.*utterance\":\"\(.*\)\"$/\1/g'` CONFIDENCE=`cat audio.txt | cut -d"," -f4 | sed 's/^.*confidence\":0.\([0-9][0-9]\).*$/\1/g'` # generate first part of mail body, converting it to LF only mv stream.part stream.new cat stream.part1 >> stream.new sed '$d' < stream.part2 >> stream.new # beginning of transcription section echo "---" >> stream.new # if audio attachment is too big if [ "$FILETOOBIG" != "" ] then # error message echo "Voice message is too long to be transcripted." >> stream.new else # append result of transcription echo "Message seems to be ( $CONFIDENCE% confidence ) :" >> stream.new echo "$TRANSCRIPT" >> stream.new fi # end of message body tail -1 stream.part2 >> stream.new # append mp3 header cat stream.part3.mp3.head >> stream.new dos2unix -o stream.new # append base64 mp3 to mail body, keeping CRLF unix2dos -o stream.part3.mp3.base64 cat stream.part3.mp3.base64 >> stream.new # append end of mail body, converting it to LF only echo "" >> stream.tmp echo "" >> stream.tmp cat stream.part4 >> stream.tmp dos2unix -o stream.tmp cat stream.tmp >> stream.new fi # send the mail thru sendmail cat stream.new | sendmail -t # go back to original directory popd # remove all temporary files and temporary directory sleep 50 rm -Rf $TMPDIR
私の意見では、このオプションはここで説明されているよりも幾分簡単です。 それはすべて、1つのスクリプトを実行してWebインターフェイスで数回クリックするだけでなく、記録を.wavではなくmp3に送信することになります。 もちろん、これはunix-wayではないと誰かが言うだろう:)が、少なくとも慣れるという目的のためには、誰かにとっては有用かもしれません。