
Githubは、すべてのユーザーにgithub.ioドメインの静的なブログを提供します。 これにより、Jekyllを使用することをお勧めします。 しかし、今日はCMSゴーストでgithubブログを作成する方法についてお話します。
作成したくない、 デモが欲しい!
ブログを作成するには、3つのステージが必要です。
ステージI
ユーザー名(http://username.github.io)でサブドメインを作成するGitでオープンリポジトリを作成する必要があります。 指示に従って、githubでユーザーの名前でリポジトリを作成します 。
ステージII
ローカル環境をセットアップし、ブログを作成します。
Node.js 0.10.x(最新の安定版)が必要になります。 Ghostを使用するには、Node.js 0.10.30およびnpm 1.4.21パッケージマネージャーをお勧めします。 以下は、Linuxのコード例です。 他のプラットフォームへのリンク: MacおよびWindows 。
ゴーストをインストールします。
mkdir ghost wget "http://ghost.org/zip/ghost-latest.zip" unzip ghost-latest.zip -d ghost cd ghost cp config.example.js config.js
nodejsとnpmをインストールします。
sudo apt-get update sudo apt-get install nodejs sudo apt-get install npm
config.js開発セクションのURLをlocalhost :2368からusername.github.ioに変更します 。
// ### Development **(default)** development: { // The url to use when providing links to the site, Eg in RSS and email. // Change this to your Ghost blogs published URL. url: 'http://username.github.io', // Example mail config // Visit http://support.ghost.org/mail for instructions // ``` // mail: { // transport: 'SMTP', // options: { // service: 'Mailgun', // auth: { // user: '', // mailgun username // pass: '' // mailgun password // } // } // }, // ``
ゴーストフォルダーに移動し、npmをインストールして実行します。
npmインストール
npm start
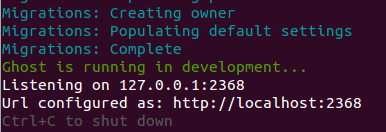
行きましょう127.0.0.1:2368 /ゴースト/:

ブロックの作成と設定、および投稿の編集(テンプレートの例に従う)は直感的です。 また、 ghost.orgで情報をいつでも見つけることができます。
ステージIII
静的なブログを作成し、githubで「コミット」します。
ゴーストを静的にするには、 バスターが必要です。
インストール:
sudo apt-get update sudo apt-get install wget sudo apt-get install python sudo apt-get install python-pip pip install buster
ブログが127.0.0.1:2368を実行しているかどうかを確認します:
cd ghost npm start
ブースターは、ブログの静的バージョン(静的)の新しいフォルダーを作成します。
cd ghost cd buster setup
githubリポジトリへのリンクを提供します: github.com/username/username.github.io
ブースターは静的フォルダーを生成しました。 次に、ブースターをつかみます。 私たちの地元の幽霊:
buster generate --domain=http://127.0.0.1:2368
プレビューするには、次を実行します:
buster preview
静的なブログを表示できるようになりました: 127.0.0.1 :9000
Control + Cプレビューの表示を停止します。 Gitのブログをダウンロード:
buster deploy
現在または数分後には、 username.github.ioで利用できるようになります。
軟膏で飛ぶ
バスター経由でGitにデプロイできませんでした。 ターミナル経由で「コミット」しました。 また、バスターは静的なゴーストページをキャッチしたくない。 私は単にそれらを投稿で発行することにしました。
毎日の使用
ゴーストを起動し、投稿を編集します127.0.0.1:2368 / ghost:
nmp start
Busterは静的バージョンを生成し
buster generate --domain=http://127.0.0.1:2368 buster deploy
おわりに
Githubで静的ブログを使用する長所:
- 無料
- DBは必要ありません。
- 高性能
- 簡単なバックアップの可能性。
- オフラインで投稿を作成する機能。
リンク集
- 元の記事: 方法:Fre eのGhostブログをホストする 。
- cms ghostをインストールするための一連のリンク: Ghost Ghostブログプラットフォームをインストールする方法 。
- Gitリポジトリバスター 。