翻訳者から
記事の公開後、活発な議論がありました。 記事は技術的な観点から完全に正しいわけではないため、コメントを読むことをお勧めします。 行動の指針ではなく、議論の資料としてお勧めします。
エントリー
今日は、ASP.NET MVCアプリケーションの汎用リポジトリパターンと作業単位のアプローチを見ていきます。 これを行うために、「ブック」アプリケーションを作成します。このアプリケーションでは、データの作成、受信、更新、削除の操作が実装されます。 資料の理解を簡単にするために、この例は本のエッセンスを1つだけ使用することに基づいています。
前の記事「 MVCのリポジトリパターンを使用したCRUD操作 」では、CRUD操作を実装する書籍エンティティのリポジトリを使用してアプリケーションを作成しました。 ただし、エンタープライズレベルの同様のアプリケーションを作成する場合は、新しいエンティティごとにリポジトリを作成する必要があります。 簡単に言えば、DRYアプローチに反するコードを複製します。したがって、「共有リポジトリ」パターンを使用する必要があります。

今、写真を見てください。 質問に苦しんでいる2人のプログラマー:重複したコードを作成するか、既存のコードを再度使用しますか? すでに知っている最初のアプローチの実装方法。 したがって、2番目を理解しようとします。 行こう
リポジトリパターン
このパターンは、データアクセス層とアプリケーションのビジネスロジックの間に抽象化を作成するように設計されています。 これは、より疎結合のアプローチを整理するのに役立つデータアクセスパターンです。 1つのクラスまたはリポジトリと呼ばれる一連のデータアクセスロジックを作成します。
今回は、共通のリポジトリと作業単位クラスを作成します。これにより、各エンティティのリポジトリのインスタンスが作成されます。 コントローラーでUnitOfWorkクラスのインスタンスを作成し、必要なエンティティに応じてリポジトリのインスタンスを作成し、最終的にリポジトリの必要なメソッドを使用します。
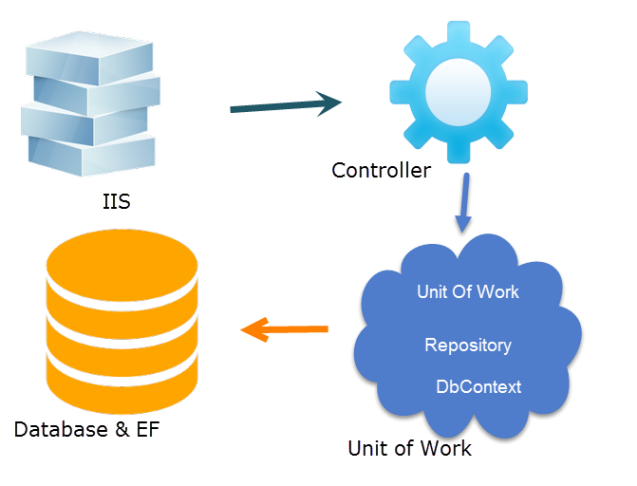
次の図は、リポジトリとEntity Frameworkデータコンテキストとの関係を示しています。この場合、コントローラーは、Entity Frameworkを介して直接ではなく、作業単位を介してリポジトリとやり取りします。
では、作業単位が正確に何を担当しているのかを把握しましょう。 彼はDbContextのインスタンスを作成する責任があり、その結果、すべてのリポジトリは同じDbContextを使用してデータベースを操作します。 つまり、作業単位パターンにより、すべてのリポジトリが同じデータコンテキストで動作することが保証されます。
共通リポジトリと作業単位クラスの実装
注意:この記事では、ユーザーインターフェイスはインターフェイスではなく特定のクラスオブジェクトを使用します。このアプローチは次の記事で説明します。 この例の簡潔さとわかりやすさのために、エラーハンドラは削除されましたが、必要に応じて自分で返すことができます。
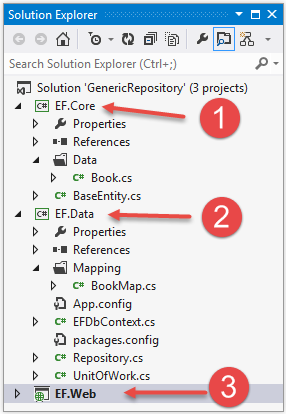
EF.CoreとEF.Dataの2つのプロジェクトを作成します。 「コードファースト」アプローチを使用します。 EF.Coreには、マッピングがデータベース内にあるエンティティが含まれます。 EF.Coreプロジェクトでは、2つのエンティティを作成します。BaseEntityクラスでは、各エンティティとBookクラスによる継承の共通プロパティを記述します。 各クラスをさらに詳しく考えてみましょう。
BaseEntityのコードは次のとおりです
using System; namespace EF.Core { public abstract class BaseEntity { public Int64 ID { get; set; } public DateTime AddedDate { get; set; } public DateTime ModifiedDate { get; set; } public string IP { get; set; } } }
次に、EF.CoreプロジェクトのDataフォルダーにBookクラスを作成します。このプロジェクトはBaseEntityを継承します
using System; namespace EF.Core.Data { public class Book : BaseEntity { public string Title { get; set; } public string Author { get; set; } public string ISBN { get; set; } public DateTime Published { get; set; } } }
EF.Dataプロジェクトには、Bookエンティティ、リポジトリ、および作業単位クラスのマッピングが含まれています。 「コードファースト」アプローチでは、DbContextから継承するデータアクセスクラスを作成するため、OnModelCreating()メソッドを書き換えるEFDbContextクラスを作成します。 このメソッドは、コンテキストモデルが初期化されたときに呼び出され、ロックする前にさらに構成することができます。 このクラスのサンプルコード:
using System; using System.Data.Entity; using System.Data.Entity.ModelConfiguration; using System.Linq; using System.Reflection; using EF.Core; namespace EF.Data { public class EFDbContext : DbContext { public EFDbContext() : base("name=DbConnectionString") { } public new IDbSet<TEntity> Set<TEntity>() where TEntity : BaseEntity { return base.Set<TEntity>(); } protected override void OnModelCreating(DbModelBuilder modelBuilder) { var typesToRegister = Assembly.GetExecutingAssembly().GetTypes() .Where(type => !String.IsNullOrEmpty(type.Namespace)) .Where(type => type.BaseType != null && type.BaseType.IsGenericType && type.BaseType.GetGenericTypeDefinition() == typeof(EntityTypeConfiguration<>)); foreach (var type in typesToRegister) { dynamic configurationInstance = Activator.CreateInstance(type); modelBuilder.Configurations.Add(configurationInstance); } base.OnModelCreating(modelBuilder); } } }
また、「最初のコード」の概念は構成の規則に従っているため、接続の名前を含む文字列をコンストラクターに渡し、App.Configファイルのアプリケーションの構成と完全に一致する必要があることも思い出してください。 これらの手順の後、データベースサーバーに自動的に接続することができます。
OnModelCreating()メソッドでは、この特定のプロジェクトの設定のクラスへのエンティティマップのリフレクションを使用します。
次に、データベースにテーブルを作成するときに使用されるブックエンティティの設定を定義します。 設定は、マッピングフォルダーのEF.Dataプロジェクトにあります。
BookMapクラスは次のようになります。
using System.ComponentModel.DataAnnotations.Schema; using System.Data.Entity.ModelConfiguration; using EF.Core.Data; namespace EF.Data.Mapping { public class BookMap : EntityTypeConfiguration<Book> { public BookMap() { HasKey(t => t.ID); Property(t => t.ID).HasDatabaseGeneratedOption(DatabaseGeneratedOption.Identity); Property(t => t.Title).IsRequired(); Property(t => t.Author).IsRequired(); Property(t => t.ISBN).IsRequired(); Property(t => t.Published).IsRequired(); ToTable("Books"); } } }
共有リポジトリを作成するときが来ました。 この例を単純化するために、インターフェイスを作成しません。 リポジトリはすべてのCRUD操作を実装します。 また、リポジトリには、パラメータ化されたコンストラクタがあります。
コンテキスト。したがって、リポジトリオブジェクトのインスタンスを作成するとき、すべてのリポジトリは同じコンテキストを持ちます。 コンテキストのsaveChanges()メソッドを使用しますが、作業単位クラスのsave()メソッドも使用できます。両方とも同じデータコンテキストを持つためです。
共有リポジトリクラスは次のようになります。
using System; using System.Data.Entity; using System.Data.Entity.Validation; using System.Linq; using EF.Core; namespace EF.Data { public class Repository<T> where T : BaseEntity { private readonly EFDbContext context; private IDbSet<T> entities; string errorMessage = string.Empty; public Repository(EFDbContext context) { this.context = context; } public T GetById(object id) { return this.Entities.Find(id); } public void Insert(T entity) { try { if (entity == null) { throw new ArgumentNullException("entity"); } this.Entities.Add(entity); this.context.SaveChanges(); } catch (DbEntityValidationException dbEx) { foreach (var validationErrors in dbEx.EntityValidationErrors) { foreach (var validationError in validationErrors.ValidationErrors) { errorMessage += string.Format("Property: {0} Error: {1}", validationError.PropertyName, validationError.ErrorMessage) + Environment.NewLine; } } throw new Exception(errorMessage, dbEx); } } public void Update(T entity) { try { if (entity == null) { throw new ArgumentNullException("entity"); } this.context.SaveChanges(); } catch (DbEntityValidationException dbEx) { foreach (var validationErrors in dbEx.EntityValidationErrors) { foreach (var validationError in validationErrors.ValidationErrors) { errorMessage += Environment.NewLine + string.Format("Property: {0} Error: {1}", validationError.PropertyName, validationError.ErrorMessage); } } throw new Exception(errorMessage, dbEx); } } public void Delete(T entity) { try { if (entity == null) { throw new ArgumentNullException("entity"); } this.Entities.Remove(entity); this.context.SaveChanges(); } catch (DbEntityValidationException dbEx) { foreach (var validationErrors in dbEx.EntityValidationErrors) { foreach (var validationError in validationErrors.ValidationErrors) { errorMessage += Environment.NewLine + string.Format("Property: {0} Error: {1}", validationError.PropertyName, validationError.ErrorMessage); } } throw new Exception(errorMessage, dbEx); } } public virtual IQueryable<T> Table { get { return this.Entities; } } private IDbSet<t> Entities { get { if (entities == null) { entities = context.Set<t>(); } return entities; } } } }
次に、作業ユニットクラスを作成する必要があります。 IDisposableインターフェイスを継承し、各コントローラーで削除されます。 このクラスは、アプリケーションのDataContextも初期化します。 このクラスの中心は、目的のエンティティのリポジトリを返すRepository()メソッドです。このメソッドは、BaseEntityから継承します。 私たちは見ます:
using System; using System.Collections.Generic; using EF.Core; namespace EF.Data { public class UnitOfWork : IDisposable { private readonly EFDbContext context; private bool disposed; private Dictionary<string,object> repositories; public UnitOfWork(EFDbContext context) { this.context = context; } public UnitOfWork() { context = new EFDbContext(); } public void Dispose() { Dispose(true); GC.SuppressFinalize(this); } public void Save() { context.SaveChanges(); } public virtual void Dispose(bool disposing) { if (!disposed) { if (disposing) { context.Dispose(); } } disposed = true; } public Repository<T> Repository<T>() where T : BaseEntity { if (repositories == null) { repositories = new Dictionary<string,object>(); } var type = typeof(T).Name; if (!repositories.ContainsKey(type)) { var repositoryType = typeof(Repository<>); var repositoryInstance = Activator.CreateInstance(repositoryType.MakeGenericType(typeof(T)), context); repositories.Add(type, repositoryInstance); } return (Repository<t>)repositories[type]; } } }
共通リポジトリパターンを使用したMVCアプリケーション
MVCアプリケーション(EF.Web)を作成します。 これはソリューションの3番目のプロジェクトになります。このプロジェクトには、BookエンティティのユーザーインターフェイスとCRUD操作のコントローラーが直接含まれます。 BookControllerコントローラーを作成します。 各CRUD操作には、独自のActionResultメソッドがあります。
まず、対応するエンティティに必要なリポジトリのコントローラーコンストラクターによる初期化のために、作業単位クラスのインスタンスを作成します。
using System.Collections.Generic; using System.Linq; using System.Web.Mvc; using EF.Core.Data; using EF.Data; namespace EF.Web.Controllers { public class BookController : Controller { private UnitOfWork unitOfWork = new UnitOfWork(); private Repository<book> bookRepository; public BookController() { bookRepository = unitOfWork.Repository<book>(); } public ActionResult Index() { IEnumerable<book> books = bookRepository.Table.ToList(); return View(books); } public ActionResult CreateEditBook(int? id) { Book model = new Book(); if (id.HasValue) { model = bookRepository.GetById(id.Value); } return View(model); } [HttpPost] public ActionResult CreateEditBook(Book model) { if (model.ID == 0) { model.ModifiedDate = System.DateTime.Now; model.AddedDate = System.DateTime.Now; model.IP = Request.UserHostAddress; bookRepository.Insert(model); } else { var editModel = bookRepository.GetById(model.ID); editModel.Title = model.Title; editModel.Author = model.Author; editModel.ISBN = model.ISBN; editModel.Published = model.Published; editModel.ModifiedDate = System.DateTime.Now; editModel.IP = Request.UserHostAddress; bookRepository.Update(editModel); } if (model.ID > 0) { return RedirectToAction("Index"); } return View(model); } public ActionResult DeleteBook(int id) { Book model = bookRepository.GetById(id); return View(model); } [HttpPost,ActionName("DeleteBook")] public ActionResult ConfirmDeleteBook(int id) { Book model = bookRepository.GetById(id); bookRepository.Delete(model); return RedirectToAction("Index"); } public ActionResult DetailBook(int id) { Book model = bookRepository.GetById(id); return View(model); } protected override void Dispose(bool disposing) { unitOfWork.Dispose(); base.Dispose(disposing); } } }
次に、ユーザーインターフェイスを作成する必要があります。
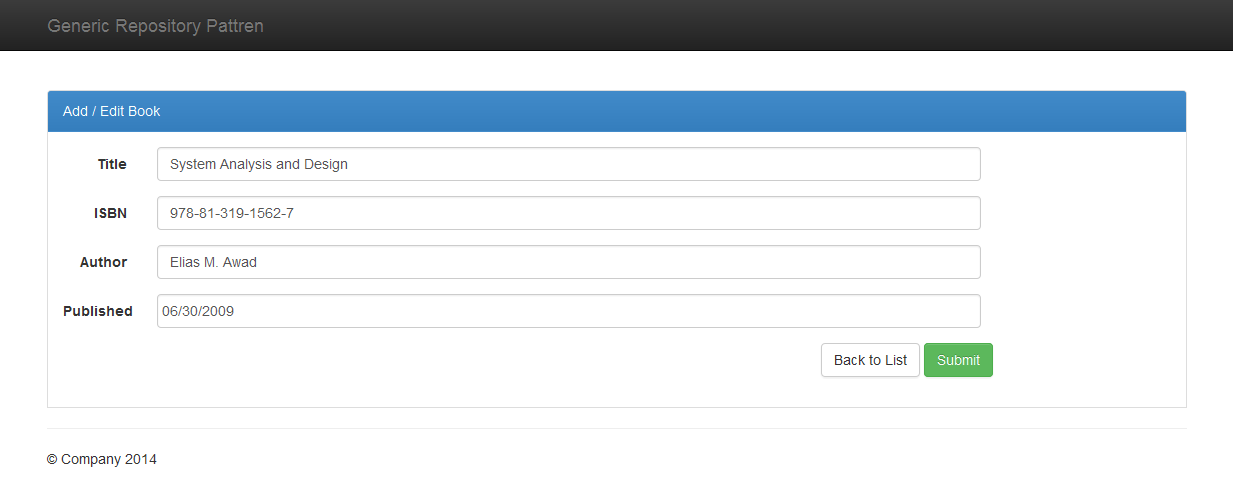
ブックビューの作成/編集
CreateEditBook.cshtmlブックを作成および編集するための一般的なビューを作成します。 本の発行日を選択するには、日付選択ツールを使用します。 JavaScriptでのコード:
(function ($) { function Book() { var $thisthis = this; function initializeAddEditBook() { $('.datepicker').datepicker({ "setDate": new Date(), "autoclose": true }); } $this.init = function () { initializeAddEditBook(); } } $(function () { var self = new Book(); self.init(); }); }(jQuery))
そして、直接CreateEditBook.cshtml自体。
@model EF.Core.Data.Book @{ ViewBag.Title = "Create Edit Book"; } <div class="book-example panel panel-primary"> <div class="panel-heading panel-head">Add / Edit Book</div> <div class="panel-body"> @using (Html.BeginForm()) { <div class="form-horizontal"> <div class="form-group"> @Html.LabelFor(model => model.Title, new { @class = "col-lg-1 control-label" }) <div class="col-lg-9"> @Html.TextBoxFor(model => model.Title, new { @class = "form-control" }) </div> </div> <div class="form-group"> @Html.LabelFor(model => model.ISBN, new { @class = "col-lg-1 control-label" }) <div class="col-lg-9"> @Html.TextBoxFor(model => model.ISBN, new { @class = "form-control" }) </div> </div> <div class="form-group"> @Html.LabelFor(model => model.Author, new { @class = "col-lg-1 control-label" }) <div class="col-lg-9"> @Html.TextBoxFor(model => model.Author, new { @class = "form-control" }) </div> </div> <div class="form-group"> @Html.LabelFor(model => model.Published, new { @class = "col-lg-1 control-label" }) <div class="col-lg-9"> @Html.TextBoxFor(model => model.Published, new { @class = "form-control datepicker" }) </div> </div> <div class="form-group"> <div class="col-lg-8"></div> <div class="col-lg-3"> @Html.ActionLink("Back to List", "Index", null, new { @class = "btn btn-default" }) <button class="btn btn-success" id="btnSubmit" type="submit"> Submit </button> </div> </div> </div> } </div> </div> @section scripts { <script src="~/Scripts/bootstrap-datepicker.js" type="text/javascript"></script> <script src="~/Scripts/book-create-edit.js" type="text/javascript"></script> }
起動後、写真のようなものが表示されます。

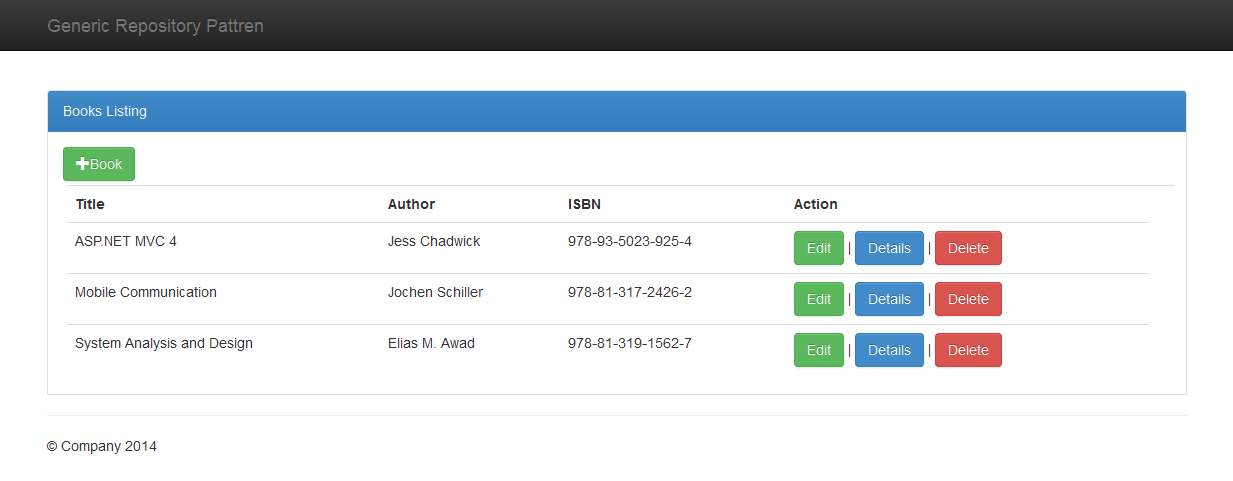
ブックリストビュー
このページはインデックスです。 エントリーポイント。 すべての本をリストします。
@model IEnumerable<EF.Core.Data.Book> @using EF.Web.Models <div class="book-example panel panel-primary"> <div class="panel-heading panel-head">Books Listing</div> <div class="panel-body"> <a id="createEditBookModal" href="@Url.Action("CreateEditBook")" class="btn btn-success"> <span class="glyphicon glyphicon-plus"></span>Book </a> <table class="table" style="margin: 4px"> <tr> <th> @Html.DisplayNameFor(model => model.Title) </th> <th> @Html.DisplayNameFor(model => model.Author) </th> <th> @Html.DisplayNameFor(model => model.ISBN) </th> <th>Action </th> <th></th> </tr> @foreach (var item in Model) { <tr> <td> @Html.DisplayFor(modelItem => item.Title) </td> <td> @Html.DisplayFor(modelItem => item.Author) </td> <td> @Html.DisplayFor(modelItem => item.ISBN) </td> <td> @Html.ActionLink("Edit", "CreateEditBook", new { id = item.ID }, new { @class = "btn btn-success" }) | @Html.ActionLink("Details", "DetailBook", new { id = item.ID }, new { @class = "btn btn-primary" }) | @Html.ActionLink("Delete", "DeleteBook", new { id = item.ID }, new { @class = "btn btn-danger" }) </td> </tr> } </table> </div> </div>
編集ボタンをクリックすると、以下が表示されます。
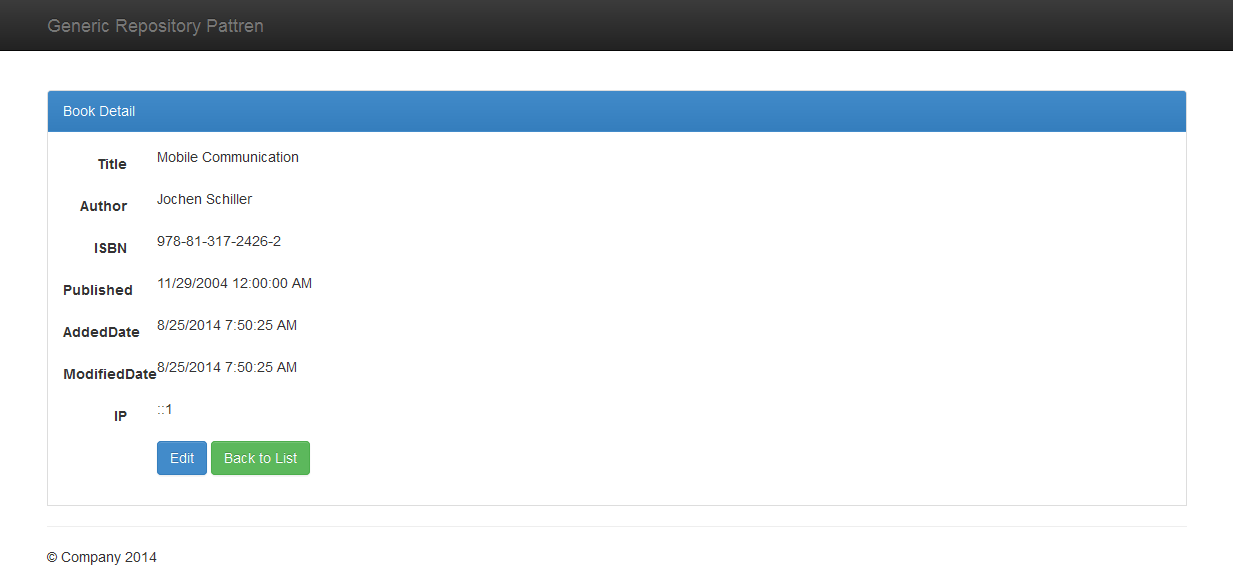
ブック詳細ビュー
選択した本の詳細。
@model EF.Core.Data.Book @{ ViewBag.Title = "Detail Book"; } <div class="book-example panel panel-primary"> <div class="panel-heading panel-head">Book Detail</div> <div class="panel-body"> <div class="form-horizontal"> <div class="form-group"> @Html.LabelFor(model => model.Title, new { @class = "col-lg-1 control-label" }) <div class="col-lg-9"> @Html.DisplayFor(model => model.Title, new { @class = "form-control" }) </div> </div> <div class="form-group"> @Html.LabelFor(model => model.Author, new { @class = "col-lg-1 control-label" }) <div class="col-lg-9"> @Html.DisplayFor(model => model.Author, new { @class = "form-control" }) </div> </div> <div class="form-group"> @Html.LabelFor(model => model.ISBN, new { @class = "col-lg-1 control-label" }) <div class="col-lg-9"> @Html.DisplayFor(model => model.ISBN, new { @class = "form-control" }) </div> </div> <div class="form-group"> @Html.LabelFor(model => model.Published, new { @class = "col-lg-1 control-label" }) <div class="col-lg-9"> @Html.DisplayFor(model => model.Published, new { @class = "form-control" }) </div> </div> <div class="form-group"> @Html.LabelFor(model => model.AddedDate, new { @class = "col-lg-1 control-label" }) <div class="col-lg-9"> @Html.DisplayFor(model => model.AddedDate, new { @class = "form-control" }) </div> </div> <div class="form-group"> @Html.LabelFor(model => model.ModifiedDate, new { @class = "col-lg-1 control-label" }) <div class="col-lg-9"> @Html.DisplayFor(model => model.ModifiedDate, new { @class = "form-control" }) </div> </div> <div class="form-group"> @Html.LabelFor(model => model.IP, new { @class = "col-lg-1 control-label" }) <div class="col-lg-9"> @Html.DisplayFor(model => model.IP, new { @class = "form-control" }) </div> </div> @using (Html.BeginForm()) { <div class="form-group"> <div class="col-lg-1"></div> <div class="col-lg-9"> @Html.ActionLink("Edit", "CreateEditBook", new { id = Model.ID }, new { @class = "btn btn-primary" }) @Html.ActionLink("Back to List", "Index", null, new { @class = "btn btn-success" }) </div> </div> } </div> </div> </div>
本を削除
削除ボタンをクリックすると、書籍の一般情報と削除確認ボタンのページが表示されます。 HttpGetを使用します。 確認ボタンをクリックすると、HttpPostを使用します。
@model EF.Core.Data.Book @{ ViewBag.Title = "Delete Book"; } <div class="book-example panel panel-primary"> <div class="panel-heading panel-head">Delete Book</div> <div class="panel-body"> <h3>Are you sure you want to delete this?</h3> <h1>@ViewBag.ErrorMessage</h1> <div class="form-horizontal"> <div class="form-group"> @Html.LabelFor(model => model.Title, new { @class = "col-lg-1 control-label" }) <div class="col-lg-9"> @Html.DisplayFor(model => model.Title, new { @class = "form-control" }) </div> </div> <div class="form-group"> @Html.LabelFor(model => model.Author, new { @class = "col-lg-1 control-label" }) <div class="col-lg-9"> @Html.DisplayFor(model => model.Author, new { @class = "form-control" }) </div> </div> <div class="form-group"> @Html.LabelFor(model => model.ISBN, new { @class = "col-lg-1 control-label" }) <div class="col-lg-9"> @Html.DisplayFor(model => model.ISBN, new { @class = "form-control" }) </div> </div> <div class="form-group"> @Html.LabelFor(model => model.Published, new { @class = "col-lg-1 control-label" }) <div class="col-lg-9"> @Html.DisplayFor(model => model.Published, new { @class = "form-control" }) </div> </div> <div class="form-group"> @Html.LabelFor(model => model.AddedDate, new { @class = "col-lg-1 control-label" }) <div class="col-lg-9"> @Html.DisplayFor(model => model.AddedDate, new { @class = "form-control" }) </div> </div> <div class="form-group"> @Html.LabelFor(model => model.ModifiedDate, new { @class = "col-lg-1 control-label" }) <div class="col-lg-9"> @Html.DisplayFor(model => model.ModifiedDate, new { @class = "form-control" }) </div> </div> <div class="form-group"> @Html.LabelFor(model => model.IP, new { @class = "col-lg-1 control-label" }) <div class="col-lg-9"> @Html.DisplayFor(model => model.IP, new { @class = "form-control" }) </div> </div> @using (Html.BeginForm()) { <div class="form-group"> <div class="col-lg-1"></div> <div class="col-lg-9"> <input type="submit" value="Delete" class="btn btn-danger" /> @Html.ActionLink("Back to List", "Index", null, new { @class = "btn btn-success" }) </div> </div> } </div> </div> </div>
