今日は、JavaScriptを使用してHTML5 Canvasでツリーを生成することについてお話したいと思います。 すぐに説明するのは、参照ツリーやBツリーではなく、毎日窓の外に見える木、空気をきれいにして酸素で豊かにする木、秋に黄色になり冬に葉を失う木についてです、キャンバスに描かれている、生きている森林、本物の木についての一般的な話です。
そのような木が判明
ゲームにツリーを生成する必要がありました。 しかし、適切なアルゴリズムを見つけることができませんでした。 だから私は自分の発電機を書いた...
何も読みたくありません。すぐに結果が欲しいです!
それで、すすの下には何がありますか?
すべてが悪名高いベジエ曲線で機能します。それらのおかげで、幹と枝は丸みを帯び、生きているように見えます。 私は多くの方法を試しましたが、最も生産的で簡単なのは曲線の使用でした。 それらは簡単に構築でき、それらから正しい方向を取得するのは簡単です。また、プログラムで軌道を計算することもできます。
ジェネレーターの構造は次のとおりです。

(Generatorダイアグラムの)TreeGeneratorクラスはBranchオブジェクトを使用してブランチとトランクを生成し、TreeGeneratorはDrawerからメソッドを呼び出します。 ブランチは、各ブランチをオブジェクトとして公開する抽象化です。 また、レンダリングにドロワーを使用します。
ステップ1.ブランチを生成する
Drawerクラスは、キャンバスAPIとブランチの間のレイヤーです。 このクラスは、指定されたパラメーターに従って葉と枝を描画します。
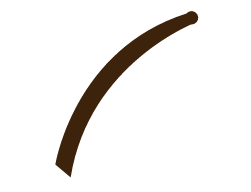
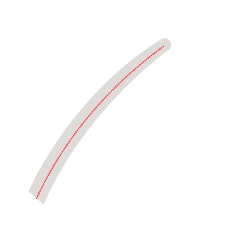
そして、これがDrawerからブランチを描くための関数です:
//x y - , leng - , w - , deform - , rotate - DrawStick = function(x, y, leng, w, deform, rotate) { // canvas . this.c.save(); this.c.translate(x, y); this.c.rotate(rotate.degree()); // degree // x y . x = 0; y = w / -2; // this.c.beginPath(); // x y this.c.moveTo(x, y); // xy ( w/BRANCH_CONSTRICTION) this.c.bezierCurveTo(x, y, x + leng / 2, y + deform, x + leng, y + (w - (w / BRANCH_CONSTRICTION)) / 2); // this.c.lineTo(x + leng, y + w / BRANCH_CONSTRICTION + (w - (w / BRANCH_CONSTRICTION)) / 2); // this.c.bezierCurveTo(x + leng, y + w / BRANCH_CONSTRICTION + (w - (w / BRANCH_CONSTRICTION)) / 2, x + leng / 2, y + w + deform, x, y + w); // this.c.lineTo(x, y); this.c.closePath(); // , this.c.arc(x + leng, y + w / BRANCH_CONSTRICTION / 2 + (w - (w / BRANCH_CONSTRICTION)) / 2, w / BRANCH_CONSTRICTION / 2, 0 * Math.PI, 2 * Math.PI, false); // this.c.fillStyle = BRANCH_COLOR; this.c.fill(); // canvas this.c.restore(); }
コードからは、おそらくブランチのトップポイントがどのように設定されているのか理解できなかったでしょう。 ご存知のように、最後のツリーブランチは最初よりも少し狭くなっています。 限り、それはBRANCH_CONSTRICTION定数によって設定されます。 デフォルトでは、1.5です。 BRANCH_COLOR-色を設定します。 値は色の配列からランダムに選択されます。
この関数の結果は、このブランチのようなものになります。
率直に言って、私たちが必要とするものと非常によく似たものになるまで。 したがって、さらに先に進みましょう!
ステップ2.ブランチからツリーを生成する
種からのみ発芽した小さな木をよく見ると、それらは葉のある単一の枝であり、他の枝はこの枝から発芽し、それも成長および拡大することがわかります。 なんで? そして、幹が本質的に1つの大きな枝であり、そこから他の枝が成長し、これらの枝からまだまぶたがあるという事実...
これに基づいて、パラメータとメソッド、およびプロセスとブランチに関する情報を保存するオブジェクトの形式で各ブランチを表す方が便利です。 このため、私が言ったように、Branchクラス:
var Branch = function(x, y, leng, width, deformation, rotate) { this.params = { x: x, y: y, leng: leng, width: width, deformation: deformation, rotate: rotate, }; this.parent = null; // , , this.children = []; // , . // canvas this.render = function() { drawer.DrawStick(this.params.x, this.params.y, this.params.leng, this.params.width, this.params.deformation, this.params.rotate); } // this.getEndPoints = function() { var ex = this.params.x + this.params.leng * Math.cos(this.params.rotate.degree()), ey = this.params.y + this.params.leng * Math.sin(this.params.rotate.degree()); return [ex, ey]; } // , this.createChild = function(leng, width, deform, rotate) { var exy = this.getEndPoints(); // // children this.children.push(new Branch(exy[0], exy[1], leng, width, deform, rotate)); // this.children[this.children.length - 1].parent = this; return this.children[this.children.length - 1]; } this.render(); // }
新しいクラスを試してみましょう。 私たちは電話します:
new Branch(100,300,200,20,-60,-50).createChild(100,20/1.5,30,-60);
結果は次のようになります。

さて、リモートはブランチに似ていますよね? しかし、木の枝は常に太陽に向かって伸びています。 作成するには、createChildの一種であるcreateDivarication関数が必要です。 自然界では、多くの場合、2つのプロセスに分岐があり、そのうちの1つがメインであるため、より太くなり、2番目のプロセスが細くなります。 いくつかのテストと選択の結果、最適な比率は1.9:1.4であることがわかりました。 あなたはあなたの樹木に対して異なる態度を使うことができます。
次に、createDivarication関数コードを示します。
// branches - c [{leng:,deform:,rotate:},{}] main - createDivarication = function(branches, main) { // var wi = this.params.width / BRANCH_CONSTRICTION / 2; for (var i = 0; i < 2; i++) { bi = branches[i]; // branches this.createChild(bi.leng, (i == main) ? (1.9 * wi) : wi * 1.4, bi.deform, this.params.rotate - bi.rotate // ); } return this.children; }
取得したものは次のとおりです。

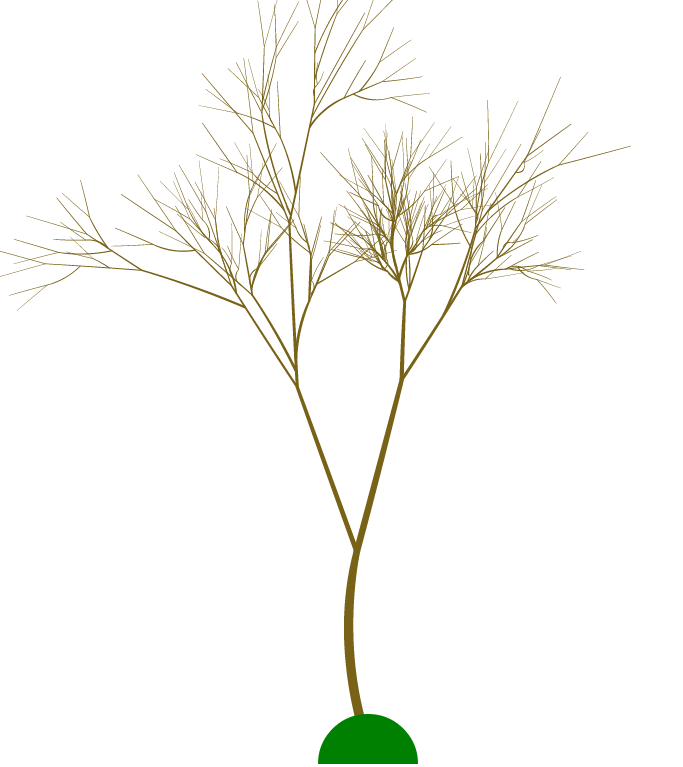
手で描くことは可能ですが、ランダムツリーが必要です。 これはまさにTreeGeneratorクラスの目的です。 彼自身:
var TreeGenerator = function(){ // - branch this.genF=function(branch) { if (branch.params.width > 1) { // var divarications = [], // dfm = BRANCH_DEFORMATION * branch.params.width / branch.params.leng; // // for (var di = 0; di <= 2; di++) { divarications.push({ leng: rand(40, branch.params.leng), // deform: rand(-dfm, dfm), // rotate: (di == 0) ? (rand(-20, -10)) : (rand(10, 20)) // }); } // var chld = branch.createDivarication(divarications, Math.floor(rand(0, 2))); // for (var ci = 0; ci < 2; ci++) { this.genF(chld[ci]); } } else { // , } } // , this.genT=function(x,y){ // var mainTreeBranch = new Branch(x, y, rand(70, BRANCH_MAXLENGTH), rand(10, BRANCH_MAXWIDTH), rand(-40, 40), rand(-120, -70)); // this.genF(mainTreeBranch); // () drawer.DrawHill(x,y+20); return mainTreeBranch; } }
コードを読んでいると、おそらく新しいBRANCH_DEFORMATION定数-ブランチ(トランクではなく)の変形(曲率)、BRANCH_MAXLENGTH-トランクの最大長、およびBRANCH_MAXWIDTH-トランクの幅に気づいたでしょう。 ブランチの変形では、幅に対するブランチの厚さも役割を果たします。ブランチが薄くなるほど、結果として偏差が小さくなります。これは、ブランチが最初にピクセルで設定されるためです。 長さに関しては、枝は成長元の枝より長くすることはできません。 DrawHill関数のコードは6行のみで構成されており、ポイントxとyに半円を描くため、コードは表示しませんでした。
それでは、ジェネレータを試してみましょう。 必要なパラメーターを指定してgenT関数を呼び出すと、次のようになります。

同意して、木は成長しています! これに終止符を打ち、木の暗いシルエットを楽しむことができます。今冬と窓の外では、木は良くなく、時にはもっと悪いことを考えると、私は停止せず、木をより多くするために発電機を改善し続けますより活発で興味深い。 あなたが私と一緒なら、私たちは次のポイントに行く必要があります。
ステップ3.枝からのシュートの生成
木が葉なしで立っている場合、それらは同じ枝の上部から成長する簡潔で太い枝だけでなく、任意の場所の主要な枝から成長するそれらの小さくてあまり枝ではないことに気付くことができます。 葉が私たちの惑星にとって非常に重要なことをするので、彼らは木をより多くの葉を持つようにします-それは水分を蒸発させ、二酸化炭素を酸素に変換します。 この投稿のこれらのブランチは、スプラウトと呼ばれます。 実際、それらは枝でもあり、私が言ったように、上からだけでなく、任意の場所から成長します。 そして、ベジエ曲線の枝! 撮影場所を計算する方法は? ベジェ曲線の式自体がこれに役立ちます。

jsでは、次のようになります。
// Branch. pointPos getPointOnCurve = function(pointPos) { // var ex = this.params.x + this.params.leng / 2 * Math.cos((this.params.rotate + this.params.deformation).degree()), ey = this.params.y + this.params.leng / 2 * Math.sin((this.params.rotate + this.params.deformation).degree()); //t - t [0,1] t = pointPos / 100; // ep = this.getEndPoints(); // x,y x = [this.params.x, ep[0]]; y = [this.params.y, ep[1]]; x,y p1 = [ex, ey]; // par1 = Math.pow((1 - t), 2) * x[0] + (1 - t) * 2 * t * p1[0] + Math.pow(t, 2) * x[1]; // x par2 = Math.pow((1 - t), 2) * y[0] + (1 - t) * 2 * t * p1[1] + Math.pow(t, 2) * y[1]; // y return [par1, par2]; }
曲線は、分岐の中心で実行されます。 視覚的には、次のようになります。
そして、今度はシュートを生成します:Branchに新しい関数を作成します
//branches - this.createOutgrowth = function(leng, width, pos, deform, rotate) { var startXY = this.getPointOnCurve(pos); // outgrowths( ) this.outgrowths.push(new Branch(startXY[0], startXY[1], leng, width, deform, this.params.rotate + rotate)); return this.outgrowths.reverse()[0]; }
ジェネレーターも拡張します。
this.genO = function(branch) { if (branch.params.width > 1) { // 1 var outgrowthsCount = rand(0, BRANCH_OUTGROWTH); // BRANCH_OUTGROWTH - . for (var io = 0; io < outgrowthsCount; io++) { // this.genF(branch.createOutgrowth(rand(10, branch.params.leng), rand(1, branch.params.width), rand(1, 100), rand(-10, 10), rand(-40, 40))); } } }
これを置き換えることにより、genF関数を拡張します。
// for (var ci = 0; ci < 2; ci++) { this.genF(chld[ci]); }
これについて:
// for (var ci = 0; ci < 2; ci++) { if (OUTGROWTH_ISSHOWN) { //OUTGROWTH_ISSHOWN , true if (chld[ci].params.width < OUTGROWTH_BRANCH_WIDTH) { //OUTGROWTH_BRANCH_WIDTH - this.genO(chld[ci]); // } } this.genF(chld[ci]); }
試してみましょうか? これがツリーです:
あまり美しくありません。葉が足りません。 次のステップはそれらについてです。
ステップ4.リーフ生成
葉はすべての木の不可欠な部分です(針は寒さから守るためだけに作られた葉でもあります)、それらはプログラムで生成するにはあまりにも異なるので、手動で作成された5種類の葉のいずれかを使用します。 葉はベジエ曲線にも最適に描画され、終点と曲線変形点を持つ配列に保存されます。 シートは7つの本質であり、左側を描画するだけでよく、権利は自動的に補完されます。
たとえば、簡単なシートのコードを見てみましょう。
[[ [100, 0], // ( - ) [70, 40] // ]],
Drawerのdraw関数も検討してください。
this.DrawLeaf = function(x, y, leafPoints, colors, scale, rotate) { // x y lx = x; ly = y; // for (var io = 0; io < 2; io++) { this.c.save(); // this.c.translate(x, y); // this.c.rotate((rotate).degree()); // this.c.scale(scale, scale); // if (io == 1) { // this.c.setTransform(-1, 0, 0, 1, x, y); this.c.scale(scale, scale); this.c.rotate((-180 - (rotate)).degree()); } x = 100 / -2; y = 0; this.c.beginPath(); this.c.moveTo(x, y); var lastPair = [0, 0]; // - for (var bi in leafPoints) { var bp = leafPoints[bi]; // this.c.bezierCurveTo(x + lastPair[0], y + lastPair[1], x + bp[1][0], y + bp[1][1], x + bp[0][0], y + bp[0][1]); // lastPair = [bp[0][0], bp[0][1]]; } // this.c.lineTo(x + LEAF_LENG, y); // LEAF_LENG - . 100 this.c.closePath(); this.c.fillStyle = colors[1]; // this.c.fill(); this.c.strokeStyle = colors[0]; // this.c.stroke(); this.c.restore(); x = lx; y = ly; } }
そして、今度はジェネレータにアタッチします。 genL関数を書きましょう
this.genL = function(branch) { leafCount = branch.params.leng / (LEAF_LENG * LEAF_SCALE) * LEAF_DENSITY; // : LEAF_SCALE - , LEAF_DENSITY - for (var li = 1; li < leafCount; li++) { // var lxy=branch.getPointOnCurve(branch.params.leng/leafCount*li); // // drawer.DrawLeaf(lxy[0], lxy[1], LeafMaps[LEAF_TYPE], ['#353', 'green'], LEAF_SCALE, branch.params.rotate - 180 ); } }
この関数をgenFに固定し、「次の手順で説明する追加のコードがあります」というコメントをgenLの呼び出しに置き換えます。次のようになります。
if(LEAF_ISSHOWN){ //LEAF_ISSHOWN - , . true this.genL(branch); }
さて、その木は成長しました!

ご清聴ありがとうございました。すべてのコードはGitHubにあります 。
私の労働の結果、あなたはそれをここで感じることができます