- 例1-コマンドの簡単な使用
- 例2-ラムダ関数と組み合わせたコマンドの簡単な使用
- 例3-コマンドとパラメーターの単純な使用
- 例4-コマンドの有効化と無効化
- 例5-コマンドトリガーイベント
- 例6-非同期コマンド
- 例7-ユーザーインターフェイス(UI)を更新する非同期コマンド
- 例8-キャンセルする機能を持つ非同期コマンド
- 例9-コマンドへのイベントのバインド
- 仕組み-コマンドクラス
- 仕組み-非同期コマンドクラス
- 仕組み-コマンドデータバインディングクラス
エントリー
MVVM(モデルビュービューモデル)パターンを使用するアプリケーションの例を使用して、コマンドの操作を検討してください。
私が使用する例は、プラットフォームに関係なく同じロジック(WPF、SilverLight、Windows Phone)を使用しています。 まず、MVVMアプリケーションでコマンドを使用するためのいくつかのオプションを検討します。 最初に例、次に報告会。
使用されるコードはすべて私のApex MVVMライブラリの一部ですが、すべての部分が完全に提供されるため、これらのメソッドをプロジェクトまたはライブラリに簡単に統合できます。または、Apexリンクを接続してすぐに開始できます。

スクリーンショット1:WPFのコマンド
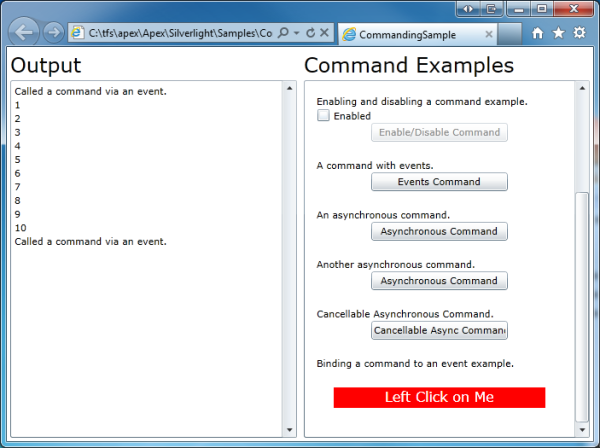
スクリーンショット2:SilverLightのチーム

Screenshot3:Windows Phoneのコマンド
チームとは何ですか?
コマンドは添付されたオブジェクトであり、これによりロジックとユーザーインターフェイスを互いに分離できます。
チームをより詳細に検討する場合、それらは次のとおりです。
- コマンドは、ICommandインターフェイスを実装するオブジェクトです。
- 通常、コマンドは機能に関連付けられています
- ユーザーインターフェイス要素はコマンドにアタッチされます-コードはユーザーによってアクティブ化され、コマンドが実行されます-対応する関数が呼び出されます
- チームは含まれているかどうかを知っています
- 関数はコマンドを無効にできます-関連するすべてのユーザー要素を自動的に無効にします
- 実際、コマンドにはさまざまな用途があります。 たとえば、コマンドを使用して、ユーザーインターフェイスなどを使用せずに/でテストできるロジックを提供する非同期関数を作成します。
例
まず、コマンドを使用する必要がある場合を検討します。 各ケースについては、対応する段落で後ほど詳しく検討します。
重要 :例のこの部分の各ビューモデルには、「メッセージ」という名前の観測可能な行のコレクションが含まれています。各サンプルアプリケーションには、何が起こっているかに関する情報を表示するメッセージが表示されます。
ビューの基本モデル(ビューモデル)を検討します。
public class MainViewModel : ViewModel { public MainViewModel() { } private ObservableCollection<string> messages = new ObservableCollection<string>(); public ObservableCollection<string> Messages { get { return messages; } } }
このビューモデルはViewModelを継承します。ViewModelはINotifyPropertyChangedインターフェイスを実装しますが、ビューモデルの他の利用可能な実装タイプを使用できます。
例1-コマンドの簡単な使用
目的 :ユーザーが要素をクリックしたときに、ビューモデルの対応する関数を呼び出します。
次に、コマンドを使用する最も簡単な例を見てみましょう。 まず、ビューモデルにコマンドオブジェクトを追加します。これは、コマンドが呼び出されたときに呼び出される関連関数です。
次に、ボタンコントロールの「コマンド」プロパティにコマンドを追加します。
以上です。 最も簡単な例が完了しました。 コマンドオブジェクトをインターフェイス要素のCommandプロパティに添付しました。 要素がアクティブになると、つまりボタンが押されると、コマンドが呼び出されます(対応するDoSimpleCommand関数が呼び出されます)。
次に、コマンドを使用する最も簡単な例を見てみましょう。 まず、ビューモデルにコマンドオブジェクトを追加します。これは、コマンドが呼び出されたときに呼び出される関連関数です。
public class MainViewModel : ViewModel { public MainViewModel() { // - DoSimpleCommand. simpleCommand = new Command(DoSimpleCommand); } /// <summary> /// The SimpleCommand function. /// </summary> private void DoSimpleCommand() { // Messages.Add(" 'DoSimpleCommand'."); } /// <summary> /// /// </summary> private Command simpleCommand; /// <summary> /// /// </summary> public Command SimpleCommand { get { return simpleCommand; } } }
次に、ボタンコントロールの「コマンド」プロパティにコマンドを追加します。
<Button Content="Simple Command" Command="{Binding SimpleCommand}" />
以上です。 最も簡単な例が完了しました。 コマンドオブジェクトをインターフェイス要素のCommandプロパティに添付しました。 要素がアクティブになると、つまりボタンが押されると、コマンドが呼び出されます(対応するDoSimpleCommand関数が呼び出されます)。
例2-ラムダ関数と組み合わせたコマンドの簡単な使用
目的 :アクティベーション中またはインターフェイス要素をクリックするときに、モデルの表示機能を呼び出します。
ただし、これは非常に単純な関数であり、明示的に記述せず、代わりにラムダ式を使用することを好みます。
このマニュアルのすべての例では、例1のように明示的に関数を作成するか、lamdsを使用してコードをわずかに削減し、よりエレガントにすることができます。 選択はあなた次第です。
繰り返しますが、コマンドをボタンのCommandプロパティにバインドするプロセスを繰り返します。
ただし、これは非常に単純な関数であり、明示的に記述せず、代わりにラムダ式を使用することを好みます。
このマニュアルのすべての例では、例1のように明示的に関数を作成するか、lamdsを使用してコードをわずかに削減し、よりエレガントにすることができます。 選択はあなた次第です。
public MainViewModel() { // . . lambdaCommand = new Command( () => { Messages.Add(" . . "); }); } /// <summary> /// The command object. /// </summary> private Command lambdaCommand; /// <summary> /// Gets the command. /// </summary> public Command LambdaCommand { get { return lambdaCommand; } }
繰り返しますが、コマンドをボタンのCommandプロパティにバインドするプロセスを繰り返します。
<Button Content="Lambda Command" Command="{Binding LambdaCommand}" />
例3-コマンドとパラメーターの単純な使用
目的 :データバインド時に渡されたパラメーターを使用するチームを作成します。
この例では、Commandオブジェクトを使用します(後で説明するAsynchronousCommandオブジェクトを使用することもできます)。 渡されたパラメーターは、呼び出された関数で使用できます。
ボタンまたは他の要素へのコマンドのバインディングを繰り返します。 また、パラメーターを追加することを忘れないでください:
コマンドを使用する場合は常に、パラメーターを渡すことができます。 コマンドを作成するとき、Action(パラメーターなしのコマンド関数)またはAction <object>(オブジェクト型のパラメーターを持つコマンド関数)を使用できます。 ラムダを使用する可能性もあります。
この例では、Commandオブジェクトを使用します(後で説明するAsynchronousCommandオブジェクトを使用することもできます)。 渡されたパラメーターは、呼び出された関数で使用できます。
public class MainViewModel : ViewModel { public MainViewModel() { // parameterizedCommand = new Command(DoParameterisedCommand); } /// <summary> /// /// </summary> private void DoParameterisedCommand(object parameter) { Messages.Add(" – : '" + parameter.ToString() + "'."); } /// <summary> /// The command object. /// </summary> private Command parameterizedCommand; /// <summary> /// Gets the command. /// </summary> public Command ParameterisedCommand { get { return parameterizedCommand; } } }
ボタンまたは他の要素へのコマンドのバインディングを繰り返します。 また、パラメーターを追加することを忘れないでください:
<Button Content="Parameterized Command" Command="{Binding ParameterizedCommand}" CommandParameter={Binding SomeObject} />
コマンドを使用する場合は常に、パラメーターを渡すことができます。 コマンドを作成するとき、Action(パラメーターなしのコマンド関数)またはAction <object>(オブジェクト型のパラメーターを持つコマンド関数)を使用できます。 ラムダを使用する可能性もあります。
// parameterizedCommand = new Command( (parameter) => { Messages.Add(" – : '" + parameter.ToString() + "'."); });
例4-コマンドの有効化と無効化
目標 :コードまたはXAMLからのコマンドを有効/無効にする機能を追加します
各コマンドにはCanExecuteプロパティが含まれ、trueに設定するとコマンドが含まれ、falseに設定するとコマンドと関連するコントロールが無効になります。 次の例では、コマンドを無効にすると、ユーザーインターフェイスのボタンも消えます。
ボタン(または他の要素)へのバインディングを作成します。
CanExecuteコマンドプロパティをバインドすることも可能です。
この例では、コード内のコマンドの状態を制御するには、対応する値をCanExecuteプロパティに割り当てます。 そして、インターフェース(XAML)を介した制御のために、追加のCheckBox要素を使用します。
コマンドオブジェクトを作成した場所と方法に関係なく、CanExecuteプロパティを制御するブール値を2番目のパラメーターとして渡す機会が常にあります。 デフォルトでは-falseに設定されています。 この例では、trueを渡して有効にします。
各コマンドにはCanExecuteプロパティが含まれ、trueに設定するとコマンドが含まれ、falseに設定するとコマンドと関連するコントロールが無効になります。 次の例では、コマンドを無効にすると、ユーザーインターフェイスのボタンも消えます。
public class MainViewModel : ViewModel { public MainViewModel() { // / enableDisableCommand = new Command( () => { Messages.Add("/ ."); }, false); } private void DisableCommand() { // EnableDisableCommand.CanExecute = false; } private void EnableCommand() { // EnableDisableCommand.CanExecute = true; } /// <summary> /// The command object. /// </summary> private Command enableDisableCommand; /// <summary> /// Gets the command. /// </summary> public Command EnableDisableCommand { get { return enableDisableCommand; } } }
ボタン(または他の要素)へのバインディングを作成します。
<Button Content="Enable/Disable Command" Command="{Binding EnableDisableCommand}" />
CanExecuteコマンドプロパティをバインドすることも可能です。
この例では、コード内のコマンドの状態を制御するには、対応する値をCanExecuteプロパティに割り当てます。 そして、インターフェース(XAML)を介した制御のために、追加のCheckBox要素を使用します。
<CheckBox IsChecked="{Binding EnableDisableCommand.CanExecute, Mode=TwoWay}" Content="Enabled" />
コマンドオブジェクトを作成した場所と方法に関係なく、CanExecuteプロパティを制御するブール値を2番目のパラメーターとして渡す機会が常にあります。 デフォルトでは-falseに設定されています。 この例では、trueを渡して有効にします。
例5-コマンドトリガーイベント
目的 :コマンドがいつ実行されたか、またはいつ実行されたかを調べます。
各コマンドには2つのイベントがあります:実行済み-コマンドの完了時に呼び出され、実行中-実行時に呼び出されます。 Executingイベントでは、コマンドをキャンセルすることもできます。
重要 :上記のイベントが非常に役立つ状況は数多くあります。 たとえば、コマンドが実行されたときに続行するかどうかを尋ねるポップアップウィンドウを表示するとします。 そして、そのようなコードを配置する場所は? コマンドコードで? データモデルでインターフェイスコードを作成する必要があり、これは主にコードを詰まらせますが、2つ目は非常に重要であり、テストを許可しないためです。 ビューにコードを配置することをお勧めします。 そして、イベントの助けを借りてそれを行うことができます。
このようなイベントの有用性を示す2番目の例は、コマンドの実行後に別の要素にフォーカスを移動する必要が生じた場合です。 ビューモデルではコントロール(コントロール)にアクセスできないため、これを行うことはできませんが、イベントをサブスクライブすることで、問題なくこれを実装できます。
次に、ボタンにバインドします。
現在、前の例のコードとの違いはありません。 Viewでイベントをサブスクライブします。
重要:私のビューでは、viewModelという名前のDataContext:
最後に、チームの実装の全力を理解することに近づきました。 ビュー(または別のViewModel、またはオブジェクト)のExecutedおよびExecutingイベントにサブスクライブすることができ、いつ発生するかがわかります。 ExecutingイベントはCancelCommandEventArgsオブジェクトを渡します-これは「Cancel」という名前のプロパティです。 trueに設定すると、コマンドは実行されません。 CommandEventArgsオブジェクトとCancelCommandEventArgsオブジェクトはどちらも、もう1つのプロパティであるパラメーターをサポートしています。 これは、コマンド(存在する場合)に渡すことができるパラメーターです。
各コマンドには2つのイベントがあります:実行済み-コマンドの完了時に呼び出され、実行中-実行時に呼び出されます。 Executingイベントでは、コマンドをキャンセルすることもできます。
重要 :上記のイベントが非常に役立つ状況は数多くあります。 たとえば、コマンドが実行されたときに続行するかどうかを尋ねるポップアップウィンドウを表示するとします。 そして、そのようなコードを配置する場所は? コマンドコードで? データモデルでインターフェイスコードを作成する必要があり、これは主にコードを詰まらせますが、2つ目は非常に重要であり、テストを許可しないためです。 ビューにコードを配置することをお勧めします。 そして、イベントの助けを借りてそれを行うことができます。
このようなイベントの有用性を示す2番目の例は、コマンドの実行後に別の要素にフォーカスを移動する必要が生じた場合です。 ビューモデルではコントロール(コントロール)にアクセスできないため、これを行うことはできませんが、イベントをサブスクライブすることで、問題なくこれを実装できます。
public class MainViewModel : ViewModel { public MainViewModel() { // eventsCommand = new Command( () => { Messages.Add(" ."); });
次に、ボタンにバインドします。
<Button Content="Events Command" Command="{Binding EventsCommand}" />
現在、前の例のコードとの違いはありません。 Viewでイベントをサブスクライブします。
重要:私のビューでは、viewModelという名前のDataContext:
/// <summary> /// Interaction logic for MainWindow.xaml /// </summary> public partial class MainWindow : Window { public MainWindow() { InitializeComponent(); viewModel.EventsCommand.Executing += new Apex.MVVM.CancelCommandEventHandler(EventsCommand_Executing); viewModel.EventsCommand.Executed += new Apex.MVVM.CommandEventHandler(EventsCommand_Executed); } void EventsCommand_Executed(object sender, Apex.MVVM.CommandEventArgs args) { viewModel.Messages.Add(" . View!"); } void EventsCommand_Executing(object sender, Apex.MVVM.CancelCommandEventArgs args) { if (MessageBox.Show(" ?", "Cancel?", MessageBoxButton.YesNo) == MessageBoxResult.Yes) args.Cancel = true; } }
最後に、チームの実装の全力を理解することに近づきました。 ビュー(または別のViewModel、またはオブジェクト)のExecutedおよびExecutingイベントにサブスクライブすることができ、いつ発生するかがわかります。 ExecutingイベントはCancelCommandEventArgsオブジェクトを渡します-これは「Cancel」という名前のプロパティです。 trueに設定すると、コマンドは実行されません。 CommandEventArgsオブジェクトとCancelCommandEventArgsオブジェクトはどちらも、もう1つのプロパティであるパラメーターをサポートしています。 これは、コマンド(存在する場合)に渡すことができるパラメーターです。
例6-非同期コマンド
目的 :コマンドが十分に長く実行されると、インターフェイスがブロックされます。 それらを非同期に実行することが可能であるべきです。
バックグラウンドプロセスのようなものを作成し、そこでコマンドを実行できます。 ただし、いくつかの質問がすぐに発生します。
「ストリーム内の関数でViewModelを更新する場合はどうなりますか?」 ユーザーインターフェイスのアクションに頼らずにこれを行うことはできません。
-インターフェイスに1つの影響のみが発生したときに、1つのチームが誤って複数のスレッドを呼び出さないようにする方法
-個別のスレッドで実行する必要のあるコマンドが多数ある場合、View Modelを散らばらないようにするにはどうすればよいですか?
-各システムのストリームにさまざまなオプションがある場合、WPおよびSilverlightとの互換性を確保する方法は?
AsynchronousCommandオブジェクトは、これらのニュアンスだけでなくすべてを考慮して作成されました。 知り合いになる:
XAML要素へのバインド:
コマンドを呼び出した後、対応する関数が呼び出されます。この関数は、ラムダ式を使用して指定します。ラムダ式は、スレッドプールとは別のスレッドで呼び出されます。
ビューモデルオブジェクト(ユーザーインターフェイス要素に関連付けることができる)で何かを行う必要がある場合は、ReportProgress関数を使用できます。
ReportProgressは、送信されたコードが目的のスレッドで起動されることを保証します。これにより、必要に応じてユーザーインターフェイスを非常に簡単に変更できます。
バックグラウンドプロセスのようなものを作成し、そこでコマンドを実行できます。 ただし、いくつかの質問がすぐに発生します。
「ストリーム内の関数でViewModelを更新する場合はどうなりますか?」 ユーザーインターフェイスのアクションに頼らずにこれを行うことはできません。
-インターフェイスに1つの影響のみが発生したときに、1つのチームが誤って複数のスレッドを呼び出さないようにする方法
-個別のスレッドで実行する必要のあるコマンドが多数ある場合、View Modelを散らばらないようにするにはどうすればよいですか?
-各システムのストリームにさまざまなオプションがある場合、WPおよびSilverlightとの互換性を確保する方法は?
AsynchronousCommandオブジェクトは、これらのニュアンスだけでなくすべてを考慮して作成されました。 知り合いになる:
public class MainViewModel : ViewModel { public MainViewModel() { // asyncCommand1 = new AsynchronousCommand( () => { for (int i = 1; i <= 10; i++) { // . asyncCommand1.ReportProgress(() => { Messages.Add(i.ToString()); }); System.Threading.Thread.Sleep(200); } }); } /// <summary> /// The command object. /// </summary> private AsynchronousCommand asyncCommand1; /// <summary> /// Gets the command. /// </summary> public AsynchronousCommand AsyncCommand1 { get { return asyncCommand1; } } }
XAML要素へのバインド:
<Button Content="Asynchronous Command" Command="{Binding AsyncCommand1}" />
コマンドを呼び出した後、対応する関数が呼び出されます。この関数は、ラムダ式を使用して指定します。ラムダ式は、スレッドプールとは別のスレッドで呼び出されます。
ビューモデルオブジェクト(ユーザーインターフェイス要素に関連付けることができる)で何かを行う必要がある場合は、ReportProgress関数を使用できます。
asyncCommand1.ReportProgress(() => { Messages.Add(i.ToString()); });
ReportProgressは、送信されたコードが目的のスレッドで起動されることを保証します。これにより、必要に応じてユーザーインターフェイスを非常に簡単に変更できます。
例7-ユーザーインターフェイス(UI)を更新する非同期コマンド
目標 :チームが完了するまでに長い時間がかかります。 進行状況バーを表示します。
AsynchronousCommandには、「IsExecuting」というプロパティがあります。 trueに設定されている場合、コマンドは進行中です。 AsynchronousCommandはINotifyPropertyChangedインターフェイスを実装するため、このプロパティにバインドして実行プロセスを表示できることを意味します。
コマンドをボタンに関連付けます。 そして、IsExecutingプロパティを別のインターフェイス要素、たとえば、それぞれTextBlockとProgressBarを含むStackPanelにアタッチします。
この例では、コマンドの実行が開始されるとすぐにボタンが消え、碑文と進行状況バーが表示されます。 コマンドのIsExecutingプロパティにバインドしていることに注意してください。
注 :Invertパラメーターは、Apex.Convertersで定義されている標準のBooleanToVisibilityConverterの拡張バージョンであるため、BooleanToVisilityConverterに渡すことができます。 結果を反転します。 特定の時点で非常に便利な小さなもの。
AsynchronousCommandには、「IsExecuting」というプロパティがあります。 trueに設定されている場合、コマンドは進行中です。 AsynchronousCommandはINotifyPropertyChangedインターフェイスを実装するため、このプロパティにバインドして実行プロセスを表示できることを意味します。
public class MainViewModel : ViewModel { public MainViewModel() { // asyncCommand2 = new AsynchronousCommand( () => { for (char c = 'A'; c <= 'Z'; c++) { // asyncCommand2.ReportProgress(() => { Messages.Add(c.ToString()); }); System.Threading.Thread.Sleep(100); } }); } /// <summary> /// The command object. /// </summary> private AsynchronousCommand asyncCommand2; /// <summary> /// Gets the command. /// </summary> public AsynchronousCommand AsyncCommand2 { get { return asyncCommand2; } } }
コマンドをボタンに関連付けます。 そして、IsExecutingプロパティを別のインターフェイス要素、たとえば、それぞれTextBlockとProgressBarを含むStackPanelにアタッチします。
<Button Content="Asynchronous Command" Command="{Binding AsyncCommand2}" Visibility="{Binding AsyncCommand2.IsExecuting, Converter={StaticResource BooleanToVisibilityConverter}, ConverterParameter=Invert}" /> <StackPanel Visibility="{Binding AsyncCommand2.IsExecuting, Converter={StaticResource BooleanToVisibilityConverter}}"> <TextBlock Text="The command is running!" /> <ProgressBar Height="20" Width="120" IsIndeterminate="True" /> </StackPanel>
この例では、コマンドの実行が開始されるとすぐにボタンが消え、碑文と進行状況バーが表示されます。 コマンドのIsExecutingプロパティにバインドしていることに注意してください。
asyncCommand1.ReportProgress(() => { Messages.Add(i.ToString()); });
注 :Invertパラメーターは、Apex.Convertersで定義されている標準のBooleanToVisibilityConverterの拡張バージョンであるため、BooleanToVisilityConverterに渡すことができます。 結果を反転します。 特定の時点で非常に便利な小さなもの。
例8-キャンセルする機能を持つ非同期コマンド
目的 :ユーザーが非同期コマンド実行プロセスをキャンセルできるようにします。
AsynchronousCommandのいくつかの機能を活用してください。 各AsynchronousCommandオブジェクトには、CancelCommandと呼ばれるコマンドも含まれています。 また、ユーザーUIにバインドするか、適切な場所でコード内で呼び出すことができます。 このコマンドが呼び出されると、AsynchronousCommandオブジェクトのIsCancellationRequestedプロパティがtrueに設定されます(プロパティはINotifyPropertyChangedを使用し、それにバインドする機会があることに注意してください)。 CancelIfRequested関数を定期的に呼び出すことができ、突然trueを返すと、コマンドは停止します。
コマンドをボタンにバインドし、IsExecutingプロパティをStackPanelにバインドします。
この例では、コマンドの実行中に[キャンセル]ボタンを表示しています。 このボタンはCancellableAsyncCommand.CancelCommandプロパティに関連付けられています。 CancelIfRequested関数を使用しているため、非同期コマンドの実行を停止する絶好の機会があります。
注 :非同期コマンドの実行を停止すると、Executedイベントは発生しません。 ただし、代わりにCanceledイベントが発生し、同じパラメーターを取ることができます。
AsynchronousCommandのいくつかの機能を活用してください。 各AsynchronousCommandオブジェクトには、CancelCommandと呼ばれるコマンドも含まれています。 また、ユーザーUIにバインドするか、適切な場所でコード内で呼び出すことができます。 このコマンドが呼び出されると、AsynchronousCommandオブジェクトのIsCancellationRequestedプロパティがtrueに設定されます(プロパティはINotifyPropertyChangedを使用し、それにバインドする機会があることに注意してください)。 CancelIfRequested関数を定期的に呼び出すことができ、突然trueを返すと、コマンドは停止します。
public class MainViewModel : ViewModel { public MainViewModel() { // cancellableAsyncCommand = new AsynchronousCommand( () => { for(int i = 1; i <= 100; i++) { // ? if(cancellableAsyncCommand.CancelIfRequested()) return; // . cancellableAsyncCommand.ReportProgress( () => { Messages.Add(i.ToString()); } ); System.Threading.Thread.Sleep(100); } }); } /// <summary> /// The command object. /// </summary> private AsynchronousCommand cancellableAsyncCommand; /// <summary> /// Gets the command. /// </summary> public AsynchronousCommand CancellableAsyncCommand { get { return cancellableAsyncCommand; } } }
コマンドをボタンにバインドし、IsExecutingプロパティをStackPanelにバインドします。
<Button Content="Cancellable Async Command" Command="{Binding CancellableAsyncCommand}" Visibility="{Binding CancellableAsyncCommand.IsExecuting, Converter={StaticResource BooleanToVisibilityConverter}, ConverterParameter=Invert}" /> <StackPanel Visibility="{Binding CancellableAsyncCommand.IsExecuting, Converter={StaticResource BooleanToVisibilityConverter}}"> <TextBlock Margin="4" Text="The command is running!" /> <ProgressBar Margin="4" Height="20" Width="120" IsIndeterminate="True" /> <Button Margin="4" Content="Cancel" Command="{Binding CancellableAsyncCommand.CancelCommand}" /> </StackPanel>
この例では、コマンドの実行中に[キャンセル]ボタンを表示しています。 このボタンはCancellableAsyncCommand.CancelCommandプロパティに関連付けられています。 CancelIfRequested関数を使用しているため、非同期コマンドの実行を停止する絶好の機会があります。
注 :非同期コマンドの実行を停止すると、Executedイベントは発生しません。 ただし、代わりにCanceledイベントが発生し、同じパラメーターを取ることができます。
例9-コマンドへのイベントのバインド
目的 :Commandプロパティは設定されていないがイベントが設定されているユーザー要素をアクティブにするときにコマンドを呼び出します。
この場合、EventBindings attachプロパティを使用できます。 Apex.Commandsクラスにあります。 EventBindingsは、EventBindingオブジェクトの単純なコレクションであるEventBindingCollectionを受け入れます。 各EventBindingは、イベントの名前と呼び出されるコマンドの名前の2つのパラメーターを取ります。
イベントにバインドするチームは次のとおりです。
EventBindingを使用する場合、コマンドはイベントに添付できます。
この場合、EventBindings attachプロパティを使用できます。 Apex.Commandsクラスにあります。 EventBindingsは、EventBindingオブジェクトの単純なコレクションであるEventBindingCollectionを受け入れます。 各EventBindingは、イベントの名前と呼び出されるコマンドの名前の2つのパラメーターを取ります。
public class MainViewModel : ViewModel { public MainViewModel() { // EventBindingCommand = new Command( () => { Messages.Add(" ."); }); } /// <summary> /// The command object. /// </summary> private Command eventBindingCommand; /// <summary> /// Gets the command. /// </summary> public Command EventBindingCommand { get { return eventBindingCommand; } } }
イベントにバインドするチームは次のとおりです。
<Border Margin="20" Background="Red"> <!— EventBindingCommand MouseLeftButtonDown. --> <apexCommands:EventBindings.EventBindings> <apexCommands:EventBindingCollection> <apexCommands:EventBinding EventName="MouseLeftButtonDown" Command="{Binding EventBindingCommand}" /> </apexCommands:EventBindingCollection> </apexCommands:EventBindings.EventBindings> <TextBlock VerticalAlignment="Center" HorizontalAlignment="Center" Text="Left Click on Me" FontSize="16" Foreground="White" /> </Border>
EventBindingを使用する場合、コマンドはイベントに添付できます。
仕組み-コマンドクラス
例1〜5で使用されたCommandクラスについて考えます。
まず、2つのオーバーロードされたコンストラクターを作成します。パラメーターなしでアクションが渡されるアクション:アクション、またはパラメーター付きでアクション<オブジェクト>、ここでオブジェクトはタイプです。
次に、コマンドを実行する機能を担当するcanExecuteフラグを設定します。 canExecuteフラグを変更した後、canExecuteChangedを呼び出す必要があります。
次に、ICommandインターフェイスを実装します
DoExecute関数については、後ほど分析します。
次に、各イベントにInvoke関数を実装します。 したがって、派生クラスからそれらを呼び出すことができます。
注 :InvokeActionは、設定されているアクションに応じて、パラメーターなしのアクションまたはパラメーター付きのアクションを呼び出します。
DoExecuteは非常に簡単です。 実行をキャンセルする機能を備えた対応するイベントを発生させるだけです。
上記のクラスはICommandインターフェイスを実装し、例1〜5で使用されるすべての必要な機能を提供します。
/// <summary> /// ViewModelCommand – ICommand, . /// </summary> public class Command : ICommand { /// <summary> /// <see cref="Command"/>. /// </summary> /// <param name="action">.</param> /// <param name="canExecute"> <c>true</c> [can execute] ( ).</param> public Command(Action action, bool canExecute = true) { // Set the action. this.action = action; this.canExecute = canExecute; } /// <summary> /// <see cref="Command"/> class. /// </summary> /// <param name="parameterizedAction"> .</param> /// <param name="canExecute"> <c>true</c> [can execute]( ).</param> public Command(Action<object> parameterizedAction, bool canExecute = true) { // Set the action. this.parameterizedAction = parameterizedAction; this.canExecute = canExecute; }
まず、2つのオーバーロードされたコンストラクターを作成します。パラメーターなしでアクションが渡されるアクション:アクション、またはパラメーター付きでアクション<オブジェクト>、ここでオブジェクトはタイプです。
次に、コマンドを実行する機能を担当するcanExecuteフラグを設定します。 canExecuteフラグを変更した後、canExecuteChangedを呼び出す必要があります。
/// <summary> /// ( ) . /// </summary> protected Action action = null; protected Action<object> parameterizedAction = null; /// <summary> /// , . /// </summary> private bool canExecute = false; /// <summary> /// / , /// </summary> /// <value> /// <c>true</c> ; - <c>false</c>. /// </value> public bool CanExecute { get { return canExecute; } set { if (canExecute != value) { canExecute = value; EventHandler canExecuteChanged = CanExecuteChanged; if (canExecuteChanged != null) canExecuteChanged(this, EventArgs.Empty); } } }
次に、ICommandインターフェイスを実装します
/// <summary> /// , , /// </summary> /// <param name="parameter"> . /// , /// null.</param> /// <returns> /// > ; - false. /// </returns> bool ICommand.CanExecute(object parameter) { return canExecute; } /// <summary> /// , . /// </summary> /// <param name="parameter"> . /// , /// null.</param> void ICommand.Execute(object parameter) { this.DoExecute(parameter); }
DoExecute関数については、後ほど分析します。
/// <summary> /// , /// </summary> public event EventHandler CanExecuteChanged; /// <summary> /// /// </summary> public event CancelCommandEventHandler Executing; /// <summary> /// , /// </summary> public event CommandEventHandler Executed;
次に、各イベントにInvoke関数を実装します。 したがって、派生クラスからそれらを呼び出すことができます。
protected void InvokeAction(object param) { Action theAction = action; Action<object> theParameterizedAction = parameterizedAction; if (theAction != null) theAction(); else if (theParameterizedAction != null) theParameterizedAction(param); } protected void InvokeExecuted(CommandEventArgs args) { CommandEventHandler executed = Executed; // if (executed != null) executed(this, args); } protected void InvokeExecuting(CancelCommandEventArgs args) { CancelCommandEventHandler executing = Executing; // Call the executed event. if (executing != null) executing(this, args); }
注 :InvokeActionは、設定されているアクションに応じて、パラメーターなしのアクションまたはパラメーター付きのアクションを呼び出します。
/// <summary> /// /// </summary> /// <param name="param">The param.</param> public virtual void DoExecute(object param) { // CancelCommandEventArgs args = new CancelCommandEventArgs() { Parameter = param, Cancel = false }; InvokeExecuting(args); // - . if (args.Cancel) return; // / , . . InvokeAction(param); // Call the executed function. InvokeExecuted(new CommandEventArgs() { Parameter = param }); }
DoExecuteは非常に簡単です。 実行をキャンセルする機能を備えた対応するイベントを発生させるだけです。
上記のクラスはICommandインターフェイスを実装し、例1〜5で使用されるすべての必要な機能を提供します。
仕組み-非同期コマンドクラス
例6〜8では、AsynchronousCommandクラスを使用します。このクラスは、上記のCommandクラスを継承します。
最初に、興行収入と建設業者を発表します。
INotifyPropertyChangedインターフェイスの実装のおかげで、IsExecuting変数が変更されたときに通知することができます。両方のコンストラクターがInitialiseメソッドを呼び出すため、より詳細に検討してください。
, , — IsCancellationRequested true. . IsCancellationRequested, , .
, . 次のコードを追加します。
. Cancelled PropertyChanged ( INotifyPropertyChanged):
, , .
, , .
, Silverlight WPF.
. , InvokeAction , . , ReportProgress , Executed. ( ), IsExecuting, : Cancelled Executed. , ReportProgress:
最初に、興行収入と建設業者を発表します。
/// <summary> /// - , .. /// </summary> public class AsynchronousCommand : Command, INotifyPropertyChanged { /// <summary> /// <see cref="AsynchronousCommand"/>. /// </summary> /// <param name="action">.</param> /// <param name="canExecute"> /// <c>true</c> .</param> public AsynchronousCommand(Action action, bool canExecute = true) : base(action, canExecute) { // Initialise(); } /// <summary> /// <see cref="AsynchronousCommand"/>. /// </summary> /// <param name="parameterizedAction"> .</param> /// <param name="canExecute"> <c>true</c> [can execute] ( ).</param> public AsynchronousCommand(Action<object> parameterizedAction, bool canExecute = true) : base(parameterizedAction, canExecute) { // Initialise(); }
INotifyPropertyChangedインターフェイスの実装のおかげで、IsExecuting変数が変更されたときに通知することができます。両方のコンストラクターがInitialiseメソッドを呼び出すため、より詳細に検討してください。
/// <summary> /// /// </summary> private Command cancelCommand; /// <summary> /// . /// </summary> public Command CancelCommand { get { return cancelCommand; } } /// <summary> /// / , , /// </summary> /// <value> /// <c>true</c> ; - <c>false</c>. /// </value> public bool IsCancellationRequested { get { return isCancellationRequested; } set { if (isCancellationRequested != value) { isCancellationRequested = value; NotifyPropertyChanged("IsCancellationRequested"); } } } /// <summary> /// /// </summary> private void Initialise() { // cancelCommand = new Command( () => { // Set the Is Cancellation Requested flag. IsCancellationRequested = true; }, true); }
, , — IsCancellationRequested true. . IsCancellationRequested, , .
, . 次のコードを追加します。
/// <summary> /// , , . /// </summary> private bool isExecuting = false; /// <summary> /// / , , .. /// </summary> /// <value> /// <c>true</c> ; <c>false</c>. /// </value> public bool IsExecuting { get { return isExecuting; } set { if (isExecuting != value) { isExecuting = value; NotifyPropertyChanged("IsExecuting"); } } }
. Cancelled PropertyChanged ( INotifyPropertyChanged):
/// <summary> /// The property changed event. /// </summary> public event PropertyChangedEventHandler PropertyChanged; /// <summary> /// , . /// </summary> public event CommandEventHandler Cancelled; DoExecute. /// <summary> /// . /// </summary> /// <param name="param">.</param> public override void DoExecute(object param) { // , . if (IsExecuting) return; // , . CancelCommandEventArgs args = new CancelCommandEventArgs() { Parameter = param, Cancel = false }; InvokeExecuting(args); // - . if (args.Cancel) return; // . IsExecuting = true;
, , .
// . #if !SILVERLIGHT callingDispatcher = Dispatcher.CurrentDispatcher; #else callingDispatcher = System.Windows.Application.Current.RootVisual.Dispatcher; #endif
, , .
, Silverlight WPF.
// Run the action on a new thread from the thread pool // (this will therefore work in SL and WP7 as well). ThreadPool.QueueUserWorkItem( (state) => { // . InvokeAction(param); // Fire the executed event and set the executing state. ReportProgress( () => { // . IsExecuting = false; // , // - , – . if(IsCancellationRequested) InvokeCancelled(new CommandEventArgs() { Parameter = param }); else InvokeExecuted(new CommandEventArgs() { Parameter = param }); // . IsCancellationRequested = false; } ); } ); }
. , InvokeAction , . , ReportProgress , Executed. ( ), IsExecuting, : Cancelled Executed. , ReportProgress:
/// <summary> /// Reports progress on the thread which invoked the command. /// </summary> /// <param name="action">The action.</param> public void ReportProgress(Action action) { if (IsExecuting) { if (callingDispatcher.CheckAccess()) action(); else callingDispatcher.BeginInvoke(((Action)(() => { action(); }))); } }
– Command
EventBindings - WPF Silverlight. WPF EventBindingsCollection FreezableCollection, . Silverlight FreezableCollection, .
EventBinding.Bind:
public static class EventBindings { /// <summary> /// Event Bindings. /// </summary> private static readonly DependencyProperty EventBindingsProperty = DependencyProperty.RegisterAttached("EventBindings", typeof(EventBindingCollection), typeof(EventBindings), new PropertyMetadata(null, new PropertyChangedCallback(OnEventBindingsChanged))); /// <summary> /// Gets the event bindings. /// </summary> /// <param name="o">The o.</param> /// <returns></returns> public static EventBindingCollection GetEventBindings(DependencyObject o) { return (EventBindingCollection)o.GetValue(EventBindingsProperty); } /// <summary> /// Sets the event bindings. /// </summary> /// <param name="o">The o.</param> /// <param name="value">The value.</param> public static void SetEventBindings(DependencyObject o, EventBindingCollection value) { o.SetValue(EventBindingsProperty, value); } /// <summary> /// Called when event bindings changed. /// </summary> /// <param name="o">The o.</param> /// <param name="args">The <see /// cref="System.Windows.DependencyPropertyChangedEventArgs"/> /// instance containing the event data.</param> public static void OnEventBindingsChanged(DependencyObject o, DependencyPropertyChangedEventArgs args) { // Cast the data. EventBindingCollection oldEventBindings = args.OldValue as EventBindingCollection; EventBindingCollection newEventBindings = args.NewValue as EventBindingCollection; // If we have new set of event bindings, bind each one. if (newEventBindings != null) { foreach (EventBinding binding in newEventBindings) { binding.Bind(o); #if SILVERLIGHT // If we're in Silverlight we don't inherit the // data context so we must set this helper variable. binding.ParentElement = o as FrameworkElement; #endif } } } }
EventBinding.Bind:
public void Bind(object o) { try { // EventInfo eventInfo = o.GetType().GetEvent(EventName); // Get the method info for the event proxy. MethodInfo methodInfo = GetType().GetMethod("EventProxy", BindingFlags.NonPublic | BindingFlags.Instance); // Create a delegate for the event to the event proxy. Delegate del = Delegate.CreateDelegate(eventInfo.EventHandlerType, this, methodInfo); // Add the event handler. (Removing it first if it already exists!) eventInfo.RemoveEventHandler(o, del); eventInfo.AddEventHandler(o, del); } catch (Exception e) { string s = e.ToString(); } } /// <summary> /// Proxy to actually fire the event. /// </summary> /// <param name="o">The object.</param> /// <param name="e">The <see /// cref="System.EventArgs"/> instance /// containing the event data.</param> private void EventProxy(object o, EventArgs e) { #if SILVERLIGHT // If we're in Silverlight, we have NOT inherited the data context // because the EventBindingCollection is not a framework element and // therefore out of the logical tree. However, we can set it here // and update the bindings - and it will all work. DataContext = ParentElement != null ? ParentElement.DataContext : null; var bindingExpression = GetBindingExpression(EventBinding.CommandProperty); if(bindingExpression != null) bindingExpression.UpdateSource(); bindingExpression = GetBindingExpression(EventBinding.CommandParameterProperty); if (bindingExpression != null) bindingExpression.UpdateSource(); #endif if (Command != null) Command.Execute(CommandParameter); }