
妄想はありますか? 彼らは常にあなたを盗聴したいと思っているようです。 重要な交渉はありますか? それでは、ここであなたに!
この記事では、Yealink T26p電話をセットアップする際の主な問題について説明します。
最初に、証明書を使用して暗号化されたトンネルをOpenVPNサーバーに上げてから、証明書と音声で暗号化されたシグナリングを使用してSIPトンネル内のSIPトンネルを許可します! (TLS + SRTP)。
誰にそれが面白いか私はキャットの下で尋ねます。
そもそも、仕事のスキームに精通することを提案します。
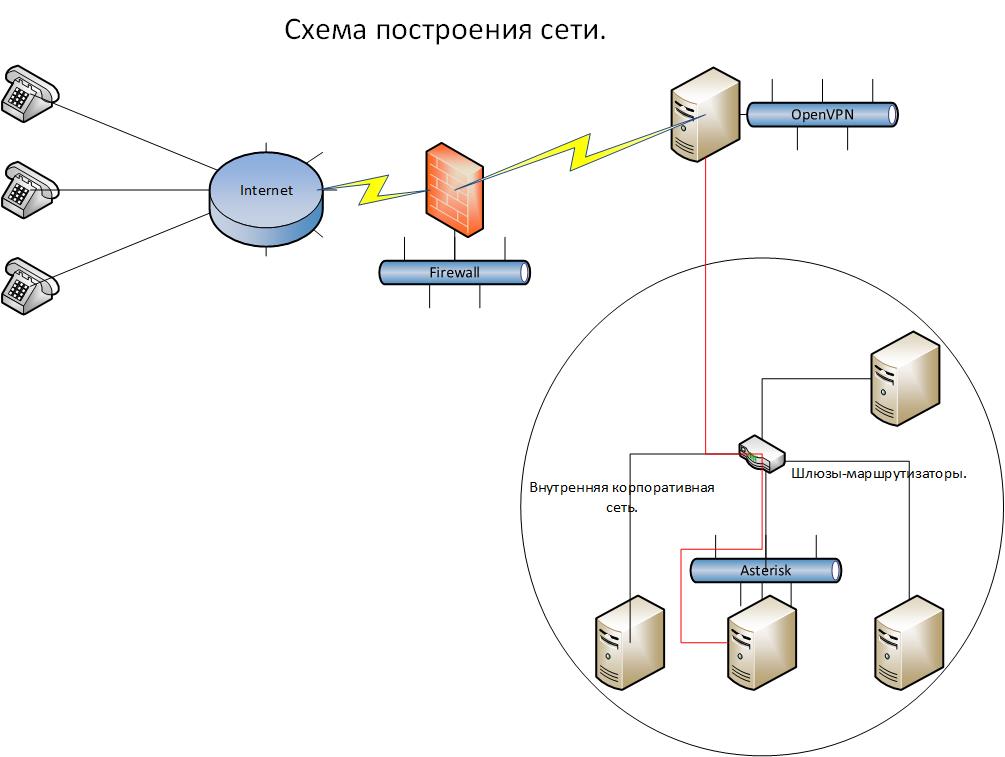
仕事の意味は次のとおりです-電話はインターネットを介してどこからでも接続されます。 暗号化されたチャネルを、世界に張り付いている唯一のOpenVPNサーバーポートに上げます。 そして、このサーバーからテレフォニーは企業ネットワークの腸に入り、そこに隠されたアスタリスクサーバーに到達します。 しかし、ご覧のように、OpenVPNサーバーへのチャネルは暗号化されていますが、多くのサービス担当者がいる企業ネットワーク内では、任意のゲートウェイでSIPトラフィックをインターセプトし、その後解読して会話の内容を知ることができます! ネットワークのこの部分には、特別に赤い線が付いています。 したがって、アスタリスクでSRTP + TLSを構成し、ネットワーク内のトラフィックを暗号化して、悪意のない従業員から保護します。 したがって、会話にアクセスできる人々の輪は非常に狭くなっています。
OpenVPNサーバーをインストールするには、Centos 6.4 DVDイメージを使用しました。 私はインストールで停止しません、すべてが標準です。
ロケールの不具合をすぐに修正します。
export LC_CTYPE=en_US.UTF-8
ネットワークインターフェイスで転送を有効にします。
nano /etc/sysctl.conf # net.ipv4.ip_forward = 1
起動時にネットワークインターフェイスの読み込みをオンにします。
nano /etc/sysconfig/network-scripts/ifcfg-eth0 # . ONBOOT=yes
CentOSを更新します。
cd /usr/src/ yum update -y
目的のリポジトリを追加します。
wget http://fedora.ip-connect.vn.ua/fedora-epel/6/i386/epel-release-6-8.noarch.rpm rpm -Uvh epel-release-6-8.noarch.rpm
必要なパッケージを入れます。
yum install openvpn git bridge-utils -y
EasyRSAは分離され、github上にあります-したがって:
git clone https://github.com/OpenVPN/easy-rsa.git cp -r /usr/src/easy-rsa/easy-rsa /etc/openvpn/
元のVPN構成をコピーし、その後の追加と変更のためにすべての行をコメント化することをお勧めします。追加に必要なコマンドとその構文を検索すると便利です。
cp /usr/share/doc/openvpn-2.3.1/sample/sample-config-files/server.conf /etc/openvpn/ nano /etc/openvpn/server.conf # , : port 1194 proto udp dev tun0 ca /etc/openvpn/easy-rsa/2.0/keys/ca.crt cert /etc/openvpn/easy-rsa/2.0/keys/server.crt key /etc/openvpn/easy-rsa/2.0/keys/server.key dh /etc/openvpn/easy-rsa/2.0/keys/dh1024.pem server 172.19.7.0 255.255.255.0 ifconfig-pool-persist ipp.txt push "route 172.19.7.0 255.255.255.0" keepalive 10 120 user root group root persist-key persist-tun status openvpn-status.log log /var/log/openvpn.log verb 3 mute 20 comp-lzo no
暗号化方式をsha256からMD5に変更します 電話は最初の方法を理解していません。 easy-rsaアセンブリのopensslファイルには3つのオプションがあります。キーと証明書を生成するときにシステムが使用するシステムを見つけられないように一度に変更します。
cp /etc/openvpn/easy-rsa/2.0/openssl-0.9.6.cnf /etc/openvpn/easy-rsa/2.0/openssl-0.9.6.cnf.orig && sed -e 's/default_md.*=.*sha256/default_md = md5 /g' /etc/openvpn/easy-rsa/2.0/openssl-0.9.6.cnf.orig > /etc/openvpn/easy-rsa/2.0/openssl-0.9.6.cnf cp /etc/openvpn/easy-rsa/2.0/openssl-0.9.8.cnf /etc/openvpn/easy-rsa/2.0/openssl-0.9.8.cnf.orig && sed -e 's/default_md.*=.*sha256/default_md = md5 /g' /etc/openvpn/easy-rsa/2.0/openssl-0.9.8.cnf.orig > /etc/openvpn/easy-rsa/2.0/openssl-0.9.8.cnf cp /etc/openvpn/easy-rsa/2.0/openssl-1.0.0.cnf /etc/openvpn/easy-rsa/2.0/openssl-1.0.0.cnf.orig && sed -e 's/default_md.*=.*sha256/default_md = md5 /g' /etc/openvpn/easy-rsa/2.0/openssl-1.0.0.cnf.orig > /etc/openvpn/easy-rsa/2.0/openssl-1.0.0.cnf
次に、デフォルト値を変更します
nano /etc/openvpn/easy-rsa/2.0/vars export KEY_SIZE=1024 export KEY_COUNTRY="RU" export KEY_PROVINCE="CA" export KEY_CITY="Moscow" export KEY_ORG="YOURCOMPANY" export KEY_EMAIL="info@YOURCOMPANY.ru" export KEY_OU="MY"
証明書の生成を開始できます:
キーと証明書を生成する目的のディレクトリに移動しましょう
cd /etc/openvpn/easy-rsa/2.0 [root@test 2.0]# source ./vars NOTE: If you run ./clean-all, I will be doing a rm -rf on /etc/openvpn/easy-rsa/2.0/keys [root@test 2.0]# ./clean-all # , , Common Name [root@test 2.0]# ./build-ca Generating a 1024 bit RSA private key .........++++++ .......................++++++ writing new private key to 'ca.key' ----- You are about to be asked to enter information that will be incorporated into your certificate request. What you are about to enter is what is called a Distinguished Name or a DN. There are quite a few fields but you can leave some blank For some fields there will be a default value, If you enter '.', the field will be left blank. ----- Country Name (2 letter code) [RU]: State or Province Name (full name) [CA]: Locality Name (eg, city) [Moscow]: Organization Name (eg, company) [YOURCOMPANY]: Organizational Unit Name (eg, section) [changeme]: Common Name (eg, your name or your server's hostname) [changeme]:test Name [changeme]: Email Address [mail@host.domain]:
サーバーの証明書とキーを作成する
デフォルトでは、すべての回答を残すことができます。
[root@test 2.0]# ./build-key-server server Generating a 1024 bit RSA private key .........................++++++ .............................++++++ writing new private key to 'server.key' ----- You are about to be asked to enter information that will be incorporated into your certificate request. What you are about to enter is what is called a Distinguished Name or a DN. There are quite a few fields but you can leave some blank For some fields there will be a default value, If you enter '.', the field will be left blank. ----- Country Name (2 letter code) [RU]: State or Province Name (full name) [MOSCOW]: Locality Name (eg, city) [MOSCOW]: Organization Name (eg, company) [YOURCOMPANY]: Organizational Unit Name (eg, section) [changeme]: Common Name (eg, your name or your server's hostname) [server]: Name [changeme]: Email Address [mail@host.domain]: Please enter the following 'extra' attributes to be sent with your certificate request A challenge password []: An optional company name []: Using configuration from /etc/openvpn/easy-rsa/2.0/openssl-0.9.8.cnf Check that the request matches the signature Signature ok The Subject's Distinguished Name is as follows countryName :PRINTABLE:'RU' stateOrProvinceName :PRINTABLE:'MOSCOW' localityName :PRINTABLE:'MOSCOW' organizationName :PRINTABLE:'YOURCOMPANY' organizationalUnitName:PRINTABLE:'changeme' commonName :PRINTABLE:'server' name :PRINTABLE:'changeme' emailAddress :IA5STRING:'mail@host.domain' Certificate is to be certified until Mar 20 06:56:48 2023 GMT (3650 days) Sign the certificate? [y/n]:y 1 out of 1 certificate requests certified, commit? [y/n]y Write out database with 1 new entries Data Base Updated
Diffie-Hellmanキーの生成
[root@test 2.0]# ./build-dh Generating DH parameters, 1024 bit long safe prime, generator 2 This is going to take a long time ...................................................+.................................................................+...................+..+.........................................................................................................................................+...........+.......................................................+....+..................................................................................................+......................................................................+.................................................................................................+............................+.....................................................................+.............++*++*++*
クライアントキーを生成します(各マシンまたは電話に対して、それは独自のものでなければなりません)
すべての回答はデフォルトで残されています。
[root@test 2.0]# ./build-key client1 Generating a 1024 bit RSA private key .++++++ ......++++++ writing new private key to 'client1.key' ----- You are about to be asked to enter information that will be incorporated into your certificate request. What you are about to enter is what is called a Distinguished Name or a DN. There are quite a few fields but you can leave some blank For some fields there will be a default value, If you enter '.', the field will be left blank. ----- Country Name (2 letter code) [RU]: State or Province Name (full name) [CA]: Locality Name (eg, city) [Moscow]: Organization Name (eg, company) [YOURCOMPANY]: Organizational Unit Name (eg, section) [changeme]: Common Name (eg, your name or your server's hostname) [client1]: Name [changeme]: Email Address [mail@host.domain]: Please enter the following 'extra' attributes to be sent with your certificate request A challenge password []: An optional company name []: Using configuration from /etc/openvpn/easy-rsa/2.0/openssl-0.9.8.cnf Check that the request matches the signature Signature ok The Subject's Distinguished Name is as follows countryName :PRINTABLE:'RU' stateOrProvinceName :PRINTABLE:'CA' localityName :PRINTABLE:'Moscow' organizationName :PRINTABLE:'YOURCOMPANY' organizationalUnitName:PRINTABLE:'changeme' commonName :PRINTABLE:'client1' name :PRINTABLE:'changeme' emailAddress :IA5STRING:'mail@host.domain' Certificate is to be certified until Mar 20 07:01:46 2023 GMT (3650 days) Sign the certificate? [y/n]:y 1 out of 1 certificate requests certified, commit? [y/n]y Write out database with 1 new entries Data Base Updated
電話を接続するためのファイルの準備:
フォルダーを作成します-内部にはキーフォルダーとvpn.cnfファイルがあります。
例vpn.cnf-XXXの代わりに、当然のことながらサーバーアドレスは次のとおりです。
client dev tun proto udp remote XXX.XXX.XXX.XXX 1194 resolv-retry infinite nobind ca /yealink/config/openvpn/keys/ca.crt cert /yealink/config/openvpn/keys/client1.crt key /yealink/config/openvpn/keys/client1.key verb 3 mute 20 comp-lzo no
キーフォルダー内には、それぞれ3つのファイル(ca.crt、client1.crt、client1.key)が必要です。 構成およびフォルダー内のファイル名は一致する必要があります。 生成後、便利な方法でサーバーからファイルをプルします。
その後、7zipを入れてvpn.cnfファイルとキーフォルダーをtarアーカイブに圧縮せずにアーカイブします。 または、vpn.cnfファイルとキーフォルダーがあるフォルダーからLinuxで実行できます。
tar cvf connect.tar ./vpn.cnf ./keys
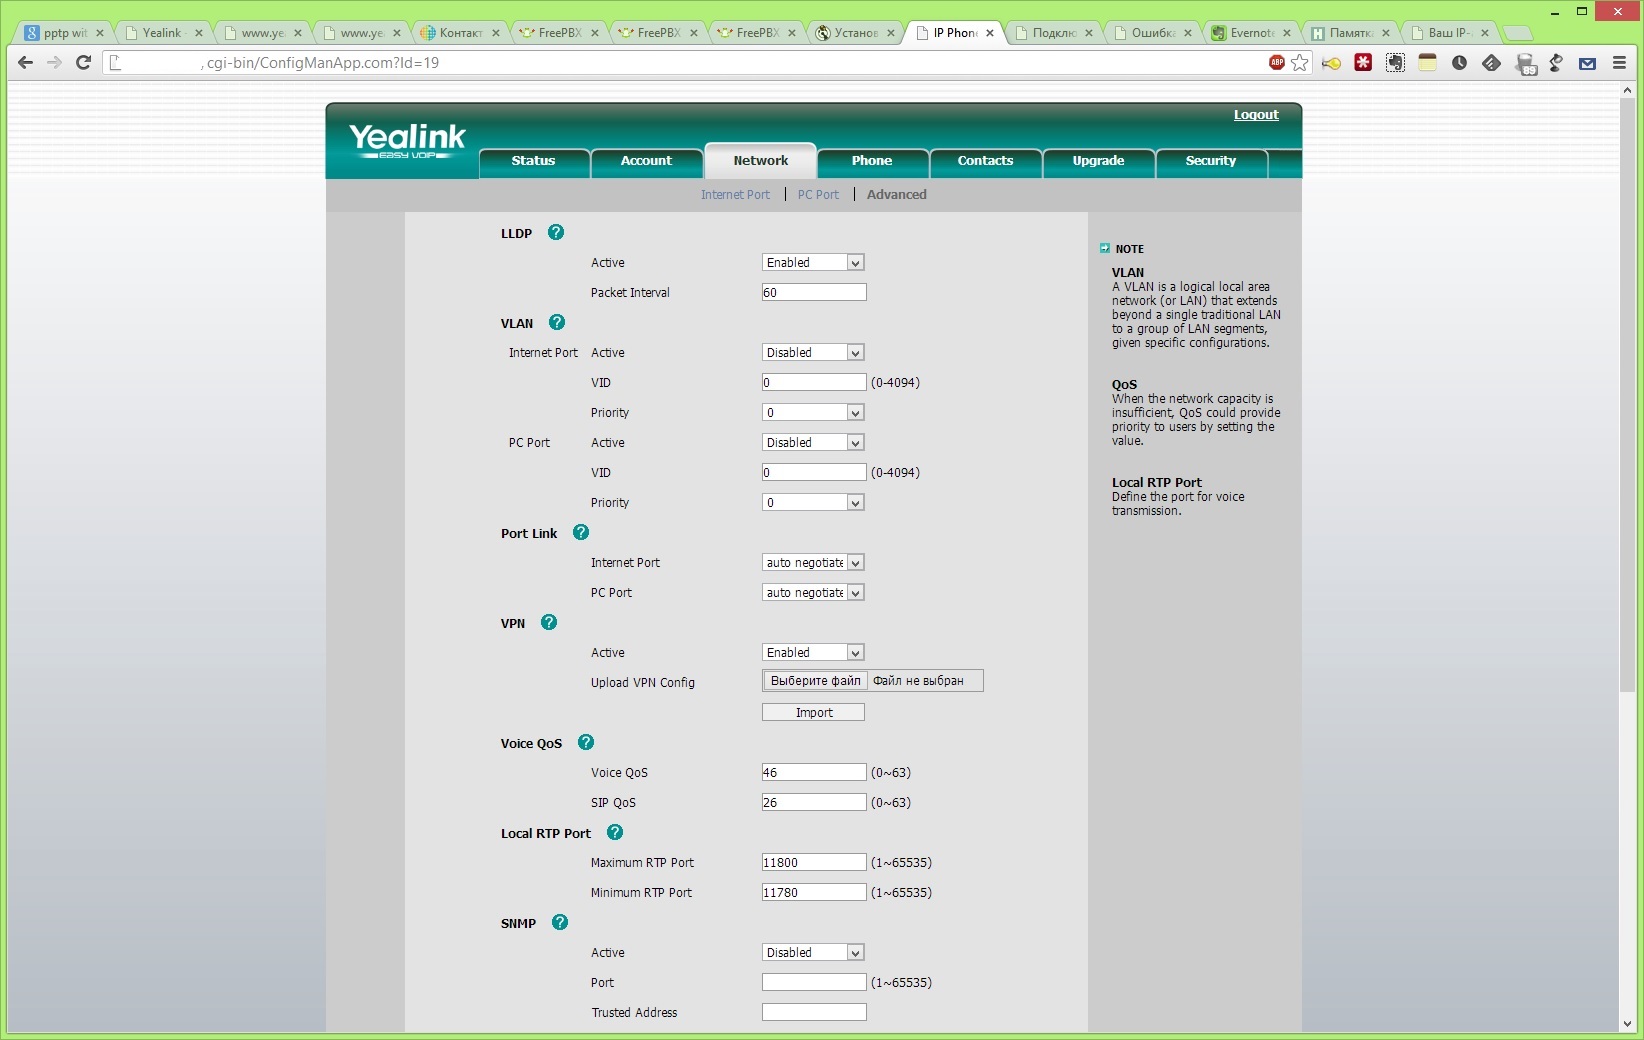
電話のWebインターフェースに入ります。 タブネットワーク>詳細設定> Vpnに移動します。 active = enabledに設定し、ファイルをインポートして、下の[送信]をクリックします。
電話機がファイルをダウンロードしなかった場合は、再起動できます。 ログを見て、彼がサーバーに接続していることを確認するには:
tail -n100 -f /var/log/openvpn.log
アスタリスクでTLS + SRTPを構成します。
たくさんの記事があり、私のものもそこにあるので、私はゼロから設定を書きません。 証明書を作成し、暗号化を有効にして、すべてを電話に押し込む方法を説明します。
したがって、アスターには認証局を作成する必要があります。
mkdir /etc/cert cd /etc/cert/ root@server-sip1:/etc/cert# openssl genrsa -des3 -out ca.key 4096 Generating RSA private key, 4096 bit long modulus .......................++ ...............................++ e is 65537 (0x10001) Enter pass phrase for ca.key: Verifying - Enter pass phrase for ca.key: root@server-sip1:/etc/cert# root@server-sip1:/etc/cert# root@server-sip1:/etc/cert# openssl req -new -x509 -days 365 -key ca.key -out ca.crt Enter pass phrase for ca.key: You are about to be asked to enter information that will be incorporated into your certificate request. What you are about to enter is what is called a Distinguished Name or a DN. There are quite a few fields but you can leave some blank For some fields there will be a default value, If you enter '.', the field will be left blank. ----- Country Name (2 letter code) [AU]:RU State or Province Name (full name) [Some-State]:MOSCOW Locality Name (eg, city) []:MOSCOW Organization Name (eg, company) [Internet Widgits Pty Ltd]:YOURCOMPANY Organizational Unit Name (eg, section) []:VoIP Common Name (eg, YOUR name) []:YUORCOMPANY CA Email Address []:INFO@YOURCOMPANY.RU root@server-sip1:/etc/cert# root@server-sip1:/etc/cert# root@server-sip1:/etc/cert# ls ca.crt ca.key root@server-sip1:/etc/cert#
CAが作成されました-次に、ca.crtファイルを電話機にダウンロードして、このCAが信頼できることを確認する必要があります-[セキュリティ]> [信頼できる証明書]タブ。

電話のサーバー証明書の作成と署名-サーバーについて説明し、電話の手順を繰り返します。
root@server-sip1:/etc/cert# openssl genrsa -out key-server.pem 1024 Generating RSA private key, 1024 bit long modulus .....++++++ ...++++++ e is 65537 (0x10001) root@server-sip1:/etc/cert# openssl req -new -key key-server.pem -out req-server.csr You are about to be asked to enter information that will be incorporated into your certificate request. What you are about to enter is what is called a Distinguished Name or a DN. There are quite a few fields but you can leave some blank For some fields there will be a default value, If you enter '.', the field will be left blank. ----- Country Name (2 letter code) [AU]:RU State or Province Name (full name) [Some-State]:MOSCOW Locality Name (eg, city) []:MOSCOW Organization Name (eg, company) [Internet Widgits Pty Ltd]:YOURCOMPANY Organizational Unit Name (eg, section) []:VoIP Common Name (eg, YOUR name) []:server Email Address []:info@yourcompany.ru Please enter the following 'extra' attributes to be sent with your certificate request A challenge password []: An optional company name []: root@server-sip1:/etc/cert# root@server-sip1:/etc/cert# root@server-sip1:/etc/cert# root@server-sip1:/etc/cert# openssl x509 -req -days 365 -in req-server.csr -CA ca.crt -CAkey ca.key -set_serial 01 -out cert-server.crt Signature ok subject=/C=RU/ST=MOSCOW/L=MOSCOW/O=Yourcompany/OU=VoIP/CN=server/emailAddress=info@yourcompany.ru Getting CA Private Key Enter pass phrase for ca.key: root@server-sip1:/etc/cert#
アスタリスクの証明書の準備。
アスターのファイル構造は次のようになります-最初に次の形式の証明書ファイル:
-----BEGIN CERTIFICATE----- MIIDvDCCAyWgAwIBAgIJAPMabsMiJJQPMA0GCSqGSIb3DQEBBQUAMIGbMQswCQYD [...] CfITDxcJBZfeXIPZP52+8FSMlm5985uMvao+emlIUGk11rY61Amxr387grDvgOaI -----END CERTIFICATE-----
その後、すぐにキーファイル:
-----BEGIN RSA PRIVATE KEY----- MIICXQIBAAKBgQCqRw0jpQFn+f+lnDZiZzCRca9ojgu2brO+Q56jnqorvCIlYFC0 [...] FT65O46u6Vmp1gPbNklOEg7TtZUtfacPY2PyeP4KoHaG -----END RSA PRIVATE KEY-----
catでビルドできます:
root@server-sip1:/etc/asterisk/cert# cat /etc/cert/key.pem > /etc/asterisk/cert/asterisk.pem root@server-sip1:/etc/asterisk/cert# cat /etc/cert/cert-server.crt >> /etc/asterisk/cert/asterisk.pem
次に、sip.confファイル(またはElastixまたはFreePBXの場合はsip_general_custom.conf)に書き込みます。
tcpenable=yes tcpbindaddr=0.0.0.0 tlsenable=yes tlsbindaddr=0.0.0.0 tlscertfile=/etc/asterisk/cert/asterisk.pem tlscafile=/etc/cert/ca.crt
すべての準備が整ったら、特定の拡張でTLSとSRTPを有効にする必要があります。
同様に、電話用のファイルを準備し、[セキュリティ]> [サーバー証明書]メニューに読み込みます。

この記事では、完全な資料であると主張したくない場合はありません。 しかし、後で遭遇するかもしれない人のために、これらの設定の重要なニュアンスを伝えたかったのです。 電話とアスタリスクの証明書を抽出して準備することのすべてのニュアンスを見つけるのに1週間かかりました。 それを行う方法について何か提案があれば-それはより速く、より速く、より正確に、それから私は喜んでコメントでそれを読みます!
更新する Business HD IP DECT Phone W52Pをセットアップすると、構成がアップロードされたことが明らかになりました。 「/ yealink」なしでパスに登録する必要があります。
ca /config/openvpn/keys/ca.crt cert /config/openvpn/keys/client1.crt key /config/openvpn/keys/client1.key
さらに、内線番号のアスタリスクパスワードのBusiness HD IP DECT Phone W52P電話は「&」文字を理解しますが、Yealink T26p電話は理解できません。
電話の安定性を高めるために、[アカウント]タブで、ログインの有効期限を600に、購読期間を300に変更しました。