目次
- Magentoの新しいメールモジュールを作成します(パート1) 。Magentoに新しい配信方法を追加します。
- Magentoの「New Mail」モジュールを作成します(パート2)。Magentoにウェアハウスデータベースを保存し、New Mailと同期するように教えます。
有害な顧客向けのプロジェクトの立ち上げに関連した休憩の後、私は始めたものを続けます。 すべてのソースはGitHubで見つけることができることを思い出させてください: github.com/alexkuk/Ak_NovaPoshta 、それらは開発中に補足されます。
このパートでは、APIキーを取得し、倉庫と都市の同期をNew MailからMagentoデータベースに書き込みます。
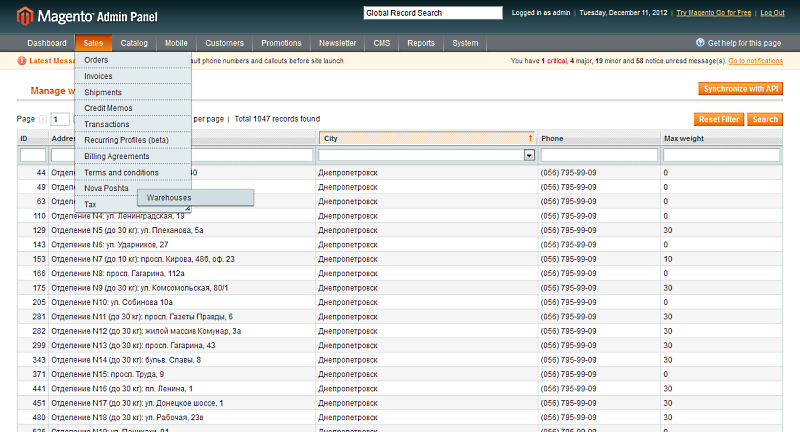
その結果、管理パネルにそのようなテーブルが表示されます。
新しいメールAPI
New Mailはできるだけ早くAPIを隠しているようです。 サードパーティのフォーラムからその存在についても学びました。
アクセスするために最初に必要なことは、新しい郵便局でロイヤルティプログラムに登録することです。 その結果、個人アカウントにアクセスするためのログインとパスワードを受け取ります。 このオフィスのページではAPIについても言及していませんが、インターネット上の善良な人々は次のアドレスを指しています: orders.novaposhta.ua/api.php?todo=api_form 。
やった! ドキュメントとリクエストテストフォームもあります。 ただし、キーも必要です。 ここでも、善良な人々の助けが必要でした-あなたの鍵を見るためには、次のアドレスに行く必要があります: orders.novaposhta.ua/api.php?todo=api_get_key_ajax 。
APIへのアクセスは、Magentoに戻ります。
構成オプションを追加する
URLとAPIキーを構成可能にしましょう。 また、APIを使用するときは、切断されたログを書き込むと便利です。
system.xmlで、次のフィールドを追加します。
<api_url translate="label"> <label>API URL</label> <frontend_type>text</frontend_type> <sort_order>120</sort_order> <show_in_default>1</show_in_default> <show_in_website>0</show_in_website> <show_in_store>0</show_in_store> </api_url> <api_key translate="label"> <label>API key</label> <frontend_type>text</frontend_type> <sort_order>130</sort_order> <show_in_default>1</show_in_default> <show_in_website>0</show_in_website> <show_in_store>0</show_in_store> </api_key> <enable_log translate="label"> <label>Enable log</label> <frontend_type>select</frontend_type> <source_model>adminhtml/system_config_source_yesno</source_model> <sort_order>140</sort_order> <show_in_default>1</show_in_default> <show_in_website>0</show_in_website> <show_in_store>0</show_in_store> </enable_log>
config.xmlでデフォルト値を追加します。
<config> ... <default> <carriers> <novaposhta> ... <api_url>http://orders.novaposhta.ua/xml.php</api_url> <enable_log>0</enable_log> </novaposhta> </carriers> </default> ... </config>
ヘルパーでは、設定値にアクセスする方法とロギング方法を実装します。 モジュールのさまざまな部分で使用されるこのような小さなものは、便利にヘルパーに取り出すことができます。 また、Mage ::ヘルパー( 'novaposhta')がヘルパーのシングルトンを返すことも理解する必要があります。
class Ak_NovaPoshta_Helper_Data extends Mage_Core_Helper_Abstract { protected $_logFile = 'novaposhta.log'; /** * @param $string * * @return Ak_NovaPoshta_Helper_Data */ public function log($string) { if ($this->getStoreConfig('enable_log')) { Mage::log($string, null, $this->_logFile); } return $this; } /** * @param string $key * @param null $storeId * * @return mixed */ public function getStoreConfig($key, $storeId = null) { return Mage::getStoreConfig("carriers/novaposhta/$key", $storeId); } }
DBを準備します
データベースにテーブルを追加します。 これを行うには、Magentoに組み込まれた更新メカニズムを使用します(詳細については、この記事のcodemagento.com/2011/02/altering-the-database-through-setup-scriptsを参照してください)。
最初に、追加するリソースとエンティティについて説明し、novaposhta_setupリソースをconfig.xmlに追加します。
... <global> <models> <novaposhta> <class>Ak_NovaPoshta_Model</class> <resourceModel>novaposhta_resource</resourceModel> </novaposhta> <novaposhta_resource> <class>Ak_NovaPoshta_Model_Resource</class> <entities> <city> <table>novaposhta_city</table> </city> <warehouse> <table>novaposhta_warehouse</table> </warehouse> </entities> <novaposhta_resource> </models> ... <resources> <novaposhta_setup> <setup> <module>Ak_NovaPoshta</module> </setup> </novaposhta_setup> </resources> </global> ...
必要なテーブルを作成するアップグレードスクリプトアプリ/コード/コミュニティ/Ak/NovaPoshta/sql/novaposhta_setup/mysql4-upgrade-1.0.0-1.0.1.phpを追加します。
/* @var $installer Mage_Core_Model_Resource_Setup */ $installer = $this; $installer->startSetup(); $installer->run(" CREATE TABLE {$this->getTable('novaposhta_city')} ( `id` int(10) unsigned NOT NULL, `name_ru` varchar(100), `name_ua` varchar(100), `updated_at` timestamp NOT NULL default CURRENT_TIMESTAMP on update CURRENT_TIMESTAMP, PRIMARY KEY (`id`), INDEX `name_ru` (`name_ru`), INDEX `name_ua` (`name_ua`) ) ENGINE=InnoDB DEFAULT CHARSET=utf8; CREATE TABLE {$this->getTable('novaposhta_warehouse')} ( `id` int(10) unsigned NOT NULL, `city_id` int(10) unsigned NOT NULL, `address_ru` varchar(200), `address_ua` varchar(200), `phone` varchar(100), `weekday_work_hours` varchar(20), `weekday_reseiving_hours` varchar(20), `weekday_delivery_hours` varchar(20), `saturday_work_hours` varchar(20), `saturday_reseiving_hours` varchar(20), `saturday_delivery_hours` varchar(20), `max_weight_allowed` int(4), `longitude` float(10,6), `latitude` float(10,6), `number_in_city` int(3) unsigned NOT NULL, `updated_at` timestamp NOT NULL default CURRENT_TIMESTAMP on update CURRENT_TIMESTAMP, PRIMARY KEY (`id`), CONSTRAINT FOREIGN KEY (`city_id`) REFERENCES `{$this->getTable('novaposhta_city')}` (`id`) ON DELETE CASCADE ON UPDATE CASCADE ) ENGINE=InnoDB DEFAULT CHARSET=utf8; "); $installer->endSetup();
config.xmlでモジュールのバージョンを1.0.1に上げ、キャッシュをクリアし、Magentoを起動すると、データベースにテーブルが作成されているかどうかを確認できます。 作成しました。
モデル、リソース、コレクションを作成する
都市と倉庫のエンティティを追加します。 それらを使用するには、対応するモデルAk_NovaPoshta_Model_CityおよびAk_NovaPoshta_Model_Warehouseを作成する必要があります。 データベースに保存するために、Ak_NovaPoshta_Model_Resource_CityおよびAk_NovaPoshta_Model_Resource_Warehouseリソースを作成します。 擬似コンストラクターのモデルクラスのリソースにモデルを接続するには、パラメーターとしてリソースクラスのエイリアスを指定して_init()メソッドを呼び出します。
class Ak_NovaPoshta_Model_City extends Mage_Core_Model_Abstract { public function _construct() { $this->_init('novaposhta/city'); } … }
リソース内で、データベーステーブルのエイリアスとプライマリキーフィールドの名前を渡すリソース上で_init()を呼び出します。
class Ak_NovaPoshta_Model_Resource_City extends Mage_Core_Model_Resource_Db_Abstract { public function _construct() { $this->_init('novaposhta/city', 'id'); } }
また、Ak_NovaPoshta_Model_Resource_City_CollectionおよびAk_NovaPoshta_Model_Resource_Warehouse_Collectionコレクションを追加します。 _init()メソッドの呼び出しでは、モデルのエイリアスを渡します。 Ak_NovaPoshta_Model_Resource_City_Collectionの例:
class Ak_NovaPoshta_Model_Resource_City_Collection extends Mage_Core_Model_Resource_Db_Collection_Abstract { public function _construct() { $this->_init('novaposhta/city'); } }
APIクライアントモデル
Ak_NovaPoshta_Model_Api_Clientモデルを作成してみましょう。これにより、APIを操作するロジックが非表示になります。 クライアントコード: github.com/alexkuk/Ak_NovaPoshta/blob/master/app/code/community/Ak/NovaPoshta/Model/Api/Client.php
新しく作成されたクライアントには、2つのパブリックメソッドがあります。getCityWarehouses()は、New Mailのオフィスがある都市を返し、getWarehouses()は、ウクライナ全体の倉庫のリストを返します。 データはSimpleXMLElementオブジェクトとして返されます。
インポート
Ak_NovaPoshta_Model_Importモデルを追加します: github.com/alexkuk/Ak_NovaPoshta/blob/master/app/code/community/Ak/NovaPoshta/Model/Import.php インポートプロセスを詳細に説明することは意味がありません。 いくつかのことだけを説明します。
2つの配列$ _dataMapCityおよび$ _dataMapWarehouseを追加しました。これらの配列は、APIによって返されたフィールド名をデータベース内のフィールド名に関連付けます。 APIから応答を受け取った後、_applyMap()メソッドを使用して、必要なフォームに応答をもたらします。
$cities = $this->_applyMap($cities, $this->_dataMapCity);
インポート時にデータベースにデータを書き込むために、CityおよびWarehouseモデルを使用せず、SQLクエリを直接分割して実行します。 core_writeリソースを使用してリクエストを実行します。
/** * @return Varien_Db_Adapter_Interface */ protected function _getConnection() { return Mage::getSingleton('core/resource')->getConnection('core_write'); }
インポートモデルをテストするために、Magentoのルートにtest.phpスクリプトをドロップしました。 その中で、Mage :: app()メソッドを呼び出してMagentoを初期化します。その後、Mageファクトリを使用できます。
require 'app/Mage.php'; Mage::app('default'); Mage::getModel('novaposhta/import')->runWarehouseAndCityMassImport();
CRONによるインポートを開始
インポートの準備ができてデバッグされました。CRONに従って定期的に実行するのがいいでしょう。 Magentoには独自のCRONサブシステムがあります。 たとえば、 www.magentocommerce.com / wiki / 1 _-_ installation_and_configuration / how_to_setup_a_cron_jobで読むことができます 。 簡単に言うと、使い慣れたUnix cronにcronジョブを追加します。cronジョブはcron.phpまたはcron.shスクリプトを実行し、CRON Magentoサブシステムを起動します。 この呼び出しの一部として、config.xmlを通じてモジュールによって追加されたすべてのタスクが実行されます。
そのため、config.xmlにタスクを追加します。
<crontab> <jobs> <novaposhta_import_city_and_warehouse> <schedule> <cron_expr>1 2 * * *</cron_expr> </schedule> <run> <model>ak_novaposhta/import::runWarehouseAndCityMassImport</model> </run> </novaposhta_import_city_and_warehouse> </jobs> </crontab>
ウェアハウステーブルを管理パネルに追加します
上の図のようにグリッドを作成するには、ブロックの2つのクラスが必要です。グリッドのコンテナのクラスとグリッド自体のクラスです。 Mage_Adminhtml_Block_Widget_Grid_Containerから継承されたコンテナは、ボタンの外観と動作を決定し、Mage_Adminhtml_Block_Widget_Gridグリッド自体も表示します。
ああ、まだコントローラーが必要です:)
Ak_NovaPoshta_Block_Adminhtml_Warehouses:
class Ak_NovaPoshta_Block_Adminhtml_Warehouses extends Mage_Adminhtml_Block_Widget_Grid_Container { public function __construct() { // $this->_blockGroup $this->_controller , _prepareLayout() (novaposhta/adminhtml_warehouses). _prepareLayout(). $this->_blockGroup = 'novaposhta'; $this->_controller = 'adminhtml_warehouses'; this->_headerText = $this->__('Manage warehouses'); parent::__construct(); // add, , $this->_removeButton('add'); // , $this->_addButton('synchronize', array( 'label' => $this->__('Synchronize with API'), 'onclick' => 'setLocation(\'' . $this->getUrl('*/*/synchronize') .'\')' )); } }
グリッドクラス:
class Ak_NovaPoshta_Block_Adminhtml_Warehouses_Grid extends Mage_Adminhtml_Block_Widget_Grid { public function __construct() { parent::__construct(); $this->setDefaultSort('city_id'); $this->setId('warehousesGrid'); $this->setDefaultDir('asc'); $this->setSaveParametersInSession(true); } protected function _prepareCollection() { /** @var $collection Ak_NovaPoshta_Model_Resource_Warehouse_Collection */ $collection = Mage::getModel('novaposhta/warehouse') ->getCollection(); $this->setCollection($collection); return parent::_prepareCollection(); } protected function _prepareColumns() { // $this->addColumn('id', array( 'header' => $this->__('ID'), 'align' =>'right', 'width' => '50px', 'index' => 'id' ) ); $this->addColumn('address_ru', array( 'header' => $this->__('Address (ru)'), 'index' => 'address_ru' ) ); $this->addColumn('city_id', array( 'header' => $this->__('City'), 'index' => 'city_id', 'type' => 'options', // City “” 'options' => Mage::getModel('novaposhta/city')->getOptionArray() ) ); $this->addColumn('phone', array( 'header' => $this->__('Phone'), 'index' => 'phone' ) ); $this->addColumn('max_weight_allowed', array( 'header' => $this->__('Max weight'), 'index' => 'max_weight_allowed' ) ); return parent::_prepareColumns(); } // false - public function getRowUrl($row) { return false; } }
これでコントローラー。 コントローラーは管理パネル用であるため、Mage_Adminhtml_Controller_Actionを継承します。
class Ak_NovaPoshta_WarehousesController extends Mage_Adminhtml_Controller_Action { /** * */ public function indexAction() { $this->_title($this->__('Sales'))->_title($this->__('Nova Poshta Warehouses')); $this->_initAction() ->_addContent($this->getLayout()->createBlock('novaposhta/adminhtml_warehouses')) ->renderLayout(); return $this; } /** * */ public function synchronizeAction() { try { Mage::getModel('novaposhta/import')->runWarehouseAndCityMassImport(); // , success message $this->_getSession()->addSuccess($this->__('City and Warehouse API synchronization finished')); } catch (Exception $e) { // , error message $this->_getSession()->addError($this->__('Error during synchronization: %s', $e->getMessage())); } // $this->_redirect('*/*/index'); return $this; } /** * Initialize action * * @return Ak_NovaPoshta_WarehousesController */ protected function _initAction() { $this->loadLayout() ->_setActiveMenu('sales/novaposhta/warehouses') ->_addBreadcrumb($this->__('Sales'), $this->__('Sales')) ->_addBreadcrumb($this->__('Nova Poshta Warehouses'), $this->__('Nova Poshta Warehouses')) ; return $this; } }
しかし、それだけではありません。 まず、Magentoがコントローラーを見つけることができるように、config.xmlにルートを追加する必要があります。
<config> ... <admin> <routers> <novaposhta> <use>admin</use> <args> <module>Ak_NovaPoshta</module> <frontName>novaposhta</frontName> </args> </novaposhta> </routers> </admin> ... </config>
次に、管理メニューにアイテムを追加し、ACLに追加する必要があります。 これらすべてをadminhtml.xmlに入力します。
<?xml version="1.0"?> <config> <menu> <sales> <children> <novaposhta translate="title" module="novaposhta"> <sort_order>200</sort_order> <title>Nova Poshta</title> <children> <warehouses translate="title" module="novaposhta"> <sort_order>10</sort_order> <title>Warehouses</title> <action>novaposhta/warehouses/</action> </warehouses> </children> </novaposhta> </children> </sales> </menu> <acl> <resources> <admin> <children> <sales> <children> <novaposhta translate="title" module="novaposhta"> <title>Nova Poshta</title> <sort_order>200</sort_order> <children> <warehouses translate="title" module="novaposhta"> <sort_order>10</sort_order> <title>Warehouses</title> </warehouses> </children> </novaposhta> </children> </sales> </children> </admin> </resources> </acl> </config>
完了
同期があり、倉庫を表示するためのかなり便利なインターフェースがあります。 次のタスクは、注文の配送方法ステップで選択する便利な形式で新規メールデポを表示することです。デフォルトでは、ユーザーの都市のデポのみを表示します。
私はコメント、質問、提案に喜んでいます:)
PS有用なコメントをしてくれたユーザーkokocに感謝します。 データベーステーブルの構造を操作するには、アップグレードスクリプトでVarien_Db_Ddl_Tableを使用することをお勧めします。 私は怠けすぎて熱くなりました:) SQLクエリの形式で記録する方が読みやすいようですが、抽象化がより重要です。