この記事では、Cisco電話と正しく連携してBLFステータスを表示するようにアスタリスクを学習します。
理論
アスタリスクコンソールでコマンドを入力します。
asterisk*CLI> core show hints -= Registered Asterisk Dial Plan Hints =- 1196@ext-local : SIP/1196 State:Ringing Watchers 3 1188@ext-local : SIP/1188 State:InUse Watchers 3 5030@ext-local : SIP/5030 State:Idle Watchers 1
状態列には、実際には、回線の状態、Watchers-この回線のリスナーの数が表示されます。 回線の状態が変わると、アスタリスクは電話にメッセージを送信し、電話は表示をオンにします。 アスタリスクでのBLFのパフォーマンスは、最初に、たとえばDrayTek SoftPhoneなどのソフトフォンで確認できます。 連絡先を追加すると、回線がビジー表示されます。 デフォルトでは、アスタリスクはCisco電話が読み取れないメッセージを送信するため、BLFはメッセージを処理しません。
パッチアスタリスクのソースコード
パッチをダウンロードしてください: issues.asterisk.org/jira/secure/attachment/32739/cisco-blf-asterisk.1.8.0.patch
このパッチをインストールすると、アスタリスクはコンパイルされません。
パッチには小さなタイプミスがあり、修正する必要があります。
23行目で、 switch(state) fix to switch(data-> state) ;
40行目でdata-> stateの 状態を修正。
60行目でデータを修正。
66行目でデータを修正。
次に、アスタリスクのソースをフォルダー(たとえば、/ usr / src / asterisk)にコピーします。
チャンネルフォルダーにパッチを置き、すぐに、たとえばpatchで名前を変更します。
コマンドを実行します。
patch chan_sip.c patch
「パッチするファイル」のリクエストで、sip.hが配置されているパスを入力します(通常はinclude / sip / sip.hにあります)。
アスタリスクがインストールされている場合は、削除する必要があります。 これを行うには、アスタリスクを停止します。
service asterisk stop
アスタリスクを削除します。
yum remove asterisk
アスタリスクをインストールする前に、ソースをコンパイルするためのすべてのモジュール、特にgcc、gcc-c ++、kernel-devel、ncurses-devel、openssl-devel、m2crypto、libssl-develをインストールする必要があります。
次に行うこと:
./configure make menuselect -- make make install
以下を開始します。
asterisk start
これはアスタリスクで終わりました。
電話設定ファイルの構成
config.file
<?xml version="1.0" encoding="UTF-8"?> <device xsi:type="axl:XIPPhone" ctiid="94"> <fullConfig>true</fullConfig> <deviceProtocol>SIP</deviceProtocol> <sshUserId>cisco</sshUserId> <sshPassword>cisco</sshPassword> <devicePool> <dateTimeSetting> <dateTemplate>YMD</dateTemplate> <timeZone>Central Asia Standard Time</timeZone> <ntps> <ntp> <name>PBX-IP Address</name> <ntpMode>Unicast</ntpMode> </ntp> </ntps> </dateTimeSetting> <callManagerGroup> <members> <member priority="0"> <callManager> <ports> <ethernetPhonePort>2000</ethernetPhonePort> <sipPort>5060</sipPort> <securedSipPort>5061</securedSipPort> </ports> <processNodeName>PBX-IP Address</processNodeName> </callManager> </member> </members> </callManagerGroup> <srstInfo> <srstOption>Disable</srstOption> <ipAddr1></ipAddr1> <port1>2000</port1> <ipAddr2></ipAddr2> <port2>2000</port2> <ipAddr3></ipAddr3> <port3>2000</port3> <sipIpAddr1></sipIpAddr1> <sipPort1>5060</sipPort1> <sipIpAddr2></sipIpAddr2> <sipPort2>5060</sipPort2> <sipIpAddr3></sipIpAddr3> <sipPort3>5060</sipPort3> <isSecure>false</isSecure> </srstInfo> <connectionMonitorDuration>120</connectionMonitorDuration> </devicePool> <sipProfile> <sipProxies> <backupProxy></backupProxy> <backupProxyPort></backupProxyPort> <emergencyProxy></emergencyProxy> <emergencyProxyPort></emergencyProxyPort> <outboundProxy></outboundProxy> <outboundProxyPort></outboundProxyPort> <registerWithProxy>true</registerWithProxy> </sipProxies> <sipCallFeatures> <cnfJoinEnabled>true</cnfJoinEnabled> <callForwardURI>x-cisco-serviceuri-cfwdall</callForwardURI> <callPickupURI>x-cisco-serviceuri-pickup</callPickupURI> <callPickupListURI>x-cisco-serviceuri-opickup</callPickupListURI> <callPickupGroupURI>x-cisco-serviceuri-gpickup</callPickupGroupURI> <meetMeServiceURI>x-cisco-serviceuri-meetme</meetMeServiceURI> <abbreviatedDialURI>x-cisco-serviceuri-abbrdial</abbreviatedDialURI> <rfc2543Hold>false</rfc2543Hold> <callHoldRingback>2</callHoldRingback> <localCfwdEnable>true</localCfwdEnable> <semiAttendedTransfer>true</semiAttendedTransfer> <anonymousCallBlock>2</anonymousCallBlock> <callerIdBlocking>2</callerIdBlocking> <dndControl>0</dndControl> <remoteCcEnable>true</remoteCcEnable> <retainForwardInformation>false</retainForwardInformation> </sipCallFeatures> <sipStack> <sipInviteRetx>6</sipInviteRetx> <sipRetx>10</sipRetx> <timerInviteExpires>180</timerInviteExpires> <timerRegisterExpires>3600</timerRegisterExpires> <timerRegisterDelta>5</timerRegisterDelta> <timerKeepAliveExpires>120</timerKeepAliveExpires> <timerSubscribeExpires>120</timerSubscribeExpires> <timerSubscribeDelta>5</timerSubscribeDelta> <timerT1>500</timerT1> <timerT2>4000</timerT2> <maxRedirects>70</maxRedirects> <remotePartyID>true</remotePartyID> <userInfo>None</userInfo> </sipStack> <autoAnswerTimer>1</autoAnswerTimer> <autoAnswerAltBehavior>false</autoAnswerAltBehavior> <autoAnswerOverride>true</autoAnswerOverride> <transferOnhookEnabled>false</transferOnhookEnabled> <enableVad>false</enableVad> <preferredCodec>none</preferredCodec> <dtmfAvtPayload>101</dtmfAvtPayload> <dtmfDbLevel>3</dtmfDbLevel> <dtmfOutofBand>avt</dtmfOutofBand> <kpml>3</kpml> <alwaysUsePrimeLine>false</alwaysUsePrimeLine> <alwaysUsePrimeLineVoiceMail>false</alwaysUsePrimeLineVoiceMail> <phoneLabel></phoneLabel> <stutterMsgWaiting>2</stutterMsgWaiting> <callStats>true</callStats> <offhookToFirstDigitTimer>15000</offhookToFirstDigitTimer> <silentPeriodBetweenCallWaitingBursts>10</silentPeriodBetweenCallWaitingBursts> <disableLocalSpeedDialConfig>false</disableLocalSpeedDialConfig> <poundEndOfDial>false</poundEndOfDial> <startMediaPort>16384</startMediaPort> <stopMediaPort>32766</stopMediaPort> <sipLines> <line button="1" lineIndex="1"> <featureID>9</featureID> <proxy>USECALLMANAGER</proxy> <port>5060</port> <autoAnswer> <autoAnswerEnabled>2</autoAnswerEnabled> </autoAnswer> <callWaiting>3</callWaiting> <sharedLine>false</sharedLine> <messageWaitingLampPolicy>3</messageWaitingLampPolicy> <messagesNumber></messagesNumber> <ringSettingIdle>4</ringSettingIdle> <ringSettingActive>5</ringSettingActive> <forwardCallInfoDisplay> <callerName>true</callerName> <callerNumber>false</callerNumber> <redirectedNumber>false</redirectedNumber> <dialedNumber>true</dialedNumber> </forwardCallInfoDisplay> <!-- ***************************** --> <featureLabel>LineName 5037</featureLabel> <displayName>LineName</displayName> <name>5037</name> <authName>5037</authName> <authPassword>password</authPassword> </line> <line button="2"> <featureID>21</featureID> <featureLabel>Description</featureLabel> <speedDialNumber>Directory Number</speedDialNumber> </line> </sipLines> <externalNumberMask></externalNumberMask> <!-- ***************************** --> <voipControlPort>5060</voipControlPort> <dscpForAudio>184</dscpForAudio> <ringSettingBusyStationPolicy>0</ringSettingBusyStationPolicy> <dialTemplate>dialplan.xml</dialTemplate> </sipProfile> <commonProfile> <phonePassword></phonePassword> <backgroundImageAccess>true</backgroundImageAccess> <callLogBlfEnabled>1</callLogBlfEnabled> </commonProfile> <vendorConfig> <disableSpeaker>false</disableSpeaker> <disableSpeakerAndHeadset>false</disableSpeakerAndHeadset> <forwardingDelay>1</forwardingDelay> <pcPort>0</pcPort> <settingsAccess>1</settingsAccess> <garp>0</garp> <voiceVlanAccess>0</voiceVlanAccess> <videoCapability>0</videoCapability> <autoSelectLineEnable>0</autoSelectLineEnable> <webAccess>1</webAccess> <daysDisplayNotActive>1,7</daysDisplayNotActive> <displayOnTime>09:00</displayOnTime> <displayOnDuration>12:00</displayOnDuration> <displayIdleTimeout>01:00</displayIdleTimeout> <spanToPCPort>1</spanToPCPort> <loggingDisplay>2</loggingDisplay> <loadServer>10.1.96.31</loadServer> <recordingTone>0</recordingTone> <recordingToneLocalVolume>100</recordingToneLocalVolume> <recordingToneRemoteVolume>50</recordingToneRemoteVolume> <recordingToneDuration></recordingToneDuration> <displayOnWhenIncomingCall>0</displayOnWhenIncomingCall> <rtcp>0</rtcp> <moreKeyReversionTimer>5</moreKeyReversionTimer> <autoCallSelect>1</autoCallSelect> <logServer>10.1.96.31</logServer> <g722CodecSupport>0</g722CodecSupport> <headsetWidebandUIControl>0</headsetWidebandUIControl> <handsetWidebandUIControl>0</handsetWidebandUIControl> <headsetWidebandEnable>0</headsetWidebandEnable> <handsetWidebandEnable>0</handsetWidebandEnable> <peerFirmwareSharing>0</peerFirmwareSharing> <enableCdpSwPort>1</enableCdpSwPort> <enableCdpPcPort>1</enableCdpPcPort> </vendorConfig> <versionStamp>1200501729-ee9247c4-1a10-481c-8fdc-612737c5aadd</versionStamp> <deviceSecurityMode>1</deviceSecurityMode> <idleTimeout>0</idleTimeout> <authenticationURL></authenticationURL> <directoryURL></directoryURL> <idleURL></idleURL> <informationURL></informationURL> <messagesURL></messagesURL> <proxyServerURL></proxyServerURL> <servicesURL></servicesURL> <dscpForSCCPPhoneConfig>96</dscpForSCCPPhoneConfig> <dscpForSCCPPhoneServices>0</dscpForSCCPPhoneServices> <dscpForCm2Dvce>96</dscpForCm2Dvce> <transportLayerProtocol>2</transportLayerProtocol> <singleButtonBarge>0</singleButtonBarge> <capfAuthMode>0</capfAuthMode> <capfList> <capf> <phonePort>3804</phonePort> <processNodeName>PBX-ip-address</processNodeName> </capf> </capfList> <certHash></certHash> <encrConfig>false</encrConfig> <advertiseG722Codec>1</advertiseG722Codec> </device>
BLFを扱うための主要なラインを考えてみましょう
<line button="2"> <featureID><b>21</b></featureID> <featureLabel>Description</featureLabel> <speedDialNumber>Directory Number</speedDialNumber> </line>
featureID 21は、この電話番号に対してBLFを使用する必要があることを意味します。
/etc/asterisk/sip_general_additional.confファイルで、次の行を追加または変更します(ある場合)。
allowsubscribe=yes notifyhold=yes callcounter=yes notifyringing=yes limitonpeers=yes buggymwi=yes
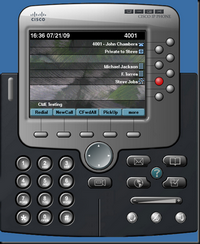
中古デバイス
次のデバイスを使用して、BLFを整理しました。
電話:Cisco 7961、7962、FreePBX 2.0.2、アスタリスク1.8.11。