
habrは既にAndroidのステータスバーに通知に関する記事を持っています。 ステータスバーに標準の構成可能なレイアウトを表示する基本について説明します。
以下では、前述の説明に加えて、進行状況バーの追加、通知をクリックしてイベントを処理、通知状態のさまざまなオプションを検討します。 先日、互換性ライブラリNotification.Builderに追加されたものを検討してください。 また、UIの推奨事項( 設計ガイドライン )についても説明します。Googleは、通知を作成する際に従うことを推奨しています。
ガイドライン
Android開発者が公式ガイドラインでアドバイスしているように
通知を表示するタイミング:
- ダイアログで画面をブロックしたり、通知画面に切り替えたりして、ユーザーの注意をそらしたくない場合に通知を表示します。 ユーザーの注意をそらすことはありませんが、通知の内容をいつでも見つける機会を奪うことはありません。
- ほとんどの場合、通知は自然にポップアップ表示されませんが、ユーザーがアプリケーションからの反応を期待しているときに表示されます。
- 通知は主に時間依存のイベントを反映する必要があります。 カレンダーイベント、受信メッセージ、ソーシャルネットワークからのリクエストなど。
通知を表示しない場合:
- 重要ではない擬似時間依存イベントの通知を表示する必要はありません。 たとえば、ソーシャルネットワークからのニュース。
- アプリケーションUIにすでに表示されているものを表示する必要はありません。
- データベースへのアクセスなど、低レベルの操作の進行状況を表示しないでください。
- アプリケーションがエラー自体を迅速に修正する場合、特に通知でこのエラーを表示する必要はありません。
- ユーザーが制御できないサービスに関する通知を表示しません。
- 悪いアプローチは、アイコンと名前を常に表示しながら、アプリケーションについてユーザーに思い出させるために、大量の通知を作成することです。
良い習慣:
- 通知をクリックすると、ユーザーは対応するアプリケーション画面を開く必要があります。 場合によっては、クリックして通知を削除するだけで十分です。
- 通知でイベントの時間を指定することも良い方法です。
- 同様のイベントを1つの通知に追加し、イベントごとに独自のイベントを表示しないことをお勧めします。
- ユーザーが既に適切なアクションを読み、実行した通知をステータスバーから常に削除します。
- 最小化されたステータスバーに作成された通知の小さなプレビューを表示します
- ユーザーがアプリケーション設定で通知をオフにできるようにします。
- アイコンを使用して、通知が特定のアプリケーションに属するかどうかを示します。 アイコンはモノクロになります。 これを行うには、特別なオンラインエディターを使用することをお勧めします
- イベントで直接的なユーザー応答が必要な場合は、通知ではなくダイアログを使用します。
アーキテクチャ:
通知を担当するユーティリティとして、私はアプリケーションでシングルトンを使用します。これは、任意のアプリケーションクラスからアクセスできます 。 コンテキストへのリンクが必要なだけです。
アプリケーションの操作中に作成されたすべての通知へのリンクが常に保存されますが、これらは引き続きステータスバーに表示されます。
また、一意のIDを新しい通知に割り当てるには、プライベート整数フィールドにアクセスするための単純なメカニズムが使用されます。このメカニズムは、毎回1ずつ増加します。
public class NotificationUtils {
private static final String TAG = NotificationUtils. class .getSimpleName();
private static NotificationUtils instance;
private static Context context;
private NotificationManager manager; // ,
private int lastId = 0; // ,
private HashMap<Integer, Notification> notifications; // -
// Singleton
private NotificationUtils(Context context){
this .context = context;
manager = (NotificationManager) context.getSystemService(Context.NOTIFICATION_SERVICE);
notifications = new HashMap<Integer, Notification>();
}
/**
*
*/
public static NotificationUtils getInstance(Context context){
if(instance== null ){
instance = new NotificationUtils(context);
} else{
instance.context = context;
}
return instance;
}
* This source code was highlighted with Source Code Highlighter .
NotificationCompat.Builderを使用して通知を作成します。
互換性ライブラリに含まれるクラスを利用するには、ライブラリを/extras/android/support/v4/android-support-v4.jarフォルダーからプロジェクトに追加する必要があります
プロジェクトがAndroid 3.0以降を対象としている場合、何も追加する必要はありません。Notification.Builderを参照してください。
public int createInfoNotification( String message){
Intent notificationIntent = new Intent(context, HomeActivity. class ); // HomeActivity
NotificationCompat.Builder nb = new NotificationCompat.Builder(context)
//NotificationCompat.Builder nb = new NotificationBuilder(context) // Android > 3.0
.setSmallIcon(R.drawable.ic_action_picture) //
.setAutoCancel( true ) //
.setTicker(message) //, -
.setContentText(message) //
.setContentIntent(PendingIntent.getActivity(context, 0, notificationIntent, PendingIntent.FLAG_CANCEL_CURRENT))
.setWhen(System.currentTimeMillis()) //
.setContentTitle( "AppName" ) //
.setDefaults(Notification.DEFAULT_ALL); // ,
Notification notification = nb.getNotification(); //
manager.notify(lastId, notification); // .
notifications.put(lastId, notification); // id
return lastId++;
}
* This source code was highlighted with Source Code Highlighter .
カスタムレイアウト通知(カスタムレイアウト)を作成します。
/**
*
* @param fileName - , .
*/
public int createDownloadNotification( String fileName){
String text = context.getString(R. string .notification_downloading).concat( " " ).concat(fileName); //
RemoteViews contentView = createProgressNotification(text, context.getString(R. string .notification_downloading)); //View
contentView.setImageViewResource(R.id.notification_download_layout_image, R.drawable.ic_stat_example); //
return lastId++; // id,
}
/**
* ProgressBar,
*
* @param text
* @param topMessage , -
* @return View .
*/
private RemoteViews createProgressNotification( String text, String topMessage) {
Notification notification = new Notification(R.drawable.ic_stat_example, topMessage, System.currentTimeMillis());
RemoteViews contentView = new RemoteViews(context.getPackageName(), R.layout.notification_download_layout);
contentView.setProgressBar(R.id.notification_download_layout_progressbar, 100, 0, false );
contentView.setTextViewText(R.id.notification_download_layout_title, text);
notification.contentView = contentView;
notification.flags = Notification.FLAG_NO_CLEAR | Notification.FLAG_ONGOING_EVENT | Notification.FLAG_ONLY_ALERT_ONCE;
Intent notificationIntent = new Intent(context, NotificationUtils. class );
PendingIntent contentIntent = PendingIntent.getActivity(context, 0, notificationIntent, 0);
notification.contentIntent = contentIntent;
manager.notify(lastId, notification);
notifications.put(lastId, notification);
return contentView;
}
notification_download_layout.xml:
<? xml version ="1.0" encoding ="utf-8" ? >
< LinearLayout xmlns:android ="http://schemas.android.com/apk/res/android"
android:layout_width ="fill_parent"
android:layout_height ="65sp"
android:padding ="10dp"
android:orientation ="vertical" >
< LinearLayout
android:layout_width ="fill_parent"
android:layout_height ="wrap_content"
android:orientation ="horizontal" >
< ImageView
android:id ="@+id/notification_download_layout_image"
android:layout_width ="wrap_content"
android:layout_height ="wrap_content"
android:src ="@drawable/ic_stat_example"
android:layout_gravity ="center_vertical" />
< TextView
android:id ="@+id/notification_download_layout_title"
style ="@style/NotificationTitle"
android:layout_width ="wrap_content"
android:layout_height ="wrap_content"
android:layout_alignParentTop ="true"
android:layout_marginLeft ="10dip"
android:singleLine ="true"
android:text ="notification_download_layout_title"
android:layout_gravity ="center_vertical" />
</ LinearLayout >
< ProgressBar
android:id ="@+id/notification_download_layout_progressbar"
style ="?android:attr/progressBarStyleHorizontal"
android:layout_width ="fill_parent"
android:layout_height ="wrap_content"
android:layout_marginTop ="4dp"
android:progress ="0" />
</ LinearLayout >
Android 2.3以降(API> 10)では、システムテーマが通知テキストの色を示す特別なリソースが作成されました。 このため、古いバージョンでは松葉杖を使用する必要があります。
ファイルres / values / styles.xmlに次のように記述します。
<? xml version ="1.0" encoding ="utf-8" ? >
< resources >
< style name ="NotificationText" >
< item name ="android:textColor" > ?android:attr/textColorPrimary </ item >
</ style >
< style name ="NotificationTitle" >
< item name ="android:textColor" > ?android:attr/textColorPrimary </ item >
< item name ="android:textStyle" > bold </ item >
</ style >
</ resources >
API> 10をサポートするには、ファイルres / values-v9 / styles.xmlを作成し、次のように入力します。
<? xml version ="1.0" encoding ="utf-8" ? >
< resources >
< style name ="NotificationText" parent ="android:TextAppearance.StatusBar.EventContent" />
< style name ="NotificationTitle" parent ="android:TextAppearance.StatusBar.EventContent.Title" />
</ resources >
次に、アプリケーションのコードから、ユーティリティに目を向けます。
NotificationUtils n = NotificationUtils.getInstance(getActivity());
n.createInfoNotification( "info notification" );
進行状況バー付きの通知を作成します。
int pbId = NotificationUtils.getInstance(getActivity()).createDownloadNotification( "downloading video" );
そして、スレッドが実行されている間、次の呼び出しによって進捗を常に更新します。
NotificationUtils.getInstance(getActivity()).updateProgress(pbId, YOUR_PROGRESS);
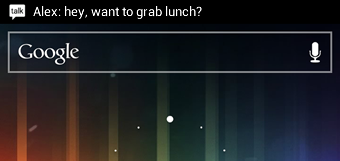
その結果、以下が得られます。

ご覧のとおり、ビルダーを使用して作成した下位の通知はいつでも削除できます。 進行状況バー付きの通知は、通知の上部ブロックにあり、ユーザーは通知をクリアできません。
そして最後に、ちょっとしたトリック:
同じアクティビティのスタックでの複製を望まない場合-マニフェストに目的のアクティビティを入れます
android:launchMode="singleTop"