スライド形式での通常のプレゼンテーションとの違いは、コンテンツのキャンバスのように、コンテンツがある領域から別の領域への移動が、移動、ズーム、回転によって発生する無地の背景の存在です。
そのため、.NETとWPFで同様のことを行っています。 個人的に、私はVB.NETが好きです(おそらく、C#で行全体を占める{...}の欠如が原因です)。
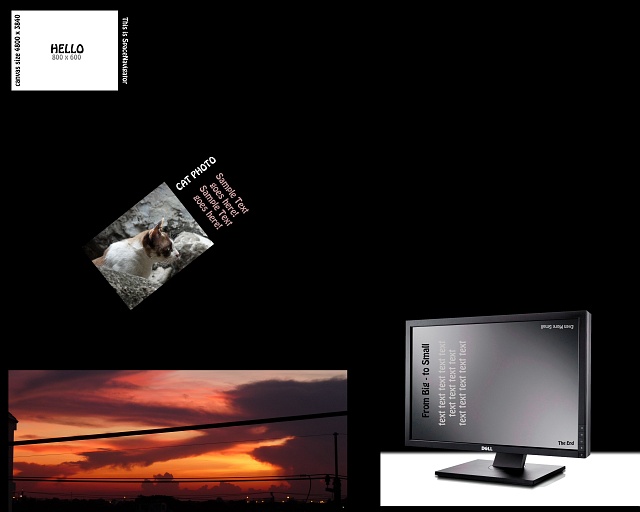
必須:VisualStudio、Framework 4、および4800x3800などの健康的な画像をPhotoshopでいくつかのコンテンツとともに描画します(PowerPointエクスポートでスライドをいくつか貼り付けることができます):
VisualStudioで空のWPFプロジェクトを作成し、次の項目を「フォーム」に追加します。
シェイプ拡張機能を備えたImageBg背景画像、非表示のバーを備えたScrollViewerコンポーネント、および拡張機能を持たない別のImage1画像。
<Grid Name="Grid1"> <Image Name="ImageBg" Stretch="Fill"/> <ScrollViewer HorizontalScrollBarVisibility="Hidden" VerticalScrollBarVisibility="Hidden"> <Image Name="Image1" Stretch="None"/> </ScrollViewer> </Grid>
変数を設定します。
' Dim base_dir As String = System.AppDomain.CurrentDomain.BaseDirectory() ' Dim trTranslate As New TranslateTransform ' Dim trRotate As New RotateTransform ' Dim trScale As New ScaleTransform ' (- ) Dim stp As Integer = 0 '- Dim stp_count As Integer = 0 ' Dim ease As New PowerEase ' (, , ) Dim init_s, init_a As Double Dim init_x, init_y As Integer ' (, , ) Dim new_z(99) As Double Dim new_a(99) As Double Dim new_x(99) As Double Dim new_y(99) As Double Dim new_t(99) As Double
Window_Loadedで画像をプリロードします。
ImageBg.Source = New BitmapImage(New Uri(base_dir + "bg.jpg"))
Image1.Source = New BitmapImage(New Uri(base_dir + "content.jpg"))
背景(たとえば、黒)とcontent.jpgを含むファイルbg.jpgは、Debugフォルダーに配置する必要があります。
コンテンツに.png透明度マスクを追加することもできますが、これまでのところこれは不要です。
そこで、画像を読み込んだ後、変換パラメータを規定します。
Dim transf_grp As New TransformGroup
transf_grp.Children.Add(trTranslate)
transf_grp.Children.Add(trRotate)
transf_grp.Children.Add(trScale)
Image1.RenderTransform = transf_grp
つまり 3つの異なるタイプの変換を含む変換グループが作成されます。
コンテンツの初期状態を設定して、大きな画像が小さなギャップで画面に収まるようにします(人間ではこれはStretchプロパティとMarginプロパティによって行われますが、この場合は変換によって必要です)。
init_s = Math.Round(Grid1.ActualWidth / (Image1.Source.Width + 50), 2)
init_a = 0
init_x = 50
init_y = (Grid1.ActualHeight - (Image1.Source.Height) * init_s) * 2
trScale.ScaleX = init_s
trScale.ScaleY = init_s
trRotate.Angle = init_a
trTranslate.X = init_x
trTranslate.Y = init_y
ファイルからステップリストを読み込む:
If File.Exists(base_dir + "loc.ini") Then
Dim oRead As System.IO.StreamReader = File.OpenText(base_dir + "loc.ini")
Dim data(99) As String
Dim i As Integer = 0
Do While oRead.Peek >= 0
i += 1
data(i) = oRead.ReadLine()
Dim param() As String = data(i).Split(",")
new_z(i) = CDbl(param(0))
new_a(i) = CDbl(param(1))
new_x(i) = CDbl(param(2))
new_y(i) = CDbl(param(3))
new_t(i) = CDbl(param(4))
If new_z(i) <> 0 Then stp_count += 1
Loop
oRead.Close()
End If
ファイル構造:各行は新しいステップであり、その行にはコンマで区切られた5つのパラメーターがあります(スケール、角度、xおよびy座標、移動時間)
ステップ間を移動するための処理を追加します。
Private Sub NavigationStep()
Dim Z_anim As New DoubleAnimation(trScale.ScaleX, new_z(stp), TimeSpan.FromSeconds(new_t(stp)))
Dim A_anim As New DoubleAnimation(trRotate.Angle, new_a(stp), TimeSpan.FromSeconds(new_t(stp) / 2))
Dim X_anim As New DoubleAnimation(trTranslate.X, new_x(stp), TimeSpan.FromSeconds(new_t(stp)))
Dim Y_anim As New DoubleAnimation(trTranslate.Y, new_y(stp), TimeSpan.FromSeconds(new_t(stp)))
ease.EasingMode = EasingMode.EaseInOut
Z_anim.EasingFunction = ease
A_anim.EasingFunction = ease
X_anim.EasingFunction = ease
Y_anim.EasingFunction = ease
trScale.BeginAnimation(ScaleTransform.ScaleXProperty, Z_anim)
trScale.BeginAnimation(ScaleTransform.ScaleYProperty, Z_anim)
trRotate.BeginAnimation(RotateTransform.AngleProperty, A_anim)
trTranslate.BeginAnimation(TranslateTransform.XProperty, X_anim)
trTranslate.BeginAnimation(TranslateTransform.YProperty, Y_anim)
End Sub
スケール、角度、座標のアニメーションは4つだけです(もちろん、変数はコードの純度のために事前に設定できますが、これもほぼコンパクトです)。
実際、それは本質的にすべてです。
テキストファイルloc.iniに一連の手順を記述することは、たとえば次のとおりです。
1.5,0,-70,-40,1.5
2,-100,-1200,-100,2
3,85,110,-640,1
4,35,-735,-1800,0.5
そして、コード内のステップ間の切り替えをアクティブにします。
Private Sub Image1_MouseUp(ByVal sender As System.Object, ByVal e As System.Windows.Input.MouseButtonEventArgs) Handles Image1.MouseUp
If Not setup_mode And Not sel_mode Then
If e.GetPosition(Grid1).X < Grid1.ActualWidth / 2 Then
stp -= 1
If stp <= 0 Then stp = stp_count
NavigationStep()
End If
If e.GetPosition(Grid1).X >= Grid1.ActualWidth / 2 Then
stp += 1
If stp = stp_count + 1 Then stp = 1
NavigationStep()
End If
End If
End Sub
コンテンツ画像の左側(1つ後ろ、右側)をクリックした場合。
通常の操作では、もちろん、新しいパラメーターを保存するチューニングモードが必要です。 ただし、ここでは説明しません。ここから、ベータ版の作業版をダウンロードできます 。 実行するには、 Framework 4が必要です。
また、さまざまな方法でプログラムを改善できます-ベクターコンテンツ(Preziに近くなります)のサポートを追加し、プロジェクトを保存し、構成するマルチタッチを追加し、高速ナビゲーション、キャンバスコンテンツを変更します。