この記事は2つの部分で構成されています。 最初の部分では、Google AdMobからアプリケーションに広告を追加する方法(この部分は主に初心者を対象としています)について詳しく説明し、2番目の部分では有料で無効にする方法について説明します。
開始するには、Eclipse環境で簡単なAndroidアプリケーションプロジェクトを作成します。 これがどのように行われるかについては書きません(たとえば、 ここで読むことができます )。
前提条件のインストール
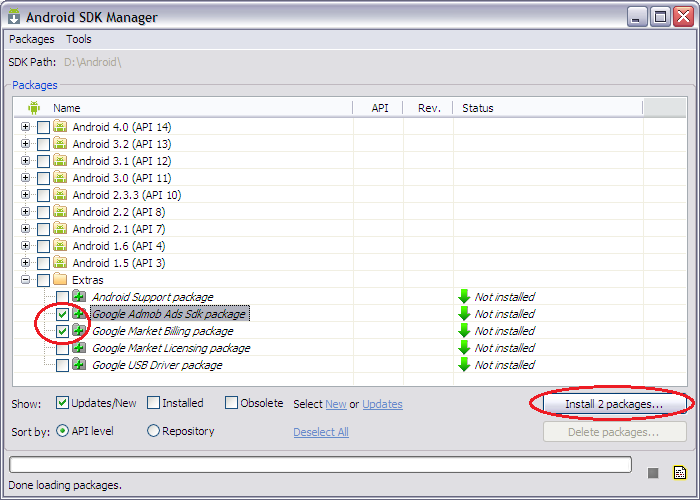
AdMobを使用するには、Google AdMob Ads SDKとAndroidプラットフォームバージョン3.2以降のSDKをインストールする必要があります( こちらをご覧ください )。 Google Market Billingパッケージもインストールします(これについては記事の後半で説明します)。
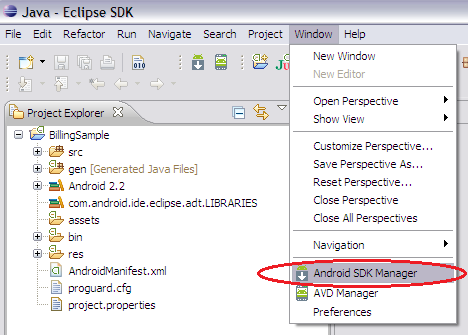
メインメニューコマンドウィンドウ > Android SDK Managerを使用して、「Android SDK Manager」を開きます。
インストールに必要なパッケージを選択し、「パッケージのインストール...」ボタンをクリックします。
パッケージをインストールしたら、AdMob Ads SDKをプロジェクトに接続します。 これを行うには:
- プロジェクトエクスプローラーでプロジェクトを右クリックし、[プロパティ]を選択します。
- ウィンドウの左側で、「Java Build Path」を選択します。
- [外部JARの追加...]ボタンをクリックします。
- 「%ANDROID%\ extras \ google \ admob_ads_sdk \」フォルダーにあるGoogleAdMobAdsSdk-4.3.1.jarファイルを選択します。

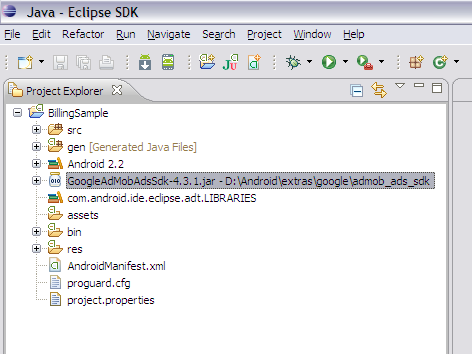
その結果、GoogleAdMobAdsSdk-4.3.1.jarファイルがプロジェクト構造に表示されます。
アプリケーション構成設定
次に、アプリケーション構成ファイルAndroidManifest.xmlを開き、次の変更を行います。
- オプションで、 android:installLocation =“ preferExternal”パラメーターをマニフェストタグに追加できます 。 このオプションを使用すると、メモリカードにアプリケーションをインストールできます。
- uses-sdkタグで、 AndroidパラメーターtargetSdkVersion = "13"を追加します。 バージョン13は、Androidプラットフォームバージョン3.2のSDKに対応しています。 新しいSDKをインストールした場合は、適切なバージョン番号を挿入します。
- 次に、アクセス許可ACCESS_NETWORK_STATEおよびINTERNETを追加します。
- そして最後に、 androidパラメーターを使用してアクティビティタグを追加します 。
<?xml version="1.0" encoding="utf-8"?> <manifest xmlns:android="http://schemas.android.com/apk/res/android" android:installLocation="preferExternal" package="com.sample.billing" android:versionCode="1" android:versionName="1.0" > <uses-sdk android:minSdkVersion="8" android:targetSdkVersion="13" /> <uses-permission android:name="android.permission.INTERNET" /> <uses-permission android:name="android.permission.ACCESS_NETWORK_STATE" /> <application android:debuggable="true" android:icon="@drawable/ic_launcher" android:label="@string/app_name" > <activity android:label="@string/app_name" android:name=".BillingSampleActivity" > <intent-filter > <action android:name="android.intent.action.MAIN" /> <category android:name="android.intent.category.LAUNCHER" /> </intent-filter> </activity> <activity android:configChanges="keyboard|keyboardHidden|orientation|screenLayout|uiMode|screenSize|smallestScreenSize" android:name="com.google.ads.AdActivity" /> </application> </manifest>
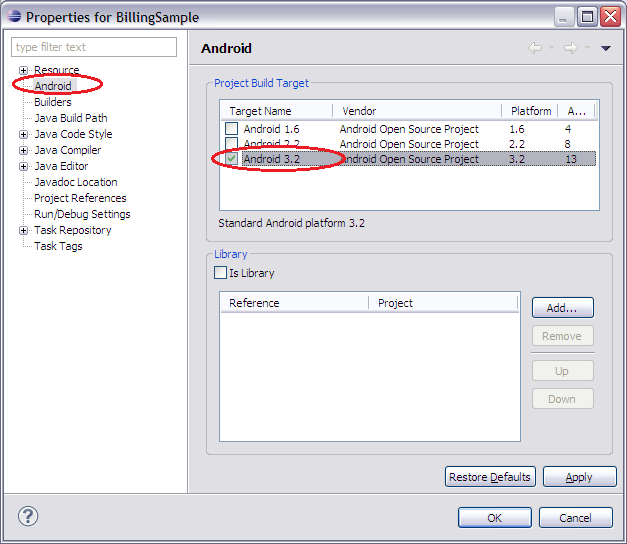
次に、プロジェクトのプロパティを再度呼び出す必要があります。 ウィンドウの左側で、「Android」を選択します。 次に、右側の[プロジェクトビルドターゲット]パネルでAndroid 3.2を選択します。 後でAndroid SDKをインストールした場合は、選択します。
AdMobパブリッシャーIDの取得
次に、サイトwww.admob.comにアクセスします(Googleアカウントを認証に使用できます)。 ここでは、アプリケーションに広告をリンクするために「パブリッシャーID」を取得する必要があります。 [サイトとアプリ]セクションに移動し、[Androidアプリ]を選択します。
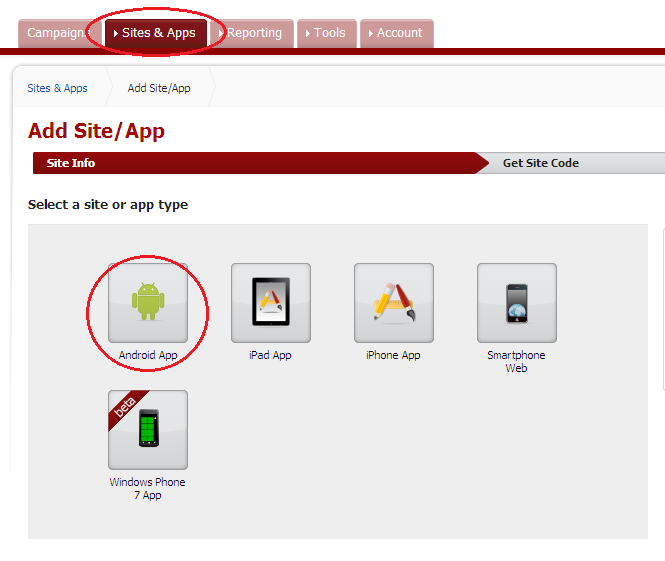
必要なフィールドに入力すると、アプリケーションが「サイトとアプリ」のリストに表示されます。 次に、アプリケーションの名前にカーソルを合わせて、表示される[設定の管理]ボタンをクリックします。

次に、アプリケーションの「発行者ID」を表示するページに移動します。 それをコピーしてください、それは我々にとってさらに役に立つでしょう。

アプリケーションに広告バナーを追加する
再びプロジェクトに戻ります。 res / values / strings.xmlを開き、次の文字列値を作成します。
<string name="admob_publisher_id"> Publisher ID</string>

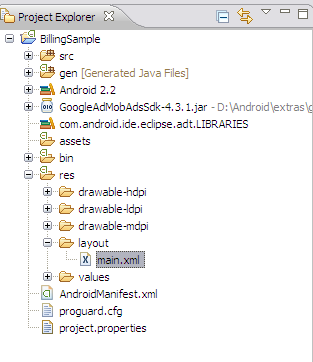
ここで、res / layout / main.xmlファイルを開きます。
ファイルに次の変更を加えます。
- xmlnsパラメーターをLinearLayoutルートタグに追加します:ads = " schemas.android.com/apk/lib/com.google.ads "
- 別のLinearLayoutを追加し、 TextViewをそこに移動します。
- android:layout_weight = "1"パラメーターを新しいLinearLayoutに追加します。 これは、バナー広告と重ならないようにするために必要です。
- com.google.ads.AdViewコンポーネントを追加します。
<com.google.ads.AdView android:id="@+id/adView" android:layout_width="wrap_content" android:layout_height="wrap_content" ads:adSize="BANNER" ads:adUnitId="@string/admob_publisher_id" ads:loadAdOnCreate="true" />
<?xml version="1.0" encoding="utf-8"?> <LinearLayout xmlns:android="http://schemas.android.com/apk/res/android" xmlns:ads="http://schemas.android.com/apk/lib/com.google.ads" android:layout_width="fill_parent" android:layout_height="fill_parent" android:orientation="vertical" > <LinearLayout android:id="@+id/linearLayout1" android:layout_width="match_parent" android:layout_height="match_parent" android:layout_weight="1" android:orientation="vertical" > <TextView android:layout_width="fill_parent" android:layout_height="match_parent" android:text="@string/hello" /> </LinearLayout> <com.google.ads.AdView android:id="@+id/adView" android:layout_width="wrap_content" android:layout_height="wrap_content" ads:adSize="BANNER" ads:adUnitId="@string/admob_publisher_id" ads:loadAdOnCreate="true" /> </LinearLayout>
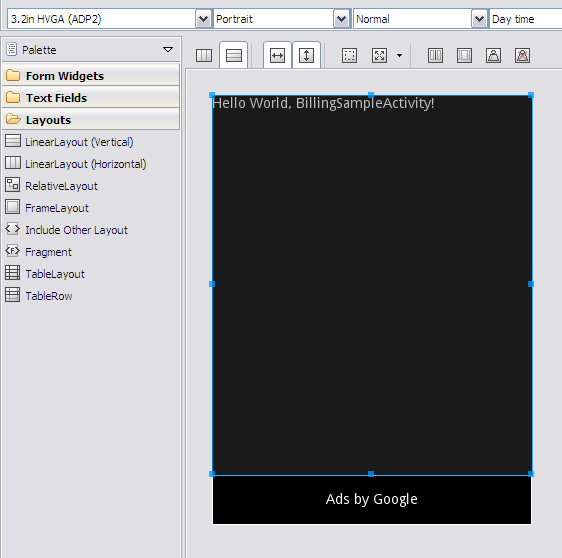
「グラフィックレイアウト」モードでは、レイアウトは次のとおりです。
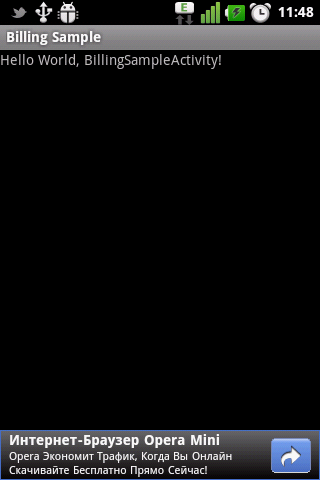
次に、デバイス(またはエミュレーター)を接続し、[ 実行 ]をクリックします 。 何が起こったのか見てみましょう。
おわりに
アクションの結果、AdMob広告をアプリケーションに追加しました。 ご覧のとおり、これは難しくありません。
次のステップは、Android MArketアプリ内課金を使用した有料広告切断の機能の開発です。これについては、記事の次の部分で説明します。
開発されたアプリケーションのソースは、 ここからダウンロードできます 。
ご清聴ありがとうございました。 誰かがこの資料を役立ててくれることを願っています。 あなたのコメントを歓迎します。