アプリケーション登録
手順はapi.yandex.ru/oauth/doc/dg/tasks/register-client.xmlで詳細に説明されています 。
登録段階で、URLスキームを考え出します
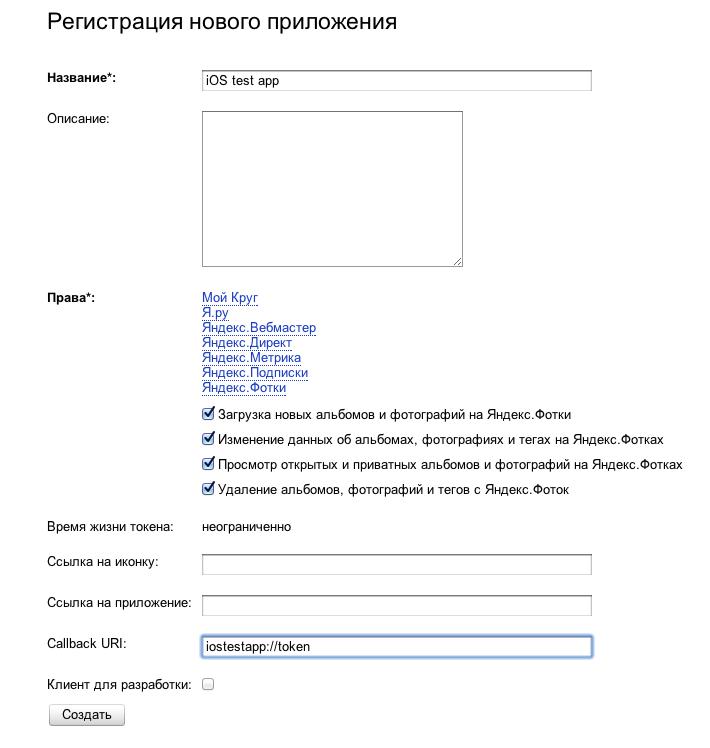
そして、アプリケーションのIDを覚えておいてください

可能な実装オプション
ドキュメントをもう一度読み、ユーザーにWebページを表示する必要があることを理解します。Webページから、認証が成功すると、登録段階で指定したスキームでURLへのリダイレクトが行われます。
ここでは2つのアプローチが可能です。
1)システム内の指定されたURLスキームのハンドラーでアプリケーションを登録します。 承認フォームでSafariユーザーを開き、アプリケーションが再起動するのを待ちます。
URLハンドラーを使用したアプリケーションの登録については、 ここで詳しく説明します。
2)UIWebViewを表示し、デリゲートメソッドでスキームに従って遷移をキャッチします。
2番目のアプローチは、私には簡単に思えます。 まず、ユーザーはアプリケーションを離れません。2番目に、Yandexを介した承認がアプリケーションに入る唯一の方法である可能性があります。
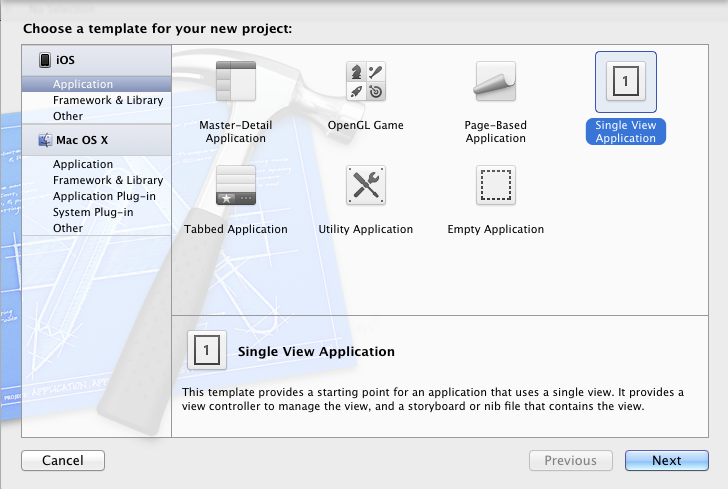
コードを書く
Xcodeでテストプロジェクトを作成します。

YandexOauthViewControllerを追加します*プロジェクトに(記事の最後にあるソースコードへのリンク)。
YandexOauthViewController.hで、次の行の値を自分のものに変更します。
#define URL_SCHEME @"iostestapp"
#define CLIENT_ID @"6ef1c6dc6f134a2daa67cc905e5c1a3d"
ViewController.hで、YandexOauthViewController.hをインポートし、YandexOauthViewControllerDelegateプロトコルの「実装者」として宣言します。
#import <UIKit/UIKit.h>
#import "YandexOauthViewController.h"
@interface ViewController : UIViewController <YandexOauthViewControllerDelegate>
@end
テストアプリケーションでは、起動時にユーザーを承認します。 これを行うには、ViewController.mでViewDidLoadメソッドを変更します。
 -(void)viewDidLoad
 {
     [super viewDidLoad];
	 //ビューを読み込んだ後、通常はペン先から追加のセットアップを行います。

     YandexOauthViewController * cntrl = [[YandexOauthViewController alloc] init];
     cntrl.delegate = self;
     [self.navigationController presentModalViewController:cntrl animated:YES];
 }
self.navigationControllerのほかに、あなたが尋ねると、あなたは正しいでしょう-コントローラーのナビゲーションはまだないので、AppDelegate.mに追加します:
 -(BOOL)アプリケーション:(UIApplication *)アプリケーションdidFinishLaunchingWithOptions:(NSDictionary *)launchOptions
 {
     self.window = [[UIWindow alloc] initWithFrame:[[UIScreen mainScreen] bounds]];
     //アプリケーション起動後のカスタマイズのオーバーライドポイント。
     self.viewController = [[ViewController alloc] initWithNibName:@ "ViewController" bundle:nil];

     UINavigationController * nav = [[UINavigationController alloc] initWithRootViewController:self.viewController];

     self.window.rootViewController = nav;
     [self.window makeKeyAndVisible];
     YESを返します。
 }
アプリケーションを起動すると、必要な認証フォームが表示されます。
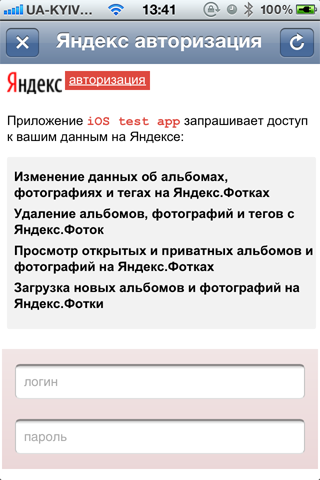
左側のボタン(×印)は画面から認証フォームを削除し、右のボタンはユーザーを認証ページに戻します。 実際には、場合によっては、Yandexは認証へのログインの目的を失い、トークンをもう渡さないユーザープロファイルを表示します。
パスワードログインを入力し、場合によってはこのデバイスで永続的な承認を確認した後、Yandexは指定されたアプリケーション登録のURLスキームにリダイレクトします。 YandexOauthViewController.mファイルでこの遷移をインターセプトすることを検討してください。
-(BOOL)webView:(UIWebView *)webView shouldStartLoadWithRequest:(NSURLRequest *)request navigationType:(UIWebViewNavigationType)navigationType
{
// URLを取得します
NSURL * url = [リクエストURL];
//カスタムURLスキームへの準拠を確認します
if([url.scheme isEqualToString:URL_SCHEME])
{
//ネットワークアクティビティインジケータを削除します
UIApplication * app = [UIApplication sharedApplication];
app.networkActivityIndicatorVisible = NO;
// URLを個別の要素に解析します
//トークンはインデックス2の下のarr配列にあります
NSArray * arr = [[url description] componentsSeparatedByCharactersInSet:[NSCharacterSet characterSetWithCharactersInString:@ "#=&"]];
//成功した承認についてデリゲートに伝え、トークンを渡します
if([delegate respondsToSelector:@selector(yandexOauthViewController:succesfullLoginWithToken :)]))
{
[デリゲートyandexOauthViewController:self succesfullLoginWithToken:[arr objectAtIndex:2]];
}
// UIWebViewを無効にしてURLを開きます
NOを返します。
}
// UIWebViewがURLに従うことを許可します
YESを返します。
}
YandexOauthViewControllerDelegateプロトコルを実装するために、ViewController.mに残ります。
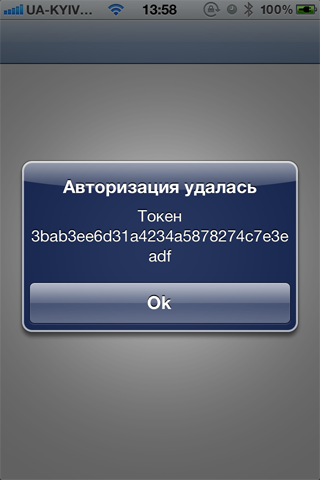
 -(void)yandexOauthViewController:(YandexOauthViewController *)コントローラー
          succesfullLoginWithToken:(NSString *)トークン
 {
     [self.navigationController dismissModalViewControllerAnimated:YES];

     UIAlertView * alert = [[UIAlertView alloc] initWithTitle:@ "承認に失敗しました"
                                                    メッセージ:[NSString stringWithFormat:@ "Token%@"、token]
                                                   デリゲート:nil
                                           cancelButtonTitle:@ "Ok"
                                           otherButtonTitles:nil];

     [アラートショー];
 }
この場所を読んでくれたみんなに感謝します。
参照資料
1)プロジェクト: github.com/eltiren/YandexOauth
2)Yandex OAuthドキュメント: api.yandex.ru/oauth/doc/dg/concepts/About.xml