ここでは、リストから地下鉄駅を選択して地図上に表示できるシンプルなアプリケーションの例を使用して、ListViewのアダプターを操作する便利な機能をいくつか示し、最も単純なGoogleマップ操作と組み込みデータベースとの対話を実装しています。
プロジェクト全体は、記事の最後にあるリンクからgithubにダウンロードできます。
実際、これはリストがどのように見えるかです:
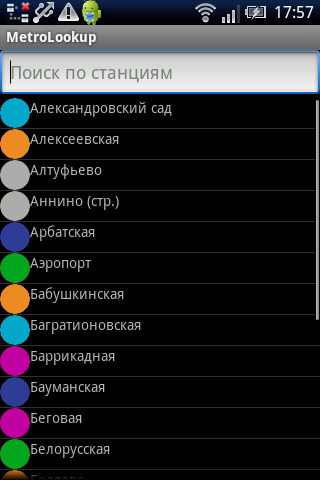
ステーション自体のリストとステーションの検索バーが含まれています。 検索にヒントが実装されます-リストに文字のシーケンスを入力すると、名前がこのシーケンスで始まるステーションのみが残ります。
Belorusskaya駅をタップすると、以下が表示されます。

ここで何が起こるか見てみましょう。
ここでは、Googleマップ(MapView)が使用されていることが簡単にわかります。 したがって、プロジェクトを作成するときは、ターゲットとしてGoogle APIを指定する必要があることを覚えておくことが重要です。
次に、ポイントごとに:
1. AndroidManifest
これは、アプリケーションの設定を記述し、アクセスできるものを示すベースファイルです。 したがって、このファイルでは、インターネットへのアクセスを登録し、com.google.android.mapsライブラリが使用されていることを示し、アクティビティを示します。この場合は、起動時に表示されるSearchDialogと、マップのアクティビティであるMapです。
2.データベース
データベースの操作を便利にするために、データベースを操作するために必要なメソッド(最初の文字によるフィルタリングやIDによる検索など)を実装するデータベースヘルパーを作成する必要があります。
既に述べたように、RecordsDbHelper.javaファイル自体は、以下のリンクで表示できます。 ここでは、IDおよびテキストフィルターによる検索メソッドを実装していることに注意してください。これらは将来使用します。
public Cursor getById(long id) { Cursor ccc = mDb.query(true, DATABASE_TABLE, new String[] { KEY_ROWID, KEY_NAME, KEY_X, KEY_Y, KEY_LINES }, KEY_ROWID + "=" + Long.toString(id), null, null, null, null, null); return ccc; } synchronized public Cursor fetchRecordsByQuery(String query) { Cursor ccc = mDb.query(true, DATABASE_TABLE, new String[] { KEY_ROWID, KEY_NAME, KEY_LINES }, KEY_NAME + " LIKE" + "'" + query + "%'", null, null, null, KEY_NAME, null); return ccc; }
public Cursor getById(long id) { Cursor ccc = mDb.query(true, DATABASE_TABLE, new String[] { KEY_ROWID, KEY_NAME, KEY_X, KEY_Y, KEY_LINES }, KEY_ROWID + "=" + Long.toString(id), null, null, null, null, null); return ccc; } synchronized public Cursor fetchRecordsByQuery(String query) { Cursor ccc = mDb.query(true, DATABASE_TABLE, new String[] { KEY_ROWID, KEY_NAME, KEY_LINES }, KEY_NAME + " LIKE" + "'" + query + "%'", null, null, null, KEY_NAME, null); return ccc; }
一般に、すべては通常通りであり、トリックはありません。
3.アダプター
これは、データベースとのリスト関係を実装するクラスです。 データベースへのクエリの結果として、テーブルカーソルを取得します。 アダプターは、相互に関連付ける必要があるitem.xml(下記参照)からカーソル、リスト、テーブルフィールド名、および要素IDを取得し、ListViewに入力します。 これがすべて実装されている標準のSimpleCursorAdapterを継承し、その中でgetViewメソッドを再定義します。
Adapter.java
public class Adapter extends SimpleCursorAdapter{ public Adapter(Context context, int layout, Cursor c, String[] from, int[] to) { super(context, layout, c, from, to); } @Override public View getView(int position, View convertView, ViewGroup parent) { View view = super.getView(position, convertView, parent); long id=getItemId(position); view.setTag(id); return view; } }
public class Adapter extends SimpleCursorAdapter{ public Adapter(Context context, int layout, Cursor c, String[] from, int[] to) { super(context, layout, c, from, to); } @Override public View getView(int position, View convertView, ViewGroup parent) { View view = super.getView(position, convertView, parent); long id=getItemId(position); view.setTag(id); return view; } }
getViewメソッドでは、タグ(ビュータイプの各オブジェクトが持っている)内のリストアイテム(つまり、ステーション名と色付きの円のリストライン)の準備ができているビューは、この要素が対応するデータベーステーブルの行のIDです。 このIDは、リストアイテムをタップすると、その後カードのあるアクティビティに転送されます。
4.リスト
まず、レイアウト、つまり必要な要素の視覚的表現のフレームを設定する必要があります。
search.xml
<?xml version="1.0" encoding="utf-8"?> <LinearLayout xmlns:android="http://schemas.android.com/apk/res/android" android:orientation="vertical" android:layout_width="fill_parent" android:layout_height="wrap_content" > <EditText android:id="@+id/search_text" android:layout_width="fill_parent" android:layout_height="wrap_content" android:hint="@string/search_hint" /> <ListView android:id="@android:id/android:list" android:layout_width="fill_parent" android:layout_height="wrap_content" /> </LinearLayout>
<?xml version="1.0" encoding="utf-8"?> <LinearLayout xmlns:android="http://schemas.android.com/apk/res/android" android:orientation="vertical" android:layout_width="fill_parent" android:layout_height="wrap_content" > <EditText android:id="@+id/search_text" android:layout_width="fill_parent" android:layout_height="wrap_content" android:hint="@string/search_hint" /> <ListView android:id="@android:id/android:list" android:layout_width="fill_parent" android:layout_height="wrap_content" /> </LinearLayout>
個々のリストアイテムのレイアウト(写真は地下鉄線の色と駅の名前の付いた円です):
item.xml
<?xml version="1.0" encoding="utf-8"?> <LinearLayout xmlns:android="http://schemas.android.com/apk/res/android" android:layout_width="fill_parent" android:layout_height="fill_parent" android:orientation="horizontal" > <ImageView android:layout_width="wrap_content" android:layout_height="wrap_content" android:id="@+id/line_image" > </ImageView> <TextView android:layout_width="wrap_content" android:layout_height="wrap_content" android:text="TextView" android:id="@+id/text1" > </TextView> </LinearLayout>
<?xml version="1.0" encoding="utf-8"?> <LinearLayout xmlns:android="http://schemas.android.com/apk/res/android" android:layout_width="fill_parent" android:layout_height="fill_parent" android:orientation="horizontal" > <ImageView android:layout_width="wrap_content" android:layout_height="wrap_content" android:id="@+id/line_image" > </ImageView> <TextView android:layout_width="wrap_content" android:layout_height="wrap_content" android:text="TextView" android:id="@+id/text1" > </TextView> </LinearLayout>
さて、最後に、検索のアクティビティを説明するSearchクラス。 ListActivity(リスト用の特別なアクティビティ)からの継承を使用して実装されます。 駅のデータ(地下鉄線の名前、座標、番号)は、上記のデータベースから取得されます。
public class Search extends ListActivity { // private EditText searchText; private RecordsDbHelper recordsDBHelper; private ListView list; private Adapter notes; // Binder private Binder binder; public void onCreate(Bundle savedInstanceState) { super.onCreate(savedInstanceState); setContentView(R.layout.search); binder = new Binder(); list = getListView(); // , // intent id , //(. ), . list.setClickable(true); list.setOnItemClickListener(new AdapterView.OnItemClickListener() { @Override public void onItemClick(AdapterView<?> av, View v, int pos, long id) { Intent intent = new Intent(); intent.putExtra("ID", (Long) v.getTag()); intent.setClass(Search.this, Map.class); startActivity(intent); } }); searchText = (EditText) findViewById(R.id.search_text); // , // updateList(), searchText.addTextChangedListener(new TextWatcher() { public void afterTextChanged(Editable s) { } public void beforeTextChanged(CharSequence s, int start, int count, int after) { } public void onTextChanged(CharSequence s, int start, int before, int count) { updateList(searchText.getText().toString()); } }); // Database Helper', // . , // . list.post(new Runnable() { @Override public void run() { recordsDBHelper = new RecordsDbHelper(Search.this); recordsDBHelper.open(); updateList(searchText.getText().toString()); } }); } // Binder, SimpleCursorAdapter.ViewBinder. // . , // . private static class Binder implements Adapter.ViewBinder { public boolean setViewValue(View view, Cursor c, int i) { if (view.getId() == R.id.line_image) { Integer line = c.getInt(i); switch (line) { case 0: ((ImageView) view).setImageResource(R.drawable.line0); break; case 1: ((ImageView) view).setImageResource(R.drawable.line1); break; … … } return true; } return false; } } // // . private void updateList(String s) { if (recordsDBHelper.isReady()) { // Cursor c = recordsDBHelper.fetchRecordsByQuery(s); startManagingCursor(c); // , String[] from = new String[] { RecordsDbHelper.KEY_NAME, RecordsDbHelper.KEY_LINES }; // id (.. ImageView, // , TextView, ) int[] to = new int[] { R.id.text1, R.id.line_image }; // notes = new Adapter(Search.this, R.layout.item, c, from, to); notes.setViewBinder(binder); setListAdapter(notes); } } }
ここで最も興味深いのは、バインダーのようです。 データベーステーブルの値をリスト行要素にバインドする方法、たとえば、テーブルに格納されているブランチ番号を、目的の色の円で対応する図にバインドする方法を決定できます。 setViewValueメソッドは、カーソルコンストラクターで指定された各ビューに対して呼び出されます。 返される結果がtrueの場合、データはバインドされており、すべて問題ありません。 falseの場合、システムは不適切なメソッドが呼び出されたことを理解し、標準のバインダーから必要なメソッドを探します。 この例では、パラメーターとして渡されたビューが、円が存在するImageViewであるかどうかを確認します。 その場合、対応する画像をそこに転送します。そうでない場合はfalseを返し、標準のバインダーを使用する必要があることを明確にします(これは画像ではないが、ここでは画像のみを処理するため)。
アクティベーションを呼び出すと、最初にonCreate()メソッドが呼び出され、表示されているすべての要素が初期化されます。 ここでは、リストアイテムのクリックハンドラーがインストールされます。このハンドラーは、レコードのIDを持つタグを描画し、このタグをマップを持つアクティビティに渡します(実際には、このアクティビティを呼び出します)。 テキスト変更ハンドラーもEditText(フィルター文字列)にインストールされます。 テキストが変更されると、updateList()関数が呼び出されます。この関数では、上記のヘルパーを使用して、要求がデータベースにスローされ、フィルター処理されたデータが取り出され、リスト用のアダプターが作成されます。
5.地図
最後に、カード自体に目を向けます。 レイアウトから始めましょう:
map.xml
<?xml version="1.0" encoding="utf-8"?> <com.google.android.maps.MapView xmlns:android="http://schemas.android.com/apk/res/android" android:id="@+id/mapview" android:layout_width="fill_parent" android:layout_height="fill_parent" android:clickable="true" android:apiKey=<b><u> GoogleMaps API</u></b> />
<?xml version="1.0" encoding="utf-8"?> <com.google.android.maps.MapView xmlns:android="http://schemas.android.com/apk/res/android" android:id="@+id/mapview" android:layout_width="fill_parent" android:layout_height="fill_parent" android:clickable="true" android:apiKey=<b><u> GoogleMaps API</u></b> />
ここにはGoogleMaps APIのキーが必要です。 私は私のものを輝かせませんでした:)それを取得する方法、あなたはここを読むことができます 。
まあ、実際にはカードでの活動:
Map.java
public class Map extends MapActivity { public MapView mapView; public MapController mapController; private RecordsDbHelper mDbHelper; @Override public void onCreate(Bundle savedInstanceState) { super.onCreate(savedInstanceState); setContentView(R.layout.map); // mapView = (MapView) findViewById(R.id.mapview); // mapView.setBuiltInZoomControls(true); mapController = mapView.getController(); // mapView.post(new Runnable() { @Override public void run() { // mDbHelper = new RecordsDbHelper(Map.this); mDbHelper.open(); // . , id , Bundle extras = Map.this.getIntent().getExtras(); if (extras != null) { long str = extras.getLong("ID"); // id Cursor cursor = mDbHelper.getById(str); startManagingCursor(cursor); cursor.moveToFirst(); double x = cursor.getDouble(cursor.getColumnIndex(RecordsDbHelper.KEY_X)); double y = cursor.getDouble(cursor.getColumnIndex(RecordsDbHelper.KEY_Y)); // GeoPoint // GeoPoint point = new GeoPoint((int) (x * 1E6), (int) (y * 1E6)); // mapController.animateTo(point); mapController.setZoom(16); } } }); } }
ここに:
1.カードに標準のZoomInおよびZoomOutボタンがインストールされています(setBuiltInZoomControls()を使用)
2.データベースが開きます。
3.このアクティビティを引き起こしたインテントから、レコードのIDが取得されます。これはリストアイテムのクリックハンドラーに渡され(上記で説明しました)、データベースからこのIDにより、ステーションの座標が必要な目的の行を取得します。
4.リクエストの結果として取得されたgetDoubleメソッドを使用して、座標が引き出されます。
5.次に、GeoPointが作成され、座標変換が実行されます(小数部はデータベースに格納され、Googleには整数が必要です。これを行うには、データベースから取得した値に10 ^ 6を掛けて丸める必要があります)。
6. animateTo()およびsetZoom()は、マップを目的の場所に移動し、ズームレベルを設定します。
ふh、それだけです。 ご覧のとおり、非常にシンプルな機能には、ささいなことはありません。初心者にとってはそれほど簡単ではありません。 したがって、私が共有した経験が、誰かが最初の問題のために熱意を失わないように助け、私たちの生活を最適化するより質の高いアプリケーションがあることを本当に願っています!
プロジェクト全体はこちらにあります 。