私たちは主にWebプロジェクトを使用しており、作業時間の60%がブラウザを使用しているため、アセンブリを監視するための小さな拡張機能を記述するのは理にかなっています。
拡張機能自体は、そのコードと同様に、ボーナスを請求しません。
ソース+パッケージ
主なアイデアは、アセンブリステータスについてCIサーバーをポーリングし、壊れている場合は拡張機能アイコンの横に赤い数字を描画することです。これは間違いなく注目を集めます。 すべてが非常に簡単です。
manifest.json。 ここではすべてが標準です。
{ "background_page": "background.html", "browser_action": { "default_icon": "images/icon19.png", "default_title": "TeamCity Checker", "popup": "popup.html" }, "description": "Team City Checker Extension", "icons": { "128": "images/icon128.png", "16": "images/icon16.png", "32": "images/icon32.png", "48": "images/icon48.png" }, "name": "TeamCity Checker", "options_page": "options.html", "permissions": [ "http://*/", "tabs" ], "version": "1.1" }
次のステップは、options.html拡張機能の設定ページを作成することです。
<html> <head> <title>TeamCity Checker</title> <meta http-equiv="Content-Type" content="text/html; charset=UTF-8" > <meta http-equiv="Content-Language" content="ru-RU" > <script type="text/javascript" src="js/jquery.js"></script> <script type="text/javascript" src="js/options.js"></script> </head> <body onload="restore_options()"> <table> <tr> <td><img src="images/icon128.png" style="width:64px" /></td> <td style="padding-left:15px;"> URL TeamCity Server ( , http://192.168.0.2:8111):<br /> <input id="server" type="text" style="width:500px" value="" /> <br /> Timeout: <br /> <select id="timeout"> <option value="5">5 sec.</option> <option value="10" selected>10 sec.</option> <option value="15">15 sec.</option> <option value="30">30 sec.</option> <option value="60">60 sec.</option> </select> <br /> <button onclick="save_options()"></button> </td> </tr> </table> </body> </html>
次に、options.js拡張設定ハンドラーを記述します
function save_options() { localStorage["server"] = $("#server").val(); localStorage["timeout"] = $("#timeout").val(); chrome.extension.getBackgroundPage().init(); } function restore_options() { var server = localStorage["server"], timeout = localStorage["timeout"]; if (!server) return; $("#server").val(server); $("#timeout [value='" + timeout + "']").attr("selected", "selected"); }
拡張機能アイコンをクリックしてポップアップハンドラー
function iResize() { var iFrames = $('iframe'); for (var i = 0, j = iFrames.length; i < j; i++) { iFrames[i].style.height = iFrames[i].contentWindow.document.body.offsetHeight + 250 + 'px'; iFrames[i].style.width = iFrames[i].contentWindow.document.body.offsetWidth + 20 + 'px'; } } function loading() { var server = localStorage["server"]; if (server) { if(server[server.length - 1] != "/") server = server + "/"; jQuery('#status').html(jQuery('<iframe\>').attr({'src': server + 'externalStatus.html?withCss=true', 'height':'auto', 'scrolling':'yes', 'frameborder':'0'})); iResize(); } }
background.jsファイルは多くの作業を行います。 ここに彼を連れてきて、私は要点を見ません。 十分大きいので。 そして、それはソースにあります。
彼の仕事の1つは、壊れたアセンブリの統計情報を取得し、このイベントについてユーザーに通知することです。
そして、拡張機能で表示するアセンブリ設定に直接行きましょう。 これを行うには、管理者権限でTeam Cityにログインし、表示するアセンブリの基本設定を編集し、[ビルドオプション]セクションのステータスウィジェットの有効化メニューを確認する必要があります。 さて、これでhabrahabrを読むことに気を取られることなく、アセンブリの状態を監視できます!
これは設定ページの外観です

ポップアップウィンドウ
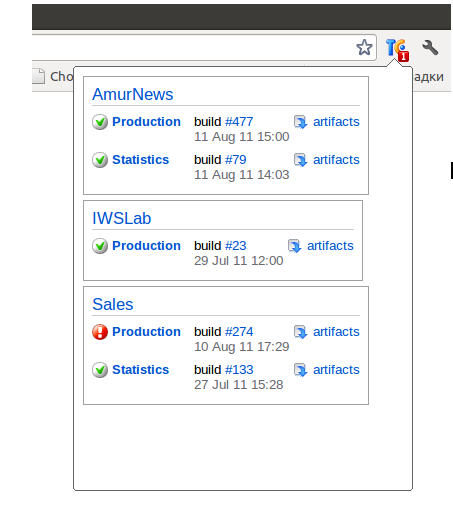
1つのアセンブリが壊れたことがわかります:(
また、ポップアップウィンドウに、ダウンロード用のアーティファクトへのリンクを配置しました。
どんな批判や提案も受け入れます。
psこの拡張機能を書いたテスターのArtyom Tyurinに感謝します。