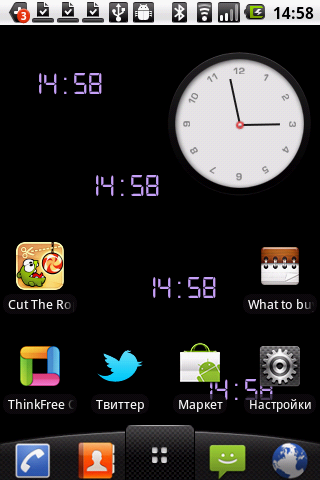
 最近、私はアンドロイド用のライブ壁紙の作り方を考え出し、良い例を使ってそれを最もよく理解することにしました-それは後で役に立つでしょう。 私はいつも快適な時計が欲しかった。 アンドロイドには十分な数のそのような壁紙が既に存在しますが、通常は画面の固定コーナーに大きな時計を描き、ウィジェットと重なっています。 私は時計が画面全体に散らばるようにしたかったのです。そうすればそれらを見る確率が高くなります。
Android向けのライブ壁紙はサービス(プラットフォームの観点からはバックグラウンドプロセス)であり、SDKには、ライブ壁紙用の既製のクラスが既に存在します。
まず、マニフェストは、アプリケーションがライブ壁紙を提供することを説明しています。
<service android:name="LiveWallpaperService" android:enabled="true" android:icon="@drawable/icon" android:label="@string/app_name" android:permission="android.permission.BIND_WALLPAPER"> <intent-filter android:priority="1" > <action android:name="android.service.wallpaper.WallpaperService" /> </intent-filter> <meta-data android:name="android.service.wallpaper" android:resource="@xml/wallpaper" /> </service>
ここで最も重要な行はandroidです:permissionとintent-filter
次に、実際には、コーディング。 独自の子孫クラスWallpaperServiceを作成し、そのメソッドonCreate、onDestroy、onVisibilityChanged、onSurfaceChanged、onSurfaceCreated、onSurfaceDestroyedを再定義します。
これらのメソッドは、システムイベントに応答します。 主な目的は、バッテリーを節約するために、視認性が変化したときに壁紙のレンダリングをオンまたはオフにすることです。
実際、私たちは以下にのみ興味があります。
@Override public void onVisibilityChanged(boolean visible) { if (visible) { painting.resumePainting(); } else { // remove listeners and callbacks here painting.pausePainting(); } } @Override public void onDestroy() { super.onDestroy(); // remove listeners and callbacks here painting.stopPainting(); } @Override public void onSurfaceChanged(SurfaceHolder holder, int format, int width, int height) { super.onSurfaceChanged(holder, format, width, height); painting.setSurfaceSize(width, height); Log.d("Clock", "Changed"); } @Override public void onSurfaceCreated(SurfaceHolder holder) { super.onSurfaceCreated(holder); painting.start(); } @Override public void onSurfaceDestroyed(SurfaceHolder holder) { super.onSurfaceDestroyed(holder); boolean retry = true; painting.stopPainting(); while (retry) { try { painting.join(); retry = false; } catch (InterruptedException e) {} } }
ユーザーのアクションに対する反応がタイムリーかつスムーズになるように、レンダリング自体を別のストリームに実装します。 これを行うには、別のThread下位クラスを作成します。 上記の例のペインティングオブジェクトはこのストリームです。
public ClockWallpaperPainting(SurfaceHolder surfaceHolder, Context context, int fontColor, int backgroundColor) { this.surfaceHolder = surfaceHolder; this.context_ = context; clockFont_ = Typeface.createFromAsset(context.getAssets(), "digital_font.ttf"); textPainter_.setTypeface(clockFont_); textPainter_.setTextSize(30); setPreferences(fontColor, backgroundColor); this.wait_ = true; } @Override public void run() { this.run_ = true; Canvas c = null; while (run_) { try { c = this.surfaceHolder.lockCanvas(null); synchronized (this.surfaceHolder) { doDraw( c ); } } finally { if (c != null) { this.surfaceHolder.unlockCanvasAndPost( c ); } } // pause if no need to animate synchronized (this) { if (wait_) { try { wait(); } catch (Exception e) {} } } } } public void pausePainting() { this.wait_ = true; synchronized(this) { this.notify(); } } public void resumePainting() { this.wait_ = false; synchronized(this) { this.notify(); } } public void stopPainting() { this.run_ = false; synchronized(this) { this.notify(); } }
ご覧のように、 doDraw()メソッドを際限なく実行し、デスクトップが表示されないときに定期的に一時停止します。
メソッド自体は次のようになります。
private void doDraw(Canvas canvas) { Date currentTime = new Date(); //Create text for clock String clockText; if (DateFormat.is24HourFormat(context_)) { if (currentTime.getSeconds()%2 == 0) clockText = DateFormat.format("kk:mm", currentTime).toString(); else clockText = DateFormat.format("kk mm", currentTime).toString(); } else { if (currentTime.getSeconds()%2 == 0) clockText = DateFormat.format("h:mmaa", currentTime).toString(); else clockText = DateFormat.format("h mmaa", currentTime).toString(); } int textSize = (int)textPainter_.getTextSize(); //Erase Background canvas.drawRect(0, 0, width_, height_, backgroundPainter_); int stepX = (width_ - textSize) / (CLOCKS_COUNT + 1); int stepY = (height_ - textSize*CLOCKS_COUNT) / (CLOCKS_COUNT + 1); for (int i=1; i <= CLOCKS_COUNT; ++i) canvas.drawText(clockText, stepX/2 + stepX * (i-1) - absoluteOffset_, height_/20 + stepY * i + textSize*(i-1), textPainter_); }
このサービスでは、デスクトップの変更に壁紙が応答するように別のメソッドを再定義します。
@Override public void onOffsetsChanged(float xOffset, float yOffset, float xStep, float yStep, int xPixels, int yPixels) { painting.setOffset(xOffset); Log.d("Clock", String.format("off:%f-%f step:%f - %f px: %d - %d", xOffset, yOffset, xStep, yStep, xPixels, yPixels)); }
この例では、別のスレッドで描画する方法がよく描かれています 。
そして最後に、設定。 これらは、他のAndroidアプリケーションの設定と同様に、シンプルになります。 xmlファイルでは、カスタムパラメータとそれらが取ることができる値の範囲を登録する必要があります。 この場合、ユーザーにテキストと背景の色を選択させます。
<PreferenceScreen xmlns:android="http://schemas.android.com/apk/res/android" android:title="@string/settings_title"> <ListPreference android:key="preference_font_color" android:title="@string/preference_font_color_title" android:summary="@string/preference_font_color_summary" android:entries="@array/color_names" android:entryValues="@array/color_values" /> <ListPreference android:key="preference_background_color" android:title="@string/preference_background_color_title" android:summary="@string/preference_background_color_summary" android:entries="@array/color_names" android:entryValues="@array/color_values" /> </PreferenceScreen>
最終的には次のようになります。
こちらからダウンロードできます。
壁紙を作成するには、 ここから開始できます