Android用Magic 8-Ballの作成
質問に答えるポストボールに基づいて
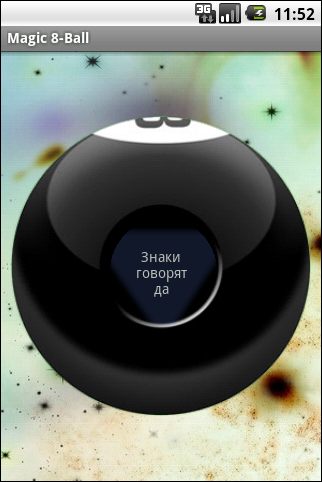
この記事では、Android用のローカライズされたMagic 8-Ballを作成します。これは、質問したり、振ったり、回答を得ることができます。 わずかな振動により、十分な揺れがあることが通知されます。
この記事は、すでにAndroid用のワールドワードを作成しており、この方向にさらに進んでいく人を対象としています。 ソースコードのフルバージョンはgoogle codeにあります 。 そこで、 ダウンロードタブでmagic-8-ball 1.1.apkファイルを試すことができます。
作業を成功させるには、インストール済みのjdk、android sdk、eclipse、ADTプラグインが必要です。 これを行う方法については、こちらをご覧ください 。
ローカリゼーション
Androidデバイスの地理は広範であるため、ローカライズの問題は、このプラットフォーム用のアプリケーションの開発における重要な問題です。 幸いなことに、車輪を再発明する必要はありません。この件に関しては、Googleがプログラマーの面倒を見てくれました。
したがって、アプリケーションのローカリゼーションの概念は次のとおりです。いくつかのリソースセットを作成します。最初のリソースセットはデフォルトでres / values / strings.xml 、残りは必要なロケールのres / values- <qualifiers> /strings.xml 、たとえば、日本語のvalues-ja。 起動時に、Androidはデバイス自体のロケールに基づいてロードするリソースを選択します。 ところで、Androidリソースとは、テキスト文字列だけでなく、レイアウト、サウンドファイル、グラフィックス、その他の静的データも意味します。
このアプリケーションでは、 res / values / 、 res / values-enおよびres / values-ruフォルダーを作成します。これらのフォルダーには、strings.xmlファイルが含まれます。 これらのファイルには、アプリケーション名、ヘッダー、マジックボールの回答が含まれており、これらは応答配列に格納されています。 次のようになります。
<? xml version ="1.0" encoding ="utf-8" ? >
< resources >
< string name ="app_name" > Magic 8-Ball </ string >
< string name ="shake_me_caption" > Shake Me </ string >
< string name ="press_menu_shake_caption" > Press Menu\n- Shake </ string >
< string name ="menu_shake_caption" > Shake </ string >
< string name ="menu_preferences_caption" > Preferences </ string >
< string name ="preferences_section_title" > Magic 8-ball Preferences </ string >
< string name ="shake_count_id" > shakeCount </ string >
< string name ="shake_count_title" > Shake count </ string >
...
< string-array name ="responses" >
< item > As I see\nit, yes </ item >
< item > It is\ncertain </ item >
< item > It is\ndecidedly\nso </ item >
< item > Most\nlikely </ item >
< item > Outlook\ngood </ item >
< item > Signs point\nto yes </ item >
< item > Without\na doubt </ item >
< item > Yes </ item >
< item > Yes -\ndefinitely </ item >
...
< item > Very\ndoubtful </ item >
</ string-array >
</ resources >
* This source code was highlighted with Source Code Highlighter .
別のニュアンスであるAndroid開発者ガイドは、デフォルトのリソース(ほとんどの場合英語)としてローカリゼーションの正確なコピーを用意する必要があることを警告しています。 そして、 res / values / strings.xmlファイルに十分な行がなく、 res / values-en / strings.xmlにあり、アプリケーションで使用されている場合、おそらくすべてが問題なくコンパイルされますが、英語とは異なるロケールで例を示しますユーザーにはエラーメッセージと[強制終了]ボタンが表示されます。
レイアウト、アニメーション、振動
単純です。空間の反転画像は背景画像によって設定されます。 その上にボールのあるImageViewがあり、TextViewを使用してメッセージが表示されます。 main.xmlのコード:
<? xml version ="1.0" encoding ="utf-8" ? >
< FrameLayout xmlns:android ="http://schemas.android.com/apk/res/android"
android:layout_width ="fill_parent"
android:layout_height ="fill_parent"
android:background ="@drawable/bg" >
< ImageView android:layout_width ="fill_parent"
android:layout_height ="fill_parent"
android:src ="@drawable/eight_ball"
android:layout_gravity ="center_vertical"
android:layout_margin ="10px" />
< LinearLayout xmlns:android ="http://schemas.android.com/apk/res/android"
android:orientation ="vertical"
android:layout_width ="fill_parent"
android:layout_height ="fill_parent"
android:gravity ="center" >
< TextView android:id ="@+id/MessageTextView"
android:layout_width ="wrap_content"
android:layout_height ="wrap_content"
android:layout_gravity ="center"
android:background ="@drawable/triangle"
android:text ="@string/shake_me_caption"
android:focusable ="false"
android:gravity ="center_vertical|center" android:layout_marginTop ="14dip" >
</ TextView >
</ LinearLayout >
</ FrameLayout >
* This source code was highlighted with Source Code Highlighter .
表示される答えには、AlphaAnimationを使用します。 このクラスはタスクに非常に適しており、オブジェクトのアルファレベルを使用してオブジェクトの表示と非表示を許可します。
private void showMessage( String message) {
TextView triangle = (TextView) findViewById(R.id.MessageTextView);
triangle.setVisibility(TextView.INVISIBLE);
triangle.setText(message);
AlphaAnimation animation = new AlphaAnimation(0, 1);
animation.setStartOffset(Defaults.START_OFFSET);
triangle.setVisibility(TextView.VISIBLE);
animation.setDuration(Defaults.FADE_DURATION);
triangle.startAnimation(animation);
vibrator.vibrate(Integer.parseInt(preferences.getString(
getString(R. string .vibrate_time_id), Defaults.VIBRATE_TIME)));
}
* This source code was highlighted with Source Code Highlighter .
答えを出す前に、Magic 8-Ballは設定(以下の設定について)から取得したVIBRATE_TIMEの間振動します。 デフォルトでは、この値は250msです。 短時間(50ms)の振動は、ユーザーアクションへの応答としてアプリケーションで使用できます。 Vibratorクラスを正しく動作させるには、AndroidManifest.xmlファイルでuses-permissionを宣言することを忘れないでください:
< uses-permission android:name ="android.permission.VIBRATE" />
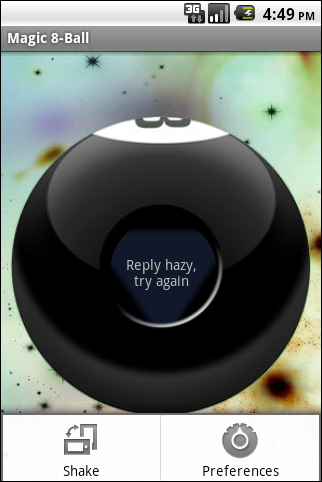
メニュー
まず、メニューを使用して回答を取得する機能を実現します。 シェイクおよび設定ボタンを含むres / menu /フォルダーにmenu.xmlファイルを作成します。
<? xml version ="1.0" encoding ="utf-8" ? >
< menu xmlns:android ="http://schemas.android.com/apk/res/android" >
< item android:id ="@+id/shake"
android:title ="@string/menu_shake_caption"
android:icon ="@android:drawable/ic_menu_always_landscape_portrait" />
< item android:id ="@+id/preferences"
android:title ="@string/menu_preferences_caption"
android:icon ="@android:drawable/ic_menu_preferences" />
</ menu >
* This source code was highlighted with Source Code Highlighter .
Magic8Ballクラスでは、次の2つのメソッドを記述します。
@Override
public boolean onCreateOptionsMenu(Menu menu) {
MenuInflater menuInflater = getMenuInflater();
menuInflater.inflate(R.menu.menu, menu);
return super.onCreateOptionsMenu(menu);
}
@Override
public boolean onOptionsItemSelected(MenuItem item) {
switch (item.getItemId()) {
case R.id.shake:
showMessage(getAnswer());
return true ;
case R.id.preferences:
startActivity( new Intent( this , Preferences. class ));
return true ;
}
return false ;
}
* This source code was highlighted with Source Code Highlighter .
MenuInflaterクラスは、xmlファイルからMenuオブジェクトを作成するために使用されます。 メソッドの名前が示すように、メニュー項目を選択すると、onOptionsItemSelectedメソッドに到達します。 [Shake]ボタンをクリックすると、応答が返されます。 [設定]ボタンについては、設定の章で説明しています。
センサーを操作する
センサーと対話するには、SensorEventListenerインターフェイスを実装する必要があります。 次の2つのメソッドが宣言されています。
- onAccuracyChanged。センサーの精度が変更されたときに呼び出されますが、必要ありません
- onSensorChangedは、センサー値が変更されたときに呼び出されます。これは本当に必要です。
もう1つの重要なポイント-センサーを操作するには、センサーを見つけてSensorManagerに登録する必要があります。
sensorManager = (SensorManager)getSystemService(Context.SENSOR_SERVICE);
sensor = sensorManager.getDefaultSensor(Sensor.TYPE_ACCELEROMETER);
Sensor.TYPE_ACCELEROMETER属性を持つセンサーを取得することに注意してください。これは、onSensorChangedメソッドに送られるデータが加速単位(m / s ^ 2)になることを意味します。 X、Y、Zの3つの軸の値は、SensorEventクラスのevent.values [0]、event.values [1]、event.values [2]の値に対応します。
public void onSensorChanged(SensorEvent event ) {
if ( event .sensor.getType() == Sensor.TYPE_ACCELEROMETER)
if (isShakeEnough( event .values[0], event .values[1], event .values[2]))
showMessage(getAnswer());
}
private boolean isShakeEnough( float x, float y, float z) {
double force = 0.0d;
force += Math .pow((x - lastX) / SensorManager.GRAVITY_EARTH, 2.0);
force += Math .pow((y - lastY) / SensorManager.GRAVITY_EARTH, 2.0);
force += Math .pow((z - lastZ) / SensorManager.GRAVITY_EARTH, 2.0);
force = Math .sqrt(force);
lastX = x;
lastY = y;
lastZ = z;
if (force > Float.parseFloat(preferences.getString(
getString(R. string .threshold_id), Defaults.THRESHOLD))) {
shakeCount++;
if (shakeCount > Integer.parseInt(preferences.getString(
getString(R. string .shake_count_id), Defaults.SHAKE_COUNT))) {
shakeCount = 0;
lastX = 0;
lastY = 0;
lastZ = 0;
return true ;
}
}
return false ;
}
* This source code was highlighted with Source Code Highlighter .
ActivitiyのライフタイムはAndroidによって制御されます。ポケットのランダムな揺れから振動するアプリケーションは必要ないため、アプリケーションが非アクティブになるとすぐにセンサーの操作を停止します。 また、センサーが見つからない場合、デバイスを振ることはできません。
@Override
public void onResume() {
super.onResume();
registerSensorListener();
if (isSensorRegistered())
showMessage(getString(R. string .shake_me_caption));
else
showMessage(getString(R. string .menu_shake_caption));
}
@Override
public void onPause() {
unregisterSensorListener();
super.onPause();
}
* This source code was highlighted with Source Code Highlighter .
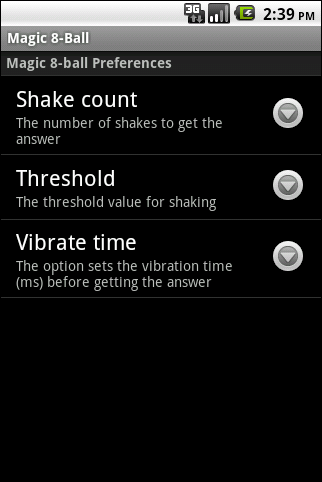
設定
最後に、設定に到達しました。 さまざまな電話でのテストでは、力の揺れのしきい値を設定する必要があることが示されました。 HTC Wildfire、Motorola Milestone、たとえばHighscreen Zeusの間では、この値は3倍異なっていました。 これによりタスクが設定されます。
- ユーザーがしきい値やその他のパラメーターを手動で設定できる設定ウィンドウが必要です
- これらの設定はどこかに保存し、どこかから読み取る必要があります。
ここでは、設定を表示するための既製の2つのPreferenceActivityクラスと、それらを保存するためのSharedPreferencesが役立ちます。 より詳細に。
PreferenceActivity-設定オブジェクトの階層を視覚的に表示するクラス。 addPreferencesFromResourceメソッドを使用して、xmlファイルからコンテンツをロードします。 SharedPreferencesクラスのオブジェクトと自動的に対話し、指定されたキーの設定を保存します。 設定用のxmlファイルを作成し、PreferenceActivityを拡張します。
<? xml version ="1.0" encoding ="utf-8" ? >
< PreferenceScreen xmlns:android ="http://schemas.android.com/apk/res/android" >
< PreferenceCategory android:title ="@string/preferences_section_title" >
< EditTextPreference
android:key ="@string/shake_count_id"
android:defaultValue ="4"
android:title ="@string/shake_count_title"
android:summary ="@string/shake_count_summary"
android:dialogTitle ="@string/shake_count_dialogTitle"
android:inputType ="number"
android:numeric ="integer"
android:maxLength ="1"
/>
< EditTextPreference
android:key ="@string/threshold_id"
android:defaultValue ="2.75f"
android:title ="@string/threshold_title"
android:summary ="@string/threshold_summary"
android:dialogTitle ="@string/threshold_dialogTitle"
android:inputType ="numberDecimal"
android:numeric ="decimal"
android:maxLength ="4"
/>
< EditTextPreference
android:key ="@string/vibrate_time_id"
android:defaultValue ="250"
android:title ="@string/vibrate_time_title"
android:summary ="@string/vibrate_time_summary"
android:dialogTitle ="@string/vibrate_time_dialogTitle"
android:inputType ="number"
android:numeric ="integer"
android:maxLength ="3"
/>
</ PreferenceCategory >
</ PreferenceScreen >
* This source code was highlighted with Source Code Highlighter .
設定xmlファイルのルート要素は、常にPreferenceScreenでなければなりません。 ネストされた要素は、Preferenceの異なるサブクラス(PreferenceScreenも含む)にすることができます。 このファイルでは、ネストされた要素はすべてEditTextPreferenceです。 このクラスは、TextEditで値を入力できるダイアログボックスをユーザーに表示するのに便利です。 次に、EditTextPreferenceのいくつかの属性について詳しく説明します。
- android:key = "@ string / shake_count_id"-SharedPreferencesにアクセスして値を読み書きするためのキー
- android:title = "@ string / shake_count_title"-名前(PreferenceActivityの資本化)
- android:summary = "@ string / shake_count_summary"-オプションの簡単な説明
- android:dialogTitle = "@ string / shake_count_dialogTitle"-ポップアップダイアログのタイトル
- android:numeric = "integer"-入力メソッドが数値でなければならないことを示します
設定を使用して新しいアクティビティを作成し(Preferences.javaを参照)、AndroidManifestで指定することを忘れないでください。
< activity android:name =".activities.Preferences"
android:label ="@string/app_name" >
</ activity >

これで、ユーザーはいくつかの設定の値を変更できるようになりました。正しく読み始めるだけです。 SharedPreferencesのインスタンスを取得するには、PreferenceManager.getDefaultSharedPreferences(this)メソッドを使用します。 データを保存するためのキーがありますが、どのように読み取ることができますか?..たとえば、バイブレータの時間は次のようになります。 );
残念ながら、preferences.getInt(...)は頑固にClassCastExceptionをスローします。 これは、設定が文字列として保存されているためと思われます。 残りの値は同じ方法で読み取られます。 しきい値を変更することで、ボールを解答に打ち砕くために異なる強度が必要になることを確認できます。
PS
アプリケーションに他に何を追加できますか? よりユーザーフレンドリーにすることができます。 たとえば、感度しきい値を変更するための値を持つウィンドウの代わりにトラックバーを追加し、最初にボールを自動的に較正するためにシェイクを要求します。 ユーザーがロケールに応じて追加できるように、アプリケーションに回答エディターを作成することもできます。
All Articles