GIMPのドキュメント用のスクリーンショットの準備(パート2)
 記事の最初の部分では 、スクリプト「fu shadow」と「Cut corners」スクリプトを調べ、ウィンドウフラグメントのスクリーンショットを美しくデザインする方法を示すことを約束しました。 約束を果たす時が来ました。 今日は、「波で切り取る」というスクリプトを分析します。これにより、正弦波に似た波線に沿って画像の一部を切り取ることができます。
さらに、イメージでの一般的なアクションの実行を高速化するために、いくつかのスクリプトを1つに組み立てる方法を検討します。
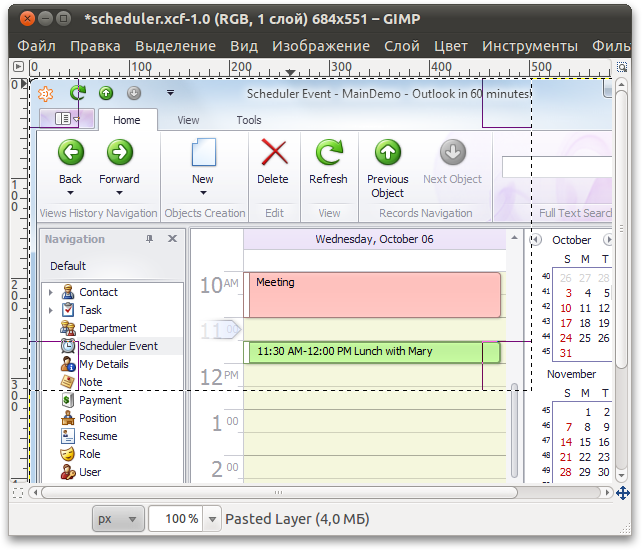
画像の一部を切り取るには、最初に選択する必要があります。 「自由選択」ツールを使用してGIMPに任意の形状を「手で」描画できますが、滑らかで美しいものを作成することはほとんどありません。 しかし、スクリプトからgimp-free-selectプロシージャを呼び出して、選択が行われるポイントの座標の配列を渡すことができます。 さて、ポイントが見栄えの良い形で並ぶように、特定の数学的規則に従って座標を計算できます。 そのため、長方形選択ツールを使用してユーザーに画像フラグメントを選択させます。
元の位置に基づいて、新しい修正された選択を作成する必要があります。 次に、画像の内部に入らない部分を削除します。 以下に、コメント付きの「波効果で切り取る」スクリプトコードを示します。
(define (script-fu-wave-crop image drawable ampl-factor reverse-phase) (gimp-context-push) (gimp-image-set-active-layer image drawable) (gimp-image-undo-group-start image) ; (if (= (car (gimp-selection-bounds image)) FALSE) (gimp-message " , .") (let* ( ; (selection-box (cdr (gimp-selection-bounds image))) ; (x1 (car selection-box)) (y1 (cadr selection-box)) ; (x2 (caddr selection-box)) (y2 (cadddr selection-box)) ; (image-width (car (gimp-image-width image))) (image-height (car (gimp-image-height image))) ) ; , (if (and (= x1 0) (= y1 0) (= x2 image-width) (= y2 image-height)) (gimp-message " , .") (let* ( ; gimp-free-select. ; 2 (x y ) (points (cons-array (* (+ (* 2 (- x2 x1)) (* 2 (- y2 y1))) 2) 'double)) (i 0) ; , (ampl-x (* (- y2 y1) ampl-factor 0.005)) (ampl-y (* (- x2 x1) ampl-factor 0.005)) ; " " (2pi 6.2832) (x x1) (y y1) ) ; (if (= reverse-phase TRUE) (begin ; (set! ampl-x (- ampl-x)) (set! ampl-y (- ampl-y)) ) ) ; (while (< x x2) (aset points ix) ; ; , (if (> y1 0) ; , (aset points (+ i 1) (+ y1 (* ampl-y (sin (* 2pi (/ (- x x1) (- x2 x1))))))) ; - . (aset points (+ i 1) 0) ) (set! i (+ i 2)) (set! x (+ x 1)) ) ; (while (< y y2) ; ; , (if (< x2 image-width) ; , (aset points i (+ x2 (* ampl-x (sin (- (* 2pi (/ (- y y1) (- y2 y1)))))))) ; - . (aset points i image-width) ) (aset points (+ i 1) y) (set! i (+ i 2)) (set! y (+ y 1)) ) ; (while (> x x1) (aset points ix) ; ; , (if (< y2 image-height) ; , (aset points (+ i 1) (+ y2 (* ampl-y (sin (* 2pi (/ (- x x1) (- x2 x1))))))) ; - . (aset points (+ i 1) image-height) ) (set! i (+ i 2)) (set! x (- x 1)) ) ; (while (> y y1) ; ; , (if (> x1 0) ; , (aset points i (+ x1 (* ampl-x (sin (- (* 2pi (/ (- y y1) (- y2 y1)))))))) ; - . (aset points i 0) ) (aset points (+ i 1) y) (set! i (+ i 2)) (set! y (- y 1)) ) ; (gimp-free-select image i points CHANNEL-OP-REPLACE TRUE FALSE 0) ; (gimp-selection-invert image) ; (gimp-layer-add-alpha drawable) ; (gimp-edit-clear drawable) ; (gimp-selection-none image) ; (plug-in-autocrop 1 image drawable) ) ) ) ) (gimp-image-undo-group-end image) (gimp-displays-flush) (gimp-context-pop) ) (script-fu-register "script-fu-wave-crop" " " " ." " <pupkin@example.com>" " " "2010/10/28" "RGB* GRAY*" SF-IMAGE "Image" 0 SF-DRAWABLE "Drawable" 0 SF-ADJUSTMENT " (0 - , 10 - )" '(3 0 10 1 0 0) SF-TOGGLE " " FALSE ) (script-fu-menu-register "script-fu-wave-crop" "<Image>/Filters/ ")
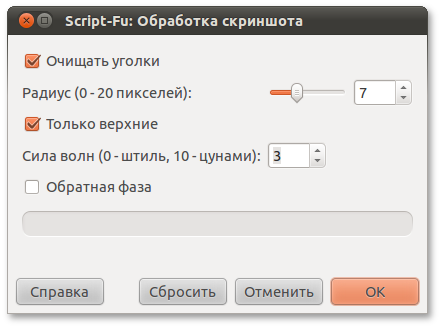
WindowsおよびLinux用のスクリプトの接続については、記事の最初の部分で説明します。 サイン波の振幅に影響する「波の強さ」係数、および波の方向を反対に変更する「逆位相」チェックボックスを使用して、「波の効果で切り取る」スクリプトのパラメーターを調整できます。

スクリプト「コーナーのカット」、「波の効果で切り取る」、「クイックシャドウ」の連続実行の結果を以下に示します。

イラストの作成に積極的に取り組んでいる場合、これらのスクリプトを一緒に呼び出す必要があります。 作業をスピードアップするために、「カットコーナー」、「波効果で切り取る」、「クイックシャドウ」スクリプト用の「スクリーンショット処理」ラッパーを作成します。 これを行うには、スクリプトが順番に呼び出されるscript-fu-screenshot-processingプロシージャを定義します 。 script-fu-cut-cornersは、作業時に選択ツールを使用し、現在の選択を削除することを考慮する必要があるだけです。 したがって、 script-fu-cut-cornersを呼び出す前に現在の選択を別のチャネルに保存し、 script-fu-wave-cropに復元する必要があります 。
(define (script-fu-screenshot-processing image drawable cut-corners radius only-top ampl-factor reverse-phase) (gimp-context-push) (gimp-image-set-active-layer image drawable) (gimp-image-undo-group-start image) (let* ( (selection-channel nil) ; , (cropping-required (car (gimp-selection-bounds image))) ) ; , (if (= cut-corners TRUE) (begin ; (set! selection-channel (car (gimp-selection-save image))) (script-fu-cut-corners image drawable radius only-top) ) ) ; , (if (= cropping-required TRUE) (begin ; (if (= cut-corners TRUE) (gimp-selection-load selection-channel)) (script-fu-wave-crop image drawable ampl-factor reverse-phase) ) ) ; script-fu-quick-shadow (script-fu-quick-shadow image drawable) ) (gimp-image-undo-group-end image) (gimp-displays-flush) (gimp-context-pop) ) (script-fu-register "script-fu-screenshot-processing" " " " , ." " <pupkin@example.com>" " " "2010/10/28" "RGB* GRAY*" SF-IMAGE "Image" 0 SF-DRAWABLE "Drawable" 0 SF-TOGGLE " " TRUE SF-ADJUSTMENT " (0 - 20 )" '(8 0 20 1 10 0 0) SF-TOGGLE " " FALSE SF-ADJUSTMENT " (0 - , 10 - )" '(3 0 10 1 0 0) SF-TOGGLE " " FALSE ) (script-fu-menu-register "script-fu-screenshot-processing" "<Image>/Filters/ ")
その結果、スクリプトパラメータは1つのウィンドウに収集されます。
GIMPが以前のスクリプト実行で使用された設定を記憶しているという事実は、作業を大幅にスピードアップします。 Ctrl + Fを押すと、設定ダイアログをスキップして最後に呼び出されたスクリプトを実行できます。
注意してください-トリミングするとき、画像の端に対する選択端の位置が考慮されます。 元の選択範囲が画像の端に沿って移動する(またはそれを超える)場合、新しい選択の対応するセグメントは画像の端に沿って直線で通過します。 エッジと中央の両方から画像の一部を切り取ることができます。

All Articles