TR-069 at Mikrotik. Testing Freeacs as an Autoconfiguration Server for RouterOS
In this article, I will try to step-by-step describe the process of installing a test server for an excellent Freeacs project to a fully functional state, and show practical methods for working with mikrotik: configuration through parameters, script execution, updating, installing additional modules, etc.
The purpose of the article is to encourage colleagues to abandon the management of network devices with the terrible rake and crutches, in the form of self-written scripts, Dude, Ansible, etc. And, in this regard, cause fireworks and massive glee in the squares.
Why are freeacs, not genie-acs, mentioned in the mikrotik-wiki , more lively?
Because according to genie-acs with mikrotik there are publications of the Spaniards. Here are their pdf and video from last year's MUM. Auto caravans on slides are cool, but I would like to get away from the concept of writing scripts, to run scripts, to run scripts ...
We will install it in Centos7, and since the devices transmit a lot of data, and ACS is actively working with the database - we will not be greedy with resources. For comfortable work, we allocate 2 CPU cores, 4GB RAM and 16GB ssd raid10 fast storage. I will install freeacs in the Proxmox VE lxc container, and you can work in any tool convenient for you.
Remember to set the correct time on the machine with ACS.
The system will be a test one, so we won’t be smart, and just use the kindly provided installation script, as it is.
As soon as the script is completed, you can immediately get to the web interface via the ip of the machine, with admin / freeacs credentials

Here is such a nice minimalistic interface, and how cool and fast it all turned out
The basic control unit for ACS is a unit or CPE (Customer Premises Equipment). And most importantly, what we need to control units is their Unit Type, i.e. equipment model that defines a set of customizable unit parameters and its software. But while we do not know how to get the new Unit Type, it is best to ask the unit about it, turning on Discovery Mode.
In production, such a regime is absolutely impossible to use, but we need to start the engine soon and see the capabilities of the system. All basic settings are stored in / opt / freeacs- *. Therefore, open
we find
and change to
In addition, we would like to increase the maximum file sizes that nginx and mysql will work with. For mysql, add the line to /etc/my.cnf
, and for nginx, in /etc/nginx/nginx.conf add
to the http section. Otherwise, we will be able to work with firmware no more than 1M.
We reboot, and we are ready to work with devices.
And in the role of the device (CPE) we will have the hAP kid ACAP lite .
Before the test connection, it is advisable to manually configure the CPE to the minimum working configuration so that the parameters that you want to configure in the future are non-empty. For the router, you can minimally enable the dhcp client on ether1, install the tr-069client package and set passwords.
It is advisable to connect all units using a valid serial number as login. Then everything will be clear to you in the logs. Someone advises to use WAN MAC - do not believe. Someone uses a common login / pass pair for everyone - bypass them.
We open the tr-069 log for monitoring “negotiations”
Open winbox, menu item TR-069.
ACS URL:
(replace with your IP)
Username: 9249094C26CB (copy the serial from system> routerboard)
Password: 123456 (not needed for discovery, but to be)
Periodic inform interval we do not change. We will issue this setting through our ACS
Below are the settings for remote connection initialization, but I couldn’t work with mikrotik with a snap. Although remote request works with phones out of the box. It will be necessary to understand.
After clicking the Apply button, data will be exchanged in the terminal, and in the Freeacs web interface you can see our router with the automatically created Unit Type “hAPaclite”.
The router is connected. You can look at the automatically created Unit Type. Open
. What is there not only! As many as 928 parameters (I spied in the shell). Whether it is a lot or a little, we'll figure it out later, but for now just a quick look. This is what Unit Type means. This is a list of supported parameters with keys, but no values. Values are set in the levels below - Profiles and Units.
It's time to download the web interface guide This 2011 guide is like a bottle of good, aged wine. Let's open it and leave to breathe.
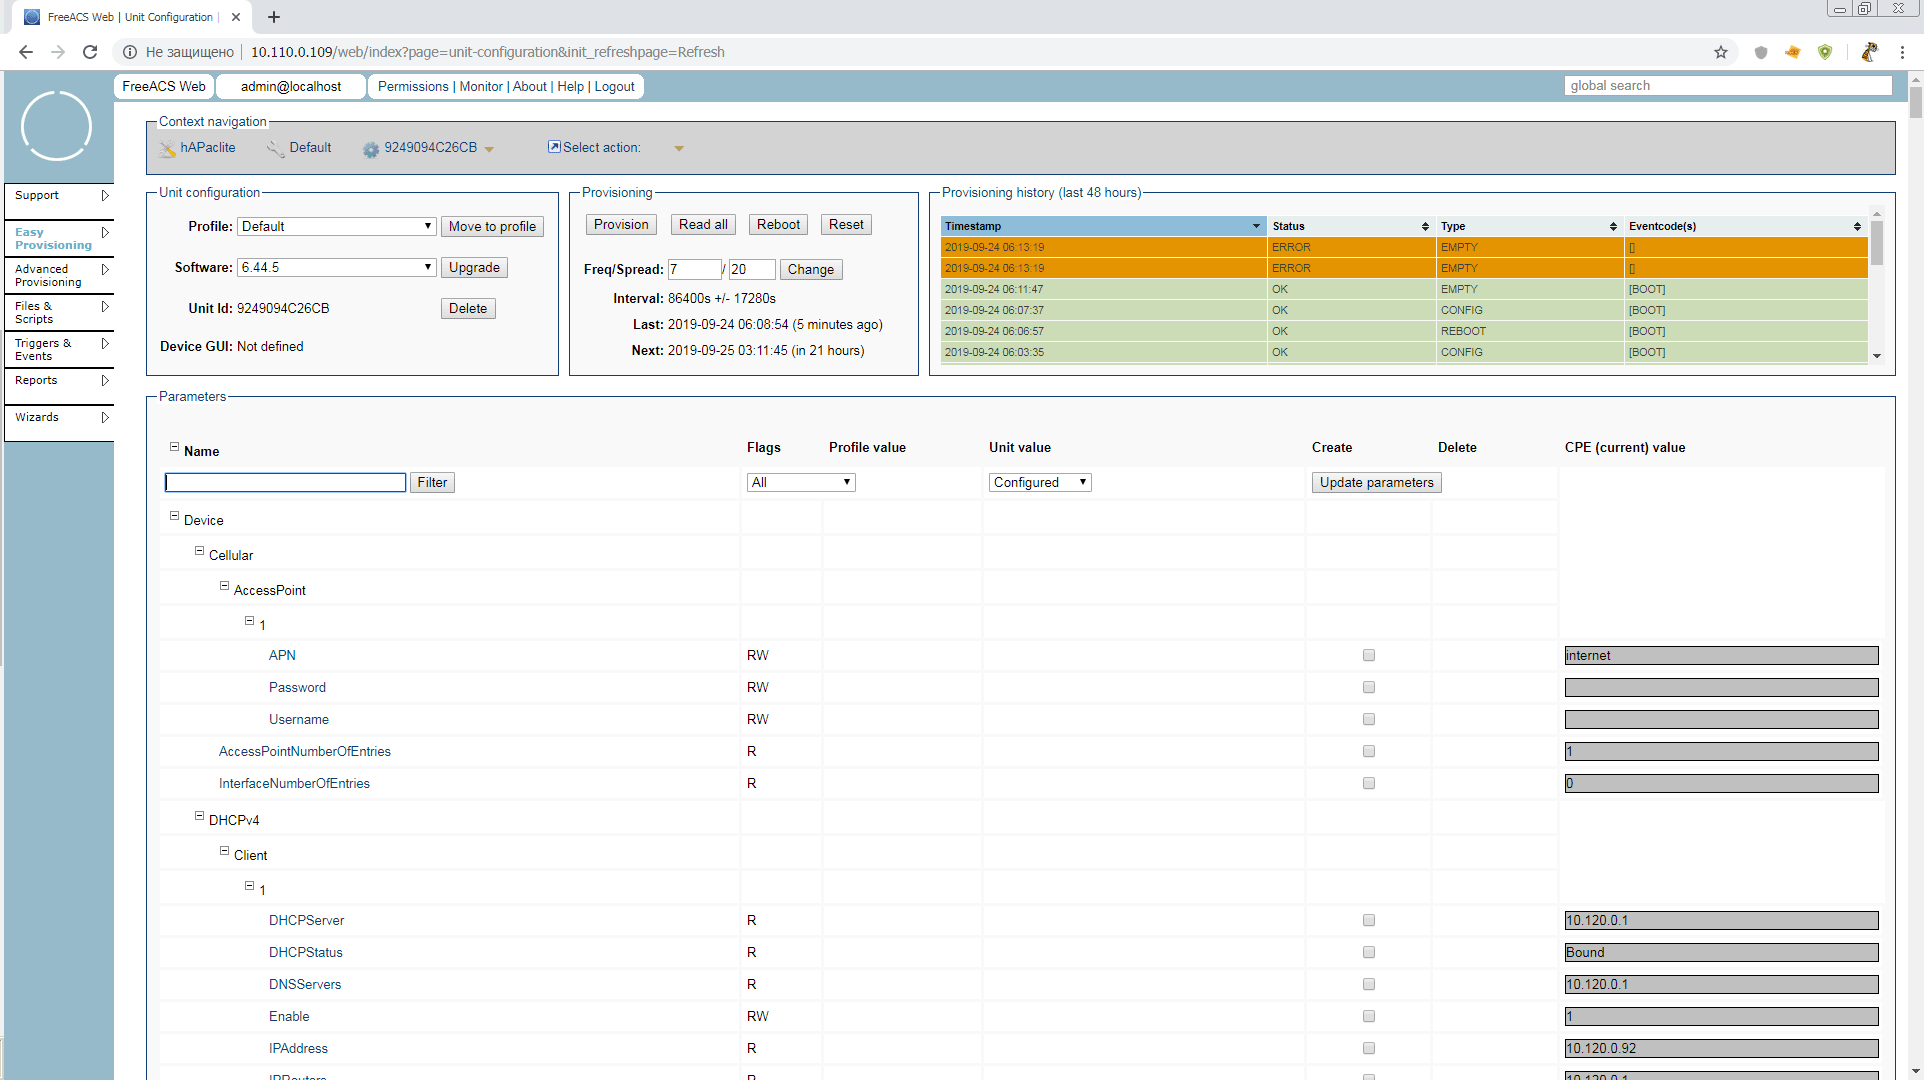
And ourselves, in the web interface, click on the pencil next to our unit and go into unit configuration mode. It looks like this:
We will briefly analyze what is interesting on this page:
Unit configuration block
Provisioning unit with buttons
Tips hint that all buttons in the Provisioning block can instantly apply configuration through ConnectionRequestURL. But, as I said above, this does not work, so after clicking the buttons, you will need to restart the tr-069 client on mikrotik to manually start provision.
Provisioning history block (last 48 hours)
Parameters block
The largest and most important block, where, in fact, the parameters for this unit are set and read. Now we see only the most important system parameters, without which ACS cannot work with the unit. But we remember that we have 928 in Unit Type. Let's look at all the values, and decide with what it all eat at Mikrotik.
In the Provisioning block, click the Read all button. In the block - a red inscription. The CPE (current) value column appears on the right. In the system settings, ProvisioningMode changed to READALL.
And ... nothing will happen except the message in System.X_FREEACS-COM.IM.Message
Restart the TR-069 client or reload the router, and continue to refresh the browser page until you get the parameters in the cheerful gray rectangles on the right
If anyone wants to take a sip of the old seasoned - this mode in the manual is described as 10.2 Inspection mode. It turns on and works a little wrong, but the essence is described quite
READALL mode itself will turn off after 15 minutes, and we will try to figure out what is useful and what can be corrected “on the fly” while we are in this mode.
You can change IP addresses, enable / disable interfaces, firewall rules that have comments (otherwise a complete mess), Wi-Fi and so on trifles.
That is, it is not yet possible to configure mikrotik sane with TR-069 only. But you can monitor very well. Available statistics on interfaces and their status, free memory, etc.
Let's now try to deliver the parameters to the router, via tr-069, in a "natural" way. The first victim will be Device.DeviceInfo.X_MIKROTIK_SystemIdentity. We find it in the unit parameters All. Apparently - it is not set. This means that any unit can itself have any Identity. Enough tolerating this!
Poke a daw in the create column, set the name Mr.White and poke the Update parameters button. What will happen next you already guessed. At the next communication session with the headquarters, the router must change its Identity.
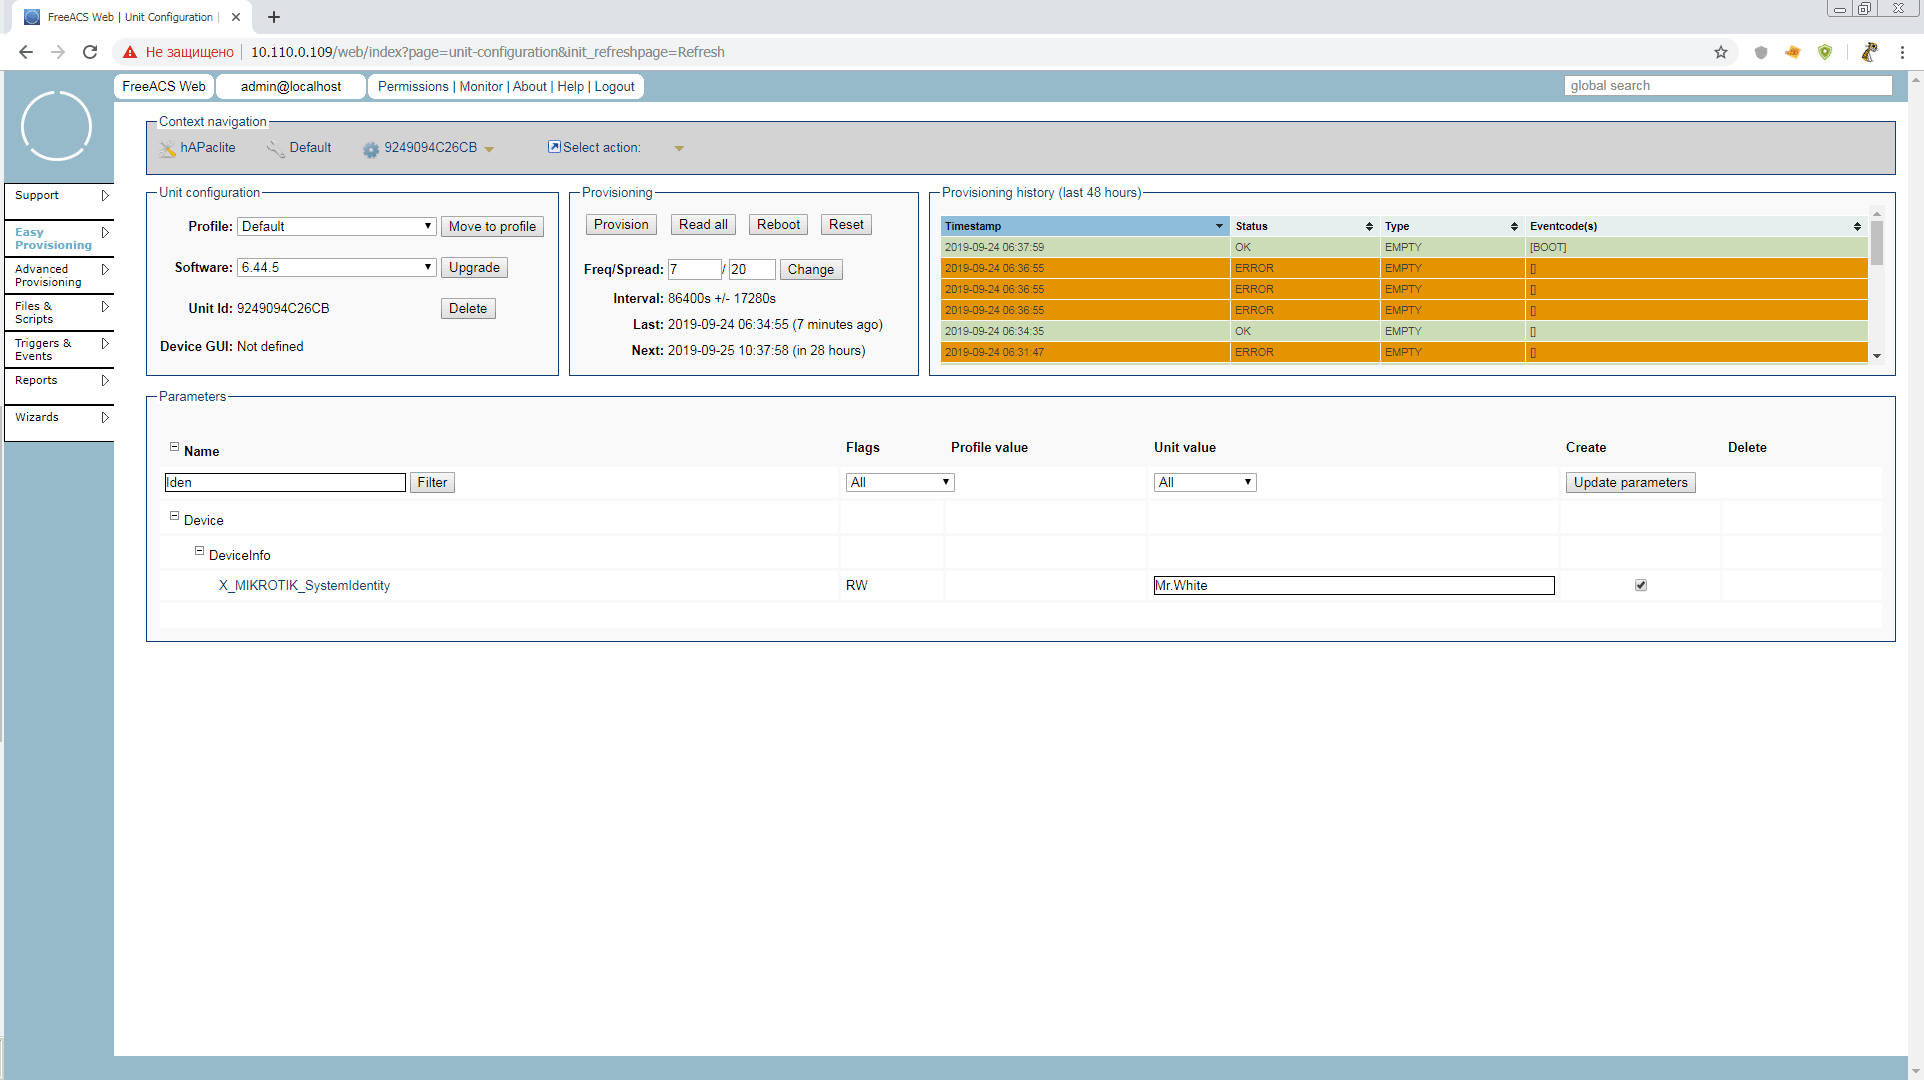
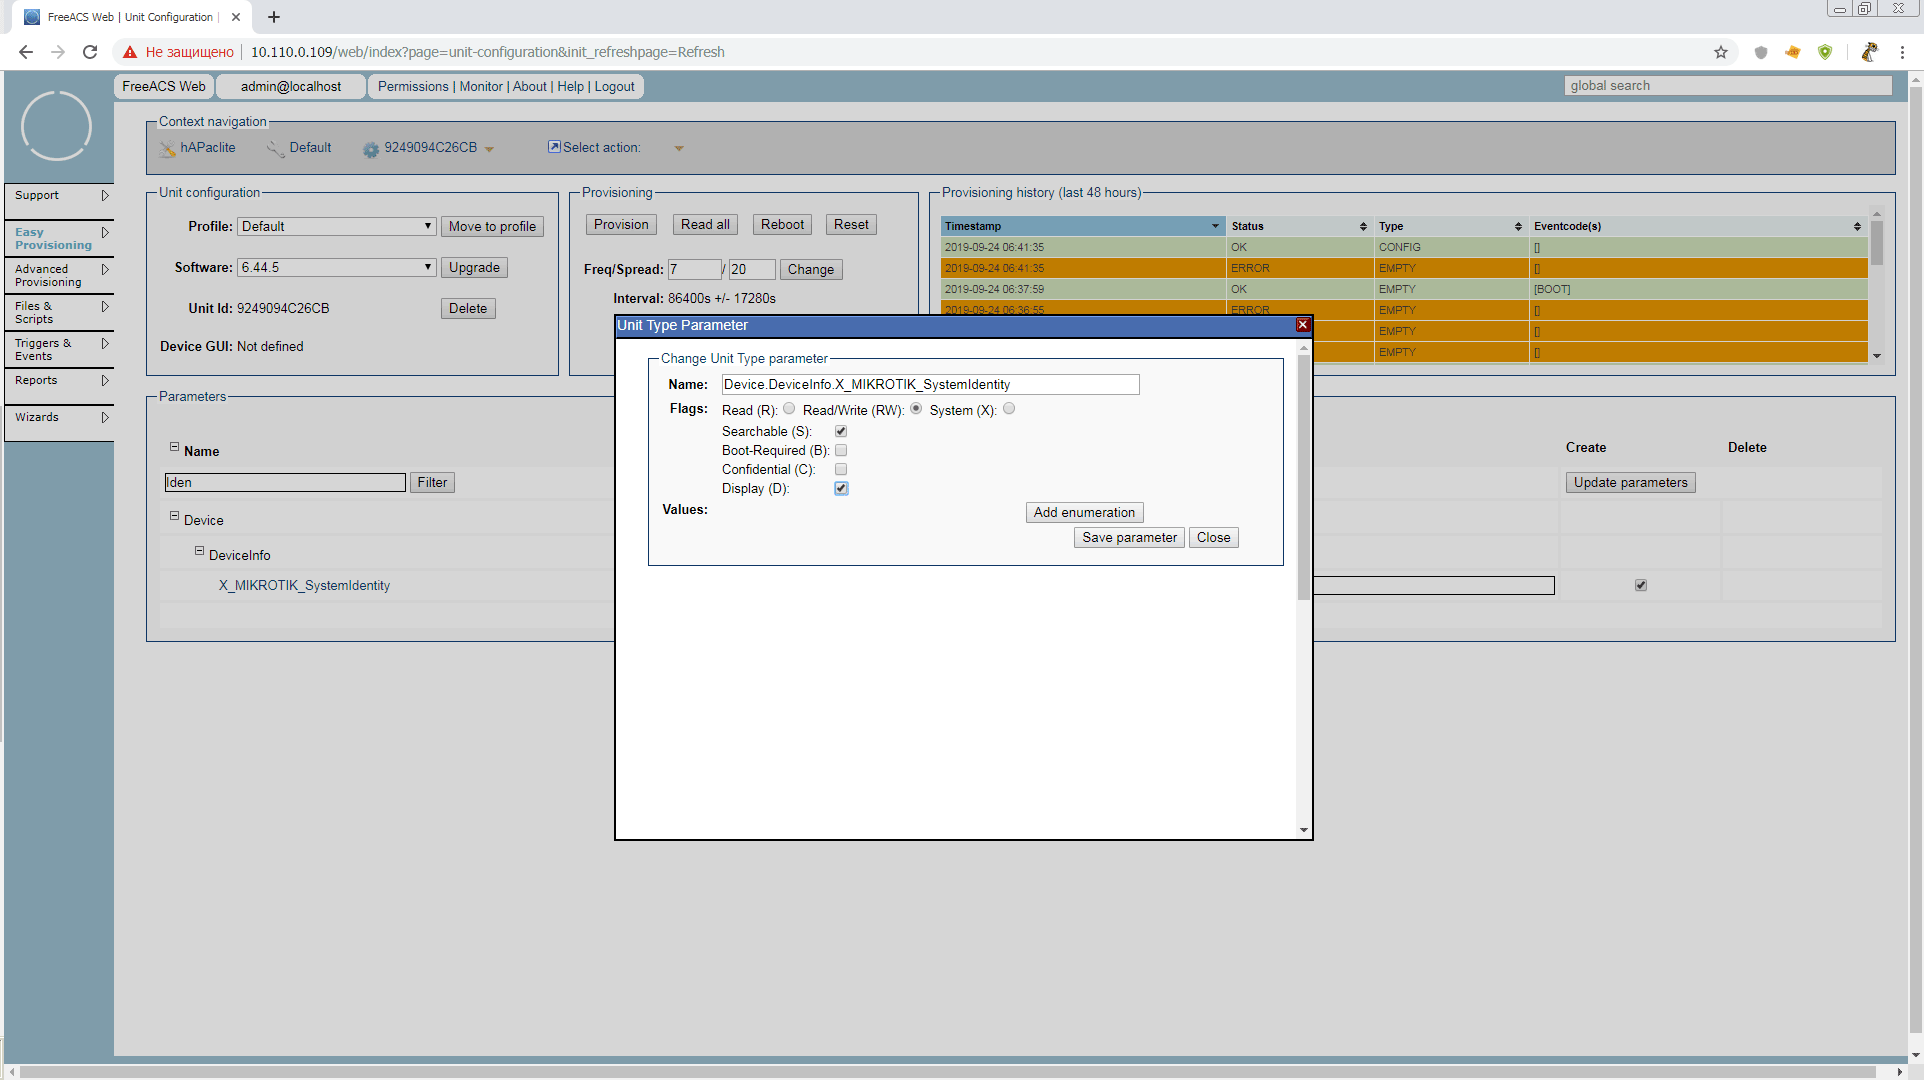
But this is not enough for us. Such a parameter as Identity is good to always have at hand when searching for the desired unit. Poke in the parameter name and put there the daws Display (D) and Searchable (S). The parameter key changes to RWSD (Remember, names and keys are set at the highest level of Unit Type)
The value is now not only displayed in the general search list, but also available for search in
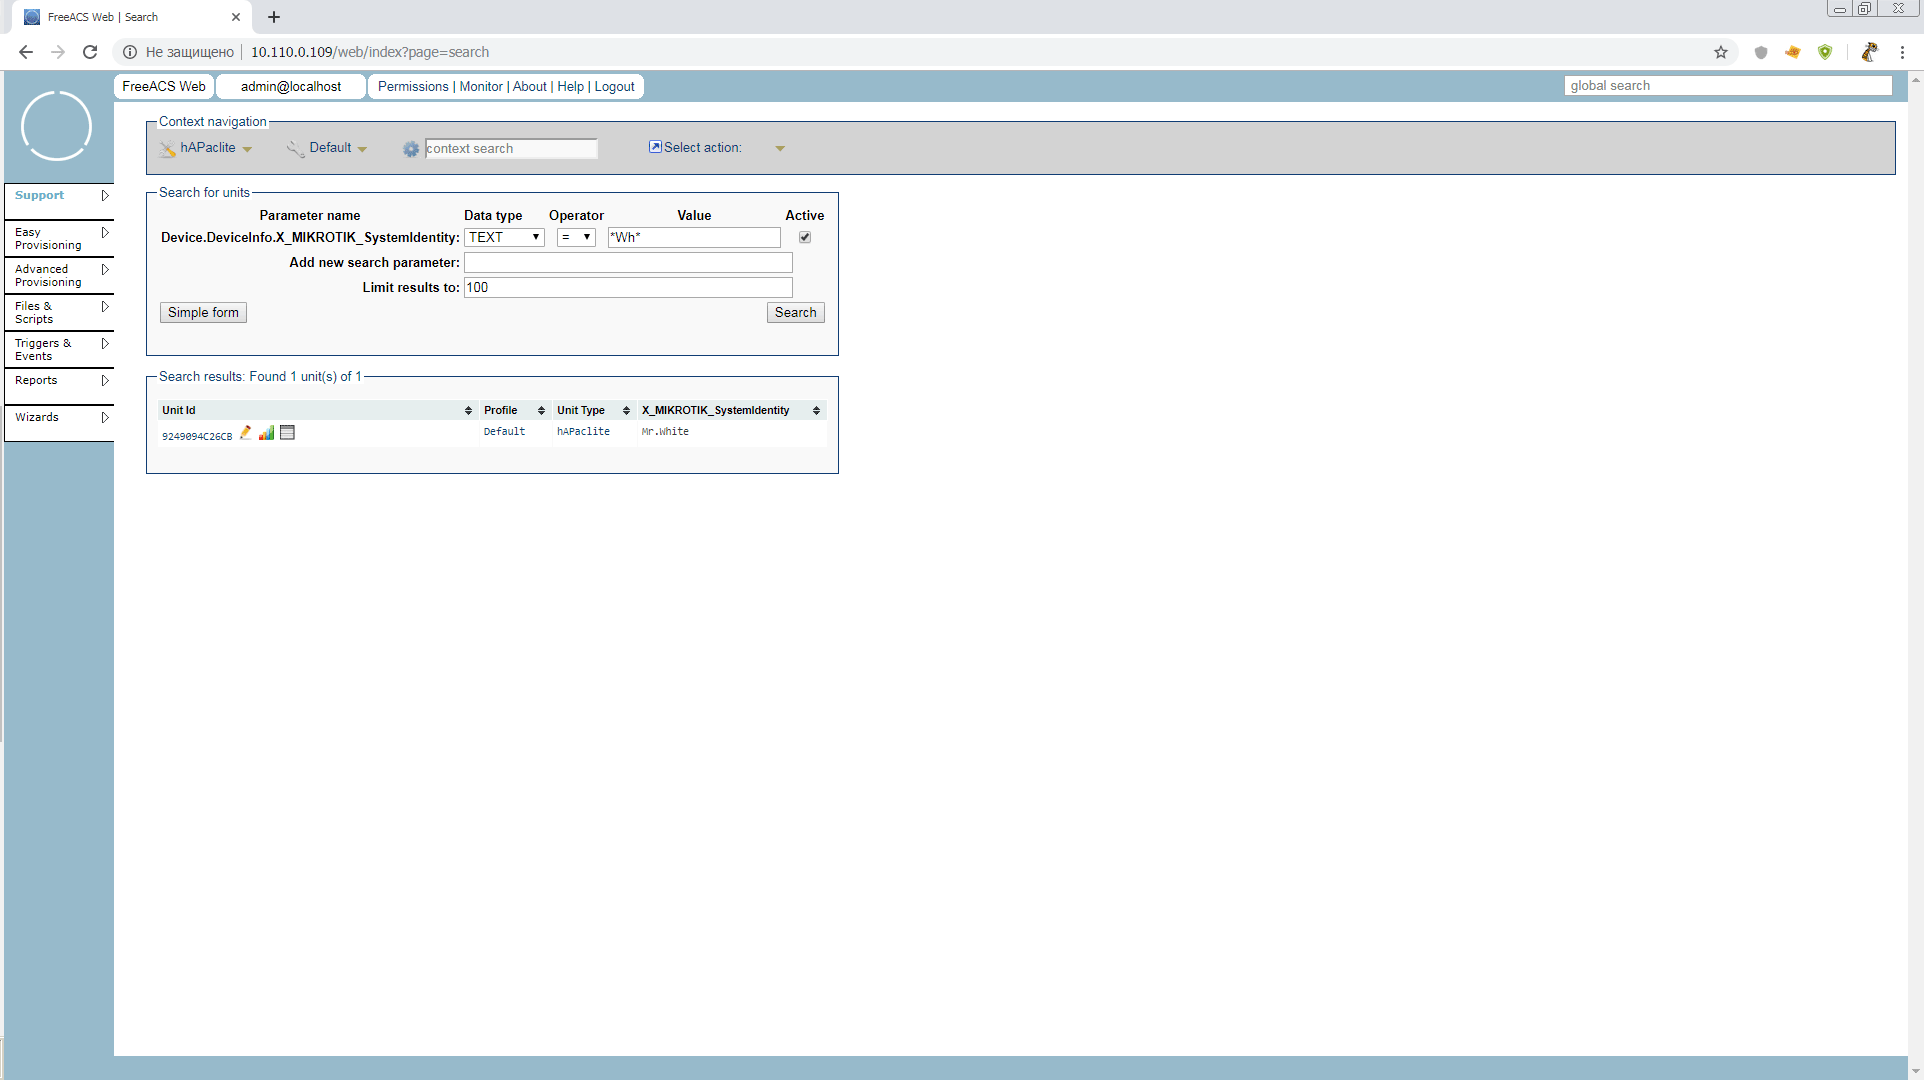
We initiate the provision and look at Identity. Hello Mr.White! Now you can’t change your identity yourself while tr-069client is running

Since we have found out that without them there is no way - let's execute them.
But before we start working with files, we need to correct the directive
in the file
After all, we still have a test configuration installed by one script. Do not forget?
Reboot ACS and head straight to
.

But what we are opening now belongs to Unit Type, i.e. globally to all hAP ac lite routers, whether it is a branch router, hotspot or capsman. We do not need such a high level yet, therefore, before working with scripts and files, you should create a profile. You can call it yourself, as the "position" of the device.
Let's make our baby a time server. Decent post with a separate software package and a small number of parameters. Go to
and create a timeserver profile in Unit Type: hAPaclite . We had no parameters in the default profile, therefore there is nothing to copy Copy parameters from: "don't copy ..."
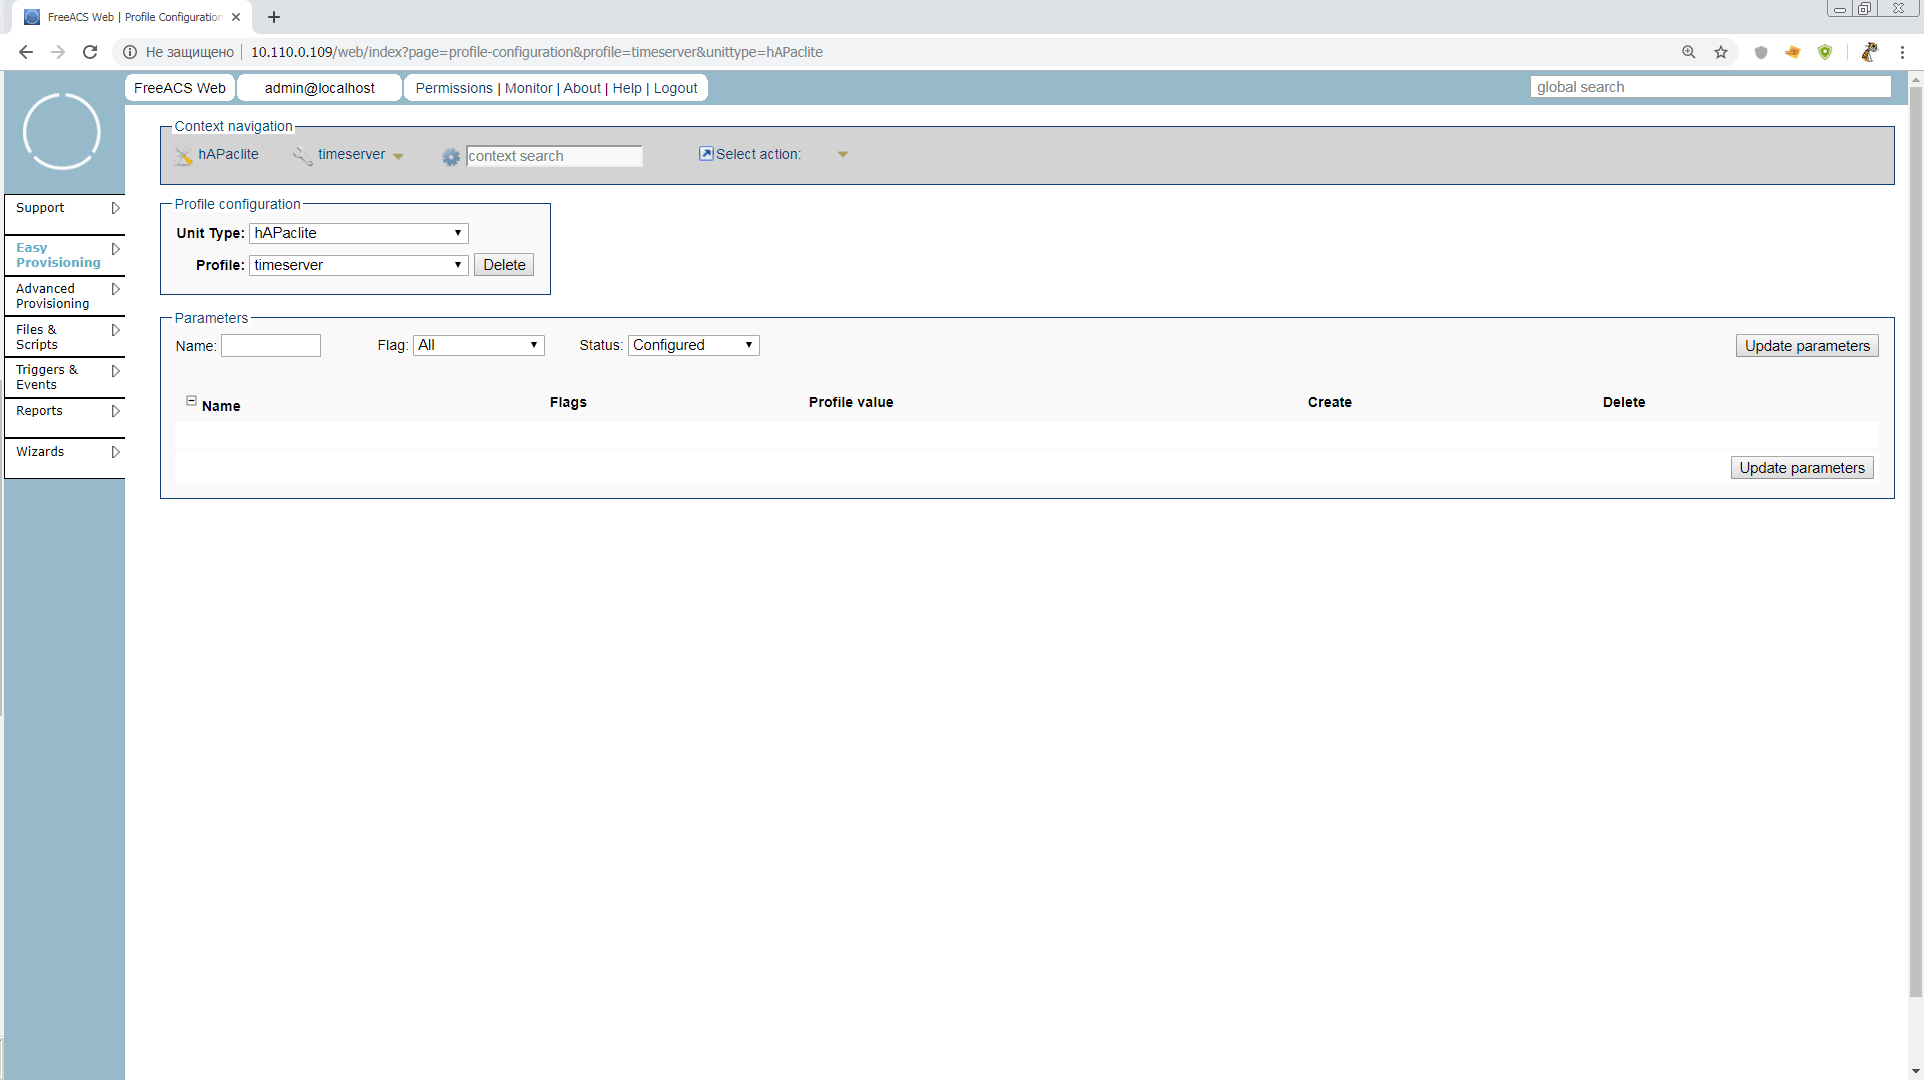
There are no parameters at all yet, but it will be possible to set those that we later want to see on our time servers, cobbled together from hAPaclite. For example, the common addresses of NTP servers.
Let's move into the unit configuration, and move it to the timeserver profile
Finally we go to
, make scripts, and here we are waiting for amazingly convenient buns.
In order to execute the script on the unit, we need to select Type: TR069_SCRIPT and Name and Target Name must have the extension .alter
At the same time, for scripts, unlike software, you can either load the finished file, or simply write / edit it in the Content field . Let's try writing right there.
And in order to immediately see the result - add a vlan router to ether1
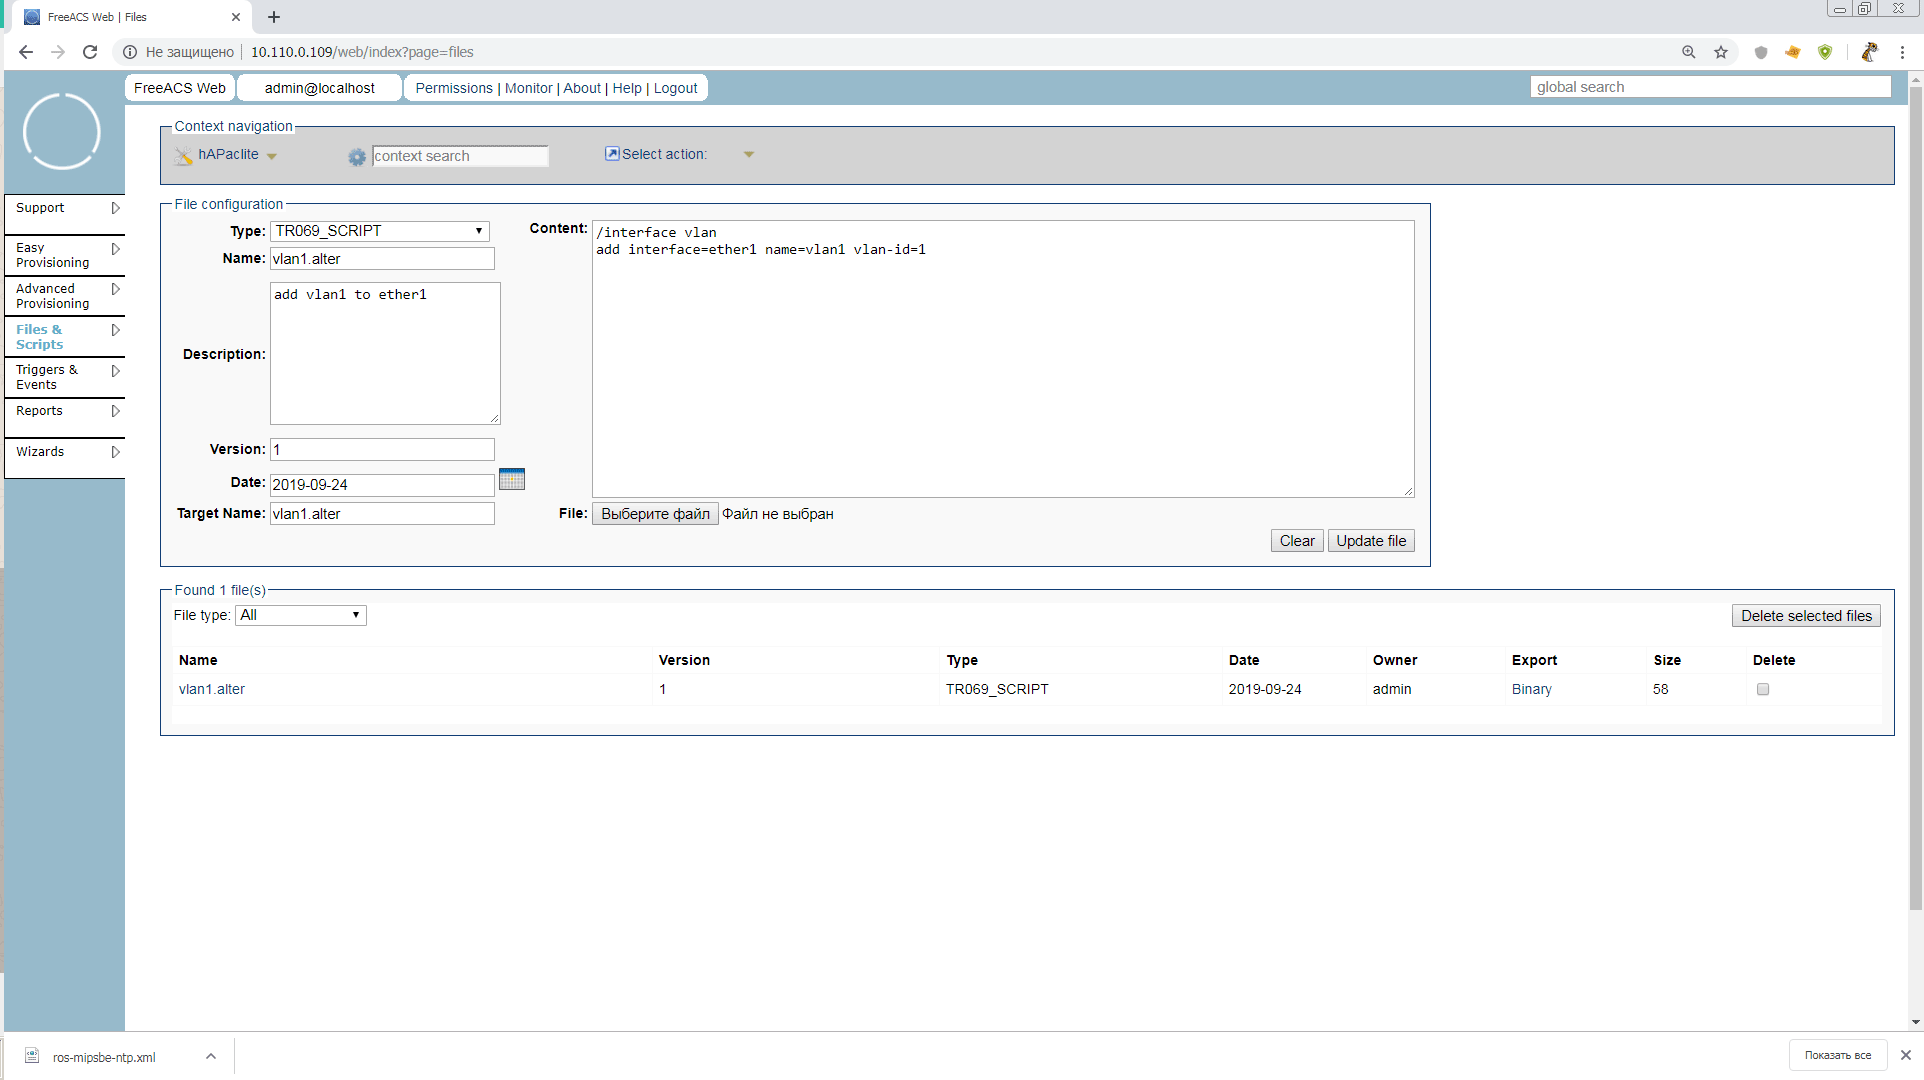
Drive in, click Upload and you're done. Our script
waiting in the wings.
Well, drove it? No. We must also add a group to our profile. Groups are not included in the equipment hierarchy, but are needed to search for units in UnitType or Profile and are required to execute scripts through Advanced Provisioning. Usually, groups are associated with locations, and have a nested structure. Let's make a group Russia.

Just imagine, we were able to narrow the search from “All time servers of the world on hAPaclite” to “All time servers of Russia on hAPaclite”. There is still a huge layer of everything interesting with groups, but we have no time. We drove into the scripts already.

Since we are in Advanced mode after all, here you can specify a bunch of different conditions for starting the job, error behavior, retries, and timeouts. I recommend reading it all in manuals or discussing it later when implementing it in production. For now, just put n1 in Stop rules so that the task stops as soon as it is completed on our 1 unit.
We fill out the necessary, and it remains only to run!

Press START and wait. Now the counter of devices killed by an underdeveloped script will run briskly! Of course not. Such tasks are given for a long time, and this is their difference from scripts, Ansible and so on. Units themselves apply for tasks on a schedule or as they appear on the network, ACS keeps track of which units have already received tasks, and how they ended, and writes this to the unit’s parameters. There is 1 unit in our group, and if there were 1001 of them, the admin would run this task and go fishing
Come on. Reboot the router already or restart the TR-069 client. Everything should go smoothly and Mr.White will get a new vlan. And our Stop rule task will become PAUSED. That is, it can still be restarted or changed. If you click FINISH, the task will be written to the archive
This is a very important point, since the Mikrotik firmware is modular, but adding modules does not change the general version of the device firmware. Our ACS is normal, and I’m not used to it.
Now we’ll do it in quick & dirty style, and push the NTP module into the general firmware right away, but as soon as the version is updated on the device, we won’t be able to add another module in the same way.
In production, such a trick is better not to apply, and install modules optional for Unit Type only with scripts.
So, the first thing we need to do is prepare the software packages of the required versions and architecture, and put it on some accessible web server. For the test, anyone will go that our Mr.White can reach, and for production it is better to assemble an auto-update mirror of the necessary software, which is not scary to put on the web
Important! Remember to always include a package with tr-069client in updates!
As it turned out, the path length to the packets is very important! When I tried to use something like
, mikrotik fell into a cyclic connection to the resource, giving the TRFERCOMPLETE to tr-069 log. And I spent a certain amount of nerve cells trying to figure out what was wrong. Therefore, while we put in the root, until clarification
So, we should have three npk files available via http. It turned out so for me
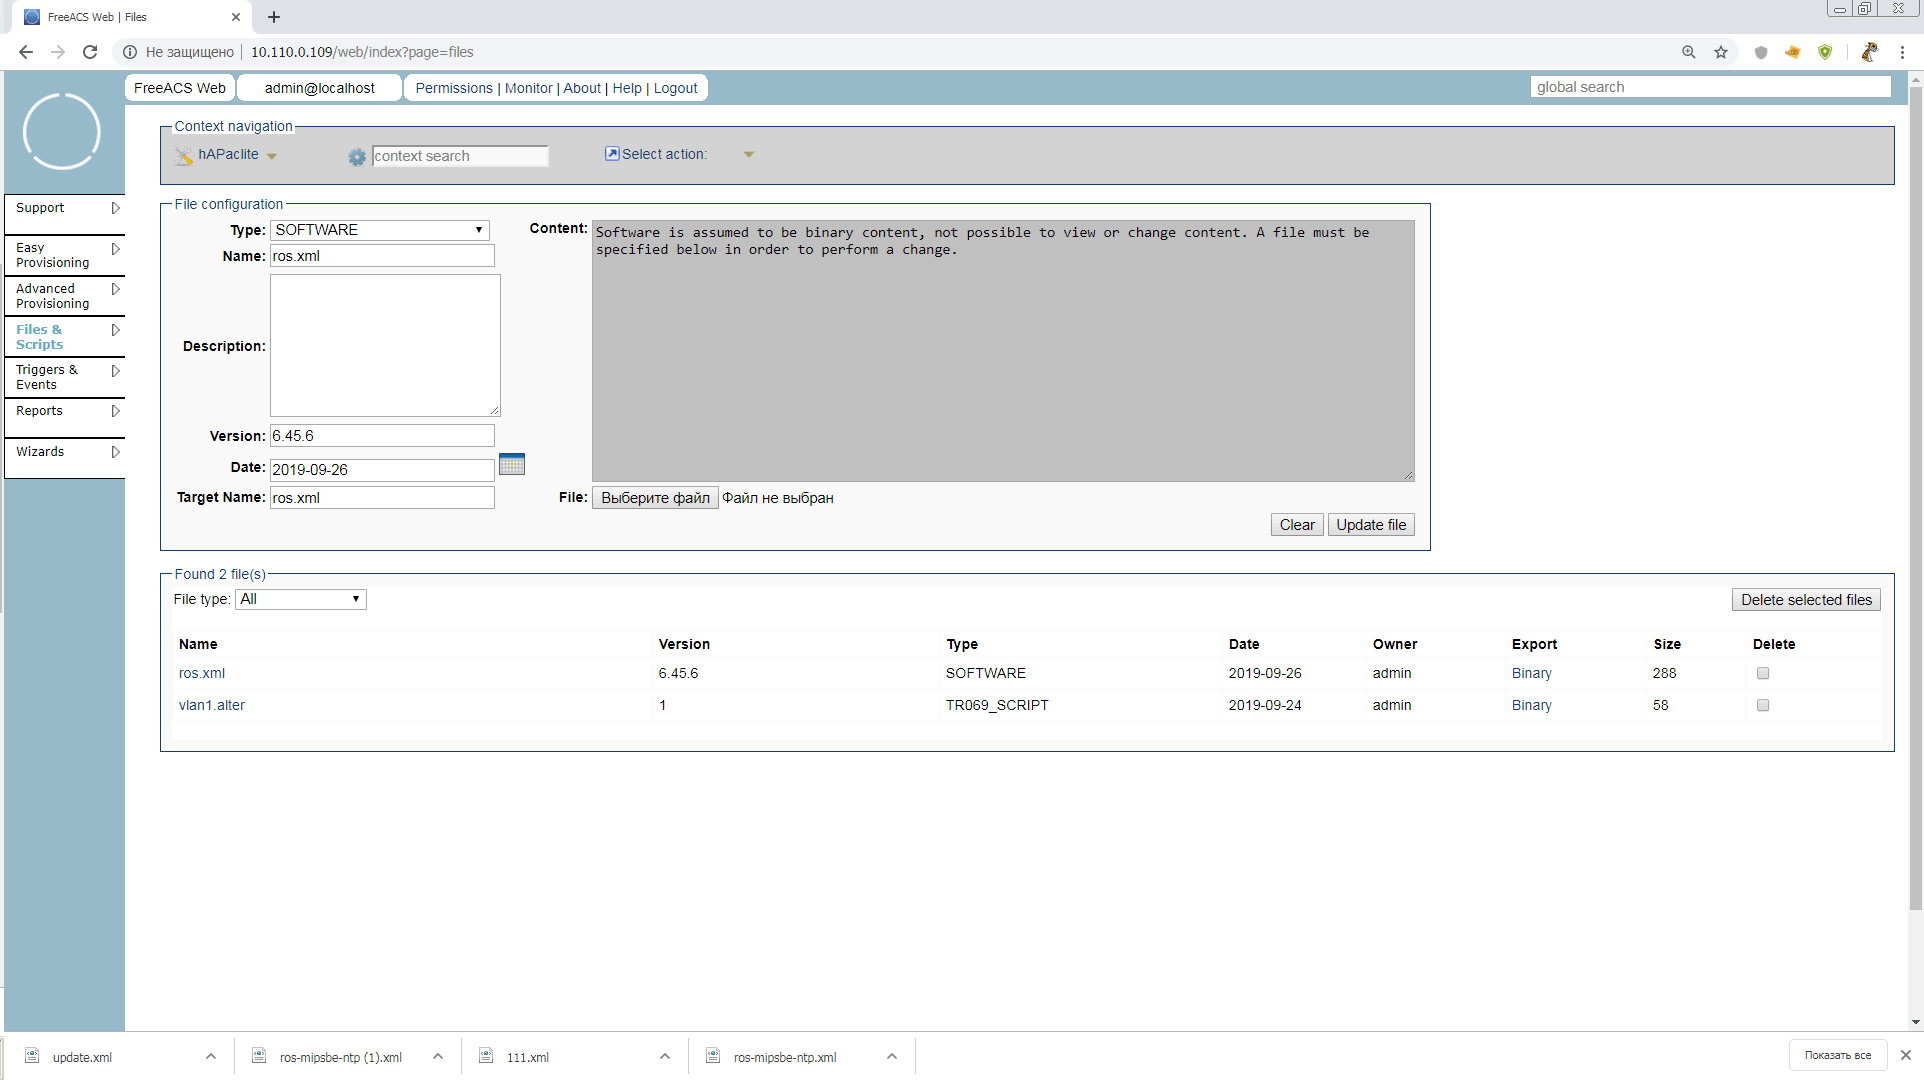
Now it needs to be issued in the xml-file with FileType = "1 Firmware Upgrade Image", which we feed Mikrotik. Let the name be ros.xml
We follow the instructions from the mikrotik-wiki :
The lack of
to access the download server is striking. You can either try to enter this as in clause A.3.2.8 of the tr-069 protocol:
Or ask directly the official Mikrotik, as well as the maximum path length to * .npk
We go to the
known to us, and create a file like SOFTWARE with Name: ros.xml, Target Name: ros.xml and Version: 6.45.6
Attention! The version here must be specified in the format in which it is displayed on the device and passed in the parameter
.
We select our xm file for download and you're done.
Now we have a ton of ways to upgrade your device. Through the Wizard in the main menu, through Advanced Provisioning and tasks with the SOFTWARE type, or simply go into the unit configuration and click Upgrade. We choose the easiest way, and even so the article is swollen.
Click the button, initiate the provision and you're done. The test program is completed. Now we can do more with mikrotik.
When I started to write, I wanted to first describe the connection of the ip-phone, and using his example to explain how cool it can be when tr-069 works easily and effortlessly. But then, as I progressed and dug through the materials, I thought that to the one who connected the Mikrotik, no phone would be scary for independent study.
In principle, Freeacs, which we tested, can already be used in production, but for this you need to configure security, SSL, you need to configure Mikrotik for auto-configuration after reset, you need to debug the correct addition of Unit Type, disassemble the work of webservices and fusion shell, and much more. Try, invent, and write a sequel!
Thank you all for your attention! I will be glad to amendments and comments!
List of materials used and useful links:
A forum thread I came across at the beginning of a search on a topic
TR-069 CPE WAN Management Protocol Amendment-6
Freeacs wiki
Parameters tr-069 in Mikrotik, and their compliance with terminal commands
Update 10.13.2019:
Looking through the information about the FreeACS project, I came across a very interesting patch proposed by the Polish guys who have FreeACS serving 20K devices.
The patch is made for different versions of hardware, but in the case of microtics, it will allow you to create several Unit Type for the same routers with a different set of software modules.
For example, hAPaclite-ntp, hAPaclite-ups, etc. And, accordingly, bypass the restriction "one model == one firmware"
The purpose of the article is to encourage colleagues to abandon the management of network devices with the terrible rake and crutches, in the form of self-written scripts, Dude, Ansible, etc. And, in this regard, cause fireworks and massive glee in the squares.
0. Choice
Why are freeacs, not genie-acs, mentioned in the mikrotik-wiki , more lively?
Because according to genie-acs with mikrotik there are publications of the Spaniards. Here are their pdf and video from last year's MUM. Auto caravans on slides are cool, but I would like to get away from the concept of writing scripts, to run scripts, to run scripts ...
1. Install freeacs
We will install it in Centos7, and since the devices transmit a lot of data, and ACS is actively working with the database - we will not be greedy with resources. For comfortable work, we allocate 2 CPU cores, 4GB RAM and 16GB ssd raid10 fast storage. I will install freeacs in the Proxmox VE lxc container, and you can work in any tool convenient for you.
Remember to set the correct time on the machine with ACS.
The system will be a test one, so we won’t be smart, and just use the kindly provided installation script, as it is.
wget https://raw.githubusercontent.com/freeacs/freeacs/master/scripts/install_centos.sh chmod +x install_centos.sh ./ install_centos.sh
As soon as the script is completed, you can immediately get to the web interface via the ip of the machine, with admin / freeacs credentials
Here is such a nice minimalistic interface, and how cool and fast it all turned out
2. Initial setup of freeacs
The basic control unit for ACS is a unit or CPE (Customer Premises Equipment). And most importantly, what we need to control units is their Unit Type, i.e. equipment model that defines a set of customizable unit parameters and its software. But while we do not know how to get the new Unit Type, it is best to ask the unit about it, turning on Discovery Mode.
In production, such a regime is absolutely impossible to use, but we need to start the engine soon and see the capabilities of the system. All basic settings are stored in / opt / freeacs- *. Therefore, open
vi /opt/freeacs-tr069/config/application-config.conf
we find
discovery.mode = false
and change to
discovery.mode = true
In addition, we would like to increase the maximum file sizes that nginx and mysql will work with. For mysql, add the line to /etc/my.cnf
max_allowed_packet=32M
, and for nginx, in /etc/nginx/nginx.conf add
client_max_body_size 32m;
to the http section. Otherwise, we will be able to work with firmware no more than 1M.
We reboot, and we are ready to work with devices.
And in the role of the device (CPE) we will have the hAP kid ACAP lite .
Before the test connection, it is advisable to manually configure the CPE to the minimum working configuration so that the parameters that you want to configure in the future are non-empty. For the router, you can minimally enable the dhcp client on ether1, install the tr-069client package and set passwords.
3. We connect Mikrotik
It is advisable to connect all units using a valid serial number as login. Then everything will be clear to you in the logs. Someone advises to use WAN MAC - do not believe. Someone uses a common login / pass pair for everyone - bypass them.
We open the tr-069 log for monitoring “negotiations”
tail -f /var/log/freeacs-tr069/tr069-conversation.log
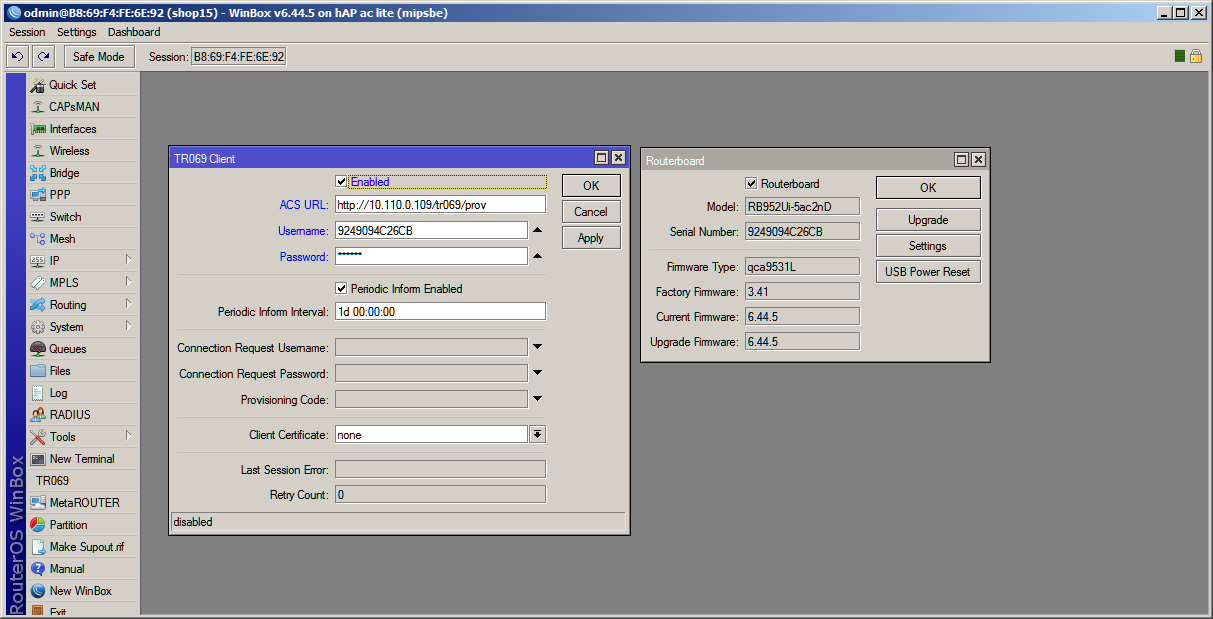
Open winbox, menu item TR-069.
ACS URL:
http://10.110.0.109/tr069/prov
(replace with your IP)
Username: 9249094C26CB (copy the serial from system> routerboard)
Password: 123456 (not needed for discovery, but to be)
Periodic inform interval we do not change. We will issue this setting through our ACS
Below are the settings for remote connection initialization, but I couldn’t work with mikrotik with a snap. Although remote request works with phones out of the box. It will be necessary to understand.
After clicking the Apply button, data will be exchanged in the terminal, and in the Freeacs web interface you can see our router with the automatically created Unit Type “hAPaclite”.
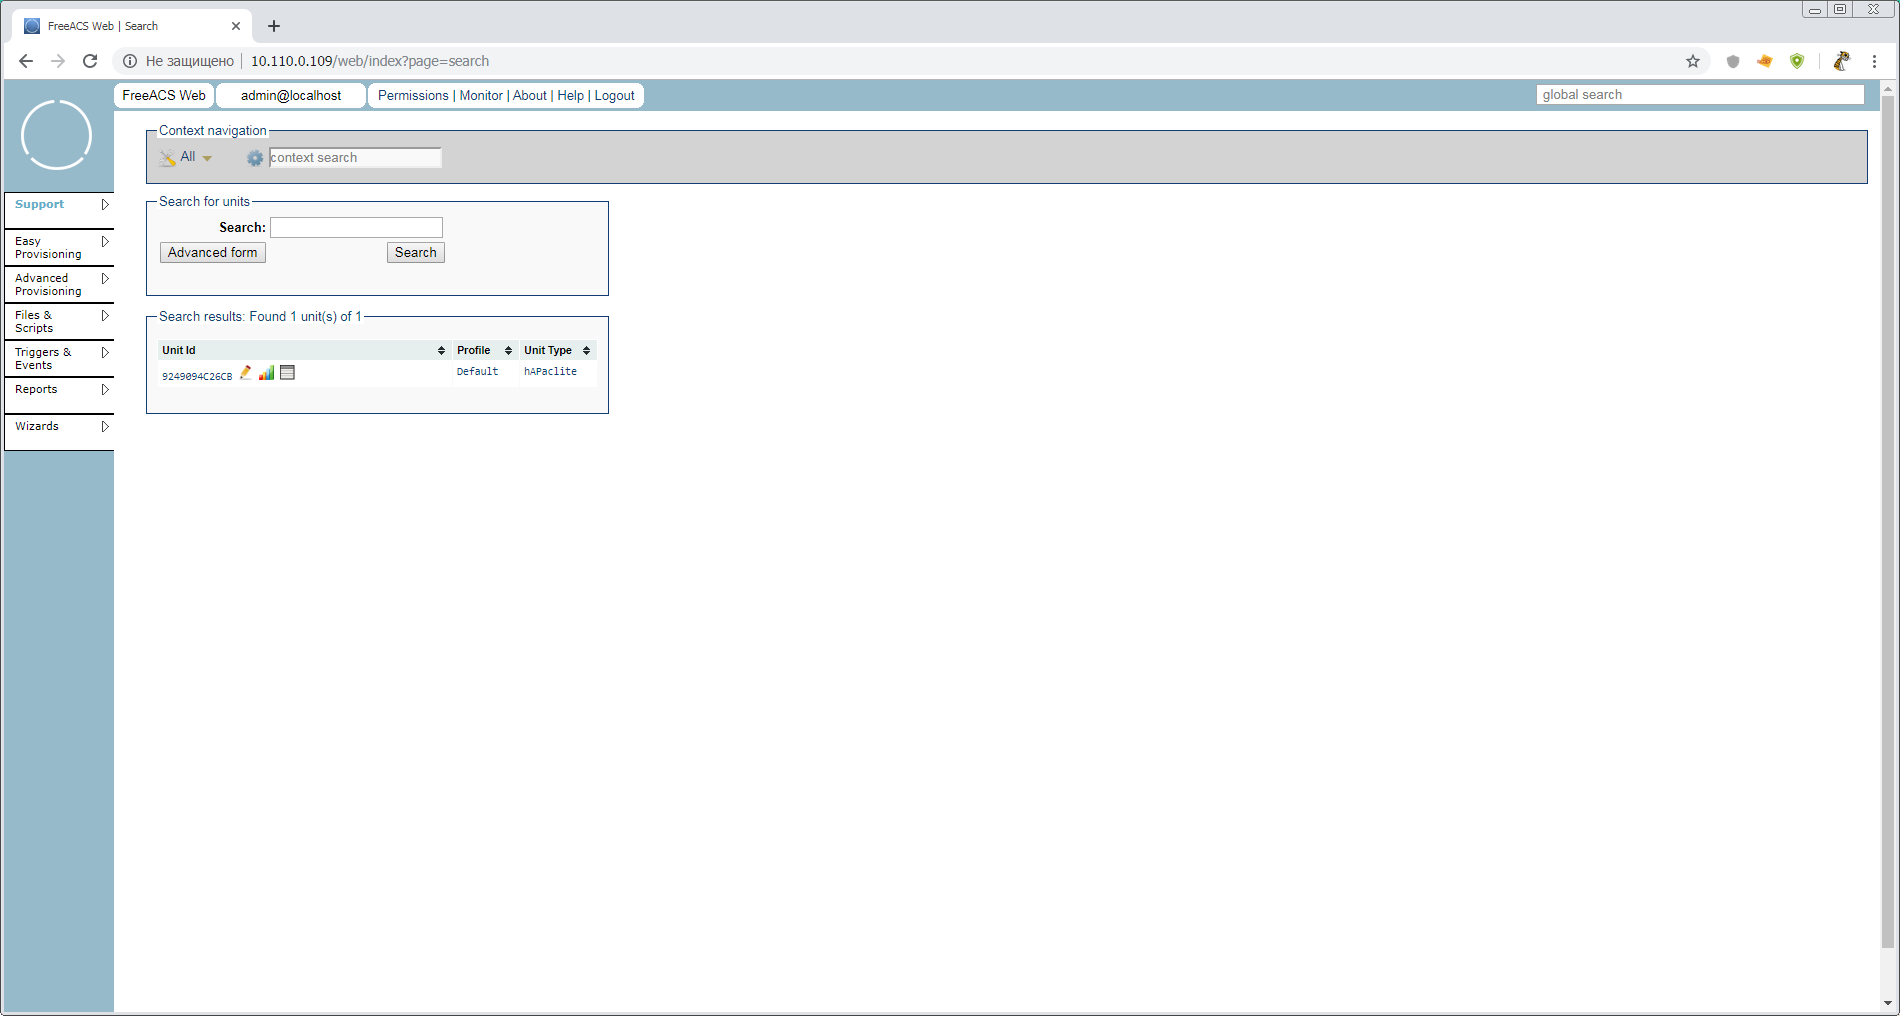
The router is connected. You can look at the automatically created Unit Type. Open
Easy Provisioning > Unit Type > Unit Type Overview > hAPaclite
. What is there not only! As many as 928 parameters (I spied in the shell). Whether it is a lot or a little, we'll figure it out later, but for now just a quick look. This is what Unit Type means. This is a list of supported parameters with keys, but no values. Values are set in the levels below - Profiles and Units.
4. Configure Mikrotik
It's time to download the web interface guide This 2011 guide is like a bottle of good, aged wine. Let's open it and leave to breathe.
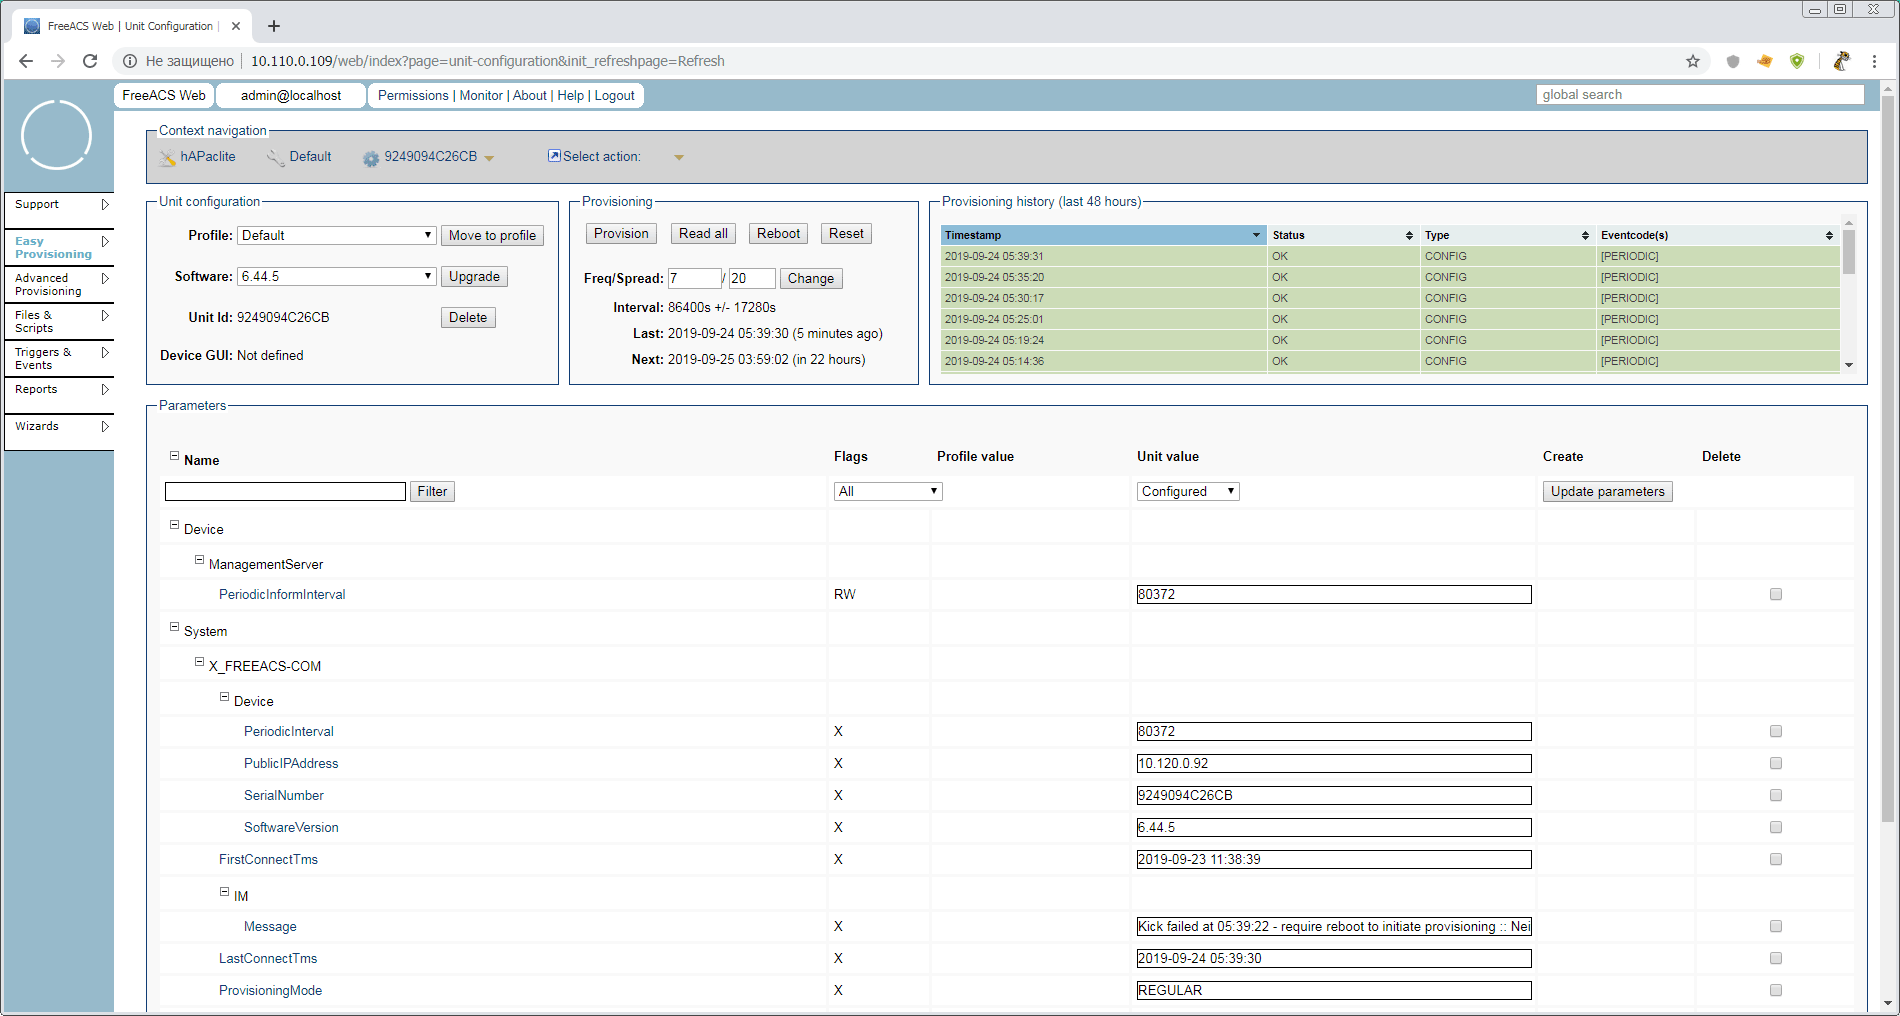
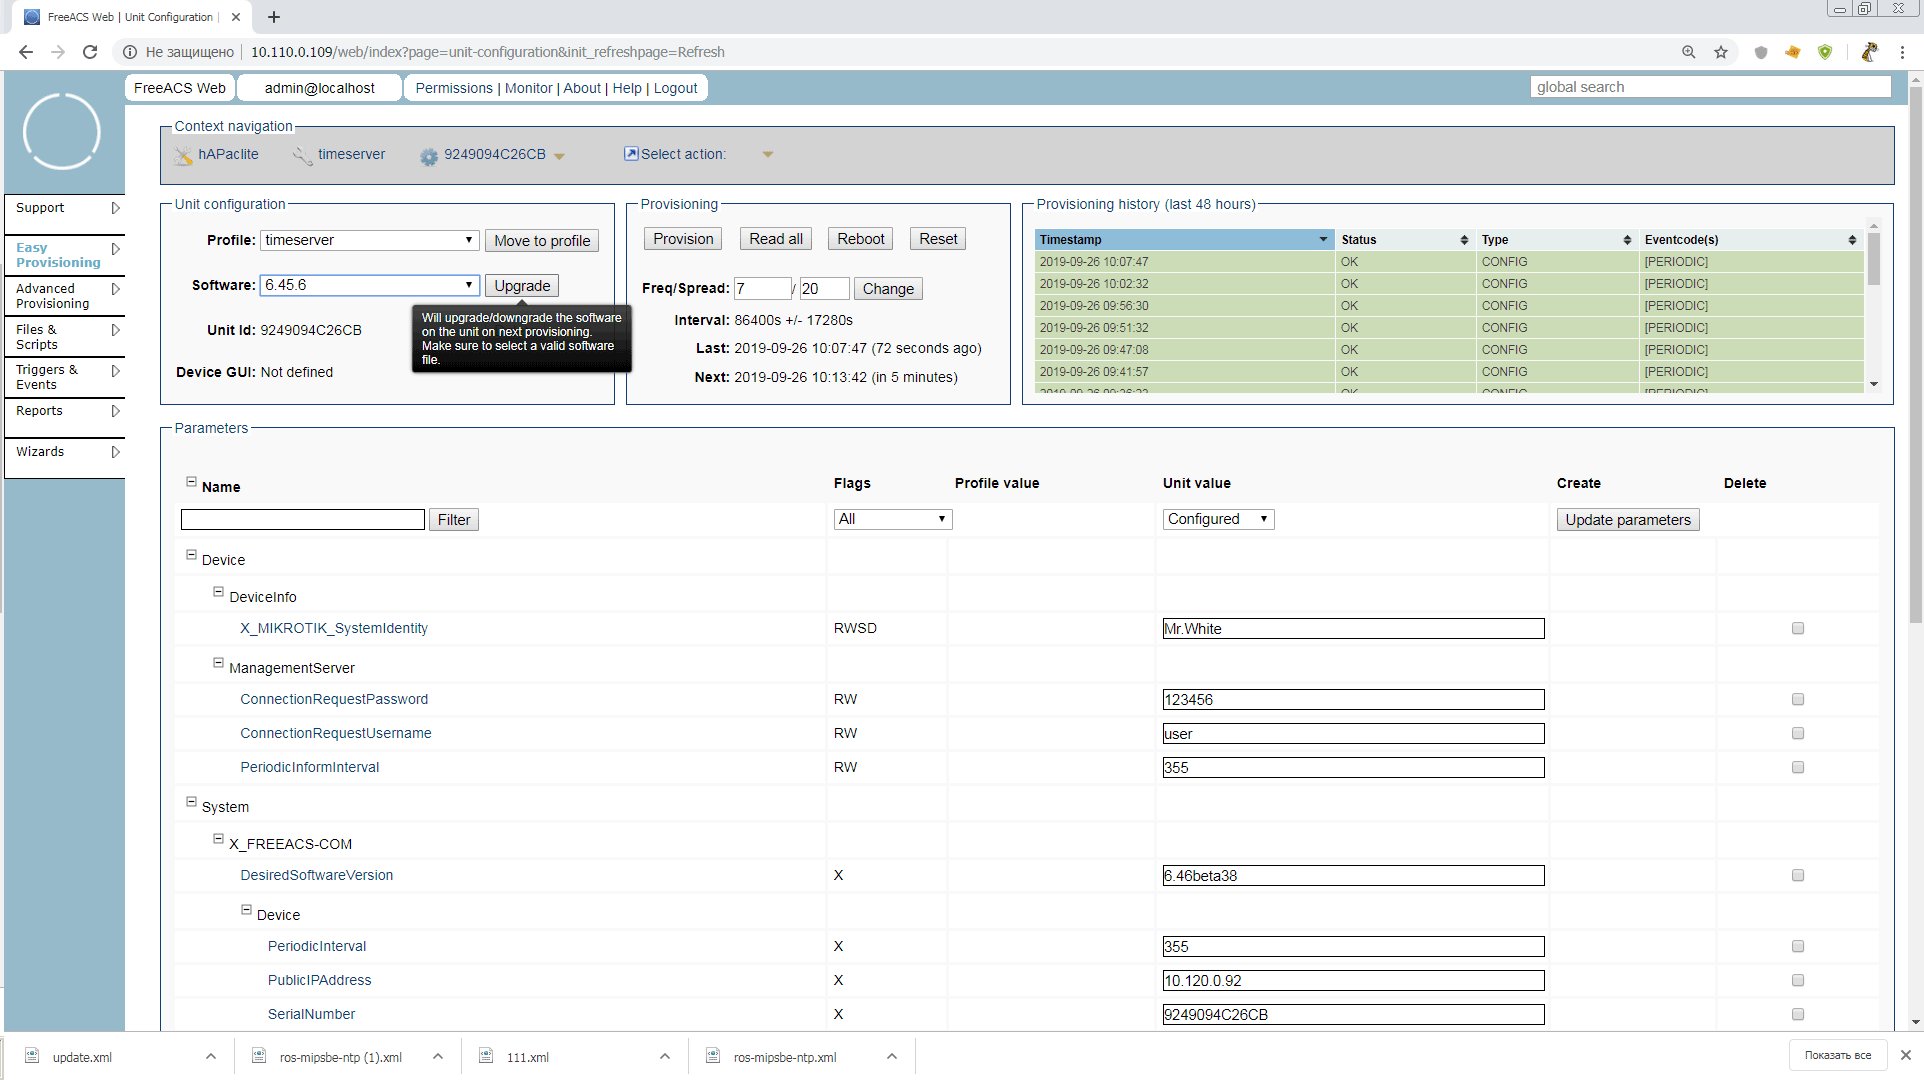
And ourselves, in the web interface, click on the pencil next to our unit and go into unit configuration mode. It looks like this:
We will briefly analyze what is interesting on this page:
Unit configuration block
- Profile: This is the profile inside Unit Type. The hierarchy is:
UnitType > Profile > Unit
. That is, we can get, for example, profileshAPaclite > hotspot
andhAPaclite > branch
, but within the device model
Provisioning unit with buttons
Tips hint that all buttons in the Provisioning block can instantly apply configuration through ConnectionRequestURL. But, as I said above, this does not work, so after clicking the buttons, you will need to restart the tr-069 client on mikrotik to manually start provision.
- Freq / Spread: How many times a week to deliver ±% configuration to reduce the load on the server and communication channels. By default it costs 7/20, i.e. every day ± 20% and a hint like this in seconds. While there is no point in changing the frequency of delivery, tk. there will be extra noise in the logs and not always the expected application of the settings
Provisioning history block (last 48 hours)
- It looks like a story, like a story, but by clicking on the title you get into a convenient database search tool, with regexp and buns
Parameters block
The largest and most important block, where, in fact, the parameters for this unit are set and read. Now we see only the most important system parameters, without which ACS cannot work with the unit. But we remember that we have 928 in Unit Type. Let's look at all the values, and decide with what it all eat at Mikrotik.
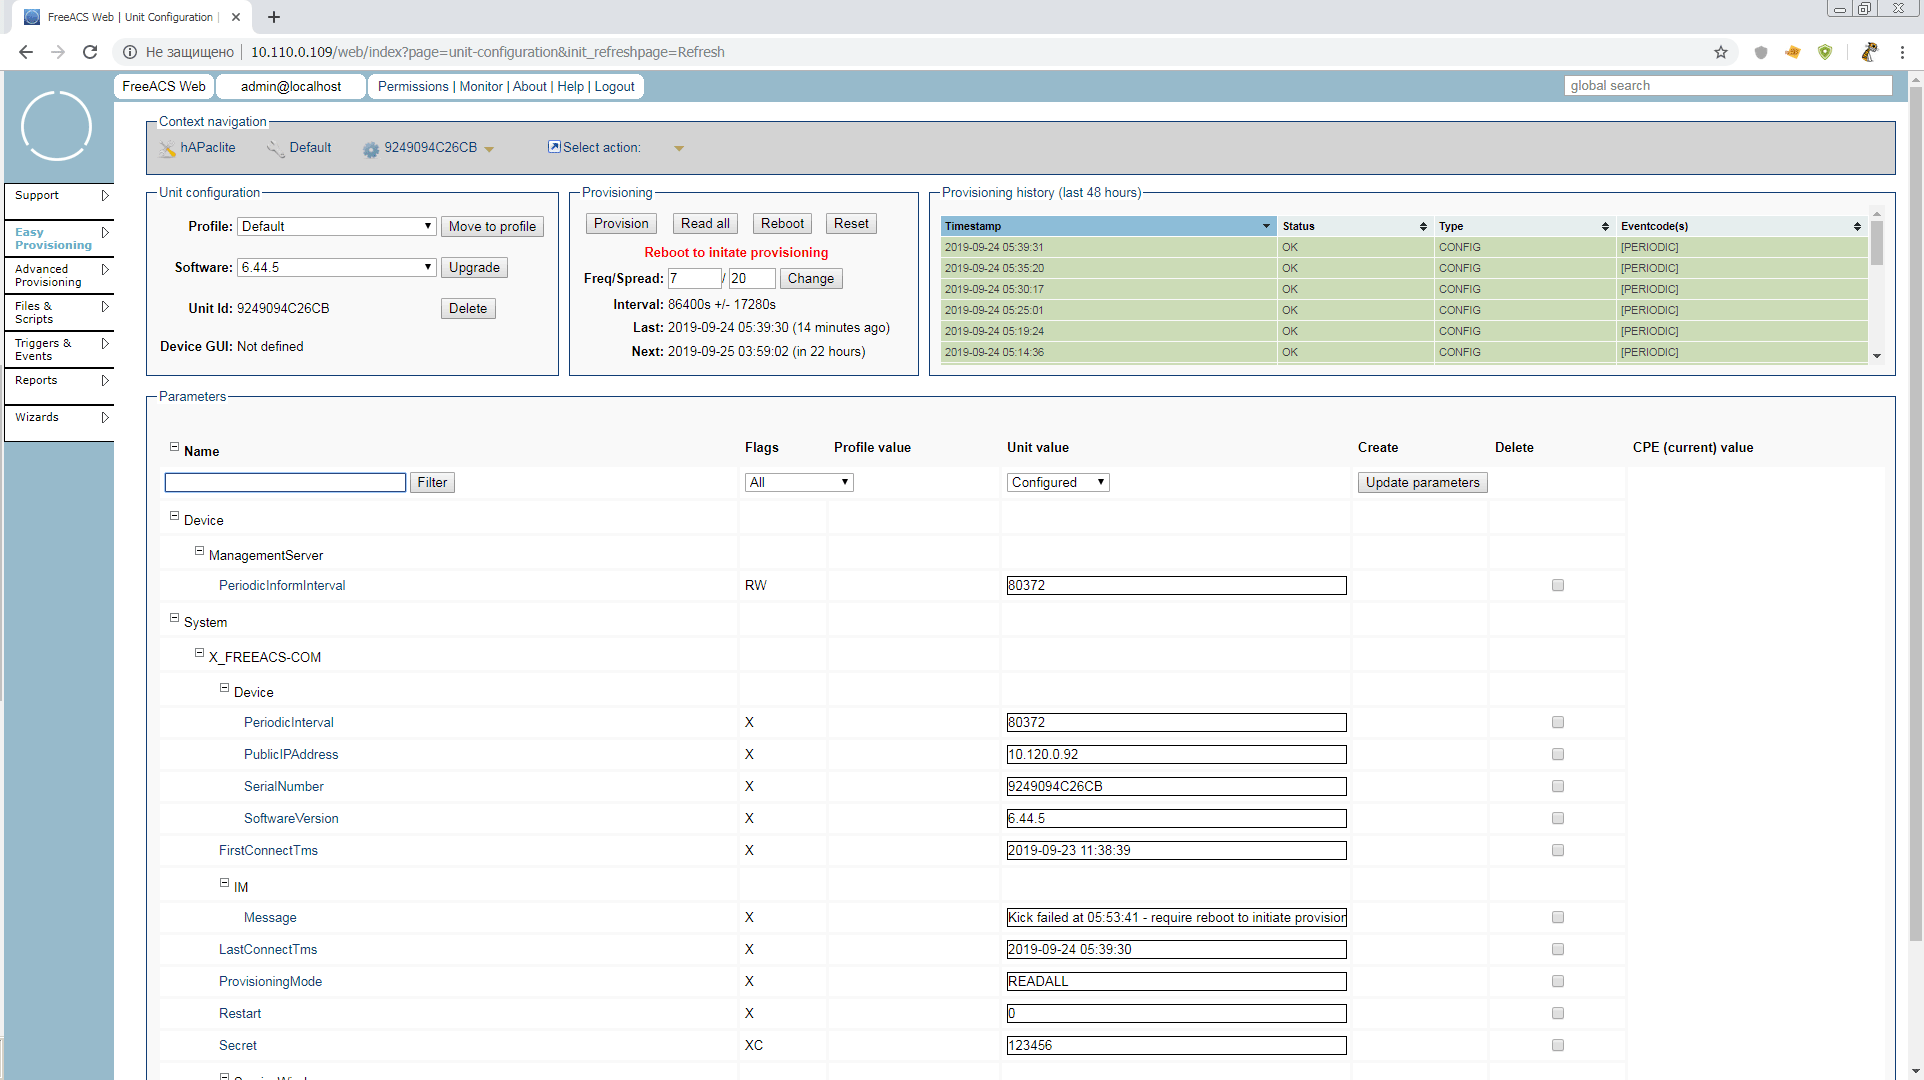
4.1 Read the parameters
In the Provisioning block, click the Read all button. In the block - a red inscription. The CPE (current) value column appears on the right. In the system settings, ProvisioningMode changed to READALL.
And ... nothing will happen except the message in System.X_FREEACS-COM.IM.Message
Kick failed at...
Restart the TR-069 client or reload the router, and continue to refresh the browser page until you get the parameters in the cheerful gray rectangles on the right
If anyone wants to take a sip of the old seasoned - this mode in the manual is described as 10.2 Inspection mode. It turns on and works a little wrong, but the essence is described quite
READALL mode itself will turn off after 15 minutes, and we will try to figure out what is useful and what can be corrected “on the fly” while we are in this mode.
You can change IP addresses, enable / disable interfaces, firewall rules that have comments (otherwise a complete mess), Wi-Fi and so on trifles.
That is, it is not yet possible to configure mikrotik sane with TR-069 only. But you can monitor very well. Available statistics on interfaces and their status, free memory, etc.
4.2 Delivery parameters
Let's now try to deliver the parameters to the router, via tr-069, in a "natural" way. The first victim will be Device.DeviceInfo.X_MIKROTIK_SystemIdentity. We find it in the unit parameters All. Apparently - it is not set. This means that any unit can itself have any Identity. Enough tolerating this!
Poke a daw in the create column, set the name Mr.White and poke the Update parameters button. What will happen next you already guessed. At the next communication session with the headquarters, the router must change its Identity.
But this is not enough for us. Such a parameter as Identity is good to always have at hand when searching for the desired unit. Poke in the parameter name and put there the daws Display (D) and Searchable (S). The parameter key changes to RWSD (Remember, names and keys are set at the highest level of Unit Type)
The value is now not only displayed in the general search list, but also available for search in
Support > Search > Advanced form
We initiate the provision and look at Identity. Hello Mr.White! Now you can’t change your identity yourself while tr-069client is running
4.3 We execute scripts
Since we have found out that without them there is no way - let's execute them.
But before we start working with files, we need to correct the directive
public.url
in the file
/opt/freeacs-tr069/config/application-config.conf
After all, we still have a test configuration installed by one script. Do not forget?
# --- Public url (used for download f. ex.) --- public.url = "http://10.110.0.109" public.url: ${?PUBLIC_URL}
Reboot ACS and head straight to
Files & Scripts
.
But what we are opening now belongs to Unit Type, i.e. globally to all hAP ac lite routers, whether it is a branch router, hotspot or capsman. We do not need such a high level yet, therefore, before working with scripts and files, you should create a profile. You can call it yourself, as the "position" of the device.
Let's make our baby a time server. Decent post with a separate software package and a small number of parameters. Go to
Easy Provisioning > Profile > Create Profile
and create a timeserver profile in Unit Type: hAPaclite . We had no parameters in the default profile, therefore there is nothing to copy Copy parameters from: "don't copy ..."
There are no parameters at all yet, but it will be possible to set those that we later want to see on our time servers, cobbled together from hAPaclite. For example, the common addresses of NTP servers.
Let's move into the unit configuration, and move it to the timeserver profile
Finally we go to
Files & Scripts
, make scripts, and here we are waiting for amazingly convenient buns.
In order to execute the script on the unit, we need to select Type: TR069_SCRIPT and Name and Target Name must have the extension .alter
At the same time, for scripts, unlike software, you can either load the finished file, or simply write / edit it in the Content field . Let's try writing right there.
And in order to immediately see the result - add a vlan router to ether1
/interface vlan add interface=ether1 name=vlan1 vlan-id=1
Drive in, click Upload and you're done. Our script
vlan1.alter
waiting in the wings.
Well, drove it? No. We must also add a group to our profile. Groups are not included in the equipment hierarchy, but are needed to search for units in UnitType or Profile and are required to execute scripts through Advanced Provisioning. Usually, groups are associated with locations, and have a nested structure. Let's make a group Russia.
Just imagine, we were able to narrow the search from “All time servers of the world on hAPaclite” to “All time servers of Russia on hAPaclite”. There is still a huge layer of everything interesting with groups, but we have no time. We drove into the scripts already.
Advanced Provisioning > Job > Create Job
Since we are in Advanced mode after all, here you can specify a bunch of different conditions for starting the job, error behavior, retries, and timeouts. I recommend reading it all in manuals or discussing it later when implementing it in production. For now, just put n1 in Stop rules so that the task stops as soon as it is completed on our 1 unit.
We fill out the necessary, and it remains only to run!
Press START and wait. Now the counter of devices killed by an underdeveloped script will run briskly! Of course not. Such tasks are given for a long time, and this is their difference from scripts, Ansible and so on. Units themselves apply for tasks on a schedule or as they appear on the network, ACS keeps track of which units have already received tasks, and how they ended, and writes this to the unit’s parameters. There is 1 unit in our group, and if there were 1001 of them, the admin would run this task and go fishing
Come on. Reboot the router already or restart the TR-069 client. Everything should go smoothly and Mr.White will get a new vlan. And our Stop rule task will become PAUSED. That is, it can still be restarted or changed. If you click FINISH, the task will be written to the archive
4.4 Update software
This is a very important point, since the Mikrotik firmware is modular, but adding modules does not change the general version of the device firmware. Our ACS is normal, and I’m not used to it.
Now we’ll do it in quick & dirty style, and push the NTP module into the general firmware right away, but as soon as the version is updated on the device, we won’t be able to add another module in the same way.
In production, such a trick is better not to apply, and install modules optional for Unit Type only with scripts.
So, the first thing we need to do is prepare the software packages of the required versions and architecture, and put it on some accessible web server. For the test, anyone will go that our Mr.White can reach, and for production it is better to assemble an auto-update mirror of the necessary software, which is not scary to put on the web
Important! Remember to always include a package with tr-069client in updates!
As it turned out, the path length to the packets is very important! When I tried to use something like
http://192.168.0.237/routeros/stable/mipsbe/routeros-mipsbe-6.45.6.npk
, mikrotik fell into a cyclic connection to the resource, giving the TRFERCOMPLETE to tr-069 log. And I spent a certain amount of nerve cells trying to figure out what was wrong. Therefore, while we put in the root, until clarification
So, we should have three npk files available via http. It turned out so for me
http://192.168.0.241/routeros-mipsbe-6.45.6.npk http://192.168.0.241/routeros/stable/mipsbe/ntp-6.45.6-mipsbe.npk http://192.168.0.241/routeros/stable/mipsbe/tr069-client-6.45.6-mipsbe.npk
Now it needs to be issued in the xml-file with FileType = "1 Firmware Upgrade Image", which we feed Mikrotik. Let the name be ros.xml
We follow the instructions from the mikrotik-wiki :
<upgrade version="1" type="links"> <config /> <links> <link> <url>http://192.168.0.241/routeros-mipsbe-6.45.6.npk</url> </link> <link> <url>http://192.168.0.241/ntp-6.45.6-mipsbe.npk</url> </link> <link> <url>http://192.168.0.241/tr069-client-6.45.6-mipsbe.npk</url> </link> </links> </upgrade>
The lack of
Username/Password
to access the download server is striking. You can either try to enter this as in clause A.3.2.8 of the tr-069 protocol:
<link> <url>http://192.168.0.237/routeros/stable/mipsbe/ntp-6.45.6-mipsbe.npk</url> <Username>user</Username> <Password>pass</Password> </link>
Or ask directly the official Mikrotik, as well as the maximum path length to * .npk
We go to the
Files & Scripts
known to us, and create a file like SOFTWARE with Name: ros.xml, Target Name: ros.xml and Version: 6.45.6
Attention! The version here must be specified in the format in which it is displayed on the device and passed in the parameter
System.X_FREEACS-COM.Device.SoftwareVersion
.
We select our xm file for download and you're done.
Now we have a ton of ways to upgrade your device. Through the Wizard in the main menu, through Advanced Provisioning and tasks with the SOFTWARE type, or simply go into the unit configuration and click Upgrade. We choose the easiest way, and even so the article is swollen.
Click the button, initiate the provision and you're done. The test program is completed. Now we can do more with mikrotik.
5. Conclusion
When I started to write, I wanted to first describe the connection of the ip-phone, and using his example to explain how cool it can be when tr-069 works easily and effortlessly. But then, as I progressed and dug through the materials, I thought that to the one who connected the Mikrotik, no phone would be scary for independent study.
In principle, Freeacs, which we tested, can already be used in production, but for this you need to configure security, SSL, you need to configure Mikrotik for auto-configuration after reset, you need to debug the correct addition of Unit Type, disassemble the work of webservices and fusion shell, and much more. Try, invent, and write a sequel!
Thank you all for your attention! I will be glad to amendments and comments!
List of materials used and useful links:
A forum thread I came across at the beginning of a search on a topic
TR-069 CPE WAN Management Protocol Amendment-6
Freeacs wiki
Parameters tr-069 in Mikrotik, and their compliance with terminal commands
Update 10.13.2019:
Looking through the information about the FreeACS project, I came across a very interesting patch proposed by the Polish guys who have FreeACS serving 20K devices.
The patch is made for different versions of hardware, but in the case of microtics, it will allow you to create several Unit Type for the same routers with a different set of software modules.
For example, hAPaclite-ntp, hAPaclite-ups, etc. And, accordingly, bypass the restriction "one model == one firmware"
All Articles