[Admin summary] How to make friends with DHCP and not be afraid of APIPA

The service that issues IP addresses to devices on the local network seems to be one of the simplest and most familiar. Nevertheless, my younger colleagues still occasionally have questions like “the computer is receiving some strange address,” and the appearance of a second DHCP server in one network segment causes some thrill or network problems.
So that those who read this material do not have such questions, I would like to put together a bunch of basic information about the operation of IP address issuing mechanisms, features and configuration examples of fault-tolerant and protected configurations. And perhaps it will be interesting for seasoned specialists to refresh neural connections.
A little theory and solutions to interesting and not very practical problems - under the cut.
In a modern local area network, the issuing of addresses is usually done by specialized services with protocol support. The most popular of these is DHCP (Dynamic Host Configuration Protocol).
Zeroconf or why do we need some kind of DHCP
In principle, a technology stack called Zeroconf was created specifically for small networks. It allows you to do without any centralized services and servers, including, but not limited to issuing IP addresses. They close (well, or almost close) the following questions:
Obtaining an IP address (Automatic Private IP Addressing or APIPA). The system itself assigns an IP from the 169.254.0.0/16 network (except for the / 24 grids at the beginning and end of the range), based on the MAC address and the pseudo random number generator. This system allows you to avoid conflicts, and the address from this network is called link-local - including because these addresses are not routed.
Search by name . The system announces its network name, and each computer works with it as with DNS, storing entries in its cache. Apple uses mDNS (Multicast DNS) technology, and Microsoft uses LLMNR (Link-local Multicast Name Resolution), mentioned in the article “ Domains, Addresses, and Windows: Mix, but Don't Shake .”
Search for network services . For example, printers. Perhaps the most famous protocol is UPnP , which, among other things, can open ports on routers itself. The protocol is quite complex, it uses a whole set of add-ons like using http, unlike the second well-known protocol - DNS-SD (DNS Service Discovery), which simply uses SRV records, including when working with mDNS.
With all the advantages of Zeroconf - without any sacred knowledge, you can build a working network by simply connecting computers at the physical level - it can even interfere with IT specialists.

A bit annoying, isn't it?
On Windows systems, to disable auto-tuning on all network adapters, you need to create a DWORD parameter with the name IPAutoconfigurationEnabled in the HKEY_LOCAL_MACHINE \ SYSTEM \ CurrentControlSet \ Services \ Tcpip \ Parameters section and set it to 0.
Of course, Zeroconf is suitable only for small isolated networks (for example, you met a friend with laptops, connected them via Wi-Fi and let's play Diablo II, without wasting time on some servers), and I also want to put a local area network on the Internet . In order not to suffer with the static settings of each computer, special protocols were created, including the hero of the day - DHCP.
DHCP and its progenitors
One of the first implementations of the protocol for issuing IP addresses appeared more than 30 years ago and was called RARP (Reverse Address Resolution Protocol). To simplify the principle of its operation a little, it looked like this: the client made a request to the broadcast address of the network, the server accepted it, found the binding of the client's MAC address and IP in its database, and sent the IP in response.
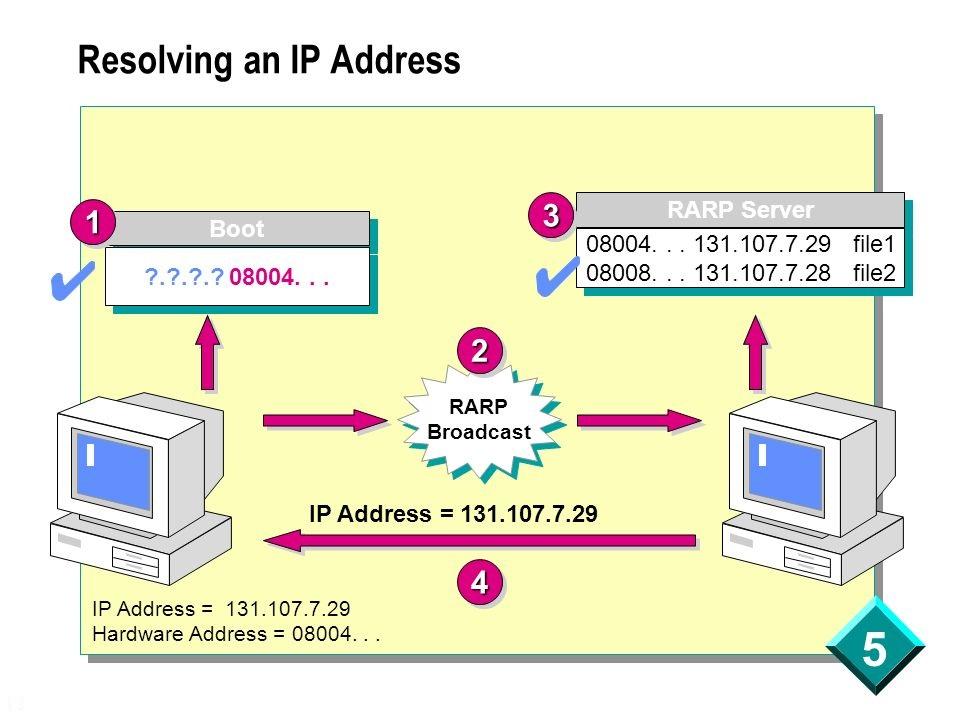
Scheme of the RARP protocol.
And everything seemed to work. But the protocol had its drawbacks: it was necessary to configure the server in each segment of the local network, register the MAC addresses on this server, and there was no way to transmit additional information to the client. Therefore, to replace it, the BOOTP protocol (Bootstrap Protocol) was created.
Initially, it was used for diskless workstations, which needed to not only give an IP address, but also transmit additional information to the client, such as the address of the TFTP server and the name of the download file. Unlike RARP, the protocol already supported relay — small services that forwarded requests to the “main” server. This made it possible to use one server on several networks simultaneously. It just remained the need to manually adjust the tables and the size limit for additional information. As a result, the modern DHCP protocol has entered the scene, which is a compatible extension of BOOTP (the DHCP server supports legacy clients, but not vice versa).
An important difference from obsolete protocols is the ability to temporarily issue an address (lease) and transfer a large amount of different information to the client. This is achieved due to the less trivial procedure for obtaining the address. If in the old protocols the scheme was simple, of the form request-response, now the scheme is as follows:
- The client searches for the server with a broadcast request, requesting additional settings as well.
- The server responds to the client by offering it an IP address and other settings.
- The client confirms the received information by a broadcast request, indicating in the confirmation the IP address of the selected server.
- The server agrees with the client by sending him a request, upon receipt of which the client already configures the network interface or rejects it.
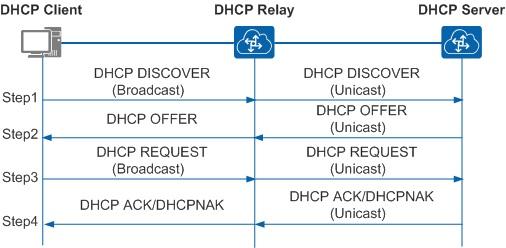
The communication scheme of the client with the forwarding server and the server.
You can read more about the server-client interaction scheme and the structure of requests and responses, for example, in the material “ Structure, format and purpose of DHCP packets ”.
At several interviews they asked me: “What transport and port does DHCP use?” Just in case, we reply: “UDP server: 67, UDP client: 68”.
Many implementations of a DHCP server have been encountered by many, even when setting up a home network. Indeed, now the server is:
- On almost any router, especially SOHO.
- On Windows Server systems. You can read about the server and its configuration in the official documentation .
- On * nix systems. Perhaps the most popular software is ISC DHCP Server (dhcpd) and the Dnsmasq “harvester”.
There are a lot of specific implementations, but, for example, on SOHO routers, server settings are limited. This primarily concerns additional settings, in addition to the classic "IP address, mask, gateway, DNS server." And it is precisely these additional options that cause the greatest interest in the protocol. The full list can be found in the corresponding RFC , but I will analyze some interesting examples.
Amazing DHCP Options
In this section, I will discuss the practical use of DHCP options on MikroTik equipment. I’ll immediately draw attention to the fact that not all options are set obviously, the format of the parameters is described in the wiki . It should also be noted that the client applies the options only when he asks for them. In some servers, you can force settings to be sent: for example, in ISC DHCP Server, the dhcp-parameter-request-list directive is responsible for this, and in Dnsmasq - * * --dhcp-option-force . MikroTik and Windows cannot do this.
Option 6 and Option 15. Let's start with a simple one. Setting number 6 is the DNS servers assigned to clients, 15 is the DNS suffix. Assigning a DNS suffix can be useful when working with domain resources in a non-domain network, as I described in the article “ How we reduced staff through Wi-Fi ”. Configure MikroTik under the spoiler.
# 15. — HEX . /ip dhcp-server option add code=15 name=dns-suffix value=0x57687920616c6c207468697320736869743f # /ip dhcp-server option sets add name=dns option=dns-suffix # DHCP- . /ip dhcp-server network set [find comment="wi-fi client dhcp"] dhcp-option-set=dns
Knowing that a DNS server is also an option has recently come in handy when different clients had to issue different DNS servers. The decision of the form “issue one server and make different dst-nat rules for port 53” did not fit for a number of reasons. Part of the configuration is again under the spoiler.
# , , ip /ip dhcp-server option add code=6 name=google value="'8.8.8.8'" add code=6 name=cloudflare value="'1.1.1.1'" # /ip dhcp-server lease add address=10.0.0.2 dhcp-option=google mac-address=11:11:11:11:11:11 server=dhcp add address=10.0.0.3 dhcp-option=cloudflare mac-address=22:22:22:22:22:22 server=dhcp
Option 66 and Option 67 . These settings came back from BOOTP and allow you to specify the TFTP server and image for network boot. For a small branch, it’s quite convenient to install Mikrotik and diskless workstations there and throw a prepared image of some ThinStation onto the router . DHCP configuration example:
/ip dhcp-server option add name="option66" code=66 value="s'192.168.88.1'" add name="option67" code=67 value="'pxelinux.0'" /ip dhcp-server option sets add name="set-pxe" options=option66,option67
Option 121 and Option 249 . They are used to transmit additional routes to the client, which in some cases may be more convenient than registering routes on the default gateway. The settings are almost identical, except that Windows clients prefer the latter. To configure the parameter, the routes must be converted to hexadecimal, collecting the destination network mask, network address and gateway in one line. Also, by RFC, you must add a default route. The tuning option is under the spoiler.
Suppose we need to add a route like dst-address = 10.0.0.0 / 24 gateway = 192.168.88.2 to clients, and the main gateway will be 192.168.88.1. Let's bring it all in HEX:
| Settings Data | Dec | Hex |
| Mask | 24 | 0x18 |
| Destination network | 10.0.0.0 | 0x0A 00 00 |
| Gateway | 192.168.88.2 | 0xc0 a8 58 02 |
| Default network | 0.0.0.0/0 | 0x00 |
| Default gateway | 192.168.88.1 | 0xc0 a8 58 01 |
Let's collect all this happiness in one line and get the setting:
/ip dhcp-server option add code=121 name=classless value=0x0A0000c0a8580200c0a85801
Read more in the article “ Mikrotik, DHCP Classless Route ”.
Option 252. Automatic proxy server configuration. If for some reason the organization uses an opaque proxy, it will be convenient to configure it with clients through a special wpad (pac) file. An example of setting up such a file is described in the Proxy Auto Configuration (PAC) material. Unfortunately, MiroTik does not have a built-in web server to host this file. You can use the hotspot package or the metarouter features for this, but it’s better to place the file somewhere else.
Option 82 . One of the most useful options is not only for the client, but for the DHCP relay. Allows you to transfer information about the switch port to which the client is connected and the id of the switch itself. Based on this information, the server, in turn, can already issue a certain set of settings to the client or simply log it - in order to find the client’s connection port, it was not necessary to go to all switches in a row (especially if they are not on the stack).
After DHCP-Relay is configured on the router, the Agent Circuit ID and Agent Remote ID fields will appear in the client information, where the first is the switch port identifier and the second is the switch identifier.

Issuing addresses with option 82.
Information is given in hexadecimal format. For convenience, you can use scripts to analyze the DHCP log. For example, a solution for a solution from Microsoft is published in the Technet script gallery called “ Decorating DHCP Options 82 ”.
Option 82 is also actively used in the billing system of providers and in protecting the network from outside interference. This is a bit more detailed.
Add reliability and security networks
Due to the simplicity of the protocol and the presence of broadcast requests, there are effective attacks on the infrastructure - mainly of the MITM type (“man in the middle”). Attacks are carried out by raising your DHCP server or relay: after all, if you control the issuance of network settings, you can easily redirect traffic to a compromised gateway. To facilitate the attack, a DHCP starvation is used (pretending to be a client or a relay, the attacker forces the "native" DHCP server to exhaust its IP addresses). You can read more about the implementation of the attack in the article “ Attacking DHCP ”, while DHCP Snooping is the method of protection.
This is a switch feature that allows you to "bind" a DHCP server to a specific port. DHCP responses on other ports will be blocked. In some switches, you can configure the work with Option 82 when it is detected in the package (which indicates the presence of a relay): discard, replace, leave unchanged.
In MikroTik switches, DHCP Snooping is enabled in the bridge settings:
# dhcp-snooping option 82 /interface bridge add name=bridge set [find where name="bridge"] dhcp-snooping=yes add-dhcp-option82=yes # /interface bridge port add bridge=bridge interface=ether1 add bridge=bridge interface=ether2 trusted=yes
Configuration in other switches is similar.
It is worth noting that not all MikroTik models have full hardware support for DHCP Snooping - only CRS3xx has it.
In addition to protection from malicious hackers, this function will save you from a headache when another DHCP server appears on the network - for example, when a SOHO router used as a switch with an access point resets its settings. Unfortunately, in networks where SOHO equipment is found, there is not always a competent cable network structure with managed routers. But that is another question.

Beautiful switching is the key to health.
Other protection methods include Port Security (“binding” a specific MAC address to the router port; if traffic from other addresses is detected, the port will be blocked), Traffic analysis for the number of DHCP requests and responses or limiting their number, and, of course, various IPS \ IDS systems.
If we talk not only about network protection, but also about reliability, then it will not be out of place to mention the capabilities of fail-safe DHCP. Indeed, with its simplicity, DHCP is often one of the key services, and if it fails, the organization’s work can be paralyzed. But if you just install two servers with identical settings, then nothing but a conflict of IP addresses will lead to this.
It would seem that you can divide the distribution area between two servers, and let one give one half of the addresses, and the other give the other. That's just a paralyzed half of the infrastructure is slightly better than the whole.
We will analyze more practical options.
On Windows Server systems , starting in 2012, the DHCP redundancy system works out of the box, in load balancing mode (active-active) or in fault tolerance mode (active-passive). A detailed description of the technology and settings can be found in the official documentation . I note that fault tolerance is configured at the zone level, so different zones can work in different modes.
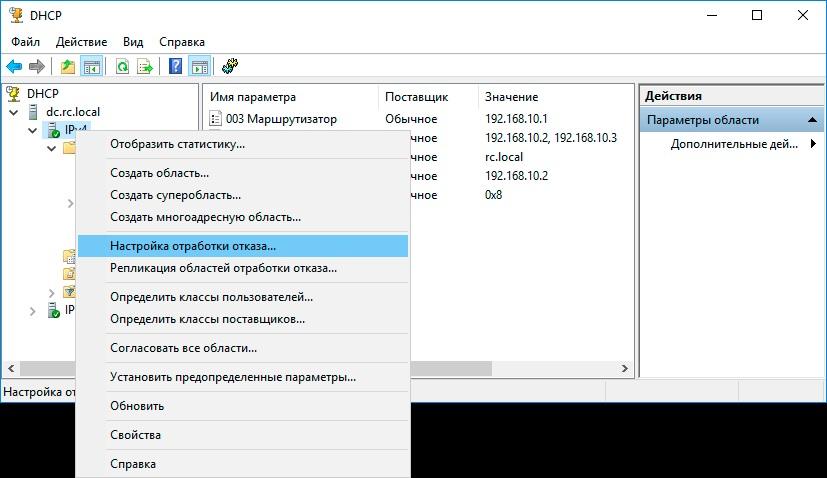
Configuring DHCP Server Failover in Windows.
ISC DHCP Server uses the failover peer directive to configure fault tolerance; it is proposed to synchronize data independently - for example, using rsync. Read more in the article " Two DHCP servers on Centos7 ... "
If you make a fault-tolerant solution based on MikroTik, then you can not do without tricks. One of the options for solving the problem was announced at MUM RU 18, and then published on the author’s blog. In short: two servers are configured, but with a different Delay Threshold parameter (response delay). Then the server will issue the address with a lower delay, and with a longer delay - only if the first one fails. Information synchronization again has to be done with scripts.
Personally, I once prettyly patted my nerves when a router appeared on the network “accidentally” and connected to the local area network both WAN and LAN interfaces.
Tell me, did you have to deal with DHCP leprosy?
All Articles