Python TamTam bot development

Hello, Habr! Let me introduce myself: my name is Sergey Agaltsov, and I am a "programmer in life." This means that I have long been an IT manager, and not a programmer by profession, but I use programming all the time, both in my main activity and as a hobby. As one of my former bosses often said - "Seryoga! You again slipped into programming!" True, I can’t say that he or someone else has ever been very unsatisfied with this.
After the Bot API appeared on the TamTam messenger, I, as a true, and therefore lazy programmer, created 2 Python libraries to work with it:
- open client API (hereinafter referred to as OAC) - initially generated it using the OpenAPI Generator based on the API scheme, then adapted it taking into account the features of the generator;
- the shell for this client is TamTamBot (hereinafter - TTB), which simplifies the work with OAC.
So there was a certain TamTam Python SDK.
I did this first of all "for myself, for the soul", but I also suggested that the TamTam community wish to use it. But, as you know, not a single good deed goes unpunished - people asked to write a training article. And here I am with this article. In it, I will tell you how to develop a simple bot using these libraries.
A task
Develop a bot designed to simplify the actions of bot developers. The bot should work in the mode of permanent polling of the state bot-api (long polling). In this article, the bot will be trained to show the insides of the message sent to him, and also configured to match the developed functionality.
It is understood that the reader has installed Python 3 , git , connected to the PyCharm development environment (the development environment may be different, but the story will be based on PyCharm). Understanding the basics of OOP is desirable.
Getting a bot token
The token is obtained through a call to the specialized bot @PrimeBot
We find this bot in TamTam, enter the / create command and answer the questions:
- Enter the unique short name of the bot in Latin letters - this is the username of the bot by which it will be available via @ or by a link of the form
https://tt.me/username
. There are no special restrictions on the username. In particular, the word bot is optional. - Enter a name - this is the display name of the bot. Here you can already use the Cyrillic alphabet.
If everything is entered correctly, then the created bot will be added to the contacts and in return we will receive a token - a sequence of characters of the form: HDyDvomx6TfsXkgwfFCUY410fv-vbf4XVjr8JVSUu4c.
Initial setup
Create a directory:
mkdir ttBotDevHelper
Go to it:
cd ttBotDevHelper/
We initialize the git repository:
git init
Download the necessary libraries, adding them as submodules of git:
git submodule add https://github.com/asvbkr/openapi_client.git openapi_client git submodule add https://github.com/asvbkr/TamTamBot.git TamTamBot
We open the created directory in PyCharm (for example, from the Explorer under the context menu "Open Folder as PyCharm project") and create a file that our bot will contain - File / New / Python file. In the dialog that appears, enter the name - ttBotDevHelper, and answer positively to the question of adding to git.
Now we need to create a virtual environment for our project.
To create a virtual environment, select File / Settings and select the Project Interpreter sub-section on the project tab. Next, on the right, click on the gear icon and select Add:
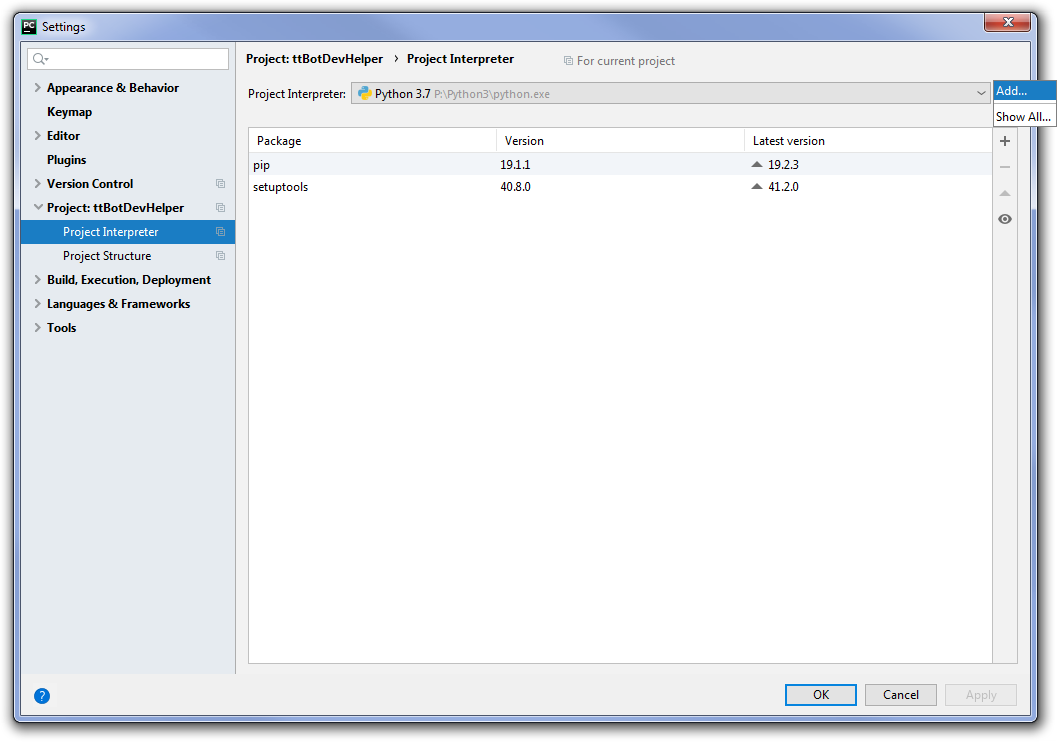
PyCharm will offer its own accommodation option.

It makes sense to agree with him.
After creating the virtual environment, the previous screen will open, but it will already contain information about the created environment. On this screen, you need to install the necessary packages by clicking the "+" icon on the right and entering the package names:
- requests
- six
Then we add the .gitignore file to the project, excluding files that are not required in git, with the following contents:
venv/ .idea/ # Byte-compiled / optimized / DLL files __pycache__/ *.py[cod] *$py.class *.log *.log.* .env ttb.sqlite3
Add an environment variable named TT_BOT_API_TOKEN
, in which we indicate the value of our bot's token received from https://tt.me/primebot and restart PyCharm.
(!) Instead of adding an environment variable directly to the OS environment, it is optimal to use a special .env file in PyCharm. Its configuration will be discussed below.
Congratulations, now you can proceed to the most interesting thing - writing your bot.
Simple bot launch
Open the ttBotDevHelper.py file and write the first lines:
# -*- coding: UTF-8 -*- from TamTamBot.TamTamBot import TamTamBot class BotDevHelper(TamTamBot): pass
Here we create our bot class based on the TamTamBot class.
PyCharm suggests that the BotDevHelper class contains abstract methods that need to be implemented. Press Alt-Enter on the class name, select "Implement abstract methods", select all the methods (2 of them) proposed by PyCharm and click OK. As a result, two empty property methods will be added: token and description. We modify the resulting code as follows:
# -*- coding: UTF-8 -*- import os from TamTamBot.TamTamBot import TamTamBot from TamTamBot.utils.lng import set_use_django class BotDevHelper(TamTamBot): @property def token(self): return os.environ.get('TT_BOT_API_TOKEN') @property def description(self): return ' .\n\n' \ 'This bot is an helper in the development and management of bots.' if __name__ == '__main__': set_use_django(False) BotDevHelper().polling()
The token
property returns the token of our bot, the value of which is taken from the environment variable TT_BOT_API_TOKEN
. The description
property returns an extended description of our bot, which will be displayed to users.
The code at the end of the file is needed to run our bot in the status polling mode.
I note that the base class TamTamBot
involves the use of the django web server for working in web hook mode. But now the task is simpler, and we don’t need django, which is what we are reporting in the set_use_django(False)
. Here, the polling()
method is called for the object of our class, which ensures operation in the required mode.
The minimum necessary is done. This code is already working. Run it to run. To do this, press the key combination Ctrl-Shift-F10.
If you did not add the environment variable earlier, directly to the OS, then an error with the message "No access_token" will occur at startup. To fix it, configure PyCharm to use the .env file.
Create a .env text file. Its content in our case should be as follows:
TT_BOT_API_TOKEN=__
Now you need to connect it to the launch configuration in PyCharm:
We select Run / Edit configuration and on the EnvFile tab we connect our .env file:

Then click Apply.
After starting the bot, you can go to TamTam, open a dialog with our bot and click the "Start" button. The bot will report information about its hidden superpowers. This means that the bot is working. While the bot is working in demo mode, in which 4 commands are available. Just check them out.
Despite the pronounced opinion of the bot about his coolness, he timidly hints at the fact that so far he can not do anything. To teach him everything necessary to conquer the world is our task.
Receiving a source message and sending a response message with an internal representation of the source message
We’ll block the receive_text()
method, the control of which is transferred when sending text to the chat with the bot:
def receive_text(self, update): res = self.msg.send_message(NewMessageBody(f' : {update.message}', link=update.link), user_id=update.user_id) return bool(res)
The update
object of the UpdateCmn
class, which is passed to this method, contains various useful information and, in particular, all that we now need:
-
update.message
- an object containing the message itself; -
update.link
- ready response link to this message; -
update.user_id
- identifier of the user who sent the message.
To send a message from the bot, use the self.msg
variable, which contains the MessagesApi
object that implements the functionality described in the messages section of the API description . This object contains the send_message()
method we send_message()
, which provides the sending of messages. At a minimum, this method must be passed an object of the NewMessageBody
class and the destination — the user ID, in our case.
In turn, an object of the NewMessageBody
class in this case is created by transmitting a textual representation of the source message object and a response link to the source message.
We restart our bot and check in a dialogue with the bot that the bot generates a response to any of our messages containing the internal representation of the source message object.
The source code for this state is here .
Adding a new bot command with a parameter - showing the internal representation of the message by its identifier
When developing bots, it is often required to look at the internal representation of a message using one or more known message identifiers (message id - mid). Add this functionality to our bot. To do this, first, we take out in a separate method the functionality of outputting information about the internal representation of messages:
def view_messages(self, update, list_mid, link=None): res = False msgs = self.msg.get_messages(message_ids=list_mid) if msgs: for msg in msgs.messages: r = self.msg.send_message(NewMessageBody(f' {msg.body.mid}:\n`{msg}`'[:NewMessageBody.MAX_BODY_LENGTH], link=link), user_id=update.user_id) res = res or r return res
In this method, we pass a list of mid.
To get message objects, we use the self.msg.get_messages
method, which returns a list of objects in the messages property.
Further, a textual representation of each of the received messages is sent to our dialogue in separate messages. To avoid errors, the text of the generated message is truncated by the constant of the maximum message length - NewMessageBody.MAX_BODY_LENGTH
.
Then add a method that processes the command. Let's call it vmp . You can pass the mid list to the command with a space.
TTB is designed so that the command handler should be created as a method with the name cmd_handler_%s
, where% s is the name of the command. Those. for the vmp command, the method will be called cmd_handler_vmp
. An object of the UpdateCmn
class is passed to the command handler. Additionally, for a command, it may contain the cmd_args
property, which contains a dictionary of lines and words in them that were entered with the command
The code will look like this:
def cmd_handler_vmp(self, update): res = None if not update.this_cmd_response: # , if update.cmd_args: # list_id = [] parts = update.cmd_args.get('c_parts') or [] if parts: for line in parts: for part in line: list_id.append(str(part)) if list_id: res = self.view_messages(update, list_id, update.link) return bool(res)
We restart the bot. Now, if you type a command in the bot’s dialogue like: /vmp mid1 mid2
(you can take mid of their previous checks), then in return we get two messages with an internal representation of the source message objects, for each of the transmitted mid.
The source code for this state is here .
Modification of a bot command for working with a text response
You can also try to forward the message from another channel / chat. But in this case, only what is contained in the source message in dialogue with the bot will be shown. In particular, when sending a message, the button information is not saved.
But what if we want to see information about the original message? In this case, you need to take mid from the forwarded message.
To implement this mode, we modify the vmp command so that when it is called without parameters, it expects the message to be forwarded, and after that it takes the middle of the forwarded message and displays information about it.
(!) For the correct operation of this functionality, the bot must be granted permission to read from the channel / chat source.
We modify the command code as follows:
def cmd_handler_vmp(self, update): res = None if not update.this_cmd_response: # , if update.cmd_args: # list_id = [] parts = update.cmd_args.get('c_parts') or [] if parts: for line in parts: for part in line: list_id.append(str(part)) if list_id: res = self.view_messages(update, list_id, update.link) else: # self.msg.send_message(NewMessageBody(f' ** / :'), user_id=update.user_id) update.required_cmd_response = True # else: # message = update.message link = message.link # link # - . if link and link.type == MessageLinkType.FORWARD: res = self.view_messages(update, [link.message.mid], update.link) else: # , . self.msg.send_message(NewMessageBody(f'. ** /. , .'), user_id=update.user_id) return False return bool(res)
And since with this approach, the risk increases due to lack of access to messages, then in the view_messages()
method we add a check for compliance with the number of requested / received messages:
def view_messages(self, update, list_mid, link=None): res = False msgs = self.msg.get_messages(message_ids=list_mid) if msgs: # mid if len(msgs.messages) < len(list_mid): self.msg.send_message(NewMessageBody( f' . @{self.username} / .', link=update.link ), user_id=update.user_id) return False else: for msg in msgs.messages: r = self.msg.send_message(NewMessageBody(f' {msg.body.mid}:\n`{msg}`'[:NewMessageBody.MAX_BODY_LENGTH], link=link), user_id=update.user_id) res = res or r return res
We restart the bot, give the / vmp command, and after the prompt about the necessity of forwarding is displayed, we forward the message from the channel / chat. If the bot has the rights to read messages in this channel / chat, a textual representation of the forwarded message object will be displayed. If there is no access, the bot will report a possible problem and will wait for forwarding from the correct source.
Setting bot properties
Now it remains to put a gloss. Let’s close the about
property, which returns the text that the bot displays when it starts working, as well as by the / start command.
@property def about(self): return ' .'
We’ll block the get_commands()
method, which returns the list of commands of our bot, which appears in the dialog with the bot.
def get_commands(self): # type: () -> [BotCommand] commands = [ BotCommand('start', ' '), BotCommand('menu', ' '), BotCommand('vmp', ' '), ] return commands
Let’s turn off the main_menu_buttons property, which returns a list of buttons on the main menu, called by the / menu command.
def main_menu_buttons(self): # type: () -> [] buttons = [ # - [CallbackButtonCmd(' ', 'start')], # - . - [CallbackButtonCmd(' ', 'vmp', intent=Intent.POSITIVE)], ] return buttons
We restart the bot, make sure that everything is in order. Congratulations, your first bot was created and, in spite of some toys, it has quite demanded functionality.
The source code for this state is here .
The working @devhelpbot bot can be seen here .
That's all for now. If the topic is of interest, then in the following articles I can consider the further development of the bot. For example, adding custom buttons (in particular, Yes / No) and processing them, sending various types of content (files, photos, etc.), working in webhook mode, etc.
By the way, you can quickly ask questions in a special chat . Direct suggestions / ideas there.
All Articles